明基GH600 说明书 1
HLG-600H系列600W恒流型+恒压型LED驱动器产品手册说明书
功能模式选项
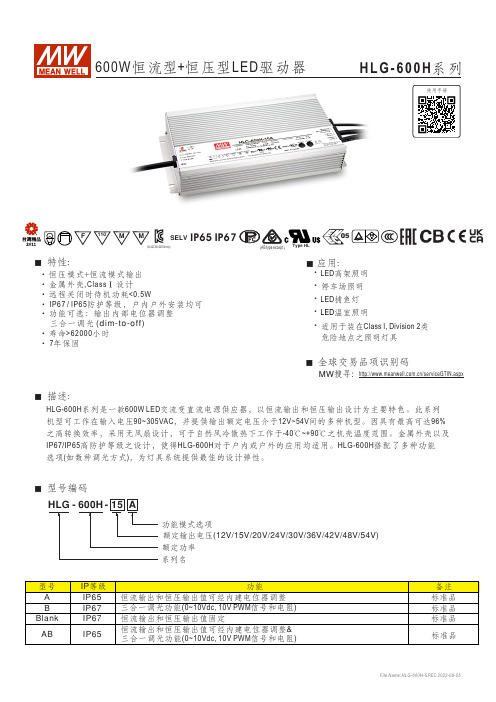
■ 特性:■ 描述:
■ 型号编码
系列名
额定功率额定输出电压 HLG-600H 系列是一款600W LED 交流变直流电源供应器,以恒流输出和恒压输出设计为主要特色。
此系列机型可工作在输入电压90~305VAC ,并提供输出额定电压介于12V~54V 间的多种机型。
因具有最高可达96%IP67/IP65高防护等级之设计,使得HLG-600H 对于户内或户外的应用均适用。
HLG-600H 搭配了多种功能选项(如数种调光方式),为灯具系统提供最佳的设计弹性。
‧恒压模式+恒流模式输出‧金属外壳 Class 设计
Ⅰ‧远程关闭时待机功耗<0.5W
‧ IP67 / IP65防护等级,户内户外安装均可‧功能可选:输出内部电位器调整 三合一调光 ‧寿命>62000小时‧ 7年保固
之高转换效率,采用无风扇设计,可于自然风冷散热下工作于-40℃~+90℃之机壳温度范围。
金属外壳以及
■ 应用:
‧LED 高架照明‧停车场照明‧LED 捕鱼灯‧温室照明
LED ‧适用于装在Class I, Division 2类
危险地点之照明灯具
HLG-600H 系列
600W 恒流型+恒压
型LED 驱动器
IP65IP67
or 24A,36A,48A,54A only
搜寻
■ 全球交易品项识别码
600W恒流型+恒压型LED驱动器
HLG-600H系列。
液体传感器数据协同 hunt TROLL 600 快速入门指南说明书
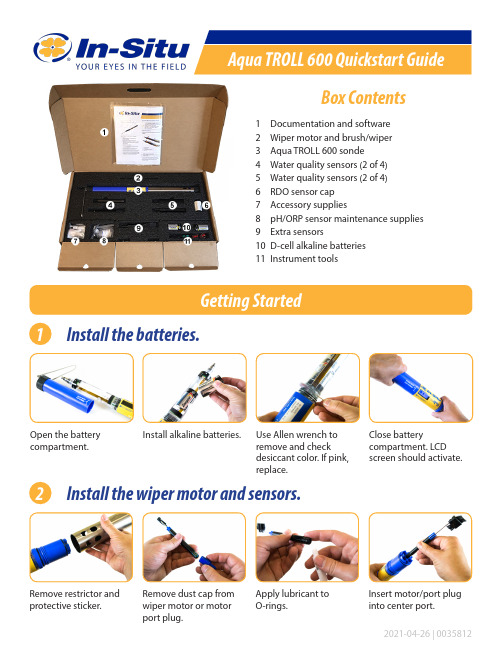
Box Contents1 Documentation and software2 Wiper motor and brush/wiper3 Aqua TROLL 600 sonde4 Water quality sensors (2 of 4)5 Water quality sensors (2 of 4)6 RDO sensor cap7 Accessory supplies8 pH/ORP sensor maintenance supplies 9 Extra sensors10 D-cell alkaline batteries 11 Instrument toolsGetting Started1Install the batteries.2 Install the wiper motor and sensors.Open the battery compartment.Install alkaline batteries.Use Allen wrench to remove and check desiccant color. If pink, replace.Remove restrictor and protective sticker.Remove dust cap from wiper motor or motor port plug.Apply lubricant to O-rings.Insert motor/port plug into center port.Close batterycompartment. LCDscreen should activate.Remove dust cap frompH/ORP sensor.Tighten screw at base ofeach sensor with Allenwrench.Apply a pea-sized drop oflubricant to O-rings.Replace restrictor withvent holes at base ofinstrument.Install sensor in port1. Sensor tongue mustslide into blue interlockgroove.Install remaining sensors. 3Connect the cable to the instrument.Remove protective capsfrom instrument andcable.Ensure O-ring oninstrument connectoris clean. Apply vacuumgrease to O-ring.Flat edge inside cableend must align withflat edge on instrumentconnector.Hold textured sleeve ofcable in one hand andinstrument in other. Pushand twist until click.When using a conductivity sensor and turbidity sensor together, install them side-by-side tomaximize performance.4 Connect the communication device.If desiccant is present, remove it from cable.Align TROLL Com connector with cable end. Push and twist until click.Connect VuSitu directly to instrument. Hold sonde vertically with sensors up. Screen will activate.or5 Connect to the software.Tap the serial number of the instrument or Wireless TROLL Com.VuSitu displays the Connected Instrument screen when pairing is complete.cdLaunch VuSitu and tap Connect .The app locates and displays nearby In-Situ devices.iOS AndroidAn iOS deviceautomatically connects to the closest In-Situ instrument.To connect to another instrument, press Disconnect and then Choose or Add Device . VuSitu displays a list of available connections.aabbYou must have the VuSitu mobile app to use the instrument with a mobile device. Download• Use D-cell alkaline batteries.• Do not use the Aqua TROLL 600 in any manner not specified by the manufacturer.• Do not use batteries of different ages or types.• Do not submerge the Wireless TROLL Com or your mobile device in liquid.• Ensure that sensors, or sensor plugs, are completely inserted into the ports, so that no liquid can enter the instrument.• Ensure that the RDO Sensor Cap is pressed firmly over the sensor lens and is flush with the instrument before submerging in liquid.• Replace the cable if insulation or connectors are damaged.• Make sure the probe and sensor O-rings are clean and free of damage.。
BenQ ME600ST Datasheet说明书

DatasheetPerformance Projection with low TCODelivering reliable visual support for successful lectures and presentations, the compact multipurpose ME Series delivers crisp projected images and natural colours to your classroom or meeting facility thanks to LCD technology. The second generation comes with a 1.0A powered USB to power external devices without the need for an additional power plug. Comprehensiveinstalled and enhanced MultiPresenter function enables simultaneous wireless presenting and sharing for up to 16 devices when the optional WiFi is chosen. The second generation comes with an even longer lamp life of 10,000 hrs in normal mode for smooth operation over a time period of over 9 years*. Thank to this improvement, you can enjoy lower maintenance saving you time and cost. Furthermore, with noise levels of only 29 dB in eco mode, there is no disturbance during your presentation.* at 8 hours operation a day, 200 days a yearBenefitsMinimized cost of ownership– due to long lamp life and filter exchange intervals.Versatile and mobile– compact and light-weight with HDMI and integrated 16W speaker.Display content that demands attention– with WXGA resolution and superb brightness levels and colour ranges, your viewers will enjoy an outstanding visual experience.Cost effective replacement– of existing NEC M LCD model installations to achieve better imaging for lectures and presentations without wall-mount adjustment.Wide array of flexible application scenarios– thanks to multi-source conferencing and efficient split-screen operation supported by a wide future-ready range of digital connectivity.Future-proof input management– thanks to 4K@30 Hz input processing.Product InformationProduct Name ME372WProduct Group Professional Desktop ProjectorOrder Code60004597ImageProjection T echnology3LCD T echnologyNative Resolution1280 x 800 (WXGA)Aspect Ratio16:10Contrast Ratio116000:1Brightness13700 ANSI LumenLamp225 W AC (151 W AC Eco Mode)Lamp Life [hrs]10000 (15000 Eco Mode)Lens F= 1.7–2.2, f= 17.4–29 mmKeystone correction+/- 30° manual horizontal / +/- 30° manual vertical Projection Angle [°] 6.6 - 11.1Projection Factor 1.2 – 2.1 : 1Projection Distance [m]0.94 – 11.59Screen Size (diagonal) [cm] /[inch]Maximum: 762 / 300"; Minimum: 76 / 30"Zoom Manual; x1.7Focus Adjustment ManualSupported Resolutions3840x2160 @ 30hzdigital;1280x800 (Maximum resolution of analog input)Frequency Horizontal: 15–100 kHz (RGB: 24 kHz– 100 kHz); Vertical: 50 – 120 HzConnectivityRGB (analog)Input: 1 x Mini D-sub 15-pin, compatible to component (YPbPr)Output: 1 x Mini D-sub 15 pinDigital Input: 2 x HDMI™ (Deep Color, Lip sync)Video Input: 1 x RCAAudio Input: 1 x 3.5 mm Stereo Mini Jack; 1 x RCA StereoOutput: 1 x 3.5 mm Stereo Mini Jack (variable)Control Input: 1 x D-Sub 9 pin (RS-232) (male)LAN 1 x RJ45; Optional WLANUSB 1 x T ype A (USB 2.0 high speed); 1 x T ype BVideo Signals NTSC; PAL; PAL60; SECAMRemote ControlRemote Control Aspect Ratio; Audio Control; Auto Adjust; AV Mute; Digital Zoom; Freeze; Help Eco Mode; IDset; Optional Presentation and Mouse Control; Picture Adjust; Picture Mode; Source SelectElectricalPower Supply100-240 V AC; 50 - 60 HzPower Consumption [W]288 (High Bright) / 196 (Eco) / 1.5 (Network Stand-by) / 0.5 (Stand-by)MechanicalDimensions (W x H x D) [mm]345 x 104.6 x 261 (without lens and feet)Weight [kg] 3.2Fan Noise [dB (A)]29 / 37 (Eco / Normal)Environmental ConditionsOperating T emperature [°C] 5 to 40Operating Humidity [%]20 to 80Storage T emperature [°C]-10 to 50Storage Humidity [%]20 to 80ErgonomicsSafety and Ergonomics CE; EAC; ErP; RoHS; TUEV T ype Approved; WEEESpeakers [W] 1 x 16 (mono)Additional FeaturesSpecial Characteristics Auto Eco Mode; Auto Power ON/OFF; Carbon Savings Meter; Colour Management; ContentT ransmission via Network; Crestron RoomView; DICOM Simulation; Direct Power-Off Function;High Altitude Mode; Kensington security slot; Keypad Lock; Keystone Correction (H=±30°,V=±30°); Lens Cover; Magnify; NaViSet Administrator 2; Off-Timer; Optional User Logo;Optional WLAN; OSD with 29 languages; Password Security System; Quick On/Off; RS-232Control; Security Bar; USB Display; USB Viewer for JPEG; Virtual Remote for direct PC control;Wall Colour CorrectionGreen FeaturesEnergy Efficiency75 % AV mute function; Auto ECO Mode; ECO scheduler; Green one touch ECO and AV mutebutton; Intelligent Power Management; Longer lamp life; Reduced power consumption. Only0.45W stand-by; Software schedulingEcological Materials100% recyclable packaging; Downloadable manuals; ECO packagingEcological Standards ErP compliant; RoHs compliant; WEEEWarrantyProjectors 3 years pan-European serviceLight Source 6 months, max. 1000 hrsShipping ContentShipping Contents IR Remote Control (RD-469E); Mini D-SUB Signal Cable (1.8 m); Quick Setup Guide; SecuritySticker; Users Manual on CD-ROM; Utility softwareOptional AccessoriesOptional Accessories DisplayNote; Lamp (NP47LP); MultiPresenter Stick; Universal Ceiling Mounts (PJ01UCM);Wireless LAN module NP05LM2 (Europe), NP05LM4 (Russia)1Compliance with ISO21118-2012TUEV T ypeApproved CE ErP RoHSThis document is © 2020 NEC Display Solutions Europe GmbH.All rights reserved in favour of their respective owners. All hardware and software names are brand names and/or registeredtrademarks of the respective manufacturers. All specifications are subject to change without notice. Errors and omissions are excepted. 20.05.2020。
GH600、Inconel600高温耐腐蚀合金参数

上海商虎/张工:158 –0185 -9914GH600高温合金相近商标GH 600 的化学成分:GH 600 的物理功能:GH 600 在常温下合金的机械功能的最小值:GH 600 合金具有以下特性:1. 具有很好的耐复原、氧化、氮化介质腐蚀的功能2. 在室温及高温时都具有很好的耐应力腐蚀开裂功能3. 具有很好的耐干燥氯气和氯化氢气体腐蚀的功能4. 在零下、室温及高温时都具有很好的机械功能5. 具有很好的抗蠕变断裂强度,引荐用在700℃以上的工作环境。
GH 600 的金相结构:600 为面心立方晶格结构。
GH 600 的耐腐蚀性:600合金对于各种腐蚀介质都具有耐腐蚀性。
铬的成分使该合金在氧化条件下比镍 99.2 (合金 200) 和镍 99.2(合金 201,低碳)具有更好的耐腐蚀性。
一起,较高的镍含量使合金在复原条件和碱性溶液中具有很好的耐腐蚀性,并且能有效地避免氯-铁应力腐蚀开裂。
600合金在乙酸、醋酸、蚁酸、硬脂酸等有机酸中具有很好的耐蚀性,在无机酸中具有中等的耐蚀性。
在核反应堆中一次和二次循环运用的高纯度水中具有很优秀的耐蚀性。
600特别突出的功能是可以反抗干氯气和氯化氢的腐蚀,运用温度达 650℃。
在高温下,退火态和固溶处理态的合金在空气中具有很好的抗氧化剥落功能和高强度。
该合金也能反抗氨气和渗氮、渗碳气氛,但是在氧化复原条件交替变化时,合金会遭到部分氧化介质的腐蚀(如绿色死亡液)GH 600 运用范围运用范畴有:1.腐蚀气氛中的热电偶套管2.氯乙烯单体生产:抗氯气、氯化氢、氧化和碳化腐蚀3.铀氧化转换为六氟化物:抗氟化氢腐蚀4.腐蚀性碱金属的生产和运用范畴,特别是运用硫化物的环境5.用氯气法制二氧化钛6.有机或无机氯化物和氟化物的生产:抗氯气和氟气腐蚀7.核反应堆8.热处理炉中曲颈瓶及部件,特别是在碳化和氮化气氛中9.石油化工生产中的催化再生器在700℃以上的运用中引荐运用合金600以取得较长的运用寿命。
明基相机使用说明书
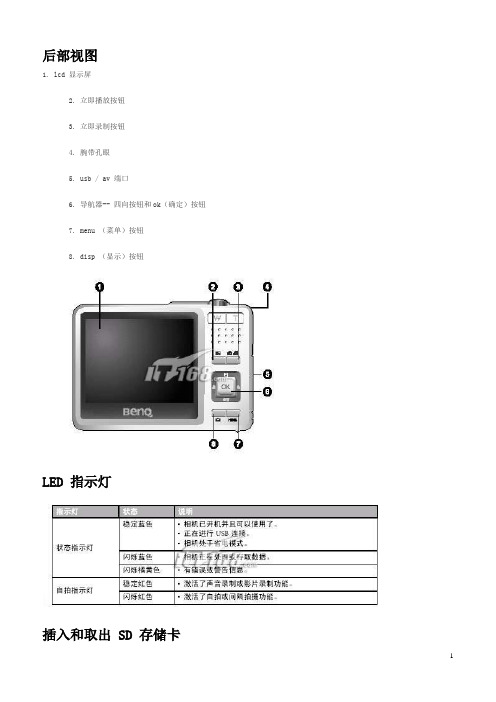
后部视图1. lcd 显示屏2. 立即播放按钮3. 立即录制按钮4. 腕带孔眼5. usb / av 端口6. 导航器-- 四向按钮和ok(确定)按钮7. menu (菜单)按钮8. disp (显示)按钮LED 指示灯插入和取出 SD 存储卡dc e600 配备24 mb 内部存储器,可让您在相机中录制视频剪辑、捕获图像或制作语音文件。
此外,还可以使用选购的sd (s ecure digital) 存储卡扩展存储容量,从而存储更多文件。
1. 在插入或取出存储卡之前,务必关闭相机的电源。
2. 按照如图所示的正确方向插入sd 存储卡。
3. 关闭电池/sd 存储卡仓盖。
如要取出sd 存储卡,请确保关闭相机电源。
轻轻地按一下存储卡的边缘,卡会弹出来。
1 在初次使用之前,务必利用本相机格式化sd 存储卡。
2 为防止意外消除sd 存储卡上的有用数据,可以将写保护开关(位于sd 存储卡侧面)推到lock (锁定)位置。
3 如需保存、编辑或消除sd 存储卡上的数据,必须解除卡锁定。
4 格式化内部存储器时,不要在相机中插入存储卡。
否则,将格式化存储卡而不格式化相机的内部存储器。
5 格式化是一个不可逆的操作,执行后无法恢复数据。
在格式化前备份您的数据。
6 存在读写问题的sd 存储卡可能无法正确格式化。
7 支持下列容量的sd 存储卡:8 mb、16 mb、32 mb、64 mb、128 mb、256 mb、512 mb 和1gb。
此相机相容由panas onic、toshiba 和sandisk 制造的sd 存储卡。
有关购买资讯,请与当地经销商联系。
设置日期和时间首次使用相机前,请先设置日期和时间。
有关的详细信息,请参见第20 页的3.4.1“设置模式菜单”中的表。
开始捕获图像2. 在拍照模式下,在lcd 显示屏中选景。
3. 先将快门按钮按下一半(1),然后完全按下(2)。
1、将快门按钮按下一半时,将自动对焦和调整曝光。
保护600立位患者抬升器说明书

PROTEKT® 600 STAND SIT-TO-STAND PATIENT LIFTMODEL: 34600OWNER’S MANUALThank you for choosing the Protekt® 600 Stand!To better serve you, please record the following information: Supplier Name: _____________________________________ Telephone: ________________________________________ Serial #: __________________________________________ Date of Purchase:__________________________________ INSPECT YOUR MERCHANDISEUpon receipt of your patient lift, verify that all merchandise is complete and free from any shipping damage. Refuse delivery if the packaging appears to be badly damaged. If the merchandise is received damaged or is missing components, contact the shipping company immediately and file a claim.For further assistance, contact your local dealer or Proactive Medical Products at the following:ARNING 6SAFETY PRECAUTIONSThe Protekt® 600 Stand lift allows a caregiver to lift and transfer a patient safely with minimum physical effort. Before attempting to lift anyone, one should practice operating the lift and explain to the patient the lifting procedures.Arrange all necessary items (e.g. lift, sling, commode chair or wheelchair) properly for a smooth procedure.•Special care must be taken with patients who cannot provide assistance while being lifted. (i.e. patients who are comatose, spastic, agitated or otherwise severely handicapped).•The Protekt® 600 Stand should be used solely for transferring a patient from one object (beds, bathtubs, toilets, etc.) to another. The lift should not be used for transporting or moving any patient fromone location to another location.•During lifting or lowering, whenever possible, always keep lift base widened.•Always keep the patient being lifted centered over the base and facing the caregiver operating the lifter.•Do not roll casters over any object while the user is in the sling.•Proactive Medical slings are specially designed to be used in conjunction with Proactive lifts. Do not use slings manufactured byother companies on the lift. Proactive Medical is not responsible forany consequence resulting from the use of non-Proactive slings on this equipment.•Do not put anything (e.g. cushion, pad, etc…..) between the user and the sling. This may cause user to slide out of the sling and causeinjury.•Use only genuine Proactive Medical parts or components. Proactive Medical is not responsible for any consequence resulting from using non-Proactive parts and components.•Service and repair of this equipment should be performed only by an authorized dealer. Proactive Medical is not responsible for anyconsequence resulting from any unauthorized service or repair.•Do not lift over the Maximum Weight limit of 600 lbs.FEATURES C ART:BaseMastControl BoxPendantActuatorLifting BoomKneepad AssemblyFootrest Brake շոչղձճմյնASSEMBLY INSTRUCTIONS:Open the box and take lift out.2.Unscrew nuts and bolts at top and bottom of the mast.3.Attach boom to mast and hand tight bolt and nut.4.Attach the L-shaped arms to back of the kneepad.(For desired height of the kneepad, use proper holes on the L-shaped arms).5.Attach kneepad assembly to the mast.6.Attach actuator and pendant to the control box.STEP 1:Attach the L-shaped arms to the mast.Make adjustment to the desired position.STEP 2:Use the bolt to fasten the L-shaped arms to the Mast.:1.Turn on the power by twisting the RED RESET BUTTON clockwise.2.Press the UP or DOWN button on the hand control once. Check if the batteryindicator lights are on. To proceed with lifting, make sure there is at least one green light. Batteries are fully charged when three (3) green lights are shown.3.After the battery indicator lights go out, push the UP button and the DOWNbutton on the hand control and ensure that the lift is operating correctly.4.Position of the base of lift around or under the object.5.Widen the base and engage the caster bakes.Fitting Stand Assist Sling1.Position the patient in a sitting position.2.Slide the sling down patient’s back to lumbar position.3.Draw the shoulder straps to the front of the patient close to the chest.4.Draw the waist belt around patient’s waist and press together to fasten.5.Attach the shoulder straps to the hooks.Lift and Transfer From Bed1.Fit sling as described in “Fitting Stand Assist Sling”.2.Push lift towards patient. Open the base of the lift.Apply the brakes in both rear casters.3.Position patient’s feet on the foot platform and kneesagainst the knee pad.4.Attached the sling straps to the hooks.5.Have the patient’s hands holding the handles. Forpatient’s who cannot hold the handles, have themhold their arms around the chest.6.Press the “UP” button on the hand control.7.Before the patient’s body is lifted from the bed, stopand make sure the sling is secured and patient’sknees are against the knee pad.8.The patient should be comfortable with the pressureunder the arms. If not, adjust the sling and tryanother loop option to release pressure.9.Press the “UP” button until the patient’s body hascompletely left the bed.10.Transfer to another object can be done at thisposition without the patient attending a full standingposition.11.Release the brakes, close the base, and pull the liftaway from the bed.12.Lower the patient to the object intended.13.To lift patient in a standing position, continue to liftuntil the patient’s knees are locked in a standingposition.14.At the standing position, patient’s knees may moveaway from the knee pad.15.Release the brakes, close the base, and pull the liftaway from the bed.16.Lower the patient to the object intended.17.Reverse the above procedures when lowering thepatient to the bed.Lift and Transfer From Wheelchair1.sling as described in tingAssistush lift towards patient. the baseof the lift to go around the chair. Apply thebrakes in both rear casters.3. patient’s feet on the foot platformand knees against the knee pad.4.Attached the sling straps to the hooks.5. the patient’s hands holding thehandles. patients who cannot holdthe handles, have them hold their armsaround the chest.6. the button on the handcontrol.7. the patient’s body is lifted fromthe chair, stop and make sure the slingis secured and patient’s knees areagainst the knee pad.The patient should be comfortable withthe pressure under the arms. not,adjust the sling and try another loopoption to release pressure.the button until the patient’sbody is completely left the chair.Transfer to another object can be doneat this position without the patientattending a full standing position.11.Release the brakes, close the base, andpull the lift away from the bed.Lower the patient to the object intended.13.To lift patient in a standing position,continue to lift until the patient’s knees arelocked in a standing position.14.At the standing position, patient’s kneesmay move away from the knee pad.15.Release the brakes, close the base, andpull the lift away from the bed.16.Lower the patient to the object intended.17.Reverse the above procedures whenlowering the patient to the bed.USER GUIDECHARGING THE BATTERY -The lift can be charged by plugging the charger directly into the control box w hile it is attached to the lift .OrThe battery pack can be charged while seated in the optional wall /desk charging c addy.OPERATING INSTRUCTIONS — USING THE CONTROL BOX1.If you press either control button (shown at right) for less than 0.5 seconds, you can access the screensshown below.Control ButtonsR Right buttonL Left buttonPressing the left button for more than 0.5 secondswill begin actuatorextension.Pressing the rightbutton for morethan 0.5 secondswill begin actuator retraction.Raise / Lower LiftLong press to raise liftLong press to lower liftbutton to raise or the button to lower the lift.3.Press the 2.OPERATING INSTRUCTIONS —USING THE HAND PENDANTRaise / Lower LiftLong pressto raise liftLong pressto lower lift1.Press thebu�on to raise or the bu�on to lower the li�.•The operator of the lift shall inspect the lift before each use. Check all bolts for tightness. Make sure the base can be easily widened, and that all lift parts are in place. Make sure that casters can be turned freely, and that caster brakes can be engaged. Make certain all necessary items (i.e. slings, andwheelchairs, etc.) are ready for use.•At least once a month, the lift should be thoroughly inspected by a person qualified to recognize any signs of wear and tear, and looseness of bolts orparts. Replace any worn parts immediately.•To lubricate, put a drop of oil on the following points when the lift is placed into service and every month thereafter. Top of Mast, Spreader Hinge, and Casters.WARNING: If you experience a problem with your lift and are unable to service it yourself, contact Proactive Medical or your Proactive authorized distributor.Toileting Sling6Fitting The Toileting SlingSlide the sling down pa �ents back to lumbar posi �on .Draw shoulder straps under the arms and around the chest into the front.Draw Velcro waist belt around waist and press together to fasten.Draw each leg support under the thigh.Crisscross leg straps by feeding one of the leg straps through the other strap.A�ach shoulder straps to hooks in upper ends of the li �ing arms.A�ach leg straps to hooks in the lower ends of the li �ing arms.LIMITED WARRANTY1.. 2.3.4.This warranty shall not apply to any product which has been repaired or altered in any way so as, in our judgment, to affect its functionality and durability, nor to any product subject to abuse, misuse, negligence or accident, improper maintenance, improper installation, nor to any product used with other parts, components and/or accessories with quality and/or specifications not compatible with this product. This warranty does not cover products that have been impaired by occurrences considered Acts of God over which authorized dealer has no control. This warranty shall also be voided if any required periodic maintenance, if applicable, has not been properly performed on this product.This warranty and the aforementioned remedies presented are exclusive and in lieu of all other express or implied warranties. No other representations or claims shall be binding or obligate authorized dealer in any way. Any warranty applicable to this product is limited to the aforementioned period indicated. In no event shall authorized dealer be liable for any special, incidental, or consequential damages; loss of revenue; or cost of replacement goods; resulting from the use or malfunction of this product to the associated equipment on which and with which it is used. This warranty gives specific legal rights and you may be entitled to other rights that vary from state to state.。
Onick 600LH使用说明书
Onick 600LH激光测距仪使用说明书一、产品用途:多功能激光测角、测距仪是一种望远镜加激光测角测距的便携式光电仪器,综合了望远镜、激光测距和测角的功能,主要表现在两个方面:1、在清晰地观察物体的同时,可测量固定物体在一定范围内的距离。
具有测距精度高、测距时间短、距离显示直观、耗电省和自动断电等优点。
2、多功能激光测角、测距仪融聚了最新科技,同时实现了目标距离和角度的测量功能。
在获得目标距离的同时,还可同时显示望远镜至目标点连线与地平面的夹角(仰角为+,俯角为-)、相对高度和水平距离。
仪器的激光发射功率小,对人眼安全;不需要合作目标,可对任意目标测距;体积小,重量轻,便于携带。
机内使用CR2-3V电池供电,购买和更换均很方便。
测距望远镜广泛适用于旅游观光,观看体育比赛、高尔夫球场、野外狩猎、野营登山、户外郊游等运动场所,是提高野外活动质量,测量目标距离的好帮手。
二、主要技术指标⑴、测程范围:5M - 600M⑵、测距误差:±1M(通常);⑶、测角功能:有;⑷、扫描测距功能:有;⑸、望远镜倍率:6X;⑹、望远镜物镜孔径: 24mm;⑺、望远镜目镜孔径: 16mm;⑻、出瞳直径: 3.8mm;⑼、视场: 7°;⑽、视度调节范围:±3屈光度;⑾、产品重量:190克;⑿、电池型号:CR2-3V锂电;⒀、液晶显示器:黑色透过式液晶⒁、防护等级:防雨⒂、脚架连接:¼“ -20螺纹;⒃、产品重量: 206g(不含电池);⒄、外形尺寸:103×71×42mm。
⒅、多功能测距、测角仪附件表:。
shinko GC-600数字指示调节仪

警 告 ●GC -63A 系列的端子块构造按照左侧配线设计,导线须由左侧插入配线端子,而后再用螺丝 紧锁端子。 ●虚线部分,表示有附加项[特选功能(Option)]时才有的配置。 ●热电偶、补偿导线等应与本调节仪的传感器输入规格一致。 ●热电阻为 3 线式,应与本调节仪的传感器输入规格一致。 ●本调节仪内部未配置“电源开关” , “断路器”及“保险丝”等。因此,必须在控制器外部就 近安装这些配件。 (推荐保险丝:额定电压:AC 250V,额定电流:2A;类别:延时保险丝) 。 ●安装 AC/DC 24V 电源时,请注意极性不能反接。 ●在继电器接点输出时,为保护内部继电器接点,请在外部按照负载容量选用继电器。 ●传感器(热电偶,热电阻等)输入线,请与电源线、负载线隔离装配,以避免外部干扰。 ●传感器输入端请勿触及电源,请勿直接将电源接输入端。 4.2 导线压接端子的使用 请使用适合 M3 螺丝的附绝缘套管压接端子。 装配安装时,其锁紧扭矩约为 0.6N.m~1.0N.m。 压接端子 Y 型 圆 型 规 格 1.25Y-3,VD1.25-B3A V1.25-3, 1.25-3 装配时扭矩 0.6N.m,最大 1.0N.m
注 意 ●在设定本调节仪的规格及功能时先接电源端子(1)及(2) ,在实施[3.控制屏的安装][4.配线] 之前,按照[5.设定]进行设定。 (如输入等规格有所变动,必须先更改设定值) 。 3. 控制屏的安装 3.1 场所的选定 本调节仪在下列环境条件内使用 ●IEC61010-1:过电压Ⅱ类,污染度 2。 安装场所符合: ●灰尘少,无腐蚀性气体。 ●无可燃性气体及无爆炸性气体。 ●机械性振动及冲击少。 ●无日光直射,周围温度应保持在 0~50℃,无温度急速变化。 ●湿度在(35~85)%RH 以内,无结露。 ●远离大容量的电磁开关或大电流的电线。 不直接接触水、油、药品或蒸汽。 3.2 外形尺寸图(S 型:48mm*48mm*80mm) (图 3.2-1)
- 1、下载文档前请自行甄别文档内容的完整性,平台不提供额外的编辑、内容补充、找答案等附加服务。
- 2、"仅部分预览"的文档,不可在线预览部分如存在完整性等问题,可反馈申请退款(可完整预览的文档不适用该条件!)。
- 3、如文档侵犯您的权益,请联系客服反馈,我们会尽快为您处理(人工客服工作时间:9:00-18:30)。
GH600数码相机用户手册1.有毒有害物质或元素表依据中国政府针对"电子信息产品污染控制管理办法"为控制和减少电子信息产品废弃后对环境造成的污染,促进生产和销售低污染电子信息产品,保护环境和人体健康,仅提供有关本产品可能含有有毒及有害物质如后:表1有关中国"电子信息产品污染控制管理办法"之相关规定请参考信息产业部所公布之信息表中标示有"X"的所有部件都符合欧盟RoHS法规 (欧盟关于电子电器设备中限制使用某些有害物质的2002/95/EC 号指令)2.产品环保使用期限的使用条件:在按照本产品的使用条件使用的情况下(说明书中对温湿度等使用条件有详细说明),从生产日期开始,在标志的年限内使用,本产品中含有的有毒有害物质或元素不会对环境造成严重污染或对人身、财产造成严重损害。
安全警告和注意事项在使用相机之前,请务必阅读并完全理解此部分内容。
若忽视和违背此部分介绍的安全警告注意事项,可能导致相机的保修失效。
而且,除了相机外,您以及您周围的其他人和物品也可能受到严重损坏、受伤、甚至存在死亡危险。
安全注意事项• 将相机及其附件存放在婴幼儿够不到的地方。
特别要注意存储卡和电池等小部件,以免婴幼儿卸下和吞咽它们。
• 为符合所有相关的法律法规并避免可能的健康和财产损失等危险,只应使用原装附件。
• 无论在任何情况下,不要拆解相机。
• 请勿在靠近人眼(尤其是婴幼儿的眼睛)或动物眼睛的地方使用闪光灯。
否则当闪光灯发出闪光时,可能损坏人眼或使动物受惊。
• 例如,电池可能爆炸。
如果导电物品(如珠宝、钥匙或珠链等)接触到电池上裸露的端子,可能导致财产损坏、人身伤害或灼伤。
物品可能形成电路并变得高温。
放置电池时务必小心,特别是将其放入衣袋、钱包或其它带有金属物品的容器中时。
请勿将废弃电池投入火中,否则它们可能爆炸。
• 为防止触电,不要尝试自行拆卸或修理相机。
环保使用期限部件名称有毒有害物质或元素铅(Pb)汞(Hg)镉(Cd)六价铬(Cr(VI))多溴联苯(PBB)多溴二苯醚(PBDE) LCD 面板X O O O O O塑胶件O O O O O O印刷电路板组件X O O O O O金属件O O O O O O镜头X O O O O O充电器X O O O O O电源适配器X O O O O O电池O O O O O O备注:O :表示该有毒有害物质在该部件所有均质材料中的含量均在『电子信息产品中有毒有害物质的限量要求』标准规定的限量要求以下。
X :表示该有毒有害物质至少在该部件的某一均质材料中的含量超出『电子信息产品中有毒有害物质的限量要求』标准规定的限量要求。
(由於在技术上有困难)• 一些相机型号可以使用非充电电池。
当使用这些电池时,请勿对它们充电。
否则,存在爆炸和火灾危险。
• 若更换电池时使用错误的类型,则存在爆炸危险。
依照相关说明处置废旧电池。
保修• 由于外部原因,如碰撞、火灾、水灾、灰尘、污水、地震和其它不可抗事件以及用电不当或使用非原装附件等而导致的损坏或系统故障,不在保修范围内。
• 由于非工厂安装的软件、部件和/或非原装附件而导致的问题(如数据损失和系统故障),完全由用户承担责任。
• 请勿对相机进行变更。
任何变更都会导致相机保修失效。
保管相机• 务必将相机存放在随附的相机包或软袋中,以更好地保护相机,避免液体飞溅、灰尘和碰撞。
• 更换电池和存储卡的唯一方式是打开电池/存储卡仓盖。
• 按照您所在国家(地区)的相关法规正确处置废旧电池和相机。
• 水可能导致火灾或触电。
因此,将相机存放在干燥的地方。
• 如果相机潮湿,应尽快用干布擦拭。
• 盐或海水可能导致相机严重损坏。
• 请勿使相机掉落或者撞击或晃动相机。
不良的相机使用行为可能损坏内部电路板,使镜头变形,甚至导致镜头无法伸缩。
• 请勿使用粗糙的化学品、清洁溶液或烈性清洁剂清洁相机。
• 相机镜头上可能留有指痕并导致图像或视频模糊不清。
为避免此问题,务必在拍照或录制视频前清洁相机镜头。
此外,还应定期清洁相机镜头。
• 如果镜头脏了,应使用镜头刷或软布清洁镜头。
• 不要用手指触摸镜头。
• 如果异物或水进入相机,应立即关闭电源,并取出电池。
接下来,取出异物或擦干水,然后将相机送到维修中心进行检修。
• 当内部存储器或外部存储卡中有数据时,应将其复制到计算机或磁盘中作为备份。
一旦数据丢失,可以使用备份的数据。
• 如果镜头无法缩进相机内,请先更换电池(通常是由于电池没电了)。
之后,镜头应能自动缩回。
如果镜头仍无法缩回,请与经销商联系。
• 无论如何,切勿手动推回镜头,否则会损坏相机。
• 根据设计,所有原装附件仅适合您购买的此型号相机使用。
请勿在其它型号的相机或其它品牌的相机上使用这些附件,以避免不可预期的危险或损失。
• 在初次使用存储卡前,务必先使用相机格式化卡。
• 切记将写保护开关(若有)拨到解锁位置。
否则,存储卡中的所有数据(如果有)受到保护,因而不能编辑或格式化卡。
使用环境• 不要在下列环境条件下使用或存放相机:• 直接阳光照射• 灰尘多的地方• 靠近空调、电热器或其它热源的地方• 在阳光直接照射的封闭汽车内• 不稳定的位置• 当正在下雨或下雪时,不要在户外使用相机。
• 不要在水中或靠近水的地方使用相机。
• 本相机的工作温度范围是0到40摄氏度。
温度过低时使用时间会缩短,这是正常现象。
• 在极端高温或低温环境下存放也会导致容量逐渐减小。
因此,相机的工作时间可能明显缩短。
• 由于相机机壳可以导热,因此相机在使用过程中会变热,这是正常现象。
避免拍摄时相机磕碰其它物体。
上,并始终将相机挂在脖子上。
如偶然遇到电池耗电结束但镜头尚未完全收回状况,更换充满电的电池即相机时,应从相机中取出电池并妥善存放电池。
避免大力撞击或尖锐物体碰撞相机镜头。
不使用相机时,应将其放入相机包中并放置在平稳的地方。
避免重物覆压相机,以防损坏。
目录熟悉相机 (12)检查包装中的物品 (12)相机 (13)前部和底部概览 (13)后部概览 (14)多功能按钮 (15)准备使用相机 (16)连接挂绳和镜头绳 (16)安装电池 (17)安装SD卡 (19)打开和关闭电源 (20)打开闪光灯 (20)初次设置 (21)设置语言 (21)设置日期和时间 (21)使用相机 (22)照相模式 (24)闪光模式 (25)面部捕捉 (26)对焦模式 (27)选择场景模式 (28)使用光圈优先模式 (29)使用快门优先模式 (29)使用手动模式 (29)使用连拍模式 (30)使用全景模式 (30)使用智能场景模式 (32)设置场景模式 (32)笑容捕捉 (36)眨眼检测器 (37)情侣人像 (37)鱼眼 (37)预先构图 (38)网络拍卖 (38)使用功能菜单 (39)图像尺寸 (40)图像质量 (40)视频尺寸 (41)设置曝光值 (41)白平衡 (41)ISO (42)测光 (43)效果模式 (43)录像 (45)使用拍摄菜单 (45)设置拍摄模式 (46)设置自动对焦区域 (46)使用对焦辅助灯 (46)设置锐利度、饱和度和对比度 (46)数码变焦 (47)日期标签 (47)快速浏览 (47)光学防抖 (48)电池状态 (48)其它设置 (49)播放模式 (51)关于播放和编辑的选项 (52)放大图像 (52)旋转图像 (52)同时查看多个文件 (52)播放视频剪辑 (53)调节播放音量 (53)幻灯片 (54)删除文件 (54)保护文件 (55)红眼消除 (55)语音留言 (55)相片效果 (56)裁剪 (57)调整尺寸 (57)开机画面 (58)DPOF (58)动态模糊 (59)使用计算机和AV系统 (59)附带软件 (59)将相机连接到计算机 (59)将相机连接到AV系统 (60)打印图像 (60)使用PictBridge进行打印 (60)故障排除和服务信息 (62)技术支持 (63)规格 (64)12 熟悉相机熟悉相机检查包装中的物品打开包装盒并检查下列物品是否齐全。
1.快速指南2.数码相机B 线4.AA 电池 x 45.挂绳6.软件和用户手册光盘7.相机袋(可选)8.镜头盖9.镜头绳•本手册中使用的所有图片、屏幕截图和图标仅供参考。
实际提供的产品、附件以及它们的外观可能因销售地域不同而存在差异。
• 如有任何物品缺失或损坏,请与经销商联系。
• 妥善保管包装物品,以备将来运输或存放时使用。
123457896熟悉相机 13简体相机4.快门按钮5.手提带孔眼6.电源按钮7.自动对焦辅助灯/自拍LED 指示灯8.模式拨盘9.闪光灯10.扬声器11.三角架安装槽口12.电池/卡仓盖14熟悉相机后部概览B / AV 端口2.LCD 显示屏3.播放按钮4.状态LED5.录制按钮6.多功能按钮(包括一个4向控制和一个 按钮)7.功能/删除按钮 8.菜单按钮 LED 指示灯状态LED不亮数码相机处于关机状态。
稳定绿色• 数码相机已做好拍摄图像的准备。
• 数码相机正在开机、或者处于省电模式。
状态LED 闪烁绿色• 数码相机无法对焦。
• 数码相机正在拍摄视频剪辑。
• 闪光灯正在充电,或者正在进行USB 通信/传输。
自拍LED 闪烁红色自拍功能处于激活状态。
23416785OK熟悉相机 15简体中文多功能按钮您可以通过按4向控制或1.向左/对焦:• 在菜单中向左滚动。
• 切换不同的对焦模式。
2.向上/面部捕捉:• 在菜单中向上滚动。
• 开启/关闭面部捕捉。
有关的详细信息,请参见第26页的“面部捕捉”。
• 旋转图像。
有关的详细信息,请参见第52页的“旋转图像”。
3.向右/闪光:• 在菜单中向右滚动。
• 选择闪光模式。
4.向下/显示:• 在菜单中向下滚动• 切换不同的显示模式。
5.: 确认所选的设置。
• 由于相机机壳可以导热,因此相机在使用过程中会变热,这是正常现象。
• 此相机的LCD 显示屏采用复杂技术制造,其上面99.99%以上的像素都满足标准规范要求。
但是,LCD 显示屏上0.01%以下的像素可能存在一些亮点或显示异常颜色。
这是正常现象,并不意味着显示屏有故障,也不影响您使用此相机拍照。
• 在强烈阳光或明亮光线条件下,LCD 显示屏会发暗。
这是正常现象。
• 为防止图像模糊,在按快门按钮时应拿稳相机。
在光线较弱的条件下拍摄时,这一点尤其重要,因为在这种情况下相机可能降低快门速度以确保图像正确曝光。
OK OK16 熟悉相机准备使用相机此部分向您介绍如何做好初次使用相机的准备。
连接挂绳和镜头绳1.将挂绳的一端穿过挂绳孔眼。
2.将其穿过内环带扣。
3.4.紧。
5.简体中文安装电池仅使用为相机指定的电池,在取出电池之前务必关闭相机电源。