HDS HDLM for Solaris安装简述
SUN服务器Solaris10安装步骤
SUN服务器Solaris10安装步骤1.开机加电,等待显示器亮后,按Ctrl+Break键。
2.服务器进入OK监控状态:OK将Solaris10系统盘插入光驱,并在OK提示符下输入以下命令:OK boot cdrom。
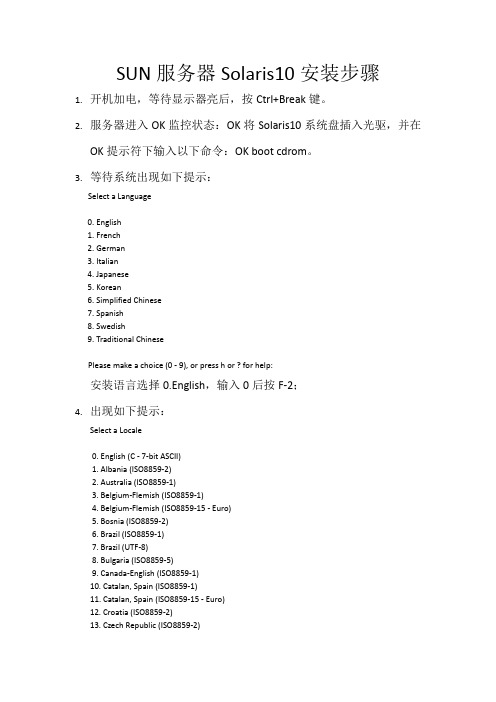
3.等待系统出现如下提示:Select a Language0. English1. French2. German3. Italian4. Japanese5. Korean6. Simplified Chinese7. Spanish8. Swedish9. Traditional ChinesePlease make a choice (0 - 9), or press h or ? for help:安装语言选择0.English,输入0后按F-2;4.出现如下提示:Select a Locale0. English (C - 7-bit ASCII)1. Albania (ISO8859-2)2. Australia (ISO8859-1)3. Belgium-Flemish (ISO8859-1)4. Belgium-Flemish (ISO8859-15 - Euro)5. Bosnia (ISO8859-2)6. Brazil (ISO8859-1)7. Brazil (UTF-8)8. Bulgaria (ISO8859-5)9. Canada-English (ISO8859-1)10. Catalan, Spain (ISO8859-1)11. Catalan, Spain (ISO8859-15 - Euro)12. Croatia (ISO8859-2)13. Czech Republic (ISO8859-2)14. Denmark (ISO8859-1)15. Denmark (ISO8859-15 - Euro)16. Egypt (ISO8859-6)17. Egypt (UTF-8)18. Estonia (ISO8859-15)Press Return to show more choices.Please make a choice (0 - 59), or press h or ? for help:本地语言选择0. English (C - 7-bit ASCII),输入0后按F-2;5.在终端上安装Solaris10,这时会出现如下提示:What type of terminal are you using?1) ANSI Standard CRT2) DEC VT523) DEC VT1004) Heathkit 195) Lear Siegler ADM316) PC Console7) Sun Command Tool8) Sun Workstation9) Televideo 91010) Televideo 92511) Wyse Model 5012) X Terminal Emulator (xterms)13) CDE Terminal Emulator (dtterm)14) OtherType the number of your choice and press Return:终端类型选择3)DEC VT100,输入3后按F-2;6.出现如下提示:q The Solaris Installation Program qqqqqqqqqqqqqqqqqqqqqqqqqqqqqqqqqqqqqqqqqqqqqThe Solaris installation program is divided into a series of short sectionswhere you'll be prompted to provide information for the installation. Atthe end of each section, you'll be able to change the selections you'vemade before continuing.About navigation...- The mouse cannot be used- If your keyboard does not have function keys, or they do notrespond, press F; the legend at the bottom of the screenwill change to show the F keys to use for navigation. qqqqqqqqqqqqqqqqqqqqqqqqqqqqqqqqqqqqqqqqqqqqqqqqqqqqqqqqqqqqqqqqqqqqqqqqqqq qqqqqF2_Continue F6_HelpSolaris的安装分为好几部分,每一部分后面都需要进行确认,如果发现有错,可以更改先前输入的信息,按F-2继续安装;7.出现如下提示:q Identify This System qqqqqqqqqqqqqqqqqqqqqqqqqqqqqqqqqqqqqqqqqqqqqqqqqqqqqqqqqOn the next screens, you must identify this system as networked ornon-networked, and set the default time zone and date/time.If this system is networked, the software will try to find the informationit needs to identify your system; you will be prompted to supply anyinformation it cannot find.> To begin identifying this system, press F2.qqqqqqqqqqqqqqqqqqqqqqqqqqqqqqqqqqqqqqqqqqqqqqqqqqqqqqqqqqqqqqqqqqqqqqqq qqqqqqqqF2_Continue F6_Help开始定义系统的名字、网络、及掩码,时区及时间,按F-2继续安装;- Network Connectivity ---------------------------------------------------------Specify Yes if the system is connected to the network by one of the Solarisor vendor network/communication Ethernet cards that are supported on theSolaris CD. See your hardware documentation for the current list ofsupported cards.Specify No if the system is connected to a network/communication card thatis not supported on the Solaris CD, and follow the instructions listed underHelp.Networked---------[X] Yes[ ] No--------------------------------------------------------------------------------F-2_Continue F-6_Help提示系统是否连接了网络,选YES,按F-2继续安装;- Configure Multiple Network Interfaces ----------------------------------------Multiple network interfaces have been detected on this system. Specify allof the network interfaces you want to configure.Note: You must choose at least one interface to configure.Network interfaces------------------[X] bge0[ ] bge1[ ] bge2[ ] bge3--------------------------------------------------------------------------------F-2_Continue F-6_Help选择主网卡接口,选bge0,按F-2继续安装;DHCP for bge0----------------------------------------------------------------Specify whether or not this network interface should use DHCP to configure itself. Choose Yes if DHCP is to be used, or No if the network interface is to be configured manually.NOTE: DHCP support will not be enabled, if selected, until after the system reboots.Use DHCP for bge0-----------------[ ] Yes[X] No--------------------------------------------------------------------------------F-2_Continue F-6_Help提示是否需要使用DHCP来配置主机的IP地址,选NO,按F-2继续安装;Host Name for bge0 -----------------------------------------------------------Enter the host name which identifies this system on the network. The namemust be unique within your domain; creating a duplicate host name will causeproblems on the network after you install Solaris.A host name must have at least one character; it can contain letters,digits, and minus signs (-).Host name for bge0 SUN_M5000--------------------------------------------------------------------------------F-2_Continue F-6_Help输入主机名:SUN_M5000,按F-2继续安装;IP Address for bge0 ----------------------------------------------------------Enter the Internet Protocol (IP) address for this network interface. Itmust be unique and follow your site's address conventions, or asystem/network failure could result.IP addresses contain four sets of numbers separated by periods (for example129.200.9.1).IP address for bge0 XXX.XXX.XXX.XXX--------------------------------------------------------------------------------F-2_Continue F-6_Help输入主机IP地址,XXX.XXX.XXX.XXX,按F-2继续安装;- Subnet for bge0--------------------------------------------------------------On this screen you must specify whether this system is part of a subnet. Ifyou specify incorrectly, the system will have problems communicating on thenetwork after you reboot.> To make a selection, use the arrow keys to highlight the option andpress Return to mark it [X].System part of a subnet-----------------------[X] Yes[ ] No--------------------------------------------------------------------------------F-2_Continue F-6_Help提示主机的网络是否采用子网掩码的方法,选YES,按F-2继续安装;- Netmask for bge0 -------------------------------------------------------------On this screen you must specify the netmask of your subnet. A defaultnetmask is shown; do not accept the default unless you are sure it iscorrect for your subnet. A netmask must contain four sets of numbers separated by periods (for example 255.255.255.0).Netmask for bge0 255.255.255.0--------------------------------------------------------------------------------F-2_Continue F-6_Help提示输入子网掩码,输入255.255.255.0,按F-2继续安装;- IPv6 for bge0 ----------------------------------------------------------------Specify whether or not you want to enable IPv6, the next generation Internet Protocol, on this network interface. Enabling IPv6 will have no effect ifthis machine is not on a network that provides IPv6 service. IPv4 servicewill not be affected if IPv6 is enabled.> To make a selection, use the arrow keys to highlight the option andpress Return to mark it [X].Enable IPv6 for bge0--------------------[ ] Yes[X] No--------------------------------------------------------------------------------F-2_Continue F-6_Help不使用IPv6技术,选NO,按F-2继续安装;- Set the Default Route for bge0 -----------------------------------------------To specify the default route, you can let the software try to detect oneupon reboot, you can specify the IP address of the router, or you can choose None. Choose None if you do not have a router on your subnet.> To make a selection, use the arrow keys to select your choice and press Return to mark it [X].Default Route for bge0--------------------------[ ] Detect one upon reboot[X] Specify one[ ] None----------------------------------------------------------------------F-2_Continue F-6_Help提示设置缺省网关,选择Specify one,按F-2继续安装;- Default Route IP Address for bge0 ----------------------------------Enter the IP address of the default route. This entry will be placed in the/etc/defaultrouter file and will be the default route after you reboot (example 129.146.89.225).Router IP Address for bge0 XXX.XXX.XXX.XXX----------------------------------------------------------------------F-2_Continue F-6_Help提示输入主机的缺省网关,输入XXX.XXX.XXX.XXX,按F-2继续安装;- Confirm Information for bge0 -------------------------------------------------> Confirm the following information. If it is correct, press F2;to change any information, press F4.Networked: YesUse DHCP: NoHost name: SUN_M5000IP address: XXX.XXX.XXX.XXXSystem part of a subnet: YesNetmask: 255.255.255.0Enable IPv6: NoDefault Route: Specify oneRouter IP Address: XXX.XXX.XXX.XXX----------------------------------------------------------------------F-2_Continue F-4_Change F-6_Help提示确认上面输入的信息,如果上面的输入信息有错,可以按F-4后重新输入,如果正确,按F-2继续安装;- Configure Security Policy: ---------------------------------------------------Specify Yes if the system will use the Kerberos security mechanism.Specify No if this system will use standard UNIX security.Configure Kerberos Security---------------------------[ ] Yes[X] No----------------------------------------------------------------------F-2_Continue F-6_Help提示配置安全策略,选NO,按F-2继续安装;- Confirm Information ----------------------------------------------------------> Confirm the following information. If it is correct, press F2;to change any information, press F4.Configure Kerberos Security: No---------------------------------------------------------------------F-2_Continue F-4_Change F-6_Help确认刚才输入的信息,如果刚才输入的信息有错,按F-2重新输入;如果正确,按F-2继续安装;- Name Service -------------------------------------------------------On this screen you must provide name service information. Select the nameservice that will be used by this system, or None if your system will eithernot use a name service at all, or if it will use a name service not listedhere.> To make a selection, use the arrow keys to highlight the optionand press Return to mark it [X].Name service------------[ ] NIS+[ ] NIS[ ] DNS[ ] LDAP[X] None----------------------------------------------------------------------F-2_Continue F-6_Help配置名字服务,选择None(不采用任何名字服务),按F-2继续安装;- Confirm Information ------------------------------------------------> Confirm the following information. If it is correct, press F2;to change any information, press F4.Name service: None----------------------------------------------------------------------F-2_Continue F-4_Change F-6_Help确认刚才输入的信息,如果刚才输入的信息有错,按F-4重新输入;如果正确,按F-2继续安装;- Time Zone ----------------------------------------------------------On this screen you must specify your default time zone. You can specify atime zone in three ways: select one of the continents or oceans from thelist, select other - offset from GMT, or other - specify time zone file.> To make a selection, use the arrow keys to highlight the option andpress Return to mark it [X].Continents and Oceans----------------------------------- [ ] Africa| [ ] Americas| [ ] Antarctica| [ ] Arctic Ocean| [X] Asia| [ ] Atlantic Ocean| [ ] Australia| [] Europev [ ] Indian Ocean----------------------------------------------------------------------F-2_Continue F-6_Help设置时区,选择Asia,按F-2继续安装;- Country or Region --------------------------------------------------> To make a selection, use the arrow keys to highlight the option and press Return to mark it [X].Countries and Regions-------------------------^ [ ] France| [ ] Germany| [ ] Gibraltar| [ ] Greece| [ ] Hungary| [ ] Ireland| [ ] Italy| [ ] Latvia| [ ] Liechtenstein| [ ] Lithuania| [ ] Luxembourg| [ ] Macedoniav [X] China----------------------------------------------------------------------F-2_Continue F-6_Help选择国家或地区,选择China,按F-2继续安装;- Date and Time -----------------------------------------------------> Accept the default date and time or enternew values.Date and time: 2010—XX--XX 10:48Year (4 digits) : 2010Month (1-12) : XXDay (1-31) : XXHour (0-23) : 10Minute (0-59) : 48----------------------------------------------------------------------F-2_Continue F-6_Help设置时间,按照当地时间,按F-2继续安装;Root Password ------------------------------------------------------Please enter the root password for this system.The root password may contain alphanumeric and special characters. For security, the password will not be displayed on the screen as you type it.> If you do not want a root password, leave both entries blank.Root password: *****Root password: *****----------------------------------------------------------------------F-2_Continue F-6_Help设置root用户密码,设置为root,按F-2继续安装;- Identify This System -----------------------------------------------On the next screens, you must identify this system as networked ornon-networked, and set the default time zone and date/time.If this system is networked, the software will try to find the informationit needs to identify your system; you will be prompted to supply any information it cannot find.> To begin identifying this system, press F2.----------------------------------------------------------------------F-2_Continue F-6_Help系统鉴别系统信息,直接按F-2继续安装;- Solaris Interactive Installation -----------------------------------On the following screens, you can accept the defaults or you can customize how Solaris software will be installed by:- Selecting the type of Solaris software to install- Selecting disks to hold software you've selected- Selecting unbundled products to be installed with Solaris- Specifying how file systems are laid out on the disksAfter completing these tasks, a summary of your selections (called a profile) will be displayed.There are two ways to install your Solaris software:- "Standard" installs your system from a standard Solaris Distribution.Selecting "Standard" allows you to choose between initial installand upgrade, if your system is upgradable.- "Flash" installs your system from one or more Flash Archives---------------------------------------------------------------------F2_Standard F4_Flash F5_Exit F6_Help- Eject a CD/DVD Automatically? --------------------------------------During the installation of Solaris software, you may be using one or moreCDs/DVDs. You can choose to have the system eject each CD/DVD automatically after it is installed or you can choose to manually eject each CD/DVD.[ ] Automatically eject CD/DVD[X] Manually eject CD/DVD----------------------------------------------------------------------F2_Continue F3_Go Back F5_Exit- Reboot After Installation? -----------------------------------------After Solaris software is installed, the system must be rebooted. You can choose to have the system automatically reboot, or you can choose to manually reboot the system if you want to run scripts or do other customizations before the reboot. You can manually reboot a system by using the reboot(1M) command.[X] Auto Reboot[ ] Manual Reboot----------------------------------------------------------------------F2_Continue F3_Go Back F5_Exit- Solaris Interactive Installation ---------------------------------------------This system is upgradable, so there are two ways to install the Solaris software.The Upgrade option updates the Solaris software to the new release, savingas many modifications to the previous version of Solaris software as possible. Back up the system before using the Upgrade option.The Initial option overwrites the system disks with the new version ofSolaris software. This option allows you to preserve any existing file systems. Back up any modifications made to the previous version of Solaris software before starting the Initial option.After you select an option and complete the tasks that follow, a summary ofyour actions will be displayed.----------------------------------------------------------------------F2_Upgrade F3_Go Back F4_Initial F5_Exit F6_Help- Initializing -------------------------------------------------------The system is being initialized.Loading install media, please wait...- License ------------------------------------------------------------- Sun Microsystems, Inc. ("Sun")| SOFTWARE LICENSE AGREEMENT|| READ THE TERMS OF THIS AGREEMENT ("AGREEMENT") CAREFULLY BEFORE | OPENING SOFTWARE MEDIA PACKAGE. BY OPENING SOFTWARE MEDIA| PACKAGE, YOU AGREE TO THE TERMS OF THIS AGREEMENT. IF YOU ARE| ACCESSING SOFTWARE ELECTRONICALLY, INDICATE YOUR ACCEPTANCE OF | THESE TERMS BY SELECTING THE "ACCEPT"(OR EQUIVALENT) BUTTON AT| THE END OF THIS AGREEMENT. IF YOU DO NOT AGREE TO ALL OF THE| TERMS, PROMPTLY RETURN THE UNUSED SOFTWARE TO YOUR PLACE OF| PURCHASE FOR A REFUND OR, IF SOFTWARE IS ACCESSED ELECTRONICALLY, | SELECT THE "DECLINE" (OR EQUIVALENT) BUTTON AT THE END OF THIS| AGREEMENT. IF YOU HAVE SEPARATELY AGREED TO LICENSE TERMS| ("MASTER TERMS") FOR YOUR LICENSE TO THIS SOFTWARE, THEN SECTIONS | 1-6 OF THIS AGREEMENT ("SUPPLEMENTAL LICENSE TERMS") SHALL| SUPPLEMENT AND SUPERSEDE THE MASTER TERMS IN RELATION TO THIS | SOFTWARE.|v 1. Definitions.----------------------------------------------------------------------F-2_Accept License F5_Exit-- Select Geographic Regions -----------------------------------------Select the geographic regions for which support should be installed.> [ ] Australasia> [ ] Asia> [ ] Eastern Europe> [ ] Northern Europe> [ ] Northern Africa> [ ] Middle EastV [/] Southern Europe[ ] Catalan, Spain (ISO8859-1)[ ] Cyprus (Greek) (UTF-8)[ ] Greece (ISO8859-7)[X] Italian[X] Italy (ISO8859-1)[ ] Malta (English) (UTF-8)[ ] Malta (UTF-8)[ ] Portugal (ISO8859-1)[ ] Spain (ISO8859-1)Press Return to hide components-------------------------------------------------------------------------------- F-2_Continue F3_Go Back F5_Exit F6_Help- Select System Locale ---------------------------------------------------------Select the initial locale to be used after the system has been installed.[ ] POSIX C ( C )Western Europe[ ] Great Britain (ISO8859-1) ( en_GB.ISO8859-1 )[ ] Great Britain (ISO8859-15 - Euro) ( en_GB.ISO8859-15 )[X] Great Britain (UTF-8) ( en_GB.UTF-8 )----------------------------------------------------------------------F-2_Continue F3_Go Back F5_Exit F6_Help- Select Products ----------------------------------------------------Select the products you would like to install.V [X] Solaris 10 Extra Value Software................. 69.92 MB[X] Sun Validation Test Suite 6.3................... 69.92 MBProduct is selected. Press Return to deselect----------------------------------------------------------------------F-2_Continue F3_Go Back F-4_Product Info F5_Exit F6_Help- Additional Products ------------------------------------------------To scan for additional products, select the location you wish to scan. Products found at the selected location that are in a Web Start Ready install form will be added to the Products list.Web Start Ready product scan location:[X] None[ ] CD/DVD[ ] Network File System----------------------------------------------------------------------F-2_Continue F3_Go Back F5_Exit- Select Software ----------------------------------------------------Select the Solaris software to install on the system.NOTE: After selecting a software group, you can add or remove software bycustomizing it. However, this requires understanding of softwaredependencies and how Solaris software is packaged.[X] Entire Distribution plus OEM support ....... 5617.00 MB[ ] Entire Distribution ........................ 5573.00 MB[ ] Developer System Support ................... 5460.00 MB[ ] End User System Support .................... 4444.00 MB[ ] Core System Support ........................ 971.00 MB[ ] Reduced Networking Core System Support ..... 920.00 MB---------------------------------------------------------------------F-2_Continue F3_Go Back F4_Customize F5_Exit F6_Help- Select Disks -------------------------------------------------------On this screen you must select the disks for installing Solaris software.Start by looking at the Suggested Minimum field; this value is theapproximate space needed to install the software you've selected. Keepselecting disks until the Total Selected value exceeds the Suggested Minimum value.NOTE: ** denotes current boot diskDisk Device Available Space====================================================================== [X] c1t0d0 69994 MB (F4 to edit)[ ] c1t1d0 69994 MBTotal Selected: 69994 MBSuggested Minimum: 4372 MB----------------------------------------------------------------------F-2_Continue F3_Go Back F4_Edit F5_Exit F6_Help- Preserve Data? -----------------------------------------------------Do you want to preserve existing data? At least one of the disks you'veselected for installing Solaris software has file systems or unnamed slicesthat you may want to save.----------------------------------------------------------------------F-2_Continue F3_Go Back F4_Preserve F5_Exit F6_Help- Automatically Layout File Systems? ---------------------------------Do you want to use auto-layout to automatically layout file systems?Manually laying out file systems requires advanced system administrationskills.----------------------------------------------------------------------F2_Auto Layout F3_Go Back F4_Manual Layout F5_Exit F6_Help- File System and Disk Layout ----------------------------------------The summary below is your current file system and disk layout, based on the information you've supplied.NOTE: If you choose to customize, you should understand file systems, theirintended purpose on the disk, and how changing them may affect the operationof the system.File sys/Mnt point Disk/Slice Size====================================================================== overlap c1t0d0s2 69994 MB----------------------------------------------------------------------F-2_Continue F3_Go Back F4_Customize F5_Exit F6_Help- Customize Disk: c1t0d0 ---------------------------------------------Boot Disk: c1t0d0Entry: Recommended: MB Minimum: MB====================================================================== Slice Mount Point Size (MB)0 01 02 overlap 699943 04 05 06 07 0====================================================================== Capacity: 69994 MBAllocated: 0 MBFree: 69994 MB--------------------------------------------------------------------------------F-2_OK F-4_Options F5_Cancel F6_Help- Customize Disk: c1t0d0 -------------------------------------------------------Boot Disk: c1t0d0Entry: swap Recommended: 0 MB Minimum: 0 MB====================================================================== Slice Mount Point Size (MB)0 / 143391 swap 81932 overlap 699943 /opt 266274 05 06 /export/home 204817 0====================================================================== Capacity: 69994 MBAllocated: 69640 MBRounding Error: 2 MBFree: 352 MB----------------------------------------------------------------------F-2_OK F-4_Options F5_Cancel F6_Help- File System and Disk Layout ----------------------------------------The summary below is your current file system and disk layout, based on the information you've supplied.NOTE: If you choose to customize, you should understand file systems, theirintended purpose on the disk, and how changing them may affect the operationof the system.File sys/Mnt point Disk/Slice Size====================================================================== / c1t0d0s0 14339 MBswap c1t0d0s1 8193 MBoverlap c1t0d0s2 69994 MB/opt c1t0d0s3 26627 MB/export/home c1t0d0s6 20481 MB----------------------------------------------------------------------F-2_Continue F3_Go Back F4_Customize F5_Exit F6_Help- Mount Remote File Systems? -----------------------------------------Do you want to mount software from a remote file server? This may benecessary if you had to remove software because of disk space problems.----------------------------------------------------------------------F-2_Continue F3_Go Back F4_Remote Mounts F5_Exit F6_Help- Profile ------------------------------------------------------------The information shown below is your profile for installing Solaris software.It reflects the choices you've made on previous screens.====================================================================== - Installation Option: Initial| Boot Device: c1t0d0| Client Services: None|| Locales: Great Britain (ISO8859-1)| System Locale: Great Britain (UTF-8) ( en_GB.UTF-8|| Software: Solaris 10, Entire Distribution plus OEM su|| File System and Disk Layout: / c1t0d0s0 14339 MB| swap c1t0d0s1 8193 MB| /opt c1t0d0s3 26627 MB| /export/home c1t0d0s6 20481 MBv----------------------------------------------------------------------F-2_Begin Installation F4_Change F5_Exit F6_Help- Warning ------------------------------------------------------------The following disk configuration condition(s) have beendetected. Errors must be fixed to ensure a successfulinstallation. Warnings can be ignored without causing theinstallation to fail.WARNING: Unused disk space (c1t0d0)WARNING: CHANGING DEFAULT BOOT DEVICEYou have either explicitly changed the default boot device, oraccepted the default to "Reconfigure EEPROM". In either case,the system's EEPROM will be changed so it will always bootSolaris from the device that you've specified. If this is notwhat you had in mind, go back to the disk selection screens andchange the "Reconfigure EEPROM" setting.----------------------------------------------------------------------F-2_OK F5_Cancel。
solaris安装步骤日志

如果系统通过 Solaris 或供应商提供的网络/通信以太网网卡(受 Solaris CD
支持)连接到网络,就指定“是”。在硬件文档里查看当前支持的网卡的列表。
如果系统连接的是一个 Solaris CD
不支持的网络/通信卡,就指定“否”,并执行帮助程序
1) ANSI 标准 CRT
2) DEC VT52
3) DEC VT100
4) Heathkit 19
5) Lear Siegler ADM31
Probing system devices
Probing memory
Probing I/O buses
Sun Fire V240, No Keyboard
Copyright 1998-2004 Sun Microsystems, Inc. All rights reserved.
Testing /pci@1e,600000/isa@7/serial@0,3f8
Probing system devices
Probing memory
Probing I/O buses
Probing system devices
Select a Language
0. English
1. French
2. German
3. Italian
4. Japanese
5. Korean
6. Simplified Chinese
7. Spanish
Attempting to configure interface bge0...
Skipped interface bge0
Setting up Java. Please wait...
Solaris 10自动安装DVD使用手册
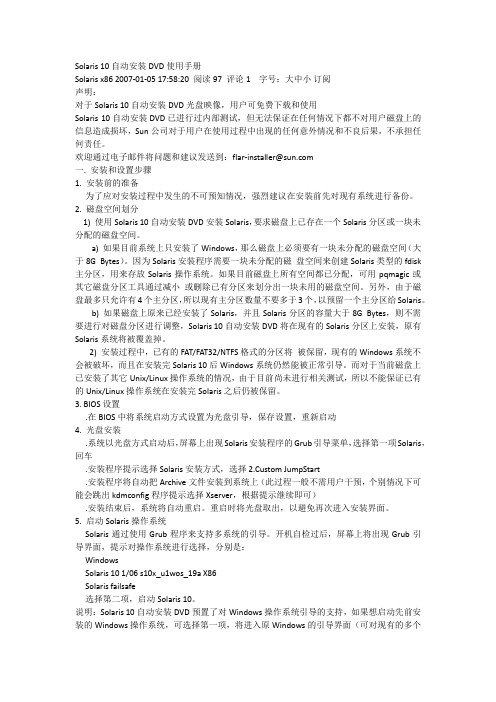
Solaris 10自动安装DVD使用手册Solaris x86 2007-01-05 17:58:20 阅读97 评论1 字号:大中小订阅声明:对于Solaris 10自动安装DVD光盘映像,用户可免费下载和使用Solaris 10自动安装DVD已进行过内部测试,但无法保证在任何情况下都不对用户磁盘上的信息造成损坏,Sun公司对于用户在使用过程中出现的任何意外情况和不良后果,不承担任何责任。
欢迎通过电子邮件将问题和建议发送到:flar-installer@一. 安装和设置步骤1. 安装前的准备为了应对安装过程中发生的不可预知情况,强烈建议在安装前先对现有系统进行备份。
2. 磁盘空间划分1) 使用Solaris 10自动安装DVD安装Solaris,要求磁盘上已存在一个Solaris分区或一块未分配的磁盘空间。
a) 如果目前系统上只安装了Windows,那么磁盘上必须要有一块未分配的磁盘空间(大于8G Bytes)。
因为Solaris安装程序需要一块未分配的磁盘空间来创建Solaris类型的fdisk 主分区,用来存放Solaris操作系统。
如果目前磁盘上所有空间都已分配,可用pqmagic或其它磁盘分区工具通过减小或删除已有分区来划分出一块未用的磁盘空间。
另外,由于磁盘最多只允许有4个主分区,所以现有主分区数量不要多于3个,以预留一个主分区给Solaris。
b) 如果磁盘上原来已经安装了Solaris,并且Solaris分区的容量大于8G Bytes,则不需要进行对磁盘分区进行调整,Solaris 10自动安装DVD将在现有的Solaris分区上安装,原有Solaris系统将被覆盖掉。
2) 安装过程中,已有的FAT/FAT32/NTFS格式的分区将被保留,现有的Windows系统不会被破坏,而且在安装完Solaris 10后Windows系统仍然能被正常引导。
而对于当前磁盘上已安装了其它Unix/Linux操作系统的情况,由于目前尚未进行相关测试,所以不能保证已有的Unix/Linux操作系统在安装完Solaris之后仍被保留。
Solaris系统安装步骤
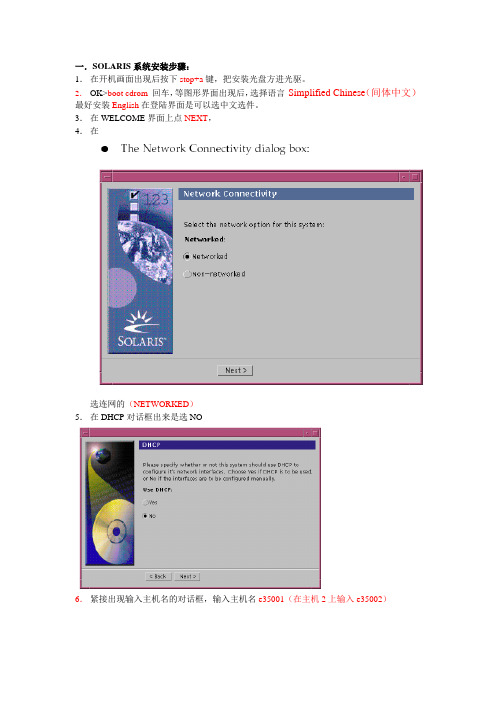
一.SOLARIS系统安装步骤:1.在开机画面出现后按下stop+a键,把安装光盘方进光驱。
2.OK>boot cdrom回车,等图形界面出现后,选择语言Simplified Chinese(间体中文)最好安装English在登陆界面是可以选中文选件。
3.在WELCOME界面上点NEXT,4.在选连网的(NETWORKED)5.在DHCP对话框出来是选NO6.紧接出现输入主机名的对话框,输入主机名e35001(在主机2上输入e35002)7.在IP地址的地方输入IP地址,10.35.55.17(在2号机器上输入10.35.55.18)8.在子网掩码对话框里输入255255.255.1289.在IPV6的IP协议框里选默认的版本即可,回车。
10.在如下的名称对话框里选NO。
11.接着选择时区,选东亚,中华人民共和国12.设置日期(默认即可)13.设置密码14.在电源管理对话框里,按NEXT ,(默认选择)15.在代理服务对话框里,根据实际的情况填写。
如果是直接连接到INTERNET 16.接着上一个确认的对话框如下,仔细检查一下,如果没有问题,点确认:17.接着会提示你放如第一张安装光盘18.选择安装方式。
自定义安装19.选择64位安装方式20.选择安装方式:完全安装(ENTIRE SOLARIS SOFTWARE GROUP PLUS OEM)21.选择DISKS,添加:22.在下面的分区框里,选择硬盘分区(MODIFY)23.输入分区打小:0 / 3000m1swap 2000m3/var 2000m4 /usr 2000m5 /opt 3000m6/oracle 4500m7150m24.然后点确认,开始安装。
24.中途会提示更换安装光盘,更换光盘,确认即可。
二.VERITAS voluemanager卷管理软件的安装。
1.把安装光盘放入光驱到安装目录用pkgadd –d . 回车即可。
Solaris安装

本文档适用于太平洋安泰人寿保险公司版本历史本文包括的附属文件目录目录 (3)1SOLARIS 10 安装 (4)2SOLARIS 10 RAID 1说明 (15)Solaris 10 安装本过程说明如何从DVD 介质安装独立的基于SPARC 的系统。
在开始安装之前,请执行下列任务。
_ 确保您有下列介质。
_ 对于DVD 安装,Solaris 10 Operating System for SPARC Platforms DVD_ 验证你的系统满足最低要求。
系统必须满足以下要求。
_ 内存-128 MB 或更大_ 磁盘空间-6.8 GB 或更大_ 处理器速度-200 MHz 或更高_ 收集安装Solaris OS 所需的信息。
_ 对于没有联网的系统,请收集下列信息。
_ 要安装的系统的主机名_ 要在系统上使用的语言和语言环境_ 对于联网的系统,请收集下列信息。
_ 要安装的系统的主机名_ 要在系统上使用的语言和语言环境_ 主机IP 地址_ 子网掩码_ 名称服务的类型(如,DNS、NIS 或NIS+)_ 域名_ 名称服务器的主机名_ 名称服务器的主机IP 地址_ 超级用户口令1. 插入Solaris 10 Operating System for SPARC Platforms DVD2. 引导系统。
-通过console口,连接服务器.-如系统正在运行中可通过Ctrl+Break键进入ok提示模式将显示ok 提示符。
3. 启动Solaris 安装程序。
_键入以下命令。
ok boot cdrom4. 安装开始。
安装程序会提示您选择在安装过程中使用的语言。
选择要在安装过程中使用的语言,然后按下Enter 键。
5. 按”F2”继续,6.选择”Yes”.7.选择“No”,不使用DHCP。
8.按实际IP地址输入9.选择“Yes”10.输入子网掩码11.选择“No”,不使用IPV612.选择“Specify one”13.输入网关的地址14.选择“DNS”15.在时区这里选择“Asia”16.地区这里选择“China”17.查看时间是否正确18:输入ROOT用户密码,输两遍。
Solaris操作系统的系统要求与安装指南说明书
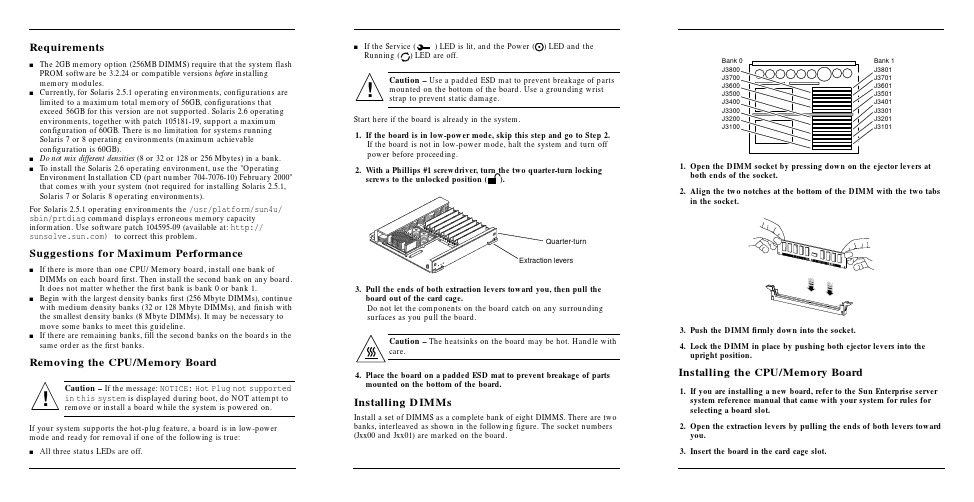
Requirementss The2GB memory option(256MB DIMMS)require that the system flash PROM software be3.2.24or compatible versions before installingmemory modules.s Currently,for Solaris2.5.1operating environments,configurations are limited to a maximum total memory of56GB,configurations thatexceed56GB for this version are not supported.Solaris2.6operating environments,together with patch105181-19,support a maximumconfiguration of60GB.There is no limitation for systems runningSolaris7or8operating environments(maximum achievableconfiguration is60GB).s Do not mix different densities(8or32or128or256Mbytes)in a bank.s To install the Solaris2.6operating environment,use the"Operating Environment Installation CD(part number704-7076-10)February2000"that comes with your system(not required for installing Solaris2.5.1, Solaris7or Solaris8operating environments).For Solaris2.5.1operating environments the/usr/platform/sun4u/ sbin/prtdiag command displays erroneous memory capacity e software patch104595-09(available at:http:// )to correct this problem.Suggestions for Maximum Performances If there is more than one CPU/Memory board,install one bank of DIMMs on each board first.Then install the second bank on any board.It does not matter whether the first bank is bank0or bank1.s Begin with the largest density banks first(256Mbyte DIMMs),continue with medium density banks(32or128Mbyte DIMMs),and finish with the smallest density banks(8Mbyte DIMMs).It may be necessary to move some banks to meet this guideline.s If there are remaining banks,fill the second banks on the boards in the same order as the first banks.Removing the CPU/Memory BoardCaution–If the message:NOTICE:Hot Plug not supportedin this system is displayed during boot,do NOT attempt toremove or install a board while the system is powered on.If your system supports the hot-plug feature,a board is in low-power mode and ready for removal if one of the following is true:s All three status LEDs are off.s If the Service()LED is lit,and the Power ()LED and theRunning()LED are off.Caution–Use a padded ESD mat to prevent breakage of partsmounted on the bottom of the e a grounding wriststrap to prevent static damage.Start here if the board is already in the system.1.If the board is in low-power mode,skip this step and go to Step2.If the board is not in low-power mode,halt the system and turn offpower before proceeding.2.With a Phillips#1screwdriver,turn the two quarter-turn lockingscrews to the unlocked position().3.Pull the ends of both extraction levers toward you,then pull theboard out of the card cage.Do not let the components on the board catch on any surroundingsurfaces as you pull the board.Caution–The heatsinks on the board may be hot.Handle withcare.4.Place the board on a padded ESD mat to prevent breakage of partsmounted on the bottom of the board.Installing DIMMsInstall a set of DIMMS as a complete bank of eight DIMMS.There are twobanks,interleaved as shown in the following figure.The socket numbers(Jxx00and Jxx01)are marked on the board.1.Open the DIMM socket by pressing down on the ejector levers atboth ends of the socket.2.Align the two notches at the bottom of the DIMM with the two tabsin the socket.3.Push the DIMM firmlydown into the socket.4.Lock the DIMM in place by pushing both ejector levers into theupright position.Installing the CPU/Memory Board1.If youare installing a new board,refer to the Sun Enterprise serversystem reference manual that came with your system for rules forselecting a board slot.2.Open the extraction levers by pulling the ends of both levers towardyou.3.Insert the board in the card cage slot.!!Extraction leversQuarter-turnBank 1J3801J3701J3601J3501J3401J3301J3201J3101Bank 0J3800J3700J3600J3500J3400J3300J3200J3100sFor a 4-slot or 5-slot card cage,orient the board with the component side to the right.sFor a 16-slot or 8-slot card cage (diagram follows):Front slot installation,orient the board with the component side down.Rear slot installation,orient the board with the component side up.4.Push the board into the card cage,then simultaneously press both extraction levers to seat the board on the centerplane.Caution –Do not press on the board front panel to seat it—doing so will damage the connector pins.Caution –When inserting a board into slot 4or slot 10of a16-slot card cage,lift the board slightly to avoid damage to the centerplane connectors.Pushing both levers simultaneously avoids twisting the board and bending the connector pins.5.With a Phillips #1screwdriver,turn the two quarter-turn locking screws to the locked position ().Rear viewFront view!!Sun ™ Enterprise ™6x 00/5x 00/4x 00/3x 00 Systems DIMM Installation GuideCaution –The heatsinks on the board can bedamaged by incorrect handling.Do not touch the heatsinks while installing or moving the board.Hold the board only by the edges.If a heatsink is loose or broken,obtain a replacement board.Caution –The heatsinks on the board can bedamaged by improper packaging.When storing or shipping the board,ensure that the heatsinks have sufficient protection.Note –Make sure the DIMM and connector are freeof dust and debris.If necessary,gently clean them using the dry,stiff brush supplied.!!Part Number: 802-5032-15Revision A of January 2000Accessing Sun Documentation OnlineThe sm web site enables you to access Sun technicaldocumentation on the Web.You can browse the archive or search for a specific book title or subject at:Sun Welcomes Your CommentsWe are interested in improving our documentation and welcome your comments and suggestions.You can email your comments to us at:*******************Please include the part number (802-5032-14)of the document in the subject line of your email.Copyright 2000 Sun Microsystems, Inc. All rights reserved. Use is subject to license terms. Third-party software, including font technology, is copyrighted and licensed from Sun suppliers. Sun, SunMicrosystems, the Sun Logo, SunDocs, and Solaris are trademarks or registered trademarks of Sun Microsystems, Inc. in the U.S. and other countries.RESTRICTED RIGHTS : Use, duplication, ordisclosure by the U.S. Government is subject to restrictions of FAR 52.227-14(g)(2)(6/87) and FAR 52.227-19(6/87), or DFAR 252.227-7015(b)(6/95) and DFAR 227.7202-3(a).Copyright 2000 Sun Microsystems, Inc. Tous droits réservés. Distribué par des licences qui enrestreignent l’utilization. Le logiciel détenu par des tiers, et qui comprend la technologie relative aux polices de caractères, est protégé par un copyright et licencié par des fournisseurs de Sun. Sun, SunMicrosystems,le logo Sun,SunDocs,et Solaris sont des marques de fabrique ou des marques déposées de Sun Microsystems, Inc. aux Etats-Unit et dans d’autres pay.Sun Microsystems Computer Company •901San Antonio Road •Palo Alto,CA 94303-4900USA •650960-1300•Fax 650969-91316.Reboot the system now or schedule a later time to reboot when system disruption will be minimized.The system cannot use the new board until the system is rebooted.7.If the system is running,look for a system message similar to the following example.This example is for a CPU/Memory board in slot 5:NOTICE: CPU Board Hotplugged into Slot 5NOTICE: Board 5 is ready to remove。
HDS HDLM for Solaris安装简述
、下面提供的仅是安装HDLM for Solaris的简要描述,详细信息请参考HDLM for solaris安装光盘hdlmhelp\eng目录下的html文件。
1、保存许可(license key)文件到/var/tmp/下,更名为hdlm_license:/var/tmp/hdlm_license将HDLM License for Solaris光盘插入光驱,CD-ROM会自动mount到/cdrom/cdrom0/ ,弹出光驱用eject 命令。
2、以root用户登录Solaris。
3、执行下述命令以确认可以看到磁盘阵列的sd或ssd设备:# devfsadm -C# format如果还是不能识别磁盘阵列的LUN,reboot系统。
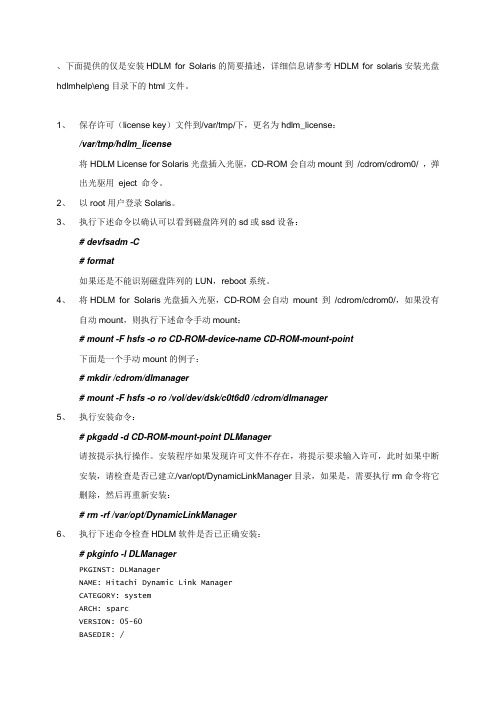
4、将HDLM for Solaris光盘插入光驱,CD-ROM会自动mount 到/cdrom/cdrom0/,如果没有自动mount,则执行下述命令手动mount:# mount -F hsfs -o ro CD-ROM-device-name CD-ROM-mount-point下面是一个手动mount的例子:# mkdir /cdrom/dlmanager# mount -F hsfs -o ro /vol/dev/dsk/c0t6d0 /cdrom/dlmanager5、执行安装命令:# pkgadd -d CD-ROM-mount-point DLManager请按提示执行操作。
安装程序如果发现许可文件不存在,将提示要求输入许可,此时如果中断安装,请检查是否已建立/var/opt/DynamicLinkManager目录,如果是,需要执行rm命令将它删除,然后再重新安装:# rm -rf /var/opt/DynamicLinkManager6、执行下述命令检查HDLM软件是否已正确安装:# pkginfo -l DLManagerPKGINST: DLManagerNAME: Hitachi Dynamic Link ManagerCATEGORY: systemARCH: sparcVERSION: 05-60BASEDIR: /VENDOR: Hitachi, Ltd....#7、使用dlmsetconf建立HDLM driver configuration定义文件(/kernel/drv/dlmfdrv.conf)和HDLM driver unconfiguration定义文件(/opt/DynamicLinkManager/config/dlmfdrv.unconf)。
Solaris网络服务器安装与配置

Solaris网络服务器安装与配置
9
域名解析器配置文件 /etc/named/resolv.conf
;domain指示域名; nameserver指示名字服务器 domain ;只有自己是名字服务器才有下面的第一行 nameserver 127.0.0.1 nameserver 166.111.7.200 nameserver 166.111.4.5
2013-7-10
Solaris网络服务器安装与配置
10
匿名FTP服务器
为了设置匿名FTP服务器,需要将下面的入口加 到文件/etc/passwd中:
ftp:x:30000:30000:Anonymous FTP:/export/ftp:/nosuchshell
在这个例子中,我们使用/export/ftp作为FTP服务 器的根目录,并且使用一个不存在的文件 /nosuchshell作为ftp用户的shell程序,这样可以 防止ftp用户使用telnet登录。另外,还需要在文 件/etc/shadow中加入下面的入口: ftp:NP:6445::::::
2013-7-10
Solaris网络服务器安装与配置
5
根域名服务器记录文件 /etc/named/named.ca
;This file holds the information on root name servers needed ; to initialize cache of Internet domain name servers ; . 99999999 IN NS . . 99999999 A 166.111.4.5 . 99999999 IN NS . . 99999999 A 166.111.8.250 . 99999999 NS . . 99999999 A 198.41.0.4 . 99999999 NS . . 99999999 A 128.9.0.107 . 99999999 NS . . 99999999 A 192.33.4.12 . 99999999 NS .
- 1、下载文档前请自行甄别文档内容的完整性,平台不提供额外的编辑、内容补充、找答案等附加服务。
- 2、"仅部分预览"的文档,不可在线预览部分如存在完整性等问题,可反馈申请退款(可完整预览的文档不适用该条件!)。
- 3、如文档侵犯您的权益,请联系客服反馈,我们会尽快为您处理(人工客服工作时间:9:00-18:30)。
、下面提供的仅是安装HDLM for Solaris的简要描述,详细信息请参考HDLM for solaris安装光盘hdlmhelp\eng目录下的html文件。
1、保存许可(license key)文件到/var/tmp/下,更名为hdlm_license:
/var/tmp/hdlm_license
将HDLM License for Solaris光盘插入光驱,CD-ROM会自动mount到/cdrom/cdrom0/ ,弹出光驱用eject 命令。
2、以root用户登录Solaris。
3、执行下述命令以确认可以看到磁盘阵列的sd或ssd设备:
# devfsadm -C
# format
如果还是不能识别磁盘阵列的LUN,reboot系统。
4、将HDLM for Solaris光盘插入光驱,CD-ROM会自动mount 到/cdrom/cdrom0/,如果没有
自动mount,则执行下述命令手动mount:
# mount -F hsfs -o ro CD-ROM-device-name CD-ROM-mount-point
下面是一个手动mount的例子:
# mkdir /cdrom/dlmanager
# mount -F hsfs -o ro /vol/dev/dsk/c0t6d0 /cdrom/dlmanager
5、执行安装命令:
# pkgadd -d CD-ROM-mount-point DLManager
请按提示执行操作。
安装程序如果发现许可文件不存在,将提示要求输入许可,此时如果中断安装,请检查是否已建立/var/opt/DynamicLinkManager目录,如果是,需要执行rm命令将它删除,然后再重新安装:
# rm -rf /var/opt/DynamicLinkManager
6、执行下述命令检查HDLM软件是否已正确安装:
# pkginfo -l DLManager
PKGINST: DLManager
NAME: Hitachi Dynamic Link Manager
CATEGORY: system
ARCH: sparc
VERSION: 05-60
BASEDIR: /
VENDOR: Hitachi, Ltd.
...
#
7、使用dlmsetconf建立HDLM driver configuration定义文件(/kernel/drv/dlmfdrv.conf)和
HDLM driver unconfiguration定义文件(/opt/DynamicLinkManager/config/dlmfdrv.unconf)。
# /opt/DynamicLinkManager/bin/dlmsetconf
执行dlmsetconf时,提示KAPL10242-I信息确认删除sd或ssd设备的逻辑设备文件,按“y”,然后重启主机。
重启后如果用format查看发现好象HDLM不起作用时,执行:
# devfsadm -C
8、当使用Veritas Volume Manager(VxVM)时,请参考备注完成后续操作。
9、重启主机:
# reboot -- -r
或
boot -r (at the ok prompt)
10、重启后执行HDLM view操作命令显示程序状态。
例如:
# /opt/DynamicLinkManager/bin/dlnkmgr view -sys
HDLM Version : 05-60
Service Pack Version :
Load Balance : on(rr)
Support Cluster :
Elog Level : 3
Elog File Size (KB) : 9900
Number Of Elog Files : 2
Trace Level : 0
Trace File Size(KB) : 1000
Number Of Trace Files : 4
Path Health Checking : on(30)
Auto Failback : off
Intermittent Error Monitor: off
HDLM Manager Ver WakeupTime
Alive 05-60 2005/06/01 10:33:03
HDLM Alert Driver Ver WakeupTime ElogMem Size
Alive 05-60 2005/06/01 10:33:03 4096
HDLM Driver Ver WakeupTime
Alive 05-60 2005/06/01 10:33:03
License Type Expiration
Permanent -
KAPL01001-I The HDLM command completed normally. Operation name = view, completion time = 2005/06/01 12:00:00
#
11、执行下述命令把HDLM设为自动故障切换:
#/opt/DynamicLinkManager/bin/dlnkmgr set -afb on
12、到此,HDLM已成功安装。
另外,可以执行下述命令显示HdevName和iLU columns:
# /opt/DynamicLinkManager/bin/dlnkmgr view -path
通过执行结果查看对应的HdevName(HDLM设备的逻辑设备文件名)和iLU(内部LUN号)。
附注:
如果安装HDLM前已安装Veritas Volume Manager,还需完成下面的步骤。
1、使用dlmvxexclude获得控制器号和设备之间的映射,命令输出结果中,要从VxVM移除的
设备被输出到paths部分。
# /opt/DynamicLinkManager/bin/dlmvxexclude
下图是一个示例,阴影部分指出需要从VxVM移除的设备。
2、将dlmvxexclude执行结果的paths部分写入/etc/vx/vxvm.exclude文件的paths部
分。
下图是一个/etc/vx/vxvm.exclude文件的示例,阴影部分代表输入的项。
也可以执行下述命令将dlmvxexclude输出结果直接写入/etc/vx/vxvm.exclude文件:# /opt/DynamicLinkManager/bin/dlmvxexclude > /etc/vx/vxvm.exclude
然后编辑vxvm.exclude文件,把最后一行的系统提示信息“dlmvxexclude terminated normally”
删除后保存。
# vi /etc/vx/vxvm.exclude
把光标移到最后一行,连续按2下字母“D”键把光标所在行删除,然后按“:x”保存退出。
3、重启系统:
# reboot -- -r-
4、执行dlnkmgr view –path命令确认必须被VxVM识别的HDLM设备。
# /opt/DynamicLinkManager/bin/dlnkmgr view -path
5、执行vxdisk命令列出VxVM识别的设备
# vxdisk list
6、对每一个vxdisk列出的HDLM设备执行vxdmpadm命令,例如:
# vxdmpadm getsubpaths dmpnodename=c5t0d0s2
7、最后就可以通过Veritas企业管理器对这些设备进行初始化和创建逻辑卷了。
在图形界面打开终
端窗口,执行下述命令启动Veritas企业管理器:
# vea。