junipersrx100防火墙配置
Juniper SRX 防火墙学习一本通(4)

Juniper SRX 防火墙学习一本通(4)一、SRX防火墙基本配置操作1.实验拓扑2.SRX 主要配置内容部署SRX防火墙主要有以下几个方面需要进行配置:◼System:主要是系统级内容配置,如主机名、管理员账号口令及权限、时钟时区、Syslog、SNMP、系统级开放的远程管理服务(如telnet)等内容。
◼Interface:接口相关配置内容。
◼Security: 是SRX防火墙的主要配置内容,安全相关部分内容全部在Security层级下完成配置,如NAT、Zone、Policy、Address-book、Ipsec、Screen、Idp、UTM等,可简单理解为ScreenOS防火墙安全相关内容都迁移至此配置层次下,除了Application自定义服务。
◼Application:自定义服务单独在此进行配置,配置内容与ScreenOS基本一致。
◼routing-options:配置静态路由或router-id等系统全局路由属性配置。
3.定义远程管理用户[edit]root@R2# set system login user admin class super-user[edit]root@R2# set system login user admin authentication plain-text-passwordNew p assword:Retype new password:[edit]root@R2# commitcommit complete[edit]root@R2#root@R2# show system login user admin | display setset system login user admin uid 2000set system login user admin class super-userset system login user admin authentication encrypted-password "$1$zIX4p$urL1B7d5geQIllG6X3Cr0"4.日志功能Set system syslog file messages any anySet system syslog file messages authorization infoSet system syslog file interactive-commands interactive-commands anySet system syslog file author.log authorization infoSet system syslog file daemon.log daemon warningSet system syslog file firewall.log firewall warningSet system syslog file change.log change-log infoSet system syslog user * any emergencySet system syslog host 192.168.1.8 any anySet system syslog host 192.168.1.8 authorization any5.网管SNMP功能set snmp community "china88" authorization read-onlyset snmp community "china88" clients 192.168.1.8/32set snmp community "china88" clients 0.0.0.0/0 restrictset snmp trap-options source-address 192.168.1.1set snmp trap-group "china88" version v2set snmp trap-group "china88" categories authenticationset snmp trap-group "china88" categories linkset snmp trap-group "china88" categories remote-operationsset snmp trap-group "china88" categories routingset snmp trap-group "china88" categories startupset snmp trap-group "china88" categories configurationset snmp trap-group "china88" targets 192.168.1.86.基本配置端口设置IP:set interfaces ge-0/0/0.0 family inet address 192.168.1.1/24或set interfaces ge-0/0/0 unit 0 family inet address 192.168.1.1/24set interfaces ge-0/0/1 unit 0 family inet address 100.100.100.1/24SRX接口要求IP地址必须配置在逻辑接口下(类似ScreenOS的子接口),通常使用逻辑接口0即可***/路由配置:set routing-options static route 0.0.0.0/0 next-hop 100.100.100.27.区域与接口set security zones security-zone trust interfaces ge-0/0/0.0/***将ge-0/0/0.0接口放到安全区域中,类似ScreenOS***/set security zones security-zone trust host-inbound-traffic system-services pingset security zones security-zone trust host-inbound-traffic system-services httpset security zones security-zone trust host-inbound-traffic system-services telnet/***在untrust zone打开允许远程登陆管理服务,ScreenOS要求基于接口开放服务,SRX要求基于Zone开放,从SRX主动访问出去流量开启服务,类似ScreenOS***/8.地址本策略地址对象定义:SRX服务网关地址对象需要自定义后才可以在策略中进行引用,默认只有any对象自定义单个地址对象如下:root# set security zones security-zone trust address-book address pc-1 192.168.1.8/32root# set security zones security-zone trust address-book address pc-2 192.168.1.9/32自定义单个地址组对象如下:set security zones security-zone trust address-book address-set pc-group address pc-1set security zones security-zone trust address-book address-set pc-group address pc-2set security zones security-zone untrust address-book address serv-1 100.100.100.8/329.定义应用服务set applications application tcp-3389 protocol tcp 定义服务对象协议<TCP\UDP\ICMP\OTHER>set applications application tcp-3389 source-port 1-65535定义服务对象源端口set applications application tcp-3389 destination-port 3389-3389定义服务对象目标地址set applications application tcp-3389 inactivity-timeout never可选定义服务对象timeout时长set applications application tcp-8080 protocol tcpset applications application tcp-8080 source-port 1-65535set applications application tcp-8080 destination-port 8080-8080set applications application tcp-8080 inactivity-timeout 360010.添加策略set security policies from-zone trust to-zone untrust policy p1 match source-address pc-1 set security policies from-zone trust to-zone untrust policy p1 match destination-address any set security policies from-zone trust to-zone untrust policy p1 match application anyset security policies from-zone trust to-zone untrust policy p1 then permitset security policies from-zone trust to-zone untrust policy p1 then log session-initset security policies from-zone trust to-zone untrust policy p1 then log session-closeset security policies from-zone trust to-zone untrust policy p2 match source-address pc-2 set security policies from-zone trust to-zone untrust policy p2 match destination-address any set security policies from-zone trust to-zone untrust policy p2 match application junos-http set security policies from-zone trust to-zone untrust policy p2 match application junos-icmp-allset security policies from-zone trust to-zone untrust policy p2 then permitset security policies from-zone trust to-zone untrust policy p2 then log session-initset security policies from-zone trust to-zone untrust policy p2 then log session-close11.基于时间的策略SRX服务网关时间调度对象需要自定义后才可以在策略中进行引用,默认没有预定义时间调度对象,自定义单个时间调度对象如下:set schedulers scheduler work-time daily s tart-time 09:00:00 stop-time 18:00:00set schedulers scheduler happy-time sunday start-time 00:00:00 stop-time 23:59:59set schedulers scheduler happy-time Saturday start-time 00:00:00 stop-time 23:59:59注意:时间调度服务生效参考设备系统时间,所以需要关注设备系统时间是否正常。
JuniperSRX高端防火墙简明配置手册

Juniper SRX防火墙简明配置手册目录一、 JUNOS 操作系统介绍 (3)1.1层次化配置结构 (3)1.2 JunOS 配置管理 (4)1.3 SRX 主要配置内容 (4)二、 SRX 防火墙配置说明 (5)2.1初始安装 (5)2.1.1登陆 (5)2.1.2设置 root 用户口令 (9)2.1.3JSRP 初始化配置 (9)2.1.4设置远程登陆管理用户 (14)2.1.5远程管理 SRX相关配置 (15)2.1.6ZONE 及相关接口的配置 (15)2.2 Policy (16)2.3 NAT (17)2.3.1Interface based NAT (18)2.3.2Pool based Source NAT (18)2.3.3Pool base destination NAT (19)2.3.4Pool base Static NAT (20)2.4 IPSEC VPN (21)2.5 Application and ALG (22)三、 SRX 防火墙常规操作与维护 (22)3.1单机设备关机 (22)3.2单机设备重启 (23)3.3单机操作系统升级 (23)3.4双机模式下主备 SRX 关机 (23)3.5双机模式下主备设备重启 (24)3.6双机模式下操作系统升级 (24)3.7双机转发平面主备切换及切换后恢复 (25)3.8双机控制平面主备切换及切换后恢复 (25)3.9双机模式下更换备SRX (25)3.10双机模式下更换主SRX (26)3.11双机模式更换电源 (27)3.12双机模式更换故障板卡 (27)3.13配置备份及还原方法 (27)3.14密码修改方法 (28)3.15磁盘文件清理方法 (28)3.16密码恢复 (28)3.17常用监控维护命令 (29)四、 SRX 防火墙介绍 (31)Juniper SRX防火墙简明配置手册SRX系列防火墙是 Juniper 公司基于 JUNOS操作系统的安全系列产品,JUNOS集成了路由、交换、安全性和一系列丰富的网络服务。
juniper srx100 防火墙配置
Junipersrx100防火墙配置指导#一、初始化安装1。
1设备登录Juniper SRX系列防火墙。
开机之后,第一次必须通过console 口(通用超级终端缺省配置)连接SRX ,输入root 用户名登陆,密码为空,进入到SRX设备之后可以开始加载基线配置。
特别注意:SRX低端系列防火墙,在第一次登陆时,执行命令“show configuration”你会发现系统本身已经具备一些配置内容(包括DNS名称、DHCP服务器等),建议删除这些配置,重新配置. Delete 删除设备开机请直接通过console 连接到防火墙设备Login : rootPassword : /***初始化第一次登陆的时候,密码为空**/Root% cli /**进入操作模式**/Root>Root〉 configure /** 进入配置模式**/Root# delete /***配置模式执行命令“delete”全局删除所有的系统缺省配置***/ 1.2 系统基线配置Set system host—name name/***配置设备名称“name”***/Set system time-zone Asia/Chongqing/***配置系统时区***/Set system root—authentication plain-text-password 输入命令,回车New password: 第一次输入新密码,Retype new password 重新确认新密码/***配置系统缺省根账号密码,不允许修改根账号名称“root” ***/注意:root帐号不能用于telnet,但是可以用于web和ssh管理登录到设备S et system login user topsci class super—user authentication plain-text-password New password 输入密码Retype new password 确认密码/***创建一个系统本地账号“name“,set system services sshset system services telnetset system services web—management http interface allset systhm services web—management http port 81 interface allset system services web—management https system—generated-certificateset system services web—management https interface all/***全局开启系统管理服务,ssh\telnet\http\https***/set interfacesge-0/0/2unit 0 family inet address 10.10.10。
JuniperSRX防火墙NAT和VPN配置
SRX NA T和Policy执行先后顺序为:目的地址转换-目的地址路由查找-执行策略检查-源地址转换。
需注意:Policy中源地址应是转换前的源地址,而目的地址应是转换后的目的地址,即Policy中的源和目的地址应是两端的真实IP地址。
Static为双向NAT,其他类型均为单向NAT。
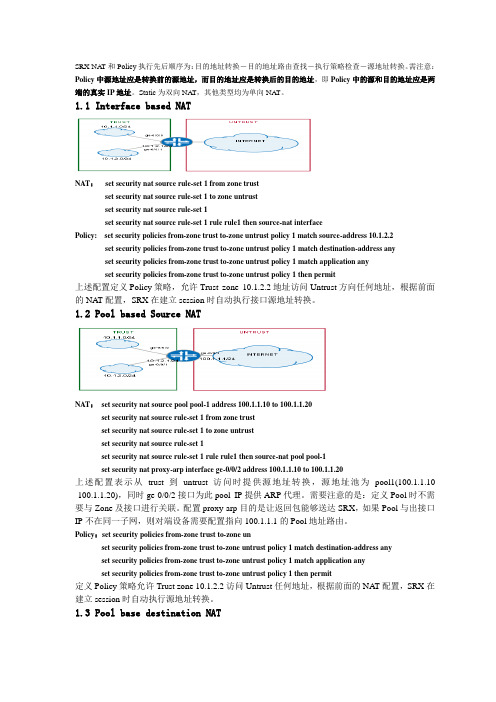
1.1 Interface based NATNAT:set security nat source rule-set 1 from zone trustset security nat source rule-set 1 to zone untrustset security nat source rule-set 1set security nat source rule-set 1 rule rule1 then source-nat interfacePolicy: set security policies from-zone trust to-zone untrust policy 1 match source-address 10.1.2.2 set security policies from-zone trust to-zone untrust policy 1 match destination-address anyset security policies from-zone trust to-zone untrust policy 1 match application anyset security policies from-zone trust to-zone untrust policy 1 then permit上述配置定义Policy策略,允许Trust zone 10.1.2.2地址访问Untrust方向任何地址,根据前面的NA T配置,SRX在建立session时自动执行接口源地址转换。
Juniper SRX防火墙简明配置手册
Juniper SRX防火墙简明配置手册SRX系列防火墙是Juniper公司基于JUNOS操作系统的安全系列产品,JUNOS集成了路由、交换、安全性和一系列丰富的网络服务。
目前Juniper公司的全系列路由器产品、交换机产品和SRX安全产品均采用统一源代码的JUNOS操作系统,JUNOS是全球首款将转发与控制功能相隔离,并采用模块化软件架构的网络操作系统。
JUNOS作为电信级产品的精髓是Juniper 真正成功的基石,它让企业级产品同样具有电信级的不间断运营特性,更好的安全性和管理特性,JUNOS软件创新的分布式架构为高性能、高可用、高可扩展的网络奠定了基础。
基于NP架构的SRX系列产品产品同时提供性能优异的防火墙、NAT、IPSEC、IPS、SSL VPN和UTM 等全系列安全功能,其安全功能主要来源于已被广泛证明的ScreenOS操作系统。
本文旨在为熟悉Netscreen防火墙ScreenOS操作系统的工程师提供SRX防火墙参考配置,以便于大家能够快速部署和维护SRX防火墙,文档介绍JUNOS操作系统,并参考ScreenOS配置介绍SRX防火墙配置方法,最后对SRX防火墙常规操作与维护做简要说明。
一、JUNOS操作系统介绍1.1 层次化配置结构JUNOS采用基于FreeBSD内核的软件模块化操作系统,支持CLI命令行和WEBUI两种接口配置方式,本文主要对CLI命令行方式进行配置说明。
JUNOS CLI使用层次化配置结构,分为操作(operational)和配置(configure)两类模式,在操作模式下可对当前配置、设备运行状态、路由及会话表等状态进行查看及设备运维操作,并通过执行config或edit命令进入配置模式,在配置模式下可对各相关模块进行配置并能够执行操作模式下的所有命令(run)。
在配置模式下JUNOS采用分层分级模块下配置结构,如下图所示,edit命令进入下一级配置(类似unix cd命令),exit命令退回上一级,top命令回到根级。
Juniper_SRX防火墙配置手册

美河学习在线 仅学习参考Juniper SRX防火墙简明配置手册第 1 页共18 页美河学习在线 仅学习参考第 2 页 共 18 页目录一、JUNOS 操作系统介绍 (3)1.1 层次化配置结构 (3)1.2 JunOS 配置管理 (4)1.3 SRX 主要配置内容 (5)二、SRX 防火墙配置对照说明 (5)2.1 初始安装 (5)2.1.1 登陆 (5)2.1.2 设置root 用户口令 (6)2.1.3 设置远程登陆管理用户 (6)2.1.4 远程管理SRX 相关配置 (6)2.2 Policy (7)2.3 NAT (7)2.3.1 Interface based NAT (8)2.3.2 Pool based Source NAT (9)2.3.3 Pool base destination NAT (9)2.3.4 Pool base Static NAT (10)2.4 IPSEC VPN (11)2.5 Application and ALG (13)2.6 JSRP (13)三、SRX 防火墙常规操作与维护 (15)3.1 设备关机 (15)3.2 设备重启 (16)3.3 操作系统升级 (16)3.4 密码恢复 (16)3.5 常用监控维护命令 (17)Juniper SRX行添加进系统里1.2 JunOS配置管理第 5 页 共SRX 通过set nat / delete1.3 SRX 部署SRX System :Interface:Security: 是如NAT 、Application二、2.1 2.1.1 登陆Console 口(login: rootPassword:root% cli root>root> [edit]第 6 页 共 18 页Root#2.1.2 设置设置root 用户口令root# 方式)注:root 2.1.3 root# 注:此lab2.1.4 /***或/***的子接口),通常使用逻辑接口美河学习在线 仅学习参考第 8 页 共 18 页SRX 中不再使用MIP/VIP/DIP 这些概念,其中MIP 被Static 静态地址转换取代,两者在功能上完全一致;DIP 被Source NA T 取代;基于Policy 的目的地址转换及VIP 被 Destination NA T 取代。
JuniperSRX防火墙批量导入配置
Juniper交换机和防火墙批量导入配置方法一:1、以set格式备份原有设备的配置。
root>show configuration | display set | no-more2、使用secureCRT或者超级终端通过console线缆连接新交换机或者防火墙的console口。
3、交换机或者防火墙加电。
4、登陆交换机或者防火墙进入配置模式输入命令“load set terminal”进入配置加载界面。
root# load set terminal[Type ^D at a new line to end input]5、在配置加载界面输入原有设备备份的配置。
(注:输入的配置必须是以set格式开头的配置,可将原配置复制后粘贴)如下所示:root# load set terminal[Type ^D at a new line to end input]set system services web-management http port 806、配置输入完成后使用“ctrl+d”退出配置加载界面。
7、在配置模式使用命令“commit check”检查输入配置的正确性。
8、确认配置无误后在配置模式使用命令“commit”提交。
9、配置恢复完成。
方法二:1、以文件形式备份原有设备的配置。
(filename.txt为文件名)root> show configuration | save filename.txt2、将原有设备备份后的配置文件上传至FTP服务器,如下所示:root>ftp 10.1.1.2ftp> put filename.txt3、将FTP服务器上的配置文件拷入U盘。
4、使用secureCRT或者超级终端通过console线缆连接新交换机或者防火墙的console口。
5、交换机或者防火墙加电。
6、将装有配置文件的U盘插入交换机或防火墙并加载,如下所示:root> start shellroot@% mkdir /tmp/usbroot@% mount -t msdosfs /dev/da1s1 /tmp/usb7、将U盘中的文件拷入交换机或者防火墙。
JuniperSRX防火墙配置管理手册

Juniper SRX系列防火墙配置管理手册目录一、JUNOS操作系统介绍 (3)1.1 层次化配置结构 (3)1.2 JunOS配置管理 (4)1.3 SRX主要配置内容 (4)二、SRX防火墙配置操作举例说明 (5)2.1 初始安装 (5)2.1.1 设备登陆 (5)2.1.2 设备恢复出厂介绍 (5)2.1.3 设置root用户口令 (5)2.1.4 设置远程登陆管理用户 (6)2.1.5 远程管理SRX相关配置 (6)2.2 配置操作实验拓扑 (7)2.3 策略相关配置说明 (7)2.3.1 策略地址对象定义 (8)2.3.2 策略服务对象定义 (8)2.3.3 策略时间调度对象定义 (8)2.3.4 添加策略配置举例 (9)2.3.5 策略删除 (10)2.3.6 调整策略顺序 (10)2.3.7 策略失效与激活 (10)2.4 地址转换 (10)2.4.1 Interface based NAT 基于接口的源地址转换 (11)2.4.2 Pool based Source NAT基于地址池的源地址转换 (12)2.4.3 Pool base destination NAT基于地址池的目标地址转换 (12)2.4.4 Pool base Static NAT基于地址池的静态地址转换 (13)2.5 路由协议配置 (14)静态路由配置 (14)OSPF配置 (15)交换机Firewall限制功能 (22)限制IP地 (22)限制MAC地址 (22)三、SRX防火墙常规操作与维护 (23)3.2设备关机 (23)3.3设备重启 (23)3.4操作系统升级 (24)3.5密码恢复 (25)3.6常用监控维护命令 (26)Juniper SRX Branch系列防火墙配置管理手册说明SRX系列防火墙是Juniper公司基于JUNOS操作系统的安全系列产品,JUNOS集成了路由、交换、安全性和一系列丰富的网络服务。
- 1、下载文档前请自行甄别文档内容的完整性,平台不提供额外的编辑、内容补充、找答案等附加服务。
- 2、"仅部分预览"的文档,不可在线预览部分如存在完整性等问题,可反馈申请退款(可完整预览的文档不适用该条件!)。
- 3、如文档侵犯您的权益,请联系客服反馈,我们会尽快为您处理(人工客服工作时间:9:00-18:30)。
Junipersrx100防火墙配置指导#一、初始化安装1.1设备登录Juniper SRX系列防火墙。
开机之后,第一次必须通过console 口(通用超级终端缺省配置)连接SRX ,输入root 用户名登陆,密码为空,进入到SRX设备之后可以开始加载基线配置。
特别注意:SRX低端系列防火墙,在第一次登陆时,执行命令“show configuration”你会发现系统本身已经具备一些配置内容(包括DNS名称、DHCP服务器等),建议删除这些配置,重新配置。
Delete 删除设备开机请直接通过console 连接到防火墙设备Login :rootPassword :/***初始化第一次登陆的时候,密码为空**/Root% cli /**进入操作模式**/Root>Root> configure /** 进入配置模式**/Root# delete /***配置模式执行命令“delete”全局删除所有的系统缺省配置***/1.2 系统基线配置Set system host-name name/***配置设备名称“name”***/Set system time-zone Asia/Chongqing/***配置系统时区***/Set system root-authentication plain-text-password 输入命令,回车New password: 第一次输入新密码,Retype new password 重新确认新密码/***配置系统缺省根账号密码,不允许修改根账号名称“root”***/注意:root帐号不能用于telnet,但是可以用于web和ssh管理登录到设备S et system login user topsci class super-user authentication plain-text-password New password 输入密码Retype new password 确认密码/***创建一个系统本地账号“name“,set system services sshset system services telnetset system services web-management http interface allset systhm services web-management http port 81 interface allset system services web-management https system-generated-certificateset system services web-management https interface all/***全局开启系统管理服务,ssh\telnet\http\https***/set interfacesge-0/0/2unit 0 family inet address 10.10.10.1/24set security zones security-zone trustinterfaces ge-0/0/2.0host-inbound-traffic system-services allset security zones security-zone trustinterfacesge-0/0/2.0host-inbound-traffic protocols all/***定义内网接口同时定义安全区域并将接口加入到安全区域,接口的选择根据实际需求安排***/★至此系统的基线配置完成,你可以通过PC机连接到防火墙的ge-0/0/2端口配置同网段的IP地址,使用WEB界面或者telnet\SSH方式登录到防火墙,实施生产配置和进一步完善基线配置,比如配置NTP服务器、SYSLOG服务器、SNMP服务器、安全策略、路由协议、地址转换、UTM等功能。
二、应用场景——生产配置实施步骤2.1 打开浏览器,输入http://Ip地址,输入用户名和密码,点击login进入到WEB管理。
2.2 配置接口IP 地址首先点击WEB 界面顶端菜单栏的”Configure”按钮,然后点击并展开左边菜单栏的”interface”按钮,接下来点击ports ,按钮,页面将展示系统在线的所有端口。
然后我们可以开始查看并配置相应的物理接口IP 地址,在本应用场景中,我们将需要在WEB 界面配置fe-0/0/0/端口(连接公网)和ge-0/0/2端口由于属于内网接口,ge-0/0/2在之前基线配置中已经完成,因此WEB 界面不再重新说明如何配置,配置方法与接下来的端口配置一致。
在此选择一个你想要配置的物理接口,点击右上角的”ADD”按钮下拉,然后再点击“logicalinterface”。
当点击”logicalinterface”之后,系统会自动跳出一个对话框,让你配置接口IP地址、接口描述等信息。
必须填写一个unit数字,比如0(建议),这个unit是一个物理接口中逻辑接口的标识,没有特殊的意义,但是必须要配置。
在描述信息中可以根据实际情况进行填写,一般建议取一个比较有意义易识别的简单拼音或英语。
在ZONE此处可以暂时不选择,因为后面会配置。
VLAN ID也不需要配置,因为是三层接口,而并非VLAN接口,接下来就是需要配置一个通信IP地址和子网掩码。
最后点击OK按钮,代表此接口配置结束,仅仅是结束并不是生效,后面我们需要根据步骤和系统右上角的”Actions”按钮会出现闪烁,提醒我们需要对刚刚完成的配置进行提交和保存,如下图,我们需要点击右上角的”Actions”按钮下拉,然后点击commmit按钮,提交和保存配置,如果配置校验检查失败,将会有告警提醒用户。
三、配置安全区域首先点击WEB界面顶端菜单栏的”Configure”按钮,然后点击并展开左边菜单栏的”security”按钮,接下来点击zone/screens,按钮,页面将展示已经存在的安全功能区域,如下图配置四、配置路由协议首先点击WEB界面顶端菜单栏的”Configure”按钮,然后点击并展开左边菜单栏的”routing”按钮,接下来点击static routing,按钮,开始添加静态路由,点击右上角的ADD按钮,系统将自动弹出一个对话框完成静态路由的添加(本次配置缺省路由到公网),点击add按钮添加下一跳网关地址,完成静态路由的添加配置,最后点击右上角的actions按钮下拉commit并点击,完成静态路由配置的提交和保存。
五、配置NAT地址装换首先点击WEB界面顶端菜单栏的”Configure”按钮,然后点击并展开左边菜单栏的”NAT”按钮,接下来点击Static NAT按钮,开始配置静态地址转换,在配置静态地址转换之前,还需要做一个与NAT相关的配置,那就是定义Proxy ARP,定义Proxy ARP是因为我们接下来使用的NAT公网地址并不是接口自身的IP地址。
点击Proxy ARP按钮在NAT配置菜单里,点击add,系统自动弹出对话框要求填写NAT公网地址段、连接公网的接口。
最后如下图:接下来配置静态地址转换的规则,其中有两个部分内容需要填写,第一部分是rule-set,然后在rule-set里面定义真正的NAT 规则rules,rules由多个小的rule组成,比如下图中的右边部分就是rule配置,一个公网地址对应一个内部DMZ区域私网IP地址,实现一对一的静态地址转换。
下图就是在完成上图之后的结果展示,点击定义好的rule-set,可以看到相应的ruels资源。
接下来配置源地址转换的规则,内网地址转换到fe-0/0/0.0接口地址。
实现内网地址访问公网。
打开source nat,点击add,首先配置rule set,此时需要指定rule set name以及NAT的方向,比如从trust zone to untrust zone,接下来点击rules中的Add,开始添加rule,同样需要填写rule name、匹配的条件(源地址、目标地址必须,可选IP协议和目的端口号),然后在action部分选择引用inteface最后我们可以查看定义完之后的源地址rule-set对象并执行commit提交配置,最终结果展现如下:五、配置安全策略本次应用场景一中的安全策略配置涉及三个方向,内网与外网之间的访问、、外网到内网之间的访问,在配置安全策略之前,我们需要提前配置与安全策略相关的策略元素,其中包括地址对象的自定义,服务对象的自定义等。
下面首先将介绍策略元素的自定义,地址对象与服务对象。
首先点击WEB界面顶端菜单栏的”Configure”按钮,然后点击并展开左边菜单栏的”security”按钮,接下来点击policy elements按钮,然后再点击”address book”按钮,接着可以点击右上角的ADD按钮添加地址对象和地址组,地址对象菜单“address”地址组对象菜单”address sets”。
当我们完成地址对象和服务对象的自定义之后,接下来可以书写安全访问控制策略,首先点击WEB界面顶端菜单栏的”Configure”按钮,然后点击并展开左边菜单栏的”security”按钮,接下来点击policy按钮,最后点击apply policy按钮去创建区域与区域之间的安全策略。
配置完成。
可以利用内网地址,ping外网测试下。
六、应用场景一测试配置CLI(生产配置)set version 12.1X44-D35.5set system host-name juniper-fw-srx100set system time-zone Asia/Chongqingset system root-authentication encrypted-password "$1$SL2B6zY9$bo.R3TbT4v0vO7sWgR7Vl."set system login user topsci uid 2001set system login user topsci class super-userset system login user topsci authentication encrypted-password "$1$EjN.ZIvT$YYy6M6qo5oTxvSnWqCFq2/"set system services sshset system services telnetset system services web-management http port 6666set system services web-management http interface allset system services web-management https system-generated-certificateset system services web-management https interface allset system syslog file policy_session user infoset system syslog file policy_session match RT_FLOWset system syslog file policy_session archive size 1000kset system syslog file policy_session archive world-readableset system syslog file policy_session structured-dataset interfaces fe-0/0/0 unit 0 family inet address 192.1685.1/24set interfaces fe-0/0/2 unit 0 family inet address 10.10.10.1/24set interfaces fe-0/0/7 unit 0 family inet address 192.168.1.1/24set interfaces st0 unit 0 family inetset routing-options static route 0.0.0.0/0 next-hop 192.168.5.1set routing-options static route 168.192.0.0/16 next-hop 10.10.10.2set routing-options static route 172.16.0.0/24 next-hop st0.0set routing-options static route 192.168.0.0/16 next-hop st0.0set security ike policy aike mode mainset security ike policy aike proposal-set standardset security ike policy aike pre-shared-key ascii-text "$9$WTu8-wkqf5z6k.5Fn9OBL x7NwYgoJ"set security ike gateway gw1 ike-policy aikeset security ike gateway gw1 address 58.135.84.24set security ike gateway gw1 external-interface fe-0/0/0.0set security ipsec policy ap2 proposal-set standardset security ipsec vpn vpn1 bind-interface st0.0set security ipsec vpn vpn1 ike gateway gw1set security ipsec vpn vpn1 ike ipsec-policy ap2set security ipsec vpn vpn1 establish-tunnels immediatelyset security nat source pool nap-pool1 address 192.168.5.2/25 to 192.168.5.3 /24set security nat source rule-set nat1 from zone trustset security nat source rule-set nat1 to zone untrueset security nat source rule-set nat1 rule nat1 match source-address 168.192.0.0/16 set security nat source rule-set nat1 rule nat1 match source-address 10.10.10.0/24 set security nat source rule-set nat1 rule nat1 match destination-address 0.0.0.0/0 set security nat source rule-set nat1 rule nat1 then source-nat interfaceset security nat static rule-set nat-1 from zone untrueset security nat static rule-set nat-1 rule rule1 match destination-address 192.168.5.1/32set security nat static rule-set nat-1 rule rule1 match destination-port 80set security nat static rule-set nat-1 rule rule1 then static-nat prefix 168.192.1.18/32 set security nat static rule-set nat-1 rule rule1 then static-nat prefix mapped-port 80 set security policies from-zone trust to-zone untrue policy trust-untrust match source-address 168.192set security policies from-zone trust to-zone untrue policy trust-untrust match source-address 10.10set security policies from-zone trust to-zone untrue policy trust-untrust match destination-address anyset security policies from-zone trust to-zone untrue policy trust-untrust match application anyset security policies from-zone trust to-zone untrue policy trust-untrust then permit set security policies from-zone trust to-zone untrue policy trust-untrust then log session-initset security policies from-zone trust to-zone untrue policy trust-untrust then log session-closeset security policies from-zone untrue to-zone trust policy untrust-trust match source-address anyset security policies from-zone untrue to-zone trust policy untrust-trust match destination-address 168.192set security policies from-zone untrue to-zone trust policy untrust-trust match destination-address 10.10set security policies from-zone untrue to-zone trust policy untrust-trust match application anyset security policies from-zone untrue to-zone trust policy untrust-trust then permit set security policies from-zone untrue to-zone trust policy untrust-trust then log session-initset security policies from-zone untrue to-zone trust policy untrust-trust then log session-closeset security policies from-zone untrue to-zone untrue policy untrue-untrue match source-address anyset security policies from-zone untrue to-zone untrue policy untrue-untrue match destination-address anyset security policies from-zone untrue to-zone untrue policy untrue-untrue match application anyset security policies from-zone untrue to-zone untrue policy untrue-untrue then permitset security policies from-zone vpn to-zone trust policy vpn-policy match source-address anyset security policies from-zone vpn to-zone trust policy vpn-policy match destination-address anyset security policies from-zone vpn to-zone trust policy vpn-policy match application anyset security policies from-zone vpn to-zone trust policy vpn-policy then permitset security policies from-zone trust to-zone vpn policy vpn-policy match source-address anyset security policies from-zone trust to-zone vpn policy vpn-policy match destination-address anyset security policies from-zone trust to-zone vpn policy vpn-policy match application anyset security policies from-zone trust to-zone vpn policy vpn-policy then permitset security policies policy-rematchset security zones security-zone trust address-book address 168.192 168.192.0.0/16 set security zones security-zone trust address-book address 10.10 10.10.10.0/24set security zones security-zone trust host-inbound-traffic system-services allset security zones security-zone trust host-inbound-traffic protocols allset security zones security-zone trust interfaces fe-0/0/2.0 host-inbound-traffic system-services allset security zones security-zone trust interfaces fe-0/0/2.0 host-inbound-traffic protocols allset security zones security-zone trust interfaces fe-0/0/7.0 host-inbound-traffic system-services allset security zones security-zone trust interfaces fe-0/0/7.0 host-inbound-traffic protocols allset security zones security-zone untrue host-inbound-traffic system-services allset security zones security-zone untrue host-inbound-traffic protocols allset security zones security-zone untrue interfaces fe-0/0/0.0 host-inbound-traffic system-services allset security zones security-zone untrue interfaces fe-0/0/0.0 host-inbound-traffic system-services ikeset security zones security-zone untrue interfaces fe-0/0/0.0 host-inbound-traffic protocols allset security zones security-zone vpn interfaces st0.0。