交换机路由器基本命令
交换机路由器配置命令
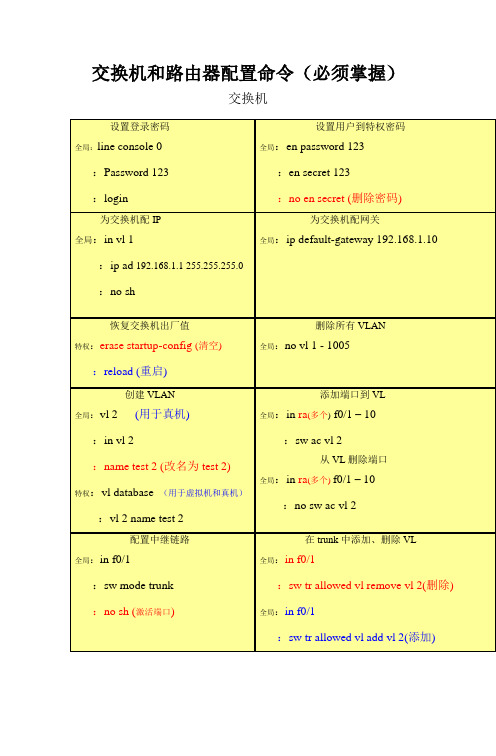
交换机和路由器配置命令(必须掌握)交换机设置登录密码全局:line console 0:Password 123:login设置用户到特权密码全局:en password 123:en secret 123:no en secret (删除密码)为交换机配IP全局:in vl 1:ip ad 192.168.1.1 255.255.255.0:no sh为交换机配网关全局:ip default-gateway 192.168.1.10恢复交换机出厂值特权:erase startup-config (清空):reload (重启)删除所有VLAN 全局:no vl 1 - 1005创建VLAN全局:vl 2 (用于真机):in vl 2:name test 2 (改名为test 2)特权:vl database (用于虚拟机和真机):vl 2 name test 2添加端口到VL 全局:in ra(多个) f0/1 – 10:sw ac vl 2从VL删除端口全局:in ra(多个)f0/1 – 10:no sw ac vl 2配置中继链路全局:in f0/1:sw mode trunk:no sh (激活端口)在trunk中添加、删除VL全局:in f0/1:sw tr allowed vl remove vl 2(删除) 全局:in f0/1:sw tr allowed vl add vl 2(添加)路由器以上命令是我认为学交换机和路由器必须要掌握的。
先就为大家收集这么多了,希望大家能好好学习。
当中可能会存在错误,如果大家发现请及时通知我。
谢谢~!SIT806——无敌精英班 班长留给路由器接口配IP全局:in f0/1:ip ad 192.168.2.2 255.255.255.0 :no sh配置单臂路由全局:in f0/0.1:encapsulation dot1q 1(VL1) :ip ad 192.168.1.1 255.255.255.0查看路由表特权:sh ip route关闭路由全局:no ip routing添加逻辑端口全局:int loopback 0配置默认路由全局:ip route 0.0.0.0 0.0.0.0 address(下一跳IP)配置静态路由 全局:ip route 192.168.1.0 255.255.255.0 192.168.2.1配置动态路由全局:router rip:network 172.25.0.0(所有直连网段)RIP V2的配置全局:router rip:version 2:no auto-summary (关闭汇总)设置远程管理全局:line vty 0 4(允许0到4,五个用户登录):login:pawwword 123全局:enable password 123。
路由与交换的配置命令
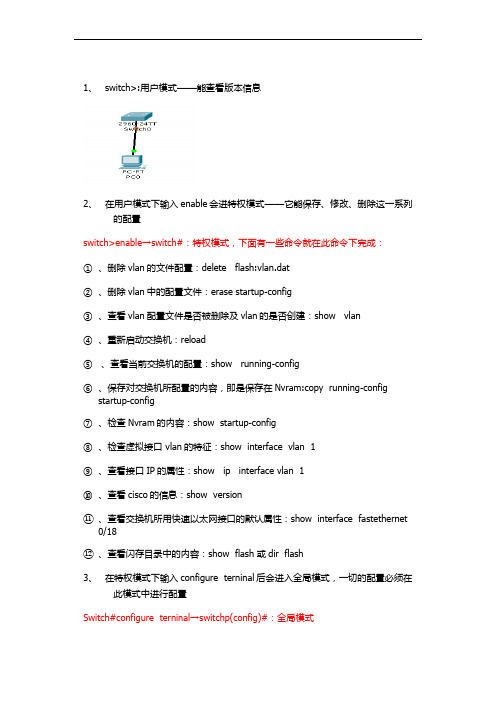
1、switch>:用户模式——能查看版本信息2、在用户模式下输入enable会进特权模式——它能保存、修改、删除这一系列的配置switch>enable→switch#:特权模式,下面有一些命令就在此命令下完成:①、删除vlan的文件配置:delete flash:vlan.dat②、删除vlan中的配置文件:erase startup-config③、查看vlan配置文件是否被删除及vlan的是否创建:show vlan④、重新启动交换机:reload⑤、查看当前交换机的配置:show running-config⑥、保存对交换机所配置的内容,即是保存在Nvram:copy running-configstartup-config⑦、检查Nvram的内容:show startup-config⑧、检查虚拟接口 vlan的特征:show interface vlan 1⑨、查看接口IP的属性:show ip interface vlan 1⑩、查看cisco的信息:show version⑪、查看交换机所用快速以太网接口的默认属性:show interface fastethernet 0/18⑫、查看闪存目录中的内容:show flash 或dir flash3、在特权模式下输入configure terninal后会进入全局模式,一切的配置必须在此模式中进行配置Switch#configure terninal→switchp(config)#:全局模式①、配置路由器设备的名字:switch(config)#hostname + 交换机的名字②、配置进入特权模式的密码,即使能密码:switch(config)#enable password +密码③、配置非明文密码:switch(config)#enable secret + 密码4、为交换机配置console口①、进入现成配置模式,即进入console口:switch(config)# line console 0②、设置密码(重新启动时需要此密码):switch(config-line)#password + 密码③、允许登录:switch(config-line)#login5、配置远程登录的密码:①、首先要配置使能密码②、允许让几个人登录:switch(config)#line vty 0 4(即允许五个登录)③、设置密码:switch(config-line)#password + 密码④、允许远程登录:switchp(config-line)#login6、在全局模式下的有关命令①对所有密码进行加密:switch(config)#service password-encryption②、不解析错误的命令:switch(config)#no ip domain-lookup7、创建vlan(2—1001,注vlan 1既不可以创建,也不可以删除)①、创建vlan :vlan + 要创建vlan的值②、给vlan取名:switch(config-vlan)#name + 名字(此步可以不要)③、把PC与交换机相连的端口添加到相应的vlan中:a、Switch(config)#interface + 端口b、Switch(config-if)#switchport access vlan + 相应vlan的值④、需要传递多个vlan信息就要打中继口,即trunka、switch(config)#interface + 交换机另一端口b、switch(config-if)#switchport mode trunk8、传统vlan 的通信(1)、router的配置①、为接口配置IP地址(该IP是相应vlan的PC网关)②、激活端口:no shutdown(2)、switch的配置①、创建vlan,将PC端口划入相应vlan②、将switch与router相连的端口划入相应的vlan(3) 、PC的配置:就是给PC配置IP,注PC的默认网关与router的IP相同,网关相同9、单臂路由实现vlan的通信(1)router配置①、添加子接口:interface f0/0.1(此处有多少个vlan就添加多少个子接口)②、将子接口封装到相应的vlan:encapsulation dot + 相应vlan的值③、将子接口配置IP:ip add +ip地址 + 子网掩码④、激活物理接口:no shutdown(2)、switch的配置①、创建 vlan,交PC的端口划入到相应vlan②、与router相连的端口打trunk(3)、配置PC的IP9、三层交换(1)、配置三层交换①、启用三层交换:(config)#ip routing②、创建vlan:(config)# vlan + 要创建vlan的值③、把相应的vlan配置IPa、指定一个vlan:(config)#interface vlan + vlan相应的值c、配置IP:(config-if)#ip add + ip + 子网掩码(2)、配置switch①、每个交换机创建vlan②、把端口划分到相应的vlan中③、打中继口(trunk)Show命令1、show version 这个命令可以查看IOS版本号,已启动时间,Flash中的IOS 的文件名,router里面共有什么端口,寄存器的值等等。
华为路由器交换机常用命令
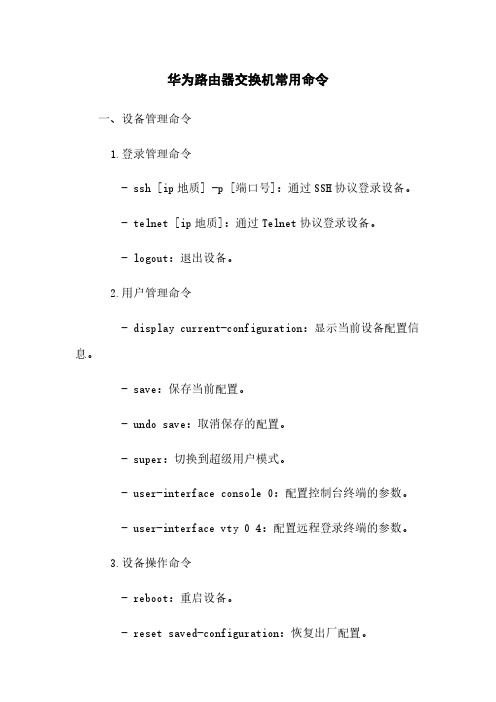
华为路由器交换机常用命令一、设备管理命令1.登录管理命令- ssh [ip地质] -p [端口号]:通过SSH协议登录设备。
- telnet [ip地质]:通过Telnet协议登录设备。
- logout:退出设备。
2.用户管理命令- display current-configuration:显示当前设备配置信息。
- save:保存当前配置。
- undo save:取消保存的配置。
- super:切换到超级用户模式。
- user-interface console 0:配置控制台终端的参数。
- user-interface vty 0 4:配置远程登录终端的参数。
3.设备操作命令- reboot:重启设备。
- reset saved-configuration:恢复出厂配置。
- display version:显示设备的硬件和软件版本信息。
- display device:显示设备的基本信息。
- display interface[接口名称]:显示指定接口信息。
- display ip routing-table:显示IP路由表信息。
二、网络配置命令1.IP配置命令- interface [接口名称]:进入指定接口。
- ip address [IP地质] [子网掩码]:配置接口IP地质。
- undo ip address:取消接口IP地质配置。
- ip route-static [目标网络] [子网掩码] [下一跳地质]:配置静态路由。
- undo ip route-static [目标网络] [子网掩码] [下一跳地质]:取消静态路由配置。
2.VLAN配置命令- vlan [VLAN ID]:创建指定VLAN。
- quit:退出VLAN配置模式。
- interface vlan [VLAN ID]:进入指定VLAN接口。
- ip address [IP地质] [子网掩码]:为VLAN接口配置IP地质。
交换机路由器基本命令大全
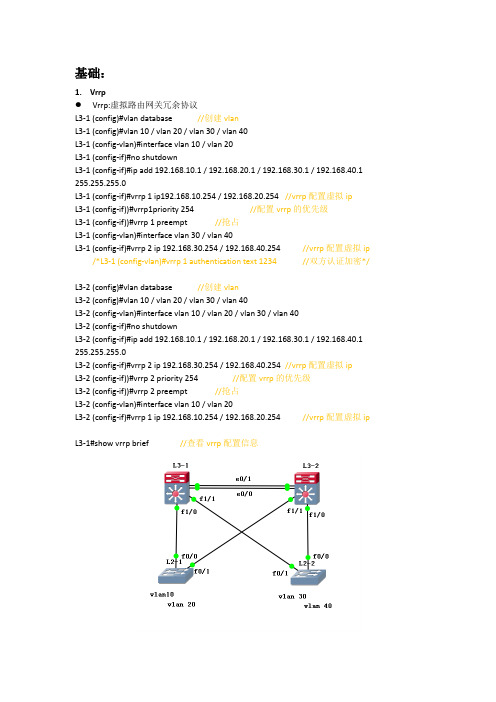
基础:1.VrrpVrrp:虚拟路由网关冗余协议L3-1 (config)#vlan database //创建vlanL3-1 (config)#vlan 10 / vlan 20 / vlan 30 / vlan 40L3-1 (config-vlan)#interface vlan 10 / vlan 20L3-1 (config-if)#no shutdownL3-1 (config-if)#ip add 192.168.10.1 / 192.168.20.1 / 192.168.30.1 / 192.168.40.1 255.255.255.0L3-1 (config-if)#vrrp 1 ip192.168.10.254 / 192.168.20.254 //vrrp配置虚拟ipL3-1 (config-if))#vrrp1priority 254 //配置vrrp的优先级L3-1 (config-if))#vrrp 1 preempt //抢占L3-1 (config-vlan)#interface vlan 30 / vlan 40L3-1 (config-if)#vrrp 2 ip 192.168.30.254 / 192.168.40.254 //vrrp配置虚拟ip /*L3-1 (config-vlan)#vrrp 1 authentication text 1234 //双方认证加密*/L3-2 (config)#vlan database //创建vlanL3-2 (config)#vlan 10 / vlan 20 / vlan 30 / vlan 40L3-2 (config-vlan)#interface vlan 10 / vlan 20 / vlan 30 / vlan 40L3-2 (config-if)#no shutdownL3-2 (config-if)#ip add 192.168.10.1 / 192.168.20.1 / 192.168.30.1 / 192.168.40.1 255.255.255.0L3-2 (config-if)#vrrp 2 ip 192.168.30.254 / 192.168.40.254 //vrrp配置虚拟ipL3-2 (config-if))#vrrp 2 priority 254 //配置vrrp的优先级L3-2 (config-if))#vrrp 2 preempt //抢占L3-2 (config-vlan)#interface vlan 10 / vlan 20L3-2 (config-if)#vrrp 1 ip 192.168.10.254 / 192.168.20.254 //vrrp配置虚拟ipL3-1#show vrrp brief //查看vrrp配置信息HsrpRouter (config)#interface fa0/1 ip 192.168.1.3 255.255.255.0 //进入端口配置ipRouter (config-if)#standby 2 //创建组Router (config-if)#standby 2 ip 192.168.1.254 //组添加ipRouter (config-if)#standby priority 200 //设置优先级,默认优先级100Router (config-if)#standby 2 preempt //抢占Router (config-if)#standby timers 3-10 //虚拟报文时间间隔Router (config-if)#standby 2 tranck fa0/0 //跟踪上行端口Router#show standby brief //查看热备份配置信息2.Mstp:多生成树协议Switch (config)#spanning-tree //启动生成树协议Switch (config)#spanning-tree mode mstp //设置生成树模式是mstpSwitch (config)#vlan 10Switch (config-vlan)#exitSwitch (config)#vlan 20Switch (config-vlan)#exitSwitch (config)#spanning-tree mst 1 priority 4096 //生成树组1的优先级设为4096 Switch (config)#spanning-tree mstconfigwration //进入生成树配置模式Switch (config)#instance 1 vlan 10,20 //把vlan10,20添加到组13.链路聚合L3-1 (config)#interface port-channel 1 //创建组L3-1 (config-if)#no shutdownL3-1(config-if)#switchport mode trunkL3-1(config-if)#interface fa1/13 //进入三层交换机间相连接口L3-1(config-if)#channel-group 1 mode on //添加到组中L3-1 (config-if)#switchport mode trunkL3-1 (config-if)#no shutdownL3-1 (config-if)#interface fa1/14L3-1 (config-if)#channel-group 1 mode onL3-1 (config-if)#switchport mode trunkL3-1 (config-if)#no shutdownL3-2(config)#interface port-channel 1 //创建组L3-2(config-if)#no shutdownL3-2(config-if)#switchport mode trunkL3-2(config-if)#interface fa1/13 //进入三层交换机间相连接口L3-2(config-if)#channel-group 1 mode on //添加到组中L3-2(config-if)#switchport mode trunkL3-2(config-if)#no shutdownL3-2(config-if)#interface fa1/14L3-2(config-if)#channel-group 1 mode onL3-2(config-if)#switchport mode trunkL3-2(config-if)#no shutdown4.VLAN(vtp)●Vtp(truch接口):Switch(config)#Vtpnamezjq //vtp命名zjqSwitch(config)#vtp password 123456 //设置vtp密码Switch(config)#vtp mode server(client) //vtp的模式设置为服务器或者客户端Switch(config)#interface FastEthernet0/1Switch(config)#switchport mode trunk //接口模式设置为trunk●配置vlanSwitch(config)#Vlan databaseSwitch(config)#Vlan 10 name xingzhengbuSwitch(config)#Switchport access vlan 10Switch(config)#Ip address 192.168.80.254 255.255.255.05.Tftp//打开tftp服务器,获取ip地址L2-1>enL2-1#copy startup-configtftp //Address of remote host []?172.16.25.0Destination filename [config.text]?zhangjq.txt6.telnet:远程登录Switch(config)#hostname silence //修改设备名称Switch(config)#intvlan 1Switch(config-if)#ip add 192.168.1.1 255.255.255.0 //设置管理交换机的IP地址Switch(config-if)#no shutdown //启用接口Switch(config)#enable secret 123456 //配置进入特权模式的密码为123456 Switch(config)#line vty 0 15//进入VTY端口,允许16台电脑同时远程登录Switch(config-line)#pass cisoco //设置Telnet的登录密码为ciscoSwitch(config-line)#login //允许Telnet登录7.管理VLAN扩展:1.路由引入(ospf)●静态路由配置(Static):要到达的网段Nwtwork:192.168.3.0/24设置下一跳Next Hop:192.168.1.2Router(config)#ip route 0.0.0.0 0.0.0.0 fa0/1●动态路由RIP:公布自己有的网段192.168.2.0/192.168.3.0OSPF:开放式最短路径协议Router(config)#router ospf 1 //启动OSPF协议,进程号Router(config)#network 192.168.1.0 0.0.0.255 area 0 //公布自己有的网段,划分区域Router(config)#do show iproute //查看路由表修改链路的开销1.Router(config-if)#bandwidth bamdwidth-kbps //修改接口的带宽参数2.Router(config-if)#ipospf cost “加数字”//命令则直接将链路开销设置为特定值并免除了计算过程2.DHCP的配置:动态主机配置协议L3-1(config)#vlan 10 //创建vlanL3-1(config-if)#intvlan 10L3-1(config-if)#ip add 192.168.10.1 255.255.255.0L3-1(config-if)#no shutdownL3-1 (config)#service dhcp //启动dhcpL3-1 (config)#ipdhcp pool <name> //建立地址池L3-1 (config)#network <network-number><mask> //动态分配ip的网段和MAC地址L3-1 (config)#default-router <ip-address> //为dhcp客户设置默认网关L2-1 (config)#interface fa0/0L2-1 (config-if)#sw mode trunkL2-1 (config-if)no shutdownL2-1 (config)#interface fa0/15L2-1 (config-if)#switchport mode accessL2-1 (config-if)#switchport access vlan 10 //绑定vlan 10L2-1 (config-if)no shutdownPC(config)#no ip routing //取消路由功能PC(config)#interface fa0/0PC(config-if)#ip add dhcpPC(config)#default gateway <ip-address>PC#show interface fa0/03.无线路由器AP>ap-mode fatAP>enAP#config tAP(config)#vlan 10AP(config-vlan)#exitAP(config)#service dhcpAP(config)#ipdhcp pool zhangjqAP(dhcp-config)#network 192.168.10.0 255.255.255.0AP(dhcp-config)#dns-server 10.20.5.1AP(dhcp-config)#default-router 192.168.10.254AP(dhcp-config)#interface gigabitEthernet0/1AP(config-if-GigabitEthernet 0/1)#encapsulation dot1Q 10 //封装vlan10AP(config-if-GigabitEthernet 0/1)#interface BVI 10AP(config-if-BVI 6)#ip add 192.168.10.254 255.255.255.0AP(config-if-BVI 6)#exitAP(config)#dot11 wlan10AP(dot11-wlan-config)#vlan10AP(dot11-wlan-config)#broadcast-ssidAP(dot11-wlan-config)#ssidzhangjqAP(dot11-wlan-config)#exitAP(config)#interface dot11radio 1/0AP(config-if-Dot11radio 1/0)#encaosulation dot1Q 10AP(config-if-Dot11radio 1/0)#mac-mode fatAP(config-if-Dot11radio 1/0)#channel 1AP(config-if-Dot11radio 1/0)#wlan-id 1AP(config-if-Dot11radio 1/0)#ip router 0.0.0.0 0.0.0.0 192.168.1.254AP(config)#intwlansec 10AP(config-if-wlansec 10)#security wpa enableAP(config-if-wlansec 10)#security wpa ciphers aes enableAP(config-if-wlansec 10)#4.ACL:访问控制列表标准控制列表:Router(config)#access-list 1 permit 192.168.2.0 0.0.0.255 //创建控制列表允许2网段可以访问,<1-99>标准访问控制列表;<100-199>扩展访问控制列表Router(config)#access-list 1 permit 192.168.1.0 0.0.0.255Router(config)#access-list 1 deny 192.168.0.0 0.0.0.255 //创建控制列表拒绝0网段可以访问,反向子网掩码Router(config)#interface se3/0 //进入se3/0Router(config-if)#ip access-group 1 out //把访问控制列表应用到接口Se3/0扩展控制列表:<才需要填写目标ip>Router(config)#access-list 101 permit ip 192.168.2.0 0.0.0.255 10.0.0.0 0.255.255.255 //创建控制列表允许源ip访问目标ip,能访问web和ping通Router(config)#access-list 101 permit tcp 192.168.1.0 0.0.0.255 10.0.0.0 0.255.255.255 eq www //创建控制列表允许源ip访问目标ip的80端口,能访问web不能ping通Router(config)#access-list 101 permit icmp 192.168.0.0 0.0.0.255 10.0.0.0 0.255.255.255 //创建控制列表允许源ip访问目标ipRouter(config)#interface se3/0Router(config-if)#ip access-group 101 outSe3/0●使用ACL保护路由安全Router(config)#access-list 1 permit 192.168.1.0 0.0.0.255Router(config)#line vty 0 15Router(config)#access-class 1 inRouter(config)#password hanlg5.NAT:地址转换●静态NAT(出口路由配置,私网地址转换成公网地址)Router(config)#ipnat inside source static【静态】私网ip公网(外)ip //内部网转换为外部网地址Router(config)#interface f0/1Router(config-if)#ipnat outside //绑定对外接口Router(config)#interface f0/2Router(config-if)#ipnat inside //绑定对内接口●动态NATRouter>enRouter#config tRouter(config)#access-list 10 permit 10.0.0.0 0.0.0.255Router(config)#ipnat pool zhangjq 131.107.0.1 131.107.0.6 netmask 255.255.255.0 Router(config)#ipnat inside source list 10 pool zhangjqRouter(config)#interface se0/0Router(config-if)#ipnat outsideRouter(config-if)#interface fa0/1Router(config-if)#ipnat insideRouter(config-if)#endRouter(config-if)#show ipnat translations●超载NAT(PAT)Router>enRouter#config tRouter(config)#access-list 10 permit 10.0.0.0 0.0.0.255Router(config)#ipnat pool zhangjq 131.107.0.1 131.107.0.1netmask 255.255.255.0 Router(config)#ipnat inside source list 10 pool zhangjqoverloadRouter(config)#interface se0/0Router(config-if)#ipnat outsideRouter(config-if)#interface fa0/1Router(config-if)#ipnat insideRouter(config-if)#endRouter(config-if)#show ipnat translations6.802.1xL2-1 (config)#aaa new-model //启动aaa服务L2-1 (config)#aaa authentication dot1x default group radius //认证802.1x,启用默认列表default,采用radius认证方式L2-1 (config)#dot1x authentication default //启用default列表应用L2-1 (config)#radius-server host 172.16.32.2 //配置radius服务器地址L2-1 (config)#radius-server key 123456 //设置交换机和服务器之间的密码L2-1 (config)#dot1x auth-mode chap //身份验证的加密方式改为chapL2-1 (config)#interface range fa0/1 - 22 //进入交换机的下行接口L2-1 (config-if)#dot1x port-control auto //在端口启用802.1x绑定vlanL2-1(config)#interface fa0/0L2-1(config)#switchport mode accessL2-1(config)#switchport access vlan10●打错Switch(config)#no ip domain-lookup●配置单臂路由Router(config)#inter fa0/0.10 //创建虚拟接口Router(config-subif)#encapsulation dot1Q 10 //封装(vlan)协议Router(config-subif)#ip address 192.168.1.1 255.255.255.0 //添加网关Router(config-subif)#no shutdown●路由引入Router(config-if)#default-information originate●回环路由(虚构一条路)Router(config)#int loopback 回环路由号Ip route 0.0.0.0 0.0.0.0 loopback 0●交换机端口安全配置Switch (config)#interface fastsernet0/1 //进入端口配置模式Switch (config-if)#speed 10 //设置端口速率为10Mbit/s,{10|100|auto}Switch (config-if)#duplex half //设置端口为半双工,{half|full|auto}Switch (config-if)#no shutdown //启用端口Switch (config-if)#switchport mode access //设置当前端口为access,交换机端口安全功能只能在access接口进行配置Switch (config-if)#switchport port-security //打开当前端口安全功能,默认关闭端口安全功能Switch (config-if)#switchportport-security maximum 10 //设置端口安全地址的最大个数,最大安全地址个数是128个Switch (config-if)#switchport port-security violation shutdown //配置处理违例的方式,默认处理方式为protectSwitch (config-if)#switchport port-security mac-address 0007.EC56.5906 //配置安全地址Switch (config-if)#endSwitch#show port-security interface fastethernet0/1 //查看0/1的端口安全配置信息,<Half-duplex,10Mb/s //已设置为半双工,10Mbit/s>Switch#show port-security //查看所有安全端口的统计信息●光电复用口L3-1 (config)#interface gi0/26L3-1 (config-GigabitEthernet 0/26) #medium-type fiberL3-2 (config)#interface gi0/26L3-2 (configGigabitEthernet 0/26)#medium-type fiber●防火墙设置步骤1.路由模式(安全)下设置2.接口IP地址设置3.路由(默认路由)4.安全策略、安全规则(nat、包过滤、ip映射、端口映射)端口映射:nat的一种,把内网端口转换成外网端口(内网的服务器ip加上端口号映射到外网ip地址)Ip映射:静态natNat:防火墙上做nat,就是要使内网用户可以访问外网QOS(服务质量)路由器的CBWFQ配置Router(config)#class-map http_ftp //创建一个分类表,并进入分类表模式Router(config-cmap)#match protocol httpRouter(config-cmap)#match protocol ftpRouter(config-cmap)#exitRouter(config)#policy-map zhangjq //创建一个策略表,并进入策略表模式Router(config-pmap)#class http_ftp //建立一个分类表,并进入策略分类表模式Router(config-pmap-c)#bandwidth 512Router(config-pmap-c)#exitRouter(config-pmap)#class class-defaultRouter(config-pmap-c)#endRouter(config)#interface fa0/1Router(config-if)#service-policy output zhangjq //在端口上应用一个策略表Router(config-if)#endRouter#show policy-mapIPSec配置R1(config)#ip route 0.0.0.0 0.0.0.0 10.1.1.1 //添加默认路由,设置下一条R1(config)#crypto isakmp policy 11 //设置IKE策略的优先级R1(config-isakmp)#encryption 3des //配置加密方式[des,3des,aes]R1(config-isakmp)#hash md5 //检验完整性,数字签名方法[md5,sha]R1(config-isakmp)#authentiaction pre-share //采用预共享密钥的认证方式R1(config)#crypto isakmp key passwd address 10.1.14.60 //协商的共享密码R1(config)#crypto ipsec transform-set one esp-3des esp-md5-hmac //配置转换集[ike配置参数转换成IPSec]R1(config)#access-list 101 permit ip 172.16.0.0 0.0.255.255 192.168.0.0 0.0.255.255//创建访问控制列表R1(config)#access-list 111 deny ip 192.168.10.0 0.0.0.255 192.168.20.0 0.0.0.255R1(config)#access-list 111 permit ip any anyR1(config)#ip nat inside source list 111 interface fa0/1R1(config)#cryptomap my 10 ipsec-isakmp //创建加密图my,序号10R1(config-crypto-map)#set peer 10.1.14.60 //标识对方路由器IP地址R1(config-crypto-map)#set transform-set one //启用转换集R1(config-crypto-map)#match address 101 //启用ACLR1(config-crypto-map)#interface FastEthernet0/0R1(config-if)#crypto map my //启用映射R1#show crypto isakmp sa //查看配置结果IKE配置配置映射Show crypto isakmpPpp:由被验方发起单向:被验证方:Route0r#config tRouter0(config)#interface Serial0/0/0Router0(config-if)#ip address 192.168.1.1 255.255.255.0 Router0(config-if)#no shutdownRouter0(config-if)#encapsulation pppRouter0(config-if)#ppp pap sent-username r0 password 123456验证方:Router1>enableRouter1#configure terminalRouter1(config)#interface Serial0/0/0Router1(config-if)#ip address 192.168.1.2 255.255.255.0 Router1(config-if)#no shutdownRouter1(config)#username r0 password 0 123456Router1(config-if)#encapsulation ppp双向:Router3>enRouter3#config tRouter3(config)#username r4 password 0 123456Router3(config)#int se2/0Router3(config-if)#encapsulation pppRouter3(config-if)#ppp pap sent-username r3 password 123456Router4>enRouter4#config tRouter4(config)#username r3 password 0 123456Router4(config)#int se3/0Router4(config-if)#encapsulation pppRouter4(config-if)#ppp pap sent-username r4 password 123456Chap(密码要求一致):chap是由验方发起,发送随机数报文查找数据库密码,随机数+密码返回验方单向:被验证方:Router>enableRouter#configure terminalRouter(config)#hostname R1R0(config)#interface Serial0/0/0R0(config-if)#no shutdownR0(config-if)#ip address 192.168.1.1 255.255.255.0R0(config-if)#encapsulation ppp //封装pppR0(config)#username R1 password 0 123456 //建立本地用户组验证方:Router>enableRouter#configure terminalRouter(config)#hostname R1R1(config)#interface Serial0/0/0R1(config-if)#no shutdownR1(config-if)#ip address 192.168.1.2 255.255.255.0R1(config-if)#encapsulation ppp //封装pppR1(config-if)#ppp authentication chapR1(config)#username R0 password 0 123456 //建立本地用户组双向:被验证方:Router>enableRouter#configure terminalRouter(config)#hostname R1R0(config)#interface Serial0/0/0R0(config-if)#no shutdownR0(config-if)#ip address 192.168.1.1 255.255.255.0R0(config-if)#encapsulation pppR1(config-if)#ppp authentication chapR0(config)#username R1 password 0 123456验证方:Router>enableRouter#configure terminalRouter(config)#hostname R1R1(config)#interface Serial0/0/0R1(config-if)#no shutdownR1(config-if)#ip address 192.168.1.2 255.255.255.0R1(config-if)#encapsulation pppR1(config-if)#ppp authentication chapR1(config)#username R0 password 0 123456Ospf ppp模式配置:Router0>enableRouter0#configure terminalRouter0(config)#interface Serial0/0/0Router0(config-if)#encapsulation pppRouter0(config-if)#ip ospf network point-to-point Router0(config-if)#no shutdownRouter0(config-if)#exitRouter0(config)#router ospf 1Router0(config-router)#net 10.1.1.0 0.0.0.255 area 0 Router0(config-router)#endRouter1>enableRouter1#configure terminalRouter1(config)#interface Serial0/0/0Router1(config-if)#no shutdownRouter1(config-if)#encapsulation pppRouter1(config-if)#ip ospf network point-to-point Router1(config-if)#no shutdownRouter1(config-if)#exitRouter1(config)#router ospf 1Router1(config-router)#network 20.1.1.0 0.0.0.255 area 0 Router1(config-router)#endRouter1#Show ip ospf neighbor帧中继Router3>enableRouter3#configure terminalRouter3(config)#interface Serial2/0Router3(config-if)#no shutdownRouter3(config-if)#encapsulation frame-relayRouter3(config-if)#frame-relay lmi-type ciscoRouter3(config-if)#exitRouter3(config)#int s2/0.1 point-to-pointRouter3(config-subif)#ip add 192.168.2.3 255.255.255.0 Router3(config-subif)#frame-relay interface-dlci 302 Router3(config)#int se2/0.2 point-to-pointRouter3(config-subif)#ip add 192.168.3.3 255.255.255.0 Router3(config-subif)#frame-relay interface-dlci 301Router1>enableRouter1#configure terminalRouter1(config)#interface Serial2/0Router1(config-if)#no shutdownRouter1(config-if)#encapsulation frame-relayRouter1(config-if)#frame-relay lmi-type ciscoRouter1(config-if)#exitRouter1(config)#int s2/0.1 point-to-pointRouter1(config-subif)#ip add 192.168.1.1 255.255.255.0 Router1(config-subif)#frame-relay interface-dlci 102 Router1(config)#int se2/0.2 point-to-pointRouter1(config-subif)#ip add 192.168.3.1 255.255.255.0 Router1(config-subif)#frame-relay interface-dlci 103Router2>enableRouter2#configure terminalRouter2(config)#interface Serial2/0Router2(config-if)#no shutdownRouter2(config-if)#encapsulation frame-relayRouter2(config-if)#frame-relay lmi-type ciscoRouter2(config-if)#exitRouter2(config)#int s2/0.1 point-to-pointRouter2(config-subif)#ip add 192.168.1.2 255.255.255.0Router2(config-subif)#frame-relay interface-dlci 201Router2(config)#int se2/0.2 point-to-pointRouter2(config-subif)#ip add 192.168.2.2 255.255.255.0Router2(config-subif)#frame-relay interface-dlci 203Dhcp:DHCP(Dynamic Host Configuration Protocol,动态主机配置协议),基于Client/Server工作模式,DHCP服务器为需要动态获取IP地址的客户端分配IP地址及网关、dns等其它参数开启dhcp服务R1(config)#service dhcp //开启dhcp功能配置dhcp地址池R1(dhcp-config)#network 192.168.1.0 255.255.255.0 //可以分配的地址范围192.168.1.1~192.168.1.254R1(dhcp-config)#dns-server 10.2.50.1 //配置DNSR1(dhcp-config)#default-router 192.168.1.1 //配置网关地址/*R1(config)#ip dhcp excluded-address 192.168.1.1 192.168.1.10//192.168.1.1~192.168.1.10不被dhcp分配*/静态路由就是手工配置的路由,使得数据包能够按照预定的路径传送到指定的目标网络R1(config)#ip route 192.168.2.0 255.255.255.0 192.168.3.2 //目标地址是192.168.2.0/24的数据包,转发给192.168.3.2R2(config)#ip route 192.168.1.0 255.255.255.0 192.168.3.1 //目标地址是192.168.1.0/24的数据包,转发给192.168.3.1R1#show ip route //查看路由R2#show ip route //查看路由RIP(Routing Information Protocol)路由协议采用距离向量算法,是一种距离向量协议。
交换机路由器命令
交换机路由器命令交换机和路由器是构建网络的重要设备,掌握它们的命令对于网络管理和维护至关重要。
接下来,让我们深入了解一些常见且实用的交换机路由器命令。
首先,我们来谈谈交换机的命令。
“show interfaces”命令用于查看交换机的接口状态,包括接口的速率、双工模式、是否连接以及有无错误等信息。
这对于排查接口连接问题非常有用。
“show vlan”命令可以展示交换机上创建的 VLAN 配置情况,包括VLAN ID、VLAN 名称以及每个 VLAN 中包含的端口。
“interface”命令用于进入特定的接口配置模式,比如“interface GigabitEthernet 0/1”就可以进入编号为0/1 的千兆以太网接口配置模式,然后可以在这个模式下进行诸如设置速率、双工模式、VLAN 归属等具体的配置。
“vlan”命令用于创建、删除和修改 VLAN 。
比如“vlan 10”创建一个VLAN 10 ,“no vlan 10”则删除 VLAN 10 。
“ip defaultgateway”命令用于为交换机设置默认网关,这在需要通过网络远程管理交换机时是必需的。
接下来,我们转向路由器的命令。
“show ip interface brief”能快速查看路由器接口的 IP 地址配置以及接口的状态,是了解路由器网络连接的重要命令。
“show ip route”命令用于查看路由器的路由表,从中可以知道路由器如何转发数据包到不同的网络。
“router ospf”命令用于启动 OSPF 路由协议,并进入 OSPF 配置模式,然后可以在其中设置区域、宣告网络等参数。
“ip route”命令用于手动添加静态路由,比如“ip route 19216820 2552552550 10002”表示将目标网络 19216820/24 的数据包通过下一跳10002 进行转发。
“accesslist”命令用于创建访问控制列表(ACL),以控制网络流量的访问权限。
交换机和路由器命令

Router(config)#int f 端口 进入端口模式
Router(config-if)#:ip address ip+子网掩码 配置IP和子网掩码
Switch(config-if)#:switchport trunk allowed vlan remove vlan-id Trunk中删除VLAN
Switch(vlan)#:exit 退出和保存
全局模式下创建VLAN
Switch(config)#:vlan vlan-id 创建vlanID
Switch(config-vlan)#:name 名字 设置vlan名称
address or name of remote host[] ? 填写FTP服务器IP地址
Destination filename [c2600-i-mz.122-28.bin]? 填写目标文件名
FTP升级或还原路由器镜像
Trunk配置
Switch(config)#:interface {FastEthernet GigabitEthernet} slot/port 进入端口
Switch(config-if)#:switchport trunk encapsulation {isl dot1q negotiate} 选择封装类型
Source filename[]? 填写FTP服务器上路由镜像
Destination filename (IOS文件名) 确认回车
FTP备份路由器镜像
Router(config)#:ip ftp username 用户名 在路由器上配置ftp的用户名
扩展知识:(config)#:username 设备用户名 password 设备密码
路由器和交换机命令大全

路由器和交换机命令大全不论是路由器也好,还是交换机也好,终归都是要依靠命令进行设备控制,因此你是否知道全部的命令呢?何不抓紧时间补全自己所缺失的命令,以便更好的进行工作开展。
「基础配置」进入console口进行本地配置用户模式xx>enable n特权模式xx#configure terminal全局配置模式 xx(config)#interface [f|s] n/m 进入接口配置模式xx(config-if)#进入(子)接口模式后配置IP(config-if)#ip addr A.B.C.D 子网掩码激活接口(config-if)#no shutdown配置速度(config-if)#speed {auto|10|100}配置接口工作模式(config-if)#duplex {auto|half|full}配置时钟(串行口DCE端)(config-if)#clock rate n反向操作(删除配置)no + 命令在换回接口上配多个ip(config-if)#ip addr A.B.C.D 子网掩码(config-if)#ip addr A.B.C.D 子网掩码 secondary查看所有配置#show running-config路由器关闭路由功能充当主机(config)#no ip routing为路由器设置网关(config)#ip default-gateway ip地址改机器名字(config)#hostname yy控制线路超时(config)#line n(config-line)#exec-timeout 0 0关闭域名解析功能(config)#no ip domain-lookup开启路由器http功能(config)#ip http server(config)#username xxx password yyy(config)#username xxx secret yyy(config)#enable secret yyy启用密码加密服务(config)#service password-encryption yyy开启路由器https功能(config)#ip http secure-server开启路由器远程登录功能(config)#line vty 0 4(config)#login local或者(config)#no login(config)#enable n登录时使用命令 telnet A.B.C.D「交换机」查看mac地址表#show mac-address-table绑定静态mac地址(config)#mac-address-table static H.H.H vlan n interface fx/x #show arp在主机上使用arp -a查看arp信息开启交换机端口安全(防止连接主机恶意发送随机mac填满mac地址表)(conifg)#switchport port-security(conifg)#switchport ?#show port-security int fx/x恢复(config)#errdisable recovery 为交换机vlan1配置管理ip(conifg)#int vlan 1(config-if)#ip addr A.B.C.D 子网掩码(config-if)#no shut「交换机vlan」查看vlan #show vlan-switch或是#show vlan创建vlan #vlan database(vlan)#vlan n将端口加入到vlan中(config-if)#switchport access vlan n给允许多个vlan的接口打trunk(config-if)#switchport mode trunk「单臂路由vlan」路由器上配置子接口实现不同vlan之间通信,先必须激活其父接口,另外IP不允许重复(config)#interface fx/x.x(config-subif)#encapsulation dot1q vlan-id(config-subif)#ip addr A.C.D.E 子网掩码(config-subif)#no shut「使用三层交换机交换虚拟接口」交换机上配置虚拟交换接口实现不同vlan之间通信,先必须在交换机上添加对应vlan(config)#int vlan n(config-if)#ip addr A.B.C.D 子网掩码(config-if)#no shut在删除时,务必先删除交换虚拟接口,再删对应vlan「VTP」配置VTP模式#vlan database(vlan)#vtp {server|client|transparent}只有域名和密码完全一样的路由器之间才能同步vlan信息(vlan)#vtp domain <域名>(vlan)#vtp password <密码>打开VTP裁剪(vlan)#vtp pruning退出激活(vlan)#exit 「端口聚合」创建R1(config)#interface port-channel 1(config-if)#switchport trunk encapsulation dot1q(config-if)#switchportmode trunk将指定接口加入聚合组内#int range f x/x-x #channel-group 1 mode on查看聚合接口#show etherchannel summary 「生成树协议」基于vlan的生成树可防止环路开启生成树协议(STP默认是开启的,可省略)(config)#spanning-tree vlan n修改生成树协议优先级(根网桥:mac最小、优先级最小)(config)#spanning-tree vlan n priority m交换机和主机之间连接的端口开启portfast,可防止主机发送BPDU伪造数据(config-if)#spanning-tree portfast查看生成树#show spanning-tree [vlan n]「静态路由」查看协议#show ip protocols查看路由表#show ip route添加静态路由(以默认路由举例)(config)#ip route 0.0.0.0 0.0.0.0 {出接口|下一跳ip}浮动静态路由(备份链路,在原链路失效后起作用)(config)#ip route 0.0.0.0 0.0.0.0 出接口AD管理距离静态黑洞路由(config)#ip route 192.168.0.0 255.255.0.0 null 0「RIP距离矢量路由,动态路由」配置RIP宣告直连网段(config)#router rip(config-router)#network 网段更改为版本2(config-router)#version {2|1}关闭自动汇总(如果被其他网路隔开时,最好关闭自动汇总)(config-router)#no auto-summary设置被动接口(只接受更新,不宣告自己)(config-router)#passive-interface 接口单播更新(只和指定的ip 交换路由信息)(config-router)#neighbor ip地址清除路由表内容#clear ip route *「OSPF链路状态路由,动态路由」配置OSPF宣告直连网路(config)#router ospf <进程号>(config-router)#router-id <任意ip地址>(config-router)#network <反掩码> area n重启OSPF进程#clear ip ospf process查看接口的OSPF信息#show ip ospf interface查看邻居表#show ip ospf neighbor查看链路数据表#show ip ospf database 「EIGRP链路状态路由,动态路由」配置EIGRP宣告直连网路(config)#router eigrp <系统编号>(config-router)#network 查看邻居表#show ip eigrp neighbors 查看拓扑表#show ip eigrp topology「VRRP虚拟路由器路由协议」提供网关冗余查看VRRP信息#show vrrp VRRP配置(在提供备份的两台路由器上做以下配置)端口跟踪(监视某个接口的状态)(config)#track 1 interface 接口line-protocol(config-if)#vrrp <1~254> ip 额外配置优先级(IP和优先级越大Master)和抢占(config-if)#vrrp <1~254> priority <1~254>(config-if)#vrrp <1~254> preempt(config-if)#vrrp 1 track 1 decrement <1~255> 「访问控制列表ACL」ACL无法控制自身发起的流量,对于已经建立的流量不起作用标准ACL(不能单独删除、添加一条访问列表)(config)#access-list <1~99|1300~1999> {permit|deny} ip地址反掩码扩展ACL(config)#access-list <100-199> {permit|deny} <协议> <源ip> <反掩码> <源端口> <目标ip> <反掩码> <目标端口>应用到指定ACL到某个接口(config)#int 接口(config-if)#ip access-group <1~99|100-199|1300~1999> {in|out}命名ACL(config)#ip access-list standard <标准ACL名字>(config-std-nacl)#{permit|deny} ip地址反掩码(config)#ip access-list extended <扩展ACL名字>(config-ext-nacl)#{permit|deny} <协议> <源ip> <反掩码> <源端口> <目标ip> <反掩码> <目标端口>应用到指定ACL到某个接口(config)#int 接口(config-if)#ip access-group <标准ACL名字|扩展ACL名字> {in|out}自反ACL(RACL,可以只允许内网主动发起的流量通过)(config)#ip access-list extended OUTB(config-ext-nacl)#permit tcp any any reflect RACL(config)#ip access-list extended INB(config-ext-nacl)#evaluate RACL(config-ext-nacl)#deny ip any any应用到指定ACL到某个接口(config-if)#ip access-group OUTB out(config-if)#ip access-group INB in 基于时间的ACL设置时区时间(config)#clock timezone GMT +8 #clock set hh:mm:ss <日> <月> <年>定义时间(config)#time-range <时间名>(config-time-range)#periodic hh:mm to hh:mm(config-time-range)#absolute start hh:mm:ss <日> <月> <年> end hh:mm:ss <日> <月> <年>结合ACL(config)#ip access-list extended <扩展ACL名字>(config-ext-nacl)#deny tcp any any time-range <时间名>「NAT和PAT」定义内外网接口(config)#int 接口(config-if)#ip nat {inside|outside}静态NAT(config)#ip nat inside source static ip地址静态PAT(config)#ip nat inside source static <协议> ip地址 <端口号>使用ACL捕获流量(config)#access-list n permit ip地址反掩码(config)#ip nat pool <地址池名> <起始ip地址> <终止ip地址> netmask 掩码TCP负载均衡(轮询转换)(config)#ip nat pool <地址池名> <起始ip地址> <终止ip地址> netmask 掩码type rotary动态NAT(config)#ip nat inside source list n pool <地址池名>动态PAT(config)#ip nat inside source list n pool <地址池名> overload查看转换项#show ip nat translations「广域网PPP协议」在串行口上的两台路由器都封装ppp协议(config)#int sx/x(config-if)#encapsulation ppp(config-if)#no shut 启用PAP认证,未加密认证方(config)#username <用户名>password <密码>(config-if)#ppp authentication pap请求认证方(config-if)#ppp pap sent-username <用户名> password <密码> 启用CHAP认证,安全加密认证方(config)#username <请求认证方名> password <请求认证方密码>(config-if)#ppp authentication chap请求认证方(config)#username <认证方名> password <认证方密码>(config-if)#ppp authentication chap 「帧中继」无广播的多路访问网络(NBMA)配置帧中继交换机关闭路由器路由功能(config)#no ip routing启用帧中继(config)#frame-relay switching进入串行接口R8(config)#int sx/x封装frame-relay协议R8(config-if)#encapsulation frame-relay指定lmi-type类型(config-if)#frame-relay lmi-type cisco指定intf-type接口类型为DCE(config-if)#frame-relay intf-type dce配置时钟频率(config-if)#clock rate n配置DLCI(config-if)#frame-relay route <进DLCI 号> int <出接口> <出DLCI号>配置路由器,封装frame-relay协议(config-if)#encapsulation frame-relay静态指定映射(config-if)#frame-relay map ip 清除动态学到的Frame Relay #clear frame-relay-inarp查看映射#show frame-relay map调试#debug frame-relay lmi点到多点(解决水平分割问题,划分子接口)适用于全互联和部分互联(config)#int sx/x(config-if)#encapsulation frame-relay(config)#int sx/x.x multipoint关闭反向arp,禁止自学习DLCI号和IP对应,而采取静态Map(config-subif)#no frame-relay inverse-arp静态映射DLCI号和IP(config-subif)#frame-relay map ip broadcast如在R1上对R3 DLCI号103 IP地址192.168.1.3点到点子接口(不存在水平分割问题)子接口可以看作是专线,适用于星型(config)#int sx/x(config-if)#encapsulation frame-relay(config)#int sx/x.x point-to-point(config-subif)#frame-relay interface-dlci以上就是店铺带给大家不一样的精彩。
交换机路由器命令
交换机之间trunk
s3550(config-if)#switchport trunk encapsulation dot1q(三层)
s3550(config-if)#switchport mode trunk
S2126(config-if)#switchport mode trunk(二层交换机直接)
Router(config-if)#end(直接回到特权模式,而exit是向上一级一级的退)
Router#
四、
路由器:
Router#show ip route(显示路由表信息)
Codes: C - connected, S - static, I - IGRP, R - RIP, M - mobile, B - BGP
s2126(config-vlan)#exit
s2126(config)#exit
s2126#
s2126#show vlan
VLAN Name Status Ports
---- -------------------------------- --------- -------------------------------
Gateway of last resort is not set
C 192.168.50.0/24 is directly connected, FastEthernet0/0
Router(config)#hostname RC(路由器重新命名)
RC(config)#
RC(config)#ip route 65.154.12.0 255.255.255.0 202.98.1.2(静态路由表中,增加一条路由记录,如果要删除,则用no ip route65.154.12.0 255.255.255.0 202.98.1.2)
- 1、下载文档前请自行甄别文档内容的完整性,平台不提供额外的编辑、内容补充、找答案等附加服务。
- 2、"仅部分预览"的文档,不可在线预览部分如存在完整性等问题,可反馈申请退款(可完整预览的文档不适用该条件!)。
- 3、如文档侵犯您的权益,请联系客服反馈,我们会尽快为您处理(人工客服工作时间:9:00-18:30)。
准备工作:1)SecureCRT 软件(推荐使用8.0注册机版)2)console线一条,RS232转USB线一条(淘宝购买)RS232转USB线插在电脑上,打开设备管理(快捷键devmgmt.msc),就会有提示,用360驱动(或其他驱动软件)打上即可。
下图为驱动安装成功后的设备管理器界面(本人电脑系统为win10)。
注意:com口与电脑上USB口是对应的,接在另一个USB口,com口的序号会变化。
file:///C:/Users/Potter/AppData/Local/Temp/msohtmlclip1/01/clip_imag e002.jpg3)电脑一台4)网络基础知识(OSI,IP,路由交换基础等)5)登陆设备( CLI命令行)设备-----Console—RS232-USB---电脑,打开SecureCRT软件file:///C:/Users/Potter/AppData/Local/Temp/msohtmlclip1/01/clip_imag e004.jpg一,锐捷交换机( 和cisco命令类似)1,设备登陆Web登陆:192.168.1.1 admin/adminConsole密码:默认为空,如果不行试试ruijie / admin2,系统基本配置enable //进入用户模式,华为H3C无对应命令clockset 10:00:00 3 17 2017 //clock set 小时:分:秒月日年!config //进入全局模式,对应华为H3C的sys hostname xx //修改设备名称!3,配置vlan!config //进入全局模式vlan 10name xxx //创建一个vlan,并命名vlan 20name xxxexit!no vlan 10 //删除一个vlan!int range gi 0/2-4sw mo ac //配置多个接口为access模式sw ac vl 10 //配置多个接口加入vlan10exitint range gi 0/5-8sw mo tr //配置多个接口为trunk模式sw tr al vl al //配置trunk模式下,接口允许所有vlan(1-4094)通过sw tr na vl 20 //配置多个接口为trunk,并指定native vlan为20 sw tr al vl remove xx //配置trunk模式下,接口不允许哪些vlan不通过sw tr al vl add xx //配置trunk模式下,接口添加哪些vlan允许通过exit!!sh vlan //查看vlan 信息,包括vlan id、名称、状态、包括的接口!sh int gi 0/2 sw //查看接口Gi 0/2 的vlan 状态!4,配置接口!configint gi 0/1des xx //给接口配置描述ip add 1.1.1.1 255.255.255.0 //路由口配置IP地址,交换口无法直接配置no sh!int vlan 10des xx //给SVI接口配置描述ip add 172.16.10.1 255.255.255.0 //创建SVI接口,一般为作为网关或管理地址!注意:SVI接口状态跟是否创建vlan,以及是否存在加入该vlan的up状态的接口。
!!int gi 0/1 //以下命令只对路由口和交换口生效speed 10/100/1000 //配置接口的速率参数duplex full/half/auto //配置接口的双工模式shut //关闭接口no shut //开启接口!!sh run int gi 0/1 //查看接口的配置sh int gi 0/1 //查看接口的详细信息sh int gi 0/1 sta //查看接口状态(up/down)sh int gi 0/48 tra //查看接口的光模块状态(该命令只对光口有效)sh ip int br //查看接口IP地址信息!5,配置聚合(这里只介绍二层聚合)!configint agg 2 //创建一个聚合口2sw mo tr //配置聚合接口为trunk模式sw tr al vl al //配置trunk模式下,聚合接口允许所有vlan (1-4094)通过exit!int range gi 0/1-2port-group 2 //将多个接口加入聚合组2no port-group //退出聚合组exit!sh run int agg 1 //查看聚合口1的配置sh agg 1 sum //查看聚合口1的汇总信息!6,配置DHCP!configvlan80 //创建一个vlanname xxexit!interface VLAN 80ip address 192.168.80.1 255.255.255.0 //配置DHCP的网关exit!servicedhcp //开启DHCP功能!ip dhcp excluded-address 192.168.80.1 192.168.80.10ip dhcp excluded-address 192.168.80.201 192.168.80.254 //配置DHCP 不分配的地址!ip dhcp pool vlan80 //创建一个DHCP地址池network 192.168.80.0 255.255.255.0 //配置DHCP地址池的范围dns-server 202.103.24.68 202.103.44.150 //配置DNSdefault-router 192.168.80.1 //配置网关!sh ip dhcp binding //查看DHCP服务器IP地址分配情况sh ip dhcp conflict //查看DHCP服务器的地址冲突情况sh ip dhcp pool //查看DHCP 地址池的信息sh dhcp lease //查看DHCP租约信息!7,配置路由!configip route 0.0.0.0 0.0.0.0 x.x.x.x //配置默认路由ip route 192.168.10.0 255.255.255.0 x.x.x.x //配置静态路由(常用于回程路由)no ip route 192.168.10.0 //删除静态路由,不需要写子网掩码!注意:路由的本质是有去有回,路由不通,首先要检查是否有回来的路由。
!sh ip ro //查看路由表sh ip ro sta //查看静态路由(常用于查看设备网关)!8,配置telnet!configline vty 0 4 //在控制台0-4 下login //允许登陆password weijishi //登陆时的密码(console线登陆)!enable password xx //用户模式下的密码,>代表特权模式,#代表用户模式!9,配置LLDP (链路层发现协议)!configlldp enable //开启LLDP功能!sh lldp nei //查看LLDP邻居信息!说明:主流路由设备都支持,相当好用的一条命令!!!!通过该命令可以查看本设备的哪个接口接到邻居设备的哪个接口。
对于了解当前网络拓扑起着关键性作用。
(很多中小型企业的网线基本是不打标签的,即使打了也看不懂。
)注意:只能是相同型号的设备互联,才能查看到信息。
比如锐捷交换机---华为交换机,就查看不到信息。
10,配置SNMP!configsnmp community ruijie wr //配置读写团体字为ruijie snmp community ruijie ro //配置读团体字为ruijie snmp community ruijie wr //配置写团体字为ruijie !sh snmp //查看snmp信息!11,常用维护命令!sh ver //查看软件版本sh ver slo //查看设备的槽位和板卡信息sh manu //查看设备的资产信息sh cpu //查看设备的CPU信息sh mem //查看设备的内存信息sh tem //查看设备的温度信息sh fan //查看设备的风扇信息sh power //查看设备的电源信息sh int sta //查看接口的状态信息sh int tra //查看接口光模块信息sh ip int br //查看接口的IP地址信息sh ip ro sta //查看静态路由sh run //查看当前配置sh run int xxx //查看接口配置sh vlan br //查看vlan信息sh arp //查看arp表sh mac //查看mac地址表sh log //查看系统日志sh clo //查看时钟信息sh date //查看日期信息sh diag //查看诊断信息,时间有点长,注意多等会,一般是给研发看的!二,华为交换机(H3C交换机命令参照华为交换机)1,设备登陆Web登陆:192.168.0.1 admin/Admin@123 huawei/Admin@huawei Console密码:默认为空2,系统基本配置!sys //全称为system-view,对应锐捷思科的config t (全局模式)sysn xx //修改设备名称!3,配置vlan!vlan10 //创建一个vlanname xx //给vlan命名vlan batch 11 to 19 21 to 22 //创建多个连续的和不连续的vlan!int g0/0/1des xxx //配置接口描述po link-t ac //配置接口为access模式po default vlan 10 //将接口加入vlan10quit!int g0/0/2des xxx //配置接口描述po link-t tr //配置接口为trunk模式po tr al vl al //配置接口trunk模式下允许所有vlan(1-4094),不敲该命令,默认只允许vlan1po tr al vl 2 to 3 //配置接口trunk模式下仅允许vlan2-3po tr pv vl 10 //配置接口trunk模式下pvid vlan(本征vlan)为10,对应锐捷思科的native vlanquit!dis vlan //查看vlan信息4,配置接口!sysint g0/0/1des xx //给接口配置描述ip add 1.1.1.1 24 //路由口配置IP地址,子网掩码可以直接写数字un shquit!vlan 10!int vlan 10des xx //给SVI接口配置描述ip add 172.16.10.1 255.255.255.0 //创建SVI接口,一般为作为网关或管理地址shut //关闭接口un sh //开启接口,对应锐捷思科的nosh !int g0/0/1negotiation auto //配置以太网接口工作在自协商模式undo negotiation auto //配置以太网接口工作在强制协商模式(多用于不同厂家设备互联)auto speed 10/100/1000 //配置接口速率auto duplex full/half //配置接口双工模式!dis cu int g0/0/1 //查看接口的配置dis int g0/0/1 //查看接口的详细信息dis int des //查看接口描述信息dis int br //查看接口状态和配置的简要信息dis tra int gi 0/48 ver //查看接口的光模块状态(该命令只对光口有效)dis ip int br //查看接口IP地址信息!【COMBO口】复用口,一光口+一电口,不能同时使用,一次只能使用一种。