MixPad产品安装指南
PADS安装说明书
6.激活完成。
图1.9
9.设置完成后点击 Done 出现图1.10 所示窗口。
图1.10
10.点击 Install 进入自动安装环节,安装过程如图1.11,图1.12,图1.13 所示。
图1.11
图1.12
图1.13பைடு நூலகம்
11.安装完成后会提示注册软件如图1.14所示:
图1.14
12.选择 at a later time,然后点击Done。到此软件安装完成。
二、软件激活
1.找到证书生成工具,如图 2.1 所示:
图2.1
2.双击红色框构选的软件出现图2.2的提示信息。第一次运行估计会报错,如果提示错误,关闭重试一次就好了。
图2.2
3.图2.3是该工具完成后弹出的证书文件,点击“文件→另存为”出现如图2.4所示的窗口,证书文件存放的位置为PADS9.5的安装目录,点击保存。
PADS安装说明书
一、软件安装
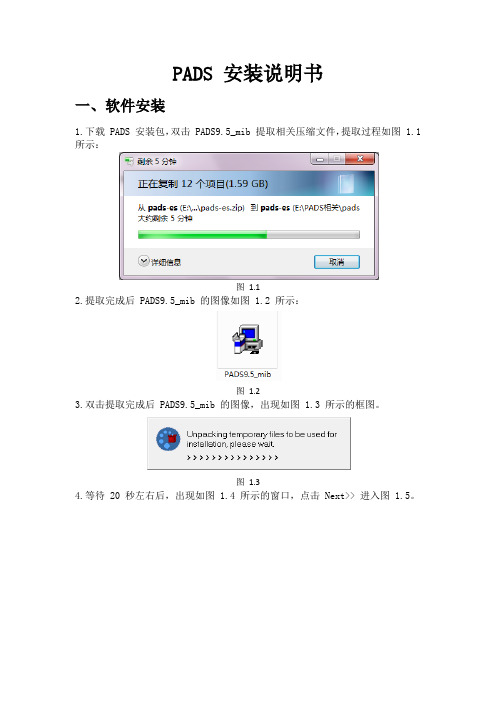
1.下载PADS安装包,双击 PADS9.5_mib 提取相关压缩文件,提取过程如图 1.1所示:
图1.1
2.提取完成后PADS9.5_mib 的图像如图1.2 所示:
图1.2
3.双击提取完成后PADS9.5_mib 的图像,出现如图1.3 所示的框图。
图1.3
4.等待 20 秒左右后,出现如图1.4 所示的窗口,点击 Next>> 进入图1.5。
图1.4
图1.5
5.点击 Skip进入图1.6。
图1.6
6.点击 Agree 进入图1.7。
图1.7
7.点击 Modify(更改),出现图1.8所示的窗口。
图1.8
8.在ProductSelection选项处选择自已需要安装的组件,一般单机版,不选择最后一项,如图1.9 所示。在 Target Path 选项处可以更改安装路径,在PADS Projects Path 选项处可以更改项目路径,本说明选择默认路径。
华为MediaPad用户手册(S7-301u,S7-302u,S7-303u,中文,for Android 4.0)

用户手册目录1开始使用 (1)1.1功能简介 (1)1.2了解HUAWEI MediaPad (1)1.3安装 (2)1.4开机和关机 (3)1.5充电 (3)1.6使用电池的注意事项 (4)1.7省电窍门 (5)1.8触摸屏操作方法 (5)1.9主屏 (7)1.9.1了解主屏 (7)1.9.2查看扩展屏幕 (8)1.9.3自定义主屏 (8)1.10锁定与解锁屏幕 (12)1.10.1锁定屏幕 (12)1.10.2设置屏幕空闲时间 (12)1.10.4设置解锁图案 (13)1.11常见屏幕按钮 (14)1.12进入设置界面 (14)1.13连接电脑 (16)1.14连接HUAWEI MediaPad与电视机 (17)2输入文字 (19)2.1切换输入法 (19)2.2 Android输入法 (19)2.3华为输入法 (20)2.4编辑文本 (21)3无线网络 (22)3.1无线局域网 (22)3.1.1开启或关闭无线局域网 (22)3.1.2打开无线局域网设置 (22)3.1.3连接无线局域网 (23)3.2蓝牙 (24)3.2.1开启或关闭蓝牙 (24)3.2.2打开蓝牙设置 (24)3.2.4与蓝牙设备中断连接或解除配对 (25)3.3连接移动网络 (26)3.3.1打开移动网络设置界面 (26)3.3.2开启或关闭漫游 (26)3.4共享您HUAWEI MediaPad数据的连接 (26)3.4.1通过USB 共享网络共享数据连接 (26)3.4.2通过便携式热点共享数据连接 (27)3.5开启或关闭飞行模式 (27)4浏览器 (28)4.1浏览网页 (28)4.2书签 (29)4.3下载文件 (30)5电子邮件 (31)5.1打开电子邮箱 (31)5.2添加和删除电子邮件账户 (31)5.2.1设置Email (31)5.2.2删除电子邮件账户 (31)5.3发送和接收电子邮件 (31)5.3.2阅读电子邮件 (32)5.3.3其他操作 (32)6通话 (33)6.1通过拨号拨打电话 (33)6.2接听、拒绝或结束通话 (33)6.3使用通话记录 (34)6.3.1打开通话记录 (34)6.3.2从通话记录拨打电话 (34)6.3.3添加电话号码到联系人 (35)6.3.4清除通话记录 (35)6.4打电话给联系人 (35)7信息 (36)7.1打开信息 (36)7.2发送信息 (36)7.2.1建立和发送文本信息 (36)7.2.2建立和发送彩信 (36)7.2.3查看和回复信息 (37)7.2.4查看信息详情 (37)8联系人 (38)8.1打开联系人 (38)8.2创建联系人 (38)8.3导入联系人 (38)8.4编辑联系人详细信息 (38)8.5删除联系人 (39)8.6合并联系人 (39)9多媒体 (40)9.1 录音机 (40)9.2 相机与摄像机 (40)9.2.1照相机取景界面 (41)9.2.2摄像机取景界面 (43)9.3视频 (44)9.4 图库 (45)9.4.1打开图库 (45)9.4.2查看图片 (46)10应用程序 (47)10.1 日历 (47)10.2 闹钟 (48)11安全设置 (49)11.1启用SIM卡PIN码 (49)11.2变更SIM卡PIN码 (49)12 FAQ (50)13个人信息和数据安全 (52)14法律声明 (53)1 开始使用1.1 功能简介感谢您选择HUAWEI MediaPad作为您日常生活的助手和伙伴!HUAWEI MediaPad 是一款为您提供高质量的图片、高清晰的视频、便捷的网络等服务的智能平板电脑。
小米平板2Miui+Win双系统安装教程v4.2
小米平板2Miui+Win双系统安装教程v4.2小米平板2对安卓和Windows 系统的兼容特性,使得它可以Miui+Win 双系统并存,并因此深得用户喜爱。
但它的双系统切换却非常不方便,成为一个痛点,本教程很好地解决了这个问题。
相比上一版,本教程一是简化了刷机操作,提升稳定性,二是集成了开机切换和一键切换安装包,可以方便地更换系统切换方式。
预知事项:刷机有风险,使用本教程前请谨慎评估,风险自负;平板各有差异,尤其魔改过的平板受其使用的硬盘限制,存在一定可能无法安装或运行安卓系统;本教程提供了BIOS刷入工具,能重置主板设置,清除主板上累积的问题,使得很多以前无法安装双系统的平板能够安装。
如果你正受此困扰,建议试试本教程;之前流传最广的双系统刷机工具是游戏尘间制作的版本,本刷机包是在游戏尘间成果基础上改进而来,在此向这位高手致敬。
下面正式开始安装过程。
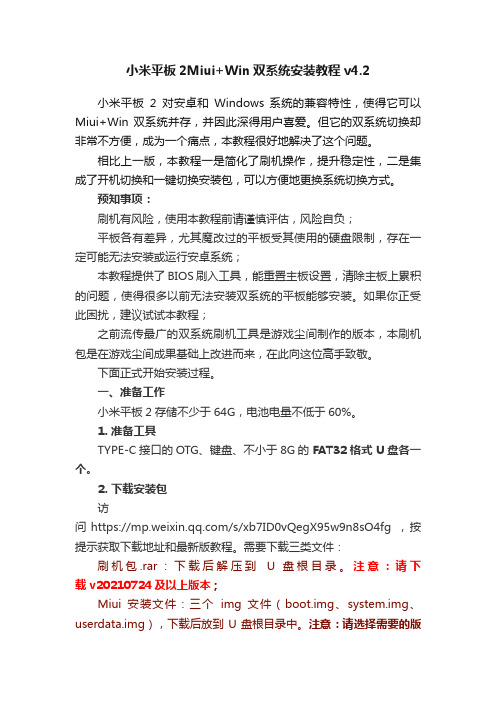
一、准备工作小米平板2存储不少于64G,电池电量不低于60%。
1. 准备工具TYPE-C接口的OTG、键盘、不小于8G的FAT32 格式 U盘各一个。
2. 下载安装包访问 https:///s/xb7ID0vQegX95w9n8sO4fg ,按提示获取下载地址和最新版教程。
需要下载三类文件:刷机包.rar:下载后解压到U 盘根目录。
注意:请下载 v20210724及以上版本;Miui 安装文件:三个img 文件(boot.img、system.img、userdata.img),下载后放到 U 盘根目录中。
注意:请选择需要的版本下载,因为安装好后不可联网升级,否则会造成切换功能失效;Win 映像文件,下载需要版本的文件夹中所有 swm 文件,拷到 U 盘的 miwindows 文件夹中。
3. 设置 Miui 系统分区大小默认 Miui 分区大小为 12G,如果想调整大小,请将刷机包的“分区文件”中对应容量的 gpt.bin 拷到 U 盘根目录替换同名文件。
Connect Family RE667 Slimline Touchpad安装指南说明书
Connect Family RE667 Slimline T ouchpad I N S T A L LG U I D EThe RE667 Slimline Touchpad is an intuitive interfacefor controlling the security system. It is AC powered andcommunicates with the panel wirelessly.Features•Vibrant 7’’ Android™ tablet display•Provides local control of security and automation functionality•Wall or table mounted•Encrypted, Connect+ and BAT-Connect enabled, battery-backedWi-Fi™ connectionInstallation Overview for Connect+1.Confirm the panel has a Wi-Fi DeviceLink card installed.Slot 2BackupBattery2.Choose a mounting location. Touchpad can be mounted on a wall or tabletop.3.Identify your network and verify signal strength before mounting it permanently.1.Ensure the panel is powered.2.Power the Touchpad by applying AC power.3.Select the “Connect” option to see the available networks. If the “Connect” option isnot available, press “Setup” then “Factory Default”. The Touchpad can be connectedto either the Wi-Fi DeviceLink card or the home router for internet access. (Internetaccess allows camera control and the ability to modify users.)4.Once a network is determined, verify the signal strength. If the signal strengthdisplayed is less than 35, relocate the Touchpad or Connect+ panel. If neither optionsare available, install an RE621 Touchpad Range Extender.Note: If connecting to a home network router, the Connect+ needs to be connectedto the same network via ethernet. The Touchpad cannot connect to the panel over anunsecured or open network.Troubleshooting Steps if Enrollment Fails:•Confirm the panel is disarmed and in wireless enrollment mode. A red light will flash on the panel if in wireless enrollment mode.•Check whether the panel is already full. The limit is four Touchpads. To confirm number of Touchpads connected, log into your account.•Tap the "Restart" button to try again.By default the Touchpad network list will show Connect+ and BAT -Connect access points. To view all networks in range tap the “Show all networks” button at the bottom of the network list.4.Mount the Touchpad.5.Enroll the Touchpad by pressing the enroll button on the side of the panel until it beeps once and then select the desired network.Note: If connecting to a home network, enter router credentials at the Touchpad. After a connection is established, the Touchpad will discover all devices on the network. Select the desired panel. After selecting the desired panel, the Touchpad will progress through stages of discovery and authentication. Upon success it will show the DISARMED screen. If the wrong panel was selected, press the “Restart”button in the side menu.6.If using cameras or user management features, you must log in to the Alula Cloud as theaccount owner. To log in go to Settings and select Touchpad. Enter master code, then select Alula Cloud. Sign in with Alula Cloud user name and password (note: internet access is required).7.Test the Touchpad by arming and disarming the panel from the Touchpad.Installation Overview for BAT -Connect3.Mount the Touchpad. Refer to section “Touchpad Mounting Options” for mounting instructions.4.Enroll the Touchpad by pressing the enroll button on the BAT -Connect for 2-3 seconds. Select your network, then select next. Enter the CRC of the BAT -Connect, which can be found on the inside cover of the BAT -Connect . The Touchpad will progress through stages of discovery and authentication. Upon success it will show the DISARMED screen. If the wrong device was selected, press the “Restart”button in the side menu.Troubleshooting Steps if Enrollment Fails:•Confirm the system is disarmed and in wireless enrollment mode. The DeviceLink LED on the BAT -Connect will flash when in enrollment mode.•Check whether the panel is already full. The limit is four Touchpads. To confirm number of Touchpads connected, log into your account.•Tap the "Restart" button to try again.1.Chose a mounting location. Touchpad can be mounted on a wall or tabletop.2.Identify your network and verify signal strength before mounting it permanently .1.Ensure the system is powered.2.Power the Touchpad by applying AC power.Note: The Touchpad cannot run off panel bus. Existing wiring needs to be moved to the provided power adapter. For additional details, please refer to Wall Mounting section .3.Select the “Connect” option to see the available networks. If the “Connect” option is not available, press “Setup” then “Factory Default”. The Touchpad should be directly connected to the BAT -Connect access point. The Touchpad can access the internet directly through the BAT -Connect. (Internet access allows camera control and the ability to modify users.)4.Once a network is determined, verify the signal strength. If the signal strength displayed is less than 35, relocate the Touchpad or BAT -Connect.Note: in order for the Touchpad to access the internet through the BAT -Connect access point, the BAT -Connect must be connected via ethernet or Wi-Fi.BAT - Connect - VBAT - Connect, M1, VZBAT - CONNECT - VBAT - Connect, M1, VZC R C :1234DTouchpad Mounting OptionsTable Top Mounting1. Co nnect the power adapter by inserting the connector into the black port. Once inserted, turn the connector to the right to lock into place.2. S lide the Touchpad onto the stand. The fit is intended to be quite snug, so some force may be required for the stand to “click” into place.3. Coil up the excess power wire into the stand, and close the stand cover to contain the wires.4.Plug in power supply.5. If using camera or user management features , internet access is required. In order to access the internet your BAT -Connect must be connected via ethernet or Wi-Fi. In addition you must log in to the Alula platform using the account owner user name and password. To log in go to Settings and select Touchpad. Enter master code, then select Alula Cloud.6. Test the Touchpad by arming and disarming the system from the Touchpad.2. There are two methods for connecting power to the Touchpad.A. If you desire to hide the power cable, you can drill a hole in the wall through one of the four windows in the mounting plate and pull a wire behind the drywall to a location with an AC power outlet. Connect one end of the wire to the terminal block on the back of the tablet. Push the buttons on the terminal block to allow the wire to be inserted. Splice the other end of the wires to the power supply wires after cutting off the barrel jack. MUST USE PROVIDED POWER SUPPLY. Power from an existing panel may be insufficient . Wire length must not exceed lengths listed below.B. Barrel jack of the power supply can be plugged directly into the back of the Touchpad. Wires can be routed through wire channel in the back of mounting base. This configuration requires the barrel jack be routed through the mounting base before the mounting base is screwed to the wall.WIRE GAUGE MAXIMUM LENGTH BETWEEN POWER SUPPLY AND TABLET#24Up to 70 feet #22Up to 100 feet #20Up to 175 feet #18Up to 250 feet #16Up to 450 feetWall Mounting1. There are two mounting configurations.A. If mounting on a stud, use the two centered holes labeled below [A].B. If not mounting on a stud, use the four corner mounting holes. Insert the wall anchors prior to screwing the screws in place [B].BSecurity• History - shows event history• Attention - shows all opened, bypassed, or troubled zones. Zones can be bypassed or activated by pressing the toggle to the right of the zone name. Cameras• Cameras - can be viewed directly from the Touchpad. Live view, clips, and event noti-fications are supported. Doorbell live view will automatically be displayed when the doorbell button is pressed. Internet access is required.Menu Guide3. Slide the Touchpadonto the mounting plate. Push any extra wire into wall before sliding onto mounting plate.4. Drop cover behind Touchpad.5. Lock in cover by pressing at these locations untilsnapped into place6.Plug in power supply.Scenes• Create scenes from the Touchpad by clicking the “+ Add” button• Enable/disable scenes with the toggle button• Navigate to the edit scene page by selecting an item in the list• Rename a scene by selecting the name label in the top bar• Modify the scene by adding/removing triggers and actionsDevices• Add/Remove Z-Wave® devices using the "+ Add" or "- Remove" buttons in the app bar• Lock and unlock Z-Wave door locks• Turn Z-Wave lights on and off• Set dimmer level for Z-Wave dimmer switches• Open and close Z-Wave garage door openers• Control Z-Wave thermostats**PLEASE SEE Z-WAVE USER GUIDE FOR ADDITIONAL INFORMATION**System• Panel• Troubles - shows all system troubles• Status - shows all status updates• Touchpad• Battery - shows battery level and charging information• Network - shows network the Touchpad is connected to• Access point MAC• Wi-Fi signal strength - must not be less than 35• Response Time• Wi-Fi channel• Touchpad Firmware• Touchpad Hardware• Updater Firmware• Serial Number• FCC/IC information• UptimeSettings• Display• Brightness - adjust slide bar to change brightness level• Auto sleep display - when enabled the Touchpad screen will go to sleep after programmedperiod of inactivity. When disabled the Touchpad screen will stay on and show the systemoverview page.• Entry wake - when enabled the screen will turn on during entry delay• Clean screen - ignores touch input on the screen for 30 seconds to allow user to clean thescreen• Sound- adjust slide bar to change volume level• Touchpad(must enter code to access)• Show Favorites - display favorites menu that shows frequently used zones, scenes, anddevices on dashboard• Show Panics - ability to turn off individual panics (this option can only be viewed when using installer or dealer code)• Lock to Dashboard• When enabled only the dashboard menu can be accessed without an access code• When disabled no access code is needed to navigate outside of dashboardStatistic Unit GOOD FAIR POOR Wi-Fi SignalStrengthdB Over 3935 to 39Under 35CommunicationSuccess Rate%Over 8985 to 89Under 85Response Time Average ms Under 200200 to 250Over 250• Return to dashboard - specifies time of inactivity before Touchpad will automatically return to dashboard• Dock - specify the items to be displayed in the bottom dock• Notifications - ability to turn on and off notifications on the system overview page• Wi-Fi - connect via Wi-Fi if using cameras and user management features• Temperature Scale - option for displaying °F or °C• Alula Cloud - must be logged into Alula Cloud as the account owner to use cameras and user management features• Power Off• Panel(must enter code to access)• Sensor Chime - enables or disables panel sensor chime mode (only available with Connect+)• Quick Arm - arm the panel without entering your access code. Access code is still required to disarm• Users - manage device users directly from the touchpad (only the account owner can modify users, internet access is required).• Keypads - lists the panel’s keypads• Rename keypads by selecting an item on the list and holding it for 2 seconds • Communication Test mode• The Touchpad will begin testing communications and display "TESTING"• After one minute, the Touchpad will show the result of the test which will be either"GOOD," "FAIR," OR "POOR"• If you get a "POOR" test result, try the test again from another location• The table below lists the thresholds used to determine the outcome of the test • If any statistic falls in the poor range, the test outcome is "POOR"• If there are no poor statistics and any statistic is in the fair range, the outcome of thetest is "FAIR"• If all statistics are in the good range, the outcome of the test is "GOOD"• Check for updates - this will tell the panel to check for any system updates• Z-Wave• Join/Leave Another Z-Wave Network - the panel can be placed into Z-Wave inclusion or exclusion mode to allow it to join/ leave existing Z-Wave networks.• Soft Reset - a soft reset will reset the Z-Wave controller software. All Z-Wave devices willremain enrolled.• Hard Reset - this action will cause your Connect+ Z-Wave module to be restored backto the default state. Warning: Performing this action results in all Z-Wave devices beingremoved from this Z-Wave controller. To add them back, you will first need to excludethem, and then include them again.**PLEASE SEE Z-WAVE USER GUIDE FOR ADDITIONAL INFORMATION**• About - lists information about the panel’s installed hardware and softwareHome Screen Functions*Tap or slide toview Side MenuactionPanic option for two seconds to triggerThe headline indicates panel status such as "Disarmed" or "Armed Stay"Tap one of the arming buttons to arm the panelThe time zone isTap to turn the Tap to viewselected favorite Zones, Devices, and Scenesto trigger police alarmto trigger fire alarmauxiliary alarm Turn on/offPanic Functions**These features were taken from a Connect+. Your features may differ depending on panel.Pro TipsPush any extra wire into wall before sliding Touchpad onto mounting plate to ensure the wires don’t get pinched. Drill a hole in the wall through any of the 4 mounting platewindows if no hole exists.The Touchpad display turns off on its own after specified allotted time of inactivity (Auto sleep display setting). It will turn back on when the screen is touched, or for somealarm conditions. The screen can also be turned off manually by pressing "Sleep."To unenroll the Touchpad navigate to the Settings menu and then to the section labeled "Panel." Put the panel, or BAT-Connect, into wireless enrollment mode and press theunenrollment button on the touchpad screen. Note: The unenrollment button is displayed only when the panel is in enrollment mode.To remove vanity cover, insert a flat head screwdriver at the two points shown below and twist the screwdriver.IC NOTICEThis device complies with Industry Canada license-exempt RSS standard(s). Operation is subject to the following two conditions:(1) This device may not cause interference, and(2) This device must accept any interference, includinginterference that may cause undesired operation of thedevice.Le présent appareil est conforme aux cnr d’Industrie Canada applicables aux appareils radio exempts de licence. L’exploitation est autorisée aux deux conditions suivantes:(1) L’appareil ne doit pas produire de brouillage, et(2) L’utilisateur de l’appareil doit accepter tout brouillageradioélectrique subi, même si le brouillage est susceptible d’en compromettre le fonctionnement.FCC NOTICEThis device complies with Part 15 of the FCC rules. Operation is subject to the following two conditions:(1) This device may not cause harmful interference.(2) This device must accept any interference that may bereceived, including interference that may cause undesiredoperation.Changes or modifications not expressly approved by Alula could void the user’s authority to operate this equipment. TRADEMARKSAlula and Connect+ are trademarks owned by Alula Holdings, LLC.Android is a trademark of Google LLC.Z-Wave is a registered trademark of Silicon Labs.Wi-Fi is a trademark of The Wi-Fi Alliance.47-0066-00 • Rev B • 2019-11-08Tech Support Line • (888) 88-ALULA • (888) 882-5852。
黑莓安装软件的三种方法
黑莓安装软件的三种方法第一种方法:正统式,就是使用黑莓官方的桌面管理器对应用程序进行安装(即常说的"DM":Handheld Tools Desktop Manager)本文选择的是4.21版的DM,更高版本的DM虽然UI界面不一样,功能却都差不多,DM 程序的安装部分无需多言,一路NEXT即可。
1.安装完毕后,打开DM程序,我们可以看到如图一所示的几个按钮,在这里,我们点选其中的“应用程序加载器按钮”来进行操作。
2.出现程序加载器的欢迎界面,点击“下一步”:3.出现应用程序加载器向导界面,在这里我们可以一目了然的看到BB中“正常”加载进去的程序,(关于JAVALOADER加载后的程序无法在DM中看到的情况我们后面再说)在这里,我们点击右上角的“添加”按钮:4.点击添加按钮后,我们找到我们需要安装的软件(在这里,我需要的是找到ALX文件,ALX类似一个指向索引,本身并无用处,但是要在DM里面安装却必须用到它,这里要注意:大部分情况下ALX文件和COD文件要在同一文件夹里,可以复选多个ALX进行快捷添加)点选该需要添加的ALX文件后,选择下方的按钮“打开”即可,如图所示:5.添加完毕后,就会回到开始的向导界面,在程序列表中我们可以看到刚才添加的程序成为了待安装状态,我们选择点击“下一步”:6.点击后出现确认界面。
在这里可以清楚的看见本次安装和删除了那些应用程序,点击完成即可完成整个安装过程:-----------------------------------------------------------猥琐而华丽的分割线------------------------------------------------------------第二种,非主流安装方式:使用JAVALOADER及其衍生物进行安装JAVALOADER的衍生物有好几个,在这里我选择我自己常用的Winloader来进行演示。
Onda V972 Android平板电脑 V1.35固件下载和安装指南说明书
Onda V972 Android Tablet V1.35 Firmware Download and Installation GuideIf you own an Onda V972 Android tablet and want to update its firmware to the latest version, you can follow this guide to download and install the Onda V972 Android Tablet V1.35 Firmware. This firmware is based on Android 4.2.2 Jelly Bean and offers some improvements and bug fixes over the previous versions.onda v972 android tablet v1.35 firmware downloadDownload ⚹⚹⚹ https:///2vEljmBefore you proceed, please note that flashing your tablet is solely your responsibility and TechBalloon365 cannot be held responsible for any issues. You should also backup your data before flashing as you may lose unsaved data during the process.RequirementsAn Onda V972 tablet with a serial number starting with V1 (you can check the serial number at the back of your tablet)A Windows PC with PhoenixSuit software installed (you can download it from here)A micro USB cableThe Onda V972 Android Tablet V1.35 Firmware image file (you can download it from here) Steps1.Launch PhoenixSuit on your PC and click on the Firmware button then Image button andlocate the .img file on your hard drive corresponding to the firmware you wish to flash.Disconnect the micro USB cable from your tablet and shut it down, either from Android 2.shutdown menu, or by pressing the Power button for about 10 seconds.3.Press the Home button on the tablet, plug in the micro USB cable on the tablet, while keeping the home button pressed.4.While keeping the Home button pressed, make short presses (about half a second duration each) on the Power button for about 10 times or until you see a dialog on the Windowsmachine asking you to format your device.5.Click Yes to allow format mode (you will lose unsaved data but it is best to choose this optionto avoid bugs/issues).6.Wait for the flashing process to complete. It may take several minutes.7.Restart your tablet. Your tablet may start configured in Chinese language. To change it toEnglish, go to Tablet settings (look for a gear icon), then look for a red cloud shaped icon just below a lock icon and press it. Then press the first option on the page that appears and then choose English.Congratulations! You have successfully updated your Onda V972 Android tablet to V1.35 firmware. Enjoy!Features and Benefits of Onda V972 Android Tablet V1.35 FirmwareThe Onda V972 Android Tablet V1.35 Firmware is based on Android 4.2.2 Jelly Bean, which is a fast and smooth operating system that offers many features and customization options. Some of the features and benefits of this firmware are:Improved stability and performance of the tabletEnhanced compatibility with various apps and gamesFixed some bugs and issues such as screen flickering, camera crashing, WiFi dropping, etc.Added support for OTG function, which allows you to connect external devices such as USB flash drives, keyboards, mice, etc. to your tabletAdded support for HDMI output, which allows you to connect your tablet to a TV or monitor and enjoy high-definition video and audioAdded support for multi-window mode, which allows you to run two apps side by side on the same screenAdded support for gesture control, which allows you to perform certain actions by waving your hand over the tablet's front cameraAdded support for face unlock, which allows you to unlock your tablet by looking at the front cameraAdded support for voice control, which allows you to control your tablet by speakingcommandsAdded support for wireless display, which allows you to mirror your tablet's screen to acompatible device such as a smart TV or a laptopTips and Tricks for Onda V972 Android Tablet V1.35 FirmwareTo make the most out of your Onda V972 Android Tablet V1.35 Firmware, here are some tips and tricks that you can try:To access the multi-window mode, long press the back button and select the apps that youwant to run in split screen. You can adjust the size of each window by dragging the dividerbar.To access the gesture control, go to Settings > Accessibility > Gesture Control and enable it.You can also customize the gestures and actions from there.To access the face unlock, go to Settings > Security > Screen Lock and select Face Unlock.You will need to set up a backup PIN or pattern in case the face unlock fails.To access the voice control, go to Settings > Language & Input > Voice Control and enable it.You can also customize the voice commands and actions from there.To access the wireless display, go to Settings > Display > Wireless Display and enable it. You will need a compatible device that supports Miracast or Wi-Fi Direct.We hope this guide has helped you update your Onda V972 Android tablet to V1.35 firmware and enjoy its features and benefits. If you have any questions or feedback, please feel free to leave a comment below.01221423d6。
亿维自动化 X系列BD扩展板使用说明书

3.4. X-2AO-BD 产品说明书 ............................................................................................................ 19
3.4.1. 产品概述 ............................................................................................................................ 19
2.1.4. 模拟量 BD 扩展板地址对照表........................................................................................... 7
3. BD 扩展板详细参数..................................................................................................................................... 9
服务热线:4000 300 890
3.1.4. 安装及接线图 .................................................................................................................... 10
3.1.5. 应用说明 .............................................................................................................................11
NP711说明书

4
方向:开启或关闭旋转平板电脑时自动改变方向的功能; 『提示』这是本机具有的重力感应功能,您下载体验相关的重力感应游戏。
电池图标将滚动,当充电完成时屏幕电池图标会变成绿色并停止滚动。 使用前请将电池充满,当电池完全充放电两到三次后方可达到最佳状态。建议前两次充电请保持在 10 小时左右,以后再进行充电保持在
2 小时左右即可。
『提示』当机器右上角显示红色的“ ”,请注意充电。 【注意】聚合物锂电池过度消耗所导致的电池损坏不属于本机质保范围。若使用非本机专用的充电器对本机充电而导致本机出现问题不 属于质保范围。 为保证机器安全,请勿在高温环境下对本机进行充电,如暖气旁、电热毯等环境下;并禁止在充电时将产品或充电器上放置遮盖物,如 被子、衣物等。 二、开关机 开机:长按电源键,系统会自动开启,进入开机画面。 关机:长按电源键,系统会出现设备选项菜单,点击关机,再次确定后,平板电脑正常关机。 『提示』电量不足情况下,系统会自动关机 【注意】非法关机后,重启会扫描和修复磁盘,界面可能会较长时间停留在进度条画面。 三、屏保 在开机状态下,按下电源键进入屏保状态。 『建议』为节能环保,请在暂停使用本机时设置好屏幕待机时间。 四、扩展卡的使用 本机设有 SD 存储卡插槽,可将音乐、电子书等文件放入卡中。使用时,需按照插卡槽的设置将 SD 存储卡正确插入,向里推卡,直至听 到咔哒一声。取出存储卡时,请向插槽里推一下存储卡,然后释放。存储卡将自动弹出来,再取出存储卡。 【注意】⑴请正确把卡插入机器的插卡槽中。
np711sd卡卡座usb接口一充电操作及电池管理本机采用内置型锂聚合物电池支持充电器充电将充电器插头插入主电源插座再与本机的充电接口相连接即可进入充电状态屏幕电池图标将滚动当充电完成时屏幕电池图标会变成绿色并停止滚动