几种发电机100%定子接地保护的应用
2017五年级语文下册重要词语句子归类

2017五年级语文下册重要词语句子归类2017浜斿勾绾ц鏂囦笅鍐岄噸瑕佽瘝璇彞瀛愬綊绫?涓€銆佽闊崇粏鍒嗙被銆€銆€骞宠垖闊筹細钃憇u艒閱墇u矛銆€銆€缈樿垖闊筹細妫箊h脿o姣h膩n铓眤h脿婢刢h茅n锟戒箰锟絲h墨閬畓h 膿閿刢h煤鍌籹h菐鐥碿h墨銆€銆€鍓嶉蓟闊筹細姣h膩n鍟僰臎n鎮u脿n 銆€銆€鍚庨蓟闊筹細鍡膿n锟界儥锟統墨n锟借厞锟絙脿n锟借幈锟絚h茅n锟借鞍锟絡i菕n锟藉┆锟絝菐n锟斤拷銆€銆€闆跺0姣嶏細濯巓琚勄巓銆€銆€鏁翠綋璁よ锛氭ūy墨n锟借幈锟絚h墨銆€銆€浜屻€佸瓧褰㈣寰楃墷銆€銆€婢勶細鍙充笂閮ㄧ殑椤烘槸妯拠銆佺偣銆佸啀鍐欎袱鎾囷紝鎹猴紱銆€銆€鍗革細9鐢伙紝绗?绗旀槸鈥滄彁鈥濓紱銆€銆€鍌伙細鍙充笂閮ㄥ垎閲岄潰鏄€溍椻€濅笉鏄€滃鈥濄€?銆€銆€涓夈€佸闊冲瓧鍒嗗緱娓?銆€銆€ju茅鍜€鍤尖攢鈹€ji谩o鍤肩儌x矛n锟芥爮鍜濇嫶銇夛拷x墨n锟戒浆鏈旓拷b脿n锟借厞闅圭銇夛拷b猫n锟借厞闇撅拷銆€銆€j矛绯婚瀷甯︹攢鈹€j矛鍏崇郴b膩o鍓ヨ幉钃攢鈹€b艒鍓ュ墛hu菐n锟界儌楠颁綅鎯熴亯锟絟u脿n锟介槕鍛筹拷銆€銆€yu猫娓呭钩涔愨攢鈹€l猫蹇箰zu膩n閽荤爺鈹€鈹€zu脿n閽荤煶w煤浜¤禆鈹€鈹€w菐n锟芥氮鍔筹拷銆€銆€p奴閾鸿矾鈹€鈹€p霉褰撻摵ch茅n锟借幈鍚绘繝銇夛拷d猫n锟借幈绱婏拷銆€銆€鍥涖€佸舰杩戝瓧鐪嬩粩缁?銆€銆€钃?钃戣。
)鈹€鈹€琛?琛拌€?閬?閬尅)鈹€鈹€钄?鐢樿敆)閱?閱夋眽)鈹€鈹€閱?瑙夐啋) 銆€銆€濯?濡╁獨)鈹€鈹€鐪?鐪夋瘺)閿?閿勫ご)鈹€鈹€鍔?甯姪)姣?姣″附)鈹€鈹€娌?娌炬煋) 銆€銆€鍗?瑁呭嵏)鈹€鈹€寰?鎶靛尽)鍤?鍜€鍤?鈹€鈹€鐖?鐖典綅)濡?濡ㄧ)鈹€鈹€璁?璁块棶) 銆€銆€婕?娌欐紶)鈹€鈹€瀵?瀵傚癁)琚?澶硅)鈹€鈹€濡?濡栧▎)琚?闀胯)鈹€鈹€娉?鐏场) 銆€銆€绁?绁稿)鈹€鈹€閿?閾侀攨)娣?娣樻皵)鈹€鈹€闄?闄跺櫒)缁?缁炴潃)鈹€鈹€鐙?鐙$尵) 銆€銆€鎰?鎰х枤)鈹€鈹€妲?妲愭爲)鐡?鐡㈣櫕)鈹€鈹€椋?椋樺姩)绡?甯愮)鈹€鈹€钃?鑾茶摤) 璇嶈锛氭敞鎰忚鍐欎笌杩愮敤銆€銆€涓€銆佽瘝璇細鐞嗚В銆€銆€澶╄祴锛氳嚜鐒跺叿澶囷紝鐢熸潵灏辨湁銆?銆€銆€杩涘寲锛氱敓鐗╃敱绠€鍗曞埌澶嶆潅锛岀敱浣庣骇鍒伴珮绾э紝閫愭笎鍙戝睍婕斿彉銆?銆€銆€鐪夌洰锛氫簨鎯呯殑澶寸华銆?銆€銆€鍥扮獦锛氬舰瀹逛负闅撅紱鎰熷埌闅惧姙銆傝鏂囨寚鎴戦潰瀵硅€佸笀鐨勮瑙e拰鍚屽鐨勫槻绗戯紝涓嶇煡閬撴€庝箞鍔炲ソ銆?銆€銆€鎯呬笉鑷锛氭劅鎯呮縺鍔紝鎺у埗涓嶄綇鑷繁銆傜锛氭帶鍒躲€?銆€銆€涓€鏈缁忥細褰㈠鎬佸害搴勯噸涓ヨ們锛岄儜閲嶅叾浜嬨€傛湁鏃跺惈璁藉埡鎰忓懗銆?銆€銆€闅忓績鎵€娆诧細鎸囬殢鐫€鑷繁鐨勫績鎰忥紝鎯虫€庢牱灏辨€庢牱銆?銆€銆€缁炲敖鑴戞眮锛氬舰瀹硅垂灏藉績鎬濄€?銆€銆€浜屻€佽瘝璇細杩愮敤銆€銆€缁炲敖鑴戞眮鈹€鈹€杩欓亾鏁板棰樺お闅句簡锛屾垜缁炲敖鑴戞眮閮芥病鏈夊仛鍑烘潵銆?銆€銆€闅忓績鎵€娆测攢鈹€浠讳綍浜洪兘涓嶈兘闅忓績鎵€娆插湴鍋氫簨锛屽湪鐝闈㈠墠浜轰汉閮芥槸骞崇瓑鐨勩€?銆€銆€鎯呬笉鑷鈹€鈹€鐪嬬潃涓浗闃熷ず寰椾簡鍐犲啗锛屾垜浠儏涓嶈嚜绂佸湴娆㈠懠璧锋潵銆?銆€銆€涓€鏈缁忊攢鈹€鏈熶腑鎴愮哗鍏竷鍚庯紝鎴戦棶鏈嬪弸锛氣€滀綘鐨勬垚缁╁浣曪紵鈥濅粬涓€鏈缁忓湴璇达細鈥滃涓嶈捣锛佹棤鍙鍛婏紒鈥濊繖瀹朵紮锛屽眳鐒惰繕鍚婃垜鑳冨彛锛?銆€銆€涓夈€佽瘝璇阀杈ㄦ瀽銆€銆€1锛庤繎涔夎瘝鏄湅鍙嬨€?銆€銆€渚电姱鈹€鈹€渚靛鎯呰叮鈹€鈹€鎯呰皟娓呰剢鈹€鈹€鎮﹁€?閲嶄复鈹€鈹€閲嶆潵銆€銆€鎯冲康鈹€鈹€鎯﹀康瀵傚癁鈹€鈹€瀛ゅ瘋瀛樺績鈹€鈹€鏁呮剰鍠ч椆鈹€鈹€鍠у摋銆€銆€闂儊鈹€鈹€闂€€椹遍€愨攢鈹€椹遍櫎鍟嗛噺鈹€鈹€鍟嗚姹插彇鈹€鈹€鍚稿彇銆€銆€澶╄祴鈹€鈹€澶╂€?杞荤泩鈹€鈹€杞诲阀鎯╃綒鈹€鈹€澶勭綒杩锋亱鈹€鈹€鐥磋糠銆€銆€缁炲敖鑴戞眮鈹€鈹€璐瑰敖蹇冩満闅忓績鎵€娆测攢鈹€涓烘墍娆蹭负涓€鍔ㄤ笉鍔ㄢ攢鈹€绾逛笣涓嶅姩銆€銆€2锛庡弽涔夎瘝鏄鎵嬨€?銆€銆€渚电姱鈹€鈹€淇濆崼骞肩鈹€鈹€鑰佺粌娓呰剢鈹€鈹€娌欏搼鏄庝寒鈹€鈹€榛戞殫銆€銆€鏁撮綈鈹€鈹€鏉備贡杞绘澗鈹€鈹€娌夐噸婕備寒鈹€鈹€涓戦檵鎵胯鈹€鈹€鍚﹁銆€銆€鐙珛鈹€鈹€渚濊禆婢勬緢鈹€鈹€娴戞祳娣樻皵鈹€鈹€鑰佸疄杞荤泩鈹€鈹€绗ㄦ嫏銆€銆€闅忓績鎵€娆测攢鈹€浠讳汉鎽嗗竷涓€鏈缁忊攢鈹€娌瑰槾婊戣垖鎯呬笉鑷鈹€鈹€鏃犲姩浜庤》鍙ユ锛氬搧鍛冲惈涔変笌鐗圭偣銆€銆€涓€銆佷匠鍙ュ搧鍏跺懗銆€銆€1锛庤崏閾烘í閲庡叚涓冮噷锛岀瑳寮勬櫄椋庝笁鍥涘0銆?銆€銆€鍝佽锛氭斁鐪兼湜鍘伙紝鍘熼噹涓婅崏鑹茶懕鑼忥紱渚ц€冲€惧惉锛屾櫄椋庝腑鐗х瑳澹板0銆備竴涓€滈摵鈥濆瓧锛屾妸鑽夌殑鑼傜洓鍜岃崏鍘熺粰浜虹殑閭g骞崇紦鑸掓湇鐨勬劅瑙夎〃鐜板嚭鏉ヤ簡锛涗竴涓€滃紕鈥濆瓧锛屾妸椋庝腑绗涘0鐨勬椂鏂椂缁€佹偁鎵閫稿拰鐗х鍚圭瑳瀣夋垙鐨勬剰鍛充紶杈惧嚭鏉ヤ簡銆傚闃旀棤杈圭殑鑽夊満涓虹墽绔ョ殑鍑哄満鎻愪緵浜嗗満鏅紝鎮犳壃鎮﹁€崇殑绗涘0锛岀儤鎵樺嚭鐗х鍔充綔鍚庤交鏉鹃棽閫傜殑蹇冨銆傛湭瑙佺墽绔ワ紝鍏堥椈鍏跺0锛岀粰浜烘棤闄愮編濂界殑鎯宠薄绌洪棿銆?銆€銆€2锛庢€敓鏃犻洦閮藉紶浼烇紝涓嶆槸閬ご鏄娇椋庛€?銆€銆€鍝佽锛氬摝锛屾€笉寰楁病涓嬮洦浠栦滑涔熷紶寮€浜嗕紴鍛紝鍘熸潵涓嶆槸涓轰簡閬洦锛岃€屾槸鎯冲埄鐢ㄤ紴浣块璁╄埞鍓嶈繘鍟婏紒璇椾汉瀵瑰効绔ョ殑鍠滅埍涔嬫儏婧簬瑷€琛紝瀵逛袱涓皬绔ュ瓙鐜╄€嶄腑閫忓嚭鐨勮仾鏄庝级淇愯禐璧忔湁鍔犮€?銆€銆€3锛庡ぇ鍎块攧璞嗘邯涓滐紝涓効姝g粐楦$銆傛渶鍠滃皬鍎夸骸璧栵紝婧ご鍗у墺鑾茶摤銆?銆€銆€鍝佽锛氭暣鍔冲姏鍦ㄦ邯涓滅殑璞嗗湴閲岄攧鑽夛紝鍗婂ぇ鐨勫瀛愬湪缂栫粐楦$锛屾渶灏忕殑瀛╁瓙鍦ㄦ邯杈硅洞鐫€鍓ヨ幉钃帺鑰嶃€傝瘲浜虹潃鍔涗簬鈥滃皬鍎库€濈殑鎻忕粯锛屸€滄邯澶村崸鍓ヨ幉钃€濆舰璞″湴鍒荤敾鍑轰粬鏃犲咖鏃犺檻銆佸ぉ鐪熸椿娉肩殑绁炴€併€傗€滄渶鍠溾€濊〃杈句簡浠栧灏忓効鐨勫枩鐖变箣鎯咃紝杩欏枩鐖变箣鎯呯紭浜庡皬鍎跨殑鍙幀鎲ㄦ€侊細鍦ㄦ邯澶磋洞鐫€锛屾偁闂插湴鍓ョ潃鑾茶摤锛屼綍绛夌殑璋冪毊锛屼綍绛夌殑鑷湪鍟婏紒銆€銆€4锛庡澶╄繃鍘伙紝绉嬪ぉ杩囧幓锛屽啲澶╁張鏉ヤ簡锛岄獑椹奸槦鍙堟潵浜嗭紝绔ュ勾鍗翠竴鍘讳笉杩樹簡銆?銆€銆€鍝佽锛氭殤鍘诲瘨鏉ワ紝楠嗛┘闃熸潵浜嗗張璧颁簡锛岃蛋浜嗗張鏉ヤ簡锛岀骞翠篃鍦ㄨ繖宀佹湀鐨勬祦閫濅腑杩滃幓浜嗐€傜骞寸殑骞肩涓嶅啀锛岀骞寸殑鏁呬簨涓嶅啀銆傝繖鍙ヨ瘽娓呮櫚鍦颁紶杈惧嚭浣滆€呭绔ュ勾鐨勭湻鎭嬶紝鎴戜滑浠夸經鑳藉惉瑙佸ス杞昏交鐨勫徆鎭紝瀵规椂鍏夋祦閫濄€佺墿鏄汉闈炵殑鎰熷徆銆?銆€銆€5锛庢垜榛橀粯鍦版兂锛屾參鎱㈠湴鍐欙紝鍙堢湅瑙佸啲闃充笅鐨勯獑椹奸槦璧拌繃鏉ワ紝鍙堝惉瑙佺紦缂撴偊鑰崇殑椹奸搩澹般€傜骞撮噸涓翠簬鎴戠殑蹇冨ご銆?銆€銆€鍝佽锛氫綔鑰呯骞撮偅娈垫棩瀛愭樉鐒舵案杩滅暀鍦ㄥス鐨勮蹇嗕腑锛岃濂规€€蹇典笉宸诧紝璁╁ス鍥炲懗涓嶅凡銆傚湪鍥炲繂涓紝鍙戠幇绔ュ勾鐨勪竴鍒囷紝骞舵病鏈夎蛋杩滐紝楠嗛┘闃熶豢浣涘氨鍦ㄧ溂鍓嶏紝椹奸搩澹颁豢浣涗篃鍝嶅湪鑰宠竟锛岀骞寸殑涓€鍒囷紝鍙堝湪蹇冨ご鍑虹幇銆?銆€銆€浜屻€佷慨杈炰竴鐐归€?銆€銆€1锛庨偅鏍蜂笐鐨勮劯锛岄偅鏍烽暱鐨勭墮锛岄偅鏍峰畨闈欑殑鎬佸害銆傗€︹€︽垜鐪嬪憜浜嗭紝鑷繁鐨勭墮榻夸篃鍔ㄨ捣鏉ャ€?銆€銆€鍝佽锛氱湅寰楀缁嗗憖锛岀湅瀹冧滑鐨勮劯锛岀湅瀹冧滑鐨勭墮锛岀湅瀹冧滑鐨勬€佸害锛涚湅寰楀鍏ョ鍟婏紝鐪嬬潃鐪嬬潃锛岃嚜宸辩殑鐗欓娇閮藉姩璧锋潵銆傝繖涓帓姣斿彞鍐欏嚭浜嗗瀛愮殑鐪熷疄鎯虫硶锛屾椿鐜板嚭浜嗗瀛愬ソ濂囩殑琛ㄦ儏锛屽ぉ鐪熺殑绁炴€併€?銆€銆€2锛庢垜鏄庣櫧浜嗏攢鈹€涓栫晫涓婇噸澶х殑鍙戞槑涓庡彂鐜帮紝鏈夋椂杩橀潰涓寸潃鍙楀埌椹遍€愬拰杩鐨勯闄┿€?銆€銆€鍝佽锛氳繖鍙ヨ瘽宸х敤浜嗗弻鍏虫墜娉曪紝涓€鏂归潰瀹冭鍑轰簡绉戝浜嬩笟鍙戝睍杩囩▼涓殑鏌愪簺鐪熷疄鎯呭喌锛岄樋鍩虹背寰枫€佸摜鐧藉凹绛夐兘鏈夎繃杩欐牱鐨勯伃閬囷紱鍙︿竴鏂归潰鏄€滄垜鈥濈敤骞介粯涓庤嚜鍢茬殑鏂瑰紡锛岃〃杈句簡瀵规浜嬬殑鐪嬫硶鈹€鈹€璋佽鎴戞湁杩欐牱閲嶅ぇ鐨勫彂鐜板憿锛熻杞板嚭鏁欏涔熷氨涓嶈冻涓哄浜嗐€備綔鑰呮妸鑷繁璺熶笘鐣屼笂鏈夐噸澶у彂鏄庝笌鍙戠幇鐨勪汉鐩告彁骞惰锛岃繖鐪熸槸鑳藉畨鎱拌嚜宸辩殑鐞嗙敱銆傝繖涔熷彲浠ョ湅鍋氭槸浣滆€呭绔ュ勾鍙戠幇涓€浜嬬殑璇勮锛岃瘽璇噷鍖呭惈鐫€鎰ゆ叏涔嬫剰銆?銆€銆€3锛庤姳寮€浜嗭紝灏卞儚鐫¢啋浜嗕技鐨勩€傞笩椋炰簡锛屽氨鍍忓湪澶╀笂閫涗技鐨勩€傝櫕瀛愬彨浜嗭紝灏卞儚铏瓙鍦ㄨ璇濅技鐨勩€備竴鍒囬兘娲讳簡锛岃鍋氫粈涔堬紝灏卞仛浠€涔堛€傝鎬庝箞鏍凤紝灏辨€庝箞鏍凤紝閮芥槸鑷敱鐨勩€?銆€銆€鍝佽锛氳繖鎷熶汉銆佹帓姣斿彞鎶婂瀛愬績涓簨鐗╃殑褰㈣薄娲荤幇鍑烘潵浜嗭紝鍊摐銆侀粍鐡溿€佺帀绫炽€佽澊铦堕兘鏄湁鐏垫€х殑锛岄兘鏄仛寰椾簡鑷繁鐨勪富鐨勶紝鏄嚜鐢卞揩涔愮殑锛屼笉鍙楃害鏉熺殑锛岀敱鐫€鑷繁鐨勬€у瓙鐢熼暱鐨勩€傝繖鏍风殑鎰熷彈锛屽綋鐒朵笌浣滆€呯殑鑷敱蹇箰鏄垎涓嶅紑鐨勶紝鐢ㄨ嚜鐢辫€屽瘜鏈夌伒鎬х殑蹇冩劅鐭ュ埌鐨勪簨鐗╋紝鎵嶄細濡傛鏃犳嫎鏃犳潫锛?銆€銆€4锛庡瀭鏌虫妸婧按褰撳仛姊冲鐨勯暅瀛愶紝灞辨邯鍍忕豢鐜夊甫涓€鏍峰钩闈欍€?銆€銆€鍝佽锛氳繖鍙ヨ瘽閲囩敤鎷熶汉銆佹瘮鍠绘墜娉曪紝绐佸嚭浜嗘邯姘寸殑骞抽潤銆佹竻婢堛€?銆€銆€涓夈€佸彞瀛愬姞宸ュ巶銆€銆€1锛庢垜浠殑绔ュ勾闅鹃亾涓嶆槸涓€棣栧厖婊″垢绂忓拰娆箰鐨勬瓕鍚楋紵銆€銆€鏀规垚闄堣堪鍙ワ細鎴戜滑鐨勭骞存槸涓€棣栧厖婊″垢绂忓拰娆箰鐨勬瓕銆?銆€銆€2锛庢垜鍦ㄤ節宀佺殑鏃跺€欏氨鍙戠幇浜嗘湁鍏宠儦鑳庡彂鑲茬殑瑙勫緥銆?銆€銆€鏀规垚鈥滆鈥濆瓧鍙ワ細鏈夊叧鑳氳儙鍙戣偛鐨勮寰嬭鎴戝湪涔濆瞾鐨勬椂鍊欏氨鍙戠幇浜嗐€?銆€銆€3锛庤€佸笀瀵瑰悓瀛︿滑璇达細鈥滄ⅵ閲岄琛岋紝璇存槑浣犱滑鏄湪闀胯韩浣撳憖銆傗€?銆€銆€鏀规垚杞堪鍙ワ細鑰佸笀瀵瑰悓瀛︿滑璇达紝姊﹂噷椋炶锛岃鏄庡悓瀛︿滑鏄湪闀胯韩浣撱€?銆€銆€4锛庡悓瀛︿滑鍚鎴戜笁骞村墠灏卞彂鐜颁簡杩涘寲璁猴紝杩樹笉绗戝鎴块《锛?銆€銆€鏀规垚鑲畾鍙ワ細鍚屽浠惉璇存垜涓夊勾鍓嶅氨鍙戠幇浜嗚繘鍖栬锛屼竴瀹氫細绗戝鎴块《锛?銆€銆€5锛庢垜鐨勫辜绋氬績鐏典腑鍗村厖婊′簡鍜屽ぇ浜轰笉鍚岀殑鎯虫硶銆?銆€銆€鍙ュ瓙鐦﹁韩锛氬績鐏典腑鍏呮弧浜嗘兂娉曘€?銆€銆€6锛庣骞存槸涓€閬撶編涓界殑椋庢櫙锛岀孩鑺辩豢鑽夋槸濂圭殑琛h锛屽僵铦跺皬楦熸槸濂圭殑浼欎即銆?銆€銆€鍙ュ瓙浠垮啓锛?銆€銆€绔ュ勾鏄竴棣栧姩浜虹殑灏忔洸锛屽枩鎬掑搥涔愭槸濂圭殑鏃嬪緥锛屾澹扮瑧璇槸濂圭殑闊崇銆?銆€銆€绔ュ勾鏄竴涓激绾风殑姊﹀锛岃摑澶╁ぇ娴锋槸濂圭殑鑳屾櫙锛屾湭鏉ュ笇鏈涙槸濂圭殑瓒宠抗銆?绉疮锛氫赴瀵岃瘝姹囦笌鍙ユ銆€銆€涓€銆佷汉鐢熷悕瑷€璁板績闂?銆€銆€*澶╄鍋ワ紝鍚涘瓙浠ヨ嚜寮轰笉鎭€傘€婂懆鏄撱€?銆€銆€*鏈夊織涓嶅湪骞撮珮锛屾棤蹇楃┖闀跨櫨宀併€傘€婁紶瀹跺疂銆?銆€銆€*鑾瓑闂诧紝鐧戒簡灏戝勾澶达紝绌烘偛鍒囷紒銆婃弧姹熺孩銆?銆€銆€*灏戝勾鏄撹€佸闅炬垚锛屼竴瀵稿厜闃翠笉鍙交銆傘€€銆婂伓鎴愩€?銆€銆€*璺浖鏇煎叾淇繙鍏紝鍚惧皢涓婁笅鑰屾眰绱€傘€€銆婄楠氥€?銆€銆€*涓嶇Н璺锛屾棤浠ヨ嚦鍗冮噷锛涗笉绉皬娴侊紝鏃犱互鎴愭睙娴枫€傘€婅崁瀛愩€?銆€銆€*鏁忚€屽ソ瀛︼紝涓嶈€讳笅闂€傘€婅璇?鍏喍闀裤€?銆€銆€*鍙や汉瀛﹂棶鏃犻仐鍔涳紝灏戝.鍔熷か鑰佸鎴愩€傞檰娓搞€婂啲澶滆涔︾ず瀛愯伩銆?銆€銆€*鐢峰効涓嶅睍椋庝簯蹇楋紝绌鸿礋澶╃敓鍏昂韬€傚啹姊﹂緳銆€銆€*灏戝勾璐熷.姘旓紝濂嬬儓鑷湁鏃躲€傛潕鐧?銆€銆€*鐩涘勾涓嶉噸鏉ワ紝涓€鏃ラ毦鍐嶆櫒銆傚強鏃跺綋鍕夊姳锛屽瞾鏈堜笉寰呬汉銆傞櫠娓婃槑銆€銆€浜屻€佽儗璇点€婂彜璇楄瘝涓夐銆嬨€婂啲闃斥€㈢骞粹€㈤獑椹奸槦銆嬬墖娈?鍙よ瘲璇嶏細銆婄墽绔ャ€?鍞?鍚曞博鑽夐摵妯噹鍏竷閲岋紝绗涘紕鏅氶涓夊洓澹般€傚綊鏉ラケ楗粍鏄忓悗锛屼笉鑴辫搼琛e崸鏈堟槑銆?鍓嶄竴鍙ユ剰鎬濓細骞块様鐨勫師閲庯紝缁胯崏濡傝尩锛涙櫄椋庝腑闅愮害浼犳潵涓夊洓鐗х澹版偁鎵殑绗涘0銆?鍏ㄨ瘲鎰忔€濓細闈掕崏鍍忚璋侀摵寮€鍦ㄥ湴涓婁竴鏍凤紝鏂瑰渾鍏竷閲岄兘鏄崏鍦般€傛櫄椋庝腑闅愮害浼犳潵涓夊洓澹扮墽绔ユ偁鎵殑绗涘0銆傜墽绔ユ斁鐗у綊鏉ワ紝鍦ㄥ悆楗辨櫄楗悗鐨勯粍鏄忔椂鍒嗐€?浠栬繛钃戣。
ckujguc日语_五十音图经典快速记忆法

^| You have to believe, there is a way. The ancients said:" the kingdom of heaven is trying to enter". Only when the reluctant step by step to go to it 's time, must be managed to get one step down, only have struggled to achieve it.-- Guo Ge Tech在学习本大法前一定要坚信,日本人的智商只适合模仿,所以他们的语言是最容易上手的,然后才能练就一眼看透神功。
+e|s\n3^'废话少说,现在开始。
!i% g{/ぁあ V12[<Cj"|!上面一个十字,象不象粪叉子?下面一根绳子打了个结,这一围一捆,是不是拿,东西被人拿了,你就“a”一声吧!ゔゕ \Jg%J _K口腔上部平行,舌头下垂到半圆,模仿一下,这个就是前面的ぁ *Z~[gF^ xぃいx2D<k右面是小手指,左面的当然是你了,很鄙视的发“i”。
:ゖlI`+{U8前面我们用很鄙视的语气表达过“你”,这里的半个你自然就是ぃ Z6D7N/3kぅう 6YZ\t-%7f这就是屁股已经到达板凳上空,还未贴板凳的前一刹那,弯腰那一刹那当然要把肚子里的气挤出来,所以轻轻的和我一起说“u”。
~OHU3z1{G<这个与字母变化不大,不过是前面加了一双手,屁股与腿成原来的角度,没边,ぅy n<bjgr ぇえ obI~5,!'4我就说日本人就这么几下了,在小板凳上坐实了,自然就“安”,“an”了。
エェ ,nv9E_p Z坐实了,腰直了,工整了,就ぇ了。
<5L5Wuぉお `w#ynjAg!哦,我姓李,李字的草体就是这样了,日本人为什么要这么敬重姓李的人呢?大家就“o”一下就当纪念我祖先吧。
V5管道电吉他放大器说明书

Owner’s ManualTABLE OF CONTENTSIntroduction (3)The Front Panel (4)The Rear Panel (5)Important Information About Tubes and Tube Products (6)A Brief History of Tubes (6)Tube Types and Usage (6)The Nature of Tubes: Why (and When) to Replace Them (7)The Importance of Proper Biasing (8)Survival Tips for Tube Amplifiers (9)System Block Diagram (10)Service Information (11)Technical Specifications (12)2IntroductionCongratulations! You are now the proud owner of a Crate V5 tube guitar amplifier. This combo amplifier packs a whole lot of vintage tube sound into its compact cabinet, providing you with an amp that is portable and easy to operate, yet still produces incredible sounds!The V-Series amps offer the versatility required for many different musical styles, and have the unique tonal purity of a hot-rodded tube amp. The V5 is a single-channel amplifier with a mas-ter volume control and a tone control. It cranks out 5 watts from a single EL84 output tube in a Class A single-ended configuration into one 10” internal speaker. It provides a wide range of clean to overdriven sounds, making it ideal for recording as well as a practice amp.Like all Crate products, your V5 amplifier is designed by musicians and built using only the best components. Each amplifier is tested to confirm that it meets our specifications, and we believe that this amplifier is the absolute best that it can be.In order to get the most out of your new amplifier, please read this manual before you begin playing.And thank you for choosing Crate.Here are some of the features packed into your new V5 Combo Amplifier:• EL84 power vacuum tube for smooth overdrive sound• 5 watts rms power output• 1 x 10" ceramic magnet speaker• Volume control• Tone control31. INPUT: Use this jack to connect yourguitar to the amplifier using a shieldedinstrument cable.2. VOLUME: Use this to adjust the gainand channel overdrive. With the controlturned counter-clockwise, the gain islow and very little distortion is present.As you rotate it clockwise, the gainincreases, producing more overdrivedistortion, and a higher output volumelevel.3. TONE: This adjusts the overall tone ofthe sound. Turning the control clockwiseincreases the higher frequencies for abrighter, crisper sound. Turning the con-trol counterclockwise reduces the higherfrequencies for a darker sound.4. LAMP: This illuminates when the ampli-fier is turned on.5. ON/OFF SWITCH: Use this switch toturn the amplifier on and off.46. AC LINE CO R D: The grounded powercord should only be plugged into agrounded power outlet that meetsall applicable electrical codes, and iscompatible with the voltage, power, andfrequency requirements stated on theV5 rear panel. Do not attempt to defeatthe safety ground connection.7.FUSE: This protects the unit fromdamage due to overload conditions orpower line surges. If the fuse blows,replace it only with the same size andtype as listed on the chassis.8. Voltage Select Switch: Set this switchto “115” for 120 VAC mains, and to“230” for 220-240 VAC mains.With the amplifier power cordunplugged, use the tip of a small flat-blade screwdriver to slide this switch tothe proper position.9. SPEAKE R8 OHMS: The V5 is shippedwith a cable connected from this jack tothe internal 10-inch 8-ohm speaker.5Important Information about Tubes and Tube Products:A Brief History Of The Tube:In 1883, Edison discovered that electrons would flow from a suspended filament when enclosed in an evacuated lamp. Years later, in 1905, Fleming expanded on Edison’s discovery and created the “Fleming Valve.” Then, in 1907, Dr. Lee de Forest added a third component– the grid – to the “Fleming Valve” and the vacuum tube was a fact of life. The door to elec-tronic amplification was now open.During World War II, data gleaned from their intensive research on the detectors used in radar systems, led Bell Telephone Laboratories to the invention of the transistor. This reliable little device gained quick support as the new component for amplification. The death of the vacuum tube seemed imminent as designers, scientists, and engineers reveled in the idea of replacing large, fragile glass tubes with these small, solid-state devices.However, there were (and still are) many serious listeners who realized that the sound pro-duced by a “transistor” amplifier is significantly different from that produced by a tube ampli-fier with identical design specifications. They considered the sound produced by these new solid-state devices to be hard, brittle, and lifeless. It was determined that solid-state devices produced a less musical set of harmonics than tubes. When pushed past their limits, they tend to mute the tone and emphasize the distortion.Tubes, on the other hand, produce a more musical set of harmonics, the intensity of which can be controlled by the player. This characteristic adds warmth and definition to the sound which has become the hallmark of tube amplifiers. When tubes are driven into clipping, the harmonic overtones can be both sweet and pleasing or intense and penetrating, depending on the musician’s musical taste and playing technique.Over the years, application engineers have designed a number of outstanding solid-state amplifiers that sound very, very good. Some use special circuitry which enables them to simu-late the distortion characteristics of a tube amplifier. However, the tube amplifier, still held in the highest esteem by many musicians, offers a classic “vintage” sound in a contemporary market.Tube Types And Usage:Tube amplifiers are based primarily on two types of tubes – preamplifier tubes and power tubes. The tubes used in preamplifiers (12AX7, 12AU7, 12AT7, etc.) are smaller than the power tubes. These tubes amplify the signal from your instrument and shape the sound. They are inherently microphonic (they can mechanically pick up and transmit external noises). Since these tubes are used in the critical first stages of a tube amplifier’s circuitry, it is very impor-tant to use high-quality, low noise/low microphonic tubes for this application. Although tubesof this quality may be difficult to find and typically cost more than “off-the-shelf” tubes, the improvement in performance is worth the investment.Preamplifier tubes are also used to drive the power tubes. When used in this application, a12AX7 will produce a more distorted tone than a 12AT7, which produces a clearer, sweeter sound. A 12AU7 is even cleaner and brighter than a 12AT7, giving more definition to the sound. (In some cases it is possible to change the sound by changing the type of preampand/or driver tubes. When making any modification to your equipment, it is highly recommend-ed that you consult with a qualified service center.)6The power tubes are the largest tubes used in an amplifier. These tubes convert the low-level, conditioned signal from the preamplifier into a level that is sufficient to drive the speakers. There are several types of power tubes available, each of which offers a different perfor-mance/sound characteristic. For example, the EL34 power tube produces a great classic rock sound. When an EL34 is driven into distortion, it produces a unique sound (“crunch”). When compared to the 6L6, the EL34 distorts more quickly, exhibits a “looser” low-end response and produces more harmonics at mid and high frequencies (“creamier” sound). These differ-ences become more noticeable at higher volumes.The EL84 is similar to the EL34 but produces less output power. It can be easily driven into distortion and is characterized by a smooth, sweet tone with excellent touch sensitivity.6L6 tubes produce a big low-end thump and have a very good dynamic range. They offer a more traditional “American Rock” sound. The 6V6 tubes produce a creamy sound with nice distortion. On the other hand, the KT88 produces a big low-end but sounds more like an EL34 in the mid and high frequencies.6550 power tubes are more rugged and stay cleaner-sounding even at full power. When they do distort, the sound produced is more solid and has a tighter low end; more of a “heavy metal” type distortion with lots of power.Some tubes are available in matched sets. These tubes have been extensively tested for opti-mum performance and longevity.The Nature Of Tubes — Why (And When) To Replace Them:Tubes are made up of a number of fragile mechanical components that are vacuum-sealed in a glass envelope or bubble. The tube’s longevity is based on a number of factors which include how hard and often the amplifier is played, vibration from the speakers, road travel, repeated set up and tear down, etc.Any time you notice a change in your amplifier’s performance, check the tubes first.If it’s been a while since the tubes were replaced and the sound from your amplifier lacks punch, fades in and out, loses highs or lows or produces unusual sounds, the power tubes probably need to be replaced. If your amplifier squeals, makes noise, loses gain, starts to hum, lacks “sensitivity”, or feels as if it is working against you, the preamplifier tubes may need to be replaced.The power tubes are subjected to considerably more stress than the preamplifier tubes. Consequently, they almost always fail/degrade first. If deteriorating power tubes aren’t replaced they will ultimately fail. Depending on the failure mode, they may even cause severe damage to the audio output transformer and/or other components in the amplifier. Replacing the tubes before they fail completely has the potential to save you time, money and unwanted trouble. Since power tubes work together in an amplifier, it is crucial that they (if there is more than one) be replaced by a matched set. If you’re on the road a lot, we recommend that you carry a spare matched set of replacement power tubes and their associated driver tubes. After turning off the power and disconnecting the amplifier from the power source, carefully check the tubes (in bright light) for cracks or white spots inside the glass or any other appar-ent damage. Then, with the power on, view the tubes in a dark room. Look for preamplifier tubes that do not glow at all or power tubes that glow excessively red.7Whenever you replace the power tube(s):• Always have the amplifier’s bias voltage checked by a qualified service center. Improper bias voltage will cause degradation in performance and possibly damage the tubes and/or the amplifier. (See “The Importance of Proper Biasing”, below for more information).• We highly recommend that you replace the driver tube(s) as well. The driver tube deter-mines the shape and amplitude of the signal applied to the power tube(s) and has to work almost as hard as the power tube(s).You can check your preamplifier tubes for microphonics by turning the amplifier on, turning up the gain and tapping lightly on each tube with the end of a pencil or a chop stick (my favorite). You will be able to hear the tapping through your speakers, which is normal. It is not normal for a tube to ring like a bell after it’s tapped. If it does ring then it’s microphonic and should be replaced. Remember to use only high quality, low microphonic tubes in the preamplifier section.Even though power tubes are rarely microphonic, you should check them anyway. The power tubes can be checked for microphonics just like pre-amp tubes.In the case of very high gain amps, you may be able to reduce the amount of noise generated by simply swapping the preamp tubes around.The Importance Of Proper Biasing:For the best performance and longest tube life, proper biasing is imperative. Bias is the nega-tive voltage which is applied to the power tube’s control grid to set the level of idle current. We cannot over emphasize the difference in warmth of tone and dynamic response that come with proper biasing. If the bias is set too high (over biased), the sound from the amp will be distorted at all levels. If the bias is set too low, (under biased) the power tubes will run hot (the plates inside the tubes may glow red due to excessive heat) and the sound from the amplifier will lack power and punch. The excessive heat greatly reduces tube life – from a few days to as little as a few hours in extreme cases. Setting the bias on your amp is like setting the idle on your car. If it’s too high or hot it’s running away with you and if it’s too low or cold it will choke when you step on it.The bias is adjusted at the factory in accordance with the type of power tube(s) installed in your amplifier. It is important to point out that tubes of the same type and specification typi-cally exhibit different performance characteristics. Consequently, whenever power tubes are replaced, the bias voltage must be checked (unless the amplifier is equipped with “self-biasing”circuitry) and readjusted to accommodate the operating parameters of the replacement tubes. Depending on the model and amplifier type, there may be hum balance controls, trim pots, or bias adjustment controls on its rear panel. However, the bias adjustment should be performed only by qualified service personnel with the proper, calibrated test equipment.8Survival Tips For Tube Amplifiers:To prolong tube life, observe these tips and recommendations:• Match the impedance of your speaker cabinet(s) to your amplifier. Improper impedance matching will contribute to early tube degradation and may cause premature tube failure.• Make sure the speaker(s) are properly connected prior to turning on the amplifier.• After playing the amplifier, allow sufficient time for it to properly cool down prior to moving it. A properly cooled amplifier prolongs tube life due to the internal components being less susceptible to the damage caused by vibration.• Allow the amplifier to warm up to room temperature before turning it on. The heat gener-ated by the tube elements can crack a cold glass housing.• Replace the output tube(s) before the performance degrades or the tubes fail completely.Replace the tube(s) on a regular basis (at least once per year or as often as every 4 to 6 months if you play long and hard every day).• Always have the bias checked after replacing the output tubes (unless the amplifier is equipped with “selfbiasing circuitry”). This should be done ONL Y at a qualified servicecenter. Improper biasing could result in the tubes running too hot, which greatly reduces the life of the tubes – or too cold, which results in distorted sound regardless of level settings. Do not play the amplifier if it exhibits these symptoms – get the bias checked/ adjusted immediately to prevent tube failure and/or other damage.• If the locating notch on the base of a power tube breaks off, replace the tube. This signifi-cantly reduces the risk of damaging your amplifier by incorrectly inserting the tube.• Protect the amplifier from dust and moisture. If liquid gets into the amplifier proper, or if the amplifier is dropped or otherwise mechanically abused, have it checked out at an authorized service center before using it.• Proper maintenance and cleaning in combination with routine checkups by your authorized service center will insure the best performance and longest life from your amplifier. CAUTION: Tube replacement should be performed only by qualified service personnel who are familiar with the dangers of hazardous voltages that are typically present in tube circuitry.910System Block Diagram INPUT V1AV1B 8 OHM INTERNAL SPEAKER EL8411Declaration Of ConformityManufacturer: LOUD Technologies Inc.16220 Wood-Red Rd. NEWoodinville, WA 98072, USAProduct Name: Crate V5Product Type: Audio AmplifierComplies with Standards:LVD: 92/31/EEC, 93/68/EEC, & 73/23/EWGSafety: EN60065EMC: EN55013, EN55020, EN55022, EN55103, EN61000-3-2, & EN61000-3-3The official Declaration of Conformity for this product is kept on file at:LOUD Technologies Inc., 16220 Wood-Red Road NE, Woodinville, WA 98072 • Tel: 1-866-858-5832Service InformationIf you are having a problem with your V5, you can go to our website () and click on Support for service information, or call 1-800-898-3211 during business hours (7 am to 5 pm PST, Monday-Friday). If you are outside of the U.S., contact your local distribu-tor for technical support and service.The V5 is covered with a durable fabric-backed vinyl material. Wipe it clean with a lint-free cloth.Never spray cleaning agents onto the cabinet. Avoid abrasive cleansers which would damage the finish.Crate continually develops new products, as well as improves existing ones. For this reason, the specificationsand information in this manual are subject to change without notice.“Crate” is a registered trademark of LOUD Technologies Inc. All other brand names mentioned are trademarks orregistered trademarks of their respective holders and are hereby acknowledged.12V5 TECHNICAL SPECIFICATIONSOutput Power Rating5 W rms @ 5% THD, 8 ohm load, 120 VAC Input Impedance700 kohms Signal-to-Noise Ratio42 dB, Typical Gain58 dB, all controls @ 10Tone±30 dB @ 10 kHz Speaker Specs1 x 10", 5 W, 8 ohm, ceramic magnet Preamp Tubes(1) 12AX7A Power Tubes(1) EL84Power Requirements90-132 VAC, 60 Hz, 30 watts220-240 VAC, 50 Hz, 30 watts Size (H x W x D)13.75 in/34.9 cm x 14.25 in/36.2 cm x8.11 in/20.6 cm Weight 19.2 lb/8.7 kgPart No. 0024538 Rev. A 07/07。
KIT-Z100 快速入门指南说明书
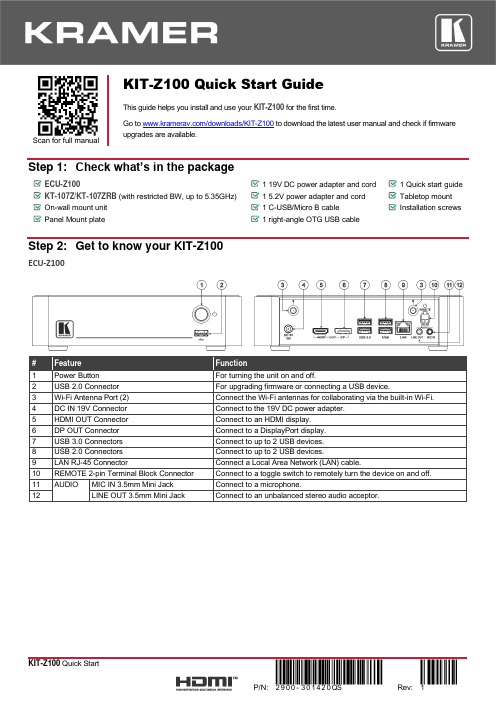
Scan for full manualKIT-Z100 Quick Start GuideThis guide helps you install and use your KIT-Z100 for the first time.Go to /downloads/KIT-Z100 to download the latest user manual and check if firmware upgrades are available.Step 1: Check what’s in the packageECU-Z1001 19V DC power adapter and cord 1 Quick start guide KT-107Z/KT-107ZRB (with restricted BW, up to 5.35GHz) 1 5.2V power adapter and cord Tabletop mount On-wall mount unit 1 C-USB/Micro B cableInstallation screwsPanel Mount plate1 right-angle OTG USB cableStep 2: Get to know your KIT-Z100ECU-Z100KT-107Z/KT-107ZRBBoth Table-top mount and wall mount include the following connectors: • A power connector, when notusing the PoE Ethernet port. • PoE RJ-45 Ethernet Port toconnect to an Ethernet cable. • A USB connector:▪ For the table-top mount, aMicro-USB port, forconnecting an external USB device (for example, a headset or memory disk). ▪ For the wall mount, a Type AUSB port is available using the right-angle OTG USB cable (included).Step 3: Mount ECU-Z100Install ECU-Z100 using one of the following methods:• Attach the rubber feet and place the unit on a flat surface.• Fasten a bracket (included) on each side of the unit and attach it to a flat surface(see /downloads/KIT-Z100).• Mount the unit in a rack using the recommended rack adapter(see /product/KIT-Z100).• Ensure that the environment (e.g., maximum ambient temperature &air flow) is compatible for the device. • Avoid uneven mechanical loading.• Appropriate consideration of equipment nameplate ratings should be used for avoiding overloading of the circuits.• Reliable earthing of rack-mounted equipment should be maintained.Step 4: Mount KT-107Z/KT-107ZRBMounting on a table using one of the following options:Portable Mount: place the tabletop mount on the table. Connected cables remain visible and the table remains intact. Secure Mount: secure the tabletop mount to the table as follows:1. Measure the exact location on the surface of the table where you want to install the KT-107Z/KT-107ZRB.2. Drill a hole in the table and optionally cut the cable pass-through opening according to the cut-out dimensions definedin the user manual.3. Secure the tabletop mount to the table using the M5x60 secure screw.4. Connect the Ethernet port to a PoE-enabled source. Optionally, you can connect the power adapter too (as backup).5. Replace the appropriate cover and place the KT-107Z/KT-107ZRB over the tabletop mount (the is magnetically heldin place), by first inserting the lower part of the then carefully laying the KT-107Z/KT-107ZRB in place.6. Wait for the Home-page to load and then secure the KT-107Z/KT-107ZRB to the tabletop mount from the rear side(using 2 M2x4 screws, supplied with the unit).7. Optionally, lock the tabletop mount with a Kensington locker (not supplied).Mounting on the wall:Before mounting KIT-Z100 on a wall, install an in-wall junction box (recommended boxes are listed in the user manual)1. Attach the on-wall mount unit to the installed junction box (top side up see indication arrows on unit).Connect Ethernet and/or power cables and optionally, insert the right-angle USB cable (supplied) for connecting to an adjacent external USB device.2. Screw the 4 wall-mounting screws (supplied) through the screw openings.The various screw openings fit various types of wall junction boxes.3. On the rear side of the KT-107Z/KT-107ZRB, remove the screwcover and the cover (by slightly pressing downwards and thenpulling out) and set aside.4. Attach the panel mount plate to the rear side of theKT-107Z/KT-107ZRB (using 4 M2x4 screws, supplied).5. Connect the flat cable from the on-wall mount (attached to thein-wall junction box) to the connector on the rear ofKT-107Z/KT-107ZRB.6. Hang the KT-107Z/KT-107ZRB on the wall by sliding the tabs onthe attached panel mount plate over the grooves on the on-wallmount unit.Step 5: Connect inputs and outputsAlways switch OFF the power on each device before connecting it to your KIT-Z100.To achieve specified extension distances, use the recommended Kramer cables available at/product/KIT-Z100. Using third-party cables may cause damage!Microphone and speakers can be connected to ECU-Z100 in the following ways:•Speakers can be connected via LINE OUT connector and/or USB ports.•Microphones cab be connected via MIC IN connector (via amp) and/or USB ports.•Speakerphones (combining a speaker and a microphone) can be connected via USB ports.KT-107Z/KT-107ZRB can be powered in any of the following ways:•Using the power adapter when connected by LAN (without PoE support).•Using the power adapter when connected to LAN by Wi-Fi•By PoE when connecting to Ethernet by PoE-supporting LAN.Step 6: Connect powerConnect the power cord to ECU-Z100 and plug it into the mains electricity.If required, connect the power adapter on the KT-107Z/KT-107ZRB to the Power 2-pin terminal block connector on the tabletop mount and to the mains power.Safety Instructions (See for updated safety information)Caution:•There are no operator serviceable parts inside the unit.Warning:•Use only the power cord that is supplied with the unit.•Disconnect the power and unplug the unit from the wall before installing.•Do not open the unit. High voltages can cause electrical shock! Servicing by qualified personnel only.•To ensure continuous risk protection, replace fuses only according to the rating specified on the product label which located on the bottom of the unit.Step 7: Set and operate KIT-Z100Before setting up the application on KT-107Z/KT-107ZRB, you need to acquire Zoom Rooms licenses.To set and operate the application, go to the Zoom Rooms website at /hc/en-us.To use the Zoom Rooms widget on Kramer Control, go to Zoom Rooms settings at/manuals/kramer/kramer-control/1/en/topic/zoom-room-module.。
HP PageWide Pro MFP 477系列用户指南说明书

User GuideCopyright and License© 2016 Copyright HP Development Company, L.P.All rights reserved. Reproduction, adaptation, or translation of this material is prohibited without prior written permission of HP, except as allowed under copyright laws.The information contained in this document is subject to change without notice.The only warranties for HP products and services are set forth in the express warranty statements accompanying such products and services. Nothing herein should be construed as constituting an additional warranty. HP shall not be liable for technical or editorial errors or omissions contained herein.Edition 1, 2/2016Trademark CreditsAdobe®, Acrobat®, and PostScript® are trademarks of Adobe Systems Incorporated. Intel® Core™ is a trademark of Intel Corporation in the U.S. and other countries.Java™ is a US trademark of Sun Microsystems, Inc.Microsoft®, Windows®, Windows® XP, and Windows Vista® are U.S. registered trademarks of Microsoft Corporation.UNIX® is a registered trademark of The Open Group.ENERGY STAR and the ENERGY STAR mark are registered trademarks owned by the U.S. Environmental Protection Agency.Table of contents1 Product basics (1)Product features (2)Environmental features (3)Accessibility features (3)Product views (4)Front left view (4)Front right view (5)Back view (5)Cartridge door view (6)Power on and off (7)Turn the product on (7)Manage power (7)Turn the product off (8)Use the control panel (9)Control panel buttons (9)Control panel home screen (10)Control panel dashboard (11)Control panel application folders (11)Control panel shortcuts (12)Help features (12)Printer information (13)Help animations (13)Quiet Mode (14)To turn Quiet Mode on or off from the control panel (14)To turn Quiet Mode on or off from the EWS (14)2 Connect the product (15)Connect the product to a computer or a network (16)To connect the product using a USB cable (16)To connect the product to a network (17)Supported network protocols (17)Connect the product using a wired network (17)ENWW iiiConnect the product using a wireless network (wireless models only) (17)To connect the product to a wireless network using the Wireless SetupWizard (18)To connect the product to a wireless network using WPS (18)To connect the product to a wireless network manually (19)Use Wi-Fi Direct to connect a computer or device to the product (20)To turn on Wi-Fi Direct (20)To print from a wireless-capable mobile device (20)To print from a wireless-capable computer (Windows) (20)To print from a wireless-capable computer (OS X) (20)Install HP printer software for a wireless product already on the network (22)Open the printer software (Windows) (22)Manage network settings (22)View or change network settings (22)Set or change the product password (23)Manually configure TCP/IP parameters from the control panel (23)Link speed and duplex settings (23)3 Printer management and services (25)HP Embedded Web Server (26)About the EWS (26)About cookies (26)Open the EWS (27)Features (27)Home tab (27)Scan tab (28)Fax tab (29)Web Services tab (29)Network tab (29)Tools tab (29)Settings tab (30)Web Services (31)What are Web Services? (31)HP ePrint (31)Print apps (31)Set Up Web Services (31)Use Web Services (32)HP ePrint (32)Print apps (33)Remove Web Services (34)HP Web Jetadmin software (34)iv ENWWProduct security features (34)Security statements (35)Firewall (35)Security settings (36)Firmware updates (36)HP Printer Assistant in the printer software (Windows) (36)Open the HP Printer Assistant (36)Features (36)Connected tab (37)Print, Scan & Fax tab (37)Shop tab (37)Help tab (38)Tools tab (38)Estimated Levels tab (38)HP Utility (OS X) (38)AirPrint™ (OS X) (38)4 Paper and print media (39)Understand paper use (40)Supported media sizes (41)Supported paper and print media sizes (41)Supported envelope sizes (42)Supported card and label sizes (42)Supported photo media sizes (42)Supported paper types and tray capacity (43)Tray 1 (multipurpose) on left side of the product (43)Tray 2 (default tray) and Tray 3 (accessory tray) (44)Configure trays (44)Load media (45)Load Tray 1 (45)Load Tray 2 (46)Load optional Tray 3 (48)Load envelopes (49)Load letterhead or preprinted forms (51)Load the automatic document feeder (52)Load the scanner (53)Tips for selecting and using paper (55)5 Cartridges (56)HP PageWide cartridges (57)HP policy on non-HP cartridges (57)ENWW vManage cartridges (57)Store cartridges (58)Print with General Office mode (58)Print when a cartridge is at estimated end of life (58)Check the estimated cartridge levels (58)Order cartridges (59)Recycle cartridges (60)Replace cartridges (60)Tips for working with cartridges (62)6 Print (63)Print from a computer (64)To print from a computer (Windows) (64)To print from a computer (OS X) (65)To set up printing shortcuts (Windows) (66)To set up printing presets (OS X) (66)To adjust or manage colors (67)Choose a preset color theme for a print job (67)Adjust the color options for a print job manually (67)Match colors to your computer screen (68)Control access to color printing (69)Print from the control panel (69)Print using job storage (69)To enable job storage (69)Disable or enable job storage (Windows) (69)Disable or enable job storage (OS X) (69)To apply job storage to one or all print jobs (70)Apply job storage to one or all print jobs (Windows) (70)Apply job storage to one or all print jobs (OS X) (71)To print a job stored on the printer (71)To delete a job stored on the printer (71)Print from a USB device (72)Print with NFC (72)Print with HP ePrint (72)Print off site by sending an email with the HP ePrint app (32)Print from an on-site computer or mobile device (73)Print with AirPrint (OS X) (73)Tips for print success (74)Cartridge tips (74)Paper loading tips (74)vi ENWW7 Copy and scan (76)Copy (77)Copy settings (77)Adjust lightness or darkness for copies (77)Select a paper tray and paper size for copies (77)Reduce or enlarge a copy (77)Load and copy identification cards (78)Copy photos (79)Load and copy mixed-size originals (80)Copy on both sides automatically (80)Cancel a copy job (80)Scan (81)Scan to a USB drive (81)Scan to a computer (81)To set up scan to computer (81)Set up scanning to a computer (Windows) (82)Set up scanning to a computer (OS X) (82)To scan to a computer from the control panel (82)Scan to email (82)To set up scan to email (82)To scan a document or photo to email (83)Scan a document or photo to email from the control panel (83)Scan a document or photo to email from the printer software (83)To change account settings (83)Scan to a network folder (83)To set up scan to a network folder (84)Set up scan to a network folder in the EWS (84)Set up scan to a network folder in the HP Printer Assistant (84)To scan to a network folder (84)Scan to a network folder from the control panel (84)Scan to a network folder from the printer software (84)Scan to SharePoint (85)To set up scan to SharePoint (85)To scan to SharePoint (85)Scan using HP scanning software (85)Scan using other software (86)To scan from a TWAIN-compliant program (86)To scan from a WIA-compliant program (86)ENWW viiGuidelines for scanning documents as editable text (87)To scan a document to editable text (Windows) (88)To scan documents as editable text (OS X) (89)Tips for copy and scan success (90)8 Fax (91)Set up fax (92)Connect fax to a telephone line (92)Configure fax settings (92)To configure fax settings from the control panel (92)To configure fax settings using the HP Digital Fax Setup Wizard (Windows) (93)Set up HP Digital Fax (93)HP Digital Fax requirements (93)To set up HP Digital Fax (94)Set up HP Digital Fax (Windows) (94)Set up HP Digital Fax (OS X) (94)Set up HP Digital Fax in the EWS (94)To modify HP Digital Fax settings (94)Modify HP Digital Fax settings (Windows) (94)Modify HP Digital Fax settings (OS X) (94)Modify HP Digital Fax settings in the EWS (94)To turn off HP Digital Fax (95)Fax programs, systems, and software (95)Supported fax programs (95)Supported phone services - analog (95)Alternate phone services - digital (95)DSL (95)PBX (95)ISDN (96)VoIP (96)Set fax settings (96)Send-fax settings (96)Set pauses or flash hooks (96)Set a dialing prefix (97)Set tone-dialing or pulse-dialing (97)Set autoredial and the time between redials (97)Set the light/dark setting (98)Set the default resolution (98)Use cover-page templates (99)viii ENWWSet fax forwarding (99)Block or unblock fax numbers (100)Set the number of rings-to-answer (100)Set distinctive ring (101)Use autoreduction for incoming faxes (102)Set the fax sounds volume (102)Set stamp-received faxes (102)Send a fax (102)Send a fax from the control panel (103)Use speed dials and group-dial entries (103)Send a standard fax from the computer (103)Send a fax from the software (104)Send a fax using monitor dialing (105)Send a fax using printer memory (105)Receive a fax (106)Receive a fax manually (106)Fax memory (107)Reprint a fax (107)Delete faxes from memory (107)Use the phone book (107)Create and edit individual speed-dial entries (108)Create and edit group-dial entries (108)Delete speed-dial entries (108)Use reports (108)Print fax confirmation reports (109)Print fax error reports (110)Print and view the fax log (110)Clear the fax log (110)Print the details of the last fax transaction (111)Print a Caller ID Report (111)View the Call History (111)9 Solve problems (112)Problem-solving checklist (113)Check that the product power is on (113)Check the control panel for error messages (113)Test print functionality (113)Test copy functionality (114)Test the fax-sending functionality (114)Test the fax-receiving functionality (114)ENWW ixTry sending a print job from a computer (114)Test the plug-and-print USB functionality (114)Factors that affect product performance (114)Information pages (115)Factory-set defaults (116)Cleaning routines (116)Clean the printhead (117)Clean the scanner glass strip and platen (117)Clean the document feeder pick rollers and separation pad (118)Clean the touch screen (118)Jams and paper-feed issues (119)The product does not pick up paper (119)The product picks up multiple sheets of paper (119)Prevent paper jams (119)Clear jams (120)Jam locations (120)Clear jams from the document feeder (121)Clear jams in Tray 1 (multipurpose tray) (122)Clear jams in Tray 2 (122)Clear jams in optional Tray 3 (123)Clear jams in the left door (124)Clear jams in the output bin (125)Clear jams in the duplexer (126)Cartridge issues (127)Refilled or remanufactured cartridges (127)Interpret control panel messages for cartridges (127)Cartridge Depleted (127)Cartridge Low (128)Cartridge Very Low (128)Counterfeit or used [color] cartridge installed (128)Do not use SETUP cartridges (128)Genuine HP cartridge installed (128)Incompatible [color] (129)Incompatible cartridges (129)Install [color] cartridge (129)Non-HP cartridges installed (129)Printer Failure (130)Problem with Print System (130)Problem with Printer Preparation (130)Problem with SETUP cartridges (130)Use SETUP cartridges (130)x ENWWUsed [color] installed (131)Printing issues (131)The product does not print (131)The product prints slowly (132)Plug-and-print USB issues (132)The Memory Device Options menu does not open when you insert the USBaccessory (132)The file does not print from the USB storage device (132)The file that you want to print is not listed in the Memory Device Options menu (133)Improve print quality (133)Check for genuine HP cartridges (133)Use paper that meets HP specifications (133)Use the correct paper type setting in the printer driver (134)Change the paper type and size setting (Windows) (134)Change the paper type and size setting (OS X) (134)Use the printer driver that best meets your printing needs (134)Align the printhead (135)Print a print-quality report (135)Scan issues (135)Fax issues (136)Fax troubleshooting checklist (136)Change error correction and fax speed (137)Set the fax-error-correction mode (137)Change the fax speed (137)Fax logs and reports (137)Print individual fax reports (137)Set the fax error report (138)Fax error messages (138)Communication error. (138)Document feeder door is open. Canceled fax. (139)Fax is busy. Canceled send. (139)Fax is busy. Redial pending. (139)Fax receive error. (140)Fax Send error. (140)Fax storage is full. Canceling the fax receive. (141)Fax storage is full. Canceling the fax send. (141)No dial tone. (141)No fax answer. Canceled send. (142)No fax answer. Redial pending. (142)No fax detected. (142)Solve problems sending faxes (143)ENWW xiAn error message displays on the control panel (143)Document feeder paper jam (143)Scanner error (143)The control panel displays a Ready message with no attempt to send the fax. (143)The control panel displays the message "Receiving Page 1" and does not progressbeyond that message (144)Faxes can be received, but not sent (144)Unable to use fax functions from the control panel (144)Unable to use speed dials (144)Unable to use group dials (144)Receive a recorded error message from the phone company when trying to senda fax (145)Unable to send a fax when a phone is connected to the product (145)Solve problems receiving faxes (145)An error message displays on the control panel (145)The fax does not respond (145)Voice mail is available on the fax line (145)The product is connected to a DSL phone service (146)The product uses a fax over IP or VoIP phone service (146)Sender receives a busy signal (146)A handset is connected to the product (146)A phone line splitter is being used (146)Cannot send or receive a fax on a PBX line (146)Solve general fax problems (146)Faxes are sending slowly (146)Fax quality is poor (147)Fax cuts off or prints on two pages (147)Connectivity issues (147)Solve USB direct-connect problems (147)Solve network problems (148)Poor physical connection (148)The computer is using the incorrect IP address for the product (148)The computer is unable to communicate with the product (148)The product is using incorrect link and duplex settings for the network (149)New software programs might be causing compatibility problems (149)The computer or workstation might be set up incorrectly (149)The product is disabled, or other network settings are incorrect (149)Wireless network issues (149)Wireless connectivity checklist (149)The product does not print, and the computer has a third-party firewall installed (150)The wireless connection does not work after moving the wireless router or product (150)xii ENWWCannot connect more computers to the wireless product (150)The wireless product loses communication when connected to a VPN (151)The network does not appear in the wireless networks list (151)The wireless network is not functioning (151)Product software issues (Windows) (151)Product software issues (OS X) (153)The printer driver is not listed in the Print & Scan list (153)The product name does not appear in the product list in the Print & Scan list (153)The printer driver does not automatically set up the selected product in the Print & Scan list (153)A print job was not sent to the product that you wanted (153)When connected with a USB cable, the product does not appear in the Print & Scan list afterthe driver is selected. (153)You are using a generic printer driver when using a USB connection (154)10 Service and support (155)Customer support (156)HP limited warranty statement (157)UK, Ireland, and Malta (158)Austria, Belgium, Germany, and Luxemburg (158)Belgium, France, and Luxemburg (159)Italy (160)Spain (160)Denmark (161)Norway (161)Sweden (161)Portugal (162)Greece and Cyprus (162)Hungary (162)Czech Republic (163)Slovakia (163)Poland (163)Bulgaria (164)Romania (164)Belgium and the Netherlands (164)Finland (165)Slovenia (165)Croatia (165)Latvia (165)Lithuania (166)Estonia (166)Russia (166)ENWW xiiiAppendix A Technical information (167)Product specifications (168)Print specifications (168)Physical specifications (168)Power consumption and electrical specifications (168)Acoustic emission specifications (168)Environmental specifications (168)Environmental product stewardship program (170)Protecting the environment (171)Ozone production (171)Power consumption (171)European Union Commission Regulation 1275/2008 (171)Paper (171)HP PageWide printing supplies (171)Plastics (171)Electronic hardware recycling (172)Material restrictions (172)General battery information (172)Battery disposal in Taiwan (172)California Perchlorate Material Notice (172)EU Battery Directive (172)Battery notice for Brazil (173)Chemical substances (173)EPEAT (173)Disposal of waste equipment by users (173)Toxic and hazardous substance table (China) (174)Restriction on hazardous substances statement (Turkey) (174)Restriction on hazardous substances statement (Ukraine) (174)Restriction of hazardous substance statement (India) (174)China energy label for printer, fax, and copier (175)China SEPA Eco Label user information (175)Regulatory information (176)Regulatory notices (176)Regulatory model identification number (176)FCC statement (176)VCCI statement (Japan) (177)Power cord instructions (177)Power cord statement (Japan) (177)EMC statement (Korea) (177)Visual display workplaces statement for Germany (177)European Union Regulatory Notice (178)xiv ENWWEuropean Union Regulatory Notice (178)Wireless models only (178)Models with fax capability only (178)Additional statements for telecom (fax) products (179)New Zealand telecom statements (179)Additional FCC statement for telecom products (US) (179)Industry Canada CS-03 requirements (180)Notice to users of the Canadian telephone network (181)Australia wired fax statement (181)Notice to users of the German telephone network (181)Additional statements for wireless products (182)Exposure to radio frequency radiation (182)Notice to users in Brazil (182)Canadian statements (182)Japan statement (183)Notice to users in Korea (183)Taiwan statement (183)Mexico statement (183)Index (184)ENWW xvxvi ENWW1Product basics●Product features●Product views●Power on and off●Use the control panel●Quiet ModeENWW1Product featuresPageWide Pro MFP 477dnD3Q19A, D3Q19B, D3Q19C,D3Q19D Tray capacity (75 GSM or 20–lb Bond paper)●Tray 1: 50 sheets ●Tray 2: 500 sheets ●Optional Tray 3: 500 sheets ●Automatic Document Feeder(ADF): 50 sheets●Standard output bin: 300sheetsPrint ●Simplex speeds up to 40 pagesper minute (ppm) for both color and black with Professional quality●Duplex speeds up to 21 ppmfor both color and black with Professional quality●Up to 55 ppm in General Officemode●Walkup Plug-and-Print USBDevice port●Walkup printing of MS Officedocuments Copy ●Simplex speeds up to 40 ppm in black and color ●Single-pass, two-sided copying for speeds up to 26 ppm in black and color ●50-sheet ADF supports page sizes up to 356 mm (14.0 in) in length and 216 mm (8.5 in) in width Scan●Duplex speeds up to 26 ppm for both color and black ●Scan to walkup USB device, email address, network folder, or SharePoint site ●Glass supports page sizes up to 356 mm (14.0 in) in length and up to 216 mm (8.5 in) in width ●HP software enables scanning a document to a file that can be edited ●Compatible with TWAIN, WIA, and WS-Scan programs Fax●Fax to email address ornetwork folder●Fax from walkup control panelor from program on connected computer●Fax archive, fax log, junk-faxblocking, non-volatile fax memory, fax redirect featureConnectivity ●802.3 LAN (10/100) Ethernet port ●Host USB Type A and Type B ports (back)●USB 2.0 Device port (front)PageWide Pro MFP 477dw D3Q20A, D3Q20B, D3Q20C, D3Q20D Has the same features as the PageWide Pro MFP 477dn, and includes the following:●Embedded wireless capability ●802.11n 5GHz dual bandsupport●HP ePrint—send documents tothe product email address for printing●HP Wireless Direct support ●NFC-enabled (Near FieldCommunications); walkup printing from smart phones and tablets●Scan to smart phone 2Chapter 1 Product basics ENWWEnvironmental featuresFeature Environmental benefitDuplex printing Automatic duplex printing is available on all models of HP PageWide Pro MFP477dn/dw series. Duplex printing saves the environment and saves you money.Print multiple pages per sheet Save paper by printing two or more pages of a document side-by-side on onesheet of paper. Access this feature through the printer driver.Copies multiple pages per sheet Save paper by copying two pages of an original document side-by-side on onesheet of paper.Recycling Reduce waste by using recycled paper.Recycle cartridges by using the HP Planet Partners return process.Energy savings Sleep modes and timer options enable this product to quickly go into reducedpower states when not printing, thus saving energy. Accessibility featuresThe product includes several features that aid users with limited vision, hearing, dexterity or strength.●Online user guide that is compatible with text screen-readers.●Cartridges can be installed and removed using one hand.●All doors and covers can be opened using one hand.ENWW Product features3Product views●Front left view●Front right view●Back view●Cartridge door viewFront left viewLabel Description1USB device connection port2Cartridge door3Tray 1 extension4Tray 15Power button6Tray 2–main paper tray7Control panel8Scanner glass4Chapter 1 Product basics ENWWFront right viewLabel Description1Automatic document feeder (ADF) cover2Main output door3ADF paper guides4ADF loading area5ADF output bin6ADF output bin stop7Main output bin stop8Main output binBack viewLabel Description1Ethernet connection port2Fax connection ports3USB Type A and USB Type B ports4Power cord connectionENWW Product views5Label Description5Left door6DuplexerCartridge door viewLabel Description1Cartridge slots2Product serial number and product number3Cartridge part numbers6Chapter 1 Product basics ENWWPower on and offNOTICE:To prevent damage to the product, use only the power cord that is provided with the product.●Turn the product on●Manage power●Turn the product offTurn the product on1.Connect the power cord that is provided with the product to the connection port on the back of theproduct.2.Connect the power cord to a wall outlet with an adequate voltage rating.NOTE:Make sure that your power source is adequate for the product voltage rating. The product useseither 100-240 Vac or 200-240 Vac and 50/60 Hz.3.Press and release the power button on the front of the product.Manage powerHP PageWide Pro MFP 477dn/dw series printers include power-management features that can help reducepower consumption and save energy.●Sleep Mode puts the product in a reduced power-consumption state if it has been idle for a specificlength of time. You can set the length of time before the product enters Sleep Mode from the controlpanel.●Schedule On/Off enables you to turn the product on or off automatically at days and time that you setfrom the control panel. For example, you can set the product to turn off at 6 p.m. on Monday throughFriday.Set the Sleep Mode time1.Open the control panel dashboard (swipe the dashboard tab at the top of any screen downward, ortouch the dashboard area on the home screen).2.On the control panel dashboard, touch .ENWW Power on and off73.Touch Power Management, and then touch Sleep Mode.4.Select one of the time-interval options.The product switches into a reduced power-consumption state when it has been idle for the amount of timethat you select.Schedule the product to turn on or off1.Open the control panel dashboard (swipe the dashboard tab at the top of any screen downward, ortouch the dashboard area on the home screen).2.On the control panel dashboard, touch .3.Touch Power Management, and then touch Schedule Printer On/Off.4.Turn the Schedule On or Schedule Off option on.5.Select the Schedule On or Schedule Off options at the bottom of the screen, and then select the day andtime that you want to schedule.The product switches on or off at the time you select on the day you select.NOTE:The product cannot receive faxes when it is turned off. Faxes sent during a scheduled off interval willprint when the product is turned on.Turn the product offNOTICE:Do not turn off the product if a cartridge is missing. Damage to the product can result.▲Press and release the power button on the front of the product to turn off your HP PageWide Pro MFP 477dn/dw series printer.A warning message appears on the control panel if you attempt to turn the product off when one ormore cartridges are missing.NOTICE:To prevent print-quality problems, turn off the product by using the power button on the frontonly. Do not unplug the product, turn off the powerstrip, or use any other method.8Chapter 1 Product basics ENWWUse the control panel●Control panel buttons●Control panel home screen●Control panel dashboard●Control panel application folders●Control panel shortcuts●Help featuresNOTE:The small text on the control panel is not designed for prolonged viewing.Control panel buttonsButtons and indicator lights on the control panel of HP PageWide Pro MFP 477dn/dw series printers appear litwhen their function is available, and are darkened if their function is not available.1Home button.Touch to view the control panel home screen.2Wireless network indicator.Solid blue when the product is connected to a wireless network. Blinks when the product is searching for awireless connection. Off when the product is connected to a wired network or by a USB cable.3NFC (Near Field Communications) indicator.The product can be enabled for walkup printing from tablets and smart phones.4Back or Cancel button.Touch to return to the previous screen, or to cancel the current process.5Help button.Touch to view the Help menu options.ENWW Use the control panel9。
YAMAHA_S500音色和伴奏中英文对照表

YAMAHA S500音色和伴奏中英文对照表面板音色一览表Piano(钢琴)001. Live! Grand Piano 现场大钢琴002. Bright Piano 亮音钢琴003. Live! WarmGrand 现场温暖华丽004. Harpsichord 拨弦古钢琴005. GrandHarpsi 豪华古钢琴006. HonkyTonk 酒吧钢琴007. MidiGrand 华丽mini008. Oct.Piano1 八度音钢琴1009. Oct.Piano2 八度音钢琴2010. CP80 击弦电拾音钢琴E.Piano(电钢琴)001. Cool! GalaxyEP 超酷银河电钢琴002. Cool! SuitcaseEP 超酷便携电钢琴003. PolarisEP 北极星电钢琴004. JazzChorus 叠奏爵士005. HyperTines 超级泰因键盘006. Cool! E.Piano 超酷电钢琴007. PhaseEP 逐级电钢琴008. NewTines 新泰因键盘009. FunkEP 抑郁电钢琴010. DX Modern dx摩登电钢琴011. VintageEP 最佳电钢琴012. VenusEP 维纳斯电钢琴013. ModernEP 温和电钢琴014. TremoloEP 颤音电钢琴015. SuperDX 超级dx016. StageEP 舞台电钢琴017. Clavi 电翼琴018. WahClavi 沃尔电翼琴Organ(风琴)001. Cool! Organ 超酷风琴002. Cool! JazzOrgan 超酷爵士风琴003. Cool! RotorOrgan 超酷电驱风琴004. Cool! FullRocker 超酷醇厚摇滚风琴005. StadiumOrg 运动场风琴006. RotaryDrive 转风琴007. RockOrgan1 摇滚风琴008. DanceOrgan 跳跃风琴009. JazzOrgan1 爵士风琴1 010. PurpleOrg 紫风琴011. an 电子风琴012. DrawbarOrg 拉杆风琴013. JazzOrgan2 爵士风琴2 014. RockOrgan2 摇滚风琴2 015. ClickOrgan 旷音风琴016. GospelOrg 福音风琴017. MellowDraw 圆润拉杆风琴018. BrightDraw 明亮拉杆风琴019. 60'sOrgan 60年代风琴020. JazzOrgan3 爵士风琴3 021. Tibia 16+4 16+4笛022. Tibia Full 醇厚的笛023. ChapelOrgn1 教堂风琴1 024. ChapelOrgn2 教堂风琴2 025. ChapelOrgn3 教堂风琴3 026. PipeOrgan管风琴027. ReedOrgan 簧片风琴Strings(弦乐)001. Live! Strings 现场弦乐002. Live! Orchestra 现场管弦乐队003. Allegro Strings 快速弦乐004. Symphon.Str 交响乐005. Sweet! Violin 甜美小提琴006. Strings 弦乐007. OrchStrings 管弦乐队008. AnalogStrs 模拟弦乐009. ChamberStrs 室内弦乐010. BowStrings 弓弦乐011. SlowStrings 慢速弦乐012. TremoloStrs 颤音弦乐013. MarcatoStrs 强劲弦乐014. SynStrings1 合成弦乐1 015. PizzStrings 披萨弦乐016. Viola 中提琴017. Cello 大提琴018. Contrabass 低音大提琴019. Harp 竖琴020. Hackbrett 大洋琴021. Fiddle 小提琴022. Banjo 斑鸠五弦琴023. Sitar 印度西塔琴024. Koto 十三弦日本古筝025. Shamisen 日本三味线026. SoloViolin 独奏小提琴027. Orch.Hit 管弦乐齐奏Choir(合唱)001. AirChoir 气息合唱002. GothicVox 哥特式唱音003. SweetHeaven 甜美空灵004. DreamHeaven 梦幻空灵005. Choir 合唱006. VoxHumana 深情的唱音Brass(铜管乐)001. Live! PopBrass 现场流行铜管乐002. Hyper Brass 超级铜管乐003. OctaveBrass 八度音铜管乐004. Live! FrenchHorns 现场法国号005. BrassCombo 管乐合奏006. BrassSection 管乐齐奏007. Sforzando 强劲的008. BigBrass 大号009. BallroomBrs 大舞厅铜管乐010. BrightBrass 亮音铜管乐011. MellowBrass 圆润铜管乐012. 80'sBrass 80年代铜管乐013. SoftBrass 轻柔铜管乐014. FullHorns 醇厚的号015. SmoothTromb 平滑的长号016. HighBrass 激昂铜管乐017. OberBrass 奥伯铜管乐018. TrumpetEns 英国小号019. MellowHorns 圆润的号020. BigBandBrs 管乐团021. PopBrass 流行铜管乐022. AnalogBrs 模拟管乐023. Trb.Section 部分管乐组合024. SmallBrass 小型铜管乐025. SoftAnalog 模拟轻柔020. FunkyAnalog 模拟暗淡027. TechnoBrass 扩音快节奏铜管乐028. SynthBrass 管乐组合Trumpet(小号)001. Sweet! Trumpet 甜美小号002. Sweet! Trombone 甜美长号003. JazzTrumpet 爵士小号004. SoloTrumpet 独奏小号005. FlugelHorn 粗管短号006. Trombone 长号007. SoftTromb 轻柔的长号008. SoloTromb 独奏长号009. MellowTromb 圆润长号010. MutedTrump 弱音小号011. BaritonHorn 中音号012. BaritonHit 中音齐奏013. Tuba 大号014. AlpBass 力度低音号Saxophone(萨克斯)001. Sweet! TenorSax 甜美次中音萨克斯002. Sweet! AltoSax 甜美中音萨克斯003. Sweet! SopranoSax 甜美高音萨克斯004. GrowlSax 轰鸣的萨克斯005. BaritoneSax 上低音萨克斯006. SopranoSax 高音萨克斯007. TenorSax 次中音萨克斯008. AltoSax 中音萨克斯009. WoodwindEns 英国木管乐器Flute/Clarinet(长笛和单簧管)001. Sweet! Flute 甜美长笛002. Sweet! Clarinet 甜美单簧管003. Sweet! PanFlute 甜美排萧004. EnglishHorn 英国号005. Bassoon 巴松管006. Class.Flute 高品级长笛007. Piccolo 短笛008. Clarinet 单簧管009. Oboe 双簧管010. Flute 长笛011. PanFlute 排萧012. Whistle 口哨013. EthnicFlute 牧笛014. Shakuhachi 尺八(日本5孔竹笛) 015. Recorder 竖笛(舌簧八孔直笛) 016. Ocarina 奥卡里那埙(陶制的卵形笛)017. Bagpipe 苏格兰风笛Guitar(吉他)001. Dynamic Nylon 尼龙弦活力吉他002. Steel Guitar 钢弦吉他003. Cool! JazzGuitar 超酷爵士吉他004. Cool! Elec.Gtr 超酷电吉他005. Sweet! Mandolin 甜美曼陀林006. Dyno Steel 倍音钢弦007. Cool! Stratsphere 超酷滑音效果008. Cool! VintageLead 超酷典型主音009. 12Strings Guitar 12弦吉他010. Cool! PowerLead 超酷大功率主音011. Dynamic Steel 活力钢弦012. Cool! BluesGuitar 超酷布鲁斯吉他013. Cool! CleanGuitar 超酷纯音吉他014. Classic Guitar 古典吉他015. PedalSteel 踏板钢弦016. RockGuitar 摇滚吉他017. VintageStrum 最佳弹拨乐器018. PowerChord 力度弦019. 60'sClean 60年代纯音020. SmoothLead 平滑主音021. VintageAmp 最佳电吉他022. CrunchGtr 嘎吱吉他023. CampfireGtr 营火会吉他024. SolidGuitar 硬吉他025. VintageOpen 最佳空旷音026. VintageMute 最佳哑音020. LeadGuitar 主音吉他028. ChorusGtr 叠奏吉他029. VintageTrem 最佳颤音030. OctaveGtr 8度音吉他031. DeepChorus 深沉的叠奏032. TremoloGtr 颤音吉他033. HeavyStack 迟重的齐奏034. WahGuitar 沃尔吉它035. Distortion 失真036. Elec.12Str 12弦电吉它037. FeedbackGtr 回音吉他038. MutedGuitar 弱音吉他039. FunkGuitar 抑郁吉他040. VodooLead Vodoo主音041. FolkGuitar 民间吉他042. Overdrive 夸张弹奏Bass(贝司)001. Cool! FingerBass 超酷指弹贝司002. Aco.Bass 和谐贝司003. PickBass 弹拨贝司004. Cool! Fretless 超酷无品贝司005. SlapBass 打弦贝司006 SubBass 潜音贝司007. HardBass 坚实的贝司008. ResoBass 背景贝司009. SuperFretles 超级无品贝司010. FusionBass 混合贝司011. Bass&Cymbal 铙钹贝司012. AnalogBass 模拟贝司013. DrySynBass 干音复合贝司014. 80'sSynBass 80年代复合贝司015. HiQBass Hi-Q贝司016. FunkBass 抑郁贝司017. ClickBass 和音贝司018. MellowFinger 圆润的手法Perc./Drum kit(鼓组)001. Vibraphone 电颤琴002. JazzVibes 爵士电颤琴003. Marimba 马林巴琴004. Xylophone 木琴005. SteelDrums 钢鼓006. Celesta 钢片琴007. Glocken 钟琴008. MusicBox 音乐盒009. TubularBell 管钟010. Kalimba 非洲克林巴琴011. Dulcimer 德西马琴012. Timpani 定音鼓013. StandardKit1 标准组1014. StandardKit2 标准组2015. JazzKit 爵士组016. BrushKit 轻触组017. RoomKit 室内组018. RockKit 摇滚组019. ElectroKit 数码组020. AnalogKit 模拟组021. DanceKit 跳跃组022. SymphonyKit 交响组023. CubanKit 古巴组024. PopLatinKit 流行拉丁组025. ArabicKit 阿拉伯组026. SFXKit1 特技效果组1027. SFXKit2 特技效果组2Accordion(手风琴)001. Musette 缪赛特手风琴002. Steirisch 施蒂里亚手风琴003. TuttiAccrd 手风琴齐奏004. SmallAccrd 小室内手风琴005. Accordion 手风琴006. TangoAccrd 探戈手风琴007. Bandoneon 班多钮手风琴008. SoftAccrd 轻柔的手风琴009. ModernHarp 现代竖琴010. BluesHarp 蓝调竖琴Pad(长音)001. Insomnia 无眠002. NeoWarmPad 古典温情的长音003. CyberPad 电子长音004. Wave2001 波浪2001005. Atmosphere 大气圈006. XenonPad 氙气长音007. Equinox 春的气息008. Fantasia 幻想009. DX Pad DX长音010. Symbiont 共生011. Stargate 星辰012. Area51 领域51013. DarkMoon 昏暗的月球014. Ionosphere 电离层015. GoldenAge 金色年华016. Solaris 沐浴阳光017. Millennium 太平盛世018. Dunes 沙滩Synth(合成器)001. Oxygen 氧气002. Matrix 派生003. WireLead 无线电004. HipLead 嘻皮主奏005. HopLead 跳跃主奏006. FireWire 火线007. Analogon 模拟008. Blaster 爆破009. Skyline 地平线010. SquareLead 方波主奏011. Saw.Lead 锯齿波主奏012. TinyLead 微小波主奏013. FunkyLead 暗淡主奏014. Paraglide 滑翔015. Portatone 轻音色016. BigLead 大主奏017. Warp 变形018. Fargo 远去019. Adrenaline兴奋020. Stardust 星辰021. AeroLead 飞行主奏022. MiniLead 小型主奏023. Impact 冲击024. SunBell 阳光地带025. UnderHeim 在家里026. HiBias 夏威夷声线027. Vinylead 从生主奏XGlite音色/XGlite可选音色*一览表(Piano &E. Piano钢琴和电钢琴)001. Grand Piano 大钢琴002. Grand Piano KSP 大钢琴ksp003. Piano Strings 钢琴弦乐004. Dream 梦幻般美妙005. Bright Piano 明亮钢琴006. Bright Piano KSP 明亮钢琴ksp007. Electric Grand Piano 电子大钢琴008. Electric Grand Piano KSP 电子大钢琴ksp 009. Detuned CP80 简化击弦电拾音钢琴010. Honky-tonk Piano 夜总会钢琴011. Honky-tonk Piano KSP 夜总会钢琴ksp 012. Electric Piano 1 电钢琴013. Electric Piano 1 KSP 电钢琴ksp014. Chorus Electric Piano 1 叠奏电钢琴015. Electric Piano 2 电钢琴2016. Electric Piano 2 KSP 电钢琴ksp017. Chorus Electric Piano 2 叠奏电钢琴2018. DX + Analog Electric Piano dx+模拟电钢琴019. Harpsichord 拨弦古钢琴020. Harpsichord KSP 拨弦古钢琴ksp021. Harpsichord 2 拨弦古钢琴2022. Clavi 翼琴023. Clavi KSP 翼琴ksp024. Celesta 钢片琴025. Glockenspiel 钟琴026. Music Box 音乐盒(Orgel风琴)027. Orgel 风琴028. Vibraphone 电颤琴029. Vibraphone KSP 电颤琴ksp030. Marimba 马林巴琴031. Marimba KSP 马林巴琴ksp032. Sine Marimba 正弦马林巴033. Balimba 巴林巴琴034. Log Drums 木鼓035. Xylophone 木琴036. Tubular Bells 管钟037. Church Bells 教堂钟038. Carillon 大钟琴039. Dulcimer 杜西码琴040. Dulcimer 2 杜西码琴2041. Cimbalom 钦巴龙琴042. Santur 山特琴043. Drawbar Organ 拉杆风琴044. Detuned Drawbar Organ 简化拉杆风琴045. 60's Drawbar Organ 1 60年代拉杆风琴1 046. 60's Drawbar Organ 2 60年代拉杆风琴2 047. 70's Drawbar Organ 1 70年代拉杆风琴1 048. 60's Drawbar Organ 3 60年代拉杆风琴3 049. 16+2'2/3050. Organ Bass 低音风琴051. 70's Drawbar Organ 2 70年代拉杆风琴2 052. Cheezy Organ 尺泽风琴053 Drawbar Organ 2 拉杆风琴2054. Percussive Organ 打击风琴055. 70's Percussive Organ 70年代打击风琴056. Percussive Organ 简化打击风琴057. Light Organ 亮音风琴058. Percussive Organ 2 打击风琴2059. Rock Organ 摇滚风琴060. Rotary Organ 转风琴061. Slow Rotary 慢转风琴062. Fast Rotary 快转风琴063. Church Organ 教堂风琴064. Church Organ 3 教堂风琴3065. Church Organ 2 教堂风琴2066. Notre Dame 圣母玛丽亚067. Organ Flute 长笛风琴068. Tremolo Organ Flute 颤音长笛风琴069. Reed Organ 簧片风琴070. Puff Organ 吹气风琴070. Accordion 手风琴072. Harmonica 口琴073. Harmonica 2 口琴2074. Tango Accordion 探戈手风琴075. Tango Accordion 2 探戈手风琴2(Guitar吉他)076. Nylon Guitar 尼龙弦吉他077.Velocity Guitar Harmonics 力度吉他和声078. Ukulele 尤克里里四弦琴079. Steel Guitar 钢弦吉他080. 12-string Guitar 12弦吉他081. Nylon & Steel Guitar 尼龙弦和钢弦吉他082. Steel Guitar with Body Sound 主音钢弦吉他083 Mandolin 曼陀林琴084 Jazz Guitar 爵士吉他085 Jazz Amp 爵士电吉他086 Clean Guitar 纯音吉他087 Chorus Guitar 叠奏吉他088 Muted Guitar 弱音吉他089 Funk Guitar 抑郁吉他090 Muted Steel Guitar 弱音钢弦吉他091 Jazz Man 爵士音乐家092. Overdriven Guitar 夸张吉他093. Guitar Pinch 吉他基音094. Distortion Guitar 失真吉他095. Feedback Guitar 回音吉他1096. Feedback Guitar 2 回音吉他2097. Guitar Harmonics 吉他和声098 .Guitar Feedback 吉他回声099. Guitar Harmonics 2 吉他和声2(Bass贝司)100. Acoustic Bass 原音贝司101. Jazz Rhythm 爵士韵律102. Velocity Crossfade Upright Bass力度垂直转换贝司103. Finger Bass 指弹贝司104. Finger Dark 指弹沉音105. Bass & Distorted Electric Guitar贝司和失真电吉他106. Finger Slap Bass 指弹击弦贝司107. Finger Bass 2 指弹贝司2108. Modulated Bass 移调贝司109. Pick Bass 拨片贝司110. Muted Pick Bass 弱音拨片贝司111. Fretless Bass 无品贝司112. Fretless Bass 2 无品贝司2113. Fretless Bass 3 无品贝司3114. Fretless Bass 4 无品贝司4115. Slap Bass 1 击弦贝司1116. Punch Thumb Bass 拇指弹拨贝司117. Slap Bass 2 击弦贝司2118. Velocity Switch Slap 快速掌击119. Synth Bass 1 合成贝司1120. Techno Synth Bass 电子合成贝司121. Synth Bass 2 合成贝司2122. Mellow Synth Bass 圆润合成贝司123. Sequenced Bass 时序贝司124. Click Synth Bass 融洽的合成贝司125. Synth Bass 2 Dark 深沉的合成贝司*126. Modular Synth Bass 标准合成贝司127. DX Bass DX贝司(Strings 弦乐)128. Violin 小提琴129. Slow Violin 慢速小提琴130. Viola 中提琴131. Cello 大提琴132. Contrabass 低音大提琴133. Tremolo Strings 颤音弦乐134. Slow Tremolo Strings 慢速颤音弦乐135. 45 Suspense Strings 含糊的弦乐136. Pizzicato Strings 拨奏弦乐137. Orchestral Harp 竖琴弦乐138. Yang Chin 扬琴139. Timpani 定音鼓140. Strings 1 弦乐1141. Stereo Strings 立体声弦乐142. Slow Strings 慢速弦乐143. 60's Strings 60年代弦乐144. Orchestra 管弦乐队145. Orchestra 2 管弦乐队2146. Tremolo Orchestra 颤音管弦乐147. Velocity Strings 力度弦乐148. Strings 2 弦乐2149. Stereo Slow Strings 立体声慢速弦乐150. Legato Strings 弦乐联奏151. Warm Strings 温和的弦乐152. Kingdom 极品153. Synth Strings 1 合成弦乐1154. Synth Strings 2 合成弦乐2(Choral) 合唱155. Choir Aahs 啊唱音156. Stereo Choir 立体声唱乐157. Mellow Choir 圆润的唱乐158. Choir Strings 唱音弦乐159. Voice Oohs 嗓音160. Synth Voice 合成嗓音161. Synth Voice 2 合成嗓音2162. Choral 合唱163. Analog Voice 模拟嗓音(Brass 铜管乐)164. Orchestra Hit 管弦乐齐奏165. Orchestra Hit 2 管弦乐齐奏2166. Impact 冲击167. Trumpet小号168. Warm Trumpet 温暖的小号169. Trombone 长号170. Trombone 2 长号2171. Tuba 大号172. Muted Trumpet 弱音小号173. French Horn 法国号174. French Horn Solo 独奏法国号175. French Horn 2 法国号2176. Horn Orchestra 号角管弦乐队177. Brass Section 铜管乐器组合178. Trumpet & Trombone Section 小号长号组合179. Synth Brass 1 合成铜管乐1180. Resonant Synth Brass 共鸣合成铜管乐181. Synth Brass 2 合成铜管乐2182. Soft Brass 轻柔的铜管乐183. Choir Brass 教堂铜管乐(Saxophone 萨克斯)184. Soprano Sax高音萨克斯185. Alto.Sax 中音萨克斯186. Sax Section 组合萨克斯187. Tenor Sax 次中音萨克斯188. Breathy Tenor Sax 喘息次中音萨克斯189. Baritone Sax 中音萨克斯(Clarine 管乐)190. Oboe 双簧管191. English Horn 英国号192. Bassoon 巴松管193. Clarinet 单簧管194. Piccolo 短笛195. Flute 长笛196. Recorder 竖笛197. Pan Flute 排萧198. Blown Bottle 吹瓶199. Shakuhachi 尺八200. Whistle 口哨201. Ocarina 奥卡里那埙(Synth 合成器)202. Square Lead 方波主奏203. Square Lead 2 方波主奏2204. LM Square LM方波205. Hollow 空洞音206. Shroud 恐怖笼罩音207. Mellow 柔和音208. Solo Sine 正弦独奏209. Sine Lead 正弦主奏210. Sawtooth Lead 锯齿波主奏211. Sawtooth Lead 2 锯齿波主奏2 212. Thick Sawtooth 厚重的锯齿波213. Dynamic Sawtooth 动态锯齿波214. Digital Sawtooth 数字锯齿波215. Big Lead 大主奏216. Sequenced Analog 音序模拟器217. Calliope Lead 汽笛风琴主奏218. Pure Lead 纯拍击主奏219. Chiff Lead 雪纺主奏220. Charang Lead 沙朗主奏221. Distorted Lead 失真主奏222. Voice Lead 嗓音223. Fifths Lead 五度音224. Big Five 大五度225. Bass & Lead 低音和主音226. Big & Low 高音和低音227. Fat & Perky 丰满活泼228. Soft Whirl 轻柔委婉229. New Age Pad新世纪长音230. Fantasy 幻觉231. Warm Pad 温暖长音232. Poly Synth Pad 多合成长音233. Choir Pad 唱音234. Itopia 埃特皮亚235. Bowed Pad 弯曲长音236. Metallic Pad 金属长音237. Halo Pad 光环长音238. Sweep Pad 掠过长音(Analog 模拟音)239. Rain 雨240. African Wind 非洲风241. Carib 加勒比242. Sound Track 脚步声243. Prologue 序幕244. Crystal 水晶245. Synth Drum Comp 合成排鼓246. Popcorn 爆玉米花247. Tiny Bells 小铃248. Round Glockenspiel 钟琴249. Glockenspiel Chimes 编钟250. Clear Bells 响亮的钟251. Chorus Bells 叠奏钟252. Soft Crystal 悦耳的水晶253. Air Bells 悠扬的钟声254. Bell Harp 竖琴和铃255. Gamelimba 木琴256. Atmosphere 大气层257. Warm Atmosphere 温暖的大气258 .Hollow Release 沉闷的虚空259. Nylon Electric Piano 尼龙弦钢琴260. Nylon Harp 尼龙弦竖琴261. Harp Vox 竖琴声262. Atmosphere Pad 大气长音263. Brightness 明亮264. Goblins 小妖265. Goblins Synth 合成小妖266. Creeper 曼草267. Ritual 宗教仪式268. To Heaven 向往天堂269. Night 黄昏270. Glisten 闪光271. Bell Choir 教堂钟272. Echoes 回声273. Sci-Fi 科幻274. Sitar 西塔琴275. Detuned Sitar 消音西塔琴276. Sitar 2 西塔琴2277. Tamboura 鼓278. Banjo 斑鸠琴279. Muted Banjo 弱音斑鸠琴280. Rabab 拉博281. Gopichant 歌尚282. Oud 乌德琴283. Shamisen 沙玛什284. Koto 日本筝285. Taisho-kin 小泰首286. Kanoon 卡农琴287. Kalimba 卡林巴琴288. Bagpipe 苏格兰风笛289. Fiddle 小提琴290. Shanai 山奈291. Tinkle Bell 电话铃292. Bonang 波南293. Altair 祈祷294. Gamelan Gongs 加麦兰锣295. Stereo Gamelan Gongs 立体声加麦兰锣296. Rama Cymbal 罗摩钹297. Agogo 阿果果298. Steel Drums 钢鼓299. Glass Percussion 玻璃打击乐300. Thai Bells 泰国钟301. Woodblock 木鱼302. Castanets 响板303. Taiko Drum 泰柯鼓304. Gran Cassa 葛兰卡萨305. Melodic Tom 旋律鼓306. Melodic Tom 2 旋律鼓2307. Real Tom 实心鼓308. Rock Tom 摇滚鼓309. Synth Drum 合成鼓310. Analog Tom 模拟鼓311. Electronic Percussion 电子打击乐器312. Reverse Cymbal 背钹313. Fret Noise 急促的噪声314. Breath Noise 呼吸音315. Seashore 海滨316. Bird Tweet 鸟鸣317. Telephone Ring 电话铃318. Helicopter 直升机319. Applause 鼓掌320. Gunshot 枪声321. Cutting Noise 切割声322. Cutting Noise 2切割声323. String Slap 击弦324. Flute Key Click 鸣笛325. Shower 阵雨326. Thunder 雷鸣327. Wind 风声328. Stream 河流329. Bubble 冒水泡330. Feed 输送331. Dog 犬332. Horse 马333. Bird Tweet 2 鸟鸣2334. Maou 猫335. Phone Call 大声打电话336. Door Squeak 门轴吱嘎声337. Door Slam 关门声338. Scratch Cut 刮擦声339. Scratch Split 劈裂声340. Wind Chime 风铃341. Telephone Ring 2 电话2342. Car Engine Ignition 发动汽车343. Car Tires Squeal 尖厉的车胎噪音344. Car Passing 汽车经过345. Car Crash 撞车346. Siren 警报器347. Train 火车348. Jet Plane 喷气式飞机349. Starship 宇宙飞船350. Burst 爆炸351. Roller Coaster 船轴352. Submarine 潜水艇353. Laugh 笑声354. Scream 尖叫声355. Punch 冲压机356. Heartbeat 心跳357. Footsteps 脚步358. Machine Gun 机关枪359. Laser Gun 雷射枪360. Explosion 爆破361. Firework 焰火带星号(*)的音色编号是XGlite可选音色。
Polycom VVX 业务媒体电话系列说明书

Polycom ® VVX ® Business Media Phones PortfolioThe Polycom family of VVX series business media phones offer high-quality audio and video communications experience for busy professionals.Entry LevelThe Polycom ® VVX ® 201 business media phone is a two-line SIP for small businesses and medium-sized organizations phone that delivering Polycom ® HD™ Voice technology.Application targetsIdeal for retail environments, call centers or shared/common areas, such as lobbies,hallways and break rooms• 2 line• LCD screen• Polycom HD Voice up to 7 kHz on all audio paths (speaker, handset, headset)• 2 x ethernet 10/100• Hard Keys: 12-key dialpad, home, speaker, mute, headset, volume•4-way navigation cluster with center “select” keyApplication targetsHome office or shared/common areas, such as lobbies, hallways and break rooms• 1 line• LCD screen• G.722 support up to 7 kHz on all audio paths (speaker, handset, headset)• 1/100 ethernet• Hard Keys: 12-key dialpad, home, speaker, mute, headset, volume•4-way navigation cluster with center “select” keyEntry LevelThe Polycom ® VVX ® 101 business media phone is a one-line SIP phone for a home office or shared/common areas deliveringenterprise grade sound quality.Mid-rangeThe Polycom ® VVX ® 401/411 business media phone is a color mid-range business media phone is designed for today’s office workers and attendant consoles delivering crystal clear communications.Application targetsSOHO, call center, cubicle, office desk• 12 lines or speed dials• 3.5” color TFT• 320 x 240 pixel resolution• Polycom HD Voice up to 7 kHz on all audio paths (speaker, handset, headset)and Acoustic Fence(TM) technology• 2x Ethernet 10/100 for network pass-through (VVX 401)• 2x GigE 10/100/1000 for high-performance network pass-through (VVX 411)• RJ9 Headset support with electronic hook switch• Asian character support• Hard Keys: 12-key dialpad, home, speaker, mute, headset, volume,messages, hold, transfer• 4-way navigation cluster with center “select” key• Supports Polycom VVX Expansion Module and Polycom VVX ColorExpansion Module (expandability up to 3 modules)•1 x USB for headset connectivity, storage and call recording (VVX 401 and 411)Application targetsCommon areas, dorm rooms, wall-mounted deployments, cubicle, office desk• 6 lines or speed dials• 208 x 104 pixel resolution• Polycom HD Voice up to 7 kHz on all audio paths (speaker, handset, headset)• 2 x Ethernet 10/100 for network pass-through (VVX 301)• 2 x GigE 10/100/1000 for high-performance network pass-through (VVX 310/311)• Asian character support• Hard Keys: 12-key dialpad, home, speaker, mute, headset, volume,messages, hold, transfer• 4-way navigation cluster with center “select” key• Supports Polycom ® VVX ® Expansion Module and Polycom ® VVX ® ColorExpansion Module (expandability up to 3 modules)BasicThe Polycom ® VVX ® 301/ 311 business media phone is a powerful entry-level phone for today’s cubicle workers handling a low tomoderate volume of calls delivering crystal clear communications.Application targetsKnowledge worker, busy professional’s office, call center• 12 lines appearances or speed dials• 320 x 240 pixel resolution• 3.5’’ color touch screen• Immersive capacitive touch UI• Video playback and video conferencing via USB camera accessory• Streaming media video playback• Full browser• Polycom HD Voice up to 14 kHz on all audio paths (speaker, handset, headset)and Acoustic Fence technology• 2x GigE 10/100/1000 for high-performance network pass-through• RJ9 Headset support with electronic hook switch• 2 x USB ports• Business applications integration• Supports Polycom VVX Expansion Module and Polycom VVX ColorExpansion Module (expandability up to 3 modules)• Video conferencing via optional USB cameraPerformanceThe Polycom ® VVX ® 501 is a performance business media phone that delivers best-in-class desktop productivity and unifiedcommunications for busy professionals.Application targetsExecutive, knowledge worker, busy professional’s office• 16 lines appearances or speed dials• 480 x 272 pixel resolution• 4.3’’ color touch screen• Polycom® HD Voice™ and Acoustic Fence™ technology• Immersive, capacitive touch UI• Video playback and video conferencing via external USB camera• 2x GigE 10/100/1000 for high-performance network pass-through• 2 x USB 2.0 host• RJ9 Headset support with electronic hook switch• Asian character support• Business applications integration• Microsoft ® SfB interoperability• Supports Polycom VVX Expansion Module and Polycom VVX Color• Expansion Module (expandability up to 3 modules)• Bluetooth support for wireless headset connectivityExecutiveThe Polycom ® VVX ® 601 UC executive business media phone delivers rich voice and applications experience for busy corporateexecutives and managers.WirelessThe Polycom® VVX D60 Wireless Handset is a cost-effective scalable, SIP-based, on premise, mobile communications systemApplication targetsVVX DECT solution is ideal for busy users who need to be reachable whether they areat their desk or elsewhere in their immediate workspace.• Support pairing up to 5 DECT handsets (for VVX 300, 400, 500 and 600) and1 DECT handset (VVX 101 and VVX 201)• Provisioning and Management through host phone via Ethernet• 2” TFT (178x220) color display with backlit LCD• Support for 4 simultaneous calls• HD Voice support• Range: 50m(165ft) indoor/300m(980ft) outdoor• 10/100 POE Base Station with Pass-through• DECT 1.92GHz - 1.93GHz (US), 1.88GHz-1.90GHz (EU)• 10 hours talk time, 100 hours standby• Dedicated 2.5 mm headset port (external 2.5mm to 3.5mm adapter)VVX video accessoryThe Polycom® VVX® Camera is a high quality USB video camera, designed as an easy add-on that complements the Polycom VVX 501 or VVX 601 desktop phones. The Polycom VVX Camera enables busy professionals to collaborate interactively with the best in class personal video communications experience.Application targetsExecutive, knowledge workers, busy professionals• High quality business grade video• Transmits Polycom HD Video resolution (720 p 30 fps) H.264 compression• Matches elegantly look and feel of the VVX 501 and VVX 601• Camera lens shutter for privacy• Lens mechanical adjustability to change camera angle for eye-level video calls• USB plug-and-play• Flexible—for use with VVX phone© 2018 Polycom, Inc. All rights reserved. All Polycom® names and marks associated with Polycom products are trademarks or service marks of Polycom, Inc. and are registered or common law marks in the United States and other countries. All other trademarks are property of their respective owners. No portion hereof may be reproduced or transmitted in any form or by any means, for any purpose other than the recipient’s personal use, without the express written permission of Polycom.35980-0918Polycom, Inc.1.800.POLYCOM Polycom Asia Pacific Pte Ltd +65 6389 .sg Polycom EMEA +44 (0)1753 About PolycomPolycom helps organizations unleash the power of human collaboration. More than 400,000 companies and institutions worldwide defy distance with video, voice and content solutions from Polycom. Polycom and its global partner ecosystem provide flexiblecollaboration solutions for any environment that deliver the best user experience and unmatched investment protection.Paper-based• 40 multifunctional line keys configurableas line registration, call appearance,speed dial, DSS, or BLF• Dual-color (red or green) illuminated LEDsfor line status information LCD-based• 4.3 in. LCD (480 x 272 pixel resolution)• Color graphical user interface• 28 multifunctional line keys configurableas line registration, call appearance,speed dial, DSS, or BLF• Dual-color (red or green) illuminated LEDsfor line status information• 3 page keys for additional lineappearances (up to 84 in total)Expandability • Up to three VVX Expansion Modules can be attached to any VVX phone • Provided by Polycom VVX host phone • Host phone powering options: IEEE802.3 (af/at) PoE or using a compatibleexternal AC adapter• Power Expansion modulesThe Polycom ® VVX ® expansion modules turn your VVX business media phone into a high-performance attendant console.Application targetsTelephone attendant’s desk, front desk, team manager’s deskCompatible with Polycom VVX 301, 311, 401, 411, 501, 601。
Maxxyz模块用户手册说明书

This product is for professional use only. It is not for household use. It presents risks of lethal or severe injury due to electric shock. Read this user manual before powering or installing the Modules, follow the safety precautions listed below and observe all warnings in this manual and printed on the product If you have questions about how to operate the product safely, please contact your Martin supplier or call the Martin 24-hour service hotline on +45 8740 0000, or in the USA on 1888-tech-180.
- 1、下载文档前请自行甄别文档内容的完整性,平台不提供额外的编辑、内容补充、找答案等附加服务。
- 2、"仅部分预览"的文档,不可在线预览部分如存在完整性等问题,可反馈申请退款(可完整预览的文档不适用该条件!)。
- 3、如文档侵犯您的权益,请联系客服反馈,我们会尽快为您处理(人工客服工作时间:9:00-18:30)。
几种发电机100%定子接地保护的应用孙 琦(上海阿海珐电力自动化有限公司 上海市 201315)【摘要】 简要介绍几种发电机100%定子接地保护装置的原理、应用效果和试验维护。
【关键词】 100%定子接地保护 原理 运行比较 应用和维护【数据库分类号】 SZ090 概述单相接地是发电机常见的故障,发电机接地保护是发电机的主保护之一。
我国G B/T142582 2006《继电保护及安全自动装置设计技术规程》规定:“100MW及以上大型发电机必须装设100%定子接地保护”。
在1995年12月“大机组继电保护调研工作会议”上,针对当时100%定子接地保护运行中出现的问题,又提出:“对由基波和三次谐波零序电压构成的发电机定子接地保护基波段和三次谐波段分开,三次谐波段只投信号”。
在实际应用中,在确定具体的发电机定子接地投运方式时,应了解该发电机实际的单相接地电容电流,由此确定发电机定子接地保护的合理投运方式,即确定保护是投跳闸还是投信号。
为确保大型发电机的运行安全,定子接地保护的设置应确保在接地故障发生时不使单相接地故障电流发展成为相间或匝间短路电流,应使单相接地故障处不产生电弧或者使接地点电弧瞬间熄灭。
这个不产生电弧的最大接地电流被定义为发电机单相接地的安全电流。
我国发电机单相接地的安全电流标准原来沿用苏联标准。
规定接地电流大于5A时接地保护作用于跳闸,小于5A时保护投信号。
随着大容量发电机组在电力系统中的投运台数逐年增长,大容量发电机组在电力系统中处于更为重要的地位,对接地保护技术提出了更高的要求;随着发电机制造中电工材料质量、工艺水平的大幅度提高,发电机运行的水平可以上升也能够上升到一个更高的台阶;根据对大容量发电机组在运行中出现的问题的分析来看:5A的定子接地电流,不是一个安全的接地电流。
所以,国标G B/T1428522006《继电保护及安全自动装置设计技术规程》中对发电机定子接地电流允许值应按制造厂的规定值,如无制造厂提供的规定值可参照表1所列数据。
目前,我国的接地保护的设计、制造、安装、调试和运行维护基本遵循上述标准和规定。
设计时保护装置保护的接地点故障电流一般不超过安全电流,以确保定子铁芯的安全;保护范围力求覆盖整个定子绕组;保护区内任一点接地故障争取有足够高的灵敏度;故障时暂态过电压数值尽可能小,不能威胁发电机的运行安全。
1 当前电网中运行的几种100%定子接地保护当前,我国电网中运行着多国、多种型号的100%定子接地保护。
如:收稿日期:2007203215。
表1 发电机定子绕组单相接地故障电流允许值发电机额定电压/kV发电机额定容量/MW 接地电流允许值/A 6.3≤50410.5汽轮发电机50~100水轮发电机10~100313.8~15.75汽轮发电机125~200水轮发电机40~22521)18~20300~6001 注:1)对于氢冷发电机2.5A盘山2×500MW 、伊敏2×500MW 、营口2×300MW 、汕头2×300MW 、绥中2×800MW 发电机组安装有前苏联БРЭ1301.01型发电机定子接地保护装置;山西河津、福建后石等电厂运行着瑞士ABB 公司的REC 2216/GIX104型等数字接地保护装置;山西漳泽发电厂苏制210MW 发电机组上匹配了苏制EP31310型100%定子接地保护装置;一些发电厂配备了南自公司的WFBZ 201、许昌的BD 210型等100%定子接地保护装置。
这些保护装置大约有以下几种不同类型。
图1 中性点双频保护信号定子接地保护装置1.1 中性点双频保护信号定子接地保护装置这种定子接地保护装置的原理框图如图1所示。
被保护发电机中性点通过匹配变压器接地,接地保护信号中基波零序电压取自发电机中性点P T ,能保护发电机机端到中性点90%~85%的范围。
三次谐波取自发电机机端P T 和中性点P T ,保护中性点附近10%~30%的绕组。
用负序电压闭锁不对称故障。
基波段和三次谐波段共用一继电器出口跳闸。
图2 保护信号分别取自机端和中性点的100%定子接地保护装置1.2 保护信号分别取自机端和中性点的100%定子接地保护装置这种定子接地保护装置的原理框图如图2所示。
被保护发电机中性点通过匹配变压器接地,接地保护基波零序电压取自发电机中性点P T 。
保护的电源和三次谐波信号取自发电机出口V 型接线P T 的二次专用线圈电压。
用基波零序电压U N 和三次谐波电压U S 之差作为三次谐波组件的工作电压,用基波电压U N作为三次谐波制动量。
负序滤过器信号取自P T 的二次专用线圈电压。
1.3 外加低频注入电源的100%定子接地保护装置这种定子接地保护装置的原理框图如图3、图4所示。
图3 外加12.5Hz 低频注入电源的100%定子接地保护装置图4 外加20Hz 低频注入电源的100%定子接地保护装置发电机中性点接匹配变压器,变压器二次接有抽头的阀片电阻,外加低频信号注入电源,注入到配电变压器的二次电阻和发电机定子绕组内。
定子接地保护由95%定子接地保护和100%定子接地保护两部分组成。
保护范围覆盖整个定子绕组。
机端的接地故障由95%定子接地保护切除,中性点接地故障由100%定子接地保护切除。
图5 机端母线匹配变压器100%定子接地保护装置1.4 机端母线匹配变压器100%定子接地保护装置这种定子接地保护装置的原理框图如图5所示。
发电机在机端母线上设置1台匹配变压器,其二次绕组采用不对称接线,通过匹配变压器在发电机电势中感应出固定的中性点偏移电压△U 用于100%定子接地保护。
以上几种保护装置的信号源的来源是各不相同的,取得保护信号设备也是不同的,以各自的方式分离、综合信号,去实现100%定子接地保护的目的。
2 几种100%定子接地保护原理的特点2.1 中性点双频保护信号定子接地保护装置这种接地保护是基于发电机三次谐波电压在正常运行和故障运行时变化趋势正好相反,基波零序电压3U 0在单相接地时接地点离中性点越远电压值越高的特点而设计的。
发电机正常运行时中性点三次谐波电压U N 3总是大于机端三次谐波电压U D 3,只有发电机出线端开路时U N 3=U D 3。
而在发电机中性点单相接地时,中性点三次谐波电压U N 3为零,机端三次谐波电压U D 3等于相电压。
发电机机端单相接地时中性点三次谐波电压U N 3等于相电压,机端三次谐波电压U D 3等于零,中性点的三次谐波电压U N 3随着接地点离开中性点的距离越大三次谐波电压越高,而机端三次谐波电压U D 3随着接地点离开中性点的距离越大三次谐波电压越低(如图6所示)。
图6 U N3和U D3随接地点α变化的变化曲线 基波零序电压动作值一般取10V ~15V 能保护发电机机端到中性点90%~85%的范围。
三次谐波电压保护采用比较幅值的方法实现。
动作量为发电机中性点三次谐波电压和机端出口三次谐波电压差值的绝对值,即|U N 3|-|U D 3|。
制动量为发电机中性点三次谐波电压绝对值,即|U N 3|。
制动系数κ取合适的值。
用负序电压对不对称故障实现闭锁。
三次谐波电压保护是保护发电机中性点附近10%~30%绕组的定子接地故障。
基波零序电压保护和三次谐波保护合成后保护区域有5%~25%的重合区。
保护的动作特性为:发电机在正常运行方式时不考虑泄漏电阻的影响,机端和中性点三次谐波电压U D 3和U N 3都和相电压E 3同相。
由于动作量|U N 3|-|U D 3|很小,制动量|U N 3|相对较大,保护可靠闭锁不动作。
而发电机定子绕组发生金属性接地时,动作量|U N 3|-|U D 3|接近于相电压E 3,而制动量|U N 3|在靠近中性点区域已变得很小,保护动作更加灵敏。
2.2 保护信号分别取自机端和中性点的100%定子接地保护装置零序基波电压保护按躲过发电机相电压曲线正弦波畸变所产生的不平衡量和高压侧单相接地短路通过变压器耦合电容传递到发电机的零序电压整定,动作电压取15V ,能保护发电机机端到中性点85%的范围。
保护采用5.5V 负序电压及延时2s 作为防止高压侧故障对接地保护影响的闭锁。
三次谐波组件用基波电压U N 和三次谐波电压U N 3之差作为三次谐波组件的工作电压。
保护动作量为发电机中性点三次谐波电压和出口三次谐波电压绝对值的差值,即|U N 3|-|U D 3|。
制动量为发电机中性点三次谐波电压绝对值,即|U N 3|。
三次谐波电压保护可保护发电机中性点附近0~30%的绕组。
基波零序电压保护和三次谐波电压保护合成后保护区域有15%的重合区。
保护装置采用了较好的三次谐波接地保护原理而具有较高的动作灵敏度,装置元件由运算放大器构成,出口速度快,灵敏度高。
2.3 外加低频注入电源的100%定子接地保护装置定子接地保护由95%定子接地保护和100%定子接地保护两部分组成。
保护范围覆盖整个定子绕组。
机端的接地故障由95%定子接地保护切除,中性点接地故障由100%定子接地保护切除。
发电机正常运行工况时仅有很小的低频信号电容电流注入到定子绕组内,不会影响发电机的运行。
当中性点附近有接地故障且接地故障电流小于5A 时,低频信号电流骤增,100%定子接地保护按预定逻辑动作。
当中性点附近有接地故障且接地故障电流大于5A 时,低频信号电流中断,中性点配电变压器二次绕组上的基波零序电压作为95%定子接地保护的动作量切除故障。
保护整定值设置为:95%定子接地保护5V/1.00s 跳闸,100%定子接地保护5k Ω/2.00s 报警,1k Ω/1.00s 跳闸。
保护外加的对地信号电流很小,对发电机三相电压的对称性几乎没有影响,也不会增加中性点的附加绝缘电阻。
装置中仅存在加入的低频信号,清除了低频信号的所有倍频信号的干扰,保护动作可靠性高。
测量精度比较高,保护线性度好,能按设定的定值和出口逻辑动作。
2.4 机端母线匹配变压器100%定子接地保护装置保护配置了1台匹配变压器,接于机端出口母线上,其二次绕组的接线是不对称的,通过匹配变压器的不对称接线在发电机电势中感应出固定的中性点偏移电压△U。
发电机正常运行时,机端电压是对称的,而发电机电势是不对称的。
由于发电机定子绕组对地绝缘,△U不能在绕组-地-匹配变压器之间感应出环流,保护不能动作。
当定子绕组接地时,则形成了接地电流,感应到接于开口三角绕组的保护回路中,即使在中性点处接地,偏移电压最小,为△U。
选择合适的动作电流,定子接地保护也能可靠动作。
在定子绕组其它点接地时,保护回路中形成的电流更大,保护更能可靠动作。
零序电压保护,保护85%以上的定子绕组。
100%定子接地保护,保护从中性点到50%的定子绕组接地故障。