GN9000系列气体报警控制器Modbus协议_V2.0
核中警HJ9000操作使用说明书

HJ9000火灾报警控制器(联动型) 操作说明书V1.0目录目录 (1)第一章概述 (3)第二章结构特征 (4)2.1面板 (4)第三章技术特征 (5)3.1 主要性能 (5)3.2 主要参数 (5)第四章使用操作说明 (7)4.1开关机 (7)4.2备电的使用 (7)4.3菜单操作 (7)4.4系统容量 (8)4.5系统自检 (8)4.6 消音 (8)4.7系统复位 (9)4.8 报警信息 (9)4.8.1 火警信息的显示及查询 (9)4.8.2 故障信息的显示及查询 (9)4.8.3 启动信息的显示及查询 (10)4.8.4 反馈信息的显示及查询 (12)4.8.5 延时信息的显示及查询 (13)4.8.6 屏蔽信息的显示及查询 (14)4.8.7 监管信息的显示及查询 (14)4.9点阵的查询 (15)4.10盘卡故障查询 (16)第五章用户的设置 (17)6.1 时间设置 (17)6.2 联动自动设置界面 (17)6.3 打印的设置 (18)第六章历史记录的查询 (19)第七章用户维护与常见故障排除 (20)第八章运输、贮存、开箱检查及注意事项 (21)第一章概述HJ9000火灾报警控制器(联动型)(以下简称为控制器)是核中警消防技术有限责任公司(以下简称为核中警公司)推出的一款新型控制器,符合国标GB4714-2005及GB16806-2006的技术要求。
可与核中警公司的火灾报警探测器、手动报警按钮、输入模块、输入/输出模块等设备组成完整的报警联动控制系统,适合2万平方米以下的建筑使用。
控制器的优点如下:可靠性控制器采用多个微处理器,使控制器有较强的数据处理能力,较快的运算速度,软件自诊断功能、冗余技术的应用,并准确无误的监控和处理火警、故障等相关信息。
显示界面控制器的基本信息同一窗口显示,容清晰、直观、方便操作。
控制器的多种功能显示通过菜单键的切换,灵活的操作即可实现。
配置选择控制器有8条回路,每条回路带256个负载,共计2048个负载。
JB-QGL-9000火灾报警控制器使用说明

2.2.2 工程配置检查................................................................................................................ 7
2.2.3 控制器内部配置及连接状况检查................................................................................ 7
第 4 章 系统配置详解.......................................................................................................................... 17
4.1
系统设置.............................................................................................................................. 18
1.1
系统简介................................................................................................................................ 1
1.2
系统特点................................................................................................................................ 1
TON90A型系列可燃气体检测报警装置
TON90A型系列可燃气体检测报警装置由探测器与报警控制器组成的工业用可燃气体安全检测仪器。
探测器可以固定安装在有可燃气体泄漏的室内、外危险场所。
当空气中有可燃性气体或可燃性液体挥发的蒸汽时,探测器即发出与可燃性气体在空气浓度成比例的电信号,并将该电信号传送给报警控制器,报警控制器即显示可燃性气体的浓度,当被测可燃性气体浓度达到或超过设定的报警浓度时,报警控制器即发出报警并输出有关开关控制信号,提示操作人员采取安全措施或启动有关自动化控制装置,从而起到保障工厂安全生产,避免重大火灾爆炸事故。
特点:测量精度高控制器的CPU采用高档单片机,运算速度快、精度高、可靠性强.显示直观、清楚采用LCD液晶屏,具有时钟显示、报警信息查阅及多条记忆、系统自动调节增益等新功能。
操作方便键盘进行操作,自动标定。
多种线制连接可与标准一次仪表实现连接。
多种信号输出可输出高、低、故障报警继电器触点信号。
安装方便专业设计的安装支架,仪器现场安装方便、快捷。
维修方便整个产品设计采用模块化结构设计,便于系统组合及维护。
船检CCS认证,电压220/50HZ或24/50HZ检测气体:天然气.液化石油气.煤气.烷类.醇.酮,苯,汽油等‖C级T6组可燃气体测量范围:0~100%LEL测量精度:±5%FS防爆方式:隔爆型防爆标志:Exd‖CT6防护等级:IP65防爆连接螺纹:G3/4管螺纹工作电压:DC5V功耗:小于1W/路温度范围:-40℃~+70℃湿度范围:15%~90%RH可配置控制器型号:JB-QT-TON90A可燃气体报警装置操作规程●适用范围:本规程适用成都安可信电子有限公司生产的JB-TB-AEL220(I) 可燃气体报警装置、上海市松江电子仪器厂生产的7BQ-1001-32可燃气体报警装置、天津市费加罗电子有限公司生产的BAT51-1可燃气体报警装置、深训市特安电子有限公司生产的JB-QT-TON90A可燃气体报警装置、华瑞科力恒(北京)科技有限公司生产的SP-1102点型可燃气体探测器1 控制面板标识说明:SAFE:浓度显示刻度POWER:电源/故障指示灯ALARM:报警指示灯TEST:自检按键SP:报警设定按键RESET:消声按键2 操作说明2.1 将后面板电源开关拨至ON位置,此时机器通电工作。
【CN209745914U】一种基于无线、有线传输的CO实时监测管理系统【专利】
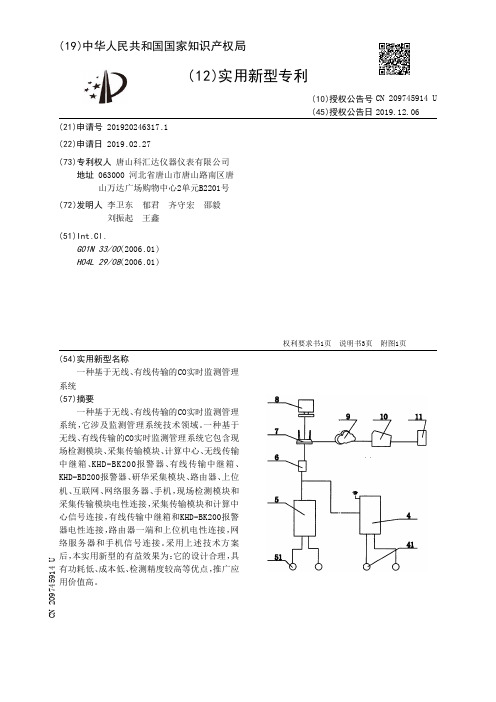
(19)中华人民共和国国家知识产权局(12)实用新型专利(10)授权公告号 (45)授权公告日 (21)申请号 201920246317.1(22)申请日 2019.02.27(73)专利权人 唐山科汇达仪器仪表有限公司地址 063000 河北省唐山市唐山路南区唐山万达广场购物中心2单元B2201号(72)发明人 李卫东 郁君 齐守宏 邵毅 刘振起 王鑫 (51)Int.Cl.G01N 33/00(2006.01)H04L 29/08(2006.01)(54)实用新型名称一种基于无线、有线传输的CO实时监测管理系统(57)摘要一种基于无线、有线传输的CO实时监测管理系统,它涉及监测管理系统技术领域。
一种基于无线、有线传输的CO实时监测管理系统它包含现场检测模块、采集传输模块、计算中心、无线传输中继箱、KHD -BK200报警器、有线传输中继箱、KHD -BD200报警器、研华采集模块、路由器、上位机、互联网、网络服务器、手机,现场检测模块和采集传输模块电性连接,采集传输模块和计算中心信号连接,有线传输中继箱和KHD -BK200报警器电性连接,路由器一端和上位机电性连接,网络服务器和手机信号连接。
采用上述技术方案后,本实用新型的有益效果为:它的设计合理,具有功耗低、成本低、检测精度较高等优点,推广应用价值高。
权利要求书1页 说明书3页 附图1页CN 209745914 U 2019.12.06C N 209745914U权 利 要 求 书1/1页CN 209745914 U1.一种基于无线、有线传输的CO实时监测管理系统,其特征在于:它包含现场检测模块(1)、采集传输模块(2)、计算中心(3)、无线传输中继箱(4)、KHD-BK200报警器(41)、有线传输中继箱(5)、KHD-BD200报警器(51)、研华采集模块(6)、路由器(7)、上位机(8)、互联网(9)、网络服务器(10)、手机(11),现场检测模块(1)和采集传输模块(2)电性连接,采集传输模块(2)和计算中心(3)信号连接,无线传输中继箱(4)一侧连接有线传输中继箱(5),无线传输中继箱(4)和KHD-BD200报警器(41)电性连接,有线传输中继箱(5)和KHD-BK200报警器(51)电性连接,研华采集模块(6)与无线传输中继箱(4)和有线传输中继箱(5)电性连接,研华采集模块(6)和路由器(7)电性连接,路由器(7)一端和上位机(8)电性连接,路由器(7)和互联网(9)通讯连接,网络服务器(10)和手机(11)信号连接。
JB9000

JB-LBZ-GS9000火灾报警控制器(联动型)使用说明书第一章、产品简介GS9000火灾报警控制器(联动型)是GS9000智能火灾报警控制系统的核心,是深圳赋安公司在总结多年研制和生产火灾报警控制系统的基础上,广泛应用现代火灾自动报警控制技术的最新成果,将传感技术、计算机自动控制技术、信号处理技术、数字通讯技术相结合,最新推出的新一代火灾报警及灭火联动控制器。
本控制器满足国家标准GB4717-97《火灾报警控制器通用技术条件》和GB16806-1997《消防联动控制设备通用技术条件》的相关要求。
本产品的设计、制造、检验、销售及服务全过程,均符合ISO9000(2000版)质量管理体系的要求,并通过国家CCC认证,是中高端火灾报警控制器的优先选择。
1-1 系统特点F 先进的32位CPU;基于Linux的系统设计系统使用了目前最先进的32位工业级嵌入式CPU,系统专为火灾报警控制器定制设计;高可靠的Linux软件设计平台和Linux操作内核;整个核心集中于一块4cm×8cm的电路板上,系统简洁、功能强大。
F 大屏幕液晶全中文操作显示界面,自由中文输入,在线操作提示GS9000采用320*240图文点阵式液晶显示屏提供多窗口的显示界面,显示内容丰富、全面,一目了然;系统安装了输入法,可以自由进行中文输入;对于任一个地址,均有10个汉字的位置描述,用户可以方便的对这些地址进行定义;菜单和系统功能,均有在线提示,只要在不明白的地方,按F1键,就能方便地获得你所需要的信息。
F 全数字信号传输GS9000基于集散控制理论设计,管理集中,危险分散,火灾、控制、操作、各级通讯等信号都通过数字信号进行传输,最大限度保证系统稳定可靠地工作。
F 现场编程功能强大GS9000可以在控制器上直接进行系统设置、联动关系设置;也可通过计算机进行编程;还可将编程信息存储在IC卡上,通过IC卡读取、存储编程信息。
F 快速报警算法、灵敏度自动调节和早期故障报警GS9000拥有快速报警算法;GS9000可以设定探测器的灵敏度,根据使用场合及使用时段(比如白天/黑夜)进行自动调节;GS9000可及时发现探测器和模块潜在故障,发出警告,提醒用户注意,避免故障扩大,影响系统正常运行。
火灾报警诺蒂菲尔产品介绍

14
NFS2-3030 联动型控制器
Honห้องสมุดไป่ตู้
先进的探测技术 View技术的高灵敏度的激光探测器。 在恶劣环境中使用的Harsh探测器。 灵敏度度 自动调整的自适应Acclimate探测器。 多种FlashScan协议的探测器。 强大的联动逻辑功能 1000个普通区。 十种逻辑和延时运算功能。 1000个逻辑区,可自定义逻辑运算表达式。 10个故障区,可自定义以故障代码为参数的逻辑表达式。 十个释放区的延时及交叉算法。
4
NOTI·FIRE·NET 智能对等局域网络
传统 消防报警系统设计方案
• 消防总值班室
• 建筑E
232 协议接口
•消
防 值 班 室
• 建筑 A
• 消防值班室
• 消防值班室
• 消防值班室
• 建筑 B
• 建筑 C
• 建筑 D
5
分散控制集中管理式系统设计方案
完全支持 FLASHSCAN 协议 使系统的通讯速度提高五倍以上 - 在一秒中内完成一个回路上的318个器件的 巡检。 - 在两秒内激活159个输出。 – 现场读取设备地址,方便维护 – 集成消防广播电话系统 – 所有端口都采用自保护可恢复结构
13
NFS2-3030 联动型控制器
方便强大的编程功能 标准键盘加功能键盘,如实现面板编程。 自动编程功能。 参数列表式选择,无须记忆。 结构化的CBE设计,更易于编程。 VeriFire Tools离线编程软件。 闪存 远程升级
• 消防总管理中心
Fire System
• 建筑A
• 建筑B
• 建筑C
地下
6
全新的CRT图文系统
核中警HJ9000操作使用说明书
HJ9000火灾报警控制器(联动型) 操作说明书V1.0目录目录 (1)第一章概述 (3)第二章结构特征 (4)2.1面板 (4)第三章技术特征 (5)3.1 主要性能 (5)3.2 主要参数 (5)第四章使用操作说明 (7)4.1开关机 (7)4.2备电的使用 (7)4.3菜单操作 (7)4.4系统容量 (8)4.5系统自检 (8)4.6 消音 (8)4.7系统复位 (9)4.8 报警信息 (9)4.8.1 火警信息的显示及查询 (9)4.8.2 故障信息的显示及查询 (9)4.8.3 启动信息的显示及查询 (10)4.8.4 反馈信息的显示及查询 (12)4.8.5 延时信息的显示及查询 (13)4.8.6 屏蔽信息的显示及查询 (14)4.8.7 监管信息的显示及查询 (14)4.9点阵的查询 (15)4.10盘卡故障查询 (16)第五章用户的设置 (17)6.1 时间设置 (17)6.2 联动自动设置界面 (17)6.3 打印的设置 (18)第六章历史记录的查询 (19)第七章用户维护与常见故障排除 (20)第八章运输、贮存、开箱检查及注意事项 (21)第一章概述HJ9000火灾报警控制器(联动型)(以下简称为控制器)是北京核中警消防技术有限责任公司(以下简称为核中警公司)推出的一款新型控制器,符合国标GB4714-2005及GB16806-2006的技术要求。
可与核中警公司的火灾报警探测器、手动报警按钮、输入模块、输入/输出模块等设备组成完整的报警联动控制系统,适合2万平方米以下的建筑使用。
控制器的优点如下:可靠性控制器采用多个微处理器,使控制器有较强的数据处理能力,较快的运算速度,软件自诊断功能、冗余技术的应用,并准确无误的监控和处理火警、故障等相关信息。
显示界面控制器的基本信息同一窗口显示,内容清晰、直观、方便操作。
控制器的多种功能显示通过菜单键的切换,灵活的操作即可实现。
配置选择控制器有8条回路,每条回路带256个负载,共计2048个负载。
布朗安防系统D9000、G和GV2系列产品说明书补充
EN Owner’s Manual Supplement D9000, G & GV2 SeriesContents1.0Introduction (3)2.0Two-Man Rule (3)2.1Description (3)2.2Using the Two-Man Rule (3)3.0Early Ambush (4)3.1Description (4)3.2Using Early Ambush (4)4.0Easy Exit Control (5)4.1Description (5)4.2Using Easy Exit Control (5)5.0 Passcode Follows Scope (6)5.1Description (6)5.2Using Passcode Follows Scope (6)6.0Passcode-Controlled Menu (7)6.1Description (7)6.2Using Passcode Controlled Menus (7)7.0Invisible Walk Test (8)7.1Description (8)7.2Using Invisible Walk Test: (8)8.0 Door Activated Custom Function (10)8.1Description (10)8.2Using Door Activated Custom Functions: (10)9.0Access Level Control (10)10.0Door Control (12)10.2Using Door Control? (12)10.3Cycle Door? (13)10.4Unlock Door? (14)11.0Delete User [COMMAND 53] (15)12.0Add/Change User - [COMMAND 56] (17)12.1Description (17)2 Bosch Security Systems | 5/05 | 33267FBosch Security Systems | 5/05 | 33267F31.0 IntroductionThis document supplements the Security System Owner’s Manual(P/N: 71-06633-000) with the Function List features for the D9000 Series. The instructions for the commands listed in this document replace those commands in the Security System Owner’s Manual . Refer to the Owner’s Manual for the operation of your new security system and its other basic Function List features.2.0 Two-Man Rule2.1 DescriptionThe Two-Man Rule adds an extra step to the disarm process by requiring two unique pass codes to disarm an area from the same keypad. Configure this feature according to the guidelines specified in theD9412GV2/D7412GV2 Program Entry Guide (P/N: F01U003636).I have this feature.I do not have this feature.2.2Using the Two-Man Rule 1.Ensure the keypad shows idle armed text. 2.Enter a valid pass code with the authority to Passcode Disarm by pressing the [passcode digits] followed by the [ENTER] key. 3.The keypad shows a request for the SECOND CODE: 4. Enter a second valid pass code with the authority to PasscodeDisarm by pressing the [passcode digits] followed by the[ENTER] key. The second pass code must be different from thefirst pass code.The area is disarmed and ready for entry.3.0 Early Ambush3.1 DescriptionEarly Ambush adds an extra step to the disarm process by requiring an additional pass code to be entered to confirm the area is secure. The second pass code can be same as the first or a different one, depending on the configuration. The first entry disarms the area and the second entry stops an automatic timer from sending a duress event. Configured this feature according to the guidelines specified in the D9412GV2/D7412GV2 Program Entry Guide (P/N: F01U003636).I have this feature.I do not have this feature.3.2 Using Early Ambush1. Ensure the keypad shows idle armed text.2. Enter a valid pass code with the authority to Passcode Disarm bypressing the [passcode digits] followed by the [ENTER] key.3. Ensure the keypad shows idle disarmed text.4. The user can now search the area; however, the user must returnbefore the preset Early Ambush Time expires.5. Enter a second valid pass code with the authority to PasscodeDisarm by pressing the [passcode digits] followed by the[ENTER] key.6. The keypad shows confirmation that the second passcode wasaccepted and that the Early Ambush Window was canceled byshowing CODE 2 VALIDATED.The area is disarmed and ready for entry.4 Bosch Security Systems | 5/05 | 33267F4.0 Easy ExitControl4.1 DescriptionThe D9412GV2 / D7412GV2 Control Panels change from one armed state to another armed state without disarming. The Easy Exit Control feature reduces the number of keystrokes and simplifies system operation. This feature is available by default and is always on.4.2 Using Easy Exit ControlSwitching armed states from Master to Perimeter:1. Ensure the keypad shows idle master armed text.the[COMMAND] key. The keypad shows SYSTEM2. PressCOMMAND.3. Press [3] to Perimeter Arm.4. The keypad display shows the Exit Delay count down.5. Enter or exit the premises.Switching armed states from Perimeter to Master:1. Ensure the keypad shows idle perimeter armed text.2. Press the [COMMAND] key. The keypad shows SYSTEMCOMMAND.3. Press [1] to Master Arm.4. The keypad shows the Exit Delay count down.5. Enter or exit the premises.Bosch Security Systems | 5/05 | 33267F 55.0 PasscodeFollows Scope5.1 DescriptionThe Passcode Follows Scope feature is an optional arming and disarming restriction that can be enabled on keypads with access to multiple areas. When this feature is set to No, the keypad restricts Passcode Arming and Passcode Disarming to the home area of the keypad. When set to Yes, this feature allows users to arm or disarm all the areas that they and the keypad have access to. This feature causes no restrictions to the keypad scope as it pertains to any other command or arming method other than Passcode Arming or Passcode Disarming.I have this feature.I do not have this feature.5.2 Using Passcode Follows ScopeArming from a keypad with Panel Wide scope and Passcode Follows Scope enabled:1. Ensure the keypad shows idle disarmed text.2. Ensure you have a valid pass code with the authority to PasscodeArm in all areas.3. Enter your code by pressing the [passcode digits] followed by the[ENTER] key.4. The keypad shows ARMING: 12345678, to indicate which areasare about to enter exit delay and arm.5. The keypad shows the exit delay count down.6. Exit the premises.6 Bosch Security Systems | 5/05 | 33267FArming from a keypad with Panel Wide scope and Passcode Follows Scope disabled (default):1. Ensure the keypad shows idle disarmed text.2. Ensure you have a valid pass code with the authority to PasscodeArm in all areas.3. Enter your code by pressing the [passcode digits] followed by the[ENTER] key.4. The keypad shows the exit delay count down.5. Exit the premises.6.0 Passcode-Controlled Menu6.1 DescriptionWhen enabled, the system prompts users to enter a passcode before viewing the keypad function list menu. The system shows the user the menu options allowed according to their authority level; thereby, providing users only the commands and functions pertinent to them. Configure this feature according to the guidelines specified in theD9412GV2/D7412GV2 Program Entry Guide (P/N: F01U003636).I have this feature.I do not have this feature.6.2 Using Passcode Controlled MenusOn a D1255 keypad with the Passcode Controlled Menu enabled:1. Press the [ESC] key. The keypad responds with the ENTERPASSCODE display.2. Enter your code by pressing the [passcode digits] followed by the[ENT] key. The first menu item that you have authority to useappears.Bosch Security Systems | 5/05 | 33267F 7On a D1260 keypad with the Passcode Controlled Menu enabled:1. Press the [Menu>] soft key in the lower right corner. The keypadresponds with the Enter passcode: then press [ENTER] display. 2. Enter your code by pressing the [passcode digits] followed by the[ENTER] key.The first and second menu items that you have authority to use appear. 7.0 Invisible WalkTest7.1 DescriptionThe D9412GV2 / D7412GV2 has a function list menu item that allows the user to test invisible interior or perimeter controlled points that are within the scope of the keypad without sending a report to the central station. This is identical to the Service Walk Test except that it is restricted to invisible points.I have this feature.I do not have this feature.7.2 Using Invisible Walk Test:On a D1255 keypad with the Passcode Controlled Menu enabled:1. Press the [ESC] key.2. Press the [NEXT] key until INVISIBLE TEST?appears.3. Press the [ENT] key to activate the Invisible Walk Test function.The keypad shows the number of invisible points within the scopeof the keypad:### PTS TO TEST4. Press the [NEXT] key to see VIEW UNTESTED?.5. Press the [ENT] key to view the untested points. The keypadshows the total number of untested invisible points within thekeypad scope:### PTS UNTESTED.6. Press the [NEXT] key to view the first point’s name.8 Bosch Security Systems | 5/05 | 33267F7. Press the [ENT] key to view the point’s hardware state:1PT### NORMAL HW if it is normal1PT### OPEN HW if it is opened1PT### SHORT HW if it is shorted1PT### MISSNG HW if it is missing 8. Activate the point’s sensor and observe the appropriate statechange.9. Press the [NEXT] key to advance to the next invisible pointwithin the scope of the keypad.10. Repeat steps 7 through 9 until all points are tested.On a D1260 keypad with the Passcode Controlled Menu enabled:the[Menu>]soft key in the lower right corner.1. Press2. Press the [Next>] soft key until the Invisible Walk Test?appears.3. Press the corresponding soft key to activate the InvisibleWalk Test function. The keypad shows the number of invisiblepoints within the scope of the keypad:### points remain to betested.5. Press the [View untested pts>] soft key to see 6 pts untested.6. Press the [Next Pt>] soft key to view the first or next untestedpoint:[Point Text]Area #, Pt #[Point State] HW Next PT><Exit Prev PT>7. Where [Point State] can be NORMAL,OPEN,SHORT, or MISSNG.8. Activate the point’s sensor and observe the appropriate statechange.9. Repeat Steps 5 through 8 until all points are tested.Bosch Security Systems | 5/05 | 33267F 98.0 Door ActivatedCustom Function8.1 DescriptionThe D9412GV2 / D7412GV2 allow a custom function to be activated when user credentials are presented to a D9210B Door Controller Reader. The custom function executes as if the user performed a function at the keypad that is associated with the door controller.I have this feature.I do not have this feature.8.2 Using Door Activated Custom Functions:Executing the door’s custom function by a user that has authority to do so when disarming the area:1. Ensure the area you are about to enter is armed.2. Present your user credentials to the D9210B Door ControllerReader. The area disarms and the custom function executes.The area is now safe to enter.9.0 Access LevelControl9.1 DescriptionUse this function to manually enable or disable access authority levels assigned to users. This function can be used to temporarily disable a user’s access level instead of deleting and adding the user.I have this feature.I do not have this feature.10 Bosch Security Systems | 5/05 | 33267F9.2 UsingACCESS LEVEL CTL?1. Ensure the display shows idle disarmed text.2. Press the [MENU] key to enter the Function List, then press[NEXT] repeatedly until you reach the CHANGE LEVELCTL?prompt. Press [ENT].3. ACCESS LEVEL CTL appears indicating that you are affectingthe authority levels of cards or tokens and not passcodes. Press[ENT].4. ENTER LEVEL:appears. Enter the access authority level numberand press [ENT].5. If the access level is currently disabled, LEVEL # ENABLE?appears. If the access level is currently enabled, LEVEL #DISABLE?appears. Press [ENT] to accept the choice. ENTERLEVEL:appears again. Press [ESC].Bosch Security Systems | 5/05 | 33267F 1110.0 Door Control10.1 DescriptionThere are three sub-functions within the door control function. They are CYCLE DOOR?, UNLOCK DOOR? and SECURE DOOR?.CYCLE DOOR? momentarily unlocks a door to allow a person into an area. UNLOCK DOOR? unlocks a door to allow free access.SECURE DOOR? unlocks a door and prohibits access regardless of a user’s authority level.I have this feature.I do not have this feature.10.2 Using Door Control?1. Ensure the display shows idle disarmed text.2. Press the [COMMAND] key. The display shows SYSTEMCOMMAND.4. The first sub-function that appears is CYCLE DOOR?You cancycle through the three sub-functions by pressing [PREV] and[NEXT].12 Bosch Security Systems | 5/05 | 33267F10.3 Cycle Door?1. To momentarily unlock an access door and allow a person into anarea, press [ENT] at the Cycle Door? prompt.The display shows CYCLE 1 2 3 4 5 6 7 8if all doors are ina normal state and available. If a door is not in a normal state, thenumber of the door is replaced with one of the symbols indicatedin Table 1.Table 1: Key to SymbolsSymbol Description---Door is not active, not in scope, or user doesnot have access level authorityC Door is timed door sequenceU Strike and shunt are latched active (held open)X Strike and shunt are deactivated (secured)P There is a problem with the door; call yoursecurity company2. Enter the number of the door to cycle then press [ENT]. Thisdoor cycles and the display changes to reflect the new status ofthe doors. For example, to cycle Door 3, at the following prompt:CYCLE DOOR 1 2 3 4 5 6 7 8press [3], then [ENT]. The display shows:CYCLE DOOR 1 2 C 4 5 6 7 8Thisindicates that all doors are in a normal state, except for Door 3, which is cycled.[ESC]to leave this subfunction, or enter another door3. Pressnumber to cycle.Bosch Security Systems | 5/05 | 33267F 1310.4 Unlock Door?1. To unlock a door to allow free access, at the CYCLE DOOR?prompt, press [NEXT] to enter the UNLOCK DOOR?subfunction.The display shows UNLOCK 1 2 3 4 5 6 7 8if all doors arein a normal state and available. If a door is not in a normal state,the number of the door is replaced with a symbol indicated inTable 1.2. Enter the number of the door to unlock then press [ENT]. Thisdoor unlocks and the display changes to reflect the new status ofthe doors.For example, if you wanted to unlock Door 4, at the followingprompt:UNLOCK DOOR 1 2 3 4 5 6 7 8press [4]then [ENT]. The display shows:UNLOCK DOOR 1 2 3 U 5 6 7 8This indicates that all doors are in a normal state, except for Door4, which is unlocked.4. Press [ESC] to leave this subfunction, or enter another doornumber to unlock.10.5 Secure Door?1. To secure a door to prohibit access to users regardless of theiraccess authority level, at the CYCLE DOOR?prompt, press[PREV] to enter the SECURE DOOR?subfunction.The display shows SECURE 1 2 3 4 5 6 7 8if all doors arein a normal state and available. If a door is not in a normal state,the number of the door is replaced with a symbol indicated inTable 1 on page 12.2. Enter the number of the door to secure then press [ENT]. Thisdoor secures, and the display changes to reflect the new status ofthe doors.For example, to secure Door 5, at the following prompt:SECURE DOOR 1 2 3 4 5 6 7 8Press [5] then [ENT]. The display shows:SECURE DOOR 1 2 3 4 X 6 7 814 Bosch Security Systems | 5/05 | 33267FBosch Security Systems | 5/05 | 33267F15This indicates that all doors are in a normal state, except for Door 5, which is secured. Press [ESC] to leave this subfunction, or enter another door11.0 Delete User[COMMAND 53] 11.1 DescriptionUse this function to delete a personal passcode from your system without assistance from your security company. You must know the user number for the passcode you want to delete.I have this feature.I do not have this feature.11.2 Using DEL USER ?1.Ensure the display shows idle disarmed text. 2.Press the [COMMAND] bar. The display shows SYSTEM COMMAND . 3. Press [5] and [3].4. The display shows DEL USER #. Enter the user number and press[ENT].5. USER ##(or user text, such as the name of the user, if this featurewas programmed into your system by your security company)appears allowing for confirmation. Press [ENT].If this is not theuser you wish to delete, press the [NEXT] or [PREV] key until thecorrect user name appears, then press [ENT].6. The display shows DELETE USER ##? Press [ENT] to delete user,and USER DELETED appears. If the user number is not in thesystem, NOT IN USE appears. If you made an error and do notwish to delete this user, press [ESC].16 Bosch Security Systems | 5/05 | 33267F12.0 Add/ChangeUser - [COMMAND 56]12.1 DescriptionUse this function to add or change a passcode or card without assistance from your security company. Before adding or changing a passcode orcard, you must know which user numbers are available, the authority level you want to assign to the new user, and the areas in which the passcode or card are valid.I have this feature.I do not have this feature.12.2 Using Add User ?1. Ensure the display shows idle disarmed text.2. Press the [COMMAND] bar. The display shows SYSTEMCOMMAND.3. Press [5] and [6].4. The display shows ENTER USER #. Enter the user number andpress [ENT].5. The display shows USER # (or user text, such as the name of theuser, if this feature was programmed into your system by yoursecurity company) to allow for confirmation. Press [ENT] if thecorrect user number (or user name) appears. Press [ESC] if not.6.ADD PASSCODE?appears (If the user number already exists,CHANGE PASSCODE?appears). Press [ENT].ENTER NEW CODEBosch Security Systems | 5/05 | 33267F 17appears. Enter the new passcode followed by [ENT].ENTERAGAIN appears. Enter the new passcode a second time forconfirmation. Press [ENT]. The display shows PASSCODE ADDED(or PASSCODE CHANGED if the user number was already in theSystems With Access Control...7. ADD LEVEL?(CHANGE LEVEL?If the user number alreadyexists) appears. Press [ENT].8. VALID AREA 1? appears. If you wish this user number to bevalid in Area 1, press [ENT]. If not, press [NEXT].9. AUTH LEVEL appears. Assign the authority level you wish theuser number to have for this area and press [ENT]. Record thisinformation.10. VALID AREA 2? appears. Enter the information necessary forthe areas in the scope of the keypad by following steps 8 and 9 foreach area (up to 8 areas). LEVEL ADDED(or LEVEL CHANGED)appears when all area assignments are made. Press [ENT].18 Bosch Security Systems | 5/05 | 33267FBosch Security Systems | 5/05 | 33267F 19。
GS9000使用说明书-新版
使用注意事项GS9000 火灾报警控制器(联动型)为消防安全产品,涉及生命财产安全,责任重大,为保证产品发挥最大的安全效能,请在安装、调试、使用和维护前仔细阅读本使用说明书,并严格按照本说明书的要求进行安装、调试、使用和维护。
禁止将市电的火线或零线接入弱电接线端子!禁止将市电的火线和零线接入回路总线!禁止将电池线接反或电池正负极短路!禁止带电作业!避免本系统设备长期在温度过高、过低或湿度过大的环境中运行。
避免本系统设备长期在高粉尘、高腐蚀的环境中运行。
应按要求进行控制器的日常维护。
应按要求定期实施控制器的专业维护。
维护人员应按要求填写维护记录。
专业维护应由具备相关资质的单位负责。
及时处理影响报警的故障,比如探测器的灰尘污染或自诊断故障。
第一章控制器简介JB-LBZ-GS9000 火灾报警控制器(联动型)适合安装于一般工业和民用建筑中使用,特别适合大中型火灾报警及消防联动一体化的消防工程。
上述型号中J 代表消防产品,B 代表报警控制器;L 代表联动型,B 代表壁挂式,Z 代表总线;GS9000 是公司的产品代号。
1.1 主要特性➢32 位工业级嵌入式CPU。
➢Linux 软件平台,系统可靠,功能强大。
➢320 × 240 点阵液晶,显示丰富、全面。
➢WINDOWS 下拉菜单,操作简单、方便。
➢内置中文输入,任一设备位置中文描述,方便火警定位。
➢菜单在线提示功能。
➢强大的现场编程功能。
➢单机容量10 个回路,每回路250 个地址。
系统最大可达60 个回路.➢采用电源全隔离和分布电源供电技术,提高系统可靠性。
➢多种通讯接口:RS485 接口连接RS485 显示盘; CAN 接口连接网络;RS232 接口连接计算机图形监控系统; PS2 接口连接标准键盘;➢多线(直接启停)接口可连接多线系统。
➢分布智能系统架构,局部故障不影响系统工作。
➢可监视、查看总线的电压、电流、漏电流和信号波动,方便工程调试和总线故障分析。
核中警HJ9000操作使用说明书
HJ9000火灾报警控制器(联动型) 操作说明书V1.0目录目录 (1)第一章概述 (3)第二章结构特征 (4)2.1面板 (4)第三章技术特征 (4)3.1 主要性能 (5)3.2 主要参数 (5)第四章使用操作说明 (7)4.1开关机 (7)4.2备电的使用 (7)4.3菜单操作 (7)4.4系统容量 (8)4.5系统自检 (8)4.6 消音 (8)4.7系统复位 (8)4.8 报警信息 (9)4.8.1 火警信息的显示及查询 (9)4.8.2 故障信息的显示及查询 (9)4.8.3 启动信息的显示及查询 (10)4.8.4 反馈信息的显示及查询 (12)4.8.5 延时信息的显示及查询 (13)4.8.6 屏蔽信息的显示及查询 (14)4.8.7 监管信息的显示及查询 (14)4.9点阵的查询 (15)4.10盘卡故障查询 (16)第五章用户的设置 (17)6.1 时间设置 (17)6.2 联动自动设置界面 (17)6.3 打印的设置 (18)第六章历史记录的查询 (19)第七章用户维护与常见故障排除 (20)第八章运输、贮存、开箱检查及注意事项 (21)第一章概述HJ9000火灾报警控制器(联动型)(以下简称为控制器)是北京核中警消防技术有限责任公司(以下简称为核中警公司)推出的一款新型控制器,符合国标GB4714-2005及GB16806-2006的技术要求。
可与核中警公司的火灾报警探测器、手动报警按钮、输入模块、输入/输出模块等设备组成完整的报警联动控制系统,适合2万平方米以下的建筑使用。
控制器的优点如下:可靠性控制器采用多个微处理器,使控制器有较强的数据处理能力,较快的运算速度,软件自诊断功能、冗余技术的应用,并准确无误的监控和处理火警、故障等相关信息。
显示界面控制器的基本信息同一窗口显示,内容清晰、直观、方便操作。
控制器的多种功能显示通过菜单键的切换,灵活的操作即可实现。
配置选择控制器有8条回路,每条回路带256个负载,共计2048个负载。
- 1、下载文档前请自行甄别文档内容的完整性,平台不提供额外的编辑、内容补充、找答案等附加服务。
- 2、"仅部分预览"的文档,不可在线预览部分如存在完整性等问题,可反馈申请退款(可完整预览的文档不适用该条件!)。
- 3、如文档侵犯您的权益,请联系客服反馈,我们会尽快为您处理(人工客服工作时间:9:00-18:30)。
GN9000系列气体报警控制器
MODBUS协议
(文件编号:GND-B-GN9000-445-V2.0)
共 3 页
深圳市吉安达科技有限公司
1、概述:
GN9000的上位机数字接口提供了远程微机(PC机、工控机、PLC等主控设备)通过其RS485接口来实现对仪表的数据采集、现场监测等功能。
GN9000分类两大类:GN9010(接4-20mA输入信号)和GN9020(接GN8000的RS485输入信号)。
特点:
(1)、采用RS485接口(差分、半双工);
(2)、通讯参数可编程:
波特率:9600b/s、2400b/s可选择;
仪表地址:1~247(0作为系统的广播地址);
数据格式:1个起始位、8位数据位、2个停止位。
(3)、数据传输模式采用RTU方式
2、MODBUS通讯协议分析:
Modbus协议是主从式点对点的通讯协议,允许一台主机和多台从机之间进行数据通讯。
在使用GN9000构成的系统中,主机是微机,从机是GN9000系列控制器。
在该通讯系统中,GN9000的地址码可通过按键设置,通讯距离可达1.2KM(在允许的速度范围内)。
命令格式:主机请求、从机应答。
主 机:它负责命令的发送。
由于一个命令表明一个响应,因而主机同时等待从机的响应。
如果从机没有响应,表明主机发送命令错误或数据传输错误。
因而,必须正确初始化主机命令,且在发送时,两次发送(发送两帧数据之间)间隔应不少于40Bits (同理,每帧数据的两个Byte之间的间隔应小于40Bits)。
从 机:负责命令的接送,对命令进行分析处理,并回传相应的结果。
帧数据格式:通讯的每一帧包含以下的信息(16进制)
从机地址 命令字 信息字 校验码
从机地址(1 Byte):GN9000的地址标识号(可通过按键设置),便于主机识别从机,进行通讯。
命令字(1 Byte): 设定主机对从机的通讯内容。
信息字(N Byte): 包括两机通讯时各种参数的位地址、字节地址、数据长度、数据信息。
校验码(2 Byte): 采用循环冗余码(CRC16)进行通讯错误校验,
3、通讯命令:
GN9000系列气体报警控制器目前只开放读命令(一些系统参数的改写,可使用按键操作),主要供主机读取系统信息和数据采集。
(1)、命令字列表:
命令字(16进制) 功能描述
03 读N个寄存器
功能 03 读N个寄存器
主机命令:从机地址(1B)+命令字(1B)+ 欲读寄存器首地址(2B)+欲读字个数(2B)+检验位(2B)从机响应:从机地址(1B)+命令字(1B)+读到字长度(1B)+ 寄存器内容(N)+ 检验位(2B)
例: 主机命令:01 03 00 10 00 02 XX XX
从机响应:01 03 04 00 00 00 00 XX XX
主机命令表示主机读从机(地址为1)寄存器内容,连续4个字节(2个字)的内容;校验码占两个字节CRC16。
从机回送从机地址、命令字、参数个数、数据内容,并回送CRC校验码。
主机地址 01 ;读取命令 03 ;<00,10>,表示回路第一个地址,以后地址为 <00,20>,<00,30>,<00,40>……以后地址累加,用16进制表示;<00 ,02>表示读取字长度,以后两位为校验位。
从机响应 地址01;03响应命令;04为字节长度,第4(高8位),第5(低8位)位为浓度值;第6位为00,第七位为 状态位;(GN9000 识别4种状态:0x01探测器故障,0x02 通讯故障,0x03 低限报警,0x04 高限报警)
例如:
读地第一回路浓度值: 01 03 00 10 00 02 C5 CE
返回第一回路浓度值: 01 03 04 00 00 00 02 FB EB 表示第一回路通讯故障
读地第二回路浓度值: 01 03 00 20 00 02 C5 C1
返回第二回路浓度值: 01 03 04 00 00 00 01 3B F3 表示第二回路探头故障
读地第三回路浓度值: 01 03 00 30 00 02 C4 04
返回第三回路浓度值: 01 03 04 00 20 00 03 FB EB 表示第三回路浓度为0x20(32),并发生低限报警。
读地第四回路浓度值: 01 03 00 40 00 02 C5 DF
返回第四回路浓度值: 01 03 04 00 3A 00 04 DB FD 表示第四回路浓度为0x3A(58),并发生高限报警。