solidworks 台灯设计
台灯建模设计报告

台灯建模设计报告一设计对象介绍现代化台灯,采用现在简单的设计理念,带给人视觉上的冲击。
完美的线条,淡淡的颜色更符合现在的大众化审美!它由底座,臂撑,灯管,外罩组成。
二建模工具Solidworks2007三建模思路分析基于现在台灯的构造,先设计了一个底座,然后再底座的中央位置设计一个造型独特的臂撑,在臂撑顶端再设计一个柱状灯管,最后就是再最外面加以灯罩。
四建模过程1. 旋转:先规定前视基准面,在前视基准面上画出底座及臂撑的单面轮廓,再进行标注尺寸,接下来利用特征中的旋转,就出来了立体图。
2. 圆角:在最底座的柱面的座面上利用特征中的圆角,半径为5mm。
在上面的一个柱面上利用圆角,半径为3mm。
3. 旋转:建立以个基准面,画出一个与中心线成25度得斜线,进行旋转,就画出了等罩。
4. 拉伸:在臂撑的顶端画一个圆,进行拉伸,在画一个小圆,再进行拉伸,这两个拉伸物体作为灯管。
5. 旋转:将图正视与面,然后再前视图中画两个椭圆,分别将他们平行于罩边。
以临时轴为旋转轴,进行旋转后为罩的上下边。
6. 拉伸:在底座上画两个小圆,对圆拉伸成圆柱状,作为按钮。
7. 圆角:对两个小圆柱进行圆角处理,美观而且舒适。
五效果展示六学习心得体会这次是由我们小团队亲自上阵进行筹划构思,每人都参与了现代化台灯的设计与制作。
在制作中我们熟悉了各种工具的用途,掌握了一些基本的制图技巧。
同时还享受到了制图中的乐趣,看到我们的小成就,更增强了我们学习3d建模的信心,我们也相信我们在这条路上会走的更远。
七我们最想看的是用建模做出来的跑车,根据我们自己的想象,加上自己喜欢的元素,颜色,打造自己与众不同的跑车。
团队成员:姓名学号班级张自圃1016303006 通信10—1 王铁柱1016303047 通信10—1 黄瑞1016301097 电气10—7。
solidworks案例教程《节能灯建模》

8、单击草图工具栏中的“3D草图”功能,绘制3D草图。先使用“转换实体引 用”功能将“草图3”和“草图4” 引用为3D草图线,然后在绘制R15圆角,完成 3D草图1。
9、选择旋转1的底面,绘制直径为6的圆作为草图5,添加圆心与直线的“穿透” 几何关系 注:草图5与直线有“穿透”关系,则与3D草图的直线也有相同的几何关系。此 处不添加可以,但要保证草图5的圆心在直线的端点上。
节能灯建模
所用工具及特征: 旋转凸台/基体 拉伸凸台/基体 基准面 3D草图 扫描 圆周阵列
1、选择前视基准面,绘制草图1。
2、选择特征工具栏的“旋转凸台/基体”工具,将草图1旋转,单击确认后 完成旋转1特征。
3、选择旋转1的底部端面,绘制草图2。
4、单击特征工具栏的“拉伸凸台/基体”工具,将草图2拉伸,设置拉伸高 度为30mm,单击确认后完成拉伸1特征。
5、选择拉伸1的一面,绘制草图3,两条直线与中心线对称。
6、选择旋转1的底面,单击参考几何体工具栏的“基准面”工具,选择“等 距距离”,设置距离为40mm,单击确认后完成基准面1。
7、选择基准面1, 绘制草图4,注意 添加集合关系来对 草图进行约束。 其中两条直线段分 别与“草图3”的两 条直线段下端点重 合;两条直线段与 圆弧相切;两条直 线段的共用端点与 原点重合。
10、单击特征工具栏中的“扫描”功能,选择草图5作为“轮廓”,选择“3D 草图1”作为路径,单击确认后完成扫描1特征。Βιβλιοθήκη 11、打开“临时轴”视图。
12、单击特征工具栏中的“圆周阵列”功能,选择旋转1的“临时轴”作为“阵 列轴”,设置旋转角度为360°,阵列数为5,勾选“等间距”,选择“扫描1”作 为“要阵列的特征”,单击确认后完成阵列(圆周)1特征。
台灯设计图纸
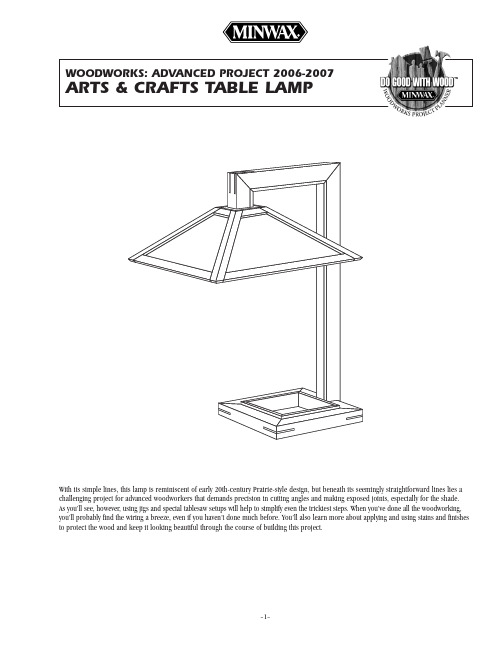
With its simple lines, this lamp is reminiscent of early 20th-century Prairie-style design, but beneath its seemingly straightforward lines lies a challenging project for advanced woodworkers that demands precision in cutting angles and making exposed joints, especially for the shade. As you’ll see, however, using jigs and special tablesaw setups will help to simplify even the trickiest steps. When you’ve done all the woodworking, you’ll probably find the wiring a breeze, even if you haven’t done much before. You’ll also learn more about applying and using stains and finishes to protect the wood and keep it looking beautiful through the course of building this project.TOOLS REQUIREDPower Tools–Tablesaw with rip/crosscut blade and dado blade–Router with 1/4" router guide bushing and 1/4" straight cutting bit–Jigsaw Miscellaneous–Pencil–Tape measure–Felt-tipped marker–Safety glasses–Carpenter’s glue–120, 150 and 220-grit sandpaper–Clean, lint-free cloths–Respirator–Double-sided tape–Gloves for finishing–Mineral spirits (for oil-based stainsand finishes)–Water-filled metal container with tight-fitting lid (for oil-based stains andfinishes waste materials)–Minwax®Wood Finish™Stain Brushor other good quality, natural-bristlebrush (for oil-based stains and finishes)SHOPPING LISTWOOD FINISHING PRODUCTS CUTTING LISTRecommended FinishPrep: Minwax®Pre-Stain Wood Conditioner (if using soft or porous wood)Stain: Minwax®Gel Stain Cherry (or your choice of any of the 8 Minwax®Gel Stain colors)Finish: Minwax®Fast-Drying Polyurethane Semi-Gloss Alternate FinishPrep: Minwax®Pre-Stain Wood Conditioner (if using soft or porous wood)Stain: Minwax®Wood Finish™Golden Oak Stain (or your choice of any of the 22 Minwax®Wood Finish™Staincolors)Finish: Minwax®Fast-Drying Polyurethane Satin (Also available in aerosol)Item Quantity8/4 cherry 3 bd. ft.4/4 cherry 3 bd. ft. Electrical parts, see belowStained glass, see belowOverall Dimensions: 22-1/2"H x 41-1/2"W x 17"DKey Part Pcs.DimensionsA Base sides41-1/8" x 1-1/2" x 9-1/4"B Base lip45/16" x 1-3/8" x 6-5/16"C Arm (vertical)11-1/2" x 1-1/2" x 22-1/2"D Arm (horizontal)11-1/2" x 1-1/2" x 10-3/4"E Arm (end)11-1/2" x 1-1/2" x 3"F Vertical cover plate17/16" x 1-1/8" x 21"G Upper cover plate17/16" x 1-1/8" x 9"H End cover plate17/16" x 1-1/8" x 2"J Shade hangers23/8" x 2-1/2" x 2-1/2"K Shade sides83/4" x 1" x 10-1/2"L Shade tops43/4" x 1" x 12"M Shade bottoms43/4" x 1" x 15-1/2"N Splines81/8" x 2" x 3-1/2" Recommended Wood: CherryAlternate Wood: Mahogany MATERIAL LISTKey Part Pcs.DimensionsQ Lamp cord and plug118 g. 8 ft. longR Rotary line switch1S Bushing11/8" ips, female bushing T Steel pipes21/8" ips, 10" longU Couplings31/8" ips, femaleV Steel pipe11/8" ips, 9" longW Armbacks (elbows)290 degree, 1/2' ball, 1/8 ips X Nipple11/8" ips, 5" longY Star lock washers21/8" ipsZ Nuts31/8" hex nutAA Keyless sockets2BB Cluster body11-1/16" x 1-1/16"CC Brass arms23-1/2", 1/8" ipsDD Wire nuts29/16" x 5/16"Key Part Pcs.DimensionsP Stained glass41/8" x 12-1/4" x 6-1/8" GlassElectricalBEFORE YOU BEGINGood craftsmanship begins and ends with good work habits, so make the following steps part of your routine workshop practice. If you have any doubts or questions about how to proceed with a project, always discuss them with your instructor.•Carefully and fully review plans and instructions before puttinga tool to the project lumber.•Work sensibly and safely. Wear safety goggles and the appropriate respirator whenever making sawdust or working with thinnersor other solvents.•At the end of every work session, clean up your shop area and put away all portable tools.CUTTING AND ASSEMBLY PROCEDUREBuild the Shade FrameThe shade is made of four identical frames. Use a stop block for all the cuts to ensure repeat accuracy.l the 4/4 cherry board to the design thickness and rip the boards into 1" widths. Rough-cut three 12" pieces and one 18" piece for each of the four frames (K, L, M, Fig. 1). Cut enough parts to build an extra frame as a precaution and for setup purposes.2.Attach a long auxiliary fence to your tablesaw’s miter gauge. Consider adding an acrylic guard just as a reminder of wherenot to put your fingers.3.Make a setup block for setting your miter gauge angles by cutting a 38-degree angle on one end and a 26-degree angle on the other. Use an accurate miter saw to cut the block.4.Set the miter gauge to cut at 38 degrees. Miter both ends of the frame sides (K) and frame bottoms (M) to final dimensions. Miter just the left edge of the frame top (L). All these cuts can be made using one miter fence setting.5.Cut the half-lap joint on the mitered end of each piece (Figs. 2 & 3). Use scrap wood to set the blade height and a stop block for each cut. You will need to rotate the miter gauge 38 degrees right and left of center to accomplish all the angles.6.Dry-fit all the pieces together and mark the position of the half-lap on the right side of the frame top (Fig. 4) to determine the exact posi-tion of the top’s second dado. Then cut the rest of the top half-laps.W o o d w o r k e r’s T i p:This piece is actually quite short in the finished shade, but it’s much easier to make and hold on the saw if you start with a long piece of wood. Trim the excess length after the frame has been glued up.7.Glue each frame assembly together with small C-clamps. When the glue has set, cut off the waste on the top.Rabbet for the Glass8.Make a template out of 1/4" plywood to cut rabbets in each frame.mark lines 1/4" to the outside of the tracing lines. Cut to this line witha jigsaw. Keep the template 3" wide to support the router.9.Rout the rabbet with a 1/4" straight bit and guide bushing (Figs. 3 & 5). Take several passes of to get the rabbet to full depth. Clean up the corners of the rabbet using a chisel.W o o d w o r k e r’s T i p:Use double-sided tape to secure the frame to the bench and template. Tuck frame scraps under the template for support.Cut the Compound Miterse the setup block to set the tablesaw miter fence to cut at 38 degrees and angle the blade to 26 degrees.11.Place a frame, face side up, with the bottom against the fence. Cut the compound miter (Fig. 6), leaving a 5/8"-wide side (Fig. 3).W o o d w o r k e r’s T i p:To ensure a clean joint, make two passes. The first cut is just shy of the line. For the second cut, add a shim, such as a playing card, to the stop block. This will take just a whisker off for a super-clean edge.12.Next, place the freshly cut side against the miter fence and adjust the angle so the uncut side is parallel to the blade. This should be approxi-mately 76 degrees on the miter gauge. Then miter the second side. 13.With a beveled side against the fence, adjust the miter fence so the frame bottom is parallel to the blade. Reset the blade to 90 degrees; rip each bottom to 3/4"-wide (Fig. 7A). Reset the blade to 45 degrees and bevel the underside of the frame’s bottom just up to the routed rabbets (Fig. 7B).14.Remove the miter fence, flip the frame over onto its face and use the tablesaw fence to bevel the top (Fig. 7A). Leave a 3/8"-wide flat reveal at the top. The shade hanger (J) sits inside this reveal. Place the frame bottom against the tablesaw fence and rip each frame top at 90 degrees so each frame is identical.15.Glue the four frames together using spring clamps. When dry, clean up the glue and sand.Cut the Glass and Shade Hangers16. Make a cardboard template 1/32" smaller than the frame opening. Mark this pattern on the glass using a felt-tipped marker.17. Make a single scoring cut just inside one of the lines. Place the scored edge over the end of the bench and, with a gentle downward motion, snap the glass at the scored mark. Repeat until all the glass is cut. Be sure to wear gloves for this step. Freshly cut glass can be razor sharp.W o o d w o r k e r’s T i p:Minor adjustments to the glass shape can be made using an 800-grit waterstone. Do not use a grinder or power sander.18. Cut the two shade hangers (J, Fig. 8). Make a simple crosscut jigflush with the top reveal. Drill a hole in the center of each hanger for the nipple (X).Make the Base and Arml 8/4 cherry to 1-1/2". Rip stock for the four base sides (A) to 1-1/8". Miter to the final dimension.20.Glue up the base with a band clamp. After the glue dries, cut slots for the splines (N) on the tablesaw (Fig. 10) using a shop-made spline slot sled (Fig. 11). Glue in the splines and trim them flush when dry. Cut the reveal around the bottom of the base (Fig. 1).21.Cut a notch in the back of the base (Fig. 1) with a dado blade.22. Mill 4/4 cherry to 5/16"-thick stock and rip to 1-3/8" wide for base lip (B). Miter to fit inside the base, and glue.23.Cut a 45" length of 1-1/2" x 1-1/2" cherry for arm assembly parts (C, D and E).24.Cut a deep groove for the conduit in the center of one edge (Fig. 1).25.Miter the arm assembly parts. To make clamping the miter easier, leave part E long until after the glue-up.26.Cut the notch in the bottom of Part C (Fig. 1). Dry-fit the base and the vertical arm.27.Drill two holes (Fig. 1, Detail. 2) for the screws that attach the base and arm. Drill a third hole for the lamp wire.28. Glue the arm assembly one joint at a time. Leave the end piece extra-long for now, so there’s room to attach the stepped block. Cut this piece to length after it’s glued.29.Cut the spline slots in the assembled upright, as in Step 20, and glue in the splines. Cut the spines and sand them flush.30. Cut arm end (E) to final length.31.Make cover plate F, G and H (Fig. 1, Detail 1) from a 40"-long strip of wood. Cut the rabbets so the cover plates fit snugly into the groove with hand pressure.32. Miter the completed cover plates to fit the upright.33.Sand the shade, base, upright and hangers to 220-grit and apply the finish. Refer to the STAINING & FINISHING section.34. Install the stained glass in the shade. To hold the glass in place, rip 3/16" x 3/16" cherry stops on the tablesaw. Miter the stops to fit behind the glass and attach them with No. 19 x 1/2" brads (Fig. 7B).NOTE:Install the glass after you stain and finish the shade.Assemble the Wiring Conduit 35. Cut two 10" pieces from the end of lamp cord (Q) and set aside for wiring the sockets later.36.Feed the lamp cord through the hole in the upright. Assembling the conduit is just a matter of screwing Parts S through X together and feeding the wire as you go (Fig. 12). Don’t overly tighten the two armbacks (W) as they can cut through the cord insulation. Make sure several inches of cord feed past the end of the nipple (X).W o o d w o r k e r’s T i p:Reverse twist the cord before screwing on the last armback so the wire is not wound in the conduit.y the conduit into the upright base/arm assembly.Complete the Wiring38.Screw the two arms (CC, Fig. 13) into the cluster (BB). IMPORTANT:Make sure the wire nuts are rated to join three18-gauge wires.39.Feed 10" of lamp cord from the cluster through each arm.40. Wire the sockets (AA, Fig. 14). Strip 5/8" of insulation from each wire end and wrap the bare wire three-quarters of the way around the screw.41.It’s standard practice in lamp wiring that the neutral wire is marked. Our wire was marked with ribbing on the insulation. Other manufacturers may use different colored insulation or a colored strand in the wire itself. No matter how it’s marked, you can always tell the neutral wire; it’s the one that comes off the wide blade on the plug. 42.Attach the rotary switch (R) to the cord (Fig. 15). Cut the hot wire, lay both wires through the switch, snap on the cover and screw it down. Small metal prongs penetrate the insulation and complete the switch circuit.43.Attach the shade to the upright (Fig. 16).44. Twist wire nuts on the three neutral wires and the three hot wires (DD, Fig. 13). Take care that all the copper wire strands are in the wire nuts. Push the wires into the cluster and screw on the cap. FINAL ASSEMBLYAttach the Base45. Screw the base onto the uprights. Check with a square to make sure the arm seats 90 degrees to the tabletop. If needed, pare the base slot with a chisel to adjust the fit. Plug the screw holes with 3/8" cherry plugs and sand them flush. After you stain and finish add self-adhesive felt pads to the bottom and you’re done!Attach the Shade46.See Fig. 16. Screw the hex nut onto the nipple until it’s just below the surface of the arm. Install the cover plates.47.Screw the upper shade hanger to the arm. To determine where tohanger, and countersink and drill three holes for the screws. Drill pilot holes into the arm end to prevent splitting.48. Set the shade on the upper shade hanger and place the lower hanger over the nipple. Tighten nut A and its washer onto the threaded conduit. Install nut B and washer about halfway down the nipple. Thread the lamp socket cluster onto the nipple. Stop when the nipple reaches just inside the cluster. Back off nut B to lock the socket cluster in place.STAINING AND FINISHINGW o o d w o r k e r’s T i p:Though you may be tempted to cut short your sanding, preparation and application time, don’t do it. These tasks are very important steps in obtaining a high-quality finish. Remember, it is the finish, just as much as the fit and smoothness of the parts that will have great bearing on how people judge your craftsmanship. To ensure an excellent result, follow the steps listed in this section and also the instructions the finish manu-facturer puts on its products.FINISHING TIPS• Test the stains and finishes you are planning to use on scraps of wood. On the back of the scrap, mark the stain/finish combination and the type of wood. Allow all samples to dry thoroughly before making your final finish selection. Save your samples for quick reference on future projects.• All stains and finishes must be allowed to dry thoroughly between coats. Remember that drying times can vary due to humidity and other climatic conditions.• If you have some leftover stain or finish, wipe the can rim so that stain or finish in the rim won’t dry out and prevent the lid from forming a tight seal.• Brushes used for water-based products, such as Minwax®Water-Based Wood Stains or Minwax®Polycrylic®Protective Finish, must be cleaned with soap and water; oil-based finishes must be cleaned with mineral spirits.49.Sand all pieces with 120-grit paper, then move up to 220-grit to complete the pre-finish smoothing. Use an orbital sander to remove any marks or scratches, then lightly sand by hand using with-the-grain sanding strokes. Dust off the piece and wipe it carefully with a clean, lint-free cloth lightly dampened with mineral spirits. Recommended Finish50.Prior to final assembly of the lamp, apply the Minwax® Gel Stain you’ve chosen to the surfaces using a clean, lint-free cloth or natural-bristle brush. Allow the Gel Stain to set for about 3 minutes, then wipe off any excess. Repeat for the exterior surfaces. To achieve a deeper color, you may apply a second coat after 8 to 10 hours, repeating the application directions for the first coat. Allow the stain to dry for 24 hours before applying the finish.W o o d w o r k e r’s T i p:When wiping off stain, make certain that your last wipe with the cloth goes with the grain of the wood. This way, any stain you might miss during wipe-off will be visually minimized by the wood grain.51.Apply Minwax®Fast-Drying Polyurethane following the directions on the can. Use a good quality, natural-bristle brush. Allow the first coat to dry overnight.52.The next day, sand all surfaces lightly with 220-grit or finer sandpa-per using with-the-grain strokes. Dust off and wipe all surfaces with a cloth lightly dampened with mineral spirits. Apply a second coat of polyurethane and set the piece aside to cure overnight.53.The following day, sand all surfaces lightly with 220-grit paper. Dust off and wipe the piece with a cloth lightly dampened with mineral spirits and apply the third and final coat of polyurethane.Alternate Finish54.Apply the Minwax®Wood Finish™you’ve chosen to the surfaces using a natural-bristle brush and a clean, lint-free cloth following the directions on the can. The brush will help you get the stain into the many inside corners and other tight spots. Allow the Wood Finish™to set for about 5 to 15 minutes, then wipe off any excess. To achieve a deeper color, you may apply a second coat after 4-6 hours, repeating the application directions for the first coat. Allow the stain to dry for 24 hours before applying the protective clear finish.55. Apply Minwax®Fast-Drying Polyurethane following the directions on the can. Use a good quality, natural-bristle brush. Allow the first coat to dry overnight.56.The next day, sand all surfaces lightly with 220-grit or finer sandpa-per using with-the-grain strokes. Dust off and wipe all surfaces with a cloth lightly dampened with mineral spirits. Apply a second coat of polyurethane and set the piece aside to cure overnight.57.The following day, sand all surfaces lightly with 220-grit paper. Dust off and wipe the piece with a cloth lightly dampened with min-eral spirits and apply the third and final coat of polyurethane. PRODUCT SAFETYFor your safety and the safety of those you work with, always read the safety warnings, which manufacturers print on their labels, and follow them to the letter.WARNING!Removal of old paint by sanding, scraping or other means may generate dust or fumes that contain lead. Exposure to lead dust or fumes may cause brain damage or other adverse health effects, especially in children or pregnant women. Controlling exposure to lead or other hazardous substances requires the use of proper protective equipment, such as properly fitted respirator (NIOSH approved) and proper containment and cleanup. For more information, call the National Lead Information Center at 1-800-424-LEAD (in US) or contact your local health authority.DANGER:Rags, steel wool, other waste soaked with oil-based stains and clear finishes, and sanding residue may spontaneously catch fire if improperly discarded. Immediately place rags, steel wool, other waste soaked with these products, and sanding residue in a sealed, water-filled metal container. Dispose of in accordance with local fire regulations.When using oil-based wood finishing products: CAUTIONS: CONTAINS ALIPHATIC HYDROCARBONS. Contents are COMBUSTIBLE.Keep away from heat and open flame. VAPOR e only with adequate ventilation. To avoid over-exposure, open windows and doors or use other means to ensure fresh air entry during application and drying. If you experience eye watering, headaches, or dizziness, increase fresh air, or wear respiratory protection (NIOSH approved), or leave the area. Avoid contact with eyes and skin. Wash hands after using. Keep container closed when not in use. Do not transfer contents to other containers for storage.FIRST AID:In case of eye contact, flush thoroughly with large amounts of water for 15 minutes and get medical attention. For skin contact, wash thoroughly with soap and water. In case of respiratory difficulty, provide fresh air and call physician. If swallowed, call Poison Control Center, hospital emergency room, or physician immediately. DELAYED EFFECTS FROM LONG-TERM OVEREXPOSURE. Contains solvents which can cause permanent brain and nervous system damage. Intentional misuse by deliberately concentrating and inhaling contents may be harmful or fatal.WARNING:This product contains chemicals known to the State of California to cause cancer and birth defects or other reproductive harm. DO NOT TAKE INTERNALLY. KEEP OUT OF REACH OF CHILDREN. CONFORMS TO ASTM D-4326. Contact a physician for more health information.When using water-based wood finishing products: CAUTIONS:Use Only With Adequate Ventilation. To avoid overexposure, open windows and doors or use other means to ensure fresh air entry during application and drying. If you experience eye watering, headaches, or dizziness, increase fresh air, or wear respiratory protection (NIOSH approved), or leave the area. Avoid contact with eyes and skin. Wash hands after using. Keep container closed when not in use. Do not transfer contents to other containers for storage.FIRST AID:In case of eye contact, flush thoroughly with large amounts of water. Get medical attention if irritation persists. If swallowed, get medical attention immediately.WARNING:This product contains chemicals known to the State of California to cause cancer and birth defects or other reproductive harm. DO NOT TAKE INTERNALLY. KEEP OUT OF REACH OF CHILDREN. CONFORMS TO ASTM D-4326. Contact a physician for more health information.SOURCESGrand Brass Lamp Parts(212) 226-2567One 10-ft. 18/2 SPT-1 cord with molded plug, #WIC10FTBL, $1.50 One black rotary line switch for SPT-1 cord, #SW423BL, $0.80One 1/8 ips female black bushing, #BG201B, $0.10Two 10" x 1/8 ips steel pipe, #PIST10, $0.75 ea.One 9" x 1/8 ips steel pipe, #PIST09, $0.75Three straight coupling brass 1/8F thru, #NE449, $0.20 ea.Two 1/8m bottom x 1/8f side,1/2 ball 90-degree armback, #AB335NP $0.75 ea.One 5" x 1/8 ips nipple steel, #NI5-0X1/8, $0.60Two 1/8 ips.slip star lock washer, #WA1/8STAR, $0.02 ea.Three 1/8 hex nut, brass, #NU424, $0.08 ea.Two 3-1/2" plain (J) arm brass 1/8m ips, #ARJL, $2.25 ea.One small turned cluster body,2-piece, #BOS2XB, $2.50Two MD wire nut, #WINUTG, $0.10Two cast-brass uno-threaded keyless socket with 1/8 ips bushing and setscrew, #SO9347CB, $10 ea.Processing fee for order under $50: $10.Total cost: Lamp electrical parts, $50 plus shipping.Southern Front Stained Glass(281) 890-5860Wissmach Glass, W0101, Dark Green and Opal WispyFive 10-1/2" x 16" panels, $27Fletcher-Terry steel glass cutter, $4.50.Woodworkers Supply(800) 645-9292Felt discs, #933-671, $2.99 strip of 601/4" straight bit, #03-140, $13.991/4" router guide bushing, #938-048, $7.99This project was adapted with permission from A m e r i c a nW o o d w o r k e r® magazine, Home Services Publications, Inc., an affiliate of Reader’s Digest Association, Inc., Suite 700, 2915Commers Drive, Eagan, MN 55121. ©Copyright 1995. All rights reserved. For subscriptions call toll-free: 1-800-666-3111.FIG 1. LAMP DETAILS1/8"1/8"/8"DETAIL 2Back of Lamp Arm BottomFIG 2. CUT THE ANGLED HALF-LAP JOINTSFIG 3. HALF-LAP JOINTSFIG 4. ASSEMBLE THE FRAMEFIG 5. RABBET EACH FRAMEFIG 6. RIP THE COMPOUND ANGLESFIG 7A. BEVELED ENDSFIG 7B. INSIDE OF SHADE FRAMEFIG 8. CUT THESHADE HANGERSFIG 9. CROSSCUT SLEDFIG 11. SPLINE SLOT SLEDFIG 12. CONDUIT ASSEMBLYFIG 13. CLUSTER WIRINGFIG 14. SOCKET ASSEMBLY–11–CONTINUED - WOODWORKS: ADVANCED PROJECT 2006-2007 ARTS & CRAFTS TABLE LAMPFIG 16. ATTACH THE SHADE FIG 15. ROTARY SWITCH。
Proe台灯建模说明书要点

台灯结构件建模说明书工学院目录第一章.台灯简介1-1截止阀简介 (3)1-2工作原理............................................... . (3)1-3使用说明 (3)第二章.建模思路 (3)第三章. 个零件建模方法与步骤3-1 底座(含笔筒) (4)3-2 连接筒 (4)3-3 灯头 (4)3-4 灯管座 (4)3-5 灯管 (4)3-6 灯管支架 (4)3-7 螺钉 (4)第四章.装配顺序与装配方法 (4)第五章成果图 (4)第一章.台灯简介这种台灯是人们生活中用来照明的一种家用电器。
这种台灯属于阅读台灯,灯体外形简洁轻便,专门用来看书写字的台灯,它一般可以调整灯杆的高度、光照的方向和亮度。
它的工作原理主要是把灯光集中在一小块区域内,便于工作和学习第二章. 建模思路台灯的结构建模是一个重要的过程,思路如下:建立法兰盘主要结构(零件1、2)→建立法兰盘装配文件→零件1、2装配→建立零件3并装入装配模型→环形整列方式完成零件3装配→建立零件4并装入装配模型→环形整列方式完成零件4装配→建立零件5并装入装配模型→建立零件6并装入装配模型→建立爆炸视图并保存→装配模型保存→完成。
第三章个零件建模方法与步骤3-1,.底座(含笔筒)(1)a.建立零件底座底部曲线截面草图→拉伸→倒角→(得到底座如图(1))b.在底座上表面建立连接杆支架的曲线草图→拉伸→倒角,圆角→(得到图(2))b.在底座上表面建立连笔筒的曲线草图→拉伸→倒角,圆角→(得到图(3))c.在底座下表面建立支撑轴的曲线草图→拉伸→倒角,圆角→(得到图(4))c.在底座下表面建立支撑轴的曲线草图→拉伸→倒角,圆角→(得到图(5))3-2 连接筒以默认模板为模板,创建一个“guandao.prt”为名的零件文件。
(2)建立零件连接管曲线草图→完成→可变剖面扫描→创建或编辑扫描剖面→画出两个圆(表示管道厚度和管道直径)→完成→如图(6)(3)建立零件“切除”平面草图→完成→旋转→位置→草绘→轴→去除材料→完成→如图(7)(4)选择阵列对象→编辑→阵列→方向→数量→完成→保存→如图(8)3-3 灯头(5)建立灯头椭圆形截面草图→拉伸→如图(9)。
3D台灯的绘制教程

2. a 第一个截面图形为圆, Radius(半径 )为 120mm.
b 复制第一个截面图形为第二个截面图形并进行修改,进入 激活次物体 Segment(线段 )。在视口内选择要编辑的线段为
Edie Spline 编辑, 红色 显示状态。
给选择的线段进行均分,选择修改栏上的
Divide 命令,设制划分段数为 3,
谈话结束后,张先生起身离开了这个地方。当他外出时,他并没有忘记关门。房间又一次变得安静了,北河甚至可以听到他的呼吸声。与此同时,他又陷入了陷阱。他仍然很悲伤。他仍然不相信。主人和弟弟被箭射死了。 “嘿.”它没过多久,我听到敲门声。北河宇光瞥了一眼门。 在方向上,我听到了“哦”,房间的门被打开了。一位穿着中国服装的老人双手扶着走进去。这个人是山的主人。领主,平日经常挂在脸上的笑容,被庄严的气氛所取代。跟着这个人,有个女人扎着马尾辫,又冷又冷。他们进入这个地方之后,他们很冷。门关上了,蒋木媛已经来到北河 边,所以他低头看着他。 “你的主人。 “我只听江慕源问道。北河的呼吸明显很重,下面是:”死了。“”声音刚刚落下,蒋木媛浑浊的瞳孔没有缩小,眼睛微微眯起,脸上的敬畏变得有点凶悍。 “这到底是怎么回事。”贝赫深吸了一口气,然后他最后一次和陆厚出去了。他将去南 丘山,忘记杀人之路。他前往卢侯被凤国七国围困,并在箭中死亡。接下来就是走到一起。在这个过程中,他的语气很平静,好像他在讲一个与自己无关的故事。听完他的话后,江慕源的脸很平静,其他理解它的人会感到惊讶。因为在这位和蔼可亲的领主面前,这种表达从未出现过。这 个房间里的沉默比北海的沉默更加激烈。气氛变得极为尊严。 “哦.”又敲门,后门被推开了。脸上带着酒窝的小蟑螂进来了,手里拿着一个竹篓和饭菜。根据张先生的说法,她为北河赚了一大笔钱。
漂亮的台灯扭曲做法(proe)

这是一盏造型漂亮的台灯,可以有很多种方法来做,各有所长吧! 当然我这个是用扭曲做的,觉得扭曲特适用于造型,任何造型都 可以快速简单的做出来,现在就扭曲的台灯来做个教程吧! 看到这个造型可以先想想从哪开始做起最简单来得容易, 从扭曲的来说我觉得台灯的头部造型有一定难度,先把头部做出 来这台灯也完成了一大半了.所以我们就从头部做起. 一, 可以看出台灯的主体部位是类似椭圆的形状,扭曲也可就简单的形状扭成任意造 型,现就可直接旋转出一个小椭圆,再用扭曲里的雕刻造型工具进行压为略扁.二,接下来做翅膀,可直接用扭曲里雕刻造型工具进行拉动控制点,接着接动中间的一个极 点让其看起来有不至于太扁了,可跟据需要调整如下图三,可以看到翅膀是弯弯的,可以用扭曲里的雕刻这样来接动控制点,如下图四,我们需要的是两翅膀还是向上飞起来的效果,不急,可以用扭曲里的折弯来做如下图, 如果觉得哪里还不够好还可继续用雕刻造型拉动控制点调到自己满意效果五,现在整个头部就做完了,可以做身子部位了,身子可直接扫描一个曲面出来六,发现扫描出来的并不是我们想要的最终效果,我们可以用扭曲经过两次调整来达到七,为了让底座更平整(不至于放着会倒,呵呵) ,可拉伸一张平面出来就轻易解决这个问 题了,八,接着就是曲面的合并,但发现勃子那里有个明显的接印,为了 让整个产品看起来造型流畅,可把此处切掉再用曲面补接起来,补 接这个地方可以有很多种方法,这里用的是边界混合(加控制点的) 想必大家都会,这里就不再多说了,当然如果觉得哪不理想同样还可以通过扭曲进行调整 然后就是曲面合并实体化着色了哈哈,这就做完了!你看懂了没会了不!!!!! !!!!!。
台灯说明书

机电与车辆工程学院《Pro/E三维机械设计》专业:____________________________________班级:___________________________________姓名:___________________________________学号:___________________________________任课教师:_______________________________日期:学习台灯一、台灯体的三维实体建模1单击"文件“工具栏中的“新建文件汀的按钮,选择“零件“模块,在“名称“ 文本框中输入“ taidengti",取消“使用缺省模板”复选框,点击“确定”按钮,选择u mms_part.solid\在单击“确定”按钮,进入零件设计环境。
2点击"草绘工具“命令,弹出"草绘"对话框,选取u FRONT"基准面为绘图平面,使用默认的参照面,进入草绘环境,绘制如图1所示的矩形。
3完成草绘后,将此截面拉伸,深度为20. 00,生成如图2所示的长方体。
4点击"草绘工具”命令,弹出"草绘會对话框,选取长方体顶面为绘图平面,右侧面为u Right"参照面。
进入草绘坏境后,绘制如图3的截面。
5、完成图3的草绘后,拉伸此截面,拉伸深度为20.00。
拉伸方向改为箭头向下,点击“建造特征”命令,系统生成图4所示的拉伸体。
6、插入“倒圆角”命令,将当前设计环境中设计对象的四条边上倒上半径为20.00的圆角。
再次插入“倒圆角”命令,将当前设计环境中设计对象的两条边倒上半径为30. 00的圆角。
系统生成如图5所示的图形。
7、点击“草绘器工具”工具条中的“可变剖面扫描工具”,系统打开“扫描特征”工具条,单击该工具条的“扫描为实体”命令;然后点击“草绘工具”命令,弹出“草绘”对话框;再单击“基准平面工具”命令。
181 海马台灯底座注塑模设计(sw三维造型设计)

毕业设计(论文)设计(论文)题目:台灯底座塑料模学院名称:机械工程学院专业:班级:姓名:学号指导教师:职称定稿日期: 2012 年 5月 30塑件注射模设计摘要本论文是台灯底座塑件注射模设计。
本文主要是对该壳体产品进行模具设计和模具结构的优化改造。
设计结合了ABS材料的成型特点;根据塑件的形状进行了一种方案模具设计分析,采取了其中的最佳的成型方案进行模具,然后对注塑设备的进行了校核。
论文着重说明了一副塑料模具设计的一般流程,其中注射模具设计的一些机构设计既是重点又是难点,主要包括分型面的确定,浇注系统的设计、模具冷却系统的设计等。
经过以上的分析设计流程,以达到塑件模具设计和优化改造的目的。
关键词:软件,注射模设计;ABS;Flashlight shell Plastic Injection Mold designabstractThe present paper is desk lamp base plastics injection mould design. This paperis mainly to the shell mould design and product of die structure optimizing reconstruction. Design with the ABS material forming characteristics; Accordingto the shape of the plastic parts for a method mold design analysis, take one ofthe best molding tool scheme, then the virwpoint of injection molding equipment.This paper mainly explains a pair of plastic mold the general design process, of which injection mold design of some of the organization design is key and difficult, mainly including points to determine the type, the design of gating system, mold cooling system design, etc. Through the above analysis, design process, in order to achieve the plastics mould design and optimize the purpose of the reform.Keywords: software, injection mould design; ABS;目录摘要 (1)abstract (2)第1章概述 (5)1.1 课题的来源 (5)1.2 课题的研究目的 (6)第2章塑件结构工艺性分析 (7)2.1 塑件的造型 (7)2.2塑件的结构分析 (8)1.塑件结构特点 (8)2. 精度等级 (8)3.脱模斜度 (8)2.3 塑件工艺分析 (9)1. 塑料材料特性 (9)2.ABS塑料主要用途 (9)3.塑料材料成型性能 (9)4. ABS的注塑工艺参数: (10)5. 塑件尺寸的影响因素 (10)6. 塑件的公差与表面质量 (11)第3章注射模具设计 (12)1. 分型面的确定 (12)2.型腔数目及排位方式的确定 (12)3 初先注塑机型号 (13)3.1 注射量的计算 (13)3.2 选择注射机 (14)3.3注射机相关参数的校核 (15)第4章.浇注系统(冷流道)的设计 (16)4.1主流道设计 (16)4.2分流道设计 (18)4.3浇口的设计 (18)第5章顶出机构设计 (19)5.1顶出结构原则 (19)5.2脱模力的计算 (20)第6章冷却系统的设计 (21)第7章合模导向机构设计 (22)7.1导柱的设计 (23)7.2导套的设计 (23)第8章模架的选用 (24)8.1成型零件的结构设计及计算 (24)8.2 动定模板的长、宽尺寸的确定 (26)8.3动模板和定模板厚度的确定 (27)8.4模具厚度尺寸的选定 (27)第9章注射机工艺参数的校核 (28)9.1 最大注射量的校核 (28)9.2 注射压力校核 (28)9.3锁模力的校核 (29)9.4 注射模安装尺寸的校核 (29)第10章零件工艺路线: (31)第11章总结 (34)11.1塑件三维造型及工程图绘制总结 (34)11.2 塑料台灯底座的模具设计总结 (34)致谢 (35)参考文献 (35)第1章概述1.1 课题的来源“模具是工业生产的基础工艺装备”也已经取得了共识。
- 1、下载文档前请自行甄别文档内容的完整性,平台不提供额外的编辑、内容补充、找答案等附加服务。
- 2、"仅部分预览"的文档,不可在线预览部分如存在完整性等问题,可反馈申请退款(可完整预览的文档不适用该条件!)。
- 3、如文档侵犯您的权益,请联系客服反馈,我们会尽快为您处理(人工客服工作时间:9:00-18:30)。
数字化设计与制造训练
总结报告
学生姓名:刘致仁学号:1121101235 专业:机械制造及其自动化
设计任务题目:台灯
专题三维零件的灯罩,插头和底座的一部分,以及部分CAD画图工作
指导教师: 董育伟
2015 年 6 月19 日
目录
1概述 (1)
说明:对任务的背景、设计对象的功能、用途、应用范围、性能特点、应用推广价值、设计任务的说明等。
2 台灯总体设计说明………………………………………………………………说明:说明设计思路和主要参数的选用、计算说明,说明设计过程,重点是设计难点的说明。
图文结合
3.三维零件的灯管,灯罩,插头和底座的一部分部件设计说明………………………………………………………………
说明:重点说明我分工设计的部件的设计思路和重要的设计计算,说明设计过程,重点是设计难点的说明。
图文结合。
4. 典型零件详细设计说………………………………………………………………
说明:重点说明自己分工设计的典型零件,分析零件各部分功能,绘制典型零件的工程图。
5. 体会和总结………………………………………………………………
台灯的历史:
1966年IngoMaurer受惠于波普艺术设计了其第一件作品:一款拥有有巨大灯泡的台灯,完成了其向电灯的发明者爱迪生的敬礼。
此后的30多年间,IngoMaurer一直为光――简单之美的诗意追求而不断创造。
1992年,Lucellino带着诗意的天使翅膀飘落人间――这也是IngoMaurer最受赞誉和畅销的作品。
工作在慕尼黑的“诗人”既不是极简主义者也不种牢牢守着那些设计理论的设计师。
只有对“无限多样性”的追求才是IngoMaure的一件件作品所要平静地阐发的。
对他而言,设计不过是一种可以从日常生活就能获取灵感的有趣科学。
一件件的作品的创作可以说也就是一次次和灵感的偶遇,IngoMaurer用他安静的敏锐将它们(灵感)捕获,再用他诗人的气质将一切的美展现给一双双为之闪亮的双眸。
而IngoMaure对光的材料的研究尝试和革新才是其塑造一件件诗意作品的前提。
从还在学生时代作学校的印刷工起Ingo就一直思考这用“纸”来塑造光的形状。
1980年的Lampampe和1997年的Zettel’z就是来于纸的创造。
而对织物的运用以及塑造雕塑般的视觉效果则是Ingo设计中的又一大特色。
而IngoMaure还走在技术的前沿,是一个“先锋诗人”。
LED (发光二极管)技术刚出现,IngoMaure马上就把其运用到了LaBellissimaBrutta(1997)的设计上,让新技术散发诗的光芒。
其后作品ohoodoo(1999),Stardust(2000)和El.E.Dee(2001)的
设计则无一不继续延续了IngoMaure试验风格和技术先锋的诗意设计美学。
我们小组进行了用solidworks和CAD等软件设计一款台灯的工作。
整体装配图如下所示:
我的工作是外观三维造型设计。
我首先设计的是灯罩
这是灯罩的具体外形。
我先通过具体测量,测量出了灯罩外形所需要的的尺寸,然后进行三维绘图设计。
第一步,我进行的是拉伸和拉伸切除的工作,然后倒圆角,
做出了灯罩的大致外形,如下图所示:
接下来需要做灯罩和台灯的灯杆之间的连接部分,这是一个难点,需要先建立一个基准面然后画两个椭圆进行放样,但是,在我的实践中出现了一个问题,就是放样以后多出了一部分废料,需要再做一次拉深切除废料才可以,我想可以把切除放到最后一
步,这样就可以简略很多,如下图:
经过一系列倒圆角之后,具体的连接部分就做出来了,再进行一些对和其它零件的配合处的加工就完成一个具体的灯罩,如图所
示
头与底座连接部分的大致外观,如下图所示
然后通过一系列的拉伸切除得到了这个部分一面的具体外观,然后我实用了镜像,让另一面也有了这样的具体外观。
然后我画了一小段导线与另一部分连接起来,通过同样的方法画出了另外一
端的零件细节,再通过对插头零件的尺寸测量绘制出了下图:
零件图如下:
我知道这个插头有一些缺陷,就是导线太短了,我不会使用solidworks这个软件画不规则缠绕的导线,所以用这么短一段来表示而已,在实际生产中完全可以变通,制造的长一点。
接下来我制作的是底座的一部分,包括底座的下底版和上底板的外观。
底座的下底板,造型十分简单,绘制过程我就不多做表述了,直接给出完成的零件图:
在绘制时要注意这四个装配点的位置关系,不然装配的时候会出现问题,倒圆角的时候也要注意和上底板吻合,不然配合会出现失误,我绘图的时候就出现了数据记错的问题,导致配合不上,后来花了一些功夫才改了回来。
我还做了底座上底板的具体外形工作
如图所示,我绘制了大致的外形,由小组的同伴完成了抽壳,具体细节的绘制,比如装配孔和开关等。
到这里我的三维制图工作就完成的差不多了,之后我进行了一部分的CAD制图工作。
然后完成了这次的课程设计。
总结与体会
通过此次课程设计,使我更加扎实的掌握了有关solidworks 和CAD方面的知识,在设计过程中虽然遇到了一些问题,但经过一次又一次的思考,一遍又一遍的检查终于找出了原因所在,也暴露出了前期我在这方面的知识欠缺和经验不足。
实践出真知,
通过亲自动手制作,使我们掌握的知识不再是纸上谈兵。
过而能改,善莫大焉。
在课程设计过程中,我们不断发现错误,不断改正,不断领悟,不断获龋最终的检测调试环节,本身就是在践行“过而能改,善莫大焉”的知行观。
这次课程设计终于顺利完成了,在设计中遇到了很多问题,最后在老师的指导下,终于游逆而解。
在今后社会的发展和学习实践过程中,一定要不懈努力,不能遇到问题就想到要退缩,一定要不厌其烦的发现问题所在,然后一一进行解决,只有这样,才能成功的做成想做的事,才能在今后的道路上劈荆斩棘,而不是知难而退,那样永远不可能收获成功,收获喜悦,也永远不可能得到社会及他人对你的认可!
课程设计诚然是一门专业课,给我很多专业知识以及专业技能上的提升,同时又是一门讲道课,一门辩思课,给了我许多道,给了我很多思,给了我莫大的空间。
同时,设计让我感触很深。
使我对抽象的理论有了具体的认识。
通过这次课程设计,我掌握了台灯的设计原理也更加掌握了solidworks和CAD方面的知识。
我认为,在这实践中,不仅培养了独立思考、动手操作的能力,在各种其它能力上也都有了提高。
更重要的是,在实验课上,我们学会了很多学习的方法。
而这是日后最实用的,真的是受益匪浅。
要面对社会的挑战,只有不断的学习、实践,再学习、再实践。
这对于我们的将来也有很大的帮助。
以后,不管有多苦,我想我们都能变苦为乐,找寻有趣的事情,发现其中珍贵的事情。
就像中国提倡的艰苦奋斗一样,我们都可以在实验结束之后变的更加成熟,会面对需要面对的事情。
回顾起此课程设计,至今我仍感慨颇多,从理论到实践,在这段日子里,可以说得是苦多于甜,但是可以学到很多很多的东西,同时不仅可以巩固了以前所学过的知识,而且学到了很多在书本上所没有学到过的知识。
通过这次课程设计使我懂得了理论与实际相结合是很重要的,只有理论知识是远远不够的,只有把所学的理论知识与实践相结合起来,从理论中得出结论,才能真正为社会服务,从而提高自己的实际动手能力和独立思考的能力。
在设计的过程中遇到问题,可以说得是困难重重,但可喜的是最终都得到了解决。
实验过程中,也对团队精神的进行了考察,让我们在合作起来更加默契,在成功后一起体会喜悦的心情。
果然是团结就是力量,只有互相之间默契融洽的配合才能换来最终完美的结果。
此次设计也让我明白了思路即出路,有什么不懂不明白的地方要及时请教或上网查询,只要认真钻研,动脑思考,动手实践,就没有弄不懂的知识,收获颇丰。
此致。