Windows 7与Protel 99SE兼容问题的解决
关于protel99se在win7系统不能添加库的解决方法

关于protel99se在win7系统不能添加库的解决方法在win7中使用protel99se,我们会遇到这中情况。
有时想要添加某个库文件,却会发生错误,导致不能用。
如图:添加库文件时发生的错误这时候是不是觉得很郁闷,不要紧张,在win7里是能添加库的,不过有点麻烦就是。
下面是添加库的方法,想学的可以看一下:第一步:打开系统盘中的window文件夹;在window文件夹中找到AdvSch99SE.ini这个配置文件,(这个是protel99se的配置文件,我们可以通过修改配置文件来达到添加库的目的。
)第二步:用记事本打开AdvSch99SE.ini,找到count=X(X代表一个数)下面还有File0=某某看下图Count=的数就是已添加库的数量。
上面的count=3,最上面的图上的库也是三个。
第三步:添加库我们以添加AMD Asic.ddb为例:先找到AMD Asic.ddb的路径。
我的AMD Asic.ddb 路径是:F:\Program Files\Design Explorer 99 SE\Library\Sch\AMD Asic.ddb如图然后在刚才打开的AdvSch99SE.ini文件中的File下添加一行File3=F:\Program Files\Design Explorer 99 SE\Library\Sch\AMD Asic.ddbcount后的数改为4然后保存。
第四部:打开protel99se可以看到刚才添加的库。
同样pcb的也一样所要更改的文件是window目录下的ADVPCB99SE.iniFile1=D:\Protel99SE\Library\Pcb\Generic Footprints\General IC.ddbFile1=D:\Protel99SE\Library\Pcb\ Generic Footprints\Advpcb.ddbFile1=D:\Protel99SE\Library\Pcb\ Generic Footprints\Miscellaneous.ddbFile0=D:\Protel99SE\Library\Sch\Miscellane ous Devices.ddbFile1=D:\Protel99SE\Library\Sch\MitelAnalog.ddbFile2=D:\Protel99SE\Library\Sch\Mitel Interface.ddbFile3=D:\Protel99SE\Library\Sch\Mitel Logic.ddbFile4=D:\Protel99SE\Library\Sch\Mitel Peripheral.ddbFile5=D:\Protel99SE\Library\Sch\Mitel Telecommunication.ddbFile6=D:\Protel99SE\Library\Sch\Motorola Analog.ddbFile7=D:\Protel99SE\Library\Sch\Motorola Consumer.ddbFile8=D:\Protel99SE\Library\Sch\Motorola Converter.ddbFile9=D:\Protel99SE\Library\Sch\Motorola Databooks.ddbFile10=D:\Protel99SE\Library\Sch\Motorola DSP.ddbFile11=D:\Protel99SE\Library\Sch\Motorola Microcontroller.ddbFile12=D:\Protel99SE\Library\Sch\Motorola Oscillator.ddbFile13=D:\Protel99SE\Library\Sch\NECDatabooks.ddbFile14=D:\Protel99SE\Library\Sch\Newport Analog.ddbFile15=D:\Protel99SE\Library\Sch\Newport Consumer.ddbFile16=D:\Protel99SE\Library\Sch\NSC Analog.ddbFile17=D:\Protel99SE\Library\Sch\NSC Consumer.ddbFile18=D:\Protel99SE\Library\Sch\NSC Converter.ddbFile19=D:\Protel99SE\Library\Sch\NSC Databooks.ddbFile20=D:\Protel99SE\Library\Sch\NSC Industrial.ddbFile21=D:\Protel99SE\Library\Sch\NSC Interface.ddbFile22=D:\Protel99SE\Library\Sch\NSC Miscellaneous.ddbFile23=D:\Protel99SE\Library\Sch\NSC Oscillator.ddbFile24=D:\Protel99SE\Library\Sch\NSC Telecommunication.ddbFile25=D:\Protel99SE\Library\Sch\Philips.ddbFile26=D:\Protel99SE\Library\Sch\PLD.ddb File27=D:\Protel99SE\Library\Sch\Protel DOS Schematic Libraries.ddbFile27=D:\Protel99SE\Library\Sch\Protel DOS Schematic Libraries.ldbFile28=D:\Protel99SE\Library\Sch\99GB4728. ddbFile29=D:\Protel99SE\Library\Sch\Actel User Programmable.ddbFile30=D:\Protel99SE\Library\Sch\Allegro Integrated Circuits.ddbFile31=D:\Protel99SE\Library\Sch\Altera Asic.ddbFile32=D:\Protel99SE\Library\Sch\Altera Interface.ddbFile33=D:\Protel99SE\Library\Sch\Altera Memory.ddbFile34=D:\Protel99SE\Library\Sch\Altera Peripheral.ddbFile35=D:\Protel99SE\Library\Sch\AMD Analog.ddbFile36=D:\Protel99SE\Library\Sch\AMDAsic.ddbFile37=D:\Protel99SE\Library\Sch\AMD Converter.ddbFile38=D:\Protel99SE\Library\Sch\AMD Interface.ddbFile39=D:\Protel99SE\Library\Sch\AMD Logic.ddbFile40=D:\Protel99SE\Library\Sch\AMD Memory.ddbFile41=D:\Protel99SE\Library\Sch\AMD Microcontroller.ddbFile42=D:\Protel99SE\Library\Sch\AMD Miscellaneous.ddbFile43=D:\Protel99SE\Library\Sch\AMD Peripheral.ddbFile44=D:\Protel99SE\Library\Sch\AMD Telecommunication.ddbFile45=D:\Protel99SE\Library\Sch\Analog Devices.ddbFile46=D:\Protel99SE\Library\Sch\Atmel Programmable Logic Device.ddbFile47=D:\Protel99SE\Library\Sch\Burr Brown Analog.ddbFile48=D:\Protel99SE\Library\Sch\Burr Brown Converter.ddbFile49=D:\Protel99SE\Library\Sch\Burr Brown Industrial.ddbFile50=D:\Protel99SE\Library\Sch\Burr Brown Oscillator.ddbFile51=D:\Protel99SE\Library\Sch\Burr Brown Peripheral.ddbFile52=D:\Protel99SE\Library\Sch\Burr Brown Telecommunication.ddbFile53=D:\Protel99SE\Library\Sch\Dallas Analog.ddbFile54=D:\Protel99SE\Library\Sch\Dallas Converter.ddbFile55=D:\Protel99SE\Library\Sch\Dallas Consumer.ddbFile56=D:\Protel99SE\Library\Sch\Dallas Logic.ddbFile57=D:\Protel99SE\Library\Sch\Dallas Interface.ddbFile58=D:\Protel99SE\Library\Sch\Dallas Memory.ddbFile59=D:\Protel99SE\Library\Sch\Dallas Microprocessor.ddbFile60=D:\Protel99SE\Library\Sch\Dallas Miscellaneous.ddbFile61=D:\Protel99SE\Library\Sch\Dallas Telecommunication.ddbFile62=D:\Protel99SE\Library\Sch\Elantec Analog.ddbFile63=D:\Protel99SE\Library\Sch\Elantec Consumer.ddbFile64=D:\Protel99SE\Library\Sch\Elantec Industrial.ddbFile65=D:\Protel99SE\Library\Sch\Elantec Interface.ddbFile66=D:\Protel99SE\Library\Sch\Gennum Analog.ddbFile67=D:\Protel99SE\Library\Sch\Gennum Consumer.ddbFile68=D:\Protel99SE\Library\Sch\Gennum Converter.ddbFile69=D:\Protel99SE\Library\Sch\Gennum DSP.ddbFile70=D:\Protel99SE\Library\Sch\Gennum Interface.ddbFile71=D:\Protel99SE\Library\Sch\Gennum Miscellaneous.ddbFile28=D:\Protel99SE\Library\Sch\Hp-EESOF.ddbFile28=D:\Protel99SE\Library\Sch\Internati onal Rectifier.ddbFile27=D:\Protel99SE\Library\Sch\Intel Databooks.ddbFile72=D:\Protel99SE\Library\Sch\Lucent Analog.ddbFile73=D:\Protel99SE\Library\Sch\Lucent Asic.ddbFile74=D:\Protel99SE\Library\Sch\Lucent Converter.ddbFile75=D:\Protel99SE\Library\Sch\Lucent Consumer.ddbFile76=D:\Protel99SE\Library\Sch\Lucent DSP.ddbFile77=D:\Protel99SE\Library\Sch\Lucent Industrial.ddbFile78=D:\Protel99SE\Library\Sch\Lucent Logic.ddbFile79=D:\Protel99SE\Library\Sch\Lucent Interface.ddbFile80=D:\Protel99SE\Library\Sch\Lucent Memory.ddbFile81=D:\Protel99SE\Library\Sch\Lucent Peripheral.ddbFile82=D:\Protel99SE\Library\Sch\Lucent Miscellaneous.ddbFile83=D:\Protel99SE\Library\Sch\Lucent Telecommunication.ddbFile84=D:\Protel99SE\Library\Sch\Maxim Interface.ddbFile85=D:\Protel99SE\Library\Sch\Maxim Miscellaneous.ddbFile86=D:\Protel99SE\Library\Sch\Microchip .ddbFile87=D:\Protel99SE\Library\Sch\QuickLogi c Asic.ddbFile88=D:\Protel99SE\Library\Sch\RF Micro Devices Analog.ddbFile89=D:\Protel99SE\Library\Sch\RF Micro Devices Telecommunication.ddbFile90=D:\Protel99SE\Library\Sch\SGS Analog.ddbFile91=D:\Protel99SE\Library\Sch\SGSAsic.ddbFile92=D:\Protel99SE\Library\Sch\SGS Converter.ddbFile93=D:\Protel99SE\Library\Sch\SGS Consumer.ddbFile94=D:\Protel99SE\Library\Sch\SGS Interface.ddbFile95=D:\Protel99SE\Library\Sch\SGS Industrial.ddbFile96=D:\Protel99SE\Library\Sch\SGS Memory.ddbFile97=D:\Protel99SE\Library\Sch\SGS Microcontroller.ddbFile98=D:\Protel99SE\Library\Sch\SGS Microprocessor.ddbFile99=D:\Protel99SE\Library\Sch\SGS Peripheral.ddbFile100=D:\Protel99SE\Library\Sch\SGS Miscellaneous.ddbFile101=D:\Protel99SE\Library\Sch\SGS Telecommunication.ddbFile102=D:\Protel99SE\Library\Sch\Sim.ddb File103=D:\Protel99SE\Library\Sch\Spice.dd bFile104=D:\Protel99SE\Library\Sch\TI Databooks.ddbFile105=D:\Protel99SE\Library\Sch\TI Logic.ddbFile106=D:\Protel99SE\Library\Sch\TITelecommunication.ddbFile107=D:\Protel99SE\Library\Sch\SGS Peripheral.ddbFile108=D:\Protel99SE\Library\Sch\SGS Miscellaneous.ddbFile109=D:\Protel99SE\Library\Sch\SGS Telecommunication.ddbFile110=D:\Protel99SE\Library\Sch\Sim.ddb File111=D:\Protel99SE\Library\Sch\Spice.dd bFile112=D:\Protel99SE\Library\Sch\TI Databooks.ddbFile113=D:\Protel99SE\Library\Sch\TI Logic.ddbFile114=D:\Protel99SE\Library\Sch\TI Telecommunication.ddb。
Win7、Win10中Protel99se不能加载库文件解决方法
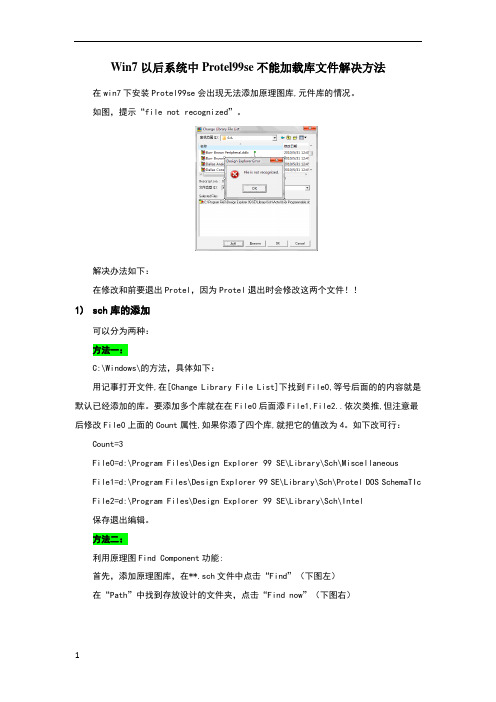
Win7以后系统中Protel99se不能加载库文件解决方法在win7下安装Protel99se会出现无法添加原理图库,元件库的情况。
如图,提示“file not recognized”。
解决办法如下:在修改和前要退出Protel,因为Protel退出时会修改这两个文件!!1)sch库的添加可以分为两种:方法一:C:\Windows\的方法,具体如下:用记事打开文件,在[Change Library File List]下找到File0,等号后面的的内容就是默认已经添加的库。
要添加多个库就在在File0后面添File1,File2..依次类推,但注意最后修改File0上面的Count属性,如果你添了四个库,就把它的值改为4。
如下改可行:Count=3File0=d:\Program Files\Design Explorer 99 SE\Library\Sch\MiscellaneousFile1=d:\Program Files\Design Explorer 99 SE\Library\Sch\Protel DOS SchemaTIc File2=d:\Program Files\Design Explorer 99 SE\Library\Sch\Intel保存退出编辑。
方法二:利用原理图Find Component功能:首先,添加原理图库,在**.sch文件中点击“Find”(下图左)在“Path”中找到存放设计的文件夹,点击“Find now”(下图右)中了,再点击“close”即可;2)PCB库的添加如果在C:\Windows下找不到,不是没有安装这个文件,而是这个文件被安装到了用户目录下面去了(C:\Users\(自己的用户名)\AppData\Local\VirtualStore\Windows),将这个文件复制到C:\windows下。
修改这个文件,如下内容Count=3File0=D>MSACCESS:$RP>d:\Program Files\Design Explorer 99SE\Library\Pcb\Generic Footprints$RN>$OP>$ON>PCB $ID>-1$ATTR>0$E>PCBLIB$STF> File1=D>MSACCESS:$RP>D:\Program Files\Design Explorer 99SE\Library\Pcb\Connectors$RN>Miscellaneous $OP>$ON>Miscellaneous$ID>-1$ATTR>0$E>PCBLIB$STF>File2=D>MSACCESS:$RP>F:\Evan99seLIB$RN>$OP>$ON>$ID>41$ATTR>0$E>PCBLib$STF>保存退出即可。
win7系统protel 99se经常卡死

win7系统下protel99se经常卡死的解决方案
由于protel99se是客户/服务器型设计软件,允许几台电脑共同设计一个原理图,所以打开protel时左上角出现下图所示界面,在“Design Desktop”(设计桌面)下“Active Design Stations”(设计电脑)栏会显示正在工作的所有电脑(点开前面的“+”会看到正在工作的电脑名),这也是导致protel经常卡死或假死的原因所在(尤其是局域网多台电脑都在用protel的情况下),解决办法就是禁止protel访问网络并关闭系统的“workstation”服务。
1、关闭protel软件右键“我的电脑”,选择“管理”进入计算机管理界面,双击“服务与应用程序”:
2、双击选择“服务”:
3、找到“Workstation”服务,双击进入属性设置界面:
4、将“启动类型”设置为“手动”,服务状态设置为“停止”:
5、选择“是”,最后点击“应用”--“确定”完成设置:
6、再次打开protel时“Active Design Stations”前方加号消失,即可解决protel卡的问题。
系统升级Win7后解决Protel99se的PCB封装库不能识别的有效办法
系统升级Win7后解决Protel99se的PCB封装库不能识别的有效办法作者蜈蚣花网上关于这个问题的文章很多。
但实际操作起来能行得通的为数不多。
其实真正解决这个问题并不太困难。
只需这样操作:第一、将原来XP系统下能正常使用的Protel99se配置文件ADVPCB99SE.INI和ADVSCH99SE.INI拷贝出来。
并将文件中PCB封装库的存放路径修改为系统升级Win7后Protel99se配置文件ADVPCB99SE.INI和ADVSCH99SE.INI的存放路径。
第二、正常安装Win7系统和Protel99se。
把修改好的Protel99se配置文件ADVPCB99SE.INI 和ADVSCH99SE.INI拷贝到Win7系统覆盖同名文件即可。
实际上ADVSCH99SE.INI 元件库的配置基本网上介绍的办法都行得通。
关键是PCB封装库。
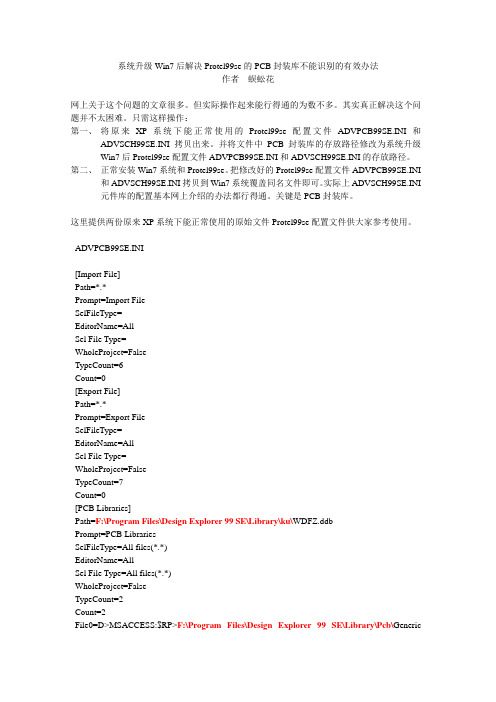
这里提供两份原来XP系统下能正常使用的原始文件Protel99se配置文件供大家参考使用。
ADVPCB99SE.INI[Import File]Path=*.*Prompt=Import FileSelFileType=EditorName=AllSel File Type=WholeProject=FalseTypeCount=6Count=0[Export File]Path=*.*Prompt=Export FileSelFileType=EditorName=AllSel File Type=WholeProject=FalseTypeCount=7Count=0[PCB Libraries]Path=F:\Program Files\Design Explorer 99 SE\Library\ku\WDFZ.ddbPrompt=PCB LibrariesSelFileType=All files(*.*)EditorName=AllSel File Type=All files(*.*)WholeProject=FalseTypeCount=2Count=2File0=D>MSACCESS:$RP>F:\Program Files\Design Explorer 99 SE\Library\Pcb\GenericFootprints$RN>Advpcb.ddb$OP>$ON>PCB Footprints.lib$ID>-1$A TTR>0$E>PCBLIB$STF> File1=D>MSACCESS:$RP>F:\Program Files\Design Explorer 99 SE\Library\ku$RN>WDFZ.ddb$OP>$ON>WDLJ.LIB$ID>20$A TTR>0$E>PCBLib$STF> [File Open]Path=*.*Prompt=File OpenSelFileType=EditorName=AllSel File Type=WholeProject=FalseTypeCount=1Count=0[File Save As]Path=*.*Prompt=File Save AsSelFileType=EditorName=AllSel File Type=WholeProject=FalseTypeCount=1Count=0[Load Netlist]Path=*.NetPrompt=Load NetlistSelFileType=EditorName=AllSel File Type=WholeProject=FalseTypeCount=2Count=0[Save Aperture]Path=*.AptPrompt=Save ApertureSelFileType=EditorName=AllSel File Type=WholeProject=FalseTypeCount=1Count=0[Load Aperture]Path=*.AptPrompt=Load ApertureSelFileType=EditorName=AllSel File Type= WholeProject=False TypeCount=2 Count=0[Save Gerber]Path=*.GBR Prompt=Save Gerber SelFileType= EditorName=AllSel File Type= WholeProject=False TypeCount=2 Count=0[Load Gerber]Path=*.G?? Prompt=Load Gerber SelFileType= EditorName=AllSel File Type= WholeProject=False TypeCount=2 Count=0[Load DXF]Path=*.DXF Prompt=Load DXF SelFileType= EditorName=AllSel File Type= WholeProject=False TypeCount=2 Count=0[BOM]Path=*.BOM Prompt=BOM SelFileType= EditorName=AllSel File Type= WholeProject=False TypeCount=1 Count=0[Report File]Path=*.Rep Prompt=Report File SelFileType=EditorName=AllSel File Type=WholeProject=False TypeCount=1Count=0[Pick and Place File]Path=*.PikPrompt=Pick and Place File SelFileType=EditorName=AllSel File Type=WholeProject=False TypeCount=1Count=0[DRC File]Path=*.DrcPrompt=DRC File SelFileType=EditorName=AllSel File Type=WholeProject=False TypeCount=1Count=0 [SystemOptions] SingleLayerMode=False DraftTrackThreshold=20000 CleanRedraw=False ShowInvisibleObjects=False DisplaySpecialStrings=False RedrawLayerOnToggle=True UseCurrentForMultiLayer=False UseNetColorForHighlight=False HighlightFull=True UseTransparent=False UseDithered=False BoardCursorType=0 TextToRectSize=11AutoPan=True ShowPadNets=True ShowPadNumbers=True ShowTestPoints=TrueShowV iaNets=True ShowStatusInfo=True ShowStatusInterval=100RepeatRotateItem=True RepeatCircular=False RepeatDegrees=45.00RepeatX=10000000.00RepeatY=0.00RepeatXUnit=1RepeatYUnit=1 RepeatCountDefault=1RepeatInc=1CheckPatterns=True CheckComments=True NetlistReportFile=True NetlistReportDialog=True DeleteUnconnectedComps=False DeleteUnconnectedPrims=True GlobalEditIncludeArcsWithTracks=False V alidateOnLoad=FalseSaveDefs=TrueDoOnlineDRC=TrueAutoPanMode=6AutoPanSpeed=1200AutoPanUnit=1AutoPanSmallStep=30 AutoPanLargeStep=100 InteractiveRouteMode=1 UndoRedoStackSize=30 PolygonThreshold=5000 PolygonRepour=0 PlowThroughPolygons=False ProtectLockedPrimitives=False LoopRemoval=True DeleteDeadEnds=False QuestionDelete=False QuestionGlobalChange=True QuestionDrag=True NearestComponent=True RemoveDuplicatesOnOutput=True DuplicateDesignatorsAllowed=False AutoVia=TrueSnapToCentre=TrueReportsCSV=FalseDeselectFirst=False DefaultPrimsPermanent=False ComponentDragMode=0RotationStep=90.00 OnlySelectV isible=True PlaceShoveDepth=0 DrawMode=00000000000000000 Top Layer=255Mid Layer 1=128Mid Layer 2=32768Mid Layer 3=65280Mid Layer 4=8388608Mid Layer 5=16776960Mid Layer 6=8388736Mid Layer 7=16711935Mid Layer 8=32896Mid Layer 9=65535Mid Layer 10=8421504Mid Layer 11=16777215Mid Layer 12=8388736Mid Layer 13=8421376Mid Layer 14=12632256Mid Layer 15=128Mid Layer 16=32768Mid Layer 17=65280Mid Layer 18=8388608Mid Layer 19=16776960Mid Layer 20=8388736Mid Layer 21=16711935Mid Layer 22=32896Mid Layer 23=65535Mid Layer 24=8421504Mid Layer 25=16777215Mid Layer 26=8388736Mid Layer 27=8421376Mid Layer 28=12632256Mid Layer 29=128Mid Layer 30=32768Bottom Layer=16711680Top Overlay=65535Bottom Overlay=32896Top Paste=8421504Bottom Paste=128Top Solder Mask=8388736 Bottom Solder Mask=16711935 Internal Plane 1=32768Internal Plane 2=128Internal Plane 3=8388736 Internal Plane 4=8421376 Internal Plane 5=32768 Internal Plane 6=128Internal Plane 7=8388736 Internal Plane 8=8421376 Internal Plane 9=32768 Internal Plane 10=128 Internal Plane 11=8388736 Internal Plane 12=8421376 Internal Plane 13=32768 Internal Plane 14=128 Internal Plane 15=8388736 Internal Plane 16=8421376 Drill Guide=128Keep Out Layer=16711935 Mechanical Layer 1=16711935 Mechanical Layer 2=8388736 Mechanical Layer 3=32768 Mechanical Layer 4=32896 Mechanical Layer 5=16711935 Mechanical Layer 6=8388736 Mechanical Layer 7=32768 Mechanical Layer 8=32896 Mechanical Layer 9=16711935 Mechanical Layer 10=8388736 Mechanical Layer 11=32768 Mechanical Layer 12=32896 Mechanical Layer 13=16711935 Mechanical Layer 14=8388736 Mechanical Layer 15=32768 Mechanical Layer 16=32896 Drill Drawing=2752767Multi Layer=12632256 Connect Layer=8421376 BackGround=0DRC Errors=65280Highlight Layer=16777215 Grid Color 1=6049101Grid Color 10=9473425Pad Hole Layer=15461320Via Hole Layer=11599871 LayerDrawingOrder0=74 LayerDrawingOrder1=33LayerDrawingOrder3=75 LayerDrawingOrder4=0 LayerDrawingOrder5=1 LayerDrawingOrder6=2 LayerDrawingOrder7=3 LayerDrawingOrder8=4 LayerDrawingOrder9=5 LayerDrawingOrder10=6 LayerDrawingOrder11=7 LayerDrawingOrder12=8 LayerDrawingOrder13=9 LayerDrawingOrder14=10 LayerDrawingOrder15=11 LayerDrawingOrder16=12 LayerDrawingOrder17=13 LayerDrawingOrder18=14 LayerDrawingOrder19=15 LayerDrawingOrder20=16 LayerDrawingOrder21=17 LayerDrawingOrder22=18 LayerDrawingOrder23=19 LayerDrawingOrder24=20 LayerDrawingOrder25=21 LayerDrawingOrder26=22 LayerDrawingOrder27=23 LayerDrawingOrder28=24 LayerDrawingOrder29=25 LayerDrawingOrder30=26 LayerDrawingOrder31=27 LayerDrawingOrder32=28 LayerDrawingOrder33=29 LayerDrawingOrder34=30 LayerDrawingOrder35=31 LayerDrawingOrder36=32 LayerDrawingOrder37=35 LayerDrawingOrder38=36 LayerDrawingOrder39=37 LayerDrawingOrder40=38 LayerDrawingOrder41=39 LayerDrawingOrder42=40 LayerDrawingOrder43=41 LayerDrawingOrder44=42 LayerDrawingOrder45=43LayerDrawingOrder47=45 LayerDrawingOrder48=46 LayerDrawingOrder49=47 LayerDrawingOrder50=48 LayerDrawingOrder51=49 LayerDrawingOrder52=50 LayerDrawingOrder53=51 LayerDrawingOrder54=52 LayerDrawingOrder55=53 LayerDrawingOrder56=54 LayerDrawingOrder57=55 LayerDrawingOrder58=56 LayerDrawingOrder59=57 LayerDrawingOrder60=58 LayerDrawingOrder61=59 LayerDrawingOrder62=60 LayerDrawingOrder63=61 LayerDrawingOrder64=62 LayerDrawingOrder65=63 LayerDrawingOrder66=64 LayerDrawingOrder67=65 LayerDrawingOrder68=66 LayerDrawingOrder69=67 LayerDrawingOrder70=68 LayerDrawingOrder71=69 LayerDrawingOrder72=70 LayerDrawingOrder73=71 LayerDrawingOrder74=72 LayerDrawingOrder75=73 LayerDrawingOrder76=79 LayerDrawingOrder77=76 LayerDrawingOrder78=76 LayerDrawingOrder79=76 LayerDrawingOrder80=76 LayerDrawingOrder81=76 LayerDrawingOrder82=76 Com1=0,0,0,0,0Com2=0,0,0,0,0Com3=0,0,0,0,0Com4=0,0,0,0,0 [ComponentTypeMap] Count=0 [CachedFiles]Count=2File0=D>MSACCESS:$RP>F:\Program Files\Design Explorer 99 SE\Library\ku$RN>WDFZ.ddb$OP>$ON>WDLJ.LIB$ID>20$A TTR>0$E>PCBLib$STF> File1=D>MSACCESS:$RP>F:\Program Files\Design Explorer 99 SE\Library\Pcb\Generic Footprints$RN>Advpcb.ddb$OP>$ON>PCB Footprints.lib$ID>-1$A TTR>0$E>PCBLIB$STF>ADVSCH99SE.INI[Change Library File List]Path=C:\Program Files\Design Explorer 99 SE\Library\Sch\Miscellaneous Devices.ddb Prompt=Change Library File ListSelFileType=All files(*.*)EditorName=AllCallBack=Sch:LibraryDocumentDescriptionSel File Type=All files(*.*)WholeProject=FalseTypeCount=2Count=1File0=C:\Program Files\Design Explorer 99 SE\Library\Sch\Miscellaneous Devices.ddb。
win7与protel99不兼容问题,添加元件库

win7与protel99不兼容问题,添加元件库经常会遇到元件库添加不进去:因为win7与protel99不兼容.教你如何添加元件库.方案一:1.找到需要添加元件库的名称,如0p07在sim.ddb数据库OpAmp.lib中.在数据库中lib 文件夹中找到sch文件里的sim.ddb文件打开.2.打开后找到find点击打开,在*号中输入Group组随意一个原件,在点击find NOW3.在add to library list就会出现相对应的原件库,点击add to library list 然后关闭protel.4.重新打开自己设计的protel文件,你会发现sim.ddb中的OpAmp.lib已经在元件库里了.在找到自己想要的原件OP07就ok了.方案二:这个是网络上找的..1。
在XP系统下进入C\\WINDOWS下找到ADVPCB99SE.INI和ADVSCH99SE.INI 两个文件;2。
将这两个文件复制下来放到U盘;3。
在WIN 7系统下进入C\\WINDOWS,将U盘的这两个文件复制过来(一定要关闭PROTEL99SE先);替换掉原来的两个文件;以上是Protel99se全为默认路径安装的,XP系统下元件库装在哪个地方7系统下也在装在哪个地方。
如果不是在XP下换到在7系统中的路径下,重新加载元件库。
重复以上步骤。
注意问题:1,元件库只能加载5个(这个是我试的数量)。
元件库中有多少个元件不管。
2,默认的元件库如果不见了。
到XP系统下进入C\\WINDOWS下找到ADVPCB99SE.INI打开找到以下语句(默认路径):File0=D>MSACCESS:$RP>c:\\Program Files\\Design Explorer 99 SE\\Library\\Pcb\\GenericFootprints$RN>Advpcb.ddb$OP>$ON>Footprints.lib$ID>-1$ATTR>0$E>PCBLIB$STF> 将这段复制到U盘转到7系统下,打开C\\WINDOWS\\ADVPCB99SE.INI 替换掉FILE0这行(但是会代替掉原来的元件库的,这个也很好解决。
protel99se 加载元件库时会出现File is not recogniazed的方便的解决方案

微软的win7系统和protel99se是不兼容的,加载元件库时会出现’File is not recogniazed,而无法加载,为了解决这一问题,网上有两方案,一是在已打开库中加元件,二是改初始化文件(ini),用后觉得有点不太方便。
所以试着找更方便的办法,一次偶然的操作发现了一个较方便的方法,现与大家分享,
我是找到了另一不同的途径来加载元件库的方法。
步骤:
1.点出find 出现“find Schemiatic Component”对话框
2.选择Scope选项中选”Specified Path”
3.点击Find Now按钮,这时会在Found Libraries框中出现很多库名。
选中你想要的。
4.点击“Add to Library List”,你会发现你想要的库就出现在Browse中,
是不是很简单。
不知道到你的电脑上能不能实现,如果能请赞一个!哈哈!
几年来有问题总想到上网找答案,并总能找到很多有用的文章。
写此短文如果对大家有帮助,就作为我对在网上提供好文章的发烧友的感谢。
win7系统_protel_se_99破解方法

protel99se在vista和windows7下sch库和pcb库均不能加载,很郁闷。
在网上问了一下,发现这是个比较普遍的问题,也有许多高手给出解决方案:Y7ZP-5QQG-ZWSF-K858方案一:1.进入C\WINDOWS下找到ADVPCB99SE.INI和ADVSCH99SE.INI两个文件;2.用写字板打开ADVSCH99SE.INI文件,在[Change Library File List]下找到File0,大家可以发现,等号后面的的内容就是默认已经添加的库,如果要添加多个怎么办呢?简单,在File0后面添File1,File2..依次类推,但注意最后修改File0上面的Count属性,如果你添了两个,就把它的值改为2。
我用的是windows7系统,我如下改可行:TypeCount=2Count=5File0=C:\Program Files\Design Explorer 99 SE\Library\Sch\Miscellaneous Devices.ddbFile1=C:\Program Files\Design Explorer 99 SE\Library\Sch\Protel DOS Schematic Libraries.ddbFile2=C:\Program Files\Design Explorer 99 SE\Library\Sch\Intel Databooks.ddbFile3=C:\Program Files\Design Explorer 99 SE\Examples\Backup of AT89C2051.LibFile4=C:\Program Files\Design Explorer 99 SE\Examples\Backup of SHUMAGUAN.Lib其中File3和File4是我自己画的两个元件。
3.同样对ADVPCB99SE.INI更改以配置PCB库。
解决win7下protel 99se 添加库时出现 file is not recognized 错误

解决win7下protel 99se 添加库时出现file is not recognized 错误因为在Protel 99 SE安装的过程中会在系统盘下加载一些文件。
也就是X:\Windows 下添加了ADVPCB99SE.INI和AdvSch99SE.INI这二个文件。
而在我们远行Protel 99 SE时添加元件库的时候也会在其下进行修改保存(X代表系统盘,因自己的电脑上的系统是安装在什么盘来定。
比如在C盘,则为C:\Windows)。
以下解决方法要在关闭Protel 99 SE的情况下操作。
否则无效双击ADVPCB99SE.INI 和AdvSch99SE.INI 打开:ADVPCB99SE.INI :在打开的文档中找到Count=1 而在其后会发现紧跟着File0=D>MSACCESS: $RP>D:\Program Files\Design Explorer 99 SE\Library\Pcb\Generic Footprints$RN>A dvpcb.ddb$OP>$ON>PCB Footprints.lib$ID>-1$ATTR>0$E>PCBLIB$STF> 一串代码。
而这个PCB封装库也就是软件中默认添加的。
所以我们只要在其后面按照其格式机上自己的P CB封装库就可以了。
比如:要添加的PCB封装库为Miscellaneous.ddb则只要在刚刚那串代码后添加上File1=D>MSACCESS:$RP>D:\Program Files\Design Explorer 99 SE\Library\P cb\Generic Footprints$RNMiscellaneous.ddb$OP>$ON>Miscellaneous.lib$ID>-1$ATT R>0$E>PCBLIB$STF> 即可。
- 1、下载文档前请自行甄别文档内容的完整性,平台不提供额外的编辑、内容补充、找答案等附加服务。
- 2、"仅部分预览"的文档,不可在线预览部分如存在完整性等问题,可反馈申请退款(可完整预览的文档不适用该条件!)。
- 3、如文档侵犯您的权益,请联系客服反馈,我们会尽快为您处理(人工客服工作时间:9:00-18:30)。
Windows7与Protel99SE兼容问题的解决
的推出,在视觉上给我们带来了巨大的冲击,在功能上也无疑比比Widows7的推出,在视觉上给我们带来了巨大的冲击,在功能上也无疑Windows XP更为强大。
大部分PC用户都从Windows XP换到了Windows7,但是一些通过手动修改兼容属性也不能兼容的软件,使得一部分用户在不甘心的。
这部分用户就包含了从事电子专业的学生,同时也不得不换回了Windows XP XP。
这部分用户就包含了从事电子专业的学生,
虽然Protel99SE在Windows 一部分学习电子专业的人将会用到Protel99SE,
99SE,虽然
上能够运行,但是不能够添加元件库这个问题,一直困扰着大家。
本人通过在网络上多方面搜索,终于找到了网友提供的解决方法,经过本人实践验证,此方法能够解决元件库的添加问题,但是本人实践验证时发现此方法不够完善,
以下第一部分为转载网友提供的解决方法。
特此将完整的解决方法共享给大家
特此将完整的解决方法共享给大家。
以下第一部分为转载网友提供的解决方法第二部分为本人补充解决方法。
第一部分
从提示上看是:file is not recognizde(文件没有通过验证)。
为什么文件没有通过验证?难道说是因为软件盗版的问题,但是如果是这样,那样为什么我们能在winXP系统下能添加元件库?在比较了Windows XP系统下的Protel99SE后,发现了问题的所在。
因为在Protel99SE安装的过程中会在系统盘下加载一些文件。
也就是X:\Windows下添加了ADVPCB99SE.INI和AdvSch99SE.INI这两个文件。
而在我们远行Protel99SE时添加元件库的时候也会在其下进行修改保存(X代表系统盘,因自己的电脑上的系统是安装在什么盘来定。
比如在C盘,则为C:\Windows)。
以下解决方法要在关闭Protel99SE的情况下操作。
否则无效。
鼠标双击AdvSch99SE.INI打开AdvSch99SE.INI:
如上图所示,在打开的文档中找到Count=1而在其后会发现紧跟着
File0=C:\Program Files\Design Explorer99SE\Library\Sch\Miscellaneous Devices.ddb一串代码。
而这个PCB封装库也就是软件中默认添加的。
所以我们只要在其后面按照其格式机上自己的PCB封装库就可以了。
比如:要添加的PCB封装库为Miscellaneous.ddb则只要在刚刚那串代码后添加上
File1=C:\Program Files\Design Explorer99SE\Library\Sch\Protel DOS Schematic Libraries.ddb即可。
如果还要有添加则File2=下去。
而且要记得还要修改Count=的值。
即:如果是加到File2,则Count=3。
关闭保存。
不能保存请参考本文第二部分。
(在添加PCB封装库的时候需要知道的是该封装库中的LIB文件的名字,不然就不能添加。
查看封装库中的LIB文件名,只需双击那封装库打开就可以
看其中的LIB文件名了)
修改前:
修改后:
在Protel99SE下则有了刚刚添加进来的封装库了。
PCB的封装库的添加方法与SCH元件库的添加方法一样。
鼠标双击ADVPCB99SE.INI打开ADVPCB99SE.INI:
如上图所示,在打开的文档中找到Count=1而在其后会发现紧跟着
File0=D>MSACCESS:$RP>C:\Program Files\Design Explorer99
SE\Library\Pcb\Generic Footprints$RN>Advpcb.ddb$OP>$ON>PCB Footprints.lib$ID>-1$ATTR>0$E>PCBLIB$STF>一串代码。
而这个PCB封装库也就是软件中默认添加的。
所以我们只要在其后面按照其格式机上自己的PCB 封装库就可以了。
比如:要添加的PCB封装库为Miscellaneous.ddb则只要在刚刚那串代码后添加上File1=D>MSACCESS:$RP>C:\Program Files\Design Explorer99SE\Library\Pcb\Generic
Footprints$RN>Miscellaneous.ddb$OP>$ON>Miscellaneous.lib$ID>-1$ATTR> 0$E>PCBLIB$STF>即可。
如果还要有添加则File2=下去。
而且要记得还要修改Count=的值。
即:如果是加到File2,则Count=3。
关闭保存。
不能保存请参考本文第二部分。
(在添加PCB封装库的时候需要知道的是该封装库中的LIB文件的名字,不然就不能添加。
查看封装库中的LIB文件名,只需双击那封装库打开就可以看其中的LIB文件名了)
修改前:
在Protel99SE下则有了刚刚添加进来的封装库了。
当我们修改了ADVPCB99SE和AdvSch99SE中的内容时,保存时会弹出现另存为对话框,单击保存按钮进行保存时,会弹出拒绝访问对话框,这是因为,当前操作的文件为系统文件,当前用户的权限不够高所造成的,接下来的操作将解决该问题。
1.首先在C:\Windows\文件夹下找到ADVPCB99SE和AdvSch99SE两个文件。
2.鼠标单击选中ADVPCB99SE文件,右击ADVPCB99SE文件,在弹出来的快捷菜单中单击“属性”。
3.在弹出来的属性对话框中,单击选择安全选项卡。
4.鼠标单击高级按钮
5.在弹出来的对话框中选择“权限”选项卡下面的Users(*******\Users)项。
注意:*******根据电脑用户名不同而不同。
6.鼠标单击“更改权限”按钮。
7.在随后弹出的对话框中,仍然选择“权限”选项卡下面的Users(*******\Users)项。
注意:*******根据电脑用户名不同而不同。
然后单击编辑按钮。
8.在弹出的对话框中,将“权限”栏下面的“完全控制”项的“允许”选择框勾上。
然后单击“确定”按钮。
9.9.AdvSch99S AdvSch99S AdvSch99SE E 文件的权限修改方法和上述的ADVPCB99S ADVPCB99SE
E 文件的权限修改方法一样,这里不在重复介绍。
用户只需按上述的ADVPCB99SE 文件的权限修改方法修改就可以了。
10.注意添加完所需要的元件库后,最好将文件修改为默认属性,以免引起其他故障。
具体操作如下:
11.在C:\Window C:\Windows s 目录下找到AdvSch99SE.IN AdvSch99SE.INI I 和ADVPCB99SE.IN ADVPCB99SE.INI I 这两个文件个文件,
,鼠标单击选中ADVPCB99SE 文件,右击ADVPCB99SE 文件,在弹出来的快捷菜单中单击“属性”。
12.在弹出来的属性对话框中,单击选择安全选项卡。
13.鼠标单击高级按钮
14.在弹出来的对话框中选择“权限”选项卡下面的Users(*******\Users)权限为完全控制的那项。
注意:*******根据电脑用户名不同而不同。
15.鼠标单击“更改权限”
16.在弹出来的对话框中仍然选中“权限”选项卡下面的Users(*******\Users)权限为完全控制的那项。
注意:*******根据电脑用户名不同而不同。
然后单击删除按钮。
17.单击“应用”按钮,再单击确定按钮。
18.
18.A A dvSch99SE文件的权限恢复方法和上述的ADVPCB99SE文件的权限恢复方法一样,这里不在重复介绍。
用户只需按上述的ADVPCB99SE文件的权限恢复方法操作就可以了。