
M501H Introduction
Trial Operation Results of Steam Cooled M501H Type Gas TurbineThe “H” series gas turbine is a high efficiency and high power output gas turbine. The total thermal efficiency is about 2% higher and the output power is about 10% greater than that of a G series gas turbine. The reason the “H”series gas turbine can achieve a higher efficiency and a larger output is that its high temperature turbine first-and second-stage vane/blade are cooled by steam supplied from the bottoming cycle, instead of conventionally used air. Accordingly, the amount of bleed air from the compressor can be reduced. In 1999, the first trial operation of the “H” series gas turbine was conducted in the in-house verification power generation facility installed at the Takasago Machinery Works of Mitsubishi Heavy Industries, Ltd. (MHI). A second trial operation run was subsequent completed successfully at the same facility in 2001. Consequently, MHI has completed development of this new gas turbine using the prototype of the “H” series gas turbine. This paper reports on the development of the “H” series gasturbine.Keizo Tsukagoshi Atsushi MaekawaEisaku ItoYoshinori HyakutakeYutaka Kawata1. IntroductionMHI developed the 1150o C class large capacity gas turbine engines known as the M701D in 1981 and verified their high plant total thermal efficiency, re-liability, and capability to protect against pollution at the No.3 Higashi Niigata Thermal Power station of the Tohoku Electric Power Company. In 1985, MHI started development of the 1350o C class “F” series gas turbine (M501F/M701F). Actual shop load tests were conducted on the first gas turbine of this series in 1989. Afterwards, MHI began development of the 1500o C class “G” series gas turbine in 1993. Trial operation tests of the M501G gas turbine for the 60Hz market were begun in February 1997 at the gas tur-bine combined cycle verification plant (hereafter referred to as the “T” point) installed at the Takasago Machinery Works. Long-term verification operational tests started in June 1997 at the same plant. On the other hand, commercial operation began on the M701G gas turbine for the 50Hz market at the Tohoku Electric Power Company’s No.4 Higashi Niigata Ther-mal Power station in July 1999.These “D”, “F”, and “G” series large capacity, high efficiency gas turbines are the engines aimed at in-creasing plant output and improving plant efficiency by increasing the turbine inlet temperature, while maintaining the reliability of the equipment. On the basis of the extensive experience obtained through the development of these gas turbines, the “H” series gas turbine has been developed in order to increase the turbine capacity and efficiency even further.An overview of the first trial operation in the de-velopment of the “H” series gas turbine engine has already been reported on the January 2000 issue of the Mitsubishi Juko Giho Vol.37 No.1. Consequently,this report is intended to focus on an outline of the second trial operation (performed in 2001) in which the gas turbine reached the rated load, and the sound-ness and the reliability of the system were verified.2. Outline of “H” series gas turbine2.1 Schedule of developmentThe schedule of development of the “H” series gasturbine is shown in T T abl ablee 1. Work on the developmentdesign was begun in 1996, and the first trial opera-tion was performed at “T” point in February 1999. The component tests were repeated at that time in order to verify the performance of individual components.After that, further improvements to the design were added. This was followed by a second trial operation that was carried out from December 2000 through March 2001. Completion of these tests saw develop-ment work using the prototype finally coming to a close.2.2 Feature of “H” series gas turbineThe turbine inlet temperature of the “H” series gas turbine is 2732o F (1500o C), equivalent to that of a “G” series engine. However, the “H” series turbine has one significant characteristic that distinguishes it from its earlier cousin. This is the adoption of steam-cooled vane/blade instead of the air-cooled vane/blade that are used in the G series gas turbines and the earlier models. In other words, a steam cooling sys-tem has been adopted for the first- and second-stagevane/blade in the “H” series gas turbine. Fig Fig Fig..1 shows the schematic flow diagram of the “T” point used in the trail operations. The high-pressure turbine out-let steam is sent to the H series gas turbine to cool them. The steam used to cool the vane and blade is then recovered and returned to the intermediate pres-sure steam turbine inlet.The main advantages of the “H” series gas turbine can be summarized as follows.(1) It is possible to increase the inlet temperature in the first stage blade, because the reduction in gas temperature before and after cooling of the turbine first stage vane achieves about half that compared with that in air cooling.(2) Heat loss due to mixing with cooling air can be reduced. Also, vane/blade cooling steam supplied from the bottoming cycle is recovered to the bot-toming cycle again after exchanging heat at the turbine airfoils, that is, energy is recovered, so that combined cycle thermal efficiency can be increased further.As the amount of combustion gas increases in cor-responding proportion to the decrease in the amount of cooling air, the work that can be done by the tur-bine increases, that is, gas turbine output increases.As a result, the “H” series gas turbine achieves a high efficiency and a high power output. Specifically, the total thermal efficiency is about 2% higher and the output power is about 10% higher than those of a “G”series gas turbine of the same basic construction.The main features of the “H” series gas turbine are summarized below.(1) Steam for cooling the blades is supplied from the turbine side shaft end to the interior of the rotor and recovered from the same shaft end. In order toprevent shaft vibration due to its asymmetrical thermal deformation, the steam passages are ar-ranged symmetrically inside the shaft and an advanced sealing mechanism is applied so that the asymmetrical thermal deformation due to uneven temperature distribution inside the rotor is re-duced as much as possible.(2) There was concern that the metal temperature would rise due to high temperature steam flowing through the interior of the hollowed shaft in the turbine side. In the disassembling inspection af-ter the second trial operation, however, it was confirmed that there was no irregularity in the white metal of the journal bearings.(3) Because the amount of cooling air for the turbine vane/blade is remarkably reduced compared with that in conventional air-cooled gas turbines, the turbine outlet gas temperature is higher at the same pressure ratio. Accordingly, the pressure ra-tio in the “H” series gas turbine is increased from 20 in the “G” series gas turbines up to 25 in the “H” series in order to keep the turbine outlet gas temperature at the same level as in conventional turbines. A new high efficiency compressor has been developed for the compression system. The compressor utilizes three-dimensional skewed vanes, which are designed using the three-dimen-sional Navier-Stokes flow analysis code. The compressor is a newly developed higher efficiency compressor with the stages reduced by making the chord wider and the aspect ratio lower than those in conventional compressors. In the front stage,MCA (Multiple Circular Arc) blades are adopted in order to restrict the generation of shock waves at the transonic range. CDA (Controlled Diffusion Air-foil) blades are adopted in the middle and rear stages so as to control the boundary layer flow. AAmb. temp Gas turbine output Steam turbine output Plant output Heat exhaust Fuel : 15o C: 225MW : 105MW: 330MW (Approved output): 0 (Air cooled condensor): LNGprior thorough performance verification has been carried out in order to adopt the new type compres-sor, with a 0.29 size prototype compressor used.(4) A steam-cooled low NOx combustor, which has al-ready been used for the 1500o C class “G” series gas turbine, is adopted as well for the “H” series. This type of combustor has been in commercial opera-tion at the “T” point since 1997.(5) A four-stage axial flow type has been developed for the “H” series gas turbine using the latest three-dimensional design system. The first and second stages are steam-cooled, the third stage is air-cooled, and the forth stage is not cooled. Using the three-dimensional Navier-Stokes flow analysis code, design and analysis have been carried out in order to minimize any profile loss. Furthermore,multi-cascade analysis has carried out in order to optimize the matching of the velocity triangle at each stage, and unsteady flow analysis has been performed to evaluate the excitation force acting on the blades.(6) The turbine airfoils are made of materials (MGA2400 for the vanes and MGA1400 for the blades) developed by MHI. The first stage blades and vanes are directly solidified airfoils.(7) The turbine disk is made of 10% Cr steel (MGA10)developed by MHI. This material is superior in high temperature strength compared with conventional materials and permits the temperature of steam recovered from the blades to be set at a higher level.(8) The technology for sealing high-temperature and high-pressure steam is one of the important tech-nologies for steam cooling. As a result, many component tests and verification tests have been intensively repeated from the initial stages of de-velopment. In the high-temperature high-pressure zones, the sealing parts deteriorate in their level of performance due to thermal deformation and wear. Therefore, an optimum sealing design aimed at addressing this problem has been newly devel-oped for the “H” series. Steam leakage affects the plant total thermal efficiency and operational ca-pability of the plant, so that minimizing such leakage is very important.(9) Vane-cooling steam is distributed evenly to each vane through a manifold (passage) provided inside the turbine blade ring supporting the vanes. Pro-viding the steam passage inside the blade ring enables the steam temperature to control the tip clearance of the turbine blade, because the steam temperature influences the metal temperature of the blade ring.3. Second trial operation of “H” series gas turbine3.1 Outline of trial operationThe second trial operation of the M501H gas tur-bine was conducted at the gas turbine combined cycle verification plant (“T” point) installed at the TakasagoMachinery Works, MHI (Fig Fig Fig..2).This plant, which had usually been operated for verifying the long-term reliability of the M501G gas turbine, was modified temporarily for the trial opera-tion of the M501H gas turbine.3.2 Results of trial operationIn the second trial operation, special measure-ments of more than 2000 points were made in order to verify the performance, combustion, mechanical properties, and reliability of the gas turbine. Ther-m o d y n a m i c f u n c t i o n s w e r e i n c l u d e d i n t h e s e measurements. For instance, the steam temperature,pressure, and flow rate at the turbine outlet are im-portant parameters for the cooling system of the gas turbine because they influence the condition of the gas turbine-cooling steam. The steam-cooled combus-tor and the turbine vane/blade play the same role as the reheater of the HRSG in the plant system. Ac-cordingly, the steam temperature and pressure after cooling are inlet steam conditions of the intermedi-ate-pressure steam turbine. Hence, they are used as parameters for deciding the operation condition and reliability of the steam turbine. As described above,for a combined cycle power generation plant using a steam-cooled gas turbine, it is very important to moni-tor and control the thermodynamic functions of the plant system.The second trial operation was conducted from December 2000 through March 2001. During this trial operation, the warming test, start-up test, no-load rated speed operation, cooling steam-switching test,and parallel load change test for the steam-cooledFig. 2 Gas turbine combined cycle verification plant ("T" point) at Takasago Machinery WorksThe trial operation of the "H" series gas turbine was conducted at this plant.parts were conducted. A long-term heat run was then successfully conducted at an operation of 225 MW in the gas turbine and 105 MW in the steam turbine, or 330 MW in total, which is the approved output of the “T” point. After the heat run, load rejection tests were successfully carried out, so that the dynamic charac-t e r i s t i c d a t a o f t h e p l a n t w e r e o b t a i n e d. N o irregularities were observed in the transient charac-teristics. The following are the principal results obtained from the second trial operation.(1) Steam leakageThe amount of steam leakage was significantly reduced, compared with that in the first trial op-eration, by improving the steam sealing design of each part. The amount of reduced leakage was confirmed to be at a level capable of being com-mercialized safely (Fig. 3Fig. 3Fig. 3).(2) Component efficiencies of compressor and turbinesIn order that the M501H gas turbine can achieve the total thermal efficiency, the individual element efficiencies of the compressor and the turbines must achieve their targets, respectively. According to the measurements in each IGV opening angle,the efficiency of the compressor was confirmed to achieve the predicted performance in any opening angle. The reliability was verified by measuring the surge margin, suction flow rate, stage load,total pressure and total temperature distributions in the radial and circumferential directions of the representative stage, as well as vibration and pres-sure fluctuations in the front stage at a rotatingstall (Figs Figs Figs..4 and 55).The point where the turbine efficiency rises sud-denly at a constant turbine inlet temperature shows a change caused by operating the Inlet guide vanes (IGV) at the compressor inlet. Results of measurements of the pressure and temperature for each stage also verified that the turbine perfor-mance as well as the gas turbine outlet gastemperature was as estimated (Fig Fig Fig..6).(3) Metal temperature of steam-cooled turbine vane/bladeSpecial measurements were made of over 400points for the steam-cooled turbine vane/blade. The measurements were found to conform with the es-t i m a t e d v a l u e s ; t h e r e f o r e , h i g h v a n e /b l a d e reliability as well as high estimating accuracy was verified. In addition, the thermal stress distribu-tion calculated from the metal temperatures of the cooled airfoils showed the cooled airfoils to havethe fatigue lives planned (Figs Figs Figs..7 7 and 8 8 8).(4) Other itemsAccording to the measured metal temperature of the turbine side journal bearing, the bearing metal was sufficiently cooled during the long-term heat run, that is, no problem was observed.A detailed analysis of the shaft vibration data showed the second trial operation to be just asGT load (%)T o t a l a m o u n t o f s t e a m l e a k a g eFig. 3 Relation between load and steam leakage inthe second trial operationFig. 4 Relation between compression ratio and com-pressor efficiency in the second trial operationT u r b i n e e f f i c i e n c yFig. 5 Relation between turbine inlet temperature andturbine efficiency in the second trial operationTurbine inlet temperatureG T e x h a u s t g a s t e m p e r a t u r eFig. 6 Relation between gas turbine inlet temperature and outlet temperature in the second trial operationsufficiently stable as the first trial operation.4. ConclusionThe “H” series gas turbines are characterized by turbine vane/blade cooled by steam supplied from the bottoming cycle, an approach that differs from con-ventional gas turbines. As a result, both the plant total thermal efficiency and the output are remark-ably improved compared with the “G” series. The construction of the newly developed gas turbine fol-lows a reliable construction proven by conventional gas turbines. However, the performance of new com-ponent technologies were verified through many component tests conducted prior to application. As a result, the gas turbine was designed and manufac-tured in a period as short as thirty months from the start of development. Further, the first trial opera-tion could achieve a plant output of 220 MW, that is,the first step verification was successfully completed.On the basis of the results of the first trial operation,the steam sealing system and other aspects of the gas turbine were improved. Component tests and prior verification tests were carried out for six months af-ter the first trial operation. A heat run was finally conducted during the second trial operation at a to-tal output of 330 MW, the approved output for the “T”point.Through these two trial operations, the stable op-eration of the steam-cooled rotor and the cooling characteristics of the steam-cooled vanes and blades were verified. Also, the amount of leakage of cooling steam and the elemental efficiencies of the compres-sor and turbines achieved their respective target values. Thus, the “H” series gas turbines were veri-fied to achieve the plant total thermal efficiencyexceeding that of conventional gas turbines.Since LNG-fired combined cycle power generation plants have low emissions, world attention has focused on these systems as a key for helping to protect against global warming, with the result that they are rapidly spreading in America and Europe. Under such condi-tions, “H” series gas turbines that can achieve even greater efficiencies can be expected to spread as a lead-ing machine for helping to prevent global warming, and MHI expects them to be able to contribute to solving global environmental problems more in the future.References(1) Umemura et al., Development and Operationg Status of“1500o C Class” Gas Turbine(2) Maekawa et al., Development of H Series Gas Turbine &Aero-engine Congress & Exhibition (2001) New Oreans, USA (3) Tsukagashi et al., The Latest Large-Capacity High-Effi-ciency Gas Turbine, GTSJ,2002-1Turbine inlet temperatureM e t a l t e m p e r a t u r eFig. 7 Relation between turbine inlet temperature and turbine first stage vane metal temperature in the second trial operationTurbine inlet temperatureFig. 8 Relation between turbine inlet temperature and turbine first stage blade metal temperature in the second trial operationKeizoTsukagoshi Power Systems HeadquartersAtsushi Maekawa TakasagoMachinery WorksEisaku Ito Takasago Research &DevelopmentCenter, Technical Headquarters Yoshinori Hyakutake TakasagoMachinery WorksYutaka Kawata Takasago Research &DevelopmentCenter, Technical Headquarters。
Intel工业级主板M50说明书

Chapter One Products IntroductionBrief IntroductionJ1900MT based on Intel® Bay Trail architecture ,supports DDRⅢ(L)1333/1066MHz memory,single memory slot supports max.8GB,integrates Intel® HD Graphics,supports VGA\HDMI\LVDS display output ,achieves independent dual display meantime ,with 1*RTL gigabit Ethernet, 1*MPCIE Slot, supports WIFI\3G module,1*2.5’ HDD space inboard.Order Info1,J1900MT-2C VER:1.5: Intel®J1900 Quad core 22nm processor 2.0GHz,supports VGA \ HDMI \ 24 bit dual channel LVDS display output,with 4*USB 2.0 and 3*USB 3.0 port, 2*COM port,supports 5V/12V charged .2,J1900MT-6C VER:1.5:Intel®J1900 Quad core 22nm processor 2.0GHz,supports VGA \ HDMI \ 24 bit dual channel LVDS display output,with 4*USB 2.0 and 3*USB 3.0 port, 6*COM port(COM1-2 support 5V\12 charged,COM3 supports RS422\485).3,J1900MT-NC VER:1.3: Intel®J1900 Quad core 22nm processor 2.0GHz,supports VGA \ HDMI \ 24 bit dual channel LVDS display output,with 4*USB 2.0 and 3*USB 3.0 port ( The following function are unavailable : LVDS ,GPIO,watchdog,PS/2 ,COM port ,LPT).SpecificationProcessorIntel® J1900 Quad core 22nm processor 2.0GHz,compatible with Intel®Bay Trail -I/M/D series CPU (optional)ChipsetIntel® Bay Trail SOC platform (CPU integrates chip)Memory1*SO DDRⅢmemory slot,supports DDRⅢ(L)1333/1066MHz memory,single memory slot supports max.8GB .DisplayIntegrated Intel® HD Graphics,with VGA /LVDS/ HDMI display output,LVDS support dual channel 24bit,Support independent display, double display copy, dual display expansion.Dial switch control LVDS resolution adjustment,(LVDS screen voltage support 12V output, the default is 3.3V,before using LVDS , please know the requirements of the rated working voltage first, then setting, to avoid burning the screen, Please refer to the JP10 jumper and SW1settings .).EthernetIntegrated 1*RTL8111E Ethernet,support wake-on -LAN / PXE .(2*RTL8111E Ethernet Optional ,LAN2 replace USB2.0)AudioALC662 6 channel audio controller,support MIC & Line-out ,Power amplifier ,Speaker (recommend to use 3Ω2W speaker).Expansion slot1*Mini-PCIE slot,support WIFI/3G module .Storage1*2.5’HDD Space inboard,1*7PIN SATA HDD Port(alternative to 2.5inch HDD, refer to SATA-SW1 jumper settings)1*MSATA slot,supports Intel agreement SSD.Rear I/O connector2* USB 3.0 port2* USB 2.0 port(alternative to LAN2)1* HDMI port1* VGA port1* RJ-45 port1* Line out(green)1* Mic (red)1* DC 12V~19V power input interfaceInternal I/O connector1* LVDS,support 24bit LCD (J1900MT-NC doesn’t support) 1* JVGA1header (with same signal to DB15) 12pin6* COM connector1* LPT 2*13pin (J1900MT-NC doesn’t support)2* USB 2.0 header1* USB 3.0 header (J1900MT-NC doesn’t support)1* PS/2 KB/MS 6Pin (J1900MT-NC doesn’t support)1* FP1Front panel buttons and LED indicator 2*5pin1* AUDIO front panel audio port1* amplifier connector 4pin1* PWROUT HDD connector1* ATX 4pin power connector1* 2pin DC power connector1* LVDS INVERTER (J1900MT-NC doesn’t support)GPIO4-Way Input/Output GPIO (J1900MT-NC doesn’t support)Cooling System1* CPUFAN and SYSFAN connector(support fanless )BIOS32MB SMT Flash ROMWatchdog timerSupport hardware reset function (L256, 0~255 seconds) , (J1900MT-NC doesn’t support)PowerDC_12V~19V Single Power InputDimension , EnvironmentMotherboard dimension: 170mm x 170mmOperating Temp.: -10℃~60℃Humidity:5%-95% ( relative humidity; non-condensing)No-operating Temp.: -20℃~70℃PictureChapter Two Hardware Installation Instructions DimensionTips1.Please select the appropriate screw and use the correct installation methods, otherwise you may damage the motherboard.2.How to identify the jumper,first pin interface,Text markers observed plug and socket side, will be represented by triangle symbol or the "1" or bold lines; have a look at the pad back, square pad is the first pin , when connecting line or device, pay attention to distinguish between the firstfoot, otherwise it will damage the motherboard.LVDS screen voltage can support 12V output, the default is 3.3V, when using LVDS , please know the working voltage first before the settings.Internal ConnectorDC2 COM1LPT1 USB2.0KBMS INVERTER LVDSJVGA1 AUDIOUSB 3.0 SW1 CPUFAN1PWROUT SATA1GPIOFP1TX-RXCOM COM3~6 COM2 4pin 电源接口SPKRMSATAMINIPE SIMSO DDR3Rear I /O portHDMIUSB 3.0 VGALine-outMICLAN1 USB 2.0 DC12V-INTips: 1.PWROUT hard drive power connector,1st pin for the +12V output, 4th pin for the +5V output. Must use the power line of the standard of our company, so as not to burn the hard disk. 2. How to identify the alarmsLong beep indicates that a system memory error occurs. Shorted beep indicates to power on the computer.Jumper SettingsJumper Interface SchematicJPW1JP10JP16JPW1JP9JP9JP15JBATSATA-SW1Before installing the hardware, please according to your needs to set the corresponding jumper based on the following information.Tip: How to identify the first pin of the jumpers and connectors: Observe the letter beside the socket; it would be marked with “1” or bold lines or triangular symbols; Observe the solder pad on the back; the square pad usually denotes the first pin. In the following definitions, Pins1 and2 Shorted (), weexpressed as 1-2; Pins 2 and 3 Shorted (), we expressed as 2-3, other andso on.1.CMOS clear/save settings JBAT (3pin)CMOS is powered by the button battery on board. Clearing CMOS will restoreoriginal settings (factory default). The steps are listed as follows: (1) Turn off the computer and unplug the power cable; (2) With the jumper cap JBAT pin 2-3 instantly Shorted circuit about 5 seconds, then put the jumper cap back to pin 1-2; (3) Turn on the computer; (4) Press Del to enter the CMOS settings at startup, load optimized defaults; (5) Save and exit. Please set as follows:2. Hardware Power_on Boot-strap Settings (JPW1)Support Hardware Power_on Boot-strap, closed in default.set as follows,3、LVDS settings ( JP9、JP10、SW1 )SettingsFunction1-2 Shorted Normal (Default)2-3 ShortedClear the contents of CMOS and all BIOS settings will restore to factory default values.SettingsHardware Power_on Boot-strap1-2 ShortedClosed2-3 ShortedOpenJBAT1 3JPW11 3Motherboard with 1*dual channel 24 bit LVDS interface, the dipswitch controls resolution settings .Different LCD screens have different voltages; The board provides 3.3V 、5V 、12V three screen working voltage options,5V and 12V screen back-light power supply voltage selection,Before using LVDS, please understand the rated working voltage of the requirements, only when the selected LCD voltage is in accord with the LCD screen operating voltage in use, can the LCD screen operate normally. Please set as follows :Use the SW3 drawing code switch to select its resolution according to the LVDS screen resolution, you can set according to the following information, SW1 pull code number is: 4 3 2 1.Settings Function (JP10)1-2 Shorted3.3V 3-4 Shorted 5V 7-8 Shorted12VSettingsFunction (JP9)1-2 Shorted 12V 2-3 Shorted5VScreen back-light power voltage settingsJP102 81 7JP91 3SW1dipswitchScreen operating voltage settings4、Serial port function settings (JP16、JP15)The motherboard can support up to 6*RS232 Com Port,the ninth pin of COM1/2 support 5V / 12V charged Function ,COM3 supports RS422/ 485 Function,Please set as follows :5、SATA Function Settings (SATA_SW1)Settings Function (JP16) 1-2 ShortedRS232 COM13-4 Shorted +5V 5-6 Shorted +12V 7-8 Shorted RS232 COM2 9-10 Shorted +5V 11-12 Shorted +12VSettings Function (JP15) 1-2 Shorted RS232 COM33-4 Shorted RS485 5-6 ShortedRS422JP16 Settings 1JP1621112JP15 Settings2 16 5JP15SATA_SW1 Settings 12 10 3 1 1-2\4-5\7-8\10-11 The default is SATA1 when shorted12 10 3 12-3\5-6\8-9\11-12The default is laptop HDD whenStorage Settings 1、SATA PortThe motherboard with one standard 7pin SATA connector and 1* 2.5inch laptop HDD space .Support the HDD inboard .Power Connector1、ATX 4pin power connector (Pitch :4.2mm )1*ATX 4pin power connector ,support input/output ,chose the output voltage based on the use of power .Pin Signal Name1 GND2 SATA_TXP 3SATA_TXN 4 GND 5 SATA_RXN 6SATA_RXP 7GNDPin Signal Name1 GND 2GND 3 +12V 4+12V7pin SATA interface definition SATA1ATX 4pin Power interface definitionATX 12V12、Fan Power Port (Pitch :2.54mm 4pin )Note :DET :Fan speed pulse output; PWM :Fan speed PWM control.3、PWROUT HDD Interface (Pitch :2.0mm 4pin )Tips: PWROUT hard drive power connector,1st pin for the +12V output, 4th pin for the +5V output.Please use the standard power cable of our company when using to avoid damage the hard disk . PinSignal Name1 GND2 +12V3 DET 4PWMPinSignal Name 1 +12V 2GND 3 GND 4+5VCPUFAN1interface definition PWROUT1 interface definitionPWROUT11 4CPUFAN11 4Audio PortThe front panel with MIC 、Line_out standard Audio hole , ,AUDIO2is by pin (Pitch :2.54mm ),1*amplifier interface ( Pitch :2.0mm )(recommend to use 3Ω2W speaker)USB PortWith external 1 set of standard double USB 2.0 interface and 1 set of USB 3.0 interface, provide internal1 set of 2x5Pin USB 2.0 connector and 1*2x9Pin USB 3.0 connector ,can support 4*USB2.0 port and 3*USB 3.0 port ,internal interfaces are defined as follows ,Pin Signal Name Pin Signal Name 1 MIC-L 2 GND 3 MIC-R4 DET5 Line out-R 6GND 7 Sense-A 8 NC 9Line OUT-L10GNDPin Signal Name1 R+2 R-3 L- 4L+2 1910 AUDIO2AUDIO2 interface definitionJSPKR4 1JSPKR1 interface definitionUSB2.0 interface definitionCOM PortThe motherboard with max. 6*RS232 serial port ,COM1\2 is 2*5pin connector (Pitch:2.54mm ),COM3_6 is 2*20pin connector (Pitch :2.0mm ).The ninth pin of COM1-2 support 5V / 12V charged , COM3 supports RS422 / 485 Function,the user can Chose the Com Port unction by making settings by jumper.Please refer to the JP15/ JP16 Settings details.Note :RS485/422 signal of COM3 which leads to the TX-RXCOMPin Signal Name Pin Signal Name 1 +5V 2 +5V 3 DATA- 4 DATA- 5 DATA+ 6 DATA+ 7 GND 8 GND10GNDPinS ignal Name Pin Signal Name 1 VCC 11 USB2+ 2RX1- 12 USB2- 3 RX1+ 13 NC 4 GND 14 NC 5 TX1- 15 NC 6 TX1+ 16 NC 7 GND 17 NC 8 USB1- 18 NC 9 USB1+ 19 NC 10NC20NCUSB2USB3.0 interface definition1 19 10 11USB3PinSignal Name PinSignal Name 1 DCD 2RXD3 TXD4 DTR5 GND6 DSR7 RTS8 CTS9 RICOM1COM1/2 interface definitionCOM2 COM3_6 2140 39COM3_6 interface definitionPin Signal Name Pin Signal Name 1 COM3_DCD 2 COM3_RXD 3 COM3_TXD 4 COM3_DTR5 GND6 COM3_DSR7 COM3_RTS 8 COM3_CTS9 COM3-RI 10 NC11 COM4_DCD 12 COM4_RXD 13 COM4_TXD 14 COM4_DTR 15 GND 16 COM4_DSR 17 COM4_RTS 18 COM4_CTS 19 COM4-RI 20 NC 21 COM5_DCD 22 COM5_RXD 23 COM5_TXD 24 COM5_DTR 25 GND 26 COM5_DSR 27 COM5_RTS 28 COM5_CTS 29 COM5-RI 30 NC 31 COM6_DCD 32 COM6_RXD33 COM6_TXD 34 COM6_DTR35 GND 36 COM6_DSR37 COM6_RTS 38 COM6_CTS39 COM6-RI 40 NCPin Signal Name PinSignal Name 1 GND 2 GND 3 TXD+ 4 TXD- 5 RXD+ 6 RXD- TX-RXCOM11 2 5 6 TX-RXCOM1 interface definitionParallel Port (LPT1)PS/2 KB/MS Connector (KBMS1)Support 1*PS/2 KB/MS header ,6pin (Pitch :2.0mm ).Pin Signal Name Pin Signal Name 1 STB 2 AFD- 3 PD0 4 ERR- 5 PD1 6 INIT- 7 PD2 8 SLIN- 9 PD3 10 GND 11 PD4 12 GND 13 PD5 14 GND 15 PD6 16 GND 17 PD7 18 GND 19 ACK 20 GND 21 BUSY 22 GND 23 PE 24 GND 25SLCT26NCKBMS1 interface definitionLPT1 interface definition 21LPT126 25Display PortThe motherboard with internal 1*JVGA connector (12pin),1* 2*15pin dual channel LVDS interface and LVDS back-light power connector ,JVGA use the same signal with DB15, can ’t use at the same time .1、DB15 VGA Connector2、JVGA1 Connector (Pitch:2.0mm )1*12pin VGA connector using the same signal with DB15,can ’t use at the same time .Pin Signal Name1 VCC 2KB_DT 3 KB_CK 4 MS_DT 5 MS_CK 6GNDPinSignal Name PinSignal Name 1 Red 2 Green 3 Blue 4 NC 5 GND 6 NC 7 GND 8 NC 9 NC 10 GND 11 NC 12DDCDATA 13 HSYNC 14 VSYNC 15 DDCCLK VGAVGA interface definitionKBMS1163、LVDS1 connector 30pin (Pitch :2.0mm )PinSignal Name Pin Signal Name1VCC2VSYNC3 HSYNC4 GND5 R6 GND7 G 8 GND9 B 10 GND 11 DDC_SD A 12DDC_S CL 1 12JVGA1 JVGA1 interface definition LVDS1 2 129 304、LVDS1 back-light control connectorPin Signal Name Pin Signal Name 1 LCDVDD 2 LCDVDD 3 LCDVDD 4 NC 5 GND 6 GND 7 LVDS_A0- 8LVDS_A0+ 9 LVDS_A1- 10 LVDS_A1+ 11 LVDS_A2- 12 LVDS_A2+ 13 GND 14 GND 15 LVDSA_CLK- 16 LVDSA_CLK+ 17 LVDS_A3- 18 LVDS_A3+ 19 LVDS_B0- 20 LVDS_B0+ 21 LVDS_B1- 22 LVDS_B1+ 23 LVDS_B2- 24 LVDS_B2+25 GND 26 GND27 LVDSB_CLK- 28 LVDSB_CLK+29 LVDS_B3- 30 LVDS_B3+Pin Signal Name 1 +12V 2 +12V 3 Back-light 4 BRIGHT 5 GND 6 GND LVDS1 interface definition INVERTER1interface definitionINVERTER 1 6Front Panel Interface(FP1)FPANEL1 can be used to be connected to the chassis ’s front panel function button and indicator as designed .(1) HDD Indicator (1,3pin HDD LED,the 1stpin is positive of LED) Hard disk during read and write operations, the indicating lamp will flicker, hard disk is running. (2) Power Indicator (2,4pin POWERLED, the 2ndpin is positive of LED) When the system is powered on, the power indicator light; When the system is powered down, the power light does not shine.(3) Reset button (5,7pin RESET BUTTON) System failure can not continue to work, can start working again by Reset.(4) POWER BUTTON (6,8pin POWER BUTTON) These two pins connected to bounce switch on the front panel can be used to connect or disconnect the power.PinSignal Name Pin Signal Name 1 HDDLED+ 2 PWRLED+ 3 HDDLED- 4 PWRLED- 5 GND 6 PWRBTN# 7 RESETBTN# 8 GND 9 NC FPANEL1 interface definition FPANEL1GPIO1 ConnectorPlease write the normal GPIO driver under the OS (Please refer to the Microsoft driver information for windows series,For Linux, UNIX , Please refer to the relevant Linux driver model), Use the GPIO driver to drive GPIO1 module, hereinafter referred to as the driver.GPIO1module is composed of 5 groups (10) pin (refer to the motherboard),The number 1,2,3,4,5,6,7,8 pin leads to Simple GPIO ,Number9 is VDD, Number 10 is VCC. Among them ,The singular numbers(1, 3, 5, 7) are for signal input pin, the Even numbers (2, 4, 6, 8) are for signal output pin :GPIO corresponds to the IO memory address ( operate by the driver only in OS):Pin Function Default Note 1 Input High 2 Output Low Decide by BIOS Settings 3 Input High 4 Output Low Decide by BIOS Settings 5 Input High 6 Output Low Decide by BIOS Settings 7 Input High 8 Output Low Decide by BIOS Settings 9 GND10 VCC2 10 1 9 GPIO1 GPIO FunctionMini-PCIE slot (MINIPE1、MSATA1)1*MINIPE1 slot (supports WIFI 、3G module ),1*MSATA1 slot, supports SSD , SSD transfer rate up to 3Gbps .Pin MemoryAddress BitRead and writeStatus Note 1 0xA05bit4 Read Only2 0xA05 bit6 Read and write3 0xA05 bit3 Read Only4 0xA05 bit7 Read and write 5 0xA01 bit3 Read Only6 0xA00 bit6 Read and write7 0xA02 bit7 Read Only8 0xA00bit4Read and write9 GND 10VCCMSATA1 slotMINIPE1 slot。
1150 型号说明书

Thermo Fisher Scientific Air Quality Instruments 27 Forge Parkway Franklin, MA 02038 1-508-520-0430 /aqi
WEEE iance
This product is required to comply with the European Union’s Waste Electrical & Electronic Equipment (WEEE) Directive 2002/96/EC. It is marked with the following symbol:
50 和 500 L HyPerforma DynaDrive 一次性生物反应器开箱指南说明书
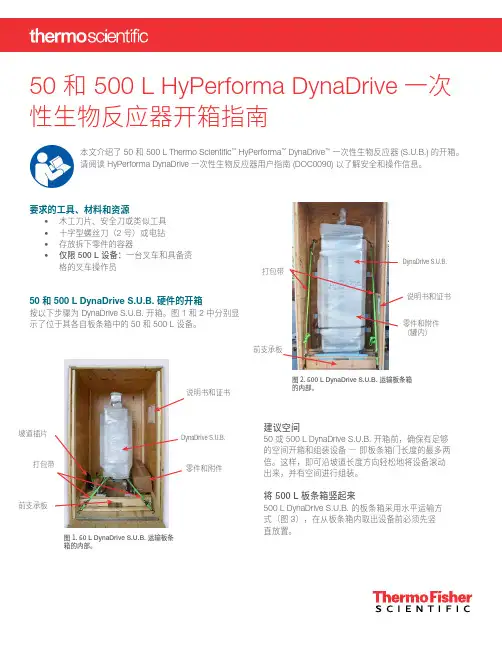
建议空间50 或 500 L DynaDrive S.U.B. 开箱前,确保有足够的空间开箱和组装设备 — 即板条箱门长度的最多两倍。
这样,即可沿坡道长度方向轻松地将设备滚动出来,并有空间进行组装。
将 500 L 板条箱竖起来500 L DynaDrive S.U.B. 的板条箱采用水平运输方式(图 3),在从板条箱内取出设备前必须先竖直放置。
要求的工具、材料和资源• 木工刀片、安全刀或类似工具• 十字型螺丝刀(2 号)或电钻• 存放拆下零件的容器•仅限 500 L 设备:一台叉车和具备资格的叉车操作员50 和 500 L DynaDrive S.U.B. 硬件的开箱按以下步骤为 DynaDrive S.U.B. 开箱。
图 1 和 2 中分别显示了位于其各自板条箱中的 50 和 500 L 设备。
50 和 500 L HyPerforma DynaDrive 一次性生物反应器开箱指南本文介绍了 50 和 500 L Thermo Scientific ™ HyPerforma ™ DynaDrive ™ 一次性生物反应器 (S.U.B.) 的开箱。
请阅读 HyPerforma DynaDrive 一次性生物反应器用户指南 (DOC0090) 以了解安全和操作信息。
坡道插片说明书和证书零件和附件前支承板图 1. 50 L DynaDrive S.U.B. 运输板条箱的内部。
打包带DynaDrive S.U.B.说明书和证书零件和附件(罐内)图 2. 500 L DynaDrive S.U.B. 运输板条箱的内部。
注:• 仅从标记为叉车装卸的一侧提升板条箱以进行运输。
• 确保叉车的货叉足够长,可在提升板条箱前支持板条箱的载荷中心。
• 叉车仅应由具备资格的操作员操作。
1. 将提升套件连接到板条箱顶部的环螺栓上(图 5)。
建议的提升套件包括一个 McMaster-Carr 带钩两腿吊货索网(零件编号 8864T821)、一个 2 x 2 in. 吊货索网(零件编号 3360T571)和一个带螺旋销的吊货索网钩环(零件编号 35505T3)。
罗克威尔自动化产品说明书

7
+REMOTE
SR
21
24
R1
A1
A2
BR
21
24
SMC
RC
A6
A7
E
A1 RED
A1
A2
A2 WHT
E
SMC
A9
A8
QC
P1
RC
13 RED 13
14 14 RED
SMC
A10
A11
QC L
F
QC
L
QC
8
R1
11
14
RC
SMC
21 RED 21
22 22 RED 6
7
NOTES:
ADD JUMPER FROM TERMINAL BLOCK
SMC-50 PORT 2
L1/1
T1/2
L2/3
T2/4
L3/5
T3/6
SMC
SMC POWER TERMINALS (SEE MANUAL)
6
7
A
+REMOTE MTR1
U1
V1 M
3 W1 PE GRD
B
SMC QC
C
1
L
SEPARATE CONTROL
4
QC
QC
LT
N
SMC C
2
HAND/OFF/AUTO
• PAR# 230 (Lower) 0000 0000 0000 0001
DPI PRESENT)
R1 11-14: SMC START COMMAND
SMC50 I/O device parameters (150-SM4):
NORSOK STANDARD M-501 表面处理和防护涂层(2004年发布,第五版,中文)
9.防火涂层喷涂---------------------------------------------------------------------------------13 9.1 总则--------------------------------------------------------------------------------------13 9.2 材料---------------------------------------------------------------------------------------13 9.3 施工---------------------------------------------------------------------------------------14 9.4 修补--------------------------------------------------------------------------------------14
Audio-Technica ATH-M50x 耳机说明书

Audio-T echnica U.S., Inc., 1221 Commerce Drive, Stow, Ohio 44224Audio-Technica Limited,Old Lane, Leeds LS11 8AG EnglandP52003 ©2007 Audio-T echnica U.S., Inc. Printed in TaiwanFrequency Respons eR e s p o n s e i n d B•Compact, lightweight stereo condenser microphone designed for any camcorder with an accessory shoe and stereo microphone input •Also suitable for a wide range of stereo applications, including field recording and studio use (with accessories available separately)•Offers the convenience of high-quality stereo pickup in a single microphone •Battery-free operation when used with recording devices that provide plug-in power at the mic input •Pair of cardioid condenser elements in X/Y configuration provides the spatial impact and realism of a live sound field •Professional condenser circuitry ensures excellent sound quality •On/off switch for convenient operation•Permanently attached 6"-12" coiled cable with right-angle molded 3.5 mm stereo mini-plug at output end •Includes camera-mount, windscreen, battery and protective pouchThe PRO 24-CM is a compact, lightweight stereo condenser microphone ideal for use with camcorders that are equipped with a 3.5 mm (1/8") stereo microphone input and an accessory shoe.The microphone is designed for either battery operation or for battery-free operation when used with camcorders (or other recording devices) that provide plug-in power (2-10volts DC) at the mic input.If used without plug-in power, install the battery before attempting use.If used with a recording device equipped for plug-in power, simply plug the microphone cable's stereo mini-plug directly into the recording device's microphone input.No battery is needed when the PRO 24-CM is used with plug-in power.T o mount the PRO 24-CM on your camcorder:1)Slide the microphone into the included camera-mount.2)Slide the camera-mount into your camcorder's accessory shoe.3)Tighten the mounting knob so the camera-mount is held securely in place.4)Connect the 3.5 mm stereo mini-plug to the MIC input on your camcorder.Battery installation:Unscrew the lower section of the microphone and slideit down to reveal the battery compartment.Insert the battery, being certain to observe polarity as indicated (+ end toward the front of the microphone).Close and secure the cover.Remove the battery during long-term storage.The PRO 24-CM is eq uipped with an ON/OFF switch for convenient operation.When you use the microphone, turn the power switch ON.Turn the switch OFF after use.Output for each stereo channel is low impedance (Lo-Z) unbalanced.The permanently attached 152.4 mm - 304.8 mm (6"-12") coiled cable features a right-angle molded 3.5 mm stereo mini-plug at the output end.Locating the PRO 24-CM nearer the sound source enhances the width of the stereo image, while decreasing room ambience.Conversely, as the mic position moves away from the sound source, a narrower left/right stereo image results, and more of the “room sound”is noted.Avoid leaving the microphone in the open sun or in areas where temperatures exceed 110°F (43°C) for extended periods.Extremely high humidity should also be avoided.PRO 24-CM SPECIFICATIONS †ELEMENTS Fixed-charge back platepermanently polarized condenser POLAR PATTERN X/Y Stereo FREQUENCY RESPONSE 100-17,000 HzOPEN CIRCUIT SENSITIVITY –50 dB (3.1 mV) re 1V at 1 Pa*IMPEDANCE600 ohmsMAXIMUM INPUT SOUND LEVEL 119 dB SPL, 1 kHz at 1%T.H.D.SIGNAL-TO-NOISE RATIO 157 dB, 1 kHz at 1 Pa*DYNAMIC RANGE (typical)82 dB, 1 kHz at Max SPL POWER REQUIREMENTS 2-10V DC plug-in power BATTERY TYPE1.5V LR44BATTERY CURRENT / LIFE 0.6 mA / 200 hours typical SWITCHOn/off WEIGHT 111 g (3.9 oz)DIMENSIONS116.5 mm (4.59") long,21.0 mm (0.83") maximum body diameterOUTPUT CONNECTOR 3.5 mm stereo mini-plug on cable CABLEPermanently attached 152.4 mm - 304.8 mm (6"-12") coiled cable with right-angle molded 3.5 mm stereo mini-plug at output endACCESSORIES FURNISHEDVideo-camera shoe mount;LR44 battery;windscreen;soft protective pouch†In the interest of standards development, A.T .U .S.offers full details on its test methods to other industry professionals on request.*1 Pascal = 10 dynes/cm = 10 microbars = 94 dB SPL T ypical, A-weighted, using Audio Precision System One.Specifications are subject to change without notice.PRO 24-CM STEREO CONDENSER MICROPHONE。
WISE-M501 多功能电源表 使用手册说明书
User ManualWISE-M501Multifunction Power MeterCopyrightThe documentation and the software included with this product are copyrighted 2016 by Advantech Co., Ltd. All rights are reserved. Advantech Co., Ltd. reserves the right to make improvements in the products described in this manual at any time without notice. No part of this manual may be reproduced, copied, translated or transmitted in any form or by any means without the prior written permission of Advantech Co., Ltd. Information provided in this manual is intended to be accurate and reliable. How-ever, Advantech Co., Ltd. assumes no responsibility for its use, nor for any infringe-ments of the rights of third parties, which may result from its use. AcknowledgementsIntel and Atom are trademarks of Intel Corporation.Microsoft Windows is registered trademark of Microsoft Corp.All other product names or trademarks are properties of their respective owners. Product Warranty (2 years)Advantech warrants to you, the original purchaser, that each of its products will be free from defects in materials and workmanship for two years from the date of pur-chase.This warranty does not apply to any products which have been repaired or altered by persons other than repair personnel authorized by Advantech, or which have been subject to misuse, abuse, accident or improper installation. Advantech assumes no liability under the terms of this warranty as a consequence of such events.Because of Advantech’s high quality-control standards and rigorous testing, most of our customers never need to use our repair service. If an Advantech product is defec-tive, it will be repaired or replaced at no charge during the warranty period. For out-of-warranty repairs, you will be billed according to the cost of replacement materials, service time and freight. Please consult your dealer for more details.If you think you have a defective product, follow these steps:1.Collect all the information about the problem encountered. (For example, CPUspeed, Advantech products used, other hardware and software used, etc.) Noteanything abnormal and list any onscreen messages you get when the problemoccurs.2.Call your dealer and describe the problem. Please have your manual, product,and any helpful information readily available.3.If your product is diagnosed as defective, obtain an RMA (return merchandizeauthorization) number from your dealer. This allows us to process your returnmore quickly.4.Carefully pack the defective product, a fully-completed Repair and ReplacementOrder Card and a photocopy proof of purchase date (such as your sales receipt)in a shippable container. A product returned without proof of the purchase dateis not eligible for warranty service.5.Write the RMA number visibly on the outside of the package and ship it prepaidto your dealer.Part No. Edition 1Printed in China June 2016WISE-M501 User Manual iiDeclaration of ConformityCEThis product has passed the CE test for environmental specifications when shielded cables are used for external wiring. We recommend the use of shielded cables. This kind of cable is available from Advantech. Please contact your local supplier for ordering information.CEThis product has passed the CE test for environmental specifications. Test conditions for passing included the equipment being operated within an industrial enclosure. In order to protect the product from being damaged by ESD (Electrostatic Discharge) and EMI leakage, we strongly recommend the use of CE-compliant industrial enclo-sure products.Technical Support and Assistance1.Visit the Advantech web site at where you can findthe latest information about the product.2.Contact your distributor, sales representative, or Advantech's customer servicecenter for technical support if you need additional assistance. Please have thefollowing information ready before you call:–Product name and serial number–Description of your peripheral attachments–Description of your software (operating system, version, application software, etc.)– A complete description of the problem–The exact wording of any error messagesiii WISE-M501 User ManualSafety Instructions1.Read these safety instructions carefully.2.Keep this User Manual for later reference.3.Disconnect this equipment from any AC outlet before cleaning. Use a dampcloth. Do not use liquid or spray detergents for cleaning.4.For plug-in equipment, the power outlet socket must be located near the equip-ment and must be easily accessible.5.Keep this equipment away from humidity.6.Put this equipment on a reliable surface during installation. Dropping it or lettingit fall may cause damage.7.The openings on the enclosure are for air convection. Protect the equipmentfrom overheating. DO NOT COVER THE OPENINGS.8.Make sure the voltage of the power source is correct before connecting theequipment to the power outlet.9.Position the power cord so that people cannot step on it. Do not place anythingover the power cord.10.All cautions and warnings on the equipment should be noted.11.If the equipment is not used for a long time, disconnect it from the power sourceto avoid damage by transient overvoltage.12.Never pour any liquid into an opening. This may cause fire or electrical shock.13.Never open the equipment. For safety reasons, the equipment should beopened only by qualified service personnel.14.If one of the following situations arises, get the equipment checked by servicepersonnel:⏹ The power cord or plug is damaged.⏹ Liquid has penetrated into the equipment.⏹ The equipment has been exposed to moisture.⏹ The equipment does not work well, or you cannot get it to work according tothe user's manual.⏹ The equipment has been dropped and damaged.⏹ The equipment has obvious signs of breakage.15.DO NOT LEAVE THIS EQUIPMENT IN AN ENVIRONMENT WHERE THESTORAGE TEMPERATURE MAY GO BELOW -40° C (-40° F) OR ABOVE 60°C (140° F). THIS COULD DAMAGE THE EQUIPMENT. THE EQUIPMENTSHOULD BE IN A CONTROLLED ENVIRONMENT.16.CAUTION: DANGER OF EXPLOSION IF BATTERY IS INCORRECTLYREPLACED. REPLACE ONLY WITH THE SAME OR EQUIVALENT TYPERECOMMENDED BY THE MANUFACTURER, DISCARD USED BATTERIESACCORDING TO THE MANUFACTURER'S INSTRUCTIONS.The sound pressure level at the operator's position according to IEC 704-1:1982 is no more than 70 dB (A).DISCLAIMER: This set of instructions is given according to IEC 704-1. Advantech disclaims all responsibility for the accuracy of any statements contained herein. WISE-M501 User Manual ivv WISE-M501 User ManualSafety Precaution - Static ElectricityFollow these simple precautions to protect yourself from harm and the products from damage.⏹To avoid electrical shock, always disconnect the power from your PC chassis before you work on it. Don't touch any components on the CPU card or other cards while the PC is on.⏹Disconnect power before making any configuration changes. The sudden rush of power as you connect a jumper or install a card may damage sensitive elec-tronic components.Battery InformationBatteries, battery packs, and accumulators should not be disposed of as unsorted household waste. Please use the public collection system to return, recycle, or treat them in compliance with the local regulations.Manual ConventionsWarning!Warnings indicate conditions, which if not observed, can cause personalinjury!Caution!Cautions are included to help you avoid damaging hardware or losingdata. e.g.There is a danger of a new battery exploding if it is incorrectly installed. Do not attempt to recharge, force open, or heat the battery. Replace the battery only with the same or equivalent type recommended by the man-ufacturer. Discard used batteries according to the manufacturer'sinstructions.Note!Notes provide optional additional information.WISE-M501 User Manual viContentsChapter1Product Overview (1)1.1Introduction (2)1.2Application (2)Chapter2Product Specifications (3)2.1Product Specifications (4)Table 2.1:PARAMETERS (4)Table 2.2:Accuracy & Resolutions (4)Chapter3Hardware Installation (7)3.1Dimensions (8)3.2Mounting (8)3.3Wiring & Connections (8)Chapter4System Configuration (11)4.1Operational Processes (12)4.2Setting & Display (13)Appendix A I/O Modbus Mapping Table (19)A.1Modbus Function Code Introduction (20)A.2I/O Modbus Mapping Table (20)Table A.1:RS485 communication parameters address table(Function code: 03h, 06h, 10h) (20)vii WISE-M501 User ManualWISE-M501 User Manual viiiChapter11.1IntroductionThe WISE-M501 series Multifunction Power Meter provide high accuracy measure-ment, display and communication (Modbus RTU) of all electrical and power quality parameters, including harmonic measurement THD (Total Harmonic distortion) Pro-vides electricity bill ratio (Cost) and carbon dioxide ratio (Co2) set can show cumula-tive electricity bills and carbon emissions, and suitable for the installation in the power management of remote communication, such as the use of demand.1.2Application⏹Control panels and Motor⏹Generator monitoring⏹Switchgear distribution systems⏹Energy Management⏹Power quality analysisWISE-M501 User Manual2Chapter22.1Product SpecificationsVoltage V12 V23 V31 V LL_Avg V1 V2 V3 V LN_AvgCurrent I 1 I2 I3 I Avg I NActive Power P 1 P 2 P 3 ΣPReactive Power Q 1 Q 2 Q 3 ΣQApparent Power S 1 S 2 S 3 ΣSPower factor PF 1 PF 2 PF 3 PF AvgFrequency HzActive Energy Wh TotalReactive Energy Varh TotalTHD for voltage THD V12 THD V23 THD V31 THD V_AvgTHD for current THD I1 THD I2 THD I3 THD I_AvgRS485 Port Modbus RTU modeCumulative electricity bills Cost (Only a single rate)CO2 emissions CO2Date time Year, Month, Day, Hour, Min, Sec.Parameters Accuracy ResolutionVoltage0.25%0.1VCurrent0.25%0.001ANeutral Current 1.0%0.001AActive Power0.5%1WReactive Power0.5%1VarApparent Power0.5%1VAPower factor0.5%0.001Frequency0.2%0.01HzActive Energy0.5%0.1kWhReactive Energy0.5%0.1kVarhTHD 1.0%0.1%WISE-M501 User Manual45WISE-M501 User ManualChapter 2Product SpecificationsProgrammable by front buttons (Actual wiring must be same)Input range:Voltage: 40~400 V LN ; 60~600V LL PT Primary range:100~500000V PT Secondary range:100~600V Current: 0~5A, (Optional:0~1A)CT Primary range: 5~9999A Frequency: 45~65HzMax. Input over capability:Voltage:2 X rated continuous: 2500V, 1 sec Current: 2 X rated continuous: 20 X rated 1 sec Input burden:Voltage: < 0.2VA?Current: < 0.1VAPower Quality THD:Total harmonic distortion for Voltage and Current RS485 communication (standard)Protocol:Modbus RTU modeBaud rate:1200/2400/4800/9600/19200/38400Data bits:8 bitsParity:None / Even / Odd Stop bits: 1 or 2Address:1~255Wiring:1200M max,Termination Res.:120~300Ω/0.25W (typical: 150Ω)Back up memory:FRAMDigital Input: 2 DI; Opto couplers: 5Vdc, 20mAReaction time:≤ 300ms; Isolation: 2000Vac Digital Output 2 DO; Open collector: 40Vdc, 50mA Reaction time:≤ 300ms; Isolation: 2000Vac Power Power supply:AC 85~264V / DC 100~300V Power consumption:AC:≤ 10W / DC:≤ 3W @ 230V Environmental Operating Temp.:0~60 ˚COperating Hum(%RH):5~95 %RH, non-condensing Temp. Coefficient:≤100 PPM/˚C Storage Temperature:-10~70 ˚CEnclosure:Front panel: IEC 529 (IP50): Housing: IP20Input Measurement:True RMS measurement Sampling:128 point / CycleConnection:1P2W, 1P3W, 3P3W(2,3CT), 3P4W, Balanced/UnbalanceWISE-M501 User Manual6Chapter33.1Dimensions3.23.39WISE-M501 User ManualChapter 3Hardware InstallationRS-485/(Terminal Block 2)WISE-M501 User Manual10Chapter44.1Operational ProcessesWISE-M501 User Manual1213WISE-M501 User ManualChapter 4System Configuration4.2Setting & DisplayWISE-M501 User Manual14Chapter 4 Array SystemConfiguration15WISE-M501 User ManualWISE-M501 User Manual16Chapter 4 Array SystemConfiguration17WISE-M501 User ManualWISE-M501 User Manual18Appendix AWISE-M501 User Manual 20A.1Modbus Function Code IntroductionA.2I/O Modbus Mapping TableCode(Hex)NameUsage03Read Holding Registers Read 16-bit register. Used to read integer or floating point process data.06Preset Single Register Write data in 16-bit integer format 10Preset Multiple RegistersWrite multiple data in 16-bit integer formatGeneral class informationRegister Name Register address Data Format Data Length Measurement range Unit R/W Default DescriptionFrequency 0000h XXXX 245.00 ~65.00Hz /100RFrequency (high word)0001h XX.XX Frequency (low word)Average phase voltage 0002h XXXX 20~500000.0V/10RAverage phase voltage (high word)0003h XXX.X Average phase voltage (low word)U l lavg 0004h XXXX 20~500000.0V/10RAverage line voltage (high word)0005h XXX.X Average line voltage (low word)I avg 0006h XXXX 20~10000.000 A /1000R Average current (high word)0007h X.XXX Average current (low word)In 0008h XXXX 20~10000.000 A /1000R Neutral current (high word)0009h X.XXX Neutral current (low word)Psum 000Ah XXXX 2-199999999 ~999999999W R Total effective power (high word)000Bh XXXX Total effective power (low word)Qsum 000Ch XXXX 2-199999999 ~999999999VAR R Total reactive power (high word)000Dh XXXX Total reactive power (low word)Ssum 000Eh XXXX 2-199999999 ~999999999VA R Total apparent power (high word)000Fh XXXX Total apparent power (low word)PF avg0010h XXXX 2-1.000 ~1.000PF /1000RAverage power factor (high word)0011h X.XXX Average power factor (low word)Ea0012hXXXX20~99999999.9kWh /10R/WEffective energy (high word), over99999999.9 auto Zero0013h XXX.X Effective energy (low word), over 99999999.9 auto ZeroEr0014hXXXX20~99999999.9kVARh /10R/WInvalid electricity (high word), over 99999999.9 auto Zero0015h XXX.X Invalid electricity (low word), over 99999999.9 auto ZeroCost0016hXXXX20~99999999.9$/10RTotal electricity bill (high word), over 99999999. 9 auto Zero0017h XXX.X Total electricity bill (low word), over 99999999.9 auto ZeroCO 20018hXXXX20~99999999.9kg/10RThe total carbon dioxide(high word),over 99999999.9 auto Zero 0019hXXX.X The total carbon dioxide (low word) over 99999999.9 auto Zero UA 001Ah XXXX 20~500000.0V/10R Phase A voltage (high word)001Bh XXX.X Phase A voltage (low word)UB 001Ch XXXX 20~500000.0V/10R Phase B voltage (high word)001Dh XXX.X Phase B voltage (low word)UC 001Eh XXXX 20~500000.0V/10R Phase C voltage (high word)001Fh XXX.X Phase C voltage (low word)UAB0020h XXXX 20~500000.0V/10RAB line voltage (high word)0021hXXX.XAB line voltage (low word)21WISE-M501 User ManualAppendix A I/O Modbus Mapping TableUBC 0022h XXXX 20~500000.0V/10R BC line voltage (high word)0023h XXX.X BC line voltage (low word)UCA 0024h XXXX 20~500000.0V/10R CA line voltage (high word)0025h XXX.X CA line voltage (low word)IA 0026h XXXX 20~10000.000A/1000R Phase A current (high word )0027h X.XXX Phase A current (ow word)IB 0028h XXXX 20~10000.000A/1000R Phase B current (high word )0029h X.XXX Phase B current (low word)IC 002Ah XXXX 20~10000.000A/1000R Phase C current (high word)002Bh X.XXX Phase C current (low word)PA 002Ch XXXX 2-199999999 ~999999999W R Phase A active power (high word )002Dh XXXX Phase A active power (low word)PB 002Eh XXXX 2-199999999 ~999999999W R Phase B active power( high word)002Fh XXXX Phase B active power (low word)PC 0030h XXXX 2-199999999 ~999999999W R Phase C active power (high word)0031h XXXX Phase C active power (low word)QA 0032h XXXX 2-199999999 ~999999999VAR R Phase A reactive power (high word)0033h XXXX Phase A reactive power (low word)QB 0034h XXXX 2-199999999 ~999999999VAR R Phase B reactive power (high word)0035h XXXX Phase B reactive power (low word)QC 0036h XXXX 2-199999999 ~999999999VAR R Phase C reactive power(high word)0037h XXXX Phase C reactive power (low word)SA 0038h XXXX 2-199999999 ~999999999VA R Phase A apparent power (high word)0039h XXXX Phase A apparent power (low word)SB 003Ah XXXX 2-199999999 ~999999999VA R Phase B apparent power (high word)003Bh XXXX Phase B apparent power (low word)SC 003Ch XXXX 2-199999999 ~999999999VA R Phase C apparent power(high word)003Dh XXXX Phase C apparent power (low word)PFA 003Eh XXXX 2-1.000 ~1.000PF/1000R Phase A Power Factor (high word)003Fh X.XXX Phase A Power Factor (low word)PFB 0040h XXXX 2-1.000 ~1.000PF/1000R Phase B Power Factor (high word)0041h X.XXX Phase B Power Factor (low word)PFC 0042h XXXX 2-1.000 ~1.000PF/1000R Phase C Power Factor (high word)0043h X.XXX Phase C Power Factor (low word)LT 0044h XX 182=R, 76=L, 67=C RR: Resistive, L: Inductive, C:Capacitive THDUA 0045h XXX.X 10~100.0%/10R Phase A voltage total harmonic( 3P3W,THDUAB)THDUB 0046h XXX.X 10~100.0%/10R Phase B voltage total harmonic (3P3W,THDUBC)THDUC 0047h XXX.X 10~100.0%/10R Phase C voltage total harmonic (3P3W,THDUCA)THDUavg 0048h XXX.X 10~100.0%/10R Average voltage total harmonic THDIA 0049h XXX.X 10~100.0%/10R Phase A current total harmonic THDIB 004Ah XXX.X 10~100.0%/10R Phase B current total harmonic THDIC 004Bh XXX.X 10~100.0%/10R Phase C current total harmonic THDIavg004ChXXX.X10~100.0%/10RAverage total harmonic currentInput group setting classRegister NameRegister addressData Format Data Length Measurement range Unit R/WDefault DescriptionVoltage wir-ing Wire-U004DhX10~6R/W 50:1P2W4:3P3W.31:1P3W5:3P4W 2:3P3W6:3P4W.B 3:3P3W.BPT- Pri004EhXXXX2100~500000VR/W600PT Primary side voltage setting( high word )004FhXXXX PT Primary side voltage setting( low word )PT- Sec 0050h XXXX 1100~600V R/W 600PT Secondary voltage settings CT- Pri 0051h XXXXX 11~10000AR/W 5CT Primary current setting P .code0052hXXXX10000~9999R/W1000Clearance password changeRS485 communication group settings classRegister Name RegisteraddressDataFormatDataLengthMeasurementrangeUnit R/W DefaultDescriptionAddr0053h XXX11~247R/W1The Communication Station No. set-tingBaud0054h X10~5R/W30:1200, 1:2400, 2:4800, 3:9600, 4:19200, 5:38400Parity0055h X10~3R/W10:N81, 1:N82, 2:O81, 3:E81 Cost group setting classRegister Name RegisteraddressDataFormatDataLengthMeasurementrangeUnit R/W DefaultDescriptionCost0056h XX.XX100.00~99.99R/W 2.30kWh the cost ratio setting CO20057h X.XXX10.000~9.999R/W0.638kWh of CO2 ratio settingTime group setting classRegister Name RegisteraddressDataFormatDataLengthMeasurementrangeUnit R/W DefaultDescriptionBack- Light0058h XX10~15R/W10~15Minute, 0 is Steadily lit Year0059h XX10~99R/W0~99 = 2000~2099Month005Ah XX11~12R/WDay005Bh XX11~31R/WTime005Ch XX10~23R/WMinute005Dh XX10~59R/WSecond005Eh XX10~59R/WPermanent screen group setting classRegister Name RegisteraddressDataFormatDataLengthMeasurementrangeUnit R/W DefaultDescriptionDef.Page005Fh X11~4R/W11: 1.2.1: Average phase voltage (T/ L-n/V) / Average current (A)/Total active power (kW)Average power factor (PF/IND/Avg)/Total active energy (kWh)2: 1.2.2: Average line voltage (T/L-L/V) / Average current (A)/Total active power (kW)Average power factor (PF/IND/Avg)/Total active energy (kWh)3:1.2.3:Total apparent power (T/ kVA)/Total reactive power (kvar)/ Total active power ( k W)/Average power factor(PF/IND/Avg)/Total active energy(kWh)4:1.2.4:Total apparent power (T/ kVA)/Total reactive power (kvar)/ Total active power (k W)/Frequency (Hz)/Total active energy (kWh)INIT0060h XXXX20000~9999R/W0Set:7170,Restore DefaultWISE-M501 User Manual2223WISE-M501 User Manual Appendix AI/O Modbus Mapping Table Client Custom classRegisterNameRegister address Data Format Data Length Measurement range Unit R/W Default Description ClientCustom15000h XX10~76(0x4c)R/W 0x0000h This regional data to set the following 20 addresses (5014h~5027h)content of the information,That is redefining 5014h~5027h address information significance Address correspondence to: 5000h set 5014h corresponding address data content.Address correspondence to: 5001h set 5015h corresponding address data content.Address correspondence to: 5013h set 5027h address data corresponding to content.Example:1: 5000h address data = 0000h, 5001h address data = 0001h. Then the corresponding address 5014h ,5015h addresses are mapped tothe content of 0000h, 0001h, accordingto the table, 5014h ,5015h address data for the frequency content high byte and low byte (Setting range 0 ~ 0x4c, read the corre-sponding region RS485 DataSheet)Client Cus-tom 25001h XX10~76(0x4c)R/W 0x0001h Client Cus-tom 35002h XX10~76(0x4c)R/W 0x0002h Client Cus-tom 45003h XX10~76(0x4c)R/W 0x0003h Client Cus-tom 55004h XX10~76(0x4c)R/W 0x0004h Client Cus-tom 65005h XX10~76(0x4c)R/W 0x0005h Client Cus-tom 75006h XX10~76(0x4c)R/W 0x0006h Client Cus-tom 85007h XX10~76(0x4c)R/W 0x0007h Client Cus-tom 95008h XX 10~76(0x4c)R/W 0x0008hClient Cus-tom 105009h XX 10~76(0x4c)R/W 0x0009h Client Cus-tom 11500Ah XX 10~76(0x4c)R/W 0x000A h Client Cus-tom 12500Bh XX 10~76(0x4c)R/W 0x000B h Client Cus-tom 13500Ch XX 10~76(0x4c)R/W 0x000C h Client Cus-tom 14500Dh XX 10~76(0x4c)R/W 0x000D h Client Cus-tom 15500Eh XX 10~76(0x4c)R/W 0x000E h Client Cus-tom 16500Fh XX 10~76(0x4c)R/W 0x000F h Client Cus-tom 175010h XX 10~76(0x4c)R/W 0x0010h Client Cus-tom 185011h XX 10~76(0x4c)R/W 0x0011h Client Cus-tom 195012h XX 10~76(0x4c)R/W 0x0012h Client Cus-tom 205013h XX 10~76(0x4c)R/W 0x0013hWISE-M501 User Manual 24Custom the output 15014h 1R Meaning of the data subject 5000h~5013h address control, data format and the unit and the actual out-put data format to match the format, see the table RS485Custom the output 25015h 1R Custom the output 35016h 1R Custom the output 45017h 1R Custom the output 55018h 1R Custom the output 65019h 1R Custom the output 7501Ah 1R Custom the output 8501Bh 1R Custom the output 9501Ch 1R Custom the output 10501Dh 1R Custom the output 11501Eh 1R Custom the output 12501Fh 1R Custom the output 135020h 1R Custom the output 145021h 1R Custom the output 155022h 1R Custom the output 165023h 1R Custom the output 175024h 1R Custom the output 185025h 1R Custom the output 195026h 1R Custom the output 205027h 1RAppendix AI/O ModbusMappingTable 25WISE-M501 User Manual。
MK50H 50W 全管头部音箱说明书
THE MK50H. ALL VALVE 50 WATT HEADSpec:50 watt all valve head. One channel, with foot-switchable overdrive and mastervolumes.Valves: 2 x 5881WXT. 4 x 12AX7WA.Cabinet:19mm ply, lock-jointed.Hardware:All corners, screws, cup washers, handle fixings etc., arenickel-plated. Bespoke CNC punched, powder coated grills. 16Gauge (1.5mm) powder coated chassis with 14 gauge base / screening platesecured to chassis with 4 machine screws. Leather handle.Transformers:Custom designed in-house and hand wound.ConstructionMethods:Point to point hand wired and hand assembled throughout.No PCBs of any sort.Controls: Chicken head knobs. Metal toggle mains switches. 2 x input sockets:high and low gain. Front panel from left to right: Volume/gain, Overdrive (footswitchable extra gain with red LED indicator), Bass, Middle, Treble, Master 1and Master 2 (foot switchable for volume lift and tonal differences from thepower amp with green LED indicator), Presence, Resonance, Standby switchand Mains switch.Rear panel from left to right: Mains inlet, Mains fuse, HT fuse, Speakerimpedance selector for 4, 8 and 16 ohm loads, Series effects loop send andreturn sockets, footswitch socket.AccessoriesSupplied:Footswitch: 14 gauge mild steel, powder coated, with 2 metal footswitches andLED indicators for Overdrive and Master 2,Top quality 8mm cable wired to Neutrik nickel-plated stereo jack.3 metre mains lead.Speaker lead, 600mm, top quality 8mm cable with nickel-plated Neutrik jacks.MK50H CONTROL OPERATIONVolume Adjusts overall pre amp gain.Overdrive Adjusts the amount of extra signal coming from the first gain stage.This is added to the amount of pre amp gain you have set; you don’tswitch to overdrive, you add it to the pre amp gain thus having a moreextreme setting but keeping the tonal integrity.Bass Adjusts low frequency response of the pre amp.Middle Adjusts frequencies around 500 Hz in the mid-range.Treble Adjusts high frequency response of pre amp.Master 1 Sets the output level of the amplifier, generally pre-set for rhythm but not strictly.Master 2 Master 2 also sets output level of amp but is generally pre-set for adifferent level than Master 1 so that a pre-set volume boost can beobtained.Presence Boosts high frequency response of the power amp only. Resonance Boosts low frequency response of the power amp only, allowing atighter or looser bass response overall.Effects loop This is a series effects loop, the send level is –6dBV. Suitable for foot pedals and rack processors.Speaker This can be set to accommodate 4, 8 and 16 ohm speaker loads ImpedanceSelector.Suggested settings for the MK50H* Switching the overdrive in will give you a much heavier rhythm sound.** Using the overdrive in and out from Master 2 to Master 1 a useful range of tones can be obtained. Note also that turning the guitar volume down with crunchy rhythm tones can result in some fat, clean tones.Please note the controls are very sensitive and altering them by small degrees will give many different sounds: don’t just try setting everything to 11.Please set Master 1 and Master 2 to a level that is appropriate to your playing situation. These are some settings which can be used as a guide to help you achieve your required sounds.Important Safety Instructions WARNING – When using electrical products, basic precautions should be followed, including the following:1.Read all the instructions before using the product.2.Do not use this product near water – for example, near a bathtub, washbowl, kitchen sink, in a wet basement, near a swimming pool or thelike.3.This product may cause permanent hearing loss. Do not operate forlong periods of time at high volume level or at any level that isuncomfortable. If you experience any hearing loss or ringing in theears, you should consul an audiologist.4.The product should be located so that its location or position does notinterfere with its proper ventilation.5.The product should be located away from heat sources such asradiators, heat registers, or other products that product heat.6.The power supply cord of the product should be unplugged from theoutlet when left unused for a long period of time.7.Care should be taken so that objects do not fall and liquids are notspilled into the enclosure through openings.8.The product should be serviced by qualified personnel when:a.The power supply cord or the plug has been damaged: orb.Objects have fallen, or liquid has been spilled into the product:orc.The product has been exposed to rain or moisture: ord.The product does not appear to operate normally or exhibits amarked change in performance: ore.The product has been dropped, or the enclosure damaged.9.Do not attempt to service the product. All servicing should beReferred to qualified personnel.10.For continued protection against risk of fire, replace fuses onlyWith those of the same type and rating as indicated on the back of the product.11.Always connect the speaker before switching on.GROUNDING INSTRUCTIONSThis product must be grounded (earthed). If it should malfunction or breakdown, grounding provides a path of least resistance for electrical current to reduce the risk of electric shock. This product is equipped with a supply cord having an equipment grounding conductor and a grounding plug. The plug must be plugged into an appropriate outlet that is properly installed and grounded in accordance with the local codes and ordinances.DANGERImproper connection of the equipment-grounding conductor can result in a risk of electric shock. Check with a qualified electrician or serviceman if you are in doubt as to whether the product is properly grounded. Do not modify the plug provided with the product – if it will not fit the outlet, have a proper outlet fitted.The wires in this mains lead are coloured with the following code:EARTH NEUTRAL LIVEU.S.A. Green White BlackU.K. Green/Yellow Blue BrownCE mark for European Harmonised StandardsThe CE mark which is attached to these products means it conforms to EMC Directive (89/69/EEC), CE mark Directive (93/68/EEC) and Low Voltage Directive (72/23/EEC).VALVES AND FUSESAll valves and fuses fitted to a Cornford amplifier are consumable items and, therefore, are not covered under the manufacturer’s guarantee.。
Endress+Hauser Liquiphant M FTL50, FTL50H, FTL51,
Products Solutions ServicesSafety Instructions Liquiphant M FTL50, FTL50H, FTL51, FTL51HATEX, IECEx:Ex ia IIC GaXA00064F-G/00/EN/16.21715404802021-08-30Liquiphant M FTL50, FTL50H, FTL51, FTL51H XA00064F-G Liquiphant M FTL50, FTL50H, FTL51, FTL51HTable of contentsAbout this document (4)Associated documentation (4)Supplementary documentation (4)Manufacturer's certificates (4)Manufacturer address (5)Other standards (5)Extended order code (5)Safety instructions: General (8)Safety instructions: Special conditions (9)Safety instructions: Installation (9)Temperature tables (13)Connection data (16)Endress+Hauser3XA00064F-G Liquiphant M FTL50, FTL50H, FTL51, FTL51H 4Endress+HauserAbout thisdocumentThis document has been translated into several languages. Legally determined is solely the English source text.The document translated into EU languages is available:•In the download area of the Endress+Hauser website: -> Downloads -> Manuals and Datasheets ->Type: Ex Safety Instruction (XA) -> Text Search: …•In the Device Viewer: -> Product tools ->Access device specific information -> Check device features If not yet available, the document can be ordered.Associated documentationThis document is an integral part of the following Operating Instructions:•KA00143F/00, KA00163F/00 (FTL50, FTL51)•KA00144F/00, KA00164F/00 (FTL50H, FTL51H)Supplementary documentationExplosion-protection brochure: CP00021Z/11The Explosion-protection brochure is available:•In the download area of the Endress+Hauser website: -> Downloads -> Brochures and Catalogs -> Text Search: CP00021Z •On the CD for devices with CD-based documentation Manufacturer's certificatesEU Declaration of Conformity Declaration Number:EG99021The EU Declaration of Conformity is available:In the download area of the Endress+Hauser website: -> Downloads -> Declaration -> Type: EU Declaration -> Product Code: ...EU type-examination certificate Certificate number:KEMA 99 ATEX 0523 X List of applied standards: See EU Declaration of Conformity.Liquiphant M FTL50, FTL50H, FTL51, FTL51H XA00064F-G Endress+Hauser 5IEC Declaration of Conformity Certificate number:IECEx DEK 15.0028X Affixing the certificate number certifies conformity with the following standards (depending on the device version):•IEC 60079-0 : 2017•IEC 60079-11 : 2011•IEC 60079-26 : 2021Manufacturer addressEndress+Hauser SE+Co. KG Hauptstraße 179689 Maulburg, Germany Address of the manufacturing plant: See nameplate.Other standardsAmong other things, the following standards shall be observed in their current version for proper installation:•IEC/EN 60079-14: "Explosive atmospheres - Part 14: Electrical installations design, selection and erection"•EN 1127-1: "Explosive atmospheres - Explosion prevention and protection - Part 1: Basic concepts and methodology"Extended order codeThe extended order code is indicated on the nameplate, which is affixed to the device in such a way that it is clearly visible. Additional information about the nameplate is provided in the associated Operating Instructions.Structure of the extended order code FTL5x(H)–*************+A*B*C*D*E*F*G*..(Device type)(Basic specifications)(Optional specifications)* =Placeholder At this position, an option (number or letter) selected from the specification is displayed instead of the placeholders.Basic specifications The features that are absolutely essential for the device (mandatory features) are specified in the basic specifications. The number ofXA00064F-G Liquiphant M FTL50, FTL50H, FTL51, FTL51H 6Endress+Hauserpositions depends on the number of features available.The selected option of a feature can consist of several positions.Optional specifications The optional specifications describe additional features for the device (optional features). The number of positions depends on the number of features available. The features have a 2-digit structure to aid identification (e.g. JA). The first digit (ID) stands for the feature group and consists of a number or a letter (e.g. J = Test, Certificate). The second digit constitutes the value that stands for the feature within the group (e.g. A = 3.1 material (wetted parts), inspection certificate).More detailed information about the device is provided in the following tables. These tables describe the individual positions and IDs in the extended order code which are relevant to hazardous locations.Extended order code: Liquiphant M The following specifications reproduce an extract from the product structure and are used to assign:•This documentation to the device (using the extended order code on the nameplate).•The device options cited in the document.Device type FTL50, FTL50H, FTL51, FTL51H Basic specificationsLiquiphant M FTL50, FTL50H, FTL51, FTL51H XA00064F-GEndress+Hauser7XA00064F-G Liquiphant M FTL50, FTL50H, FTL51, FTL51H 8Endress+HauserOptional specifications No options specific to hazardous locations are available.Safety instructions:General•The device is intended to be used in explosive atmospheres as defined in the scope of IEC 60079-0 or equivalent national standards. If no potentially explosive atmospheres are present or if additional protective measures have been taken: The device may be operated according to the manufacturer's specifications.•Staff must meet the following conditions for mounting, electrical installation, commissioning and maintenance of the device:•Be suitably qualified for their role and the tasks they perform •Be trained in explosion protection •Be familiar with national regulations •Install the device according to the manufacturer's instructions and national regulations.•Do not operate the device outside the specified electrical, thermal and mechanical parameters.•Only use the device in media to which the wetted materials have sufficient durability.•Avoid electrostatic charging:•Of plastic surfaces (e.g. enclosure, sensor element, special varnishing, attached additional plates, ..)•Of isolated capacities (e.g. isolated metallic plates)•Refer to the temperature tables for the relationship between the permitted ambient temperature for the sensor and/or transmitter,depending on the range of application and the temperature class.•Modifications to the device can affect the explosion protection and must be carried out by staff authorized to perform such work by Endress+Hauser.•The probe is made of stainless steel or high corrosion-resistant alloy of thickness ≥ 1 mm.Liquiphant M FTL50, FTL50H, FTL51, FTL51H XA00064F-G Endress+Hauser 9Safety instructions:Special conditions•Limitations of the maximum ambient temperature at the electronics enclosure may be required dependent on device configuration,process temperatures and temperature classification.•Details of limitations: → 13, "Temperature tables".•To avoid electrostatic charging: Do not rub surfaces with a dry cloth.•In the event of additional or alternative special varnishing on the enclosure or other metal parts or for adhesive plates:•Observe the danger of electrostatic charging and discharge.•Do not install in the vicinity of processes (≤ 0.5 m) generating strong electrostatic charges.Basic specification, Position 8, 9 = x6Covers with glass window not permitted.Basic specification, Position 8, 9 = x5, x7Avoid sparks caused by impact and friction.Safety instructions:InstallationBasic specification, Position 7 = D, 5, 6, 7, 81A Zone 01Tank; Zone 02Electronic insert 3Enclosure 4Basic specification, Position 7 = 5, 6, 7, 8:Associated intrinsically safe power supply units Basic specification, Position 7 = D:Only associated intrinsically safe power supply unit FML621 from Endress+HauserXA00064F-G Liquiphant M FTL50, FTL50H, FTL51, FTL51H 10Endress+Hauser Basic specification, Position 7 = A2A Zone 01Tank; Zone 02Electronic insert 3Enclosure 4Permitted terminating resistor Ex ia IIC 5Certified associated apparatus 6Power supply 7Potential equalization •Connect the device using suitable cable and wire entries of protection type "Intrinsic safety (Ex i)".•Continuous service temperature of the connecting cable: ≥ T a +5 K.•Perform the following to achieve the degree of protection IP66/67:•Screw the cover tight.•Mount the cable entry correctly.•Seal unused entry glands with approved sealing plugs that correspond to the type of protection.•Observe the pertinent guidelines when interconnecting intrinsically safe circuits.•Connection of intrinsically safe PROFIBUS devices: 10 devices.Liquiphant M FTL50, FTL50H, FTL51, FTL51H XA00064F-G Endress+Hauser 11•Observe the maximum process conditions according to the manufacturer's Operating Instructions.•At high medium temperatures, note flange pressure load capacity as a factor of temperature.•Install the device to exclude any mechanical damage or friction during the application. Pay particular attention to flow conditions and tank fittings.•Support extension tube of the device if a dynamic load is expected.Accessory: Sliding sleeve The sliding sleeve can be used for a continuous setting of the switch point (see Operating Instructions).Intrinsic safety •The device is only suitable for connection to certified, intrinsically safe equipment with explosion protection Ex ia.•The intrinsically safe input power circuit of the device is isolated from ground. The dielectric strength is at least 500 V rms .Potential equalization •Integrate the device into the local potential equalization.•Grounding the screen, see the following figure.XA00064F-G Liquiphant M FTL50, FTL50H, FTL51, FTL51H Basic specification, Position 7 = A3A Version 1: Use small capacitors (e.g. 1 nF, 1500 V dielectric strength,ceramic). Total capacitance connected to the screen may not exceed 10 nF.B Version 21Terminating resistor2Distributor/T box3Screen insulated4Supply unit/Segment coupler5Potential equalization (secured in high degree)6Field device12Endress+HauserLiquiphant M FTL50, FTL50H, FTL51, FTL51H XA00064F-G Endress+Hauser 13Temperature tablesDescription notesUnless otherwise indicated, the positions always refer to the basic specification.1st column: Position 5, 6 = Ax, Bx, ...2nd column: Temperature classes T6 (85 °C) to T1 (450 °C)Column P1 to P5: Position (temperature value) on the axes of the derating •T a : Ambient temperature in °C •T p : Process temperature in °CZone 0Zone 0Zone 0XA00064F-G Liquiphant M FTL50, FTL50H, FTL51, FTL51H14Endress+HauserOutside Zone 0Outside Zone 0OutsideZone 0Position 7 = A, D, 5, 71)Only in connection with Position 8, 9 = x6Liquiphant M FTL50, FTL50H, FTL51, FTL51H XA00064F-G Position 7 = 6, 81)Only in connection with Position 8, 9 = x6Endress+Hauser15XA00064F-G Liquiphant M FTL50, FTL50H, FTL51, FTL51H 16Endress+HauserConnection dataBasic specification, Position 7 = D, 5, 6, 7, 8Associated intrinsically safe power supply unit with max. electrical specifications below the characteristic values of the electronic insertsOnly associated intrinsically safe power supply unit FML621 from Endress+HauserLiquiphant M FTL50, FTL50H, FTL51, FTL51H XA00064F-G Endress+Hauser 17Basic specification, Position 7 = A Certified intrinsically safe fieldbus (PROFIBUS PA), in accordance with the FISCO Modell, with the following maximum valuesCertified intrinsically safe circuit with the following maximum values*71540480*71540480。
H-1豪华乘务车说明书
H-1Enrich your life The new H-1The new H-1 adds a rich, distinctive dimension to your life,with a luxurious and sophisticated design that combineselegance with adventure.Projection Headlamp The 12/9-seater H-1 opens up a new world for you to experience. Projection headlampsdeliver a sleek, purposeful impression, while a stylish radiator grille enhances the overall presence.Newly-designed wheels and side garnish complete the modern, progressive style.Chrome-coated radiator grille Side garnish Outside mirrors with side repeaters 17˝ Alloy wheels New experience, new opportunitiesLED rear combination lamps*The rear foglamp apply only to certain countries.The H-1 offers numerous advantages as an 12/9 seat passenger wagon. Suiting a wide range of applications, from business to leisure, many seat variations are available. Passenger comfort isassured by a range of convenience functions and devices.The H-1 interior, with a horizontal layout providing a wide, open feel, achievesthe highest levels of design. In addition to the a udio system , a stylish, sportysteering wheel also enhances the drive.Change your worldviewManual tilt & telescopic steering wheel Audio system (MP3, CDs, Radio)Full auto air conditioning system5-speed automatic transmissionDual SunroofH-1 vans offer both style and huge versatility. A 5-seater window van provides plenty of spacefor luggage, while a 3-seater panel van allows room for up to 800kg of cargo.Anything is possible with an H-1 van. Whether it’s carrying lots of cargo or lots of passengers,or a combination of both, the vehicle is equipped to handle every trip.2/3-seater passenger space5/6-seater cargo van variationMove it your wayGetting gear in and out of an H-1 van is easy thanks to a range of carefully thought out features.Twin rear doors open up for easy loading and unloading, while a panel keeps passengers andcargo safely partitioned.Max payload Passenger/cargo space partition panel5/6-seater window van cargo room 2/3-seater panel van cargo room Windows protection bar Double swing rear door 5/6-seater window van 2/3-seater panel van Max payload Packed and ready to goFeel it under the pedalThe powerful driving performance of the H-1 is demonstrated by high power diesel engines thatmeet strict Euro 6 exhaust gas regulations. While safety features include a comprehensive airbagsystem and Anti-lock Brake System(ABS) provides more stable driving in any environment.Airbag systems 2.4 MPi gasoline engine 2.5 CRDi diesel engine with WGT / VGT175/23.2 PS/kg·m2.4 MPi gasoline engine 136/35 PS/kg·m 2.5 CRDi diesel engine with WGT 170/45 PS/kg·m 2.5 CRDi diesel engine with VGT T o r q u e (k g .m )Engine Speed (rpm)1,000 2,000 3,000 4,000 5,000 6,000 7,000Torque Power 28.026.024.022.020.018.016.014.012.010.08.022020018016014012010080604020P o w er (p s )To r q u e (k g .m )Engine Speed (rpm)1,000 1,500 2,000 2,500 3,000 3,500 4,000WGTVGTTorque PowerTorque Power 5045403530252015018016014012010080604020P owe r(p s )Features17″ alloy wheels17″ alloy wheels16″ alloy wheels16″ steel wheelsHead lampsSafety power windowRear combination lamps3-way washer jetsElectric folding outside mirrorsRear spoiler with High-mounted stop lamp (HMSL)Window controlsRear view cameraFolding keySun visorRoof antennaDoor Storage systemCooling glove boxElectric chromic mirror (ECM)Auto light controlOverhead consoleDriver air ventilationSpecificationsDimensionsVAN (3/2-seater)Unit : mmVAN (6/5-seater)1,6851,6601,9201,9355,1503,2008801,0705,1503,2008801,0701,6851,6601,9201,935Interior trims & Exterior colors2/3-seater panel van GL2/3-seater window van GLLeather / Beige GLS / Option Leather / Gray GLS / OptionTricot suede / Beige GLS Tricot suede / Gray GLS Woven / GrayGL12/9-seater wagonGL 12/9-seater wagonTOP5/6-seater window vanGL5/6-seater panel van GLLine up•The above values are results from internal testing and are subject to change after validation.•Some of the equipment illustrated or described in this catalog may not be supplied as standard equipment and may be available at extra cost.•Hyundai Motor Company reserves the right to change specifications and equipment without prior notice.•The color plates shown may vary slightly from the actual colors due to the limitations of the printing process.•Please consult your dealer for full information and available colors and trims.Creamy white *YAC / TAC Tan brown *YN9 / TN9Hyper metallic silver *P2S / P3S Dynamic yellow *NFA / MFM Ocean view *W9U / U9UTimeless black *RB5 / PB5* 1 Tone / 2 Tone5,1503,2008801,0701,9251,6851,6601,920WAGON (12/9-seater)12-seater。