戴森PH07遥控器说明
遥控器按键功能介绍

1遥控器按键功能介绍1.1“SNOOZE”键在闹铃时按此键可暂停闹铃10分钟后重新闹。
1.2“play/pause”键,IPod播放状态下,按此键一次暂停播放,再按一次恢复播放。
1.3“SOURCE”键在开机状态下,按此键可依次选择IPOD、FM、AUX音源。
1.4音量“+”键1.4.1在播放状态下,按此键可增加音量。
1.4.2在设置闹钟时可调整闹钟的时间和闹铃的音量,可切换闹钟“O N”/“OFF”状态显示。
1.4.3在设置时间时可调整数值。
1.5音量“-”键1.5.1在播放状态下,按此键减少音量。
1.5.2在设置闹钟时可调整闹铃的时间和闹铃的音量。
1.5.3在设置时间时可调整数值1.6“ENTER”键1.6.1确认、选择各项设置。
1.7“上一曲”键1.7.1在I Pod播放状态下,按此键播放上一曲。
1.7.2在FM状态下,按此键进入手动调台并向上调整频率。
1.8“下一曲”键1.8.1在I Pod播放状态下,按此键播放下一曲。
1.8.2在FM状态下,按此键进入手动调台并向下调整频率。
1.9“SLEEP”键在开机的状态下,按一次此键启动SLEEP功能,同时连续按该键可调整SLEEP的时间,每按一下已15分钟递增,最高为60分钟;如3秒钟内不再按该键,则系统自动退出SLEEP设置,而SLEEP的时间为最后显示的时间,如最后显示的时间为“00”,则退出后SLEEP功能关闭。
1.10“POWER ON”键在关机状态下按一下此键开机,再按一下关机。
1.11“MUTE”键按此键可静音。
1.12“TIME”键按此键可进入时间设置。
1.13“MEM”键按此键可存储电台频率。
1.14“ALARM 1”1.14.1按此键可进入闹钟1设置。
1.14.2闹铃时,按此键可停止闹铃。
1.15“ALARM 2”1.15.1按此键可进入闹钟2设置。
1.15.2闹铃时,按此键可停止闹铃。
1.16“PRESET”键在FM模式下,按此键可选择收听存储的频道。
戴森吸尘器说明书
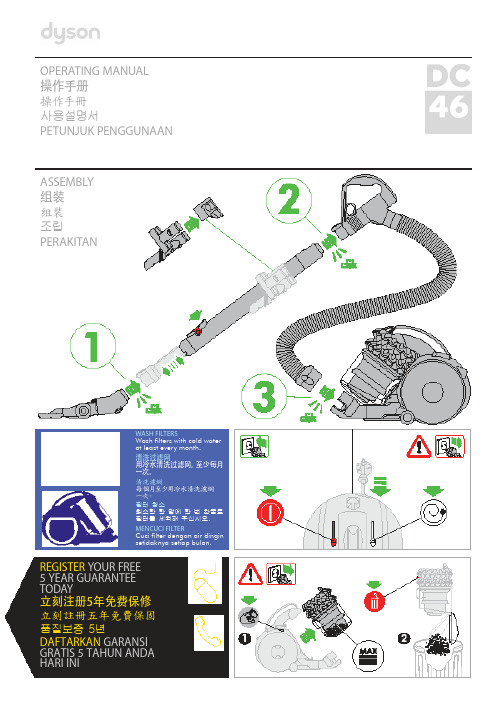
OPERATING MANUAL操作手册操作手冊사용설명서PETUNJUK PENGGUNAANASSEMBLY组装組裝조립PERAKITANWASH FILTERS清洗过滤网清洗濾網필터 청소MENCUCI FILTERREGISTER YOUR FREE5 YEAR GUARANTEE TODAY立刻注册5年免费保修立刻註冊五年免費保固품질보증 5년DAFTARKAN GARANSI GRATIS 5 TAHUN ANDA HARI INIDYSON CUSTOMER CARETHANK YOU FOR CHOOSING TO BUY A DYSON APPLIANCEAfter registering your free 5 year guarantee, your Dyson appliance will be covered for parts and labour for5 years from the date of purchase, subject to the terms of the guarantee.If you have any questions about your Dyson appliance, call the Dyson Helpline with your serial number and details of where/when you bought the appliance.Most questions can be solved over the phone by one of our trained Dyson Helpline staff.Alternatively visit for online help, general tips and useful information about Dyson.戴森客户服务感谢您选择购买戴森产品登记获取 5 年免费保修后,您的戴森产品自购买之日起,将享受 5 年的零件和人工保修服务,但须符合保修条款的规定。
戴森空气净化器说明书
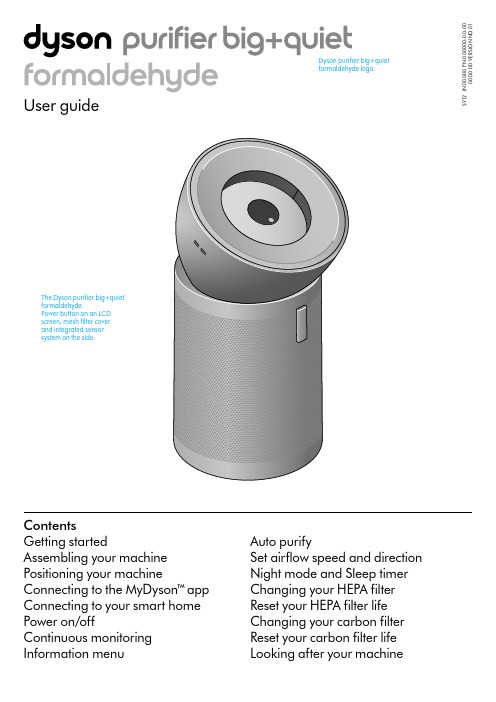
S V 12 J N .00000 P N .000000-00-00 00.00.00 V E R S I O N N O .01ContentsGetting startedAssembling your machine Positioning your machineConnecting to the MyDyson™ a pp Connecting to your smart home Power on/offContinuous monitoring Information menuAuto purifySet airflow speed and direction Night mode and Sleep timer Changing your HEPA filter Reset your HEPA filter life Changing your carbon filter Reset your carbon filter life Looking after your machineDyson purifier big+quiet formaldehyde logo.formaldehyde.real time.Hidden wheelsEasy to manoeuvre across a room – designed for hard surfaces.Carbon filterfilter is wrapped A real-time LCD display screen reports indoor air quality.on hard surfaces.Assembling your machineUse both hands to lift your machine out of the box, by its base.Your machine comes with a HEPA filter, carbon filter and permanent catalytic filter. These are already installed in your machine.Lift the conic amplifier out of the box and place it on the top of your machine.Rotate the conic amplifier until it clicks securely into place.Plug in and press the power button on the screen or remote control.Place the remote control on the front of yourmachine with the buttons facing down.The image demonstrates the location of the standby button and remote control.Image demonstrates how to assemble theDyson purifier big+quiet formaldehyde’s conic amplifier. Position and twist. A click indicates a secure lock.Positioning your machineYour machine is fitted with wheels to make it easier to move.Position your machine on a level floor.For the most effective purification, position your machine on the edge of the room at least 1 metre from the wall, with the conic amplifier pointing to the furthest point, along the wall.You can also position your machine facing diagonally acrossthe room.The purifier positioned on the edge of a room. A blue arrow shows the conic amplifier direction, pointing to furthest point, along the wall.The purifier positioned on the edge of a room. A blue arrow shows the conic amplifier direction, pointing diagonally across the room.Connecting to the MyDyson™ a ppConnecting to your smart homeTake full control with the MyDyson™ a pp and access step-by-step setup and support, control how and when your Dyson air purifier operates, monitor air quality with visual updates and automatically keep up to date with the latest software updates.Download the MyDyson™ a pp from the App Store or Google Play.Open the app and follow the on-screen instructions to create a new account.Apple and the Apple logo are trademarks of Apple Inc., registered in the U.S. and other countries. App Store is a service mark of Apple Inc., registered in the U.S. and other countries.Google Play and the Google Play logo are trademarks of Google Inc.The Android robot is reproduced or modified from work created and shared by Google and used according to terms described in the Creative Commons 3.0 Attribution License.Using Amazon AlexaAsk Alexa to enable the Dyson skill – to help control your air purifier. Set a routine that automates how your machine works with other devices in your home.Using Google AssistantControl all of your connected purifiers with Google or set a routine to automate how your machine works with other devices in your home. Just say “Hey Google” to get started.Using SiriConnect your Dyson machine to Siri Shortcuts to control it by voice onyour Apple device.Power on/offPress the Stand-by on/off button on your Dyson air purifier or remote control to start/stop your machine. It will continue to monitor the air quality.Continuous monitoring is turned off by default. You’ll need to activate it to see your historic AQ data.With continuous monitoring active, your Dyson air purifier will gather air quality and temperature information, displaying iton the LCD screen and in the MyDyson™ a pp.Continuous monitoring on/offYou’ll be prompted to activate Continuous monitoring on the MyDyson™ a pp. To turn it on or off using the remote control, press and hold the Auto mode button for five seconds. The LCD screen will indicate the Continuous monitoring status.Wi-Fi connectivityWi-Fi is turned on by default. To turn the Wi-Fi on or off, press and hold the Stand-by on/off button on your machine for five seconds.Continuous monitoring The remote control with the Stand-by button on the top left.Information menuPress this button to scroll through information monitored by your Dyson air purifier.Information about air quality, temperature, humidity and filter levels is shown on the LCD screen.When a particular type of pollutant causes air quality to decrease, a symbol for the pollutant will show on the LCD screen.Volatile organic compoundsVOCs are potentially harmful odours found in cleaning products, paints and furnishings.The current status of connection to theIndoor temperatureMonitor the ambient temperature of the room.Particulate matter (PM2.5)Microscopic particles up to 2.5 microns in size, suspended in the air we breathe. These include smoke, bacteria and allergens.Indoor humidityThe amount of water vapour in the air, shown as a percentage.Nitrogen dioxide and other oxidizing gases Potentially harmful gases released into the air by combustion from cooking and vehicle exhaust emissions.Particulate matter (PM10)Larger microscopic particles up to 10 microns in size, suspended in the air we breathe. These include dust, mould and pollen.Indoor air qualityAir quality graph shows the last12 seconds of data.Formaldehyde (HCHO)A common indoor pollutant released for many years from furnishings, floorings and glue.Carbon dioxide (CO 2)CO 2 can build up indoors without adequate ventilation, which can impact cognitive function.The remote control with the information button highlighted on the right hand side.In Night mode, your Dyson air purifier will continue to clean the air quietly, in a lower airflow speed with its LCD screen dimmed. Press the Night mode and Sleep timer button to scroll through the timer options.Night mode and Sleep timerSet your air purifier to Auto mode and the on-board sensors willintelligently adjust the settings of the machine according to the air quality.Air quality: your machine will pause when the target air quality has been reached, switching on again when the air quality levels drop.Airflow speed: the airflow speed will increase to its maximum until the target air quality has been reached.Increase or decrease the airflow speed and change air direction from 0° to 50° using the remote or MyDyson™ a pp.Select Breeze mode by repeatedly pressing down on the airflow direction button until it activates or by using the MyDyson™ a pp.Auto purifySet airflow speed and directionThe remote control with the Auto mode button highlighted on the left hand side.The remote control with the Night mode button on the bottom right and Sleep timer button on the bottom left.running low. Replacement filters are available to buy on www.dysoncanada.caRemove the conic amplifierSlide the Release button on the back of the conic amplifier to unlock. Lift the conic amplifier off your machine.Lift the outer cover off the base of your machine.Remove the filterThe HEPA filter is located in the outer cover. Press the filter release buttons located on the inner rim and lift the outer cover off the filter.Dispose of the filter.Install a new filterRemove your replacement filter from any packaging. Place the filter on the base of your machine.Place the outer cover over the filter and press down until it clicks securely into position.Place the conic amplifier on your machine and rotate until it clicks securely in position.Plug in, switch on and reset your filter life.Reset your HEPA filter lifeIt’s important to reset the filter life after replacing your filter.Press and hold the Night mode button on the remote control.The LCD screen on your machine will count down from five, until a tick appears on the screen.The filter life has been reset and your machine is ready to use.Pressing the night mode button on the bottom right of the remote control for 5 seconds.running low. Replacements are available to buy on www.dysoncanada.caRemove the conic amplifierSlide the Release button on the back of the conic amplifier to unlock. Lift the conic amplifier off your machine.Lift the outer cover off the base of your machine.Reset your carbon filter lifeIt’s important to reset your filter life after you have replaced your filter.Press and hold the down airflow direction button on the remote control. The LCD screen on your machine will count down from five, until a tick appears on the screen.The filter life has been reset and your machine is ready to use.Remove the filterThe carbon filter is wrapped around the central body of your machine. Pull each of the four clips towards you to release the filter.Dispose of the filter.Install a new filterRemove your replacement filter from any packaging.Wrap the filter around the base of your machine, fit the clips in position and push each one to secure the filter.Place the outer cover and HEPA filter back in position on the base of your machine.Place the conic amplifier on your machine and rotate until it clicks securely in position.Plug in and switch on, and reset your filter life.Holding down theairflow direction button on the right hand side of the remote control for 5 seconds.machine. A clickPlace the outer cover position on the base of your machine.Looking after your machineTo always get the best performance from your Dyson air purifier, it’s important to regularly clean it and check for blockages.Cleaning your machine If your machine is dusty, wipe with damp, lint-free cloth.Check the sensor inlets on the left hand side of the conic amplifier for dust and debris.Look for dust and debris in the outer cover and in the conic e a soft brush to remove dust and debris.Don’t use detergents or polishes to clean your machine.Eye icons identify where a user should regularly check for dust and debris, in outer cover and conic amplifier. Use a soft brush on the areas highlighted to clean the purifier.。
全功能遥控器说明书

尊敬的用户:感谢您使用XXXXXXXX 的产品,请您在使用前熟悉该说明书,掌握产品的卓越功能,使该产品发挥应有的效能。
主要用途:LED 灯饰集中编码智能遥控控制系统,是一种可广泛应用于宾馆、酒店、家庭客厅、房间、办公场地的LED 灯饰进行编码智能遥控控制的智能化控制系统,该系统可对LED 灯饰进行开关、调光、定时、装饰灯色彩的集中编码遥控控制;即分别通过对各种LED 灯饰进行编码,然后用该智能控制器对各种编码的LED 灯饰进行单独遥控控制;分组遥控控制;全部同时遥控控制。
减少线路布线和日常维护,通过增加的调光和定时功能节能降耗,通过对新增颜色调节功能的灯具的调节,增加装饰灯的观赏性,该智能控制器的使用,使一种灯饰配一只遥控器改变为一只遥控器可遥控多种灯饰或电器(1-225),给操作使用灯饰带来方便。
遥控器面板说明:1、控制器位置指示功能开关,控制位置指示功能,方便夜晚寻找控制器,按位置开关按扭可开、关该功能。
2、IP-编码操作状态,指示控制器为编码操作状态,按IP 按扭可使控制器为IP 编码状态。
3、TM-定时关灯设定状态,指示控制器为定时关灯设定状态,按TM 按扭可使控制器为定时关灯设定状态。
4、SE-模似量设置状态,在各种模似量设置时该标识会点亮。
5、电池电量显示器,显示操作时的实时电池电量,电池外框显示为电池电量一级;电池外框加框内一格为电量二级;电池外框加框内二格为电量三级;全部电池标记全显为电池满。
电池电量不够时该指示器闪烁指示电池电量不够。
6、操作显示屏,显示各种操作状态的IP 地址、亮度等级、定时时间等。
7、1-0-编码按扭,设定各种编码与模拟量的输入。
8、WP-设定编码到被控制器,当编码设定好后同时按该按扭和被编灯饰的编码按扭可将编码写入被控制电器,也叫写码按扭。
9、SV-保存按扭,将所有需要保存的操作数据保存到被控制电器中。
状态RGB 9编码前两位显示编码与定时、时间控制器位置指示功能开10、< >编码加、编码减,加减灯饰IP地址编码。
戴森 吸尘器 用户手册说明书

User manualIn the boxGetting startedCharging your machine Caring for your floors Emptying your bin Cleaning your bin Washing your filterWashing your brush barS V 12 J N .00000 P N .000000-00-00 00.00.00 V E R S I O N N O .01Cleaning your tools Clearing blockagesLooking after your machineThe Dyson cordless vacuum cleaner in an upright position with the wand and cleaner head attached.Dyson micro one point five kilogramsIn the boxWand clipClips to your vacuum's wand to hold tools.A plastic clip that attaches to the wandGetting startedCharging your machineFor the best experience, we recommend fully charging your machine, and any additional batteries, as soon as you open the box and after every clean.The LED light on the end of the handle will flash when the power is running low and you need to put your battery on to charge.Connect the charger directly to the charging point on the base of the handle of your machine. You can also connect to your dock as shown in the installation instructions supplied with your dock.The LED light on the end of the handle will pulse with a blue LED light when charging, and the light will go out when fully charged.It can take up to four hours to fully charge your battery. Your battery has been designed to be left on charge.Your machine won’t operate or charge if the ambient temperature is below 5°C (41°F). This is designed to protect both the motor and battery.You can help prolong the battery life by leaving your machine to cool downbefore recharging.Caring for your floorsCheck that the underside of the cleaner head or tool is clean and free from any objects that may cause damage.Before vacuuming your flooring, rugs, and carpets, check the manufacturer’s recommended cleaning instructions.This machine is designed for use on hard floors. The brush bar on your machine can damage certain flooring. Some rug materials may fuzz if a rotating brush bar is used when vacuuming. If this happens, we recommend vacuuming without the motorised floor tool and consulting with your flooring manufacturer.Washing your filterWash your filter at least once a month to maintain the best performance. Make sure the filter is completely dry before refitting.Twist off your filterDon’t put any part of your machine in a dishwasher or use detergents, polishes or air fresheners.Turn your filter anti-clockwise and pull it away from your machine.Before washing your filter, tap it gently over a bin to remove any loose dust and debris.Wash your filterWash the outside of the filter, rubbing with your fingers to remove the dirt. Carefully rinse the inside filter, without allowing water to fill the filter. Repeat these steps until the water runs clear.Shake and dryEmpty the filter and shake firmly to remove excess water.Keep shaking until there’s no water coming from the filter.Place your filter end up, as shown.Leave your filter to dry for at least 24 hours in a well-ventilated, warm place. Don’t dry your filter in a tumble dryer, microwave or near a naked flame. Important: your filter must be completely dry before you put it back into the machine. Your machine could be damaged if used with a damp filter.Refit your filterTo refit your filter, slide it onto the handle and turn it clockwise until it clicks into place.Your filter may need more frequent washing if you vacuum fine dust,use Max mode frequently or use with the bin full.A hand holding the filter with thenarrow end pointing downwards withdroplets of water being shaken from thefilter and again, with the end pointingdownwards shaking water out.The filter is left to drywith the pleated filterend facing upwards.Filter with hand overthe open end witharrows showing ashaking motion.Filter held in uprightposition, with the widerend in the palm of ahand. Water runningfrom a tap into thenarrower end.The filter is located at therear of your machine.Holding the filterby the hard, plasticend, tap the otherend over the bin.Washing your brush barRemove brush barDon’t put any part of your machine in a dishwasher or use detergents, polishes or air fresheners.Press the cleaner head release button to remove it from the wand.Pull the brush bar off the end cap and put the end cap to one side, don’t wash it.Wash and dry brush baror dirt. Keep washing until the water runs clear.Stand the brush bar upright and leave for at least 24 hours to dry.Replace your brush barsMake sure your brush bar is completely dry before refitting.Rotate the end cap until it clips securely back into position.The cleaner head housing is not washable and should only be wiped over with a damp lint-free cloth.Cleaning your toolspolishes or air fresheners.Light pipe crevice tool Mini motorised toolClearing blockagesIf your machine detects a blockage, the motor will pulse six times. You won’t be able to use your machine until the blockage has been cleared.If you try to use your machine when the motor is pulsing, it will automatically cut out.Leave your machine to cool down before looking for blockages and, for yoursafety, take care not to touch the power button.Disconnect your machine from the charger before looking for blockages. Be careful not to touch the trigger and be aware of sharp objects.Leave your machine to cool down before looking for blockages.Don't use your machine when looking for blockages as this could cause injury.With the wand removed from the machine, check for blockages at both ends of the wand.With the bin removed, check for blockages, paying particular attention to the air inlet, located at on the right–hand side of the machine just below the point where the bin joins the main body of the machine.Turn the cleaner head over to check for obstructions on the brush bar and air inlet.runner.Remove any obstructions from the brush bar.Looking after your machineTo always get the best performance from your machine, it’s important to clean it regularly and check for blockages.Look after your machineIf your machine is dusty, wipe with a damp lint-free cloth.Check for blockages in the cleaner head, tools and main body of your machine. Wash your filter regularly and leave to dry completely.Don’t use detergents or polishes to clean your machine.Look after your batteryTo get the best performance and life from your battery, use Eco mode.Your machine won’t operate or charge if the ambient temperature is below 5°C(41°F). This is designed to protect both the motor and battery.Your serial numbersYou can register your machine using the serial number found on the bottomof your machine.You can find your serial numbers on your machine, battery and charger.Use your serial number to register.。
遥控器操作手册

第三章 遥控器操作手册§3.2 遥控器操作§3.2.1 遥控器的外形(HDR-2型)蓝牙遥控器的外形菜单键§7.1 HD8200E操作流程1、开机:打开接收机,打开遥控器。
2、连接:遥控器与主机进行自动连接,若连接不成功,检查遥控器控制的接收机号,或自动搜索,完成后按“Shift”键重新连接。
3、设置工作方式:若工作方式不能更改,请在采集设置中结束当前文件。
4、查看卫星状态及是否进入3-D;若未进入3-D请等待收星,需要约1-2分钟,直到进入3-D状态。
5、输入文件名,时段及其它设置参数,新建或修改,成功后进行以下操作。
6、若静态,采集完成后结束文件或关机。
7、动态按“·5MNO”键进入动态设置界面,进行碎部或连续测量。
8、完成后,结束文件或直接关机。
9、若十五分钟内未能进入3-D状态,则接收机自动关机以防误开接收机,并节约电能。
10、主机上指示灯的状态代表的含义如下表。
操作遥控器前的准备:1.在背面打开电池盖,按标识正确的方向放入两节1.5V七号电池。
2.按ON/ESC键开机,显示屏会显示开机画面并进入主菜单。
3.选择相应的功能,按ENTER键进入该项设置,也可按快捷键直接进入。
4.设置完毕按ON/ESC键可返回上一级菜单,或退出该项命令的执行。
5.在需要输入字符提示下,按键默认为数字和字母键,由按键次数确定。
信号指示遥控器电量接收机电量§3.3 测量操作步骤连接成功后,遥控器将控制接收机进行全部的工作,由于接收机工作状态分为静态和后差分(动态)两种,遥控器的操作也不完全相同,以下分别进行说明。
§3.3.1 静态操作步骤”和“45o仰角线地平线卫星编号经度纬度大地高解状态精度因子§3.3.2 后差分(动态)操作步骤后差分工作方式是通过使用至少一台GPS接收机作基准站,另外使用一台或多台GPS接收机作流动站,基准站通常安置在一个已知点或一个假定点的已知点上,以静态方式进行观测。
戴森 空气净化器 用户手册说明书
AC2891, AC2888AC2886, AC2880用户手册使用产品前请仔细阅读本使用说明书保留备用目录1 重要事项 2安全22 您的空气净化器4产品概述4控件概览53 使用入门7安装滤网74 使用产品8了解空气质量指示灯8打开和关闭8更改自动模式设置9更改风速10设置定时器11使用灯光开/关功能115 清洁12清洁计划12清洗产品机身12清洁空气质量感应器12请清洁预过滤网136 更换滤网14了解健康空气智能锁14更换过滤网147 故障排除168 保修与服务18订购部件或附件189 声明18电磁场 (EMF) 18回收181简体中文1 重要事项安全使用本产品之前,请仔细阅读本用户手册,并妥善保管以备日后参考。
危险• 切勿让水或任何其它液体或易燃性清洁剂进入产品,以免发生触电和/或火灾。
• 切勿用水或任何其它液体或(易燃性)清洁剂来清洁产品,以免发生触电和/或火灾。
• 切勿在产品周围喷洒杀虫剂或香水等任何可燃材料。
警告• 在将产品连接电源之前,请先检查产品所标电压与当地的供电电压是否相符。
• 如果电源软线损坏,为避免危险,必须由制造厂或其维修部或类似的专职人员来更换。
• 如果插头、电源线或产品本身受损,请勿再使用本产品。
• 本产品适合由 8 岁或以上年龄的儿童以及肢体不健全、感觉或精神上有障碍或缺乏相关经验和知识的人士使用,但前提是有人对他们使用本产品进行监督或指导,以确保他们安全使用,并且让他们明白相关的危害。
不得让儿童玩耍本产品。
请勿让儿童在无人监督的情况下清洁和保养产品。
• 请勿堵塞进风和出风口,例如不要将物体放置在出风口上或进风口前方。
• 确保异物未通过出风口进入产品内部。
警告• 本产品不能替代正常通风、日常吸尘或者在烹饪时使用的抽油烟机。
• 如果连接产品的电源插座接触不良,则产品的插头可能会变得很热。
确保所连接的电源插座接触良好。
• 一定要在干燥、稳固、平整且水平的表面上放置和使用本产品。
rc-07遥控器说明书

rc-07遥控器说明书RC-07遥控器是一款适用于各种家电的遥控器,具有多种功能,操作简单,适用范围广泛,是现代家庭必不可少的电器之一。
下面我们具体介绍一下RC-07遥控器的使用方法和功能。
一、使用方法1.开机:按下电源键,遥控器开机,准备控制可连接的家电。
2.连接家电:选择需要控制的家电类型,按照提示进行设置,然后按下连接键,系统自动扫描家电连接,连接成功后,遥控器即可控制该家电。
3.操作家电:通过遥控器上的按键,可以将操作指令发送到被控制的家电中,实现各种功能,比如开/关电器、调节音量、切换频道等功能。
4.切换模式:遥控器上有多个控制模式,用户可以根据自己的需要进行切换,比如针对不同品牌的电视机,遥控器有相应的不同控制模式。
5.节能提示:遥控器自带节能提示功能,在用户长时间不使用的情况下,会自动进入待机模式,节省能源。
二、功能介绍1.多种控制模式:该遥控器支持多种控制模式,用户可以根据家电品牌自由进行切换。
2.人性化设计:遥控器采用人性化设计,按键排列合理,操作简单,使用方便。
3.光感技术:遥控器采用先进的光感技术,灵敏度高,反应速度快,操作稳定。
4.广泛适用:该遥控器可以控制各种品牌的电视机、DVD机、空调、电风扇等家电,适用范围广泛。
5.实用功能:遥控器具有实用的功能,比如电视机控制模式、睡眠计划定时开关、音量和频道控制,能够满足用户的各种需求。
6.系统升级:该遥控器支持自动系统升级,随着家电技术的不断发展,系统也会随之升级,更新功能更加实用。
三、使用注意事项1.遥控器需要及时更换电池,避免影响操作效果。
2.使用时请注意避免水和其他化学溶液接触。
3.请勿用力敲打遥控器,避免损坏内部电路。
4.请勿将遥控器置于高温、潮湿或震动较大的环境中,避免影响正常使用。
以上就是对RC-07遥控器的详细介绍。
总的来说,该遥控器操作简单、功能强大、使用方便,是各种家电的最佳配套设备。
我们相信,随着科技的不断发展,遥控器的应用范围和功能也会越来越广泛,让我们一起期待遥控器的更多新功能和应用场景。
- 1、下载文档前请自行甄别文档内容的完整性,平台不提供额外的编辑、内容补充、找答案等附加服务。
- 2、"仅部分预览"的文档,不可在线预览部分如存在完整性等问题,可反馈申请退款(可完整预览的文档不适用该条件!)。
- 3、如文档侵犯您的权益,请联系客服反馈,我们会尽快为您处理(人工客服工作时间:9:00-18:30)。
戴森PH07遥控器说明
进入手机,找到“万能遥控器”,并点击。
在万能遥控器首页,点击左上角“+”。
进入“红外遥控器”页面后,点击“风扇”。
在“选择风扇品牌”页面,点击右侧品牌首字母“D”可以快速定位到首字母为“D”的页面(或向上滑屏来查找)。
找到“戴森”后,点击它。
在“添加风扇遥控器”页面,点击电源按钮图标,之后根据提示来操作即可轻松地添加上戴森电风遥控器,并显示在首页上。
遥控器添加好后,就像平时用遥控器一样来控制风扇了。
END注意事项手机需要有红外功能,且安装有万能遥控器。
1、使用戴森吸尘器前,应仔细看一遍说明书,然后对照说明书检查一下它的各种附件是否齐全,再按说明书上的步骤和方法将吸尘器各部分安装好。
每次连续使用时间尽量不要超过2小时,以免电机过热而烧毁。
2、启动前,先核对一下电源的电压和频率,如果戴森吸尘器带有地线,应接地。
还应检查机体上的集层过滤袋,看框格是否放平放妥,机体上应该关紧的门、搭扣或盖是否关好、盖严和搭紧,检查确认无误后才可启用。
3、使用戴森吸尘器前,应将被清扫场所中较大的脏物、纸片等除去,以免吸入管内堵塞进风口或尘道。
使用戴森吸尘器时,应注意不要吸进易燃物(如沾有汤油的尘团、火柴头、未熄灭的烟头、易燃药粉等)、潮湿泥土、污水、金属屑等等,以防损坏机器。
4、戴森吸尘器的外观清洁比较容易,一般只需要用蘸有肥皂水的软布擦拭即可,但是千万不能用有机溶剂清洗,以免其外观塑料开裂、褪色或者掉漆,当然也不可以用钢丝球等硬物清洁,以免给机体造成损害。