交换机路由器常用配置操作
1.路由器、交换机基本配置

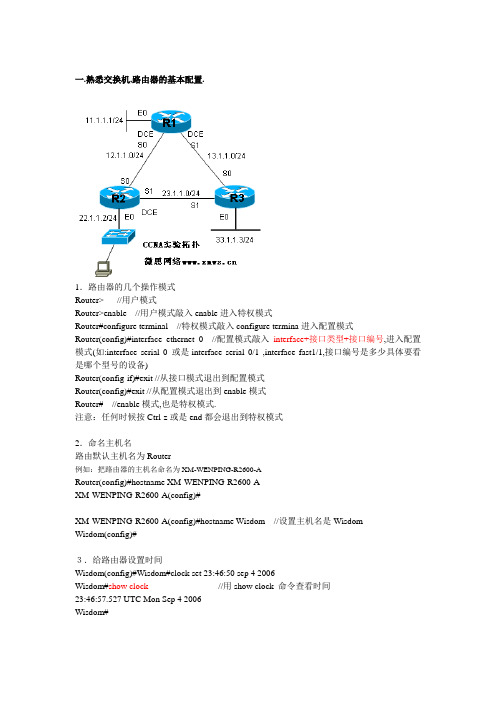
一.熟悉交换机,路由器的基本配置.1.路由器的几个操作模式Router> //用户模式Router>enable //用户模式敲入enable进入特权模式Router#configure terminal //特权模式敲入configure termina进入配置模式Router(config)#interface ethernet 0 //配置模式敲入interface+接口类型+接口编号,进入配置模式(如:interface serial 0 或是interface serial 0/1 ,interface fast1/1,接口编号是多少具体要看是哪个型号的设备)Router(config-if)#exit //从接口模式退出到配置模式Router(config)#exit //从配置模式退出到enable模式Router# //enable模式,也是特权模式.注意:任何时候按Ctrl-z或是end都会退出到特权模式2.命名主机名路由默认主机名为Router例如:把路由器的主机名命名为XM-WENPING-R2600-ARouter(config)#hostname XM-WENPING-R2600-AXM-WENPING-R2600-A(config)#XM-WENPING-R2600-A(config)#hostname Wisdom//设置主机名是WisdomWisdom(config)#3.给路由器设置时间Wisdom(config)#Wisdom#clock set 23:46:50 sep 4 2006Wisdom#show clock //用show clock 命令查看时间23:46:57.527 UTC Mon Sep 4 2006Wisdom#4.给路由器设置banner//登录信息Wisdom(config)#banner motd #Enter TEXT message. End with the character '#'.Welcome to wisdom !!#Wisdom(config)#endWisdom#exit03:12:58: %SYS-5-CONFIG_I: Configured from console by consoleWisdom#exitWisdom con0 is now availablePress RETURN to get started.Welcome to wisdom !!// 配置是banner之后无论谁登录到路由器都会先看到的信息. Wisdom>enableWisdom#Banner信息很多情况下是一些警告的信息:如:banner motd ^C********************************************************** [WARNING] ** If you are not authorised to access this system ** exit immediately. ** Unauthorised access to this system is forbidden by ** company policies, national, and international laws. ** Unauthorised users are subject to criminal and civil ** penalties as well as company initiated disciplinary ** proceedings. ** ** By entry into this system you acknowledge that you ** are authorised to access it and have the level of ** privilege at which you subsequently operate on ** this system ** You consent by entry into this system to the ** monitoring of your activities **********************************************************^C5.路由器,交换机接口的描述Wisdom(config)#interface ethernet 0Wisdom(config-if)#description To Fuzhou-R2600-A//描述ethernet0口是接到福州的路由器A,一般都要尽可以的描述详细一点,这样有利于日后的维护.6.路由器,交换机密码的设置A.enable密码的设置(enable的密码就是从用户模式到特权模式的密码,enable的密码有两种,一种是加密的,一种是不加密码的,建议使用enable secret 设置密码)Wisdom(config)#enable password ciscoWisdom(config)#enable secret cisco1Wisdom(config)#endWisdom#disable03:29:29: %SYS-5-CONFIG_I: Configured from console by consoleWisdom>enablePassword://这里要输入的是cisco1 ,如果enable的两个密码同时设置,只是secret生效.Wisdom#Wisdom#show runBuilding configuration...Current configuration:!enable secret 5 $1$LNtZ$XFAQft5YyTsrXFV AXNp0Y///加密过的enable password cisco //显示为明文,容易被破解.不过可以手工加密,用命令service password-encryption 进行加密Wisdom(config)#service password-encryptionWisdom#show runBuilding configuration...Current configuration:!enable secret 5 $1$LNtZ$XFAQft5YyTsrXFV AXNp0Y///加密过的enable password 7 104D000A0618//手工加密过的B.设置交换机路由器的console 口密码Wisdom(config)#line console 0Wisdom(config-line)#login//启用密码no login 是不启用密码Wisdom(config-line)#password cisco //设置的密码为ciscoWisdom(config-line)#end03:39:51: %SYS-5-CONFIG_I: Configured from console by consoleWisdom#exitWisdom con0 is now availablePress RETURN to get started.Welcome to wisdom !!User Access VerificationPassword://要输入console口密码cisco 才可以进入用户模式Wisdom>C.设置路由器交换机的vty 密码(也是就是远程登陆telnet的密码)Wisdom(config)#line vty 0 4//04的意思是0到4,5个人可以同时登录Wisdom(config-line)#login//启用密码,no login 是不启用密码Wisdom(config-line)#password cisco//设置的密码为cisco测试网络的连通性:telnet+IP addressD:删除enable ,console ,vty 密码Wisdom(config)#no enable passwordWisdom(config)#no enable secretWisdom(config)#line conWisdom(config)#line console 0Wisdom(config-line)#no passwordWisdom(config)#line vty 0 4Wisdom(config-line)#no passwordWisdom(config-line)#E.两条常用的命令阻止会话退出--exec-timeout使光标还原到原来的位置,重新显示被覆盖的命里--logging synchronousWisdom(config)#line console 0Wisdom(config-line)#exec-timeout 0 0//0分0秒表示永远不超时,等同于no exec-timeoutWisdom (config)#line console 0Wisdom (config-line)#logging synchronousF.路由器和交换机的基本配置是一样的.大同小异.这里介绍怎么远程telnet 到交换机. Switch(config)#hostname SW2950 //命名主要机SW2950(config)#interface vlan 1 //在二层的交换机上配置一个三层管理地址SW2950(config-if)#ip add 192.168.10.225 255.255.255.0SW2950(config-if)#no shutdown //启用接口SW2950(config)#line vty 0 4SW2950(config-line)#loginSW2950(config-line)#password ciscoSW2950(config-line)#pc>telnet 192.168.10.225Trying 192.168.10.225 ... OpenUser Access VerificationPassword:SW2950>这证明远程telnet 成功.G:配置R1.R2.R3的基本配置,使得在R1可以ping通12.1.1.2,ping通13.1.1.3配置R1:R1(config)#no ip domain-lookup //关掉域名查找R1(config)#line console 0R1(config-line)#loginR1(config-line)#password ciscoR1(config-line)#logging synchronousR1(config-line)#exec-timeout 0 0R1(config-line)#配置路由器的E0口IP地址Router(config)#hostname R1R1(config)#interface ethernet 0 //配置E0接口的IP地址R1(config-if)#ip address 11.1.1.1 255.255.255.0R1(config-if)#no shutdownR1(config-if)#no keepaliveR1(config-if)#exit配置路由器的S0 口IP地址R1(config)#interface serial 0R1(config-if)#ip address 12.1.1.1 255.255.255.0R1(config-if)#clock rate 4000000 //给DCE接口配置时钟R1(config-if)#no shutdown配置路由器的S1 口IP地址R1(config)#interface serial 1R1(config-if)#ip address 13.1.1.1 255.255.255.0R1(config-if)#clock rate 4000000R1(config-if)#no shutdown配置R2:R2(config)#no ip domain-lookup //关掉域名查找R2(config)#line console 0R2(config-line)#loginR2(config-line)#password ciscoR2(config-line)#logging synchronousR2(config-line)#exec-timeout 0 0R2(config-line)#Router(config)#hostname R2R2(config)#interface ethernet 0R2(config-if)#ip address 22.1.1.2 255.255.255.0R2(config-if)#no shutdownR2(config-if)#no keepaliveR2(config-if)#exiR2(config)#interface serial 0R2(config-if)#ip address 12.1.1.2 255.255.255.0R2(config-if)#no shutdown配置R3:R3(config)#no ip domain-lookup //关掉域名查找R3(config)#line console 0R3(config-line)#loginR3(config-line)#password ciscoR3(config-line)#logging synchronousR3(config-line)#exec-timeout 0 0R3(config-line)#exitRouter(config)#hostname R3R3(config)#interface ethernet 0R3(config-if)#ip address 33.1.1.3 255.255.255.0R3(config-if)#no shutdownR3(config-if)#no keepaliveR3(config)#int serial 0R3(config-if)#ip address 13.1.1.3 255.255.255.0R3(config-if)#no shutdown配置了以前步骤之后用命令show interface 检查接口的状态. R1#show ip interface briefEthernet0 11.1.1.1 YES manual up up Serial0 12.1.1.1 YES manual up up Serial1 13.1.1.1 YES manual up upR1#show interfaces ethernet 0Ethernet0 is up, line protocol is upHardware is Lance, address is 00e0.b05b.018e (bia 00e0.b05b.018e)Internet address is 11.1.1.1/24MTU 1500 bytes, BW 10000 Kbit, DL Y 1000 usec,reliability 255/255, txload 1/255, rxload 1/255Encapsulation ARPA, loopback not setKeepalive not setARP type: ARPA, ARP Timeout 04:00:00…………..…………..R1#show interfaces serial 0Serial0 is up, line protocol is upHardware is HD64570Internet address is 12.1.1.1/24MTU 1500 bytes, BW 1544 Kbit, DL Y 20000 usec,reliability 255/255, txload 1/255, rxload 1/255Encapsulation HDLC, loopback not setKeepalive set (10 sec)………………………….R1#show interfaces serial 1Serial1 is up, line protocol is upHardware is HD64570Internet address is 13.1.1.1/24MTU 1500 bytes, BW 1544 Kbit, DL Y 20000 usec,reliability 255/255, txload 1/255, rxload 1/255Encapsulation HDLC, loopback not setKeepalive set (10 sec)……………..……………………..R1#R2#show ip interface briefEthernet0 22.1.1.2 YES manual up up Serial0 12.1.1.2 YES manual up up Serial1 unassigned YES unset administratively down downR3#show ip interface briefInterface IP-Address OK? Method Status Protocol Ethernet0 33.1.1.3 YES manual up up Serial0 13.1.1.3 YES manual up up Serial1 unassigned YES unset administratively down down在R1测试到R2 R3的连通性,使用ping 的命令Ping + ip address如:R1#ping 12.1.1.2Type escape sequence to abort.Sending 5, 100-byte ICMP Echos to 12.1.1.2, timeout is 2 seconds:!!!!! //5个!表明网络是通的Success rate is 100 percent (5/5), round-trip min/avg/max = 4/4/8 msR1#ping 13.1.1.3Type escape sequence to abort.Sending 5, 100-byte ICMP Echos to 13.1.1.3, timeout is 2 seconds:!!!!! //5个!表明网络是通的Success rate is 100 percent (5/5), round-trip min/avg/max = 4/4/8 msR1#在路由器或是交换机里使用ping命令如果ping的结果是!!!!!则表明网络正常...则表明网络不通.如果ping的结果是…如果ping的结果是U.U.U则表明下一跳不可达.H:路由器交换机几条常用的命令:Show version //查看软件版本show running-config //查看当前运行的配置文件show startup-config //查看已保存过的配置文件show ip int brie //查看接口基本状态show interface //查看接口状态的详细信息copy run star //把当前运行的配置COPY到NVRAM(断电后不丢失)show controller serial 0 //检察s0口的串行线是否连接好R1#show controllers serial 0HD unit 0, idb = 0x29A524, driver structure at 0x2A1AE8buffer size 1524 HD unit 0, V.35 DCE cable, clockrate 4000000…………R1#show controllers serial 1HD unit 0, idb = 0x29A524, driver structure at 0x2A1AE8buffer size 1524 HD unit 0, V.35 DCE cable, clockrate 4000000 //DCE接口要配置时钟…………R2#show controllers serial 0HD unit 0, idb = 0x270B50, driver structure at 0x278108buffer size 1524 HD unit 0, V.35 DTE cable //DTE接口不用配置时钟………………I.清除NVRAM(注:交换机和路由器所用命令一样)SW2950#erase startup-config要重起路由器或是交换机,配置才会丢失.。
华三华为交换机-路由器配置常用命令

H3C交换机配置命令大全1、system-view 进入系统视图模式2、sysname 为设备命名3、display current-configuration 当前配置情况4、language-mode Chinese|English 中英文切换5、interface Ethernet 1/0/1 进入以太网端口视图6、port link-type Access|Trunk|Hybrid 设置端口访问模式7、undo shutdown 打开以太网端口8、shutdown 关闭以太网端口9、quit 退出当前视图模式10、vlan 10 创建VLAN 10并进入VLAN 10的视图模式11、port access vlan 10 在端口模式下将当前端口加入到vlan 10中12、port E1/0/2 to E1/0/5 在VLAN模式下将指定端口加入到当前vlan中13、port trunk permit vlan all 允许所有的vlan通过H3C路由器配置命令大全1、system-view 进入系统视图模式2、sysname R1 为设备命名为R13、display ip routing-table 显示当前路由表4、language-mode Chinese|English 中英文切换5、interface Ethernet 0/0 进入以太网端口视图6、ip address 192.168.1.1 255.255.255.0 配置IP地址和子网掩码7、undo shutdown 打开以太网端口8、shutdown 关闭以太网端口9、quit 退出当前视图模式10、ip route-static 192.168.2.0 255.255.255.0 192.168.12.2 description To.R2 配置静态路由11、ip route-static 0.0.0.0 0.0.0.0 192.168.12.2 description To.R2 配置默认的路由H3C S3100 SwitchH3C S3600 SwitchH3C MSR 20-20 Router1、调整超级终端的显示字号;2、捕获超级终端操作命令行,以备日后查对;3、language-mode Chinese|English 中英文切换;4、复制命令到超级终端命令行,粘贴到主机;5、交换机清除配置:<H3C>reset save ;<H3C>reboot ;6、路由器、交换机配置时不能掉电,连通测试前一定要检查网络的连通性,不要犯最低级的错误。
路由与交换--交换机常用配置及其实验案例

路由与交换--交换机常⽤配置及其实验案例1 交换机常⽤配置命令1.1 配置主机名与⼝令Switch>enableSwitch#config tSwitch(config)#hostname SASA(config)#enable password cisco(明⽂)SA(config)#enable secret cisco(暗⽂)SA(config)#exitSA#show running-config //显⽰当前运⾏的配置⽂件1.2 配置端⼝Switch>enableSwitch#config tSwitch(config)#interface fa0/1Switch(config-if)#no shutdownSwitch(config-if)#exitSwitch#show interfaces fe0/1//显⽰特定端⼝的所有信息1.3 配置⼀组端⼝Switch>enableSwitch#config tSwitch(config)#interface range fa0/1 – 3Switch(config-range)#speed 10Switch(config-range)#no shutSwitch(config-range)#exitSwitch#show interfaces //显⽰所有端⼝信息1.4 接⼊⽅式密码的配置(1)Telnet 终端线路密码设置Switch>enableSwitch#config tSwitch(config)#line vty 0 15 //设置虚拟连接数Switch(config-line)#loginSwitch(config-line)#password cisco(2)Console 线路密码设置Switch(config)#line con 0Switch(config-line)#loginSwitch(config-line)#password cisco1.5 配置的保存和查看保存Switch#copy running-config startup-config //将配置⽂件保存为启动配置⽂件查看Switch#show ?2 VLAN 基本配置命令创建 VLAN 组。
华为路由器交换机常用命令

华为路由器交换机常用命令一、设备管理命令1.登录管理命令- ssh [ip地质] -p [端口号]:通过SSH协议登录设备。
- telnet [ip地质]:通过Telnet协议登录设备。
- logout:退出设备。
2.用户管理命令- display current-configuration:显示当前设备配置信息。
- save:保存当前配置。
- undo save:取消保存的配置。
- super:切换到超级用户模式。
- user-interface console 0:配置控制台终端的参数。
- user-interface vty 0 4:配置远程登录终端的参数。
3.设备操作命令- reboot:重启设备。
- reset saved-configuration:恢复出厂配置。
- display version:显示设备的硬件和软件版本信息。
- display device:显示设备的基本信息。
- display interface[接口名称]:显示指定接口信息。
- display ip routing-table:显示IP路由表信息。
二、网络配置命令1.IP配置命令- interface [接口名称]:进入指定接口。
- ip address [IP地质] [子网掩码]:配置接口IP地质。
- undo ip address:取消接口IP地质配置。
- ip route-static [目标网络] [子网掩码] [下一跳地质]:配置静态路由。
- undo ip route-static [目标网络] [子网掩码] [下一跳地质]:取消静态路由配置。
2.VLAN配置命令- vlan [VLAN ID]:创建指定VLAN。
- quit:退出VLAN配置模式。
- interface vlan [VLAN ID]:进入指定VLAN接口。
- ip address [IP地质] [子网掩码]:为VLAN接口配置IP地质。
锐捷交换机路由器常用配置操作

1.1通过TELNET方式来配置设备提问:如何通过telnet方式来配置设备?回答:步骤一:配置VLAN1的IP地址S5750>en ----进入特权模式S5750#conf ----进入全局配置模式S5750(config)#int vlan 1 ----进入vlan 1接口S5750(config-if)#ip address 192.168.0.230 255.255.255.0----为vlan 1接口上设置管理ip S5750(config-if)#exit ----退回到全局配置模式步骤二:配置telnet密码S5750(config)#line vty 0 4 ----进入telnet密码配置模式S5750(config-line)#login ---启用需输入密码才能telnet成功S5750(config-line)#password rscstar ----将telnet密码设置为rscstarS5750(config-line)#exit ----回到全局配置模式S5750(config)# enable secret level 15 0 rscstar----配置进入特权模式的密码为rscstar 1.2更改IOS命令的特权等级提问:如何只允许dixy这个用户使用与ARP相关的命令?回答:S5750(config)#username dixy password dixy ----设置dixy用户名和密码S5750(config)#username dixy privilege 10 ----dixy帐户的权限为10S5750(config)#privilege exec level 10 show arp----权限10可以使用show arp命令S5750(config)#privilege config all level 10 arp----权限10可以使用所有arp打头的命令S5750(config)#line vty 0 4 ----配置telnet登陆用户S5750(config-line)#no passwordS5750(config-line)#login local1.3设备时钟设置提问:如何设置设备时钟?回答:S5750#clock set 12:45:55 11 25 2008----设置时间为2008年11月25日12点45分55秒S5750#clock update-calendar ----设置日历更新S5750(config)#clock timezone CN 8 22 ----时间名字为中国,东8区22分2.1 交换机vlan和trunk的配置提问:如何在交换机上划分vlan,配置trunk接口?回答:步骤一:给交换机配置IP地址S2724G#confS2724G(config)#int vlan 1S2724G(config-if)#ip addess 192.168.0.100 255.255.255.0----给VLAN 1配置IP地址S2724G(config-if)#no shutdown ----激活该VLAN接口S2724G(config-if)#exitS2724G(config)#ip default-gateway 192.168.0.1 ---指定交换机的网关地址步骤二:创建VLANS2724G#confS2724G(config)#vlan 10 ----创建VLAN 10S2724G(config-vlan)#exitS2724G(config)# vlan 20 ----创建VLAN 20S2724G(config-vlan)#exit步骤三:把相应接口指定到相应的VLAN中S2724G(config)#int gi 0/10S2724G(config-if)#switch access vlan 10 ----把交换机的第10端口划到VLAN 10中S2724G(config-if)#exitS2724G(config)#int gi 0/20S2724G(config-if)#switch access vlan 20 ----把交换机的第20端口划到VLAN 20中S2724G(config-if)#exitS2724G(config)#int gi 0/24S2724G(config-if)#switch mode trunk ----设置24口为Trunk模式(与三层交换机的连接口S2724G(config-if)#步骤四:保存配置S2724G(config-if)#endS2724G#write2.2 turnk接口修剪配置提问:如何让trunk接口只允许部分vlan通过?回答:Switch(config)#int fa 0/24Switch (config-if)#switch mode trunkSwitch (config-if)#switchport trunk allowed vlan remove 10,20,30-40----不允许VLAN10,20,30-40通过Trunk口2.3 PVLAN配置提问:如何实现几组用户之间的隔离,但同时又都能访问公用服务?回答:步骤一:创建隔离VLANS2724G#confS2724G(config)#vlan 3 ----创建VLAN3S2724G(config-vlan)#private-vlan community ----将VLAN3设为隔离VLAN S2724G(config)#vlan 4 ----创建VLAN4S2724G(config-vlan)#private-vlan community ----将VLAN4设为隔离VLAN S2724G(config-vlan)#exit ----退回到特权模式步骤二:创建主VLANS2724G(config)#vlan 2 ----进入VLAN2S2724G(config-vlan)#private-vlan primary ----VLAN2为主VLAN步骤三:将隔离VLAN加到到主VLAN中VLANS2724G(config-vlan)#private-vlan association add 3-4----将VLAN3和VLAN4加入到公用VLAN中,VLAN3和VLAN4的用户可以访问公用接口步骤四:将实际的物理接口与VLAN相对应S2724G(config)#interface GigabitEthernet 0/1----进入接口1,该接口连接服务器或者上联设备S2724G(config-if)#switchport mode private-vlan promiscuous----接口模式为混杂模式S2724G(config-if)#switchport private-vlan mapping 2 add 3-4----将VLAN3和VLAN4映射到VLAN2上S2724G(config)#int gi 0/10 ----进入接口10S2724G(config-if)#switchport mode private-vlan hostS2724G(config-if)#switchport private-vlan host-association 2 3----该接口划分入VLAN3 S2724G(config)#int gi 0/20 ----进入接口20S2724G(config-if)#switchport mode private-vlan hostS2724G(config-if)#switchport private-vlan host-association 2 4----该接口划分入VLAN4步骤五:完成VLAN的映射S2724G(config)#int vlan 2 ----进入VLAN2的SVI接口S2724G(config-if)#ip address 192.168.2.1 255.255.255.0----配置VLAN2的ip地址S2724G(config-if)#private-vlan mapping add 3-4----将VLAN3和VLAN4加入到VLAN2中注释:1. S20、S21不支持私有VLAN,可以通过保护端口实现类似功能2. S3250、S3750和S5750同时支持保护端口和私有VLAN3. S3760不支持私有VLAN和保护端口2.4 端口汇聚配置提问:如何将交换机的端口捆绑起来使用?回答:S5750#confS5750(config)#interface range gigabitEthernet 0/1 – 4 ----同时进入1到4号接口S5750(config-if)#port-group 1 ----设置为聚合口1S5750(config)#interface aggregateport 1 ----进入聚合端口1注意:配置为AP口的接口将丢失之前所有的属性,以后关于接口的操作只能在AP1口上面进行2.5 生成树配置提问:如何配置交换机的生成树?回答:步骤一:根桥的设置switch_A#conf tswitch_A(config)#spanning-tree ---默认模式为MSTPswitch_A(config)#spanning-tree mst configurationswitch_A(config)#spanning-tree mst 10 priority 4096 ---设置为根桥步骤二:非根桥的设置switch_B#conf tswitch_B(config)#spanning-tree ---默认模式为MSTPswitch_B(config)#spanning-tree mst configurationswitch_B(config)#int f0/1 ---PC的接入端口switch_B(config)#spanning-tree bpduguard enableswitch_B(config)#spanning-tree portfast2.6 端口镜像设置提问:如何配置交换机的端口镜像?回答:switch#conf tswitch#(config)#switch (config)# monitor session 1 source interface gigabitEthernet 3/1 both---监控源口为g3/1 switch (config)# monitor session 1 destination interface gigabitEthernet 3/8 switch ---监控目的口为g3/8,并开启交换功能注意:S2026交换机镜像目的端口无法当做普通接口使用3.1 交换机地址绑定(address-bind)功能提问:如何对用户ip+mac进行两元素绑定?回答:S5750#confS5750(config)# address-bind 192.168.0.101 0016.d390.6cc5----绑定ip地址为192.168.0.101 MAC地址为0016.d390.6cc5的主机让其使用网络S5750(config)# address-bind uplink GigabitEthernet 0/1----将g0/1口设置为上联口,也就是交换机通过g0/1的接口连接到路由器或是出口设备,如果接口选择错误会导致整网不通S5750(config)# address-bind install ----使能address-bind功能S5750(config)#end ----退回特权模式S5750# wr ----保存配置注释:1. 如果修改ip或是MAC地址该主机则无法使用网络,可以按照此命令添加多条,添加的条数跟交换机的硬件资源有关2. S21交换机的address-bind功能是防止Ip冲突,只有在交换机上绑定的才进行ip和M AC的匹配,如果下边用户设置的ip地址在交换机中没绑定,交换机不对该数据包做控制,直接转发。
锐捷交换机及路由器基本配置

锐捷交换机及路由器基本配置锐捷交换机及路由器基本配置交换机和路由器是构建计算机网络的重要设备,锐捷交换机和路由器是目前市场上常用的网络设备之一。
本文档将详细介绍锐捷交换机和路由器的基本配置步骤。
一、硬件连接1.将交换机或路由器与电源连接,并确保设备处于正常工作状态。
2.使用网线将交换机或路由器的LAN口与计算机或其他网络设备连接。
二、登录设备1.打开计算机的网络设置页面。
2.在浏览器中输入设备的管理IP地质,并按回车键。
3.输入设备的默认用户名和密码进行登录。
三、基本配置1.设定设备的基本信息a) 修改设备名称:根据需求修改设备的名称。
b) 设定管理IP地质:如果需要修改管理IP地质,可以在网络设置中进行修改。
2.设置设备的时间和日期a) 设置时区和时间格式:根据所在地区设置对应的时区和时间格式。
b) 同步时间服务器:选择能够提供时间同步服务的服务器,并进行同步。
3.配置系统登录认证a) 修改管理账号和密码:设置设备的管理员账号和密码,确保设备的安全性。
b) 配置远程登录:如果需要通过远程方式登录设备,可以设置远程登录相关配置。
4.网络接口配置a) 配置接口IP地质:根据局域网的需求,为设备的接口分配合适的IP地质。
b) 设置接口上行速率:根据实际的网络接入速率,设置接口的上行速率。
5.VLAN配置a) 创建VLAN:根据网络的需求,创建对应的VLAN,并为其分配合适的IP地质。
b) 配置端口:根据需要,将接口划分到特定的VLAN中。
6.路由配置a) 配置静态路由:根据网络的拓扑结构,配置静态路由,实现不同子网之间的通信。
b) 开启动态路由协议:如果需要支持动态路由,可以配置相应的路由协议,如OSPF或BGP。
7.安全配置a) 配置防火墙策略:根据网络的安全要求,设置防火墙策略,限制不安全的流量。
b) 启用端口安全功能:可以通过配置端口安全来限制接口上的设备数量。
8.保存配置与重启设备a) 保存配置:在完成基本配置后,及时保存配置,以防止配置丢失。
华为交换机路由器常见开局配置指导

华为交换机路由器常见开局配置指导 5.3 配置网络互连互通 ..................................................... 51 5.3.1 通过快速向导配置实现上网 .......................................... 51 5.3.2 配置静态 IP 地址上网 .............................................. 56 5.3.3 配置 PPPoE 拨号上网 .............................................. 59 5.4 配置 DHCP 服务器 ..................................................... 61 5.5 映射内网服务器....................................................... 62 5.6 限速配置............................................................ 64 5.6.1 基于 IP 地址限速 ................................................. 65 5.6.2 基于内网用户限速................................................. 66 5.7 公网多出口配置....................................................... 69 5.7.1 基于源地址的多出口 ............................................... 69 5.7.2 基于目的地址的多出口 ............................................. 73 6 常见网络故障维护方法 ...................................................... 76 6.1 删除多余配置 ........................................................ 76 6.2 密码恢复............................................................ 77 6.2.1 Console 密码恢复 ................................................ 77 6.2.2 Telnet 密码恢复 ................................................. 77 6.2.3 Web 密码恢复.................................................... 77 6.3 信息采集............................................................ 77 6.4 本地端口镜像配置 ..................................................... 82 6.5 流量统计配置 ...................................................局配置指导
交换机路由器命令大全(结合配置实例)

交换机路由器命令大全(结合配置实例)交换机路由器命令大全(结合配置实例)交换机和路由器是计算机网络中常用的网络设备,用于实现数据包的转发和路由选择。
在实际应用中,我们需要使用命令来配置交换机和路由器的各项参数。
本文将给出交换机和路由器常用命令的大全,并结合实际配置示例进行说明。
一、交换机命令1. 查看交换机基本信息查看交换机型号、固件版本、序列号等基本信息:show version2. 配置交换机端口设置交换机接口的速率、全双工模式等参数:interface interface_namespeed speed_valueduplex {full | half}3. 查看交换机端口状态查看交换机端口的连接状态、速率、工作模式等信息:show interfaces status4. 配置交换机VLAN创建VLAN和端口关联,实现VLAN的隔离和管理:vlan vlan_idname vlan_nameinterface interface_name5. 查看交换机MAC表显示交换机学习到的MAC地址和对应的端口:show mac-address-table6. 配置交换机链路聚合将多个物理端口绑定为一个逻辑端口,提高带宽和冗余性:interface port-channel channel_numberdescription description_textswitchport mode trunk/access7. 交换机Spanning Tree配置配置交换机的Spanning Tree协议参数,避免网络环路:spanning-tree vlan vlan_idpriority priority_value二、路由器命令1. 查看路由表显示路由器的路由表,包括直连路由、静态路由和动态路由表项:show ip route2. 配置静态路由手动配置路由器的静态路由表,指定目的网络和下一跳信息:ip route destination_network subnet_mask next_hop_ip3. 配置路由器接口配置路由器的接口参数,包括IP地址、子网掩码、描述等:interface interface_nameip address ip_address subnet_maskdescription description_text4. 配置路由器OSPF协议配置路由器之间的OSPF动态路由协议,实现网络的动态路由选择:router ospf process_idnetwork network_address wildcard_mask area area_number5. 配置路由器ACL配置路由器的访问控制列表,用于控制数据包的流量:access-list access_list_number permit/deny source destination6. 配置路由器NAT配置路由器的网络地址转换功能,实现内网与外网的互通:interface interface_nameip nat inside/outside三、配置实例1. 配置交换机端口接口GigabitEthernet0/1配置为100Mbps全双工模式:interface GigabitEthernet0/1speed 100duplex full2. 配置交换机VLAN创建VLAN10,将接口GigabitEthernet0/1划分到VLAN10:vlan 10name VLAN10interface GigabitEthernet0/13. 配置路由器接口将接口GigabitEthernet0/0配置为192.168.1.1/24的IP地址:interface GigabitEthernet0/0ip address 192.168.1.1 255.255.255.0description LAN interface4. 配置静态路由配置路由器的静态路由表,将目的网络192.168.2.0/24指向下一跳192.168.1.2:ip route 192.168.2.0 255.255.255.0 192.168.1.25. 配置路由器ACL设置访问控制列表,允许源IP地址为192.168.1.0/24的流量通过:access-list 1 permit 192.168.1.0 0.0.0.2556. 配置路由器NAT设置路由器的NAT,将内部接口GigabitEthernet0/1地址转换为公网地址:interface GigabitEthernet0/1ip nat inside以上是交换机和路由器常用命令的大全以及配置实例。
- 1、下载文档前请自行甄别文档内容的完整性,平台不提供额外的编辑、内容补充、找答案等附加服务。
- 2、"仅部分预览"的文档,不可在线预览部分如存在完整性等问题,可反馈申请退款(可完整预览的文档不适用该条件!)。
- 3、如文档侵犯您的权益,请联系客服反馈,我们会尽快为您处理(人工客服工作时间:9:00-18:30)。
锐捷交换机路由器常用配置操作1.1 通过TELNET方式来配置设备提问:如何通过telnet方式来配置设备?回答:步骤一:配置VLAN1的IP地址S5750>en ----进入特权模式S5750#conf ----进入全局配置模式S5750(config)#int vlan 1 ----进入vlan 1接口S5750(config-if)#ip address 192.168.0.230 255.255.255.0 ----为vlan 1接口上设置管理ipS5750(config-if)#exit ----退回到全局配置模式步骤二:配置telnet密码S5750(config)#line vty 0 4 ----进入telnet密码配置模式S5750(config-line)#login ---启用需输入密码才能telnet成功S5750(config-line)#password rscstar ----将telnet密码设置为rscstarS5750(config-line)#exit ----回到全局配置模式S5750(config)# enable secret level 15 0 rscstar ----配置进入特权模式的密码为rscstar1.2 更改IOS命令的特权等级提问:如何只允许dixy这个用户使用与ARP相关的命令?回答:S5750(config)#username dixy password dixy ----设置dixy用户名和密码S5750(config)#username dixy privilege 10 ----dixy帐户的权限为10S5750(config)#privilege exec level 10 show arp ----权限10可以使用show arp命令S5750(config)#privilege config all level 10 arp ----权限10可以使用所有arp打头的命令S5750(config)#line vty 0 4 ----配置telnet登陆用户S5750(config-line)#no passwordS5750(config-line)#login local1.3设备时钟设置提问:如何设置设备时钟?回答:S5750#clock set 12:45:55 11 25 2008 ----设置时间为2008年11月25日12点45分55秒S5750#clock update-calendar ----设置日历更新S5750(config)#clock timezone CN 8 22 ----时间名字为中国,东8区22分2.1 交换机vlan和trunk的配置提问:如何在交换机上划分vlan,配置trunk接口?回答:步骤一:给交换机配置IP地址S2724G#confS2724G(config)#int vlan 1S2724G(config-if)#ip addess 192.168.0.100 255.255.255.0----给VLAN 1配置IP地址S2724G(config-if)#no shutdown ----激活该VLAN接口S2724G(config-if)#exitS2724G(config)#ip default-gateway 192.168.0.1 ---指定交换机的网关地址步骤二:创建VLANS2724G#confS2724G(config)#vlan 10 ----创建VLAN 10S2724G(config-vlan)#exitS2724G(config)# vlan 20 ----创建VLAN 20S2724G(config-vlan)#exit步骤三:把相应接口指定到相应的VLAN中S2724G(config)#int gi 0/10S2724G(config-if)#switch access vlan 10 ----把交换机的第10端口划到VLAN 10中S2724G(config-if)#exitS2724G(config)#int gi 0/20S2724G(config-if)#switch access vlan 20 ----把交换机的第20端口划到VLAN 20中S2724G(config-if)#exitS2724G(config)#int gi 0/24S2724G(config-if)#switch mode trunk ----设置24口为Trunk模式(与三层交换机的连接口S2724G(config-if)#步骤四:保存配置S2724G(config-if)#endS2724G#write2.2 turnk接口修剪配置提问:如何让trunk接口只允许部分vlan通过?回答:Switch(config)#int fa 0/24Switch (config-if)#switch mode trunkSwitch (config-if)#switchport trunk allowed vlan remove 10,20,30-40 ----不允许VLAN10,20,30-40通过Trunk口2.3 PVLAN配置提问:如何实现几组用户之间的隔离,但同时又都能访问公用服务?回答:步骤一:创建隔离VLANS2724G#confS2724G(config)#vlan 3 ----创建VLAN3S2724G(config-vlan)#private-vlan community ----将VLAN3设为隔离VLANS2724G(config)#vlan 4 ----创建VLAN4S2724G(config-vlan)#private-vlan community ----将VLAN4设为隔离VLANS2724G(config-vlan)#exit ----退回到特权模式步骤二:创建主VLANS2724G(config)#vlan 2 ----进入VLAN2S2724G(config-vlan)#private-vlan primary ----VLAN2为主VLAN步骤三:将隔离VLAN加到到主VLAN中VLANS2724G(config-vlan)#private-vlan association add 3-4----将VLAN3和VLAN4加入到公用VLAN中,VLAN3和VLAN4的用户可以访问公用接口步骤四:将实际的物理接口与VLAN相对应S2724G(config)#interface GigabitEthernet 0/1 ----进入接口1,该接口连接服务器或者上联设备S2724G(config-if)#switchport mode private-vlan promiscuous ----接口模式为混杂模式S2724G(config-if)#switchport private-vlan mapping 2 add 3-4----将VLAN3和VLAN4映射到VLAN2上S2724G(config)#int gi 0/10 ----进入接口10S2724G(config-if)#switchport mode private-vlan hostS2724G(config-if)#switchport private-vlan host-association 2 3 ----该接口划分入VLAN3S2724G(config)#int gi 0/20 ----进入接口20S2724G(config-if)#switchport mode private-vlan hostS2724G(config-if)#switchport private-vlan host-association 2 4 ----该接口划分入VLAN4步骤五:完成VLAN的映射S2724G(config)#int vlan 2 ----进入VLAN2的SVI接口S2724G(config-if)#ip address 192.168.2.1 255.255.255.0 ----配置VLAN2的ip地址S2724G(config-if)#private-vlan mapping add 3-4 ----将VLAN3和VLAN4加入到VLAN2中注释:1. S20、S21不支持私有VLAN,可以通过保护端口实现类似功能2. S3250、S3750和S5750同时支持保护端口和私有VLAN3. S3760不支持私有VLAN和保护端口2.4 端口汇聚配置提问:如何将交换机的端口捆绑起来使用?回答:S5750#confS5750(config)#interface range gigabitEthernet 0/1-4 ----同时进入1到4号接口S5750(config-if)#port-group 1 ----设置为聚合口1S5750(config)#interface aggregateport 1 ----进入聚合端口1注意:配置为AP口的接口将丢失之前所有的属性,以后关于接口的操作只能在AP1口上面进行2.5 生成树配置提问:如何配置交换机的生成树?回答:步骤一:根桥的设置switch_A#conf tswitch_A(config)#spanning-tree ---默认模式为MSTPswitch_A(config)#spanning-tree mst configurationswitch_A(config)#spanning-tree mst 10 priority 4096 ---设置为根桥步骤二:非根桥的设置switch_B#conf tswitch_B(config)#spanning-tree ---默认模式为MSTPswitch_B(config)#spanning-tree mst configurationswitch_B(config)#int f0/1 ---PC的接入端口switch_B(config)#spanning-tree bpduguard enableswitch_B(config)#spanning-tree portfast2.6 端口镜像设置提问:如何配置交换机的端口镜像?回答:switch#conf tswitch#(config)#switch (config)# monitor session 1 source interface gigabitEthernet 3/1 both ---监控源口为g3/1 switch (config)# monitor session 1 destination interface gigabitEthernet 3/8 switch ---监控目的口为g3/8,并开启交换功能注意:S2026交换机镜像目的端口无法当做普通接口使用3.1 交换机地址绑定(address-bind)功能提问:如何对用户ip+mac进行两元素绑定?回答:S5750#confS5750(config)# address-bind 192.168.0.101 0016.d390.6cc5----绑定ip地址为192.168.0.101 MAC地址为0016.d390.6cc5的主机让其使用网络S5750(config)# address-bind uplink GigabitEthernet 0/1----将g0/1口设置为上联口,也就是交换机通过g0/1的接口连接到路由器或是出口设备,如果接口选择错误会导致整网不通S5750(config)# address-bind install ----使能address-bind功能S5750(config)#end ----退回特权模式S5750# wr ----保存配置注释:1. 如果修改ip或是MAC地址该主机则无法使用网络,可以按照此命令添加多条,添加的条数跟交换机的硬件资源有关2. S21交换机的address-bind功能是防止Ip冲突,只有在交换机上绑定的才进行ip和MAC 的匹配,如果下边用户设置的ip地址在交换机中没绑定,交换机不对该数据包做控制,直接转发。
