YALE锁安装
蓝牙门锁的最终安装指南和操作方法说明书
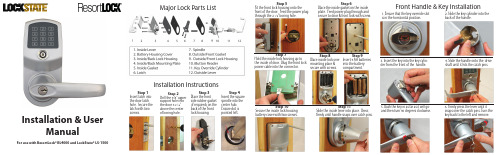
Front Handle & Key Installation1. Ensure that the key override slot is in the horrizontal position.2. Slide the key cylinder into the back of the handle.3. Insert the key into the key cylin-der from the front of the handle.4. Slide the handle onto the drive shaft until it hits the catch pins.5. Push the key in as far as it will go and then turn 90 degrees clockwise.6. Firmly press the lever until it snaps over the catch pins. Turn thekey back to the left and remove.Step 5Fit the front lock housing onto thefront of the door. Feed the power plugthrough the 2 1/8” boring hole.Step 6Place the inside gasket on the insideplate. Feed power plug through andsecure to door & front lock with screw.Step 7Hold the inside lock housing up tothe inside of door. Plug the front lockpower cable into the connector.Step 8Place inside lock overmounting place &secure with screws.Step 9Insert 4 AA batteriesinto the batterycompartment.Step 10Secure the inside lock housingbattery cover with two screws.Step 11Slide the inside lever into place. Pressrmly until handle snaps over catch pins.Major Lock Parts ListInstallation InstructionsStep 1Insert latch intothe door latchhole. Secure thelatch with twoscrews.Step 2Drill the 3/8” uppersupport hole intothe door 3 5/16”above the centerof boring hole.Step 4Insert the squarespindle into thecenter hub.Ensure dot ispointed left.Step 3Place the frontside rubber gasket(if required) on theback of the frontlock housing.Installation & UserManualFor use with ResortLock® RL4000 and LockState® LS-1500®Complete List ofManual Programming Functions1. To set a new or change the Master Code (and not delete existing user codes):# current or default mc # 11 # 1-9 digit new mc # 1-9 digit new mc #2. To change Master Code (and delete all user codes):# current or default mc # 22 # 1-9 digit new mc # 1-9 digit new mc #3. Set date & time - (24 hr. clock, Example: 2:45PM on July 12, 2010 = 1007121445) # mc # 88 # yymmddhhmm #4. Enter one or more User Code with no restriction (for multiple users, repeat highlighted) # mc # 01 # 1-9 digit user code # # #5. Enter one or more iButton key with no restriction (for multiple users, repeat highlighted)# mc # 01 #Hold iButton key to lock reader # #6. Enter one or more iButton key + User Code with no restriction (for multiple users, repeat highlighted)# mc # 01 # 1-9 digit user code # Hold iButton key to lock reader# #7. Enter one or more User Code with time restriction (for multiple users, repeat highlighted)(beginning time) (ending time) # mc # 01 # 1-9 digit user code # yymmddhhmm # yymmddhhmm #8. Enter one or more iButton key with time restriction (for multiple users, repeat highlighted)(beginning time)(ending time)# mc # 01 # iButton key yymmddhhmm # yymmddhhmm #9. Enter one or multiple iButton + User Codes with time restriction (for multiple, repeat highlighted)(beginning time) (ending time) # mc # 01 # 1-9 digit code # iButton key yymmddhhmm # yymmddhhmm #10. Enable Passage Mode(1=Monday, 7=Sunday)# mc # 15 # 1-7 Schedule # hhmm start hhmm end #11. Disable Passage Mode12. Enable/ disable LED blink (2 beeps = blink o ~ 4 beeps = blink on)*Warning: enabling blink mode will drain batteries more quickly.Lock will blink red when locked, green when unlocked.# mc # 16 # # mc # 18 # (for multiple users, repeat highlighted)(for multiple users, repeat highlighted) *A User Code or iButton must be programmed before Advanced Schedule Access can be applied.13.Enable Daylight Saving Time# mc # 31 #* Lock time does not change when you enable this function. The time will change according to the U.S. Daylight Saving Time schedule.14.Disable Daylight Saving Time # mc # 32 #15.Add One Time Service codes (up to 10) (for multiple users, repeat highlighted) # mc # 33 # 1-9 digit user code #16. Delete one User Code or iButton user # mc # 46 # User code or touch iButton #17. Enable Auto-UNlock function # mc # 64 #18. Disable Auto-UNlock function # mc # 65 #19.Set Automatic Unlock time (Enable function #17 rst) # mc # 63 # hhmm #20. Enable Auto-Lock function # mc # 67 #21. Disable Auto-Lock function # mc # 68 #22.Set Automatic Lock time (Enable function #20 rst) # mc # 66 # hhmm #23. Enable/Disable temporary lockout of all users #mc# 99#Advanced Schedule Access 24. Set schedule for User Code: (1=Monday, 7=Sunday)# mc # 45 # 1-9 digit User Code # 1-7 Schedule # hhmm start hhmm end #25.Set schedule for iButton user: (1=Monday, 7=Sunday) # mc # 45 # iButton key # 1-7 Schedule #hhmm start hhmm end #For Example: to set schedule from 8:00AM to 5:00PM, Mon. to Friday# mc # 45 # 1-9 digit User Code # 12345 # 0800 1700 #Lock Operation GuideGeneral Information:• Door Handle: The handle is reversible so it will t both right and left-handed doors. Thehandle will always turn even when the door is locked. However, when locked, the exterior handle will not retract the latch. The interior handle will always retract the latch.• Exit Programming Mode: Enter * to exit programming mode, or wait for 10 seconds.• Low battery warning: When batteries are low, the red LED will ash and beep ve times afterentering a valid User Code.• Unlocking indicator: Green light will ash and beep twice.• Locking indicator: No light and will beep twice.• Reset: To reset the lock back to factory default settings, press and hold the reset button for 10 seconds until the light on the front of the lock starts ashing green. Release the reset button and press the # key to con rm. You will receive 3 beeps if successful.Manufacture Default Setting:• Daylight Saving Mode: Disabled • Auto Lock/Unlock: Disabled • Lock Mode: Storehouse • Default Programming Master Code: 123456• Test Code: 0 #Unlocking the Door:There are several ways to unlock the lock, including the following methods:• Keycode: Enter a User Code, then press #• iButton: Touch the iButton key to the lock reader• iButton+Keycode: Touch the iButton key to the lock reader, then enter User Code and press #• One time service code: Enter one time code, then press #• Manual key: Insert and turn the override key 90 degrees clockwise, then turn the handleTerms:Master Code (MC): The master code enters the lock into programming mode. It will not lock or unlock the lock the door. If more than 6 seconds pass in between programming entries, the lock will return to normal operational status. For maximum security change the default Master er code: User Codes are the normal codes for day-to-day operation.Service Code: Service codes can be used for maintenance personnel or vendors. Service codes only grant one-time access. A total of 10 sets of service codes can be programmed into each lock.Passage Mode: When Passage Mode is enabled, the lock will stay in an unlocked status after a valid entry code is entered. Enter a valid entry code to re-lock the door.Storehouse Mode: For each valid entry, the lock will automatically re-lock after 5 seconds.Time Format: 24 hr. clock ~ 8:30AM = 0830; 5:30PM = 1730 Schedule Date: 1=Mon, 2=Tue, 7=SunQuick Start GuideStep 1: Program a new Master Code into the lock.The Master Code DOES NOT unlock or lock the door. It is only used to program your lock. The default Master Code is 123456. For security purposes, you will need to change this to your own Master Code. Decide on a new Master Code and write it here: _____________To program a new Master Code, enter the following into the lock’s keypad:# 123456 # 11 # Your Master Code # Your Master Code Again #If done correctly , after the last # you press you’ll hear 2 beeps with 2 green ashes.Step 2: Program the Date & Time.Some functions on the lock will not work on the lock unless the date & time are programmed. Toprogram the date & time, enter the following:# Master Code # 88 # YYMMDDHHMM #Example: If the date and time is 05/30/2010 at 3:32PM, you would enter:# Master Code # 88 # 1005301532 #Step 3: Program a User Code into the lock.**Important: Your lock will not lock until a valid User Code is programmed and used on the er Codes are the codes you will use to unlock and lock your door. These codes will remain active in the lock until they are deleted (if desired). Up to 800 permanent codes can be programmed into the lock. Here is how:# Master Code # 01 # 1-9 digit user code # # # #If done correctly , you will hear two beeps after pressing the 3rd #, then a red light after the 4th #.Step 4: Set the Passage Mode. (Optional)Your lock is shipped in Storehouse Mode. This means the lock will re-lock 5 seconds after it is unlocked. To change this to passage mode, enter the following:# Master Code # 15 # 1-7 Schedule # hhmm start, hhmm end #Example: If you want the lock to always be in Passage Mode, enter:# Master Code # 15 # 1234567 # 0001 2359 # (7 days of the week from 12:01AM to 11:59PM)Step 5: Enable Daylight Saving Time.If you live in an area that observes Daylight Saving Time, you will want to enable this function. Enabling does not change the current time on the lock. The time wil change according to the U.S. Daylight Saving Time schedule. To enable, enter:# Master Code # 31 ## # # # # #。
电子门锁的安装说明

电子门锁的安装说明电子门锁是一种高科技的门锁系统,具有便捷、安全的特点。
以下是电子门锁的安装说明。
一、准备工作:1. 打开门锁包装,将里面的零件和配件清点齐全。
2. 仔细阅读安装说明书,了解门锁的工作原理和安装要点。
3. 进行施工准备,确保门锁安装位置的平整、稳固。
二、安装过程:1. 将电子门锁安装板固定在门框上,使用螺丝刀拧紧螺丝。
2. 将门锁主体安装在安装板上,确认位置合适后,使用螺丝刀将螺丝拧紧。
3. 连接电源线,将电源线从门锁主体引出,根据指示线路进行连接。
4. 连接其他配件,根据需要连接防撬报警器、门铃等配件,确保线路连接牢固。
5. 完成连接后,将电子门锁主体与安装板对齐,轻轻抬起门锁主体,插入安装板并按下锁住。
三、调试与设置:1. 开启电源,使用电子门锁配套的开启电源工具将门锁主体的电源打开。
2. 进行用户身份验证设置,按照说明书中的方式设置用户密码或指纹等。
确保用户身份验证方式被正确设置。
3. 测试门锁功能,按下门锁的开锁按钮,确认门锁正常解锁。
再按下锁住按钮,确认门锁正常锁定。
4. 设置其他功能,根据需要设置指纹添加、删除、密码修改等功能。
按照说明书的指示进行设置。
四、使用与维护:1. 仔细阅读用户手册,了解电子门锁的使用方法和注意事项。
2. 定期检查门锁的工作状态,保持门锁主体和配件的清洁干燥。
3. 遇到问题或故障时,及时联系厂家或售后服务,不要私自拆卸或修理。
五、安全注意事项:1. 安装过程中,确保电源已经关闭,以免发生触电事故。
2. 在设置用户身份验证方式时,保证密码或指纹等的机密性,避免泄露和被他人盗用。
3. 在使用电子门锁时,确保门锁主体和相关设备的正常工作状态,以免影响门锁的安全性能。
六、法律责任:1. 在安装电子门锁前,应了解并遵守当地相关的法律法规和规章制度。
2. 在使用电子门锁时,应遵守公共安全规定,不得利用门锁从事非法活动。
七、免责声明:1. 本安装说明仅供参考,具体操作以厂家提供的说明书为准。
各种智能锁安装方法
各种智能锁安装方法引言随着科技的不断进步,智能家居已经成为了现实生活中的一部分。
智能锁作为智能家居的重要组成部分,给人们的生活带来了便利和安全。
本文将介绍几种常见的智能锁安装方法,帮助读者更好地了解和使用智能锁。
1. 门锁类型1.1 指纹识别锁指纹识别锁可通过读取用户指纹信息来开启门锁。
其安装步骤如下:1. 清洁门锁安装位置,确保门面整洁干净。
2. 使用电钻或电锤钻孔,将门锁主体安装在门框上的合适位置,通常为门把手的下方。
3. 将指纹识别模块固定在门框上。
4. 连接门锁和指纹识别模块的电线,通电测试。
1.2 密码锁密码锁通过输入正确的密码来开启门锁。
其安装步骤如下:1. 清洁门锁安装位置,确保门面整洁干净。
2. 使用电钻或电锤钻孔,将门锁主体安装在门框上的合适位置,通常为门把手的下方。
3. 将密码输入模块固定在门框上。
4. 连接门锁和密码输入模块的电线,通电测试。
1.3 IC卡锁IC卡锁通过识别IC卡信息来开启门锁。
其安装步骤如下:1. 清洁门锁安装位置,确保门面整洁干净。
2. 使用电钻或电锤钻孔,将门锁主体安装在门框上的合适位置,通常为门把手的下方。
3. 将IC卡读取器固定在门框上。
4. 连接门锁和IC卡读取器的电线,通电测试。
2. 安装注意事项在安装智能锁时,需要注意以下事项:- 安装位置选择:根据门的材质和厚度选择合适的安装位置,确保门锁的安全性和便利性。
- 电源供给:智能锁通常需要外接电源,因此需要确保安装位置附近有可靠且稳定的电源供给。
- 密码设置:安装完成后,及时设置好开锁密码,并妥善保管,避免密码泄露。
- 使用指南:及时阅读并掌握智能锁的使用指南,了解各种功能和操作。
3. 灵活运用智能锁不同的智能锁可以互相结合,形成更加安全和便捷的使用方式。
例如,可以将指纹识别锁和密码锁结合使用,以增加开锁方式的多样性;还可以将智能锁与家庭智能控制系统连接,实现远程控制和监控等功能。
此外,还可以根据个人需求,选择具有特定功能的智能锁。
Yale Real Living 智能锁Z-Wave模組安裝和設置指南说明书

®Installing the Z-WaveModuleTo Enroll the Module:•••To Unenroll the Module:• • • IMPORTANT: the batteries must be removed priorto removing and/or inserting the network module:• Remove battery cover.• Remove batteries.• Remove and/or insert network module.• Reinstall batteries.• Replace cover.P/N AYR200-ZW-INSTAL-FUL Rev BChanges or modifications to this device, not expressly approved by Yale Security Inc. FCC:FCC ID: UA4-YRHCPZW0LMModel: YRMZW1This equipment has been tested and found to comply with the limits for a Class B digital device, pursuant to Part 15 of the FCC Rules. These limits are designed to provide reasonable protection against harmful interference in a residential installation. This equipment generates, uses, and can radiate radio frequency energy and, if not installed and used in accordance with the instructions, may cause harmful interference to radio communications. However, there is no guarantee that interference will not occur in a particular installation. If this equipment does cause harmful Interference to radio or television reception, which can be determined by turning the equipment off and on, the user is encouraged to try to correct the interference by one or more of the following measures:• Reorient or relocate the receiving antenna.• Increase the separation between the equipment and receiver.• Connect the equipment into an outlet on a circuit different from that to which the receiver is connected.• Consult the dealer or an experienced radio/TV technician for help.THIS DEVICE COMPLIES WITH PART 15 OF THE FCC RULES. OPERATION IS SUBJECT TO THE FOLLOWING TWO CONDITIONS.(1) THIS DEVICE MAY NOT CAUSE HARMFUL INTERFERENCE, AND (2) THIS DEVICE MUST ACCEPT ANY INTERFERENCE RECEIVED, INCLUDING INTERFERENCE THAT MAY CAUSE UNDESIRED OPERATION.Industry Canada:IC: 6982A-YRHCPZW0LMModel: YRMZW1Section 7.1.2 of RSS-GEN Under Industry Canada regulations, this radio transmitter may only operate using an antenna of a type and maximum (or lesser) gain approved for the transmitter by Industry Canada. To reduce potential radio interference to other users, the antenna type and its gain should be so chosen that the equivalent isotropically radiated power (e.i.r.p.) is not more than that necessary for successful communication.En vertu des règlements d'Industrie Canada, cet émetteur radio ne peut fonctionner avec une antenne d'un type et un maximum (ou moins) approuvés pour gagner de l'émetteur par Industrie Canada. Pour réduire le risque d'interférence aux autres utilisateurs, le type d'antenne et son gain doivent être choisies de façon que la puissance isotrope rayonnée équivalente (PIRE) ne dépasse pas ce qui est nécessaire pour une communication réussie.Section 7.1.3 of RSS-GEN This Device complies with Industry Canada License-exempt RSS standard(s). Operation is subject to the following two conditions: 1) this device may not cause interference, and 2) this device must accept any interference, including interference that may cause undesired operation of the device.Cet appareil est conforme avec Industrie Canada RSS standard exemptes de licence(s). Son fonctionnement est soumis aux deux conditions suivantes: 1) ce dispositif ne peut causer des interférences, et 2) cet appareil doit accepter toute interférence, y compris les interférences qui peuvent causer un mauvais fonctionnement du dispositif.Product Support T el 800.810.WIRE (9473) • Y ale Locks & Hardware is a division of Y ale Security Inc., an ASSA ABLOY Group company.Y ale® is a registered trademark of Y ale Security Inc., an ASSA ABLOY Group company.Y ale Real Living™ is a trademark of Y ale Security Inc., an ASSA ABLOY Group company.Copyright © 2014, Y ale Security Inc., an ASSA ABLOY Group company.All rights reserved. Reproduction in whole or in part without the express written permission ofY ale Security Inc. is prohibited.YALE, with its unique global reach and range of products, is the world's favorite lock– the preferred solution for securing your home, family and personal belongings.ASSA ABLOY is the global leader in door opening solutions,dedicated to satisfying end-user needs for security, safety and convenience.。
门锁安装工程技术交底
门锁安装工程技术交底1. 介绍本文档旨在详细介绍门锁安装工程的技术交底内容,以确保安装人员能够正确、高效地进行门锁的安装工作。
2. 安装准备在进行门锁安装之前,需要做好以下准备工作:- 确认门锁型号、规格和数量- 准备所需的安装工具和材料- 确保安装区域的清洁和整齐3. 安装步骤步骤一:确定安装位置在安装门锁之前,需要确认安装位置。
考虑以下因素:- 安装位置的高度和合适性- 门锁与门框的配合程度- 用户使用惯和方便性步骤二:安装门锁主体按照以下步骤安装门锁主体:1. 使用正确的工具,将门锁主体固定在安装位置上。
2. 确保门锁主体与门框之间没有松动或空隙。
3. 调整门锁主体的位置,使其与门框完全吻合。
步骤三:安装锁芯和钥匙按照以下步骤安装门锁的锁芯和钥匙:1. 将锁芯插入门锁主体中,并用螺丝固定。
2. 使用正确的工具将钥匙插入锁芯,测试锁芯的灵活性和顺畅度。
步骤四:调试和测试在安装完成后,进行以下调试和测试:1. 将门锁打开和关闭多次,确保锁芯的工作正常。
2. 使用钥匙进行开锁和上锁测试,检查是否顺畅无阻。
4. 安全注意事项在进行门锁安装工作时,请务必注意以下安全事项:- 穿戴合适的工作服和个人防护装备。
- 小心使用尖锐工具,避免划伤自己或损坏门锁。
- 注意电源安全,避免触电风险。
- 如果遇到安装问题或困难,请及时向上级汇报和寻求帮助。
5. 维护和保养门锁安装完成后,请告知用户以下维护和保养注意事项:- 定期清洁门锁表面,保持其外观整洁。
- 定期润滑门锁主体和锁芯,确保其灵活性和顺畅度。
- 定期检查门锁和配件的紧固情况,修复松动或损坏的部件。
以上就是门锁安装工程的技术交底内容。
请安装人员在实施安装工作时严格按照以上步骤进行操作,确保门锁的安装质量和使用效果。
谢谢!。
耶鲁智能锁YF1083M 智能电子锁使用者说明书

4. 低功耗模式 系统无操作超过8秒自动进入低功耗模式。
5. 低电量提示 电压低于6.8V以后,每次开锁都会自动提示“电量低,请及时 更换电池”,提示后仍可以开锁200次左右;请务必在开锁次数 归零前更新电池或充电。
外露出门平面 18-20mm
步骤 4 步骤 5
安装后底板: 将硅胶垫套入后底板(没螺柱面), 接着将后底板对准门体孔位安装到 门体室内,再用2颗M5螺丝从底板 插入,固定好锁头盖,用1颗M5螺 丝从底板插入,固定好前板,安装 成整套锁;
图1
安装后面板总成: 将方杆插入锁体方轴,再将后面板总成安装在室内门体上,安 装时锁芯方条、反锁方条、方杆、后底板螺柱必须对准各自相 应孔位,方可锁紧固定后面板总成;
类别
开门钥匙
容量
指纹 识别感应
电特性 工作环境
技术参数
内容
设计指标
管理员
9组(编号001~009) 管理员可以是人脸、指纹、密码或门卡
普通用户
191组(编号010~200) 普通用户可以是人脸、指纹、密码或门卡
机械钥匙
2把
人脸容量
50枚
开门指纹数量
开门密码数量
共200个用户
开门门卡数量
指纹模块认假率
客服电话:400-880-7858
Part of ASSA ABLOY
智能电子锁使用手册
YF 1082R / YF 1083M
* 本产品的功能和设计将会在提升质量的情况下进行更新,恕不另行通知。
目录
产品概述
套装门锁安装方法
套装门锁安装方法
1. 准备材料:套装门锁、螺丝刀、钻头和电钻。
2. 清理门面:清理好门面和门锁的安装位置,确保门面平整无杂物。
3. 安装门锁底座:将门锁底座放在门面上,用钻头在底座上打孔,然后用螺丝刀把底座紧固在门面上。
4. 安装门锁体:把门锁体插入底座内,确认门锁体和底座之间的接口无松动。
5. 安装插销:把插销插入门锁体中,然后安装插钥匙,试着转动一下,确认插销转动自如。
6. 安装锁箍:安装锁箍,把锁芯固定在门锁体上。
7. 安装把手:按照说明书上的步骤,安装好把手和锁扣。
8. 检验门锁:检验门锁是否正常运转,打开和关上门锁,转动锁芯,观察插旋是否正常。
9. 调整门锁:如有必要,请调整门锁,以确保门锁的正确运转。
电子锁安装详解,常见的一下安装了解

电子锁安装详解,常见的一下安装了解说到智能电子门锁,这是一款神秘而普通的产品,神秘在当前市场上并不是很受欢迎,安装此类产品的朋友不多,并且没有这类产品的实际经验或操作,其中一个共同点是机械锁是智能门锁的核心,它增加了非传统的解锁方式。
鲁班到家,电子锁安装。
鲁班到家也许是因为它的“矛盾”,越来越多的人对智能门锁感兴趣。
因此,编辑团队赶到朋友家中,记录智能门锁的安装过程。
第一步:拆除如果你看一下安全门上的传统锁,你认为它不是很大,但当你拿下它并将它与电子锁比较时,你真的看到了一个欺负锁是什么。
锁体变小,相应的锁定点减小。
但是,当在站点上安装主机时,锁定点与安全性不成正比。
关键锁定点牢固可靠,其余锁定点相互关联。
实现。
这也消除了由较小的锁定体和减少的锁定点引起的安全问题。
第二步:初始安装,测量取下旧锁后,需要测试电子锁对安全门的锁定。
在安装过程中,需要测量门板和新锁体的宽度和厚度。
根据现有门锁的体积和螺栓的位置标记安全门上的开口。
也就是说,电子门锁的安装是破坏性的安装。
第三步:睁开眼睛和钻孔。
在测量相关数据后,需要拆下锁体,并且需要用角磨机或圆盘砂光机切割安全门的钢体,没有必要谈论安装火星产生的噪音,我认为这是一个低调的修正案,但我仍然记得那些邻居。
第4步:安装锁体并进行校准。
以上是所有准备工作,然后是真正的安装过程。
首先,需要固定的锁体,并且在完全固定之前需要进行第二次校准,螺栓位置应与原始门框匹配,最重要的是门锁不能倾斜,我在网站上看到了很多安装图片,发现门锁不是垂直的,虽然它们不影响使用但也会影响外观。
第五步:安装前后面板。
看似简单的面板安装实际上是“智能”的核心。
锁体和面板需要用大螺栓固定,前后面板之间有连接线,形成智能解锁。
另外,我们需要安装防水橡胶垫等。
从下图可以看出,智能门锁的结构实际上非常复杂,智能门锁的重量比传统机械锁重。
第六步:尝试+密码。
完成所有调试后,您需要设置智能门锁。
为确保家庭安全,您必须更改原始密码并输入管理员的指纹信息。
- 1、下载文档前请自行甄别文档内容的完整性,平台不提供额外的编辑、内容补充、找答案等附加服务。
- 2、"仅部分预览"的文档,不可在线预览部分如存在完整性等问题,可反馈申请退款(可完整预览的文档不适用该条件!)。
- 3、如文档侵犯您的权益,请联系客服反馈,我们会尽快为您处理(人工客服工作时间:9:00-18:30)。
一天,偶然间接到耶鲁电子锁的电话,得知作为耶鲁的达人可以得到一次免费安装耶鲁电子锁的机会并享受正常消费者所有的售后服务。
接触不少新事物的我,也知道耶鲁(Yale)电子锁的价格可不便宜,是个美国的百年品牌,并且在一些经济发达国家还非常流行。
在国内呢,也很畅销,但由于国内部分老百姓受固有传统思想的束缚,所以还没有真正了解和认识到电子锁极强的安保性与便捷性。
这么好的事儿摊在我头上,突然间真有点错愕的感觉!
拆下原来的锁装上耶鲁电子锁
在安装的过程中呢,向工作人员询问了一些我比较关心的问题,比如:电池没电了怎么办?估计也是大家比较关心的。
工作人员回答:首先耶鲁电子锁的电量是由4节5号电池提供的,电量可供正常开启3000次,所以一般家庭至少能使用一年,在电池电量仅够一个月使用时,会在操作面板出现明显的提示,提醒您更换电池。
如果您还是忘记更换,也不要
紧,可将外部滑盖打开,找到电池外连接口,作为备用电源也可以开启门锁。
当然,您也可以用机械钥匙开启门锁。
这款YDM4109同时提供指纹、密码、钥匙,三种开启方式。
听到这样的回答,我就放心了。
再有呢,就是密码的问题;因为我们家楼道一侧安置了长长的储物柜,所以楼道空间变得很有限并且很窄,加上邻居的大门和我们紧紧相连,输入密码的时候会不会被看到?工作人员回答:耶鲁电子锁密码设置最长可达12位数字,最短呢,也要有6位数字组成,一长一短之间,就有6位数字的空间,在我们输入的正确密码前面或后面,您可以任意输入小于或等于6位的数字,起到虚位密码的作用。