CUDA安装
pytorch(cuda)的安装

pytorch(cuda)的安装安装好之后可以进去虚拟环境,然后进去python,接着导⼊模块import torch,然后torch.cuda.get_device_capability()可以知道⾃⼰的显卡的算⼒我的cuda算⼒是3.5,⽽⼤神说pytorch1.3需要满⾜>=3.7算⼒,所以就不⽤想了!我的显卡是GeForce920m。
需要注意的是每种包(或框架)对应的python版本,对应的其它包的版本是⼀⼀对应的,需要搞清楚再来安装。
1.安装了anaconda之后先创建⼀个虚拟环境: 创建虚拟环境:conda create -n env_name list of packagename,如:conda create -n pytorch python=3.72.然后⽤nvcc -V(如果没有反应就先安装sudo apt install nvidia-cuda-toolkit)查看Linux系统的cuda是什么版本,我的cuda版本是9.1.85。
3.接着去pytorch官⽹找安装pytorch的安装命令conda install pytorch==1.2.0 torchvision==0.4.0 cudatoolkit=9.2 -c pytorch4.进⼊虚拟环境,安装:conda install pytorch==1.2.0 torchvision==0.4.0 cudatoolkit=9.2 -c pytorch注意:可以直接覆盖,不需要先卸载再安装。
1.⼀开始我是⽤conda install pytorch torchvision cudatoolkit=10.2 -c pytorch来安装,没有指定pytorch的版本,所以它会⾃动安装最新的版本(1.5.1)。
但是运算的时候出现了错误RuntimeError: CUDA error: no kernel image is available for execution on the device(运⾏时错误:CUDA 错误:没有可在设备上执⾏的内核映像),可能是安装的cuda版本和系统的cuda版本不⼀样的原因。
Ubuntu16.04上安装CUDA9.0详细教程
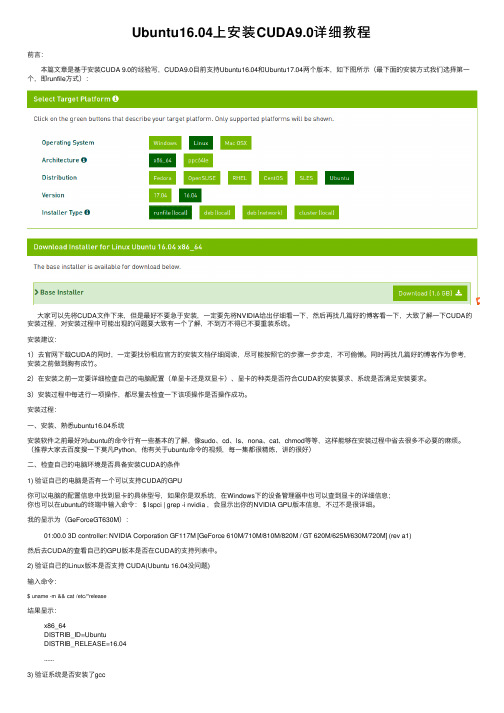
Ubuntu16.04上安装CUDA9.0详细教程前⾔:本篇⽂章是基于安装CUDA 9.0的经验写,CUDA9.0⽬前⽀持Ubuntu16.04和Ubuntu17.04两个版本,如下图所⽰(最下⾯的安装⽅式我们选择第⼀个,即runfile⽅式):⼤家可以先将CUDA⽂件下来,但是最好不要急于安装,⼀定要先将NVIDIA给出仔细看⼀下,然后再找⼏篇好的博客看⼀下,⼤致了解⼀下CUDA的安装过程,对安装过程中可能出现的问题要⼤致有⼀个了解,不到万不得已不要重装系统。
安装建议:1)去官⽹下载CUDA的同时,⼀定要找份相应官⽅的安装⽂档仔细阅读,尽可能按照它的步骤⼀步步⾛,不可偷懒。
同时再找⼏篇好的博客作为参考,安装之前做到胸有成⽵。
2)在安装之前⼀定要详细检查⾃⼰的电脑配置(单显卡还是双显卡)、显卡的种类是否符合CUDA的安装要求、系统是否满⾜安装要求。
3)安装过程中每进⾏⼀项操作,都尽量去检查⼀下该项操作是否操作成功。
安装过程:⼀、安装、熟悉ubuntu16.04系统安装软件之前最好对ubuntu的命令⾏有⼀些基本的了解,像sudo、cd、ls、nona、cat、chmod等等,这样能够在安装过程中省去很多不必要的⿇烦。
(推荐⼤家去百度搜⼀下莫凡Python,他有关于ubuntu命令的视频,每⼀集都很精炼,讲的很好)⼆、检查⾃⼰的电脑环境是否具备安装CUDA的条件1) 验证⾃⼰的电脑是否有⼀个可以⽀持CUDA的GPU你可以电脑的配置信息中找到显卡的具体型号,如果你是双系统,在Windows下的设备管理器中也可以查到显卡的详细信息;你也可以在ubuntu的终端中输⼊命令: $ lspci | grep -i nvidia ,会显⽰出你的NVIDIA GPU版本信息,不过不是很详细。
我的显⽰为(GeForceGT630M):01:00.0 3D controller: NVIDIA Corporation GF117M [GeForce 610M/710M/810M/820M / GT 620M/625M/630M/720M] (rev a1)然后去CUDA的查看⾃⼰的GPU版本是否在CUDA的⽀持列表中。
Win10下安装CUDA11.0...

Win10下安装CUDA11.0...⽬录下载地址安装CUDA配置环境变量安装CUDNN验证CUDA是否安装成功安装tesorflow-gpu2.4.1安装pytorch-gpu1.7.0安装paddlepaddle-gpu2.0.0下载地址官⽅下载:和.安装之前,建议关掉360安全卫⼠双击cuda_11.0.3_451.82_win10.exe⽂件根据⾃⼰需要更改安装路径将Visual Studio Integration的勾去掉配置环境变量C:\Program Files\NVIDIA GPU Computing Toolkit\CUDA\v11.0\libnvvp;安装CUDNN将下载的CUDNN解压缩,如下图。
将将CUDNN⽂件夹⾥⾯的bin、include、lib⽂件直接复制到CUDA的安装⽬录,如下图为CUDA的安装位置,粘贴过来直接覆盖即可。
# CUDA的安装⽬录C:\Program Files\NVIDIA GPU Computing Toolkit\CUDA\v11.0等待复制完成,即可!验证CUDA是否安装成功打开cmd,输⼊如下命令,即可!nvcc -V安装tesorflow-gpu2.4.1查看对应版本pip install -i https:///simple tensorflow-gpu==2.4.1测试代码import tensorflow as tfimport osos.environ['TF_CPP_MIN_LOG_LEVEL']='2'print(tf.__version__)a = tf.constant(1.)b = tf.constant(2.)print(a+b)print('GPU:', tf.test.is_gpu_available())安装pytorch-gpu1.7.0查看对应版本pip install torch===1.7.0+cu110 torchvision===0.8.1+cu110 torchaudio===0.7.0 -f https:///whl/torch_stable.html测试代码import torchprint(torch.__version__)print(torch.cuda.is_available())安装paddlepaddle-gpu2.0.0查看对应版本python -m pip install paddlepaddle-gpu==2.0.0.post110 -f https:///whl/stable.html测试代码import paddlepaddle.utils.run_check()到此这篇关于Win10下安装CUDA11.0+CUDNN8.0+tensorflow-gpu2.4.1+pytorch1.7.0+paddlepaddle-gpu2.0.0的⽂章就介绍到这了,更多相关tensorflow pytorch CUDA 安装内容请搜索以前的⽂章或继续浏览下⾯的相关⽂章希望⼤家以后多多⽀持!。
NVIDIA CUDA 安装指南(微软窗口)说明书

DU-05349-001_v9.2 | June 2018Installation and Verification on WindowsTABLE OF CONTENTS Chapter 1. Introduction (1)1.1. System Requirements (1)1.1.1. x86 32-bit Support (2)1.2. About This Document (3)Chapter 2. Installing CUDA Development T ools (4)2.1. Verify You Have a CUDA-Capable GPU (4)2.2. Download the NVIDIA CUDA T oolkit (4)2.3. Install the CUDA Software (5)2.3.1. Uninstalling the CUDA Software (8)2.4. Use a Suitable Driver Model (8)2.5. Verify the Installation (9)2.5.1. Running the Compiled Examples (9)Chapter 3. Compiling CUDA Programs (11)3.1. Compiling Sample Projects (11)3.2. Sample Projects (11)3.3. Build Customizations for New Projects (12)3.4. Build Customizations for Existing Projects (12)Chapter 4. Additional Considerations (14)CUDA® is a parallel computing platform and programming model invented by NVIDIA. It enables dramatic increases in computing performance by harnessing the power of the graphics processing unit (GPU).CUDA was developed with several design goals in mind:‣Provide a small set of extensions to standard programming languages, like C, that enable a straightforward implementation of parallel algorithms. With CUDA C/C++, programmers can focus on the task of parallelization of the algorithms rather than spending time on their implementation.‣Support heterogeneous computation where applications use both the CPU and GPU. Serial portions of applications are run on the CPU, and parallel portions are offloaded to the GPU. As such, CUDA can be incrementally applied to existingapplications. The CPU and GPU are treated as separate devices that have their own memory spaces. This configuration also allows simultaneous computation on the CPU and GPU without contention for memory resources.CUDA-capable GPUs have hundreds of cores that can collectively run thousands of computing threads. These cores have shared resources including a register file and a shared memory. The on-chip shared memory allows parallel tasks running on these cores to share data without sending it over the system memory bus.This guide will show you how to install and check the correct operation of the CUDA development tools.1.1. System RequirementsTo use CUDA on your system, you will need the following installed:‣ A CUDA-capable GPU‣ A supported version of Microsoft Windows‣ A supported version of Microsoft Visual Studio‣the NVIDIA CUDA Toolkit (available at /cuda-downloads)The next two tables list the currently supported Windows operating systems and compilers.T able 1 Windows Operating System Support in CUDA 9.2T able 2 Windows Compiler Support in CUDA 9.2x86_32 support is limited. See the x86 32-bit Support section for details.1.1.1. x86 32-bit SupportNative development using the CUDA Toolkit on x86_32 is unsupported. Deployment and execution of CUDA applications on x86_32 is still supported, but is limited to use with GeForce GPUs. To create 32-bit CUDA applications, use the cross-development capabilities of the CUDA Toolkit on x86_64.Support for developing and running x86 32-bit applications on x86_64 Windows is limited to use with:‣GeForce GPUs‣CUDA Driver‣CUDA Runtime (cudart)‣CUDA Math Library (math.h)‣CUDA C++ Compiler (nvcc)‣CUDA Development Tools1.2. About This DocumentThis document is intended for readers familiar with Microsoft Windows operating systems and the Microsoft Visual Studio environment. You do not need previous experience with CUDA or experience with parallel computation.Basic instructions can be found in the Quick Start Guide. Read on for more detailed instructions.The setup of CUDA development tools on a system running the appropriate version of Windows consists of a few simple steps:‣Verify the system has a CUDA-capable GPU.‣Download the NVIDIA CUDA Toolkit.‣Install the NVIDIA CUDA Toolkit.‣Test that the installed software runs correctly and communicates with the hardware.2.1. Verify You Have a CUDA-Capable GPUYou can verify that you have a CUDA-capable GPU through the Display Adapters section in the Windows Device Manager. Here you will find the vendor name and model of your graphics card(s). If you have an NVIDIA card that is listed in http:// /cuda-gpus, that GPU is CUDA-capable. The Release Notes for the CUDA Toolkit also contain a list of supported products.The Windows Device Manager can be opened via the following steps:1.Open a run window from the Start Menu2.Run:control /name Microsoft.DeviceManager2.2. Download the NVIDIA CUDA T oolkitThe NVIDIA CUDA Toolkit is available at /cuda-downloads. Choose the platform you are using and one of the following installer formats:work Installer: A minimal installer which later downloads packages required forinstallation. Only the packages selected during the selection phase of the installerare downloaded. This installer is useful for users who want to minimize download time.2.Full Installer: An installer which contains all the components of the CUDA Toolkitand does not require any further download. This installer is useful for systemswhich lack network access and for enterprise deployment.The CUDA Toolkit installs the CUDA driver and tools needed to create, build and run a CUDA application as well as libraries, header files, CUDA samples source code, and other resources.Download VerificationThe download can be verified by comparing the MD5 checksum posted at http:// /cuda-downloads/checksums with that of the downloadedfile. If either of the checksums differ, the downloaded file is corrupt and needs to be downloaded again.To calculate the MD5 checksum of the downloaded file, follow the instructions at http:// /kb/889768.2.3. Install the CUDA SoftwareBefore installing the toolkit, you should read the Release Notes, as they provide details on installation and software functionality.The driver and toolkit must be installed for CUDA to function. If you have notinstalled a stand-alone driver, install the driver from the NVIDIA CUDA T oolkit.The installation may fail if Windows Update starts after the installation has begun.Wait until Windows Update is complete and then try the installation again. Graphical InstallationInstall the CUDA Software by executing the CUDA installer and following the on-screen prompts.Silent InstallationThe installer can be executed in silent mode by executing the package with the -s flag. Additional parameters can be passed which will install specific subpackages instead of all packages. See the table below for a list of all the subpackage names.T able 3 Possible Subpackage NamesFor example, to install only the compiler and driver components:<PackageName>.exe -s nvcc_9.2 Display.DriverExtracting and Inspecting the Files ManuallySometimes it may be desirable to extract or inspect the installable files directly, such as in enterprise deployment, or to browse the files before installation. The full installation package can be extracted using a decompression tool which supports the LZMA compression method, such as 7-zip or WinZip.Once extracted, the CUDA Toolkit files will be in the CUDAToolkit folder, and similarily for the CUDA Samples and CUDA Visual Studio Integration. Within each directory isa .dll and .nvi file that can be ignored as they are not part of the installable files.Accessing the files in this manner does not set up any environment settings, suchas variables or Visual Studio integration. This is intended for enterprise-leveldeployment.2.3.1. Uninstalling the CUDA SoftwareAll subpackages can be uninstalled through the Windows Control Panel by using the Programs and Features widget.2.4. Use a Suitable Driver ModelOn Windows 7 and later, the operating system provides two driver models under which the NVIDIA Driver may operate:‣The WDDM driver model is used for display devices.‣The Tesla Compute Cluster (TCC) mode of the NVIDIA Driver is available for non-display devices such as NVIDIA Tesla GPUs, and the GeForce GTX Titan GPUs; it uses the Windows WDM driver model.The TCC driver mode provides a number of advantages for CUDA applications on GPUs that support this mode. For example:‣TCC eliminates the timeouts that can occur when running under WDDM due to the Windows Timeout Detection and Recovery mechanism for display devices.‣TCC allows the use of CUDA with Windows Remote Desktop, which is not possible for WDDM devices.‣TCC allows the use of CUDA from within processes running as Windows services, which is not possible for WDDM devices.‣TCC reduces the latency of CUDA kernel launches.TCC is enabled by default on most recent NVIDIA Tesla GPUs. To check which driver mode is in use and/or to switch driver modes, use the nvidia-smi tool that is included with the NVIDIA Driver installation (see nvidia-smi -h for details).Keep in mind that when TCC mode is enabled for a particular GPU, that GPU cannotbe used as a display device.NVIDIA GeForce GPUs (excluding GeForce GTX Titan GPUs) do not support TCC mode.2.5. Verify the InstallationBefore continuing, it is important to verify that the CUDA toolkit can find and communicate correctly with the CUDA-capable hardware. To do this, you need to compile and run some of the included sample programs.2.5.1. Running the Compiled ExamplesThe version of the CUDA Toolkit can be checked by running nvcc -V in a Command Prompt window. You can display a Command Prompt window by going to:Start > All Programs > Accessories > Command PromptCUDA Samples include sample programs in both source and compiled form. To verify a correct configuration of the hardware and software, it is highly recommended that you run the deviceQuery program located atC:\ProgramData\NVIDIA Corporation\CUDA Samples\v9.2\bin\win64\ReleaseThis assumes that you used the default installation directory structure. If CUDA is installed and configured correctly, the output should look similar to Figure 1.Figure 1 Valid Results from deviceQuery CUDA SampleThe exact appearance and the output lines might be different on your system. The important outcomes are that a device was found, that the device(s) match what is installed in your system, and that the test passed.If a CUDA-capable device and the CUDA Driver are installed but deviceQuery reports that no CUDA-capable devices are present, ensure the deivce and driver are properly installed.Running the bandwidthTest program, located in the same directory as deviceQuery above, ensures that the system and the CUDA-capable device are able to communicate correctly. The output should resemble Figure 2.Figure 2 Valid Results from bandwidthT est CUDA SampleThe device name (second line) and the bandwidth numbers vary from system to system. The important items are the second line, which confirms a CUDA device was found, and the second-to-last line, which confirms that all necessary tests passed.If the tests do not pass, make sure you do have a CUDA-capable NVIDIA GPU on your system and make sure it is properly installed.To see a graphical representation of what CUDA can do, run the sample Particles executable atC:\ProgramData\NVIDIA Corporation\CUDA Samples\v9.2\bin\win64\ReleaseThe project files in the CUDA Samples have been designed to provide simple, one-click builds of the programs that include all source code. To build the Windows projects (for release or debug mode), use the provided *.sln solution files for Microsoft Visual Studio 2010, 2012, or 2013. You can use either the solution files located in each of the examples directories inC:\ProgramData\NVIDIA Corporation\CUDA Samples\v9.2\<category>\<sample_name>or the global solution files Samples*.sln located inC:\ProgramData\NVIDIA Corporation\CUDA Samples\v9.2CUDA Samples are organized according to <category>. Each sample is organized into one of the following folders: (0_Simple, 1_Utilities, 2_Graphics, 3_Imaging, 4_Finance, 5_Simulations, 6_Advanced, 7_CUDALibraries).3.1. Compiling Sample ProjectsThe bandwidthTest project is a good sample project to build and run. It is located in the NVIDIA Corporation\CUDA Samples\v9.2\1_Utilities\bandwidthTest directory.If you elected to use the default installation location, the output is placed in CUDA Samples\v9.2\bin\win64\Release. Build the program using the appropriate solution file and run the executable. If all works correctly, the output should be similar to Figure 2.3.2. Sample ProjectsThe sample projects come in two configurations: debug and release (where release contains no debugging information) and different Visual Studio projects.A few of the example projects require some additional setup. The simpleD3D9 example requires the system to have a Direct3D SDK (June 2010 or later) installed and the Visual C++ directory paths (located in Tools > Options...) properly configured. Consult the Direct3D documentation for additional details.These sample projects also make use of the $CUDA_PATH environment variable to locate where the CUDA Toolkit and the associated .props files are.The environment variable is set automatically using the Build Customization CUDA 9.2.props file, and is installed automatically as part of the CUDA Toolkit installation process.T able 4 CUDA Visual Studio .props locationsYou can reference this CUDA 9.2.props file when building your own CUDA applications.3.3. Build Customizations for New ProjectsWhen creating a new CUDA application, the Visual Studio project file must be configured to include CUDA build customizations. To accomplish this, click File-> New | Project... NVIDIA-> CUDA->, then select a template for your CUDA Toolkit version. For example, selecting the "CUDA 9.2 Runtime" template will configure your project for use with the CUDA 9.2 Toolkit. The new project is technically a C++ project (.vcxproj) that is preconfigured to use NVIDIA's Build Customizations. All standard capabilities of Visual Studio C++ projects will be available.To specify a custom CUDA Toolkit location, under CUDA C/C++, select Common, and set the CUDA Toolkit Custom Dir field as desired. Note that the selected toolkit must match the version of the Build Customizations.3.4. Build Customizations for Existing ProjectsWhen adding CUDA acceleration to existing applications, the relevant Visual Studio project files must be updated to include CUDA build customizations. This can be done using one of the following two methods:1.Open the Visual Studio project, right click on the project name, and select BuildCustomizations..., then select the CUDA Toolkit version you would like to target.2.Alternatively, you can configure your project always to build with the most recentlyinstalled version of the CUDA Toolkit. First add a CUDA build customization to your project as above. Then, right click on the project name and select Properties.Under CUDA C/C++, select Common, and set the CUDA Toolkit Custom Dir fieldto $(CUDA_PATH) . Note that the $(CUDA_PATH) environment variable is set by the installer.While Option 2 will allow your project to automatically use any new CUDA Toolkit version you may install in the future, selecting the toolkit version explicitly as in Option 1 is often better in practice, because if there are new CUDA configuration options added to the build customization rules accompanying the newer toolkit, you would not see those new options using Option 2.If you use the $(CUDA_PATH) environment variable to target a version of the CUDA Toolkit for building, and you perform an installation or uninstallation of any version of the CUDA Toolkit, you should validate that the $(CUDA_PATH) environment variable points to the correct installation directory of the CUDA Toolkit for your purposes. You can access the value of the $(CUDA_PATH) environment variable via the following steps:1.Open a run window from the Start Menu2.Run:control sysdm.cpl3.Select the "Advanced" tab at the top of the window4.Click "Environment Variables" at the bottom of the windowFiles which contain CUDA code must be marked as a CUDA C/C++ file. This can done when adding the file by right clicking the project you wish to add the file to, selecting Add\New Item, selecting NVIDIA CUDA 9.2\Code\CUDA C/C++ File, and then selecting the file you wish to add.Note for advanced users: If you wish to try building your project against a newer CUDA Toolkit without making changes to any of your project files, go to the Visual Studio command prompt, change the current directory to the location of your project, and execute a command such as the following:msbuild <projectname.extension> /t:Rebuild /p:CudaToolkitDir="drive:/path/to/ new/toolkit/"Now that you have CUDA-capable hardware and the NVIDIA CUDA Toolkit installed, you can examine and enjoy the numerous included programs. To begin using CUDA to accelerate the performance of your own applications, consult the CUDA C Programming Guide, located in the CUDA Toolkit documentation directory.A number of helpful development tools are included in the CUDA Toolkit or are available for download from the NVIDIA Developer Zone to assist you as you develop your CUDA programs, such as NVIDIA® Nsight™ Visual Studio Edition, NVIDIA Visual Profiler, and cuda-memcheck.For technical support on programming questions, consult and participate in the developer forums at /cuda/.NoticeALL NVIDIA DESIGN SPECIFICATIONS, REFERENCE BOARDS, FILES, DRAWINGS, DIAGNOSTICS, LISTS, AND OTHER DOCUMENTS (TOGETHER AND SEPARATEL Y, "MATERIALS") ARE BEING PROVIDED "AS IS." NVIDIA MAKES NO WARRANTIES, EXPRESSED, IMPLIED, STATUTORY, OR OTHERWISE WITH RESPECT TO THE MATERIALS, AND EXPRESSL Y DISCLAIMS ALL IMPLIED WARRANTIES OF NONINFRINGEMENT, MERCHANTABILITY, AND FITNESS FOR A PARTICULAR PURPOSE.Information furnished is believed to be accurate and reliable. However, NVIDIA Corporation assumes no responsibility for the consequences of use of such information or for any infringement of patents or other rights of third parties that may result from its use. No license is granted by implication of otherwise under any patent rights of NVIDIA Corporation. Specifications mentioned in this publication are subject to change without notice. This publication supersedes and replaces all other information previously supplied. NVIDIA Corporation products are not authorized as critical components in life support devices or systems without express written approval of NVIDIA Corporation.TrademarksNVIDIA and the NVIDIA logo are trademarks or registered trademarks of NVIDIA Corporation in the U.S. and other countries. Other company and product names may be trademarks of the respective companies with which they are associated. Copyright© 2009-2018 NVIDIA Corporation. All rights reserved.。
windows安装cuda的方法

windows安装cuda的方法
CUDA是NVIDIA公司开发的一个并行计算平台和编程模型,可以让开发者使用GPU来加速应用程序的运算速度。
在Windows操作系统下,安装CUDA可以让开发者在本地环境中进行CUDA程序的编写和测试。
以下是安装CUDA的方法:
1. 下载CUDA安装包
从NVIDIA官网下载与自己显卡型号和操作系统版本相匹配的CUDA安装包。
2. 安装CUDA Toolkit
运行下载的CUDA安装包,按照提示完成安装。
3. 配置环境变量
在环境变量中添加CUDA的路径,以便在命令行中运行CUDA程序。
在系统变量中添加以下两个环境变量:
(1)CUDA_PATH:CUDA安装路径,例如“C:Program FilesNVIDIA GPU Computing ToolkitCUDAv10.1”
(2)PATH:CUDA相关的路径,例如
“%CUDA_PATH%bin;%CUDA_PATH%libnvvp”
4. 安装显卡驱动
安装显卡驱动可以确保CUDA程序能够正常运行。
从NVIDIA官网下载与自己显卡型号和操作系统版本相匹配的显卡驱动程序,运行安装即可。
5. 验证CUDA安装成功
在命令行中输入“nvcc -V”,如果输出CUDA的版本信息,则表示CUDA安装成功。
现在,您已经完成了在Windows操作系统下安装CUDA的全部步骤,可以开始使用CUDA进行并行计算了。
Windows下安装CUDA8.0

Windows下安装CUDA8.0在Win10下安装CUDA8.0,并使⽤VS2013测试;机器配置:Windows 10VS 2013CUDA8.0CUDA 8.0:CUDA其他版本:1. 安装CUDA 8.0双击安装下载的.exe⽂件,然后选择解压路径,如下图,解压到哪⾥⽆所谓,安装成功会⾃动删除;解压完成后,得到如下图:精简:安装所有CUDA模块,并覆盖掉当前的NVIDIA驱动程序;(说实话,容易出问题)⾃定义:选择⾃⼰想要安装的模块,此处选择这⾥;选择⾃定义后,出现下图所⽰:下⾯⼏个模块准确具体有什么⽤,不能100%确定,但能⼤概才出来:CUDA:这个是必须的,下⾯有CUDA Runntime、Samples⼀些东西;NVIDIA GeForce Experience:这个好像是为了更好的游戏体验,之前安装显卡驱动程序时也提⽰是否安装,果断拒绝了;Other components:这⾥的PhysX好像也是为了游戏体验来的;Driver components:这个就要慎重了,意思就是重新安装显卡驱动程序;如果之前已经成功安装驱动程序,这⾥就不⽤选了;如果之前没安装驱动程序,建议还是去官⽹上单独下载驱动程序进⾏安装吧;选择好需要安装的模块,就要选择安装路径了,我的选择如下图:在如图所⽰位置建⽴相应⽂件夹,然后再指定安装路径;安装成功后;Ctrl+R,打开cmd:nvcc -V输出版本信息,则表明安装成功;配置环境变量将F:\CUDA\NVIDIA GPU Computing Tookit\CUDA\v8.0\lib\x64添加的系统变量的path中;2. 安装CuDNN下载对应CUDA 8.0版本的CuDNN:(如果安装的是其他版本的CUDA,注意CuDNN的版本)下载完成后,解压得到⼀个名为cuda的⽂件夹;将该⽂件夹下的⽂件复制到上⼀步安装的CUDA中;注意对应的⽂件夹;./cuda/bin/**.dll 复制到 ./NVIDIA GPU Computing Tookit/CUDA/v8.0/bin/./cuda/include/**.dll 复制到 ./NVIDIA GPU Computing Tookit/CUDA/v8.0/include/./cuda/lib/x64/**.dll 复制到 ./NVIDIA GPU Computing Tookit/CUDA/v8.0/lib/x64/安装完成;3. 测试1使⽤VS2013打开./cuda/v8.0/Samples_vs2013.sln;加载完成后,执⾏本地Windows编译,最后输出成功,见下图;4. 测试2在VS2013上配置CUDA;4.1 新建项⽬并进⾏配置1. 打开VS2013,新建空⽩项⽬,设置项⽬名称、位置信息,如下图;2. 在源⽂件添加—>新建项—>NVIDIA CUDA 8.0—>CUDA C/C++ File,命名为hello.cu,如下图;hello.cu右键—>属性—>配置属性—>常规—>项类型,配置如下图;3. 在项⽬上右键—>⽣成依赖项—>⽣成⾃定义—>选择CUDA 8.0,如下图;4. 在项⽬上右键—>属性—>常规—>配置管理器—>活动解决⽅案平台(新建)—>键⼊或选择新平台(选择x64),如下图;5. 项⽬右键—>属性—>VC++⽬录—>包含⽬录,如下图,添加;F:\CUDA\NVIDIA GPU Computing Tookit\CUDA\v8.0\include6. 项⽬右键—>属性—>VC++⽬录—>库⽬录,如下图,添加;F:\CUDA\NVIDIA GPU Computing Tookit\CUDA\v8.0\lib\x647. 项⽬右键—>属性—>链接器—>常规,如下图,添加;$(CUDA_PATH_V8_0)\lib\$(Platform)8. 项⽬右键—>属性—>链接器—>输⼊—>附加依赖项,如下图,添加;注意:不同版本的CUDA,下⾯的lib是不同的;当然,⼀个项⽬也不⼀定需要所有的lib;具体有哪些lib,位于:F:\CUDA_Dev_Doc_Sam\v8.0\lib\x64;cublas.libcublas_device.libcuda.libcudadevrt.libcudart.libcudart_static.libcudnn.libcufft.libcufftw.libcurand.libcusolver.libcusparse.libnppc.libnppi.libnppial.libnppicc.libnppicom.libnppidei.libnppif.libnppig.libnppim.libnppist.libnppisu.libnppitc.libnpps.libnvblas.libnvcuvid.libnvgraph.libnvml.libnvrtc.libOpenCL.lib4.2 编译在上⾯建的hello.cu⽂件中添加下⾯代码:// CUDA runtime 库 + CUBLAS 库#include <cuda_runtime.h>#include <cublas_v2.h>#include <device_launch_parameters.h>#include <time.h>#include <iostream># pragma warning (disable:4819)using namespace std;bool initDevice(void)int cnt, i;cudaGetDeviceCount(&cnt);if (cnt < 0){cout << "Can not find CUDA device" << endl;return false;}for (i = 0; i < cnt; i++){cudaDeviceProp porp;if (cudaGetDeviceProperties(&porp, i) == cudaSuccess){if (porp.major >= 1) {break;}}}if (i == cnt){cout << "< 1.0" << endl;}return true;}__global__ void kernel_compute(float *model, float *input, float *output){int idx_x, idx_y;idx_y = blockIdx.x;idx_x = idx_y * blockDim.x + threadIdx.x;float sum = 0;for (int i = 0; i < 9; i++){sum += input[idx_x] * model[i];}//printf("%3d %d %2.6f %2.6f\n", idx_x, idx_y, sum, input[idx_x]);output[idx_x] = sum;}/*block ---> row*/int buildMaps(float *model, float *input, float *output, int height, int width){initDevice();float *dev_m = NULL, *dev_i = NULL, *dev_o = NULL;int size = height * width;cudaMalloc((void **)&dev_m, 9 * sizeof(float));cudaMalloc((void **)&dev_i, size * sizeof(float));cudaMalloc((void **)&dev_o, size * sizeof(float));cudaMemcpy(dev_m, model, 9 * sizeof(float), cudaMemcpyHostToDevice);cudaMemcpy(dev_i, input, size * sizeof(float), cudaMemcpyHostToDevice);dim3 grid(height, 1, 1);dim3 block(width, 1, 1);kernel_compute << <grid, block >> > (dev_m, dev_i, dev_o);cudaMemcpy(output, dev_o, size * sizeof(float), cudaMemcpyDeviceToHost); return 0;}新建main.cpp⽂件;#include <iostream>#include <Windows.h>#include <stdlib.h>#include <time.h>using namespace std;extern int buildMaps(float *model, float *input, float *output, int height, int width); void show(float *ptr, int height, int width, char *str){cout << str << " : " << endl;for (int h = 0; h < height; h++){for (int w = 0; w < width; w++){int cnt = h * width + w;printf("%5.5f ", ptr[cnt]);}cout << endl;}}#define width 5#define size (width * width)int main(){float *model = (float *)malloc(9 * sizeof(float));float *input = (float *)malloc(size * sizeof(float));float *output = (float *)malloc(size * sizeof(float));if (!model || !input || !output){std::cout << "Malloc Error" << endl;exit(-1);for (int i = 0; i < 9; i++){model[i] = (float)(i);}srand((unsigned)time(0));for (long long int i = 0; i < size; i++){input[i] = ((rand() % 100) * 1.f) / (rand() % 100 + 1);}buildMaps((float *)model, (float *)input, output, width, width); show(model, 3, 3, "model");show(input, width, width, "input");show(output, width, width, "output");int a;cin >> a;}编译,输出结果为:。
Ubuntu20.04安装cuda10.1的步骤(图文教程)

Ubuntu20.04安装cuda10.1的步骤(图⽂教程)安装前准备CUDA的主要⽤途是深度学习,⽽⽬前主流的深度学习框架Tensorflow2最⾼⽀持CUDA 10.1,因此本⽂讲解在Ubuntu 20.04系统上安装CUDA 10.1的主要过程。
⾸先要查看你的NVIDIA显卡驱动是否⽀持cuda10.1版本。
在终端执⾏以下命令:nvidia-smi如果 CUDA Version: … 这⾥的版本号⼤于等于10.1(我的是10.2),就可以安装cuda10.1.关键点:gcc降级因为Ubuntu20.04⾃带的gcc版本为9.3,⽽cuda10.1不⽀持gcc-9,因此要⼿动安装gcc-7,命令如下:sudo apt-get install gcc-7 g++-7安装完gcc-7,系统中就存在两个版本的gcc,因此要设置默认的gcc,命令如下:sudo update-alternatives --install /usr/bin/gcc gcc /usr/bin/gcc-7 9sudo update-alternatives --install /usr/bin/gcc gcc /usr/bin/gcc-9 1此命令可以通过update-alternatives设置gcc各版本的优先级,优先级最⾼的为系统默认版本,可以⽤下述命令显⽰其优先级:sudo update-alternatives --display gcc设置默认的g++也是如此:sudo update-alternatives --install /usr/bin/g++ g++ /usr/bin/g++-7 9sudo update-alternatives --install /usr/bin/g++ g++ /usr/bin/g++-9 1显⽰g++优先级:sudo update-alternatives --display g++按照官⽹的安装步骤下载并安装CUDA 10.1如上图所⽰,推荐选择run⽂件安装,⽐较简洁。
最详细不过的CUDA的下载安装使用、环境变量配置,有这一篇就够了

最详细不过的CUDA的下载安装使⽤、环境变量配置,有这⼀篇就够了在上⼀期中,我们介绍了为什么使⽤GPU可以加速计算和处理图像,以及查看⾃⼰的电脑能否使⽤GPU加速,不知道的可以去看上⼀期⽂章,这期我们正式的来下载与安装GPU加速⼯具CUDA,并检查是否安装成功。
前⾔:可以看到,如果我们想要下载安装CUDA需要有NVIDA的显卡、Windows系统、Visual Studio,即:第⼀步:查看⾃⼰电脑是否有NVIDA显卡。
第⼆步:查看⾃⼰是否有⽀持的版本的微软Windows系统,具体⼤家可看上图Table1。
第三步:查看⾃⼰是否有⽀持版本的Visual Studio,因为我们在安装CUDA时需要⽤到其中的组件,具体请看上图Table2。
安装⼯作总结查看⾃⼰有是否有⽀持NVIDA的独⽴显卡查看⾃⼰是否有NVIDA显卡驱动程序,没有请下载安装官⽹下载安装 Microsoft Visual Studio(申请⼀个微软账号)官⽹下载安装 CUDA检验CUDA安装是否成功CUDA安装成功后的使⽤这⾥教⼤家安装CUDA10.2和免费社区版VS2017的下载和安装教程正式下载与安装CUDA第⼀步:查看⾃⼰是否有⽀持安装CUDA的NVIDA显卡,具体请见我上期⽂章。
安装完后,可以打开NVIDA控制⾯板,查看GPU显卡所⽀持的CUDA版本,具体开始菜单 -》NVIDIA控制⾯板-》帮助-》系统信息-》组件-》nvidia.dll后⾯的cuda参数,可以看到,我的显卡⽀持版本为10.2,所以我下载安装cuda10.2版本。
第三步:下载安装 Visual Studio安装Visual Studio,因为CUDA在安装时,需要VS的⾥⾯的⼯具包来编译。
VS这⾥我安装的是社区免费版VS2017,⽆需秘钥key就可以使⽤,也可以使⽤其它版本,但是需要key,请见第⼀张图的Table2,在安装过程中,会⾃动检测本机是否已经安装了配套的VS版本其中之⼀,如果VS版本和Cuda版本不匹配的话,安装⽆法进⾏。
- 1、下载文档前请自行甄别文档内容的完整性,平台不提供额外的编辑、内容补充、找答案等附加服务。
- 2、"仅部分预览"的文档,不可在线预览部分如存在完整性等问题,可反馈申请退款(可完整预览的文档不适用该条件!)。
- 3、如文档侵犯您的权益,请联系客服反馈,我们会尽快为您处理(人工客服工作时间:9:00-18:30)。
CUDA3.1 X32 + Windows 7 32bit + Visual Studio 2005 +
Visual assist安装指南收藏
1. 安装CUDA Driver,toolkit,SDK
a) 建议driver,toolkit,SDK的顺序,默认路径安装
b) 如果笔记本用户,可以选择强行安装3.1的驱动包(选择对应台式机的型号),但是会有部分游戏随机花屏等问题。
可以装2.2就有笔记本驱动
2. 安装Visual studio 2005
3. 安装wizard x32版
4. 环境配置
a) 将
i. C:\Documents and Settings\All Users\Application Data\NVIDIA Corporation\NVIDIA GPU Computing SDK\C\bin\win32\Debug;
ii. C:\Documents and Settings\All Users\Application Data\NVIDIA Corporation\NVIDIA GPU Computing SDK\C\bin\win32\emudebug;
iii. C:\Documents and Settings\All Users\Application Data\NVIDIA Corporation\NVIDIA GPU Computing SDK\C\bin\win32\release;
添加到path中
b) 打开vs2005,工具,选项,项目和解决方案,VC++目录,
库文件中添加
C:\Documents and Settings\All Users\Application Data\NVIDIA
Corporation\NVIDIA GPU Computing SDK\C\common\lib
C:\CUDA\lib
包含文件中添加
C:\CUDA\include
C:\Documents and Settings\All Users\Application Data\NVIDIA
Corporation\NVIDIA GPU Computing SDK\C\common\inc
源文件中添加
C:\Documents and Settings\All Users\Application Data\NVIDIA
Corporation\NVIDIA GPU Computing SDK\C\common\src
c) VC++项目设置,
d) C/C++扩展名添加*.cu
e) 包含扩展名添加.cuh
f) 规则文件搜索路径设为
C:\Documents and Settings\All Users\Application Data\NVIDIA
Corporation\NVIDIA GPU Computing SDK\C\common
g) 到此可以新建一个项目测试一下hello cuda能否运行。
h) 调试程序时
在工程上右键选custom build rules->Find Existing,选中cuda.rules,点击ok。
在工程上右键选属性,在CUDA中
GPU Architecture选择sm_13
Use Fast Math 选择“是”
Optimization选择Maximize speed或Full Optimization
Set the default "CUDA -> Advanced -> GPU Architecture Compile Name" as "1.0(virtual) Arch", You may change it depends on your system.
Set the default "CUDA -> Advanced -> GPU Architecture Code Name" as "1.0(hardware) code", You may change it depends on your system.
Set the default "CUDA -> Output -> Inern Mode" as "Real" in Debug & Release;
5. 安装Visual Assist
破解版一大堆自己找吧
6. VA配置
a) 将C:\Documents and Settings\All Users\Application Data\NVIDIA Corporation\NVIDIA GPU Computing
SDK\C\doc\syntax_highlighting\visual_studio_8中的usertype.dat拷贝到
C:\Program Files\Microsoft Visual Studio 8\Common7\IDE中
b) 打开VS2005,选择工具-选项-文本编辑器-文件扩展名,在扩展名编辑框中填入cu,在编辑器下拉菜单中选择Microsoft Visual C++,单击添加,然后点击确定。
c) 打开注册表,在HKEY_LOCAL_MACHINE\SOFTWARE
\Microsoft\VisualStudio\9.0\Languages\File Extensions\.cpp下面添加子键 .cu 然后copy .cpp的键值到.cu。
这样才能表示cu也是VS下的VC的工程文件。
d) 打开VS,运行下VA(建立一个CPP工程,折腾到VA能用为止),关掉IDE,否则注册表不会添加对应信息。
e) HKEY_CURRENT_USER\Software\Whole Tomato\Visual Assist X\VANet8 在ExtSource键添加键值.cu
f) 打开Visual Assist属性,在projects 的C/C++ Directories custom下面添加CUDA 的头文件目录,这样才能在Visual Assist 生成规则的时候找到CUDA自身的特殊定义才能生成Visual Assist的关键字,如__global__.
添加的目录有C:\CUDA\include,C:\Documents and Settings\All Users\Application Data\NVIDIA Corporation\NVIDIA GPU Computing SDK\C\common\inc
Source file中添加C:\Documents and Settings\All Users\Application
Data\NVIDIA Corporation\NVIDIA GPU Computing SDK\C\common\src。