中文版django官方教程part2(1)
django基本使用教程

django基本使⽤教程1. 创建⼯程django-admin startproject ⼯程名2. 创建应⽤cd ⼯程名mkdir appscd appspython3 ../manage.py startapp 应⽤名3. 数据库迁移3.1 将应⽤添加到setting.py 的INSTALLED_APPS 中3.2 ⽣成迁移⽂件python3 manage.py makemigrations3.3 迁移python3 manage.py migrate4. 配置静态⽂件路径STATIC_URL 访问静态⽂件的URL前缀STATICFILES_DIRS 存放查找静态⽂件的⽬录5. 数据库增加savefrom . import modelspeople = models.PeopleInfo(name="hhh", age=3)people.save()createfrom . import modelspeople = models.PeopleInfo.objects.create(name="hhh", age=3)6. 数据库修改savepeople = PeopleInfo.objects.get(name='hhh') = "HHH"people.save()updatePeopleInfo.objects.filter(name="HHH").update(name="HhH")7. 数据库删除模型类对象.delete()people = PeopleInfo.objects.get(name="HhH")people.delete()模型类.objects.filter().delete()PeopleInfo.objects.filter(name="HHH").delete()8. 数据库查询8.1 基本查询8.1.1 get查询单⼀结果,如果不存在则会抛出模型类. DoesNotExist 异常 PeopleInfo.objects.get(name="HHH")8.1.2 all 查询多个结果PeopleInfo.objects.all()8.1.3 count 查询结果数量PeopleInfo.objecrs.count()8.2 过滤查询filter 过滤出多个结果exclude 排除过滤掉符合条件剩下的结果get过滤单⼀结果过滤条件表达语法如下属性名称__⽐较运算符=值 # 注意属性名称和⽐较运算符之间是两个_相等exact:表⽰判等# 查询PeopleInfo表中id为1的对象PeopleInfo.objects.filter(id__exact=1) 可以简写 PeopleInfo.objects.filter(id=1)模糊查询contains:表⽰是否包含# 查询PeopleInfo表中name字段包含H的对象PeopleInfo.objects.filter(name__contains="H")空查询isnull:是否为null# 查询PeopleInfo表中name不为空的对象PeopleInfo.objects.filter(name__isnull=True)范围查询(⾮连续)in:是否包含在范围内# 查询PeopleInfo表中id为1,3,5的对象PeopleInfo.objects.filter(id__in=[1,3,5])范围查询(连续)range:是否包含在范围内# 查询PeopleInfo表中id为1到5之间的对象PeopleInfo.objects.filter(id__range=[1,5])⽐较查询gt:⼤于gte:⼤于等于lt:⼩于lte:⼩于等于# 查询id⼤于3的对象PeopleInfo.objects.filter(id__gt=3)返回满⾜条件以外的数据exclude()# 查询id不等于3的对象PeopleInfo.objects.exclude(id__exact=3)⽇期查询pub_date 字段为 models.DateField(verbose_name='发布⽇期', null=True)year、month、day、week_day、hour、minute、second:对⽇期时间类型的属性进⾏运算# 查询People表中pub_date字段的值为1998的PeopleInfo.objects.filter(pub_date__year=1998)# 查询People表中pub_date字段的值⼤于1998-1-1的PeopleInfo.objects.filter(pub_date__gt='1998-1-1')8.3 字段值进⾏⽐较from django.db.models import F8.3.1 F对象使⽤⽅法: F(属性名)# 查询money字段⼤于 age乘10PeopleInfo.objects.filter(money__gt=F("age")*10)8.4 多条件过滤8.4.1 Q对象进⾏多个条件查询使⽤⽅法: Q(属性名__运算符=值)# 查询 age 字段等于1 money⼤于500PeopleInfo.objects.filter(Q(age=1),Q(money__gt=500))PeopleInfo.objects.filter(Q(age=1)&Q(money__gt=500))# 查询 age 字段等于1 或 money⼤于500PeopleInfo.objects.filter(Q(age=1)|Q(money__gt=500))# 查询 age 字段等于1 money⼩于等于500PeopleInfo.objects.filter(Q(age=1), ~Q(money__gt=500))8.4.2 多个条件查询# 查询 age 字段等于2 money 字段⼤于5000PeopleInfo.objects.filter(age__gt=2, money__gt=3000)# 查询 age 字段等于2 id字段⼤于3PeopleInfo.objects.filter(age__gt=2).filter(id__gt=3)8.5 关联查询由⼀到多使⽤⽅法: ⼀对应的模型类对象.多对应的模型类名⼩写_setpeople = PeopleInfo.objects.get(id=1)books = peopel.book_set.all()由多到⼀使⽤⽅法: 多对应的模型类对象.多对应的模型类中的关系类属性名book = Book.objects.get(id=1)peoples = book.people获取由多对⼀,获取⼀的属性值使⽤⽅法:多对应的模型类对象.关联类属性_id 可以为id 也可以为其他字段book = Book.objects.get(id=1)book.people_id9. 聚合函数使⽤aggregate() 过滤器⽤来聚合函数Avg平均Count 数量Max 最⼤Min 最⼩Sum 求和from django.db.models import Sum# 查询书的总量BookInfo.objects.aggregate(Sum('readcount'))10. 排序默认升序PeopleInfo.objects.all().order_by('id')降序PeopleInfo.objects.all().order_by('-id')11. 分页Paginator类⽅法序号⽅法名说明1page(self, number)返回第number页的page类实例对象Paginator类属性序号属性名说明1num_pages返回分页之后的总页数2page_range返回分页后的页码列表Paginator实例⽅法序号⽅法名说明has_previous判断当前页是否有前⼀页has_next判断当前页是否有下⼀页previous_page_number返回前⼀页的页码next_page_number返回下⼀页的页码Paginator实例属性序号属性名说明1number返回当前页的页码2object_list返回当前页的数据查询集3paginator返回对应的Paginator类对象# 查询数据books = BookInfo.objects.all()# 导⼊分页类from django.core.paginator import Paginator# 创建分页实例paginator = Paginator(books, 2) # 每页有2个数据# 获取指定页码的数据page_books = paginator.page(1) # 第1页# 获取分页数据total_page=paginator.num_pages。
django教程

django教程Django是一个Python Web应用程序框架,它提供了一种快速开发高质量网站的方式。
本教程将介绍Django框架的基础知识和使用方法,以帮助初学者入门。
首先,我们需要安装Django。
可以通过在终端或命令提示符中输入以下命令来安装最新版本的Django:```pip install Django```安装完成后,我们可以创建一个新的Django项目。
在终端或命令提示符中,进入项目所在的目录,然后运行以下命令:```django-admin startproject myproject```这将创建一个名为"myproject"的文件夹,并在其中生成一些Django所需的文件。
接下来,我们可以创建一个Django应用程序。
在终端或命令提示符中,进入项目文件夹,并运行以下命令:```python manage.py startapp myapp```这将创建一个名为"myapp"的文件夹,并在其中生成一些Django所需的文件,用于构建我们的应用程序。
接下来,我们需要定义模型。
在"myapp"文件夹中的models.py文件中,可以定义数据库中的表格结构。
例如,我们可以创建一个名为"Article"的模型,表示网站上的文章,并定义它的标题、内容和发布日期等字段。
然后,我们可以创建视图。
在"myapp"文件夹中的views.py文件中,可以定义处理网页请求的视图函数。
例如,我们可以创建一个名为"article_list"的视图函数,用于显示所有文章的列表。
接下来,我们需要创建URL模式。
在项目文件夹中的urls.py 文件中,可以定义URL与视图之间的映射关系。
例如,我们可以将"/articles/"映射到"article_list"视图函数。
最简单的Python Django入门教程

最简单的Python Django入门教程Django的学习教程也是分门别类,形式不一。
或是较为体系的官方文档,或者风格自由的博客文档,或者偏向实例的解析文档。
即使官方文档,章节较多,文字阐述累赘,有时候我们只是关注某个功能用法而已,而自由博文最大的问题是互相抄袭,结构混乱,涵盖面小且错误较为明显。
由此,本文结合学习期间资料梳理和项目开发经验,整理出一套较为常用实用的文章。
适用于新手入门,无论C#,C,java,Python,R等具有任何编程语言基础均可;想快速了解Django并可以快速开发上手者。
适用于作为资料查询,技术点参考。
几个基本概念前置条件:假设读者基本Python语言基础,或者具备某种编程语言的基础。
你还熟悉web开发环境,懂些css,js,db等。
Django是什么?Django是一个开放源代码的Web应用框架,由Python写成。
采用了MVC的软件设计模式,即模型M,视图V和控制器C。
它最初是被开发来用于管理劳伦斯出版集团旗下的一些以新闻内容为主的网站的。
并于2005年7月在BSD许可证下发布。
这套框架是以比利时的吉普赛爵士吉他手Django Reinhardt来命名的。
Django的主要目标是使得开发复杂的、数据库驱动的网站变得简单。
Django注重组件的重用性和“可插拔性”,敏捷开发和DRY法则(Don't Repeat Yourself)。
在Django中Python被普遍使用,甚至包括配置文件和数据模型。
————维基百科Django是一个开放源代码的Web应用框架,由Python写成。
采用了MVC的框架模式,即模型M,视图V和控制器C。
它最初是被开发来用于管理劳伦斯出版集团旗下的一些以新闻内容为主的网站的,即是CMS(内容管理系统)软件。
并于2005年7月在BSD许可证下发布。
这套框架是以比利时的吉普赛爵士吉他手Django Reinhardt来命名的。
————百度百科MTV开发模式?Django是一个基于MVC构造的框架。
(完整word版)在pycharm下使用Django
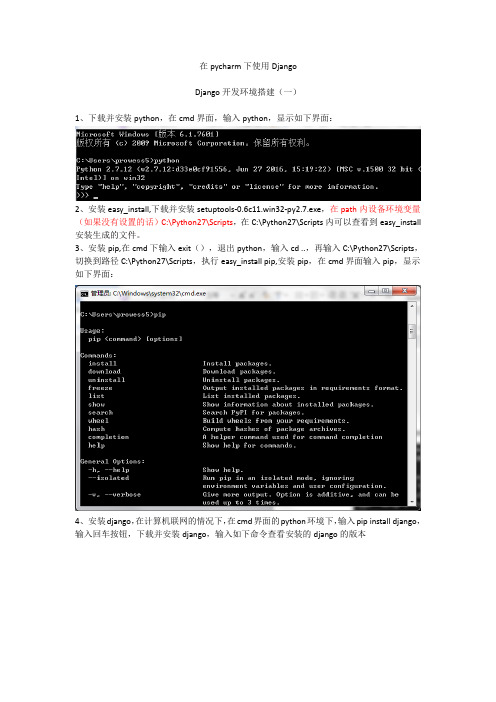
在pycharm下使用DjangoDjango开发环境搭建(一)1、下载并安装python,在cmd界面,输入python,显示如下界面:2、安装easy_install,下载并安装setuptools-0.6c11.win32-py2.7.exe,在path内设备环境变量(如果没有设置的话)C:\Python27\Scripts,在C:\Python27\Scripts内可以查看到easy_install 安装生成的文件。
3、安装pip,在cmd下输入exit(),退出python,输入cd ..,再输入C:\Python27\Scripts,切换到路径C:\Python27\Scripts,执行easy_install pip,安装pip,在cmd界面输入pip,显示如下界面:4、安装django,在计算机联网的情况下,在cmd界面的python环境下,输入pip install django,输入回车按钮,下载并安装django,输入如下命令查看安装的django的版本至此,django的开发环境搭建完成。
注1:带版本的安装,命令如下:pip install Django==1.10.4注2:更换Django的版本需要先卸载django,在python环境下,输入如下命令,找到django的安装路径:Import django;print(django.__path__)找到django的目录,删除django 目录即可,然后重新安装。
Django项目的创建(二)下载pycharm的专业版,然后一键安装,打开IDE,pycharm,在pycharm中,点击File,再点击New Project,然后选择Django,以及python对应的版本,见截图:我们来看创建好的webSite项目下的文件,众所周知,django是基于MTV模式的web框架,在新创建的Django项目中,templates是存储html,css,js等文件的,webSite目录文件为:文件如下:__init__.py:让Python把该目录看成一个package使需的文件,而不是一个文件的目录settings.py:Django项目的设置和设置,数据库,时区等等的配置,都是在这个配置文件下urls.py:Django项目的url设置,可以理解为Django网站的目录,后面在介绍url隐射的时候会介绍到该文件manage.py:一个命令行工具,允许以多种方式与python进行交互。
django框架知识点

Django框架知识点什么是Django?Django是一个开源的Web应用框架,用于快速开发安全、可扩展的Web应用程序。
它采用了MTV(模型-模板-视图)的架构模式,提供了许多用于处理常见Web开发任务的工具和功能。
Django框架的核心组件1. 模型(Models)模型是Django框架中的核心组件之一。
模型定义了数据结构和关系,并提供了与数据库交互的API。
通过定义模型,我们可以轻松地创建、读取、更新和删除数据库中的记录。
2. 视图(Views)视图是Django框架中处理用户请求的组件。
视图接收HTTP请求,并根据请求的内容生成HTTP响应。
在视图中,我们可以从数据库中检索数据,利用模板生成动态内容,并将结果呈现给用户。
3. 模板(Templates)模板是用于生成动态内容的文件。
它们可以包含HTML、CSS和JavaScript代码,以及用于呈现从视图传递给模板的数据的模板语言标记。
通过使用模板,我们可以将动态内容与静态内容分离,使代码更加可维护和可重用。
4. URL配置(URL Configuration)URL配置用于将URL映射到相应的视图。
它定义了应用程序支持的URL模式,并指定了与每个URL模式相对应的视图函数。
通过URL配置,我们可以实现网站的导航和路由。
5. 表单(Forms)Django框架提供了表单组件,用于处理用户输入和验证。
表单可以生成HTML 表单元素,并在提交时验证用户输入。
通过使用表单,我们可以轻松地处理用户注册、登录和其他表单交互。
6. 身份验证和授权(Authentication and Authorization)Django框架提供了身份验证和授权的功能。
它支持用户注册、登录、注销以及对用户进行身份验证的功能。
通过使用Django的身份验证和授权功能,我们可以保护应用程序中的敏感数据和功能。
7. 中间件(Middleware)中间件是在请求和响应之间执行的代码。
django教程

django教程Django是一个基于Python的开源Web应用框架,它采用了MVC(模型-视图-控制器)的设计模式,可用于快速开发高质量的Web应用程序。
以下是一个简单的Django项目的创建和部署过程。
1. 首先,确保你已经安装了Python和Django。
可以通过运行以下命令来检查是否已经安装了Python:python --version如果Python版本大于或等于3.6,那么你可以继续安装Django。
运行以下命令来安装Django:pip install django2. 创建一个新的Django项目。
在命令行中,切换到你想要创建项目的目录,然后运行以下命令:django-admin startproject myproject这将在当前目录中创建一个名为"myproject"的新文件夹,其中包含了Django项目的基本结构和配置文件。
3. 进入项目文件夹,运行以下命令来创建数据库:python manage.py migrate这将根据项目中的模型创建数据库表。
4. 创建一个Django应用程序。
在命令行中,运行以下命令:python manage.py startapp myapp这将在项目中创建一个名为"myapp"的新文件夹,其中包含了应用程序的相关文件。
5. 在应用程序中定义模型。
打开"myapp/models.py"文件,并添加你的模型定义。
例如,你可以创建一个名为"User"的模型来表示用户信息:```pythonfrom django.db import modelsclass User(models.Model):name = models.CharField(max_length=50)email = models.EmailField()age = models.IntegerField()```6. 运行数据库迁移命令以创建新的模型表:python manage.py makemigrationspython manage.py migrate7. 创建视图。
Django Web开发框架教程说明书

About the T utorialDjango is a web development framework that assists in building and maintaining quality web applications. Django helps eliminate repetitive tasks making the development process an easy and time saving experience. This tutorial gives a complete understanding of Django.AudienceThis tutorial is designed for developers who want to learn how to develop quality web applications using the smart techniques and tools offered by Django.PrerequisitesBefore you proceed, make sure that you understand the basics of procedural and object-oriented programming: control structures, data structures and variables, classes, objects, etc.Disclaimer & CopyrightCopyright 2015 by Tutorials Point (I) Pvt. Ltd.All the content and graphics published in this e-book are the property of Tutorials Point (I) Pvt. Ltd. The user of this e-book is prohibited to reuse, retain, copy, distribute or republish any contents or a part of contents of this e-book in any manner without written consent of the publisher.We strive to update the contents of our website and tutorials as timely and as precisely as possible, however, the contents may contain inaccuracies or errors. Tutorials Point (I) Pvt. Ltd. provides no guarantee regarding the accuracy, timeliness or completeness of our website or its contents including this tutorial. If you discover any errors on our website or inthistutorial,******************************************.T able of ContentsAbout the Tutorial (i)Audience (i)Prerequisites (i)Disclaimer & Copyright (i)Table of Contents .................................................................................................................................... i i 1.DJANGO – BASICS . (1)History of Django (1)Django – Design Philosophies (1)Advantages of Django (1)2.DJANGO – OVERVIEW (3)3.DJANGO – ENVIRONMENT (4)Step 1 – Installing Python (4)Step 2 - Installing Django (4)Step 3 – Database Setup (6)Step 4 – Web Server (6)4.DJANGO – CREATING A PROJECT (7)Create a Project (7)The Project Structure (7)Setting Up Your Project (8)5.DJANGO – APPS LIFE CYCLE (10)6.DJANGO – ADMIN INTERFACE (12)7.DJANGO – CREATING VIEWS (15)8.DJANGO – URL MAPPING (17)9.DJANGO – TEMPLATE SYSTEM (23)The Render Function (23)Django Template Language (DTL) (23)Filters (24)Tags (24)10.DJANGO – MODELS (28)Creating a Model (28)Linking Models (30)11.DJANGO – PAGE REDIRECTION (33)12.SENDING E-MAILS (36)Sending a Simple E-mail (36)Sending Multiple Mails with send_mass_mail (37)Sending HTML E-mail (39)Sending E-mail with Attachment (41)13.DJANGO – GENERIC VIEWS (42)14.DJANGO – FORM PROCESSING (46)15.DJANGO – FILE UPLOADING (51)16.DJANGO – APACHE SETUP (55)17.DJANGO – COOKIES HANDLING (57)18.DJANGO – SESSIONS (60)19.DJANGO – CACHING (64)Setting Up Cache in Database (64)Setting Up Cache in File System (65)Setting Up Cache in Memory (65)Caching the Entire Site (65)Caching a View (66)Caching a Template Fragment (67)MENTS (69)21.DJANGO – RSS (74)22.DJANGO – AJAX (78)Django 5Django is a high-level Python web framework that encourages rapid development and clean, pragmatic design. Django makes it easier to build better web apps quickly and with less code. Note : Django is a registered trademark of the Django Software Foundation, and is licensed under BSD License.History of Django∙ 2003: Started by Adrian Holovaty and Simon Willison as an internal project at the Lawrence Journal-World newspaper.∙ 2005: Released July 2005 and named it Django, after the jazz guitarist Django Reinhardt.∙ 2005: Mature enough to handle several high-traffic sites.∙Current : Django is now an open source project with contributors across the world. Django – Design PhilosophiesDjango comes with the following design philosophies:∙ Loosely Coupled : Django aims to make each element of its stack independent of the others.∙ Less Coding : Less code so in turn a quick development.∙ Don't Repeat Yourself (DRY): Everything should be developed only in exactly one place instead of repeating it again and again.∙ Fast Development : Django's philosophy is to do all it can to facilitate hyper-fast development.∙Clean Design : Django strictly maintains a clean design throughout its own code and makes it easy to follow best web-development practices. Advantages of DjangoHere are few advantages of using Django which can be listed out here:1.Django6∙Object-Relational Mapping (ORM) Support: Django provides a bridge between the data model and the database engine, and supports a large set of database systems including MySQL, Oracle, Postgres, etc. Django also supports NoSQL database through Django-nonrel fork. For now, the only NoSQL databases supported are MongoDB and google app engine.∙Multilingual Support: Django supports multilingual websites through its built-in internationalization system. So you can develop your website, which would support multiple languages.∙Framework Support: Django has built-in support for Ajax, RSS, Caching and various other frameworks.∙Administration GUI: Django provides a nice ready-to-use user interface for administrative activities.∙Development Environment: Django comes with a lightweight web server to facilitate end-to-end application development and testing.Django 7As you already know, Django is a Python web framework. And like most modern framework, Django supports the MVC pattern. First let's see what is the Model-View-Controller (MVC) pattern, and then we will look at Django ’s specificity for the Model-View-Template (MVT) pattern.MVC PatternWhen talking about applications that provides UI (web or desktop), we usually talk about MVC architecture. And as the name suggests, MVC pattern is based on three components: Model, View, and Controller. Check our MVC tutorial here to know more.DJANGO MVC - MVT PatternThe Model-View-Template (MVT) is slightly different from MVC . In fact the main difference between the two patterns is that Django itself takes care of the Controller part (Software Code that controls the interactions between the Model and View), leaving us with the template. The template is a HTML file mixed with Django Template Language (DTL). The following diagram illustrates how each of the components of the MVT pattern interacts with each other to serve a user request:The developer provides the Model, the view and the template then just maps it to a URL and Django does the magic to serve it to the user.2.Django 8Django development environment consists of installing and setting up Python, Django, and a Database System. Since Django deals with web application, it's worth mentioning that you would need a web server setup as well.Step 1 – Installing PythonDjango is written in 100% pure Python code, so you'll need to install Python on your system. Latest Django version requires Python 2.6.5 or higher for the 2.6.x branch or higher than2.7.3 for the 2.7.x branch.If you're on one of the latest Linux or Mac OS X distribution, you probably already have Python installed. You can verify it by typing python command at a command prompt. If you see something like this, then Python is installed.Otherwise, you can download and install the latest version of Python from the link /download.Step 2 - Installing DjangoInstalling Django is very easy, but the steps required for its installation depends on your operating system. Since Python is a platform-independent language, Django has one package that works everywhere regardless of your operating system.You can download the latestversion of Django from the link/download. UNIX/Linux and Mac OS X InstallationYou have two ways of installing Django if you are running Linux or Mac OS system: ∙You can use the package manager of your OS, or use easy_install or pip if installed. ∙ Install it manually using the official archive you downloaded before.We will cover the second option as the first one depends on your OS distribution. If you have decided to follow the first option, just be careful about the version of Django you are installing.3.Django9Let's say you got your archive from the link above, it should be something like Django-x.xx.tar.gz:Extract and install.You can test your installation by running this command:If you see the current version of Django printed on the screen, then everything is set. Note: For some version of Django it will be django-admin the ".py" is removed.Windows InstallationWe assume you have your Django archive and python installed on your computer.First,PATH verification.On some version of windows (windows 7) you might need to make sure the Path system variable has the path the following C:\Python27\;C:\Python27\Lib\site-packages\django\bin\ in it, of course depending on your Python version.Then, extract and install Django.Next, install Django by running the following command for which you will need administrative privileges in windows shell "cmd":To test your installation, open a command prompt and type the following command:If you see the current version of Django printed on screen, then everything is set.ORLaunch a "cmd" prompt and type python then:1011End of ebook previewIf you liked what you saw…Buy it from our store @ https://store.tutorialspoint。
django课程设计

django课程设计一、课程目标知识目标:1. 掌握Django框架的基本原理和结构,理解MVT(Model-View-Template)设计模式;2. 学会使用Django命令创建项目和应用,并能进行基本的配置;3. 熟悉Django后台管理系统的使用与自定义,掌握模型(Model)的创建与管理;4. 掌握Django模板(Template)的语法和变量使用,实现数据展示;5. 学会使用Django视图(View)处理用户请求,实现业务逻辑。
技能目标:1. 能够运用Django框架独立开发简易的Web应用;2. 掌握Django ORM的使用,能进行数据库的增删改查操作;3. 学会使用Django表单处理用户输入,实现数据的验证和保存;4. 掌握Django路由系统,实现不同URL对应不同的视图处理;5. 能够运用Django中间件处理请求和响应。
情感态度价值观目标:1. 培养学生对Web开发的兴趣,激发学习热情;2. 培养学生的团队协作意识,提高沟通与协作能力;3. 培养学生遇到问题时积极思考、主动解决的能力;4. 引导学生关注网络安全,树立正确的网络价值观。
本课程针对高年级学生,课程性质为实践性较强的学科。
在教学过程中,需关注学生的个体差异,充分调动学生的主观能动性,培养学生动手实践能力。
课程目标根据学科知识体系和学生特点进行分解,确保学生能够掌握Django框架的核心知识,为后续学习打下坚实基础。
同时,注重培养学生的情感态度价值观,使学生在学习过程中形成良好的学习习惯和价值观。
二、教学内容1. Django框架概述- 理解Web开发基本概念;- 介绍Django框架的起源、特点及应用场景。
2. Django环境搭建与项目创建- 学会安装Python和Django;- 掌握使用命令行创建Django项目和应用的步骤。
3. 模型(Model)与数据库- 熟悉Django ORM系统;- 学习定义模型类,实现数据库表的创建、查询、更新和删除操作。
- 1、下载文档前请自行甄别文档内容的完整性,平台不提供额外的编辑、内容补充、找答案等附加服务。
- 2、"仅部分预览"的文档,不可在线预览部分如存在完整性等问题,可反馈申请退款(可完整预览的文档不适用该条件!)。
- 3、如文档侵犯您的权益,请联系客服反馈,我们会尽快为您处理(人工客服工作时间:9:00-18:30)。
# Uncomment the admin/doc line below and add 'django.contrib.admindocs' # to INSTALLED_APPS to enable admin documentation: # (r'^admin/doc/', include('django.contrib.admindocs.urls')),
Make the poll app modifiable in the admin 让投票程序的数据可编辑
But where's our poll app? It's not displayed on the admin index page. 但是投票程序显示在哪里?在管理后台的首页上没有显示出来。
You should see a few other types of editable content, including groups, users and sites. These are core features Django ships with by default. 你会看到几块能够进行编辑的内容,包括 Gourps、Users、Sites。这些都是 Django 默认的特性。
生成后台的功能。
Philosophy Generating admin sites for your staff or clients to add, change and delete content is tedious work that doesn’t require much creativity. For that reason, Django entirely automates creation of admin interfaces for models. Django was written in a newsroom environment, with a very clear separation between “content publishers” and the “public” site. Site managers use the system to add news stories, events, sports scores, etc., and that content is displayed on the public site. Django solves the problem of creating a unified interface for site administrators to edit content. The admin isn’t necessarily intended to be used by site visitors; it’s for site managers.
Activate the admin site 启用管理后台
The Django admin site is not activated by default – it’s an opt-in thing. To activate the admin site for your installation, do these three things:
• Edit your mysite/urls.py file and uncomment the lines below the “Uncomment the next two lines...” comment. This file is a URLconf; we’ll dig into URLconfs in the next tutorial. For now, all you need to know is that it maps URL roots to applications. In the end, you should have a urls.py file that looks like this: 默认情况下 Django 管理后台是不启用的——它是可选的。要启用管理后台, 要做三件事:
Writing your first Django app, part 2
编写你的第一个 Django 程序,第二部分
This tutorial begins whereTutorial 1 left off. We’re continuing the Web-poll application and will focus on Django’s automatically-generated admin site. 本文接续第一部分。我们会继续开发网页投票程序,并深入研究 Django 自动
Explore the free admin functionality 体验管理功能
Now that we've registered Poll, Django knows that it should be displayed on the
admin index page: 现在我们在管理后台中注册了 Poll 模型,Django 就知道要在后台首页上显示 出来了:
在 INSTALLED_APPS 设置中加入 django.contrib.admin。 运行 python manage.py syncdb。因为你在 INSTALLED_APPS 中加入了一个新程序,数据表需要更新。
编辑 mysite/urls.py 文件,并将“Uncomment the next two lines...”下面的部分取消注释。这个文件是 URL 配置文件;我们会在后面的部 分深入 URL 配置。现在你所需要知道就是它将 URL 映射到代码中。最后你保 存的 url.py 文件应该向下面这样:
# Uncomment the next two lines to enable the admin: from django.contrib import admin admin.autodiscover()
urlpatterns = patterns('', # Example: # (r'^mysite/', include('mysite.foo.urls')),
Enter the admin site 进入管理后台
Now, try logging in. (You created a superuser account in the first part of this tutorial, remember?) You should see the Django admin index page: 现在试试登录进去(还记得不?前面你已经创建了一个超级用户的账户)。你 能看到 Django 管理后台的首页:
Start the development server 启动开发服务器
Let’s start the development server and explore the admin site. 我们来启动开发服务器,看看管理后台是什么样的。
Recall from Tutorial 1 that you start the development server like so: 复习第一部分,启动服务器需要用到下面的命令: python manage.py runserver
哲理 为你的员工或客户创建后台来管理内容是一件不需要什么创意的乏味工作。因为这个原 因,Django 为模型对象有一套完整的自动创建管理界面的机制。 Django 是在一个新闻编辑部里诞生的,在这个环境下在“内容编辑”和“公众网站”之间有 很明显的分界线。网站管理员使用这个系统来增加新闻内容、时间、体育赛事报道等等, 而这些内容会在公众网站上展示出来。Django 为网站管理员提供了一个统一的管理界面。 管理工具不是让网站访问者来使用的;它是为了网站管理员而准备的。
Just one thing to do: We need to tell the admin that Poll objects have an admin interface. To do this, create a file called admin.py in your polls directory, and edit it to look like this: 只需要做一件事:我们要告诉管理后台 Poll 对象要有个管理界面。在 polls 文 件夹下创建一个 admin.py 文件,加入下面的代码: from mysite.polls.models import Poll from django.contrib import admin
Click "Polls." Now you're at the "change list" page for polls. This page displays all the polls in the database and lets you choose one to change it. There's the "What's up?" poll we created in the first tutorial: 点击“Poll”。现在你看到一个投票数据的列表页面了。这个页面显示了数据库 中所有投票数据,你可以点击一个进行修改。刚才我们有个“What’ up”的投票 选项:
Now, open a Web browser and go to "/admin/" on your local domain -e.g.,http://127.0.0.1:8000/admin/. You should see the admin's login screen: 现在打开浏览器,在本地域名上访问/admin/——例如 http://127.0.0.1:8000/admin/。你就会看到下面的登录界面: