EX4200VC 配置向导
XPE终端配置说明

计算机培训资料二零零九年四月二十八日内部资料注意保管XPE终端配置说明一、正确连接各种外设连接好显示器、鼠标、键盘、读卡器、指纹仪、密码小键盘、电源线、验印平台、网线等外设后开机进入系统。
本部分注意事项:终端必须直立摆放,摆放位置必须保证散热的正常。
二、配置终端网络。
1.查看MAC地址进入系统后,在插上网线(网卡1)的情况下,双击桌面右下角的本地连接小图标,在出现的网络连接页面中双击,在本地连接状态页面(如图1)中单击”支持”后进入该页面(图2), 在支持页面中单击后出现的页面中就是MAC 地址。
图1图22.配置IP地址拨下网线,双击桌面右下角的本地连接图标,在出现的网络连接页面中双击图标出现本地连接属性页面(如图3),在该页面中双击后出现Internet 协议(TCP/IP)属性页面(如图4),在该页面中单击使用下面的IP地址,在下面的文本框中输入正确的IP地址、子网掩码和网关地址(例如图5),输入完成按“确定”退出各页面,并插上网线。
图3图4图5本部分注意事项:在查看出MAC地址后应联系总行网络管理员,由总行网络管理员分配给该终端IP地址后,再进行IP地址配置;IP地址和下面要说到的主机地址为两个不同的概念,IP地址指终端本身的地址,主机地址指的是该网点的前置机地址,一般为154.3.10.6x。
三、配置Telnet连接1.配置原有的连接在桌面上双击图标,进入连接页面后选择设置菜单下的通讯出现通讯设置页面中(如图6),在该页面中需要更改的分别是主机地址和仿真类型,主机地址输入各支行的前置机地址,如不清楚可在其他终端上查看或询问机房;仿真类型在下拉菜单中选择XENIX。
图62.新建连接如果在业务技能练习等情况下需要用到多个Telnet连接的,可以在桌面双击图标,出现连接向导后输入连接名称,例如“核心业务2”,输入完成选择后进入下一个页页,在该页面中只需更改仿真类型,在仿真类型一栏的下拉菜单中选择XENIX 后再单击,该步中只需输入IP址址即前置机地址,输入完成后再点选,这步中无需做任何更改直接即可,完成后可以在桌面上看到新的“核心业务2”连接。
Sun Fire X4500 伺服器作業系統安裝指南说明书

Sun Fire™X4500 伺服器作業系統安裝指南Sun Microsystems, Inc.文件號碼 820-1153-102007 年 4 月,修訂版 B請將本文件的意見傳送到:/hwdocs/feedback請回收Copyright 2007 Sun Microsystems, Inc., 4150 Network Circle, Santa Clara, California 95054, U.S.A.版權所有。
Sun Microsystems, Inc. 對於本文件所述技術擁有智慧財產權。
且這些智慧財產權可能包括,但不限於一項或數項 列於/patents 上於美國取得之專利,以及一項或數項在美國及其他國家取得的其他專利或正在申請的專利 。
本文件及相關產品在限制其使用、複製、發行及反編譯的授權下發行。
未經 Sun 及其授權人 (如果適用) 事先的書面許可,不得使用任何方法以任何形式來複製本產品或文件的任何部分。
協力廠商軟體,包含字型技術,其著作權歸 Sun 供應商所有,經授權後使用。
本產品中的某些部份可能衍生自加州大學授權的 Berkeley BSD 系統的開發成果。
UNIX 是在美國 及其他國家的註冊商標,專由 X/Open Company, Ltd 進行授權。
Sun 、Sun Microsystems 、Sun 標誌、Java 、AnswerBook2、 、Sun Fire 和 Solaris 是 Sun Microsystems, Inc. 在美國和其他國家的商標或註冊商標。
所有 SPARC 商標均基於使用授權合約使用,是 SPARC International, Inc. 在美國和其他國家的商標或註冊商標 。
凡帶有 SPARC 商標的產品都是以 Sun Microsystems, Inc. 所開發的架構為基礎。
AMD Opteron 是 Advanced Microdevices, Inc. 的商標或註冊商標。
洛雷斯4通道LCDDVR与预装硬盘的快速设置指南说明书

Now with ArrayQuiCk STaRT GuiDEW W W.L O R E X C C T V.C O MSystem Contents:PaCkaGE CONTENTS, iNSTaLLaTiON GuiDE, NaViGaTiON & CONTROLSTimeunder 30 minutes under 15 minutes under 60Hand ToolsHardwareSkills - IntermediateadvancedSkills - AdvancedIntermediate advanced☠ aTTENTiON:Broadband router and computers are required for local and remote monitoring iNSTRuCTiONS:for detailed setup information, please refer to your user’s manual.SOFTWaREREQuiREMENTS:for Lorex client software requirements, please refer to Lorex client software ☠ aTTENTiON:*number of channels,cameras and hard drive capacity may vary by model. check your MOUSE:LEFT BUTTON• Double click in viewing mode to display camera in RECOMMENDED FOR EaSY uSE aND NaViGaTiONRECOMMENDED FOR uSE FROM a DiSTaNCE*STEP 1 - SET uP YOuR MONiTOR FiRSTconnect the first camera to the cH1 input. follow the same steps to connect the additional cameras.CONNECT CaMERaS TO THE MONiTOR:connect one end of the ethernet cable to one of the router’s (not included) Lan ports and the other end to monitor’s network port located at the bottom of the monitor. see picture below showing a generic Lan/wan connection.CONNECT THE ETHERNET CaBLE:connect the mouse to the ps2 port of the monitor.CONNECT THE MOuSE:WAN (WIDEAREA NETWORK)LAN (LOCAL AREA NETWORK)TO YOUR COMPUTERTO YOUR MONITORBACK OF THE ROUTER SHOWNMOuSE CONTROL aVaiLaBLE1. Connect the Female BNC end of the supplied 60’ extension cable to the camera. Connect the male Power end of the extension cable to the camera.2. Connect the Female end of the supplied 60’ extension cable to an open BNC camera input on the back of the System. Connect the female Power end of the extension cable to one of end of the 4 in one power adaptor.1connect one end of the power adaptor to the monitor, the other end to an electrical outlet. this unit powers on once it is plugged in to the power outlet.CONNECT POWER CaBLE:IMPORTANT NOTE: The ends of the extension cable are NOT the same - one end has a Male power port, and the other has a Female power port. Before permanently running the Camera Extension Cable, make sure that the cable has been oriented between the Camera and the unit correctly34521. access the main menu setup screens, and navigate to the main menu - externaL device - tcp/ip setup - ip setup option.2. record the mac address of your system. this information is necessary for the ddns setup process.3. confirm that the dHcp mode is set to automatic. this will allow your system to lease an ip address from your router. if the system is not set to automatic, change the setting in the dHcp setup menu and click detect ip.4. the ip port is 50000 by default.STEP 2 - SET uP LOCaL ViEWiNG ON YOuR PCRETRiEVE SYSTEM iNFORMaTiON:RECORD THE iP aND MaC aDDRESSES iN THE SECTiON BELOW:note: the system will lease networking information from your router. if you wish to set your information manually, then set the dHcp mode to manuaL. please consult your Hardware manual for further menu options.insert the Lorex cLient 2.2 software cd into your local computer’s cd rom drive and proceed with the installation.iNSTaLL SOFTWaRE:(on your local computer for local viewing)follow the installation screens to complete Lorex client 2.2 software installation.LOREX CLiENT 2.2 SOFTWaRE:(on your local computer for local viewing)for Lorex client software requirements, please refer to the software user manual.12345123close the cd menu screen. a Lorex client icon will appear on your desktop.LOREX CLiENT 2.2 SOFTWaRE:(on your local computer for local viewing)double-click the Lorex cLient 2.2 software icon on your desktop to run the program.RuN THE LOREX CLiENT 2.2 SOFTWaRE:(on your local computer)4THIS STEP RELATES TO REMOTE VIEWING OVER THE LAN (LOCAL AREA NETWORK)STEP 2 - SET uP LOCaL ViEWiNG ON YOuR PCCONTiNuEDCongratulations! Youhave completed Stepsuccessfully. You cannow view and playbackimages on your localcomputer over the LocalArea Network (LAN).5ADMIN681. once you see the registered site, press the save button.2. click the oK button. you will be asked to key in the user id andpassword.user id: By default is adminpassword: Leave it blankLOREX CLiENT 2.2 iRS SETuP - REGiSTERiNG SiTE(on your local computer for local viewing)129123457STEP 3 - SET uP iNTERNET REMOTE SECuRiTY MONiTORiNGvisit /support to view tHe router configuration guideCOMPLETE NEW aCCOuNT iNFORMaTiON:1. for product License select the L15Ld420 / L17Ld420 series from the drop down menu.2. for product code enter the monitor’s mac address (recorded in step 2, section 1).3. for urL reQuest enter a unique urL name (e.g. tomsmith). note: urL name should not be more than 15 characters.12312345STEP 3 - SET uP iNTERNET REMOTE SECuRiTY MONiTORiNGENTER DDNS SET-uP ON YOuR SYSTEM:6• set the ddns enaBLe to on• domain - enter the ddns domain name from the registration email sent to you(e.g. )• user name - enter the user name from the registration email sent to you (e.g. tomsmith)• password - By default is left blank• ddns status - indicates the status of ddns connection.• click on register - this will register your system with Lorex ddns. if the information you haveENaBLE DDNS SETTiNGS:788follow the installation screens to complete Lorex client 2.2software installation.LOREX CLiENT 2.2 SOFTWaRE:(on your remote computer)123459close the cd menu screen. a Lorex client icon will appear on your desktop.LOREX CLiENT 2.2 SOFTWaRE:(on your remote computer for remote viewing)double-click the Lorex cLient 2.2 software icon on your desktop to run the program.RuN THE LOREX CLiENT 2.2 SOFTWaRE:(on your local computer)10CONTiNuEDSTEP 3 - SET uP iNTERNET REMOTE SECuRiTY MONiTORiNGCONTiNuEDCongratulations! You have completed Step successfully. You can now view and playback images on your remote computer over the internet.click on the “registering site” button to add a new site to your system.LOREX CLiENT 2.2 iRS SETuP - REGiSTERiNG SiTE(on your remote computer for remote viewing)1. once you see the registered site, press the save button.2. click the oK button. you will be asked to key in the user id and password. user id : By default is admin password : Leave it blankLOREX CLiENT 2.2 iRS SETuP - REGiSTERiNG SiTE(on your remote computer for remote viewing)121. click the H.264 viewer screen (as shown in the picture) and press the connect button to connect to the remote Live site.ViEW CaMERaS REMOTELY:(on your remote computer for remote viewing)123451112131415RECOMMENDED TiPStilt the monitor up to loacte your monitor’s connections.LOCaTE MONiTOR CONNECTiONS:DiSPLaY CONFiGuRaTiON / FuNCTiON iCONSthe system provides a storage calculator to calculate the amount of recording time available on your Hard drive, based on the system recording settings.click on the menu icon to enter main menu. on the main menu, click on the record menu. on the record menu, click onrecord set up.RECORD SETuP (storage calculator):1. [QuaLity]: set up the recording picture qualityQuality level: normal / High / Highest. data size of image in paL system is a little bigger than ntsc system, but the total recording time is same.2. [frame rate]: adjust recording frame rate.3. [pre aLarm record]: displays the amount of time included from the pre recording (in seconds).4. [Hdd remaining]: indicates Hdd capacity remaining by size (gB). / indicates total Hdd capacity (gB).5. [remain time]: indicates Hdd capacity remains by time. (d- days, H- hours, m- minutes).1234510formatting tHe new Hard drive:the new Hard drive must be formatted. if a new Hard drive is detected, the system will prompt you to format the drive. please refer to the system’s user manual for Hdd installation.HDD iNSTaLLaTiON:the system comes with a pre-installed Hard drive, however the unit will work with a replacement single sata Hard drive (up to 500gB).note: make sure that the system is off and the power cable has been disconnected before changing the Hard drive. for detailed instructions, check the user’s manual.TiP ON CaMERa MOuNTiNG:note: test the cameras prior to selecting a permanent mounting location by temporarily connecting the cameras and cables toyour system.RECOMMENDED TiPS CONTiNuEDnote: you must have an active internet connection to the system to be able to perform remote viewing or playback. remote access is dependant on your connection speed, internet traffic and other network factors - the speed is normally 1~2 fps (frames per second). this may impact the audio and ptZ functions.for faster playback, it is recommended to download previously recorded video using the backup function and play it back using Backup player 2.2 software - refer to the user manual for details. regardless of the network playback speed, video is being recorded on your system in real time, and can be viewed when you are at the system or through the backup player.TiP ON REMOTE ViEWiNG aND PLaYBaCk OVER THE iNTERNET (WaN):11 LOREX CLiENT 2.2 iNTERNET REMOTE SOFTWaRE (iRS)1. LOREX iRS SETuPsetting up irs is necessary in order to use the H.264 viewer.2. LOREX H.264 ViEWERremote monitoring software recommended for internet remote monitoring. H.264 video compressiontechnology allows for efficient data transfer over the internet. you can view your system remotely whileconsuming less bandwidth.3. LOREX SEaRCHsearch for recorded data to playback from a remote location.4. LOREX BaCkuPcreate a backup of your recorded data from a remote location.5. LOREX PLaYERplayback data that has been backed up either from the system using a usB thumbdrive or from thebackup software.6. LOREX REMOTE SETuPconfigure the system remotely (e.g. change recording settings or schedules).1PRODuCT SuPPORT it’s all on the Web for detailed setup information, please refer to your user’s manual. for additional information about determining your ip address, configuring your router, and port forwarding, please visit our website /support and clickconsumer guides section or view guides from the cd included with your system.emailsupport:*********************toll free technical support :north america: 1-888-42 Lorex (1-888-425-6739)toll free technical support :international (outside of north america): +800-425-6739-0(example: from the uK, dial 00 instead of +)Lorex international website - 。
Sun Server X2-4安装指南说明书
Sun Server X2-4(以前称为Sun Fire X4470 M2)安装指南(适用于Linux操作系统)文件号码E37954–012012年9月版权所有©2012,Oracle和/或其附属公司。
保留所有权利。
本软件和相关文档是根据许可证协议提供的,该许可证协议中规定了关于使用和公开本软件和相关文档的各种限制,并受知识产权法的保护。
除非在许可证协议中明确许可或适用法律明确授权,否则不得以任何形式、任何方式使用、拷贝、复制、翻译、广播、修改、授权、传播、分发、展示、执行、发布或显示本软件和相关文档的任何部分。
除非法律要求实现互操作,否则严禁对本软件进行逆向工程设计、反汇编或反编译。
此文档所含信息可能随时被修改,恕不另行通知,我们不保证该信息没有错误。
如果贵方发现任何问题,请书面通知我们。
如果将本软件或相关文档交付给美国政府,或者交付给以美国政府名义获得许可证的任何机构,必须符合以下规定:ERNMENT END USERS:Oracle programs,including any operating system,integrated software,any programs installed on the hardware,and/or documentation,delivered to U.S. Government end users are"commercial computer software"pursuant to the applicable Federal Acquisition Regulation and agency-specific supplemental regulations.As such,use,duplication,disclosure,modification,and adaptation of the programs,including any operating system,integrated software,any programs installed on the hardware,and/or documentation,shall be subject to license terms and license restrictions applicable to the programs.No other rights are granted to the ernment.本软件或硬件是为了在各种信息管理应用领域内的一般使用而开发的。
海康威视4200软件发卡器配置手册

4200软件发卡器配置手册目录一、操作流程(配置流程) (1)二、操作步骤(配置步骤) (1)三、适用型号 (2)四、变更记录 (2)五、关于海康威视 (1)一、操作流程(配置流程)1)4200 系统配置2)进入卡片管理,添加卡片测试二、操作步骤(配置步骤)1. 4200 系统配置(DS-K1F100-D8、DS-K1F100-D8E 免驱动)将发卡器接入4200所在PC客户端,打开4200—系统配置—可视对讲—读卡器类型。
备注:从V1.4基线的产品线4200客户端开始才支持D8E发卡器,之前版本仅支持D8且不用配置发卡器,V1.4基线的产品线4200需要配置发卡器型号。
2. 进入卡片管理,添加卡片测试正常情况下能刷出卡号,异常情况下无法刷出卡号,此时可以重启下4200。
五、关于海康威视海康威视是以视频为核心的物联网解决方案提供商,面向全球提供综合安防、智慧业务与大数据服务。
海康威视全球员工超26000人(截止2017年底),其中研发人员和技术服务人员超13000人,研发投入占企业销售额的7-8%,绝对数额占据业内前茅。
海康威视是博士后科研工作站单位,以杭州为中心,建立辐射北京、上海、重庆、武汉以及加拿大蒙特利尔、英国利物浦的研发中心体系,并计划在西安、武汉、成都、重庆和石家庄建立新的研发基地。
海康威视拥有视音频编解码、视频图像处理、视音频数据存储等核心技术,及云计算、大数据、深度学习等前瞻技术,针对公安、交通、司法、文教卫、金融、能源和智能楼宇等众多行业提供专业的细分产品、IVM智能可视化管理解决方案和大数据服务。
在视频监控行业之外,海康威视基于视频技术,将业务延伸到智能家居、工业自动化和汽车电子等行业,为持续发展打开新的空间。
海康威视在中国大陆拥有32家省级业务中心/一级分公司,在境外有38 个分支机构(截止2018年9月30日)。
海康威视产品和解决方案应用在150 多个国家和地区,在G20杭州峰会、北京奥运会、上海世博会、APEC会议、德国纽伦堡高铁站、韩国首尔平安城市等重大项目中发挥了极其重要的作用。
海康流媒体服务器软件4200配置及使用说明
流媒体服务器软件使用说明在百度文库看到了一篇文章,介绍怎么用海康的软件配置流媒体服务器,不过介绍的不详细,没有配置成功,后经过海康技术人员指点最终成功,现整理出来供大家参考。
海康官方网站上流媒体是和客户端软件(目前版本为)放在一起,点击下载网站上客户端软件,解压缩后可见流媒体服务器软件。
流媒体服务器软件需要和客户端配合(2个都要运行)使用才能起到转发效果。
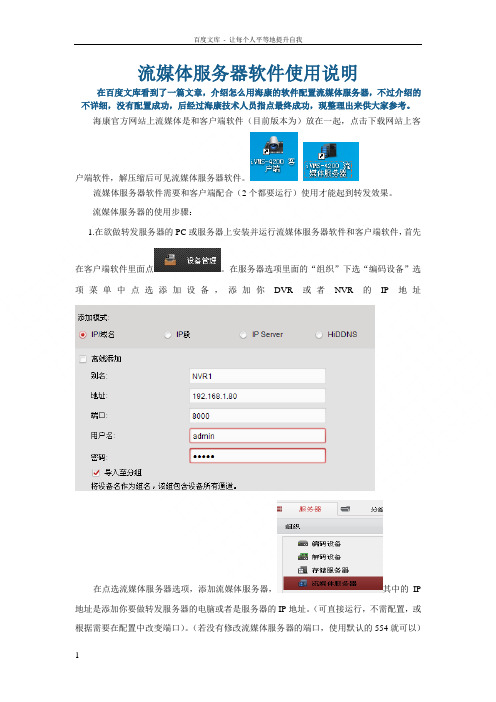
流媒体服务器的使用步骤:1.在欲做转发服务器的PC或服务器上安装并运行流媒体服务器软件和客户端软件,首先在客户端软件里面点。
在服务器选项里面的“组织”下选“编码设备”选项菜单中点选添加设备,添加你DVR或者NVR的IP地址在点选流媒体服务器选项,添加流媒体服务器,其中的IP 地址是添加你要做转发服务器的电脑或者是服务器的IP地址。
(可直接运行,不需配置,或根据需要在配置中改变端口)。
(若没有修改流媒体服务器的端口,使用默认的554就可以)在分组选项中的编码通道下点选导入添加各监控点的摄像机。
在分组选项中选择一个摄像机,点修改—可以选你要转发摄像机的主、和子码流。
可以用复制到选项来一次性修改所有摄像机转发为子码流或者单独一个摄像机的码流。
在重启流媒体服务器软件生效既可。
2.流媒体运行软件后,在客户端电脑上打开一个网页,输入流媒体服务器的IP地址,如果能弹出登陆框,输入流媒体服务器的用户名和密码,能看到摄像机图像,说明流媒体服务器配置成功了。
(网页不能浏览太多图像,因流媒体对网页没有转发效果,客户端电脑需要运行4200客户端软件才有流媒体转发效果)。
客户端电脑运行4200软件。
配置方法与流媒体服务器的方法相同,只不过客户端不用启用流媒体服务器软件。
3.在其他需要访问的电脑客户端4200软件上重复配置流媒体服务器的步骤,全部都添加完成后即可。
添加成功后进行预览,在流媒体服务器上能看到连接信息区和命令信息区能分别看到提示.开启流媒体服务器转发后依旧没有效果的可能原因1.有部分客户端没有添加流媒体服务器,依然通过直连设备来获取数据流。
Dell Xcelerator 用户指南说明书
If you need additional help or require information that is not included in this guide, visit the Dell Support website or call 1-800-BUY-DELL
Information in this document is subject to change without notice. © 2007 Dell Inc. All rights reserved. Trademarks used in this text:
Dell Xcelerator is a registered trademark of Dell Inc. Microsoft, Windows, DirectShow, and DirectX are registered trademarks of Microsoft Corporation. Windows XP and Windows Vista are trademarks of Microsoft Corporation. Other trademarks and trade names may be used in this document to refer to either the entities claiming the marks and names or their products.
This device complies with Part 15 of the FCC Rules. Operation is subject to the following two conditions:
ቤተ መጻሕፍቲ ባይዱ
ESX4.1安装配置指南
VMware ESX4.1 安装配置指南Version. 1.0Henry·Sun目录第一章安装VMware vSphere ESX 4.1 (3)2.1服务器准备 (3)2.1.1磁盘准备 (3)2.1.2 CPU准备 (3)2.2 安装VMware vSphere ESX 4.1 (3)第二章安装vCenter Server 4.1 (12)2.1 操作系统准备 (12)2.2 安装vCenter Server 4.1 (12)2.3 安装VMware vSphere Converter 4.1 (16)第三章vCenter配置 (19)3.1 添加主机 (19)3.2 新建集群 (21)第四章VMware网络配置 (24)第五章存储配置 (26)第一章安装VMware vSphere ESX 4.12.1服务器准备2.1.1磁盘准备本次安装VMware vSphere ESX 4.1使用的物理服务器为两台DELL R710服务器,该款服务器标配两块146GB的SAS硬盘,为保证系统安全,现将该服务器两块硬盘做成RAID1磁盘整列,互相做镜像,这样任意一块硬盘故障不会影响系统运行。
磁盘准备的方法是,检查服务器电源连接正常后,启动服务器,在系统检测到RAID卡的时候,根据服务器荧幕上的提示按下相应的键盘按键,进入RAID 卡的设置界面,选择RAID1,然后将两块硬盘加入到RAID1分组中,确认退出,重启服务器。
2.1.2 CPU准备DELL R710服务器的CPU高级设置里面很多高级功能默认是没有启用的,所以安装VMware vSphere ESX 4.1前,需要对DELL CPU高级选项进行设置,其中最重要的是打开Intel CPU的VT功能。
打开服务器电源,按下F10键,进入DELL R710服务器BIOS设置界面,选择CPU高级设置,将所有高级功能从disable改为enable,保存退出,重新启动服务器。
4200存储服务器设置方法
4200客户端2.0版本存储服务器配置方法如下:
1、4200存储服务器软件需要在电脑上开启
2、存储服务器添加
双击,打开4200客户端软件,在控制面板中打开,先在编码设备中添加设备,确保编码设备状态正常,可以正常预览图像,在点击添加设备类型,勾选存储服务器。
详见下图所示:
点击左侧,会弹出以下界面:
箭头所指的用户名和密码指存储服务器的用户名和密码。
存储服务器默认用户名为admin 密码:12345 。
3、存储服务器配置
进入录像计划配置界面。
在左侧分组列表中选择需要录像的监控点,勾选“存储服务器录像”,选择您之前添加的存储服务器
点击,进入模板界面后可选择不同的模板。
全天模板、工作日模板、报警模板为固定配置,不能修改;自定义可对模板直接进行编辑,模板01至模板08可根据需求对其进行修改保存。
最后点击保存即可。
NETGEAR ReadyNAS 4200 安装和基本配置指南说明书
Guide d'installationInstallation et configuration de baseVeuillez suivre les instructions ci-dessous pour installer votre ReadyNAS 4200 NETGEAR.Durée approximative de l'installation : 20 minutes.Remarque: Ces instructions sont rédigées pour une configuration équipée de disques gérée en mode X-RAID2 par défaut. Une unité sans disque nécessite l'installation des disques etl'initialisation du RAID avant de continuer. Consultez la page /hcl pour obtenir une liste des disques pris en charge. Reportez-vous au Manuel de l'utilisateur pour obtenir des instructions sur l'installation des disques et la configuration RAID. Avertissement: Selon les disques installés, le poids de l'unité peut dépasser 36 kg. Vous pouvez demander une assistance pour le déplacement de l'unité.Installation de l'utilitaire RAIDar1. Installez l'utilitaire RAIDar à partir du CD fourni avec le produit. Vous trouverez, sur leCD d'installation, l'utilitaire RAIDar pour Windows, MAC et Linux. Branchement de l'unité et connexion1. Lors de la configuration de l'unité, connectez le port Ethernet LAN1 du ReadyNAS à votreréseau et allumez-le. Le démarrage prend environ une minute. Par défaut, l'adresse IP est obtenue via DHCP. Une fois trouvée, l'adresse IP s'affiche dans la zone d'état.2. Exécutez l'utilitaire RAIDar afin qu'il détecte l'unité et toutes les autres unités sur le mêmesous-réseau.Conseil: Dans votre serveur DHCP, réservez l'adresse IP attribuée à votre ReadyNAS afin qu'il utilise toujours cette même adresse. Ainsi, les unités mappées fonctionnent demanière homogène sur n'importe quel système d'exploitation. 3. Cliquez sur le bouton Setup (Configuration) relatif àRAIDar pour ouvrir une session de navigationFrontView avec l'unité. L'écran de connexion s'ouvre.Le nom d'utilisateur et le mot de passe par défaut sontrespectivement admin et netgear1. La paged'accueil de l'assistant de configuration s'affiche.Exécution de l'assistant deconfigurationL'assistant de configuration vous explique comment configurer les paramètres de base etpartager les fichiers.Remarque: Si vous souhaitezdésactiver l'assistant deconfiguration, assurez-vous deconfigurer les alertes et les adressesélectroniques, de modifier le mot depasse admin et d'indiquer unequestion pour la récupération dumot de passe.1. Par défaut, l'assistant deconfiguration est activélorsqu'il est connecté à l'unité.Cliquez sur Next (Suivant)pour utiliser l'assistant.2. Sous l'onglet Clock (Horloge),vous pouvez modifier ouaccepter le fuseau horaire,l'heure et les options NTPparamétrées par défaut.Cliquez sur Next (Suivant)pour continuer.3. Sous l'onglet Alerts (Alertes),indiquez au moins une adresseélectronique pour recevoir lesalertes du système. Cliquez surNext (Suivant) pour continuer.4. Sous l'onglet Ethernet 1,acceptez ou modifiez lesparamètres de l'adresse IP.Cliquez sur Next (Suivant)pour continuer.5. Sous l'onglet Global Settings (Paramètres globaux), vous avez la possibilité de modifierle nom d'hôte de l'unité. Par ailleurs, si vous optez pour une configuration IP statique,vous devrez configurer la passerelle et les paramètres DNS (vous n'avez pas besoin demodifier ces paramètres si vous utilisez l'unité dans sa configuration DHCP par défaut).Cliquez sur Next (Suivant) pour continuer.6. Sous l'onglet Admin Password (Mot de passe admin), modifiez le mot de passe dusystème et indiquez une question de récupération, sa réponse et une adresseélectronique. Veuillez noter ces modifications. Cliquez sur Next (Suivant) pour continuer.7. Sous l'onglet Security Mode (Mode de sécurité), sélectionnez l'option « User »(Utilisateur) par défaut qui permet de contrôler l'accès aux partages en fonction descomptes clients ou de groupe. FrontView essaiera de détecter le premier nom de groupede travail présent sur le réseau. Dans le cas contraire, « VOLUME » sera le nom pardéfaut du groupe de travail. Indiquez le nom du groupe de travail auquel votre unitédoit se connecter. Reportez-vous au Manuel de l'utilisateur du ReadyNAS 4200 pourobtenir des instructions d'installation ACS. Cliquez sur Next (Suivant) pour continuer.8. Sur la page Accounts (Comptes), cliquez sur Add User (Ajouter un utilisateur). Ajoutezun nouvel utilisateur et un mot de passe d'utilisateur. Cliquez sur Next (Suivant) pourterminer la procédure d'installation avec l'assistant. Reportez-vous au Manuel del'utilisateur du ReadyNAS 4200 pour obtenir des instructions complètes sur laconfiguration de comptes.Remarque: Reportez-vous au Manuel de l'utilisateur pour obtenir des instructionscomplémentaires concernant la configuration d'options telles que la sauvegarde, les serveursde contenu multimédia, les imprimantes, le VLAN ou les comptes d'utilisateur et les quotas.ReadyNAS™ 4200 NETGEAR®Ce symbole a été apposé conformément à la directive européenne 2002/96 sur la mise au rebut des équipements électriques et électroniques (directive WEEE - Waste Electrical and Electronic Equipment). En cas de mise au rebut de ce produit dans un Etat membre de l'Union européenne, il doit être traité et recyclé conformément à cette directive.© 2010 par NETGEAR, Inc. Tous droits réservés. NETGEAR et le logo NETGEAR sont des marques déposées de NETGEAR, Inc. aux Etats-Unis et/ou dans d'autres pays. Les autres marques ou noms de produits sont des marques commerciales ou des marques déposées de leurs détenteurs respectifs. Ces informations sont susceptibles d'être modifiées sans préavis.Février 2010Accès à votre stockage partagéVous remarquerez que ces protocoles de partage de fichiers sont activés par défaut : CIFS, AFP (annoncé sur Bonjour et AFP), HTTP/S. FTP , NFS, iSCSI et Rsync sont pris en charge mais ne sont pas activés par défaut.Reportez-vous au Manuel de l'utilisateur du ReadyNAS 4200 pour obtenir des instructions concernant l'accès aux partages à partir de système d'exploitation Linux ou Unix, le mappage de lecteurs et d'autres options de partage de fichiers, notamment la prise en charge d'un seul langage pour les noms de fichiers tels que ceux qui utilisent des caractères Unicode ou idéographiques.Accès aux partages à partir d'un ordinateur exploitant Windows1. Pour afficher une liste de partages sous Windows, cliquez sur Browse (Parcourir) dansRAIDar ou bien saisissez \\<adresse_ip> ou \\<nom_d'hôte> dans la barre d'adresse.2. Lorsque vous y serez invité, saisissez le nom d'utilisateur et le mot de passe pour vousconnecter au ReadyNAS. Windows Explorer affichera le contenu de partage du ReadyNAS.Accès aux partages depuis MAC OS X1. Pour accéder au même partage sur AFP avec OS X, ouvrez Finder et recherchez un nomd'hôte ReadyNAS dans la section SHARED (PARTAGE). 2. Cliquez sur le nom d'hôte pour afficher les partages.Astuces et précautions d'emploiPour un fonctionnement optimal, suivez ces directives.•Mise sous/hors tensionLa mise sous tension de l'unité peut nécessiter environ une minute. Pour mettre l'unité hors tension, appuyez deux fois sur le bouton d'alimentation situé à l'avant de l'unité. Cette méthode permet une mise hors tension en bonne et due forme. Pour d'autres options concernant la mise hors tension, reportez-vous au Manuel de l'utilisateur du ReadyNAS 4200.•VentilationDouze disques haute vitesse et de grande capacité produisent une quantité de chaleur considérable. Veillez à ne jamais obstruer la grille de ventilation.•Utilisation d’une alimentation protégée (Onduleur avec batterie de secours)L’utilisation d’un onduleur protège votre unité et permet une mise hors-tensionautomatique en cas de coupure de courant. Pour en savoir plus sur l’utilisation d’un onduleur, consultez le Manuel de l'utilisateur du ReadyNAS 4200.•Affichage d'informations d'état dans FrontViewLa barre située en bas de l'utilitaire de configuration FrontView affiche des voyants d'état à code de couleurs permettant d'en savoir plus sur la connexion à des groupes de travail, les disques, le ventilateur, la température et l'ASI (le cas échéant). Doublecliquez sur le voyant d'état pour afficher les détails correspondant à l'élément.•Redondance et extensionLe ReadyNAS 4200 est livré avec 6 disques ou plus et préconfiguré avec X-RAID2 à double redondance, afin de protéger vos données en cas de défaillance simultanée de deux disques, tout en vous permettant d'accroître votre capacité à la volée. Pouraugmenter votre capacité X-RAID2, il vous suffit d'ajouter un nouveau disque avec une capacité égale ou supérieure au disque existant ; si les emplacements pour disques sont tous pleins, il est possible de remplacer les disques existants par des disques de plus grande capacité afin d'augmenter verticalement votre stockage. Les disques, qu'ilssoient neufs ou de remplacement peuvent être ajoutés ou remplacés à chaud, un par un, en cours de fonctionnement du ReadyNAS. Il convient d'attendre que le nouveau disque soit complètement synchronisé avant de remplacer ou d'ajouter un autre disque. Utilisez FrontView pour savoir où en est le processus en cours ; par ailleurs, vous recevrez un message d'alerte pour vous indiquer que le processus de synchronisation est terminé.Assistance techniqueNous vous remercions d'avoir choisi les produits NETGEAR.Après l'installation de votre appareil, notez le numéro de série inscrit sur l'étiquette de votre produit. Il vous sera nécessaire pour enregistrer votre produit à l'adressegear.fr/support/ Vous devez être enregistré pour utiliser notre service d'assistance téléphonique. Nous vous recommandons vivement de procéder à l'enregistrement sur notre site Web.Visitez le site gear.fr/support/ pour obtenir des mises à jour de produits et consulter le support Web.Pour en savoir plus sur l'installation, la configuration et l'utilisation de votre produit, reportez-vous au manuel de l'utilisateur du ReadyNAS 4200. Le CD qui vous a été livré avec l'unité contient un lien vers le manuel de l'utilisateur.。
- 1、下载文档前请自行甄别文档内容的完整性,平台不提供额外的编辑、内容补充、找答案等附加服务。
- 2、"仅部分预览"的文档,不可在线预览部分如存在完整性等问题,可反馈申请退款(可完整预览的文档不适用该条件!)。
- 3、如文档侵犯您的权益,请联系客服反馈,我们会尽快为您处理(人工客服工作时间:9:00-18:30)。
三台交换机VC的配置步骤:
首先要说明一下,三台交换机要按照一定的顺序和注意事项进行配置,配置成功后会展示为一台整体交换机。
顺序:
1. 首先要将组建VC的交换机恢复出厂设置,通过 load factory default 实现,之后要重新设定root用户的密码:set system root-authentication plain-text-password:
2. 选择一台交换机,配置:
2.1 目前这些上联模块是万兆和千兆都支持的模块,默认情况下是万兆的,只有第一和第三个口可用。
如果想改成4口千兆,需要明确配置:
在配置模式下 # set chassis fpc 0 pic 1 sfpplus pic-mode 1g
然后 commit 执行
这时会提示变更上联模块类型需要重启才能生效。
在> request system reboot 进行重启
2.2 重启之后在配置模式下:
#Set virtual-chassis member-id 0 master-priority 255
如果用上联接口作为VCP接口,需要明确指定:
在> request virtual-chassis vc-port set pic-slot 1 port X
Pic-slot 1 指是上联模块,port号如果是千兆上联则从0到3,如果是万兆上联则port0 和port1。
到此,这台设备配置已经完成,在不连线的情况下,配置第二台4200.
3 配置第二台4200
配置方法其实和第一台完全一样,首先初始化配置(一定要注意4200配置vc之前要初始化配置);修改上联模块类型,由万兆变为千兆,然后重启生效;配置VC;
#set system root-authentication plain-text-password:
# set chassis fpc 0 pic 1 sfpplus pic-mode 1g
然后 commit 执行
重启生效
# Set virtual-chassis member-id 0 master-priority 255
这里要注意在加入VC之前,每台设备都是master 0 这个数字编号是VC系统自己分配的,当加入VC后会自动进行变更,此时还是配置master 0
> request virtual-chassis vc-port set pic-slot 1 port X
这时,配置已经完成,将光跳连接好,设备会自动选举VC master,自动变更member id,需要等待几十秒。
通过这些命令查看VC状态:
show virtual-chassis
如果正常的话应该出现:
Member ID Status Serial No Model priority Role ID Interface
0 (FPC 0) Prsnt BP020******* ex4200-48t 255 master 1 vcp-255/1/0
2 vcp-255/1/1
1 (FPC 1) Prsnt BP020******* ex4200-48t 128 Backup 0 vcp-255/1/0
2 vcp-255/1/1
应该能看到两台设备即两个FPC的状态,说明两台4200已经建立了VC,并且状态应该该是Prsnt,系统会自动选举一台作为master,另一台作为backup,并且backup的优先级被自动修改为128。
4. 在不连线的情况下按照同样的方法配置第三台交换机,配制方法与内容和第二台完
全一样。
#set system root-authentication plain-text-password:
# set chassis fpc 0 pic 1 sfpplus pic-mode 1g
然后 commit 执行
重启生效
# Set virtual-chassis member-id 0 master-priority 255
这里要注意在加入VC之前,每台设备都是master 0 这个数字编号是VC系统自己分配的,当加入VC后会自动进行变更,此时还是配置master 0
> request virtual-chassis vc-port set pic-slot 1 port X
之后,连接好光跳,等待VC状态变化,正常后,
show virtual-chassis
应该出现:
0 (FPC 0) Prsnt BP020******* ex4200-48t 255 Master 1 vcp-255/1/0
2 vcp-255/1/1
1 (FPC 1) Prsnt BP020******* ex4200-48t 128 Backup 0 vcp-255/1/0
2 vcp-255/1/1
2 (FPC 2) Prsnt BP020******* ex4200-48t 128 Linecard 1 vcp-255/1/0
0 vcp-255/1/1
新加入的交换机会自动变为member 2 即FPC2,状态正常后应为:Prsnt,优先级变为128,状态为线卡。
5 目前VC已经建立完成,可以将三台4200看做一台模块化整体交换机。
> show chassis hardware
Hardware inventory:
Item Version Part number Serial number Description
Chassis BP020******* Virtual Chassis
FPC 0 REV 18 750-021254 BP020******* EX4200-48T, 8 POE CPU BUILTIN BUILTIN FPC CPU
PIC 0 BUILTIN BUILTIN 48x 10/100/1000 Base-T PIC 1 REV 04 711-026017 CH020******* 4x GE SFP+
Xcvr 0 REV 01 740-011614 C09F02532 SFP-LX10
Xcvr 1 REV 01 740-011614 C09D14000 SFP-LX10
Xcvr 2 REV 01 740-011614 C09F02928 SFP-LX10
Power Supply 0 REV 04 740-020957 AT0509230042 PS 320W AC
Fan Tray Fan Tray
FPC 1 REV 18 750-021254 BP020******* EX4200-48T, 8 POE CPU BUILTIN BUILTIN FPC CPU
PIC 0 BUILTIN BUILTIN 48x 10/100/1000 Base-T PIC 1 REV 04 711-026017 CH020******* 4x GE SFP+
Xcvr 0 REV 01 740-011614 C09F02601 SFP-LX10
Xcvr 1 REV 01 740-011614 C09F02411 SFP-LX10
Xcvr 2 REV 01 740-011614 C09F02636 SFP-LX10
Power Supply 0 REV 04 740-020957 AT0509238885 PS 320W AC
Fan Tray Fan Tray
FPC 2 REV 18 750-021254 BP020******* EX4200-48T, 8 POE CPU BUILTIN BUILTIN FPC CPU
PIC 0 BUILTIN BUILTIN 48x 10/100/1000 Base-T PIC 1 REV 04 711-026017 CH020******* 4x GE SFP+
Xcvr 0 REV 01 740-011614 C09D14492 SFP-LX10
Xcvr 1 REV 01 740-011614 C09F02397 SFP-LX10
Xcvr 2 REV 01 740-011614 C09F18019 SFP-LX10
Xcvr 3 REV 01 740-011614 C09F02520 SFP-LX10
Power Supply 0 REV 04 740-020957 AT0509238561 PS 320W AC
Fan Tray Fan Tray
每一个FPC其实就是台4200。
6. 修改每个member的优先级都改为255,确保切换时状态稳定。
#set virtual-chassis member 1 mastership-priority 255
# set virtual-chassis member 2 mastership-priority 255
另外还需要再设置一下每台交换机上联模块为4口千兆,因为重启后,会自己变为默认的万兆上联,VC就无法通信了。
# set chassis fpc 0 pic 1 sfpplus pic-mode 1g
# set chassis fpc 1 pic 1 sfpplus pic-mode 1g
# set chassis fpc 2 pic 1 sfpplus pic-mode 1g
km这一步很重要,如果没有设置,一旦重启则VC失效。
另外还需配置:
# set virtual-chassis no-split-detection
# set chassis redundancy graceful-switchover
以确保切换时迅速,平稳。
所有配置完成后,commit执行,然后重启测试。
request system reboot all-members。