亿利达风机DLL接口说明
运达1.5MW风力发电机组技术手册

运达1.5MW风力发电机组技术手册运达1.5MW风力发电机组技术手册1、技术手册说明 (3)2、万用表使用方法 (3)3、绝缘表的使用方法 (3)4、直流电阻测试的使用方法 (3)5、偏航电机的更换方法 (4)6、SSB直流变桨系统L+B的更换方法 (4)7、SSB直流变桨系统Converter说明书 (4)8、SSB直流变桨系统Converter更换说明书 (4)9、SSB交流变桨系统MPC说明书 (4)10、SSB变桨系统MPC 地址更改说明书 (4)11、交流变桨MPC参数导入操作说明 (5)12、Gateway使用说明 (5)1、技术手册说明本手册为售后服务部内部技术文件,此文件结合现场各反应回来问题汇总,特此编写此文件。
希望能给现场故障处理等问题提供一定的指导,提高现场服务人员的技能水平。
2、万用表的使用方法产品名称:钳形万用表产品型号: VC3266A※相序指示正相、负相、缺相及相电压。
※独特的火线判别电路,LCD符号显示。
※采用3节7号电池和独立的电池门,更换方便。
※功能选择采用拨盘开关,便于单手操作。
※数据保持功能,便于数据观察和记录。
※厚度仅为22mm掌握与携带更方便。
※ 20A/200A/600A交流电流量程选择,分辨力0.01A。
VC3266A采用大规模集成电路和独特的功能转换电路,使整机完成交直流电压测量、交直流电流测量、电阻、二极管及通断测量,配以相序指示火线判别电路,使之成为一台优越的电工专用钳形万用表。
最大显示:1999自动极性显示测量方法:双积分A/D转换器采样频率:每秒2次过载显示:仅最高显“1”1。
UHFReader18CSharp.DLL动态连接库使用手册V2.5

UHFReader18CSharp.DLL动态连接库使用手册V2.51.操作系统: (1)2.函数详单: (1)2.1)通用函数: (1)2.2)EPCC1-G2协议函数: (2)2.3)18000-6B协议函数: (4)3.函数的描述: (5)3.1)通用函数: (5)3.1.1) AutoOpenComPort():自动连接串口 (5)3.1.2) OpenComPort():连接到指定串口 (6)3.1.3) CloseComPort():关闭串口连接 (7)3.1.4) CloseSpecComPort():关闭指定串口 (7)3.1.5)GetReaderInformation():获得读写器的信息 (7)3.1.6) WriteComAdr():写入读写器地址 (8)3.1.7) WriteScanTime():设置询查命令最大响应时间 (9)3.1.8) SetPowerDbm():设置读写器功率 (9)3.1.9) Writedfre():设置读写器工作频率 (9)3.1.10) Writebaud():设置串口波特率 (10)3.1.11) SetWGParameter():设置韦根参数 (11)3.1.12) SetWorkMode():设置工作模式 (11)3.1.13) GetWorkModeParameter ():读取工作模式参数 (12)3.1.14) ReadActiveModeData ():读取主动模式数据- (13)3.1.15) SetAccuracy():EAS检测精度测试- (13)3.1.16) SetOffsetTime ():设置Syris命令响应偏置时间- (13)3.1.17) SetFhssMode ():设置读写器跳频模式 (14)3.1.18) GetFhssMode ():获取读写器跳频模式- (14)3.1.19) SetTriggerTime ():获取读写器跳频模式- (15)3.1.20) BuzzerAndLEDControl ():声光控制命令- (15)3.1.21) SetRelay ():设置继电器动作- (16)3.1.22) OpenNetPort():连接网口 (16)3.1.23) CloseNetPort():关闭网口 (17)3.2)EPCC1-G2协议函数: (17)3.2.1) Inventory_G2 ():G2询查命令 (17)3.2.2) ReadCard_G2 ():G2读取数据命令 (18)3.2.3) WriteCard_G2 ():G2写命令 (19)3.2.4) EraseCard_G2 ():G2块擦除命令 (20)3.2.5) SetCardProtect_G2 ():G2设定存储区读写保护状态命令 (21)3.2.6) DestroyCard_G2 ():G2销毁卡片命令 (22)3.2.7) WriteEPC_G2 ():G2写EPC号命令 (23)3.2.8) SetReadProtect_G2 ():G2单张读保护设置命令 (23)3.2.9) SetMultiReadProtect_G2 ():G2单张读保护设置命令(不需卡号) (24)3.2.10) RemoveReadProtect_G2 ():G2解锁读保护命令 (25)3.2.11) CheckReadProtected_G2 ():G2测试卡片是否被读保护命令 (25)3.2.12) SetEASAlarm_G2 ():G2EAS报警设置命令 (26)3.2.13) CheckEASAlarm_G2 ():G2EAS报警探测命令 (27)3.2.14) LockUserBlock_G2 ():G2user区块锁命令(永久锁定) (27)3.2.15) WriteBlock_G2 ():G2块写命令 (28)3.3)18000-6B协议函数: (29)3.3.1) Inventory_6B ():6B寻查命令(单张) (29)3.3.2) Inventory2_6B ():6B按条件寻查电子标签命令 (30)3.3.3) ReadCard_6B ():6B读数据命令 (30)3.3.4) WriteCard_6B ():6B写数据命令 (31)3.3.5) CheckLock_6B ():6B锁定检测命令 (32)3.3.6) LockByte_6B ():6B锁定命令 (32)4.其他返回值定义 (33)5.错误代码定义 (34)上位机应用程序通过UHFReader18CSharp.DLL操作EPCC1-G2、18000-6B格式电子标签读写器。
发卡器DLL接口使用手册【模板】

发卡器DLL接口使用手册V1.3.0XX公司2021年1月5日概述本手册是酒店发卡器动态链接库的使用说明。
一、定义1.应用函数开发包含下列文件:CardEncoder.dllmfc140ud.dllmsvcp140d.dllucrtbased.dllvcruntime140d.dll2.适用操作系统:Win7或Win103.说明:目前除停止发送空白卡接口外,不接受多个接口同时调用,请在上一个接口接收到返回值后再进行下一步操作。
本套接口与通通酒店客户端及相关系列产品不通用,通通酒店下添加的锁及已初始化的卡片无法使用dll。
二、错误说明1.常规错误码2.设备相关错误3.数据解析相关错误三、特殊获取说明1. hotelInfo获取通过固定Cloud API服务器接口获取,若未在本地配置特殊的Cloud API服务器,请固定使用接口:***.com/v3/hotel/getInfo接口:/v3/hotel/getInfo, GET说明:获取hotelInfo串返回值:四、函数说明1.配置服务器接口地址原型:bool CE_ConfigServer (const char *url)说明:本函数用于配置请求的服务器域名地址。
未配置本地服务器时,默认不再调用该接口,使用公网地址进行访问,url配置为具体的目标接口参数:返回值:2.连接设备原型:int CE_ConnectComm (const char *portName)说明:本函数用于PC与酒店发卡器设备的连接与初始化。
参数:portName:连接串口(COM1~COM256)返回值:3.关闭连接原型:int CE_DisconnectComm(void)说明:本函数用于关闭PC到酒店发卡器的连接。
返回值:4.配置发卡器原型:int CE_InitCardEncoder(const char *hotelInfo) 说明:将发卡器配置给指定的酒店。
参数:返回值:5.将空白卡写成酒店专用卡原型:CE_InitCard(const char *hotelInfo)说明:将空白卡初始化成指定酒店的卡,操作前请终止其它操作参数:返回值:6.停止发送空白卡操作原型:int CE_StopInitCard(void)说明:本函数用于打断酒店发卡操作,请另启线程执行,执行完成后再执行其它操作!否则可能出现未知错误!!返回值:7.新增单条IC卡数据原型:int CE_WriteCard(const char *hotelInfo, int buildNo, int floorNo, const char *mac,unsigned long timestamp, bool allowLockOut)说明:向IC卡中写入一条开锁数据参数:返回值:新增卡数据部分参数说明:8.清空IC卡数据原型:int CE_ClearCard(const char *hotelInfo) 说明:清空IC卡中写入的开锁数据参数:返回值:9.读取IC卡中的所有数据原型:int CE_ReadCard(const char *hotelInfo, char **hotelArray) 说明:从IC卡中读取所有写入的数据参数:返回值:hotelArray参数:hotelArray.hotelArray参数说明:10.获取IC卡卡号原型:int CE_GetCardNo(char **cardNumber)说明:本函数用于获取IC卡卡号参数:返回值:11.蜂鸣器发声原型:int CE_Beep(int voiceLen, int interval, int voiceCount)说明:本函数用于使得蜂鸣器发声,在连续操作接口时,请完成其他操作后调用参数:返回值:12.获取设备的版本信息原型:int CE_GetVersion(char **versions)说明:获取发卡器的版本信息参数:返回值:versions返回值:13.发工程卡原型:int CE_InitConstructionCard()说明:将空白卡初始化成工程卡,工程卡可用来打开所有未初始化的酒店锁返回值:14.恢复空白卡原型:int CE_DeInitCard(const char *hotelInfo)说明:将酒店卡反初始化为空白卡参数:返回值:15.写入挂失卡信息原型:int CE_CancelCard(const char *hotelInfo, const char *cardNo, unsigned long timestamp)说明:向A卡内写入一条需要挂失的卡B的信息参数:返回值:16.读取IC卡中的挂失相关数据原型:int CE_ReadCancellationInfo(const char *hotelInfo, char **infoArray) 说明:从IC卡中读取所有挂失相关的数据参数:返回值:infoArray参数:Array参数说明:17.设置扇区可用性原型:int CE_SetSectors(const char *sectors) 说明:设置各个扇区的可用性参数:返回值:18.读取扇区可用性原型:int CE_GetSectors(char **sectorStr); 说明:读取各个扇区可用性参数:返回值:19.解析单个扇区的数据(1.2.0)原型:int CE_ParseResData(const char *hotelInfo, unsigned char *sectorData, bool isLowestSector, char **hotelArray);说明:解析单个扇区的数据,该接口可脱离本公司发卡器使用参数:返回值:hotelArray参数:hotelArray.hotelArray参数说明:20.创建单个扇区数据(1.2.0)原型:int CE_GenerateSectorData(const char *hotelInfo, unsigned char *sectorData, bool isLowestSector, int buildNo, int floorNo, const char *mac, unsigned long timestamp, bool allowLockOut);说明:获取向单个扇区内写入一条数据的扇区数据,该接口可脱离本公司发卡器使用,该接口必须配置远程服务器地址参数:返回值:新增卡数据部分参数说明:21.创建用于删除扇区数据的数据(1.2.0)原型:int CE_GenerateClearData(unsigned char *srcBytes);说明:创建用于删除扇区数据的数据,该接口可脱离本公司发卡器使用参数:返回值:22.获取新增挂失信息的单个扇区数据(1.2.1)原型:int CE_Ge nerate CancelCardData(const char *hotelInfo, unsigned char *sectorData, bool isLowestSector, const char *cardNo, unsigned long timestamp);说明:获取向单个扇区内写入一条挂失信息的扇区数据,该接口可脱离本公司发卡器使用,必须配置远程服务器地址参数:返回值:23.解析单个扇区内挂失相关数据(1.2.1)原型:int CE_ParseLossData(const char *hotelInfo, unsigned char *sectorData, bool isLowestSector, char **infoArray);说明:解析挂失卡单个扇区内写入的挂失数据信息,该接口可脱离本公司发卡器使用,该接口必须配置远程服务器地址参数:返回值:24.创建工程卡块区数据(1.2.1)原型:int CE_GenerateConstructionCardData(unsigned char *blockData, const char *cardNo);说明:获取创建工程卡的块区数据,该接口可脱离本公司发卡器使用,必须配置远程服务器地址,工程卡数据必须写入第0个扇区的第2块区(以0,1,2块区标准)参数:返回值:五、常见问题说明1.操作卡片返回错误106(1)卡片为空白卡,无法进行读卡、写卡、清卡、挂失等相关卡数据操作。
Nemo4000网格接入风机说明书
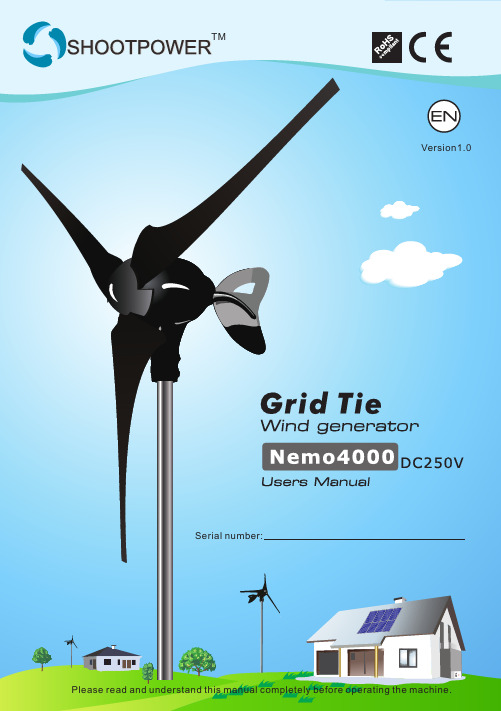
TMVersion1.0 Serial number:CONTENTS1. Getting started12. Safety instruction3. Installation siting124. Specifications45. Part name556. Assembling module6-1 Verify the following upon purchase56-2 Assembly procedure66-3 Attaching to pole787.Connecting the system87-2 Connecting wind turbine, smart box and inverter8998. Considerations when choosing peripheral materials/Device 998-2 Mounting tower98-3 Cable Diameter size108-4 Grounding101110. Site Elevation1211. Maintaining the generator system121312. Warranty information 7-1 Connecting wind turbine and whole system’s all of cables7-3 Install the wind turbine on the top of the pole8-1 Inverter9. Explanation Operations7-4 Connecting the wind generator output cable extension1.Getting StartedCongratulations on the purchase of your new Nemo4000 grid tie Shoot Power Wind Turbine. This manual will provide you with a good basic understanding of the operation and maintenance of this unit. If you have any questions regarding the operation and/or maintenance of the unit, please consult your point of purchase or contact us at:Email:*******************In the unlikely event that this product does not function properly, prohibit all persons except for trained technicians from handling its internal systems and contact either the dealer from whom you purchased it or Shoot Power customerservicedepartment:*******************The specifications of this product may change due to improvements without prior notice.For explanation purposes, the illustrations and images throughout this manual may differ from the actual product.Certain installation procedures are dangerous. Always ask a trained professional to perform the installation work.Be aware that manufacturer assumes no responsibility for accidents or damage caused by improper installation, use, or attempts to modify this product.Be aware that the manufacturer assumes no responsibility for accidents or damage sustained as a result of not following the procedures and warnings specified in this manual.Failure to operate this product in accordance with the content of sections labeled “Danger”, “Warning”, and “Caution” may result in accidental death, injury, fire and/or damage to the product itself.☼2.Safety instructionParticularly important information is distinguished in this manual by the following notations.This symbol indicates information that could result in death or severe injury if ignored. It is used to indicate information of a particularlyThis symbol indicates information that could result in death or severe injury if ignored.SHOOTPOWERBe aware that failure to use the product in the manner indicated bymay, depending on circumstances, also have severe consequences. All of the symbols described above indicate important safety information. Obey all safetyinformation when using this product.Safety information is indicated as shown below.This symbol is intended to draw reader’s attention to Danger/Warning/Cautioninformation. Specific details on the nature of the thread to safety are indicated insideor beside the symbol.This symbol indicates prohibited actions. Specific details on the prohibited action areindicated inside or beside the symbol.This symbol indicates instruction that must be followed. Specific details on themandatory instructions are indicated inside or beside the symbol.Install this product so that the tips of the rotor blades have at least 3.5m (11.5 ft)clearance from any surrounding objects. After installation is complete, clear awayall scaffoldings, making sure that the rotor blades are far out of reach of people, petsand/or livestock.Never touch a moving rotor blade by your hand or any other part of the body. The rotorblades are sharp and accidental contact can result in death or severe injury.The body of wind generator will also move in accordance with wind direction once itbegins to make contact with the wind. Exercise caution if it is necessary to approachthe wind generator to perform installation or maintenance work.For safety reasons, do not install the wind generator before inspecting the durability/quality of the pole and the area in which it will be installed. If the pole and the locationare not suitable, injury or death may result.Do not install the wind generator in close proximity to structures such as smokestacksthat attain extremely high temperatures. The heat could melt the insulation on electrical cables, resulting in electrocution, fire or other damage.Do not install the wind generator if the pole to which it will be attached is not standingstraight up. The wind generator could fall, causing an accident or mechanicaldamage/malfunction.Do not use the wind generator for any purpose other than generating electricity fromnatural wind. Do not attempt to generate electricity by mounting the wind generatoron a moving vehicle. Do not use the wind generator in close proximity to an exhaustduct or in any other extremely high-temperature environment. Doing so could resultin fire, injury, or damage to the wind generator.Discontinue use if the lines or cables are damaged (i.e. exposed wires, cut cables,plug damage). Continued use could result in electrocution, fire, or short circuits.This symbol indicates information that could result in death, severe injury, or damage to limited property if ignored.Do not install the wind generator in close proximity to electric or telephone lines. Afallen pole or contact between the rotor and electric/telephone lines could result inelectrocution, disconnection, damage or malfunction of the turbine.Do not pull on, excessively bend, or attempt to modify the wires/cables of the windgenerator. Doing so could result in cord damage, electrocution, or fire.Never attempt to disassemble or modify the wind generator. Doing so could resultin electrocution, fire, or wind generator malfunction.Due to conditions of use, this system may not continuously supply stable electricalpower. Do not attempt to use the electricity generated by the wind generator topower medical devices or other equipment related to human life systems support.Do not attempt to use the electricity generated by the wind generator to powerObserve all safety precautions when working on the wind generator in highlocations. Take care to ensure that hardware and other parts do not fall from thewind generator. Falling parts can cause injuries or other accidents.Before assembling the wind generator, secure adequate space to ensure thatwork can be completed safely. Inadequate space can result in injuries or otheraccidents.3.Installation sitingSmall changes in wind speed can have a dramatic effect on powerproduction. The location of your wind turbine should be carefullyconsidered.In general the higher the tower the greater the wind speed and ultimately the power production. However, towers are expensive and can easily exceed the cost of the turbine.The minimum recommended tower height is 25 ft (7.6 m) on open ground or 20 ft (6m) above nearby obstructions. Try to locate the wind turbine in the “cleanest” turbulent free air as possible. Turbulence will reduce the efficiency of the wind turbine and may accelerate wear on rotatingcomponents.Safety must be the primary concerned when selecting the mountinglocation. Install wind turbine so there is no possibility of accidental contact with rotating blades even if it requires installing the wind turbine in a less than ideal location. Safety has precedence over efficiency.Optimal wind turbine locationEach installation is different and is often a compromise between tower height, distance from the battery bank, local zoning requirements and obstacles such as buildings and trees.4.Specification s 3m /s(11KPH, 6.7MPH)-4K W (20m /s, 72KPH, 45MPH )1200rpm(20m/s, 72KPH, 45MPH)839290007076UPC codeRotor Diameter1776mm(69.9'')Weight18kg(38lbs)Mount Diameter48.6mm(1-15/16'')Number Blades3Horizontal axis, up-wind Wind Turbine TypeBlade MaterialCarbon-fiber Body MaterialAluminum diecast Product FinishTelfon-based paint GeneratorSynchronous-type, three phase power generator with neodymium iron boron magnets ControllerBuilt-in Yaw controlFree yaw (360 degrees)Direction ControlSwing-tail Over Wind ControlStall control(600rpm mode)Start-up wind speed49.2m/s(177KPH, 110MPH)Cut-out wind speedSurvival wind speedRated Power1KW (12.5m/s, 45KPH, 28MPH)Rated Rotor Speed1200rpm Peak PowerMaximum Rotor SpeedOutput VoltageDC250V Braking SystemRegenerative electromagnetic braking system Recommended System PV inverter(constant voltage type)*Cut-in: wind speed at which the turbine begins to produce power.**Cut-out: wind speed at which the turbine stops to produce power.Output power characteristicsPower output(W)5000Wind speed(m/s)5101520**2530354045503*040003000200010006. Assembling module6-1 Verify the following upon purchase Blades, Hub, and Nose ConeFor tightening the main-shaft. Should be able to tighten up to 29.5±1.5ft.lb (40±2N.m) NOTE: Do not press the rotor shaft into the body.Failure to observe these safety instructions may result in a severe accident or damage to the wind generator or other parts of the system.Do not place the wind generator body upside down or inclined during installation ormaintenance. Water (rain, snow) can leak inside the body joint gap and cause damage to the turbine. During installation when the body is upside down or inclined and has the possibility of getting wet, put a cover over the body.On the tower top use a mast with an outer diameter of 1.91 inch(48.6mm), 3/16 inch(5mm) of thickness and at least 3 ft (1m) in length. A 1-1/2 inches schedule 80 steelpipe meets this requirement. Do not use plastic pipes.Do not install the wind generator if the pole is not standing straight.If the wind generator is not mounted in an upright position, it could topple or fall, causing injury or damage to the system.as death or injury. After attaching the rotor to the body, fix the rotor in place to prevent it from rotating until the wind turbine has been completely installed.If the wind turbine has not been completely assembled, a strong gust of wind or similar phenomenon may cause it to fall, causing an injury or other mishaps.When wind turbine has been completely assembled, in order to prevent corrosion, apply silicone sealant to the screw hole till the screw hole is completely covered.6-3 Attaching to poleWhile attaching the wind turbine to the tower, be careful not to pinch the AWG#10 (5.5mm²) yaw wires. Slide the yaw all the way down over the end of pole. After the yaw is seated on the pole, move it back up a 1/8th inch (2mm) to prevent the bottom of the yaw from contacting the top of the pole. This way the only contract between the tower and yaw isthrough the rubber pad, which will reduce noise transmission. Using a torque wrench, tight all mounting fasteners to 16±0.74ft.lb (22 ±1N.m). Make sure that your tower allows for proper clearance of the blades. Aminimum of 2inches (50mm) clearance must be given between the blades tips and any obstructions.7.Connecting the system7-1 Connecting wind turbine and whole system’s all of cables*Pay attention to the + and – terminals when connecting the power cableto the Smart box and inverter. Reverse connection will cause serious damage.(Be aware that any damage to this product caused by improper connectionis NOT covered by the warranty. Connect the cables to the correct terminals). 7-2 Connecting wind turbine, smart box and inverterThe wind generator is designed to use wires with a length of 15m(49ft) and a gauge of AWG #10 (5.5mm²) between the wind generator and the Smart box. However you can select the appropriate wire gauge according to the distance. Please check section 8 (“Considerations when choosing Peripheral Materials/Devices”). Make sure to include the height of the tower.turbine to the inverter input terminals is the same as above.Pay attention to the +and -terminals when connecting the power cable to the Smart box and inverter.A reverse connection will cause serious damage to the unit.Please turn on the switch after all of the cables connections are finished.This manual is intended for individuals who have the knowledge andtechnical skills needed to work with electrical wiring. If the wind generator is used in an inappropriate configuration or wired incorrectly, its use could cause a severe accident and damage the system, including this product.If you have any questions regarding the wind generator systemconfiguration, contact either the dealer where you purchased this product or Shoot Power Customer Service for more information.7-3 Install the wind turbine on the top of the pole7-4 Connecting the wind generator output cable extensionConnecting wind turbine to the Smart boxConnecting Smart box to the inverterConnecting the inverter and circuit breaker123Turn on the circuit breaker48. Considerations when choosing Peripheral Materials/Devices •Type: We recommend the use of PV solar inverter.1).The Max input voltage: 400VDC or more.2).The minimum input voltage:200VDC or less.8-1 Inverter •W e Recommend use SMA company Sunny boy PV inverter or other reliable brands.8-2 Mounting Tower:The mounting tower that supports the wind generator is an extremely important part with respect to safety. The mast used to attach the turbine and its foundation, must be strong enough to provide adequate safety.•Location and height of the mounting tower: select a free and safelocation where the ample amount of wind flow is obtained. The height of the pole must be 11.5ft (3.5m) or more to ensure safety from hazard to people.•The tower must have an upper portion of at least 3ft(1m) in length and an outer diameter of 1.9inches(48.6mm)(the1½inch schedule 80 steel pipePlease see the section 6-2 Assembly procedure•The tower must withstand horizontal wind pressure of 231lbf(105kgf) (at a wind speed of 49.2m/s, 110mph,177KPH).•If unsure please consult with your local tower contractor for details. 8-3 Cable Diameter Sizes:To select the appropriate cables gauge, measure the distance between the turbine and the smart box. Make sure to include the height of the tower. Please refer to the following wire gauge chart.meets it). The total tower height must be sufficient to prevent accidents with body or structures.Distance between the turbine and smart box Wire Gauge(1 cables per polarity)Cross Sectional Area Diameter of the cooper core AWG #Maximum Total resistance (round & trip)Up to 20m(49ft)Up to 30.5m(100ft)5.5mm²8.0mm² 2.64mm 3.19mm 1080.022Ω0.03ΩNOTES:•For the connection between the Smart box and the inverter, youcan use the same wiring per polarity as in the table. Alternativelyyou can use a single cable AWG #10. In all the cases the cable between the Smart box and the inverter has to be no more than 3ft long.We recommended installing a 1 or 2 ft (30 or 60cm)long grounding jumper between the wind turbine bracket hex bolts and the mast. Use AWG # 6 wires with ring crimp terminals (lugs) .The terminal ring inside diameter should be 3/8 inch or 10 mm. It has to be mounted in between the 2half-moon brackets and inside one of its 4 hex bolts. Remove the coat of paint on the contact area and use electrical joint compound. The brackets have to be tighten fully, otherwise use stainless steel flat washers to fill the gap. To connect the jumper to the mast pipe, you can use grounding clamps of the same metal as the pipe itself to avoid galvanic corrosion.8-4 Grounding: Connect the base of the tower/mast to earth ground, using enough ground rods, according to the soil conductivity.Since the turbine typically has to be mounted on a structure (tower, pipe, etc.) you should take into account the possibility of a lightning strike in your area that could hit the top of the structure.Most of the time a lightning ground system super-exceeds therequirements for a safety ground. However be sure always to meet the requirements as per the local electric code in both cases. Consult acertified electrician or technician specialized in both types of grounding systems.The customer itself or through a professional contractor, has the responsibility to meet the local electric code.Please check periodically the Shoot Power website for more information about grounding.LED Indicator 9. Explanation OperationsDuring operation, the LED indicator onthe body of the wind generator canbe used to check the operating statusof the system.The indicator LED can light in solid orflashing red and green.Operating StatusTable10. Site Elevation:An important fact to keep in mind is elevation. The higher the windgenerator is from sea level, the lower the air density. Air density is directly proportional to the output of your wind generator. Here are some general numbers to keep in mind when determine the maximum output that can be expected.FEET1-500ftMETER 0-150m OUTPUT POWER 100%500-1,000ft1,000-2,000ft2,000-3,000ft3,000-4,000ft4,000-5,000ft5,000-6,000ft6,000-7,000ft7,000-8,000ft8,000-9,000ft9,000-10,000ft 150-300m 300-600m 600-900m 900-1,200m 1,200-1,500m 1,500-1,800m 1,800-2,100m 2,100-2,400m 2,400-2,700m 2,700-3,000m 97%94%91%88%85%82%79%76%73%70%11.Maintaining the generator systemMonthly/ Yearly Inspection:Although the wind generator is basically a maintenance-free system, we recommend visual inspections (see details on the operating status table).a)Is the system exhibiting operations listed on the “Operating Status Table For example: the indicator lamp is green when the rotor is rotating at a high speed(250-1200rpm), etc.b)Are the blades free from damage?c)Is there an approximate 3mm gap between the aluminum hub and the front unit face?d)Is any debris such as ice, snow, or tree branches jamming the turbines?e)Is the joint on the tail moving smoothly?f)Is the tail free from any minor damage?In working time, can not connect + and - cables together to make the wind turbine in short circuit, also must keep the connection between the smart box with wind turbine, otherwise, it will damage the wind turbine MPPT controller.If you want to stop the wind turbine, just need to shut down circuit breaker, the wind turbine will get into 300rpm mode, when the power of the Capacitor is used up completely, the wind turbine will stop automatically. 12.Warranty InformationShoot Power Wind Turbines are warranted for a 3 year period. Against defective parts or manufacturers workmanship.What is NOT Covered•Damage from lightening•Damage due to extreme winds•Damage from improper installation (Including poor tower design andinverted hanging)•Damage from improper wiring•Damage to blades from debris and wind blown debrisAny and All modifications to the unit, not stated in this manualNo one has the authority to add to or vary this limited warranty, or to create any other obligations in connection to Shoot Power and its products. Any implied warranty is limited to the duration that is stated on this manual. Shoot Power will not be liable for damages that any person or property might suffer as a result to the breach and or implied warranty. This warranty applies to the original purchaser.。
利达联动使用说明书

JB-QB-LD128EN(M)火灾报警控制器(联动型)安装使用说明书目录第一章概述 (2)第二章技术特性 (2)第三章结构特性 (4)第四章安装与调试 (7)第五章系统设置 (8)第六章使用与操作 (20)第七章联动控制盘 (28)第八章故障分析与排除 (29)第九章注意事项 (29)第十章售后服务 (29)◇火警指示(红):首次火警发生时灯亮,并保持到系统复位。
◇反馈指示(红):设备有回答时灯亮,无回答时灯灭。
◇启动指示(红):设备被启动后,指示灯亮,无启动设备时灭。
◇延时指示(红):设备尚未启动,正处在延时状态时灯亮,延时结束时灯灭。
◇气体喷洒(红):气体喷洒设备有启动命令时灯亮,无启动命令时灯灭。
◇消音指示(绿):有火警、启动或故障发生时,按消音键后,消音指示灯亮。
◇全局手动(绿):当联动设备的启动状态设置为[全局手动]时灯亮。
◇全局自动(绿):当联动设备的启动状态设置为[全局自动]时灯亮。
◇屏蔽指示(黄):当有未接或故障的设备被屏蔽时灯亮。
无屏蔽设备时灯灭。
◇输出禁止(黄):当任意一联动设备被禁止时灯亮,无设备被禁止时灯灭。
◇系统故障(黄):当控制器主板程序出错时灯亮,主程序运行正常时灯灭。
◇公共故障(黄):控制器有故障时灯亮,全部故障消除后灯灭。
◇主电故障(黄):主电欠压及断线时灯亮,主电正常时灯灭。
◇备电故障(黄):备电欠压及断线时灯亮,备电正常时灯灭。
◇通讯故障(黄):当控制器主板与多线联动盘通讯故障时灯亮,无故障时灯灭。
◇本机发送(红):有火警发生时,本机向其他设备发送出火警信息后灯亮,未送出火警时灯灭。
◇监管报警(红):当漏电报警或断电时灯亮,系统复位后灯灭。
◇本机接收(红):当本机接收到其它设备发送来的火警信息后灯亮,未收到灯灭。
◇漏电报警(红):当漏电保护器发出漏电报警时灯亮,无报警时灯灭。
◇漏电断电(红):当漏电保护器断电时灯亮,正常工作时灯灭。
◇声光报警屏蔽(黄):声光报警屏蔽时灯亮,声光报警取消屏蔽时灯灭。
托利多条码秤通用接口DLL说明手册
||
| | | | ============保留 2
||
| || ||
===结果保存文件名(秤内数据)
||
| || ||
|===段头结束标识
||
| || ||
||
+---------------------+ +--+ +------+ + + + + +---------++
[MT_STAND_FIRE,PLU,WRITE,0,0,0,0,C: \aaa.txt]-----〉段标识
对话框的显示界面如下:
通用 DLL 说明手册 V1.0
3:入口函数:
MT DLL 对 外 提 供 两 个 入 口 函 数 Transfer_Ethernet_Ex 和
l Transfer_Ethernet,它们提供同样的上、下载功能,这两个函数保持和
以前的 DLL 相同的接口。MT DLL 主要支持 MT 的新文本格式,同时
[MT_STAND_FIRE,PLU,WRITE,0,0,0,0,C: \aaa.txt] 0003,0013,1,2.5,0,0,0,3,0,0,0,0,0,aaa, 1651,1651,1,35.6,0,0,0,0,0,0,0,0,0,bbb, [MT_STAND_FIRE,PLU,Read GE,1,100,0,0,C:\Application\test\bin\RL00\Adver.bin] [MT_STAND_FIRE,Preset key,WRITE,0,0,0,0,C:\Application\test\bin\RL00\PresetKey.bin] 1,1 2,2 3,3
Yilida SYP系列风机样本
Version Number: A201201 该手册最终解释权归亿利达公司所有
SYP
系列离心式空调风机 The Smart Air
亿利达 技术手册
The Smart Air
Fan Applications
风机应用部分
AMCA Introduction
AMCA 介绍
Quantities, Symbols and Units
4) AMCA 的认证额定值程序向采购员和专业人士保证,各 竞争者的额定值都是基于标准的测试方法和程序得出,并由 AMCA 国际作为一个公平的权威机构来进行审核。
5) 所有 AMCA 认证的产品都列入网站,以便您可以验证出
4) The AMCA certified ratings program assures buyers and specifiers that competitors’ ratings are based on standard test methods and procedures, and are subject to review by AMCA International as an impartial authority.
AMCA 的使命是促进空气运动及控制行业与公众利益一致 并健康发展。AMCA 国际是一种非常有价值的资源,同时也 是行业自律的强有力组织。人们不论是购买还是指定风机、 风阀和百叶窗,都一定要充分了解 AMCA 国际认证额定值 印章的价值。
利达LDEII主机调试说明

利达L D E I I主机调试说明集团标准化工作小组 [Q8QX9QT-X8QQB8Q8-NQ8QJ8-M8QMN]JB-QG-LD128E Ⅱ火灾报警控制器(联动型)调试手册(VER 版本)版本说明:本版是配合LD128EⅡ火灾报警控制器(联动型)的调试而使用,控制器软硬件都根据调试和使用的实际情况作了相应的升级。
本版调试手册适用于LD128EⅡ监控软件和POT设置软件版本。
本版对工程调试进行了更详尽的说明。
希望调试人员对新增加和修改部分仔细阅读,并及时反馈信息。
注意:请不要对控制器进行查毒操作!第一节系统简介JB-QG-LD128E Ⅱ火灾报警控制器(联动型)(以下简称LD128EⅡ)依据国标《GB4717-93》以及《GB16806-1997》设计,并通过了上述两个标准的检测。
LD128EⅡ采用对等网络架构设计,所有内部部件和外部扩展均通过CAN (Control Area Network)Bus网络完成,均是网络上的一个节点,通讯可靠,扩展方便。
内部部件由以下部分组成:一、主控部分采用嵌入式工业计算机,保证系统在满足设备技术条件的环境下长时间稳定工作,以及配合显示的器件、存储的器件、输入、打印等器件。
1、主板(编号:LD128E-E-C00-XXX)2、多功能板(编号:LD128E-E-C01-XXX)3、液晶(编号:LD128E-E-C02-XXX)4、打印机(编号:LD128E-E-C07-XXX)5、液晶升压板(编号:LD128E-E-C08-XXX)6、驱动板(编号:LD128E-E-D00-XXX)7、触摸屏二、驱动部分由1至16块驱动板组成,每个驱动板可输出4个探测回路。
每个回路可连接256(0-255)个总线设备(探测器、手报、输入输出模块、楼层显示器等)。
在一台机器内部最多可接16块驱动板(编号:LD128E-E-D00- XXX),总线设备表示为:X X — XXX地址号(000-255)回路号(00-31)总线设备可以为以下几种方式:1、报警类:包括感烟、感温探测器、手报按钮、输入模块等。
- 1、下载文档前请自行甄别文档内容的完整性,平台不提供额外的编辑、内容补充、找答案等附加服务。
- 2、"仅部分预览"的文档,不可在线预览部分如存在完整性等问题,可反馈申请退款(可完整预览的文档不适用该条件!)。
- 3、如文档侵犯您的权益,请联系客服反馈,我们会尽快为您处理(人工客服工作时间:9:00-18:30)。
亿利达风机选型接口说明书
2010/4/13
目录
一、概要 (3)
二、接口清单 (3)
三、接口详细说明 (3)
1,FanSelection (3)
2,GetResultData (3)
3,ExportPicture (4)
4,BeltSelection (4)
四、相关文件 (5)
五、风机选型结果 (5)
1,返回字符串下标说明 (5)
2,返回数值下标说明 (5)
六、配件选型结果 (6)
1,返回字符串下标说明 (6)
2,返回数值下标说明 (6)
七、代码示例 (8)
1、接口声明 (8)
2、风机选型 (9)
3、皮带选型 (10)
八、开发支持 (11)
一、概要说明
1,WIN32 动态链接库
2,开发环境: C++ Builder 6
3,接口声明均为标准格式
4,示例代码均以C++ 语法格式声明,使用时请转成相应的语法
二、接口清单
三、接口详细说明
1,FanSelection
int FanSelection(double pFlow,double pPres,int pPresType)
风机选型
参数1:pFlow 风量(m^3/h)
参数2:pPres 风压(Pa)
参数3:pPresType 风压类型 0-全压 1-静压
返回:选型结果个数
2,GetResultData
Void GetResultData(int pIndex,char pStrData[100][255], double
pDoubleData[100])
获得选型结果(上次选型的结果)
参数1:pIndex 记录索引(以0为起始)
参数2:pStrData 用于返回字符串的字符串数组(具体下标参见附件1)
参数3:pDoubleData 用于返回数值型的数组(具体下标参见附件2)
3,ExportPicture
void ExportPicture(double pFlow,double pPres,char pStrData[100][255],double pDoubleData[100],int pWidth,int pHeight,const char * pFileName)
导出曲线图到指定文件(为bmp格式)
参数1:pFlow 风量(m^3/h)
参数2:pPres 风压(Pa)
参数3:pStrData 返回字符串的字符串数组(具体下标参见附件1)
参数4:pDoubleData 返回数值型的数组(具体下标参见附件2)
参数5:pWidth 图形宽度
参数6:pHeight 图形高度
参数7:pFileName 保存的图形文件名称
4,BeltSelection
int BeltSelection( char ReDataStr[100][255],
double ReDataDouble[100],
int pHz_DataType,
int pRotation,
bool pPole[4],
bool pBeltType[4],
bool pBeSetFanSped,
double pFanSpedRt_User,
bool pBeSetBeltMoveSped,
double pBeltMoveSped_User,
double pCenterDistance )
配件选型
参数1: ReDataStr 风机选型的字符串型结果
参数2: ReDataDouble 风机选型的数值型结果
参数3: pHz_DataType 频率选择 0-50HZ 1-60HZ(界面选择)
参数4: pRotation 出风旋转角度 0-R0,1-R90,2-R180,3-R270 参数5: pPole 用户选择的极数 2,4,6,8
参数6: pBeltType 皮带类型 SPZ SPA SPB SPC
参数6: pBeSetFanSped 用户设定了风机转速
参数6: pFanSpedRt_User 用户设定的风机转速差
参数6: pBeSetBeltMoveSped 用户设定最大皮带运动速度
参数6: pBeltMoveSped_User 用户设定的最大皮带运动速度
参数6: pCenterDistance 中心距 (mm)
四、相关文件
五、风机选型结果
1,返回字符串下标说明
2,返回数值下标说明
六、配件选型结果
1,返回字符串下标说明
2,返回数值下标说明
七、代码示例
1、接口声明
注:__declspec(dllimport) 为C++Builder 特有语法(静态加载方式),其他语言下,在使用时可以使用动态加载方式
注:颜色的区隔表示代码位置的不同,CMyList类是列表类,属自有代码,请使用时使用相应的列表类代替即可
注:这里使用了风机选型的数据,所以需要将用户选择的风机型号数据传递进去(见红色字体部分)
亿利达风机选型接口说明书
八、开发支持
公司名称:上海华电源信息技术有限公司
邮箱:hdy@
电话:86-21-65049733
第11页共11页。