温湿度记录仪操作说明书
USB温湿度记录仪用户手册
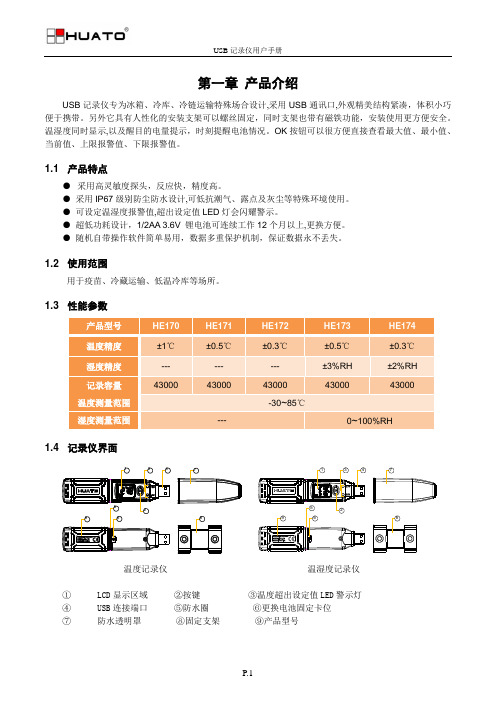
第一章 产品介绍USB 记录仪专为冰箱、冷库、冷链运输特殊场合设计,采用USB 通讯口,外观精美结构紧凑,体积小巧便于携带。
另外它具有人性化的安装支架可以螺丝固定,同时支架也带有磁铁功能,安装使用更方便安全。
温湿度同时显示,以及醒目的电量提示,时刻提醒电池情况。
OK 按钮可以很方便直接查看最大值、最小值、当前值、上限报警值、下限报警值。
1.1 产品特点● 采用高灵敏度探头,反应快,精度高。
● 采用IP67级别防尘防水设计,可低抗潮气、露点及灰尘等特殊环境使用。
● 可设定温湿度报警值,超出设定值LED 灯会闪耀警示。
● 超低功耗设计,1/2AA 3.6V 锂电池可连续工作12个月以上,更换方便。
● 随机自带操作软件简单易用,数据多重保护机制,保证数据永不丢失。
1.2 使用范围用于疫苗、冷藏运输、低温冷库等场所。
1.3 性能参数产品型号 HE170 HE171 HE172 HE173 HE174 温度精度 ±1℃ ±0.5℃ ±0.3℃ ±0.5℃ ±0.3℃ 湿度精度 --- --- --- ±3%RH ±2%RH 记录容量 430004300043000 4300043000温度测量范围 -30~85℃湿度测量范围---0~100%RH 1.4 记录仪界面213465879213465879温度记录仪 温湿度记录仪① LCD 显示区域 ②按键 ③温度超出设定值LED 警示灯 ④ USB 连接端口 ⑤防水圈 ⑥更换电池固定卡位 ⑦ 防水透明罩 ⑧固定支架 ⑨产品型号1.5 温度LCD 显示符号说明13824567① HI 符号显示,表示已经进入温度上限设定值查看状态。
② LO 符号显示,表示已经进入温度下限设定值查看状态。
③ 电池电量显示符号。
④ MIN 符号显示,表示已经进入温度记录最小值查看状态。
⑤ MAX 符号显示,表示已经进入温度记录最大值查看状态。
温湿度记录仪使用说明书
温湿度记录仪使用说明书一、产品概述温湿度记录仪是一种用于测量和记录环境中温度和湿度数据的仪器。
该记录仪具有精确度高、操作简单、数据可靠性强等特点,广泛应用于各种需要监测和记录温湿度数据的场合。
二、产品组成1. 温湿度记录仪主机:包含显示屏、按键和数据存储功能。
2. 温湿度传感器:用于感知环境温湿度,并将数据传输至主机。
三、使用步骤1. 准备工作(1) 确保温湿度记录仪已充电或插入电源适配器。
(2) 检查温湿度传感器是否与主机连接良好。
2. 开机设置按下主机上的开机按钮,待显示屏亮起后即可进行下一步操作。
首次使用时,系统将要求进行一些基本设置,如选择语言、日期时间等。
按照屏幕提示进行设置即可。
3. 启动测量(1) 将温湿度记录仪放置到需要测量的环境中。
(2) 按下主机上的测量按钮,仪器将开始实时监测环境中的温湿度数据。
4. 数据存储与导出(1) 温湿度记录仪将实时记录测量到的数据,并在主机上进行存储。
用户可以通过查看屏幕上的数据来获取当前的温湿度情况。
(2) 若要导出数据,可以通过连接温湿度记录仪与电脑,使用附带的数据传输线将数据导出至计算机。
根据软件提示进行相应操作,用户可以选择保存数据的格式和位置。
5. 数据分析与报告用户可以使用相关软件对导出的数据进行分析和生成报告。
通过软件提供的功能,用户可以绘制温湿度曲线图、生成报表等,以便更好地了解环境变化趋势和进行数据分析。
6. 关机长按主机上的关机按钮,待显示屏关闭后即可断开电源。
四、注意事项1. 请勿将温湿度记录仪暴露于过高或过低的温度环境中,以免影响仪器的测量精度和使用寿命。
2. 使用前请确保温湿度传感器与主机连接完好,如有异常应及时联系售后服务部门。
3. 温湿度记录仪在使用过程中应尽量避免与水或其他液体接触,以防损坏仪器。
4. 使用过程中如遇异常情况或设备故障,请勿私自修理,应尽快联系售后服务部门进行维修。
五、维护与保养1. 定期清洁温湿度记录仪主机和传感器,可使用干布擦拭外表面,注意不要使用化学溶剂。
RX-TH101温湿度记录仪说明书
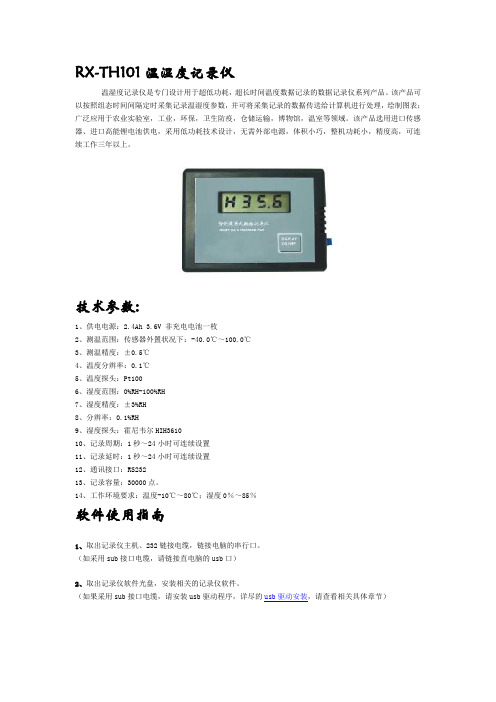
RX-TH101温湿度记录仪温湿度记录仪是专门设计用于超低功耗,超长时间温度数据记录的数据记录仪系列产品。
该产品可以按照组态时间间隔定时采集记录温湿度参数,并可将采集记录的数据传送给计算机进行处理,绘制图表;广泛应用于农业实验室,工业,环保,卫生防疫,仓储运输,博物馆,温室等领域。
该产品选用进口传感器、进口高能锂电池供电,采用低功耗技术设计,无需外部电源,体积小巧,整机功耗小,精度高,可连续工作三年以上。
技术参数:1、供电电源:2.4Ah 3.6V 非充电电池一枚2、测温范围:传感器外置状况下:-40.0℃~100.0℃3、测温精度:±0.5℃4、温度分辨率:0.1℃5、温度探头:Pt1006、湿度范围:0%RH-100%RH7、湿度精度:±3%RH8、分辨率:0.1%RH9、湿度探头:霍尼韦尔HIH361010、记录周期:1秒~24小时可连续设置11、记录延时:1秒~24小时可连续设置12、通讯接口:RS23213、记录容量:30000点。
14、工作环境要求:温度-10℃~80℃;湿度0%~85%软件使用指南1、取出记录仪主机、232链接电缆,链接电脑的串行口。
(如采用sub接口电缆,请链接直电脑的usb口)2、取出记录仪软件光盘,安装相关的记录仪软件。
(如果采用sub接口电缆,请安装usb驱动程序,详尽的usb驱动安装,请查看相关具体章节)3、软件安装完毕,点击“”图标,和记录仪主机建立链接,设置相应的记录仪记录属性。
一般来说,需要设置的相关属性如下:“标题”——记录仪的标称等信息。
“启动方式”——立即启动或者延时启动。
“记录停止方式”——记满即停或循环记录。
“记录间隔时间”——记录的间隔时间。
“记录仪描述”——记录仪的使用情况,使用时间等的描述。
“报警设置”——设置记录仪的高低限报警值。
(注:记录报警下的“启动”复选框一定要打勾。
)然后点击"记录仪属性下载",下载上述记录仪属性设置。
RCW-800W 温湿度记录仪使用说明书
RCW-800WIoT Data Logger ManualElitech iCold Platform: RCW-800W series is an IoT recorder that communicates through WIFI network, which is used for real-time monitoring, recording, alarming and data uploading of ambient tempera-ture/humidity. The recorder is mainly composed of a temperature/humidity sensor and a host instrument. It directly transmits the measured value to the Elitech cold cloud through the Wi-Fi network. It can be stored in the Elitech cold anytime, anywhere through mobile phones and PCs with Internet access functions. View and analyze the data in the cloud platform. After the limit is exceeded, the alarm can be sent in time through SMS, email, voice and other methods.*When the temperature and humidity are higher than the upper limit, the screen value will display red; when the temperature and humidity are lower than the lower limit, the screen value will display blue.● Small size, stylish shape, magnetic tray design, easy to install ● Large-size TFT color screen display● Built-in rechargeable lithium battery, can still provide real-time data upload for a longtime after power failure● The product is suitable for warehouses, cold storage, refrigerated trucks, cool cabinets, medicine cabinets, freezer laboratories and other scenarios①② Time ③ Date④ Probe 1⑤ Currenttemperature ⑥ Devicestatus⑦ Buzzer status ⑧ WIFI module status⑨ Battery power status⑩ Charging statu⑪ Probe 2⑫ Currenthumidity⑬ Number ofo ine data① Power LED Light ② Alarm LED Light③ LCD Display screen④ Home key ⑤ Right key⑥ Monitoring start/stop ⑦ Buzzer on/o⑦ Micro usb port③ Back cover screws⑤ Sensor port ⑥ Power switch④ Reset button(short press to enter thedistribution network, long press to restart t he device)⑩ Celsius/Fahrenheit conversion⑨ ② Batterycover① Bracket6. Instructions1. Power input: 5V/1A2. Temperature display resolution: 0.1℃3. Humidity display resolution: 0.1%RH4. O ine record :20,000 points5. Data storage method: circulating memory6. Record,Upload interval &Alarm interval① Normal Recording interval: 1min~24H can be set② Alarm logging interval:1min~24H can be set(The alarm recording interval must be less than or equal to the normal recording interval)③ Normal Upload interval: 1min~24H can be set,default5mins④ Alarm upload interval: 1min~24H can be set,default2mins(The alarm upload interval must be less than or equal to the normal upload interval)7.Battery life: no less than 7 days (@25℃, upload interval 5 minutes)8.Indicator light: Alarm indicator light, charging indicator light 9.Screen: TFT color screenmunication method: WIFI11.Alarm method:Local alarm, cloud alarm (SMS, APP , email)12.Buttons: switch machine, reset button (WIFI/Bluetooth), left key, home key, right key, Celsius/Fahrenheit conversion, monitoring start/stop, buzzer on/o ,13.Protection grade: IP5014.Standard sizes:110mm*78mm*27mm● ChargeConnect to the power adapter via a USB cable;When charging, the charging indicator light will be always on.The status bar will display the5. Technical Specifications● Interface●ButtonBuzzer on/off key: long press for 3 seconds, the buzzer function is turned on/closure open icon / close iconShort press in an alarm state will turn off the current buzzer alarmHome button: Short press to switch to the home page Left key: short press the interface to page forward Right key: short press the interface to page backwardsCelsius/Fahrenheit conversion key: press and hold for 3 seconds, the temperature unit will switch between Celsius/Fahrenheit.Monitoring start/stop button: long press for 3 seconds, start/stop monitoring, data start/stop record storage, displayThe lower left corner will display the status synchronously: monitoring/not monitoring① Probe 1temperature alarm limit ② Probe 2temperature alarm limit③ Temperature upper limit alarm value Dual temperature configuration parameter interfaceTemperature and humidity configuration parameter interface④ Temperature lower limit alarm value⑤ Temperature upper limit alarm value ⑥ Temperature lower limit alarm value① Probe 1temperature alarm limit ② Probe 1 humidity alarm limit③ Temperature upperlimit alarm value ④ Temperature lowerlimit alarm value ⑤ Humidity upper limit alarm value ⑥ Humidity lowerlimit alarm value2. Account registration and loginOpen the APP , in the login interface (as shown in Figure 1), enter the verification information according to the prompts, and click "Login" to complete the account login. If you have not yet registered an account, please click "Register Now" " in the login interface. In this interface (as shown in Figure 2), enter the verification information according to the prompts to complete the account registration.① Time interval between two data recordings ② Data logging interval when alarming ③ Data upload interval④ Time interval for uploading data to cloud platform when alarming⑤ Current record time of the collector ⑥ The total number of data recorded by the collector this timeIP addressWIFI MAC address ID number 20 digits Software versionWIFI configured: configured/unconfigured⑦ Automatic sleep time after no operation1.Download and install APPPlease scan the QR code below to download the "Elitech iCold"Configuration parameter interfacesystem information interface3.WiFi distribution network1)Connect the phone to the WiFi network and open the APP;2)Short press the reset button on the back of the machine to enter the WiFi network configuration mode, please see the LCD status bar icon for the specific status;Figure 1: Account login interface Figure 2: Account registration interface3) Follow the steps below to configure WiFi, the top of the screen displays " ", and the device has successfully configured WiFi;Open the APP,click the “ ” icon;Click the " " icon, scan the QR code on the back of the device or manually enter the device GUID;Edit the device name, select the time zone, and click "Add"to add the device successfully.4. Bluetooth distribution network1) Connect the phone to the WiFi network, open the APP and Bluetooth;2) Short press the reset button on the back of the machine to switch to the Bluetooth network configuration mode. Please see the LCD status bar icon for the specific status;Figure 3: Device InformationClick "Confirm" to start configuring WiFi;4) If the device WiFi configuration is unsuccessful, repeat the above steps 1) to 3).5) When the device needs to reconfigure WiFi, follow steps 1) to 2). Then open the "Device Information"⑤~⑥Enter the WiFi password in the APP;Click "Confirm", the WiFiconfiguration is successful.For more functions, please log in to the Elitech iCloud platform: , do more.After the device is added for the first time, you can get free SMS, data and premium service trial, please recharge the device after the trial service expires. For more recharge details, please refer to the "Elitech Cold Cloud Value-added Service Recharge Guide" in the APP to operate.3) Refer to the WiFi network for the network steps, and the Bluetooth network can support static IP address settings.④ Enter the WiFi password in the APP①Turn on the Bluetooth network②Obtain IP address automatically③Turn o automatic IP address acquisition: fill in the IP address manually Please refer to the current networking message requirements:IP address, subnet grab code, gateway address, DSN server address9.。
温湿度记录仪使用方法说明书
温湿度记录仪使用方法说明书一、产品简介温湿度记录仪是一种用来测量和记录环境温度和湿度的设备。
本产品采用先进的传感技术,具备高精度、可靠性强等特点。
温湿度记录仪广泛应用于室内外环境监测、仓储物流、医药食品、电子通讯等领域,以提供准确可靠的环境数据支持。
二、功能介绍1. 温度测量:温湿度记录仪可以准确测量环境温度,温度测量范围为-20℃至70℃,温度分辨率为0.1℃。
2. 湿度测量:温湿度记录仪可以准确测量环境湿度,湿度测量范围为0%至100%RH,湿度分辨率为0.1%RH。
3. 数据记录:温湿度记录仪可以自动记录环境温度和湿度数据,并存储在内部存储器中。
用户可以根据需要设置记录间隔,最大可达到1分钟记录一次。
4. 数据导出:用户可以通过连接电脑,将记录的温湿度数据导出到电脑中进行分析和存档。
5. 警报功能:当环境温度或湿度超过用户设定的阈值时,温湿度记录仪会发出声音和光亮报警,以提醒用户采取相应的措施。
三、使用说明1. 开机和关机:- 按下电源键,温湿度记录仪将开机并启动。
- 长按电源键,温湿度记录仪将关机。
2. 温湿度测量:- 确保温湿度记录仪正常开机。
- 将温湿度记录仪置于待测环境中,保持不受外界干扰。
- 温湿度数据将在屏幕上实时显示。
3. 数据记录设置:- 按下设置键进入设置模式。
- 在设置模式下,使用上下键选择记录间隔。
- 使用确认键确认设置并退出设置模式。
- 温湿度记录仪将按照设定的记录间隔进行数据记录。
4. 数据导出:- 将温湿度记录仪与电脑通过数据线连接。
- 打开电脑上的数据管理软件,点击导出数据。
- 选择导出的日期范围,并选择导出格式。
- 确认导出,待导出完成后断开连接即可。
5. 警报设置:- 按下设置键进入设置模式。
- 在设置模式下,使用上下键选择温度或湿度阈值。
- 使用左右键调整阈值大小。
- 使用确认键确认设置并退出设置模式。
- 当环境温度或湿度超过设置的阈值时,温湿度记录仪将发出警报。
温湿度记录仪说明书
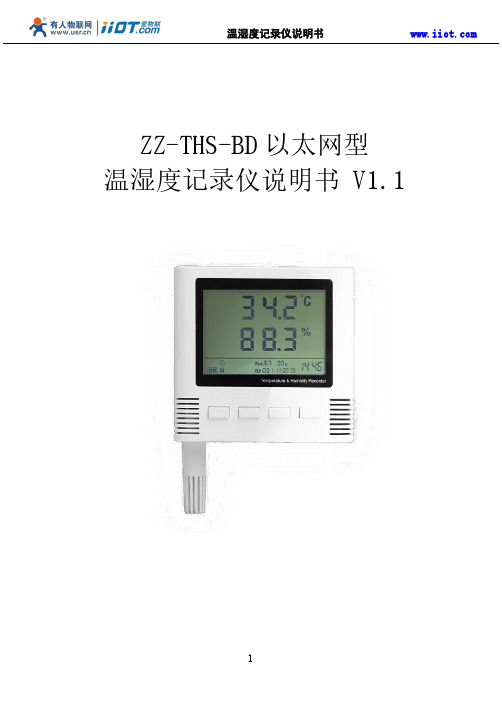
ZZ-THS-BD以太网型温湿度记录仪说明书V1.1目录一、产品简介 (3)1.1产品概述 (3)1.2功能特点 (3)1.3主要参数 (3)1.5湿度参数 (5)1.6温度对湿度测量的影响 (6)二、硬件连接 (9)2.1设备安装前检查 (9)2.2外形尺寸与操作面板 (9)2.3设备接口说明 (12)2.4设备安装说明 (12)三、系统菜单与设置 (14)3.3配置菜单介绍 (15)3.4时间设置 (16)3.5上报设置 (17)3.6温度湿度报警设置 (18)3.7探头微调设置 (20)四、配置软件安装及使用 (20)4.1软件基本使用与设备搜索 (20)4.2传感器的网络配置 (22)4.3传感器参数设置 (23)4.4传感器详细配置 (22)4.5主动上传与TCPmodbus模式的切换 (22)五、通信协议(TCP modbus) (23)5.2寄存器地址 (24)六、主动上报协议 (25)6.2协议基本组成 (25)6.3主动上报协议 (26)七、联系方式 (27)八、售后与质保 (27)一、产品简介1.1产品概述本产品为带超大屏幕液晶显示的工业级以太网型温湿度传感器,可以实时采集温湿度信息并通过以太网方式进行通讯,支持TCP-Modbus方式或者主动上传方式,相较于传统的温湿度布线方式,网络型温湿度变送器可以实现传感+通讯二合一,不再需要网关与通信主机,实现了一个设备即为一个物联网节点的功能。
1.2功能特点本产品采用高灵敏度数字探头,信号稳定,精度高。
具有测量范围宽、线形度好、使用方便、便于安装、传输距离远等特点。
产品采用大屏液晶显示,具有温湿度上下限双重控制,自由设置限制,可以实现高低温度报警与高低湿度报警并实时显示。
本产品可以广泛应用于机房监控系统、电力监控系统、安防工程、医疗卫生监控、能耗监控系统、智能家居1.3主要参数直流供电12V-24V DC传输接口RJ4510M/100M自适应温度长期稳定型≤0.1℃/year湿度长期稳定性≤1%y温度范围-40-80℃(可定制)湿度范围5-95%RH温度分辨率0.1℃湿度分辨率0.1%RH通信协议主动上报/TCP modbus DNS动态解析支持1.4温度参数内容最小值典型值最大值单位分辨率(14bit)-0.01-℃线性偏差-±0.3见后表1℃重复度-±0.1-℃工作范围-40-125℃响应时间(63%)5-30秒长期漂移-<0.04-℃/年表一不同温度下温度测量精度温湿度记录仪说明书如上表所示,在5-60摄氏度范围内最大偏差在±0.5内,小于0℃和大于60摄氏度情况下偏差递增。
TH702温湿度记录仪记录仪使用说明书
软件介绍:F-LINK 是一款软件产品,可对本公司生产的便携式记录仪”进行编程、数据下载,能显示、分析和报告来自记录仪的时间温度等数据,其友好的操作界面为用户提供优越的灵活性。
F-LINK 支持的操作系统包括:Windows® 98,Windows® 2000,Windows® XP,Windows® Server 2003,Windows® Vista 32 bit。
最低•Pentium® 系列处理器(CPU) - 1 Ghz•256色VGA•512 Mb RAM•Windows® 98推荐•Pentium® 系列处理器(CPU) - 2 Ghz 或更高•真彩色VGA•1Gb Mb RAM•Windows® XP使用介绍:1、连接设备:对设备的任何操作(如启动、停止或下载等),必须在已与设备建立连接的条件下进行。
同时,通过此项功能,用户可以查看设备即时工作状态。
方法:选择菜单设备/启动在线采集或工具栏在线。
2、启动设备:方法:选择菜单设备/配置或工具栏配置,显示向导对话框。
第一步:配置各通道记录和报警功能。
第二步:配置设备工作参数和用户信息。
1.启动方式分为"立即启动"、"定时启动"和"手工启动"2.立即启动:配置启用后,设备立即进入工作状态.定时启动:配置启用后,设备处于等待状态,直到走时至指定时间即进入工作状态。
手工启动:配置启用后,设备处于等待状态,直到按下设备面板上的启动按钮即进入工作状态。
3.记录间隔:指定设备保存记录的间隔时间。
4.停止方式:分为"记满停止"、"循环记录"、"定时停止"和"指定次数"记满停止: 当存储空间耗尽时,设备停止工作。
循环记录: 当存储空间耗尽时,以新记录覆盖旧记录,设备始终处于工作状态。
温度与湿度数据记录仪说明书

Instructions for Use: Digital Temperature & Humidity DataloggerTo track temperature and humidity.●When you purchase a Temp-DL-TH NFC temperature data logger from Healthmark,your Temp-DL-TH Dashboard account will be setup with administrator rights foryour organization by contacting Healthmark at 800-521-6224 Ext. 6634 or email****************, 800-521-6224 Ext. 6722 or email **************** to set up the organization and the first admin/user.● Go to: https://. in the Login Panel, your login will always beyour email address and a default password of Temp-DL-TH123.●As an administrator, you can assign other Temp-DL-TH Dashboard users for yourcompany or user rights by clicking on the Users menu in the left menu panel on themain screen. This is where you will change your own password.●The administrator can change the password by clicking on Users in the left panel.●Click on the user’s email address and change the password and click update to save.Fig. 1Figure 1●If you change your password in Temp-DL-TH Dashboard, remember to change it inTemp-DL-TH NFC.Setup Temp-DL-TH Console ConnectionIf you are using Android NFC Smartphone or Tablet1. Tap on the Apps icon, tap on the Play Store app.2. At the top of the page where it says ‘Google Play’ on your Android NFC enabledsmartphone or tablet, type in “healthmark”.3. Scroll down the list of apps to ‘TEMP-DL-TH app and tap to download app onto thesmartphone or tablet.4. After the installation is complete, the TEMP-DL-TH app will appear on the phone ortablet screen.●Tap the Temp-DL-TH NFC logger with your smartphone or tablet to open up theApp. (Fig.1) Place your smartphone next to the datalogger.●Tap on the ⁝ icon (top right corner) to select the WiFi Settings menu. (Fig. 2.)●Tap on ⁝ icon and select settings i n the menu. (Fig. 3.)●Enter your Temp-DL-TH Dashboard login email address and password. (Fig. 4.)Figure 1 Figure 2Figure 3 Figure 4Using and reading a Temp-DL-TH NFC Temperature Data LoggerFigure 1 Figure 2Figure 3 Figure 4Figure 5 Figure 6 Reading a NFC Temperature Data Logger with a NFC Mobile Device1.Bring the mobile NFC device to the Temp-DL-TH NFC logger about 1” away. When Temp-DL-TH “Temp” start screen shows, move mobile device away an d bring back to mobile device. (Fig. 1)2. Make sure Temp-DL-TH NFC mobile App is setup with your Temp-DL-TH Dashboard login and preferences are set in the App Settings screen. (Fig. 2)3. If Auto PDF Report Download is not set, you will be prompted if you want to download the temperature PDF report to your mobile device. (Fig. 3)●Log onto .●In the measurement screen, click on the chart button.●In the strip chart screen, set the date and time range and click on the PDF button.●The PDF temperature report is instantly created.4. To view recording details, tap on the Recording Details button. (Fig. 4)5. To view the temperature chart, tap on the Temperature Graph button or see other functions. (Fig. 5)6. View temperature chart, download PDF report, or upload data to Temp-DL-TH Dashboard on the cloud. (Fig. 6)Figure 1 Figure 2Figure 3 Figure 4 Figure 5Figure 6Build Custom Profiles On Your Temp-DL-TH NFC Temperature Data Logger1. Bring Temp-DL-TH mobile NFC device to the Temp DL-TH NFC logger about 1” away, Temp-DL-TH “Temp” start screen shows, move the mobile device away and bring back to mobile device. (Fig.1)2. Tap the first wrench tool in the top status bar. (Fig. 2)3. Default Profile window will display. Tap on the symbol with the plus sign and circle around it in the top status bar to customize a profile. (Fig.3)4. Tap on the plus sign and circle around it in the top right corner. Give the profile a unique name. (Fig. 4)5. The custom profile screen will be blank. Tap on the symbol with the plus sign and circle around it above the pencil icon in the blue menu bar to add a field to the profile. (Fig. 5)6. Arrow back to Profile Manager and select Predefined Field and enter the attribute value such as text for description, integer value for temperature or search time limits, and Cancel or OK for check box. Or enter your own custom text field and data. (Fig. 6)7. Once all the fields are defined, tap on the Save icon to save the custom profile. (Fig.7)Figure 1 Figure 2 Figure 3Figure 4 Figure 5 Figure 6 Figure 7Rev. B。
- 1、下载文档前请自行甄别文档内容的完整性,平台不提供额外的编辑、内容补充、找答案等附加服务。
- 2、"仅部分预览"的文档,不可在线预览部分如存在完整性等问题,可反馈申请退款(可完整预览的文档不适用该条件!)。
- 3、如文档侵犯您的权益,请联系客服反馈,我们会尽快为您处理(人工客服工作时间:9:00-18:30)。
温湿度记录仪操作说明书
一、产品介绍
温湿度记录仪是一种用于测量和记录环境温度和湿度的设备。
它适
用于许多场所,包括仓库、实验室、办公室等,帮助用户监测和控制
环境条件,确保工作和生活环境的舒适和安全。
二、操作步骤
1. 开机与关机
步骤:长按电源按钮,待显示屏亮起后松开按钮即可开机。
再次
长按电源按钮,待显示屏关闭后即可关机。
2. 设置温湿度上限与下限
步骤:进入菜单界面,通过方向控制键选择“设置”选项。
然后,
进入“温湿度设置”子菜单,通过方向控制键分别设置温度和湿度的上、下限值。
完成设置后,按确认键保存。
3. 数据记录和导出
步骤:在主界面选择“记录”,然后进入“开始记录”选项,即可开
始温湿度的数据记录。
记录完成后,通过连接数据线将记录仪与电脑
连接。
在电脑上打开数据导出软件,即可将记录仪内的数据导出为Excel或其他格式。
4. 数据分析和报表生成
步骤:打开数据导出软件后,导入导出的数据文件。
利用软件提供的数据分析工具,可对温湿度数据进行统计、图表化分析。
点击“生成报表”按钮,可以生成详细的温湿度变化报表。
5. 温湿度校准
步骤:进入菜单界面,选择“设置”选项,然后进入“温湿度校准”子菜单。
根据实际测量值和已知标准值,进行校准调整。
详细的校准步骤,请参阅产品附带的校准手册。
6. 电池更换
步骤:当电池电量低于警示线时,屏幕将显示电池低电量提示。
此时应及时更换电池。
打开仪器背部的电池仓盖,将旧电池取出,并按照正确的极性方向装入新电池。
注意不要将电池弄湿。
7. 报警设置
步骤:进入菜单界面,选择“设置”选项,然后进入“报警设置”子菜单。
根据需要,设置温湿度超过上下限时的报警方式和报警值。
三、注意事项
1. 本设备仅限于测量和记录环境温度和湿度,不适用于其它用途。
2. 在使用本设备前,请仔细阅读说明书,并确保正确理解和掌握操作步骤。
3. 如需将记录仪连接到电脑,应使用产品附带的数据线,并在电脑端安装相应的导出软件。
4. 仪器在运输或长时间不使用时,应存放在干燥、通风、温度适宜的环境中。
5. 避免将仪器接触到液体或过高温度的环境,以免损坏设备。
6. 根据实际需求,合理设置仪器的温湿度上下限和报警值,以便及时掌握环境变化。
7. 请定期校准仪器,确保温湿度测量结果准确可靠。
四、维护保养
1. 定期清洁仪器表面,使用软布轻轻擦拭,避免使用有腐蚀性的溶剂。
2. 如遇仪器故障或异常,请及时联系售后服务中心进行维修或更换部件。
3. 请勿随意更换或拆卸仪器内部部件,以免影响正常使用。
以上即为温湿度记录仪的操作说明书。
如有其他疑问,请咨询售后服务中心。
祝您使用愉快!。