HiTool工具使用说明
MATATAKITOYO扭力扳手手册

MARTA TAKITOYO 扭力扳手Matatakitoyo提供具有竞争优势的产品,在全球范围的市场上,都极竞争力。
Matatakitoyo,公司一直在专业设计,制造扭力扳手。
从1992年以来,他们已经致力于研究、开发和生产的优质的扭力扳手产品,确保优良的质量。
MatatakitoyoG公司的产品,在日本和欧洲得到广泛的应用,同时,该公司的产品,提供OEM / ODM服务。
在未来的日子里,公司希望Matatakitoyo产品,能得到全世界客户的认可。
Matatakitoyo扭力扳手,将以优良的产品品质,稳定的产品质量,完美的售后服务体系,服务于广大的扭力扳手产品的用户。
一)调节式扭力扳手T-可调式扭力扳手详细说明:DTP-双向精密型扭力扳手详细说明:PR-双向快脱扭力扳手详细说明:MOT-视窗型扭力扳手详细说明:NTP-精密型扭力扳手详细说明:HPR-活头双向快脱扭力扳手详细说明:二)可换头式扭力扳手ATP-精密型可换头式扭力扳手详细说明:MIT-视窗型可换头式扭力扳手详细说明:IPR-可换头双向扭力扳手详细说明:一)二)三)数显式扭力扳手MEB-可换头双向数显扭力扳手详细说明:MET-双向数显扭力扳手详细说明:四)管钳式扭力扳手PIT-管钳式精密型扭力扳手详细说明:五)扭力起子(螺丝刀)MTD-扭力起子套装详细说明:MTD-调节式扭力起子详细说明:FTD-精密型固定值扭力起子详细说明:六)MT-倍力器详细说明:六)固定值扭力扳手LT-固定扭力扳手详细说明:APS-棘轮式固定扭力扳手详细说明:CPS-固定式扭力扳手详细说明:FPS-彩色固定扭力扳手详细说明:FPS-5/12P-汽车轮胎专用套装组详细说明:FPS-5/15P-汽车轮胎专用套装组详细说明:七)扭力扳手可用换头OH-72齿快脱棘轮换头详细说明:RH1418棘轮换头系列详细说明:C型扭力扳手换头详细说明:勾型扭力扳手换头详细说明:SET0912系列详细说明:SE1418系列详细说明:SE0912系列详细说明:SH1418系列详细说明:SH0912系列详细说明:扭力扳手套装组八)扭力扳手套装组MIT-200N11详细说明:MIT-100N12详细说明:MIT-60N12 详细说明:MIT-30N10 详细说明:MIT-15N11 详细说明:ATP-210N8C 详细说明:ATP-210N11 详细说明:ATP-110N12 详细说明:ATP-80N8详细说明:ATP-30N10详细说明:NTP-210N11详细说明:NTP-110N11详细说明:九)扭力测试仪扭力测试操作组合详细说明:1,显示器是必须的.2,根据所检验的扭力扳手,选择适合的传感器,有四款供选择.3,测试平台有两款可以选择,是整个测试过程中降低人为操作引起的误差的关键.LD-扭力测试平台详细说明:TSD-扭力数具传感器详细说明:MTS-电子式数具显示器详细说明:。
DL5x滴定仪快速入门手册
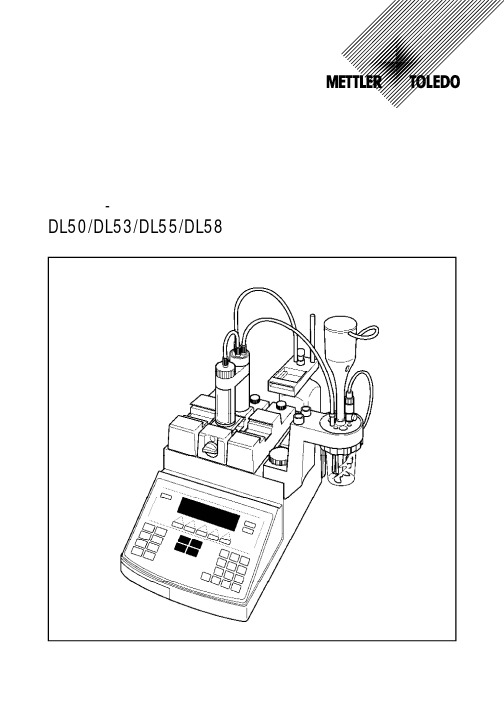
注 滴定仪在开头48小时内应保持通电状态以便内置电池(可充电电池)完全充电 该电池在滴定仪断 电时给内置时钟供电 如滴定仪停用4个月以上 电池必须重新充电并重新设定时间
7
3.1 操作原理
通电后 滴定仪先进行自检 然后显示滴定仪名称(以DL55为例) 显示(屏)
8. 测定溶液pH值 ............................................................................................... 36
9. 存 储 样 品 数 据 ............................................................................................... 37
7. 7.1 7.2 7.2.1 7.2.2 7.3
测定NaOH溶液的滴定度 ............................................................................... 31 滴定度 ...................................................................................................................... 31 准备 ......................................................................................................................... 31 修该某一标准法 ....................................................................................................... 31 滴定剂和基本标准.................................................................................................... 32 测定滴定度 .............................................................................................................. 33
FANUC_RobotR-30iA_控制装置HandingTool操作说明书.pdf

有关操作机器人时的详细功能,请用户通过说明书充分理解其规格。
如果说明书与本资料存在差异,应以本资料为准。 目录
前言
-------------------------------------------------------------------------------------------------------------------------------------- s-1
“操作者”不能在安全栅栏内进行作业。 “编程人员”、“维护技术人员”可以在安全栅栏内进行作业。 安全栅栏内的作业,包括搬运、设置、示教、调整、维护等。 要在安全栅栏内进行作业,必须接受过机器人的专业培训。
在进行机器人的操作、编程、维护时,操作者、编程人员、维护技术人员必须注意安全,至少应穿戴下列物品进行作业。
我公司备有各类培训课程。详情请向我公司的营业部门查询。 (2) 在设备运转之中,即使机器人看上去已经停止,也有可能是因为机器人在等待启动信号而处在即将动作的状态。即
使在这样的状态下,也应该视为机器人处在操作状态。为了确保作业人员的安全,应当能够以警报灯等的显示或者 响声等来切实告知(作业人员)机器人处在操作之中。 (3) 务须在系统的周围设置安全栅栏和安全门,使得如果不打开安全门,作业人员就不能够进入安全栅栏内。安全门上 应设置互锁开关、安全插销等,以使作业人员打开安全门时,机器人就会停下。
操作者
进行如下的作业。
• 接通/断开系统的电源
• 起动或停止程序
• 系统报警状态的恢复
操作者不得在安全栅栏内进行作业。
编程人员/示教人员
除了操作者的作业外,
• 还进行机器人的示教、外围设备的调试等安全栅栏内的作业。
上述人员必须接受针对机器人的专业培训。
旋转手工具数字显示88008888110066说明书

Rotary Tool withDigital Display8088106Owner’s ManualGeneral Safety RulesRead and understand all instructions. Failure to follow all instructions listed below, may result in electric shock, fire and/or serious personal injury. SA VE THESE INSTRUCTIONS.Work AreaKeep your work area clean and well lit. Cluttered benches and dark areas invite accidents. Do not operate power tools in explosive atmospheres, such as in the presence of flammable liquids, gases, or dust. Power tools create sparks which may ignite the dust or fumes. Keep bystanders, children, and visitors away while operating a power tool. Distractions can cause you to lose control.Electrical SafetyDo not abuse the cord. Never use the cord to carry the tool. Keep cord away from heat, oil, sharp edges, or moving parts. Replace damaged cords immediately. Damaged cords may create a fire. Power tool plugs must match the outlet. Never modify the plug in any way. Do not use any adapter plugs with grounded power tools. Use of unmodified plugs in matching outlets as intended will reduce the risk of electric shock.Personal SafetyStay alert, watch what you are doing, and use common sense when operating a power tool. Do not use tool while tired or under the influence of drugs, alcohol, or medication.A moment of inattention while operating power tools may result in serious personal injury. Dress properly. Do not wear loose clothing or jewellery. Contain long hair. Keep your hair, clothing and gloves away from moving parts. Loose clothes, jewellery, or long hair can be caught in moving parts. Avoid accidental starting. Be sure switch is in the locked or off position before plugging in. Carrying tools with your finger on the switch or plugging in a tool with the switch on invites accidents. Remove adjusting keys or wrenches before turning the tool on. A wrench or a key that is left attached to a rotating part of the tool may result in personal injury. Do not overreach. Keep proper footing and balance at all time. Proper footing and balance enables better control of the tool in unexpected situations. Use safety equipment. Always wear eye protection. Dust mask, non-skid safety shoes, hard hat, or hearing protection must be used for appropriate conditions.Tool Use and CareUse clamps or other practical way to secure and support the workpiece to a stable platform. Holding the work by hand or against your body is unstable and may lead to loss of control. Do not force tool. Use the correct tool for your application. The correct tool will do the job better and safer at the rate for which it is designed. Do not use tool if switch does not turn it on or off. A tool that cannot be controlled with the switch is dangerous and must be repaired.Unplug the tool or place the switch in the locked or off position before making any adjustments, changing accessories, or storing the tool. Such preventive safety measures reduce the risk of starting the tool accidentally. Store idle tools out of reach of children and other untrained persons. Tools are dangerous in the hands of untrained users. Check for misalignment or binding of moving parts, breakage of parts, and any other condition that may affect the tool’s operation. If damaged, have the tool serviced before using. Many accidents are caused by poorly maintained tools. Use only accessories that are recommended by the manufacturer for your model. Accessories that may be suitable for one tool may create a risk of injury when used on another tool.ServiceTool service must be performed only by qualified repair personnel. Service or maintenance performed by unqualified personnel may result in a risk of injury. When servicing a tool, use only identical replacement parts. Additional Safety Precautions• Check that the rated speed of the accessories is equal to or greater than the rated speed of the grinder (30,000 RPM).• Handle and store grinding accessories with care.• Inspect tool and accessories before operation. Do not use chipped, cracked or otherwise defective products.• Ensure that mounted wheels and points are fitted according to manufacturer’s instructions before operation.• After mounting an accessory properly, turn on the tool and run it idle for 30 seconds in a safe position. Stop immediately if there is considerable vibration or if other defects are detected. Unplug and check the machine to determine the cause.• Do not use separate reducing bushings or adapters to adapt large hole abrasive wheels.• Ensure the work piece is properly supported.• Do not use cut-off wheels for side grinding.• Ensure that sparks resulting from use do not create a hazard. For example, that they do not hit surrounding persons, or ignite flammable substances.• Ensure that the vent is free of dust during operation. Unplug tool before cleaning dust from the vent. To avoid damaging the inner components, do not clean the tool with metal materials.• Always wear necessary safety equipment such as eye protection, hearing protection and gloves.• Note that the work head may continue rotating after the tool is turned off.• WARNING! On the upper side of the tool there is a shaft-lock button. Do NOT press the shaft-lock button while the tool is running.• WARNING! Do not use a grinding or cutting accessory with a diameter larger than 1"(25 mm). Excessive workload can seriously damage tool, leading to overheating or fire,or causing grinding accessory to fly apart.Tool FunctionThe rotary tool is suitable for a variety of functions. Some examples include:OperationWARNING! Unplug the rotary tool before installation!Cut-off Wheel Assembly1. Loosen the screw at the top of the mandrel in a counter clockwise direction.2. Put the cutting wheel on the mandrel.3. Firmly tighten the screw in a clock wise direction.Sanding Roller Assembly1. Loosen the screw of the sanding band.2. Slide the sanding roller on.3. Tighten the screw in a clockwise direction.Polishing Pad Assembly1. Using the screw thread on top of the polishing pad shaft, screw theshaft into the hole in the polishing pad.D e b u r r mm e t a lOn/Off SwitchWARNING! Inspect the grinder’s work heads and points before use to ensure that they are fitted correctly. Do not use chipped, cracked or otherwise defective products.1. Plug in the tool and turn the on/off switch to on for operation.2. Run the tool at low speed for 30 seconds to check if the accessory work-head is in safe and good condition.3. Increase the speed, and make sure the work-head runs smoothly. If strong vibration is found, the shaft of your tool is likely damaged. DO NOT use the tool in such cases.4. Select the right speed for each job. Vary speed to find the best speed for the accessory you are using and the job to be done.WARNING! Keep your hand away from the running accessory.• Always wear eye protection to operate the rotary tool. Wear dust mask or respirator in dusty conditions.• Check the work area before operation. Beware of potential hazards while operating. Make sure you will not fall down should an accident occur.• Do not grasp the tool with the vent hole covered.• Draw lines with a pencil to mark where you want to cut or polish• When changing accessories, the work-head can be taken out easily from the collet after you loose the collet nut.Speed ControlThis tool is designed with variable speed control ranging from 8,000 to 30,000 RPM. The RPM displayed on the LCD screen is the free speed (no-load) to the nearest 1,000 RPM only. While under load, the RPM will drop, depending on the load being applied. This change in RPM will not be reflected on the display.Set the speed control dial to fit the job. To achieve the best results, when working with different materials the speed of the tool should be regulated. To select the right speed for each job, use a practice piece of material. Vary speed to find the best speed for the accessory you are using and the job to be done.• Select low speed when operating on plastic materials, otherwise the frictionheat may damage the material.• Select low operation speeds when using wire brush accessory.• Hard woods, metals and glass require high speed operation.• Drilling should also be done at high speeds.The work speed is determined not only by the accessory in use but also by the work-piece material. The perfect speed can be found by practice on the odd side or scrap material.MaintenanceWARNING! Unplug the tool after operation, before maintenance and when changing the accessories.WARNING! When changing accessory after finishing a job, do not touch the work head, collet or collet nut, as they will be hot. Always use a wrench. Always use genuine manufacturer replacement parts.• Maintain your tool with care. Keep the cutting tools sharp and clean for better and safer performance.• To change accessories, loosen the collet nut by rotating it counter clockwise with a wrench, and tighten it by rotating clockwise.• The carbon brushes should be inspected frequently. When any one or both are worn down by about 1/3, replace both brushes. Use a screwdriver to loosen the screws, replace the old brushes with a pair of new ones and fix the screws again.• Inspect the power cable of the tool periodically, and have it repaired by an authorized technician if damaged.• When safety fittings or other parts are damaged, have the tool repaired or replaced by a recognized service person.。
HiTool工具使用说明

修订说明 第 1 次临时版本发布。
文档版本 00B01 (2014-12-20)
海思专有和保密信息 版权所有 © 深圳市海思半导体有限公司
i
HiTool 工具使用说明
目录
目录
前 言...................................................................................................................................................i 1 准备环境..........................................................................................................................................1 2 准备烧写文件.................................................................................................................................. 3 3 按分区烧写......................................................................................................................................4
邮编:518129
HiTool 工具使用说明
前言
初稿,仅供 参 考 !
前言
概述
本文档主要介绍 HiTool 烧写工具的使用方法,适用于一键烧写所有程序镜像到单板 flash 上的场景、单板已有 bootrom 可按地址烧写其他程序镜像到单板 flash 上的场景以 及在空板上只烧写 boot 到单板 flash 上的场景。
中海达操作规程(hi-rtk手簿软件说明书)
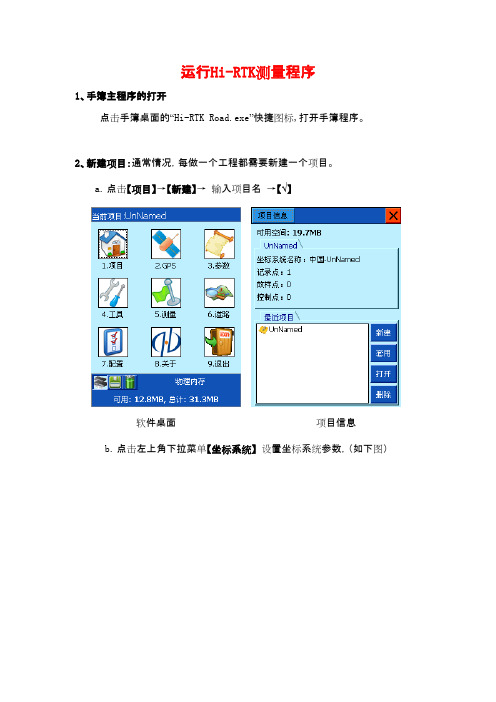
碎部测量主界面
放大比例尺
缩小比例尺
当前位置居中 全图
配置
间接测量
打开自动记录
关闭自动记录
平滑采集
手动记录点 碎部点库 坐标栏显示经纬度
坐标栏显示直角坐标 解状态类型分为:
:表示单点定位 Fix:表示固定坐标(基准站) Int:表示 RTK固定解 Float:表示 RTK浮动解 RTD:表示伪距差分模式 WAAS:表示WAAS星站差分模式 None: 表示没有GPS数据 ukonwn:表示未知数据类型
点名,编码,Y,X,H P1,Y1,X1, H1 … n,Pn,Yn, Xn, Hn ◆ AUTOCAD(*.dxf) 详细格式请参照Auto CAD帮助文档。
8
放样点库
Hi-RTK手簿软件说明书(GIS+手簿)
保存了所需要放样点的坐标数据,包括:点名,X,Y,H,并对点库中的点进行 ,添加、编辑、过滤、删除、导出、新建、打开点库、等操作。
5
1.参数计算
Hi-RTK手簿软件说明书(GIS+手簿)
用于计算两个坐标系统之间的转换关系,包括“四参数+高程拟合”、“七参 数”、“一步法”、“三参数”。
拖动滚动条,右边 会显示每个点的残 差值
计算参数
添加点
选择参数“计算类型”,如果使用“转换参数+高程拟合”请选择“高程拟合模型”。
【添点】:添加点的源坐标和目标坐标,源坐标可手工输入或从GPS、点库、图上获取
Hi-RTK手簿软件说明书(GIS+手簿)
椭球
投影
“坐标系”: 选择国家,输入坐标系统名称,格式为“国家--
xxxx”,源椭球一般为WGS84,目标椭球和已知点一致,如果目标坐标为自定义坐标系,则可以 不更改此项选择,设置为默认值:“北京-54”。 “投影”: 选择投影方法,输入投影参数。(中国用户投影方法,一般选择“高斯自
uCLinux开发介绍

uCLinux开发介绍严永红Linux是当前一种非常受欢迎的操作系统,它与UNIX系统兼容,并开放源代码。
它包含所有现代操作系统所具有的一切特性,包括多任务,虚拟内存,代码共享,按需载入,内存管理,以及TCP/IP网络。
并且,它遵循POSIX标准,只要是遵循POSIX API的应用程序很容易被移植。
目前,随着嵌入式系统的蓬勃发展。
Linux也已对嵌入式系统的开发产生具大影响。
大多数流行的CPU都被移植上去,ARM, PowerPC , MIPS, 68K, SPARC, Alpha, SH 等等. 这些CPU都含有一种叫做内存管理单元(MMU)的硬件,来支持标准Linux所需要的虚拟内存。
但在嵌入式世界里,还有很多CPU是没有MMU的,象ARM7、68328等等。
uClinux 正是为了解决这种没有MMU的CPU而产生的。
在uCLinux这个英文单词中,u表示Micro,小的意思,C表示Control,控制的意思,连起来就是Micro-Control-Linux, ―运行在微控制器上的Linux.‖针对这种没有MMU的CPU架构,uCLinux采用了一种平板式(Flat)的内存模型来去除对MMU的依赖, 并且改变了用户程序的加载方式,开发了运用于uCLinux的C函数库--uCLibc. 由于这些变化,一般的Linux开发工具(例如GDB)在开发uCLinux时会碰到一些困难,包括内核的移植,驱动程序及应用程序的调试。
针对这样状况。
Hitool System公司开发了Hitool for uClinux开发套件,来帮助用户开发基于uClinux的系统。
Hitool for uClinux与其它的Linux开发工具相比,有几个优点:A.整个开发过程只在Windows环境下完成,包括内核的配臵、编译,应用程序的编译,文件系统的生成,内核的调试,用户程序的调试。
B.可以采用多种调试方式,既可以采用JTAG方式来调试,也可通过网口用Hitool自己的监控程序(MDB)来调试。
hitool使用方法

hitool使用方法hitool是一款功能强大的数据分析工具,可以用于数据的清洗、转换、计算和可视化。
以下是hitool的使用方法:1. 安装hitoolhitool可以通过pip安装,打开终端输入以下命令即可安装: pip install hitool2. 导入hitool在Python中导入hitool:import hitool3. 导入数据使用hitool读取数据文件:data = hitool.read_csv('filename.csv') # 读取csv文件4. 数据清洗使用hitool清洗数据,如去除空值、重复值等:data = hitool.drop_na(data) # 去除空值data = hitool.drop_duplicates(data) # 去除重复值5. 数据转换使用hitool进行数据转换,如数据类型转换、数据列合并等: data = hitool.convert(data, {'col1': 'int', 'col2':'float'}) # 数据类型转换data = hitool.merge(data1, data2, on='col') # 数据列合并 6. 数据计算使用hitool进行数据计算,如求平均值、最大值等:mean = hitool.mean(data['col']) # 求平均值max = hitool.max(data['col']) # 求最大值7. 数据可视化使用hitool进行数据可视化,如绘制直方图、散点图等:hitool.hist(data['col']) # 绘制直方图hitool.scatter(data['x'], data['y']) # 绘制散点图以上就是hitool的基本使用方法,它可以大大简化数据分析的流程,让数据分析工作更加高效和准确。
- 1、下载文档前请自行甄别文档内容的完整性,平台不提供额外的编辑、内容补充、找答案等附加服务。
- 2、"仅部分预览"的文档,不可在线预览部分如存在完整性等问题,可反馈申请退款(可完整预览的文档不适用该条件!)。
- 3、如文档侵犯您的权益,请联系客服反馈,我们会尽快为您处理(人工客服工作时间:9:00-18:30)。
5 BOOT 烧写....................................................................................................................................17
5.1 适用场景....................................................................................................................................................... 17 5.2 烧写步骤....................................................................................................................................................... 17
初稿,仅供 参 考 !
HiTool 工具使用说明
文档版本 发布日期
00B01 2014-12-20
版权所有 © 深圳市海思半导体有限公司 2014。保留一切权利。
非经本公司书面许可,任何单位和个人不得擅自摘抄、复制本文档内容的部分或全部,并不得以任何 形式传播。
商标声明
、
、海思和其他海思商标均为深圳市海思半导体有限公司的商标。
4 按地址烧写....................................................................................................................................12
4.1 适用场景....................................................................................................................................................... 12 4.2 烧写步骤....................................................................................................................................................... 12
初稿,仅供 参 考 !
深圳市海思半导体有限公司
地址: 网址: 客户服务电话: 客户服务传真: 客户服务邮箱:
深圳市龙岗区坂田华为基地华为电气生产中心 +86-755-28788858 +86-755-28357515 support@
本文档提及的其他所有商标或注册商标,由各自的所有人拥有。
注意
您购买的产品、服务或特性等应受海思公司商业合同和条款的约束,本文档中描述的全部或部分产 品、服务或特性可能不在您的购买或使用范围之内。除非合同另有约定,海思公司对本文档内容不做 任何明示或默示的声明或保证。
由于产品版本升级或其他原因,本文档内容会不定期进行更新。除非另有约定,本文档仅作为使用指 导,本文档中的所有陈述、信息和建议不构成任何明示或暗示的担保。
修订说明 第 1 次临时版本发布。
文档版本 00B01 (2014-12-20)
海思专有和保密信息 版权所有 © 深圳市海思半导体有限公司
i
HiTool 工具使用说明
目录
目录
前 言...................................................................................................................................................i 1 准备环境..........................................................................................................................................1 2 准备烧写文件.................................................................................................................................. 3 3 按分区烧写......................................................................................................................................4
邮编:518129
HiTool 工具使用说明
前言
初稿,仅供 参 考 !
前言
概述
本文档主要介绍 HiTool 烧写工具的使用方法,适用于一键烧写所有程序镜像到单板 flash 上的场景、单板已有 bootrom 可按地址烧写其他程序镜像到单板 flash 上的场景以 及在空板上只烧写 boot 到单板 flash 上的场景。
产品版本
与本文档相对应的产品版本如下。
产品名称 Hi3536
产品版本 V100
读者象
本文档(本指南)主要适用于以下工程师: z 技术支持工程师 z 单板软件开发工程师
修订记录
修订记录累积了每次文档更新的说明。最新版本的文档包含以前所有文档版本的更新 内容。
修订日期 2014-12-20
版本 00B01