Linksys WPS54G打印服务器教程说明书 USB打印机共享服务器
LINKSYS WPSM54G 说明书

USER GUIDE Wireless-G PrintServerModel: WPSM54GCopyright © 2008 Cisco Systems, Inc. All rights reserved. Other brands and product names are trademarks or registered trademarks of their respective holders.Chapter 1: Product Overview 2 Front Panel. . . . . . . . . . . . . . . . . . . . . . . . . . . . . . . . . . . . . . . . . . . . . . . . . . 2 Back Panel . . . . . . . . . . . . . . . . . . . . . . . . . . . . . . . . . . . . . . . . . . . . . . . . . . 2 Chapter 2: How to Use the PrintServer 3 How to Access the PrintServer Utility . . . . . . . . . . . . . . . . . . . . . . . . . . . . . . . . . 3 About the Print Server Information Screen . . . . . . . . . . . . . . . . . . . . . . . . . . . . . 4 Chapter 3: Advanced Configuration 6 How to Access the Web-Based Utility . . . . . . . . . . . . . . . . . . . . . . . . . . . . . . . . . 6 The Setup Tab. . . . . . . . . . . . . . . . . . . . . . . . . . . . . . . . . . . . . . . . . . . . . . . . 6 The Protocol Tab > TCP/IP . . . . . . . . . . . . . . . . . . . . . . . . . . . . . . . . . . . . . . . . 6 The Protocol Tab > SNMP. . . . . . . . . . . . . . . . . . . . . . . . . . . . . . . . . . . . . . . . . 7 The Wireless Tab > Basic . . . . . . . . . . . . . . . . . . . . . . . . . . . . . . . . . . . . . . . . . 8 The Wireless Tab > Security. . . . . . . . . . . . . . . . . . . . . . . . . . . . . . . . . . . . . . . 8 The Printer Tab > Scan . . . . . . . . . . . . . . . . . . . . . . . . . . . . . . . . . . . . . . . . . . 9 The Printer Tab > Internet Printing. . . . . . . . . . . . . . . . . . . . . . . . . . . . . . . . . . .10 The Printer Tab > Logical Port. . . . . . . . . . . . . . . . . . . . . . . . . . . . . . . . . . . . . .10 The Status Tab > Device . . . . . . . . . . . . . . . . . . . . . . . . . . . . . . . . . . . . . . . . .11 The Status Tab > Printer . . . . . . . . . . . . . . . . . . . . . . . . . . . . . . . . . . . . . . . . .11 The Status Tab > Wireless. . . . . . . . . . . . . . . . . . . . . . . . . . . . . . . . . . . . . . . . .12 The Exit Tab . . . . . . . . . . . . . . . . . . . . . . . . . . . . . . . . . . . . . . . . . . . . . . . . .12 Appendix A: Troubleshooting 13 Appendix B: Specifications 15 Appendix C: Warranty Information 16 Limited Warranty. . . . . . . . . . . . . . . . . . . . . . . . . . . . . . . . . . . . . . . . . . . . . .16 Appendix D: Regulatory Information 18 FCC Statement . . . . . . . . . . . . . . . . . . . . . . . . . . . . . . . . . . . . . . . . . . . . . . .18 FCC Radiation Exposure Statement . . . . . . . . . . . . . . . . . . . . . . . . . . . . . . . . . .18 Safety Notices. . . . . . . . . . . . . . . . . . . . . . . . . . . . . . . . . . . . . . . . . . . . . . . .18 Industry Canada Statement . . . . . . . . . . . . . . . . . . . . . . . . . . . . . . . . . . . . . . .18 Avis d’Industrie Canada. . . . . . . . . . . . . . . . . . . . . . . . . . . . . . . . . . . . . . . . . .19 Wireless Disclaimer . . . . . . . . . . . . . . . . . . . . . . . . . . . . . . . . . . . . . . . . . . . .19 Avis de non-responsabilité concernant les appareils sans fil . . . . . . . . . . . . . . . . . .19 User Information for Consumer Products Covered by EU Directive 2002/96/EC on Waste Electric and Electronic Equipment (WEEE). . . . . . . . . . . . . . . . . . . . . . . . . . . . . .20 Appendix E: Software License Agreement 24 Software in Linksys Products . . . . . . . . . . . . . . . . . . . . . . . . . . . . . . . . . . . . . .24 Software Licenses . . . . . . . . . . . . . . . . . . . . . . . . . . . . . . . . . . . . . . . . . . . . .24EthernetPrintServer to your wired network for setup. USBthe USB printer.PrintServer Utility. Refer to the following section, “About the PrintServer Information Screen”, for details.Computer To run the wizard that sets up the driver, click Setup Computer. Refer to the Quick Installation for details.PrintServer To run the wizard that sets up thePrint Server InformationConnected DisconnectedConfigurationRegulatory Domain and MAC Address The PrintServer’s Domain and MAC Address are listed and cannot be changed.Enter the name of your wireless network. This is the unique name shared by all devices in a wireless network.is case-sensitive and should have 32 or fewerPrinter > Internet PrintingMail ServerMail Server IP Address Enter the IP address of your mail server. (This value must be a fixed IP address.)Account Name and Password Enter the Account Name and Account Password.Verify Password Enter the Account Password again.Mail every Specify how often you want the PrintServer to check for e-mail to be printed.Redirect unprintable Mail to Specify an e-mail address sided copies, and Logical Printer 3 for manual feed. Then configure the Logical Printers on the Logical Port tab, so Logical Printers 1, 2, and 3 will be mapped to the physical printer on the PrintServer’s USB port.LogicalPrinter 3 for manual feed. Map Logical Printers 1, 2, and 3 to the physical printer on the PrintServer’s USB port. Select PrinterConvert LF to CR+LF Select this option if you want LF (line feed) characters changed to CR+LF (carriage return + line feed) characters.Click the Save button to apply your changes, or click the Cancel button to cancel your changes.Status > Device - Server DetailsA firmware upgrade can only be performed when the PrintServer is connected to the network using its Ethernet port. If you want to upgrade the PrintServer’s firmware, follow these instructions:Go to the Linksys website at .Support and then Download. Find your product’s name and download the latest firmware for the PrintServer.Extract the firmware file on your PC.Unplug the power from the PrintServer.Connect an Ethernet network cable to the Ethernet port of the PrintServer. Connect the other end of the On the login screen, enter7. admin in the User Namefield. Then enter the password in the Password field.Click the OK button.Click the8. Status tab.2.3.Clickthis screen.The Status Tab > PrinterTheprinter. No values can be changed on this screen. Click the RefreshClick the Refresh button to update the information on this screen.address of the associated wireless router or point, channel setting, and transmission rate are displayed here.ThroughputThe transmission and reception throughput, link quality, and signal strength are displayed here.This problem may also occur if you assigned a static IP address within the range used by the DHCP server. If so, use another IP address NOT within the range used by the DHCP server.Click the10. Upgrade button, and follow the on-screeninstructions.that the product, software or any equipment, system or network on which the product or software is used will be free of vulnerability to intrusion or attack. The product may include or be bundled with third party software or properly packaging and shipping your product to Linksys at your cost and risk. You must include the RMA number and a copy of your dated proof of original purchase when returning your product. Products received without a RMA number and dated proof of original purchase will beCollection and Processing of Information. You agree that Linksys and/or its affiliates may, from time to time, collect and process information about your Linksys product and/ or the Software and/or your use of either in order (i) to enable Linksys to offer you Upgrades; (ii) to ensure thatDisclaimer of Liabilities. IN NO EVENT WILL LINKSYS OR ITS SUPPLIERS BE LIABLE FOR ANY LOST DATA, REVENUE OR PROFIT, OR FOR SPECIAL, INDIRECT, CONSEQUENTIAL, INCIDENTAL OR PUNITIVE DAMAGES, REGARDLESS OF CAUSE (INCLUDING NEGLIGENCE), ARISING OUT OF PreambleThe licenses for most software are designed to take away your freedom to share and change it. By contrast, thedistributed under the terms of Sections 1 and 2 above on a medium customarily used for software interchange; or, restrictions on the recipients’ exercise of the rights granted herein. You are not responsible for enforcing compliance by third parties to this License.If the Program specifies a version number of this License which applies to it and “any later version”, you have the option of following the terms and conditions either of that version or of any later version published by the Free Software Foundation. If the Program does below in this Schedule 3 are from the public web site atthey know their rights.We protect your rights with a two-step method: (1) we copyright the library, and (2) we offer you this license, which gives you legal permission to copy, distribute and/ or modify the library.more people to use the whole GNU operating system, as well as its variant, the GNU/Linux operating system. Although the Lesser General Public License is Less protective of the users’ freedom, it does ensure that the user of a program that is linked with the Library has thework based on the Library, the distribution of the whole must be on the terms of this License, whose permissions for other licensees extend to the entire whole, and thus to each and every part regardless of who wrote it.of the Library (because it contains portions of the Library), rather than a “work that uses the library”. The executable is therefore covered by this License. Section 6 states terms for distribution of such executables.Give prominent notice with the combined library of b)the fact that part of it is a work based on the Library, and explaining where to find the accompanying uncombined form of the same work.to contest validity of any such claims; this section has the sole purpose of protecting the integrity of the free software distribution system which is implemented by public license practices. Many people have made generous contributions to the wide range ofthe conditions of the OpenSSL License and the original SSLeay license apply to the toolkit. See below for the actual license texts. Actually both licenses are BSD-style Open Source licenses. In case of any license issues related **********************************************.Eric Young (*****************).This product includes softwarewrittenbyTimHudson(*****************).ANY EXPRESS OR IMPLIED WARRANTIES, INCLUDING, BUT NOT LIMITED TO, THE IMPLIED WARRANTIES OF MERCHANTABILITY AND FITNESS FOR A PARTICULAR PURPOSE ARE DISCLAIMED. IN NO EVENT SHALL THE AUTHOR OR CONTRIBUTORS BE LIABLE FOR ANY8112010B-AI。
LINKSYS WUSB54G 说明书
USER GUIDE Wireless-G USB Network AdapterModel: WUSB54Gof their respective holders.Chapter 1: Product Overview 1 LEDs. . . . . . . . . . . . . . . . . . . . . . . . . . . . . . . . . . . . . . . . . . . . . . . . . . . . . . 1 Chapter 2: Wireless Security Checklist 2 General Network Security Guidelines. . . . . . . . . . . . . . . . . . . . . . . . . . . . . . . . . 2 Additional Security Tips . . . . . . . . . . . . . . . . . . . . . . . . . . . . . . . . . . . . . . . . . 2 Chapter 3: Configuration 3 Accessing the Wireless Network Monitor. . . . . . . . . . . . . . . . . . . . . . . . . . . . . . . 3 Using the Wireless Network Monitor . . . . . . . . . . . . . . . . . . . . . . . . . . . . . . . . . 3 Link Information . . . . . . . . . . . . . . . . . . . . . . . . . . . . . . . . . . . . . . . . . . . . . . 3 Site Survey. . . . . . . . . . . . . . . . . . . . . . . . . . . . . . . . . . . . . . . . . . . . . . . . . . 5 Profiles . . . . . . . . . . . . . . . . . . . . . . . . . . . . . . . . . . . . . . . . . . . . . . . . . . . . 6 Appendix A: Troubleshooting 16 Appendix B: Specifications 17 Appendix C: Warranty Information 18 Limited Warranty. . . . . . . . . . . . . . . . . . . . . . . . . . . . . . . . . . . . . . . . . . . . . .18 Appendix D: Regulatory Information 20 FCC Statement . . . . . . . . . . . . . . . . . . . . . . . . . . . . . . . . . . . . . . . . . . . . . . .20 FCC Radiation Exposure Statement . . . . . . . . . . . . . . . . . . . . . . . . . . . . . . . . . .20 Safety Notices. . . . . . . . . . . . . . . . . . . . . . . . . . . . . . . . . . . . . . . . . . . . . . . .20 Industry Canada Statement . . . . . . . . . . . . . . . . . . . . . . . . . . . . . . . . . . . . . . .21 Règlement d’Industry Canada . . . . . . . . . . . . . . . . . . . . . . . . . . . . . . . . . . . . .21 Wireless Disclaimer . . . . . . . . . . . . . . . . . . . . . . . . . . . . . . . . . . . . . . . . . . . .21 Avis de non-responsabilité concernant les appareils sans fil . . . . . . . . . . . . . . . . . .21 User Information for Consumer Products Covered by EU Directive 2002/96/EC on WasteElectric and Electronic Equipment (WEEE). . . . . . . . . . . . . . . . . . . . . . . . . . . . . .22 Appendix E: Software License Agreement 26 Software in Linksys Products . . . . . . . . . . . . . . . . . . . . . . . . . . . . . . . . . . . . . .26 Software Licenses . . . . . . . . . . . . . . . . . . . . . . . . . . . . . . . . . . . . . . . . . . . . .261.filtering enabled, wireless network access is provided solely for wireless devices with specific MAC addresses. For example, you can specify the MAC address of each computer in your home so that only those computers can access your wireless network.Link InformationSubnet Mask This is the Adapter’s Subnet Mask.Default Gateway This is the Default Gateway address.DNS This is the DNS address of the Adapter.Adapter, in real time, since connecting to the wireless network or since the Refresh Statistics button was last pressed.Where can I find the Button?This will walk you through a couple of screens to help you find the button, which is usually located on the front of the wireless router or access point.If you’ve clicked the button by accident or do not wish to use SecureEasySetup, you can click Back to return to the previous screen.Cisco logo or SecureEasySetup button on wireless router or access point. When it turns white begins to flash, click the Next button on the Setupscreen. The logo or button will stop flashing on the wireless router or access point when the Adapter has been in the table on the left. The table shows each network’s SSID, Channel, and the quality of the wireless signal the Adapter is receiving. You may click SSID, CH (Channel), or Signal, to sort by that field.listed:SSID This is the SSID or unique name of the Wireless Network.ProfilesThis is the name of the profile.is the SSID or unique name of the wirelessProfile Information Thisof buttons. Before you press any buttons, though, youshould locate the SecureEasySetup button on the deviceyou’re connecting the Adapter to, such as a wireless routeror access point.for any additional SecureEasySetup device.NOTE: You can only add one SecureEasySetupdevice at a time.WPA PersonalWPA Personal offers two encryption methods, TKIP and AES, with dynamic encryption keys. Select TKIP or AES for encryption. Then enter a Passphrase that is 8-63 charactersin length.channel set on the other devices in your wireless network. If you are unsure about which channel to use, keep thedefault setting.WPA PersonalWPA Personal offers two encryption methods, TKIP and AES, with dynamic encryption keys. Select TKIP or AES forPSK2Passphrase Enter a Passphrase of 8-63 characters in the Passphrase field.Advanced WIreless Settingsin the Server Name field (this is optional).CCX2.0 Cisco Compatible Extensions, a Cisco wirelessnetwork protocol. Select Enabled from the drop-downmenu to use the function. Select Disabled to disable tofunction.Congratulations!that the product, software or any equipment, system or network on which the product or software is used will be free of vulnerability to intrusion or attack. The product may include or be bundled with third party software or at your cost and risk. You must include the RMA number and a copy of your dated proof of original purchase when returning your product. Products received without a RMA number and dated proof of original purchase will beused in typical laptop computer(s) with USB slot. Other applications like handheld PC or similar device have not been verified and may not be in compliance with relatedRF exposure rule and such use shall be prohibited.Collection and Processing of Information. You agree that Linksys and/or its affiliates may, from time to time, collect and process information about your Linksys product and/ or the Software and/or your use of either in order (i) toenable Linksys to offer you Upgrades; (ii) to ensure thatDisclaimer of Liabilities. IN NO EVENT WILL LINKSYS OR ITS SUPPLIERS BE LIABLE FOR ANY LOST DATA, REVENUE OR PROFIT, OR FOR SPECIAL, INDIRECT, CONSEQUENTIAL, INCIDENTAL OR PUNITIVE DAMAGES, REGARDLESS OF CAUSE (INCLUDING NEGLIGENCE), ARISING OUT OF PreambleThe licenses for most software are designed to take away your freedom to share and change it. By contrast, thedistributed under the terms of Sections 1 and 2 above on a medium customarily used for software interchange; or, restrictions on the recipients’ exercise of the rights granted herein. You are not responsible for enforcing compliance by third parties to this License.If the Program specifies a version number of this License which applies to it and “any later version”, you have the option of following the terms and conditions either of that version or of any later version published by the Free Software Foundation. If the Program does below in this Schedule 3 are from the public web site atthey know their rights.We protect your rights with a two-step method: (1) we copyright the library, and (2) we offer you this license, which gives you legal permission to copy, distribute and/ or modify the library.more people to use the whole GNU operating system, as well as its variant, the GNU/Linux operating system. Although the Lesser General Public License is Less protective of the users’ freedom, it does ensure that the user of a program that is linked with the Library has thework based on the Library, the distribution of the whole must be on the terms of this License, whose permissions for other licensees extend to the entire whole, and thus to each and every part regardlessof who wrote it.of the Library (because it contains portions of the Library), rather than a “work that uses the library”. The executable is therefore covered by this License. Section6 states terms for distribution of such executables.the fact that part of it is a work based on the Library, and explaining where to find the accompanying uncombined form of the same work.to contest validity of any such claims; this section has the sole purpose of protecting the integrity of the free software distribution system which is implemented by public license practices. Many people have made generous contributions to the wide range ofthe conditions of the OpenSSL License and the original SSLeay license apply to the toolkit. See below for the actual license texts. Actually both licenses are BSD-style Open Source licenses. In case of any license issues related**********************************************.Eric Young (*****************).This product includes softwarewrittenbyTimHudson(*****************).ANY EXPRESS OR IMPLIED WARRANTIES, INCLUDING, BUT NOT LIMITED TO, THE IMPLIED WARRANTIES OF MERCHANTABILITY AND FITNESS FOR A PARTICULAR PURPOSE ARE DISCLAIMED. IN NO EVENT SHALL THE AUTHOR OR CONTRIBUTORS BE LIABLE FOR ANY8112420B-ST。
WPS54G 7

LINKSYS WPS54G 为无线网络打印服务器。
如果你需要无线打印设备请先断开有线连接再插电源。
这时无线打印服务启用。
当需要使用有线打印或者配置WPS54G时请先插上有线然后再通电,这时无线不启用。
1-1 :配置WPS54G 时。
需要把有线网卡指定到WPS54G 的同一个段上。
像下面图片这样。
然后点确定。
现在WPS54G 默认网关为192.168.1.60 所以我指定到192.168.1.22 这样就可以进入配置他。
1-2:然后在IE 浏览器输入192.168.1.60 回车后,可以看到下面的图:1-3 :SETUP 界面不用配置。
现在点PROTOCOL 会出现下面图,这里可以更改WPS54G 的网关,但是一定要选择use the following address 选项不然会很麻烦。
如果你的路由是192.168.1.1 这个段上就不用更改。
如果是其他段。
如:192.168.0.1 这个段上则需要把WPS54G 网段改为:192.168.0.60 Gateway 可以不填也可以改为路由的网关。
改完后记得点下面的SA VE 保存。
如果你修改了WPS54G 的段。
前面的1-1连接他网卡配置也需要重新更改为和WPS54G 相同段才可以重新对他配置。
配置完好记得点SA VE 保存。
1-4:点WIRELESS 配置无线, 出现下面界面,SSID 默认是为LINKSYS ,如果是其他路由器。
需要改为和路由无线SSID 相同的名字,输入时注意大小写。
错了不能连接上。
其他不用管。
记得点SA VE 保存。
1-5:如果是加密网络请看下图:点Security 例如:为WEP 64bit加密模式:在KEY1 输入对应的密码就可以了。
记得点SA VE 保存。
1-6:上面配置完成后。
拔掉有线端口和电源。
然后把打印机USB口插入WPS54G。
通电。
等WPS54G 无线灯亮起后USB灯亮起后。
说明他已经接入你的无线路由网络。
打印服务器&网络打印机安装教程

1.网口打印机连接设置
图:打印机自检页示例
1.网口打印机连接设置
1. 可更改电脑IP地址为192.168.123.99,使之与打印机IP 处于同一网络中
1.网口打印机连接设置
1. 连接后可通过ping打印机IP地址测试打印机与局域网 是否连通
2. 运行网口打印机自带IP地址设定工具,更改网口打印机 IP地址为客户工作环境中的IP,此工具一般在打印机 驱动光盘自带,也可从打印机官网下载;
注:设定IP地址时,IP地址不可与局域网中的其它IP地址相同
1.网口打印机连接设置
1. 再次更改本机IP地址为局域网中的原地址 2. 按照下节内容“网口打印机驱动安装“开始安装打印机
驱动程序
注:以上步骤也可按照一般打印机驱动安装方法安装 打印机驱动,有些网口打印机驱动安装过程可以为打 印机指定一个IP端口连接地址,安装完成后,可再次 通过“打印机IP地址更改工具”,更改打印机默认IP为 指定的端口连接IP地址,详细步骤可参考打印机安装 说明
1.网口打印机连接设置
2. 打印自检页,查看打印机IP地址 打印自检样张方法: 1) 连接打印机电源,如果打印机处于开机状态, 首先关闭打印机电源; 2) 按住打印机进纸按钮,打开打印机电源,打印 机将打印自检样张 3) 在打印机自检页中查看打印机默认IP地址子网 掩码,如图:打印机出厂默认 如以下IP:192.168.123.100
二、网口打印机安装方案
1.网口打印机连接设置
1. 配置好局域网,将网口打印机使用标准网线与交换机相 连接 打印机连接注意事项: a.将网口打印机与电脑网卡使用一根网线直接连接时, 需使用交叉网线 b.将网口打印机与交换机或者路由器连接时使用标准网 线(即平行线) 推荐将网口打印机通过普通网线连接至局域网交换机
设置--打印机共享

打印机共享如何设置?这是在工作中经常遇到的问题。
由于公司购买的打印机不带网络打印功能,但又想能让办公室里的所有人员都能共用这一台打印机。
那么把打印机设置成共享就能很好解决这一问题。
下面,就让小编教你如何设置打印机共享。
1.配置打印机主机首先我们要在主机上配置打印机。
我们暂且称直接连接打印机的电脑为“主机”,而局域网内其他需要和主机共享打印的电脑称为“客户机”。
第一步:将打印机连接至主机,打开打印机电源,通过主机的“控制面板”进入到“打印机和传真”文件夹,在空白处单击鼠标右键,选择“添加打印机”命令,打开添加打印机向导窗口。
选择“连接到此计算机的本地打印机”,并勾选“自动检测并安装即插即用的打印机”复选框。
第二步:此时主机将会进行新打印机的检测,很快便会发现已经连接好的打印机,根据提示将打印机附带的驱动程序光盘放入光驱中,安装好打印机的驱动程序后,在“打印机和传真”文件夹内便会出现该打印机的图标了。
第三步:在新安装的打印机图标上单击鼠标右键,选择“共享”命令,打开打印机的属性对话框,切换至“共享”选项卡,选择“共享这台打印机”,并在“共享名”输入框中填入需要共享的名称,例如CompaqIJ,单击“确定”按钮即可完成共享的设定。
提示:如果希望局域网内其他版本的操作系统在共享主机打印机时不再需要费力地查找驱动程序,我们可以在主机上预先将这些不同版本选择操作系统对应的驱动程序安装好,只要单击“其他驱动程序”按钮,选择相应的操作系统版本,单击“确定”后即可进行安装了。
2.配置协议为了让打印机的共享能够顺畅,我们必须在主机和客户机上都安装“文件和打印机的共享协议”。
右击桌面上的“网上邻居”,选择“属性”命令,进入到“连接”文件夹,在“本地连接”图标上点击鼠标右键,选择“属性”命令,如果在“常规”选项卡的“此连接使用下列项目”列表中没有找到“Microsoft的文件和打印机共享”,则需要单击“安装”按钮,在弹出的对话框中选择“服务”,然后点击“添加”,在“选择服务”窗口中选择“文件和打印机共享”,最后单击“确定”按钮即可完成。
DLINK系列打印服务器配置手册
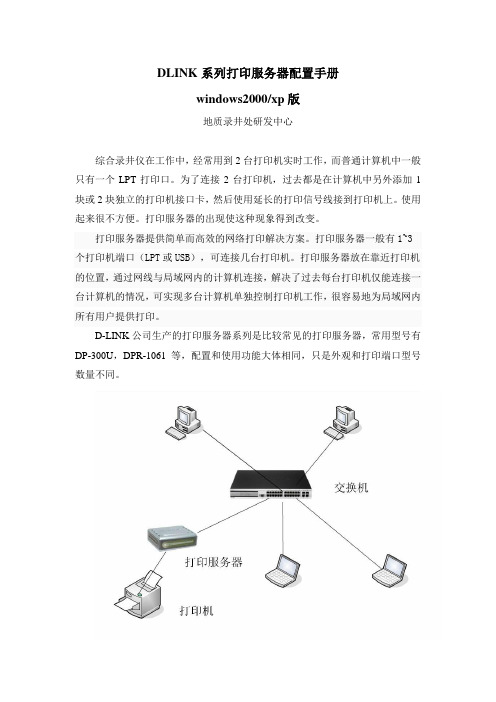
DLINK系列打印服务器配置手册windows2000/xp版地质录井处研发中心综合录井仪在工作中,经常用到2台打印机实时工作,而普通计算机中一般只有一个LPT打印口。
为了连接2台打印机,过去都是在计算机中另外添加1块或2块独立的打印机接口卡,然后使用延长的打印信号线接到打印机上。
使用起来很不方便。
打印服务器的出现使这种现象得到改变。
打印服务器提供简单而高效的网络打印解决方案。
打印服务器一般有1~3个打印机端口(LPT或USB),可连接几台打印机。
打印服务器放在靠近打印机的位置,通过网线与局域网内的计算机连接,解决了过去每台打印机仅能连接一台计算机的情况,可实现多台计算机单独控制打印机工作,很容易地为局域网内所有用户提供打印。
D-LINK公司生产的打印服务器系列是比较常见的打印服务器,常用型号有DP-300U,DPR-1061等,配置和使用功能大体相同,只是外观和打印端口型号数量不同。
打印服务器是作为“打印端口”在计算机上使用的。
因此,打印服务器的配置工作,就是为计算机添加“打印端口”。
配置好端口后,打印服务器与计算机操作系统中的打印机项目里原先的LPT1、LPT2等端口实现同样的功能。
一台新的打印服务器,配置步骤主要分为3步:1、将打印服务器IP地址调整为本地网段,为了方便管理,在NLS综合录井仪中,打印服务器的IP统一设置为100.100.100.88;2、在计算机上添加“打印端口”;3、添加打印机,安装打印机驱动,使用新添加的打印服务器端口。
下面将每一步的详细步骤分别加以说明:一、调整打印服务器的IP:1、安装D-LINK打印服务器管理软件PS Admin2、运行PS ADMIN程序如果连接正常,PS ADMIN会搜索到打印服务器,如下图中左边的PS-1DD21f,如搜索不到,请检查电源和网线。
3、点击上面第三个按钮“IP”,输入打印服务器的新IP地址,记住这个IP,并保存退出。
设置好IP以后,就可以通过浏览器来方位打印服务器的设置界面。
打印共享服务器安装及配置手册

一、打印服务器的安装;
1、点击任务栏上的“服务器管理器”图标;
2、点击“服务器管理器”页面中的“角色”后点击“添加角色”;
3、在“添加角色向导”页面上点击“下一步”;
4、选择“打印和文件服务”;
5、在如下图中点击“下一步”;
6、选择默认的“打印服务器”组件后,点击“下一步”;
7、出现如下图所示后点击“安装”;
8、出现如下图所示后,等待安装完成;
9、安装完成后,点击关闭。
10、重启服务器后,完成安装。
二、打印服务器的使用;
1、在开始菜单中选择“设备和打印机”
2、点击“添加打印机”;
3、选择“添加网络、无线或Bluetooth打印机”;
4、点击“我需要的打印机不在列表中”
5、选择“按名称选择共享打印机”,格式为“\\打印服务器IP地址\打印机名称”
如下图示;
出现如下画面,等待;
出现下图画面,输入用户名密码后,点击确定;
安装完驱动后出现如下图状态;
即可使用网络打印机。
使用路由器USB接口共享文件和打印机

使用路由器USB接口共享文件和打印机在现代家庭和办公室中,共享文件和打印机是一个基本需求。
由于技术的进步,使用路由器USB接口共享文件和打印机已经变得非常容易。
在本文中,我们将介绍如何使用路由器USB接口来共享文件和打印机。
一、了解路由器的USB接口在开始共享文件和打印机之前,我们需要了解一些基本信息。
许多路由器都配备了USB接口,这些接口可能用于连接打印机,USB存储设备或其他外围设备。
这些设备可以轻松共享,并可在任何时候访问。
二、共享USB存储设备如果你想共享USB存储设备(如外置硬盘、U盘等),则可以按照以下步骤进行设置:1. 将USB存储设备连接到路由器的USB接口上。
2. 打开路由器管理界面。
这通常可以通过在网页浏览器中输入路由器的IP地址来完成。
3. 在路由器管理界面上找到和USB接口相关的设置。
这通常称为“USB共享”或类似的名称。
4. 在 USB 共享部分选择“启用网络共享”,然后将 USB 存储设备的共享名称设置为您自己想要的名称。
5. 您可以选择密码保护和访问权限等选项以设置您的共享。
现在,您可以在共享网络上访问您的USB 存储设备。
要访问共享,请确保您的计算机已连接到路由器,并可以从计算机上的文件资源管理器中打开访问共享文件夹。
三、共享打印机如果您想共享打印机,则可以按照以下步骤进行设置:1. 将打印机连接到路由器的USB接口上。
2. 打开路由器管理界面,并找到“打印服务器”或使用类似的名称。
3. 在打印服务器部分配置“打印服务器”。
4. 在“添加打印机”选项中,选择您的打印机并添加。
5. 您可以选择密码保护和访问权限等选项以设置您的共享。
现在,您可以在网络上访问您的共享打印机。
请确保您的计算机已连接到路由器,然后设置共享打印机并打印测试页面。
结论:使用路由器USB接口共享文件和打印机,只需要简单的设置就能实现,避免了传统的公共文件夹和服务器的复杂操作。
这样做不仅可以提高效率,而且还能减少安装和维护的时间和费用。
- 1、下载文档前请自行甄别文档内容的完整性,平台不提供额外的编辑、内容补充、找答案等附加服务。
- 2、"仅部分预览"的文档,不可在线预览部分如存在完整性等问题,可反馈申请退款(可完整预览的文档不适用该条件!)。
- 3、如文档侵犯您的权益,请联系客服反馈,我们会尽快为您处理(人工客服工作时间:9:00-18:30)。
Linksys WPS54G 打印服务器设置简单说明
首先准备一个XP系统以下的电脑,IE浏览器要在6.0以下版本。
进入设置界面方法一:如果你收到的时候有一张纸条,上面写了ip 地址如
192.168.1.5 的ip地址格式,那么你直接用网线将电脑和打印服务器连接。
然后打开本地连接的TCP/IP属性
自定义设置IP地址,和打印的纸张上一样(在同一个局域网段),这样相当于将打印服务器和电脑局域网连接好了。
打开ie输入打印服务器的IP,进入设置中心,然后按照下面的步骤设置即可
进入设置界面方法二:一定要找一个路由器(能自动分配IP地址的路由器)先用网线连接上打印服务器,然后插上电源。
这时,打印服务器就可以得到一个由路由器分配来的IP地址。
想知道这个IP地址是多少,请登陆您的路由器查看,查看到这个IP地址后(如果查看不到打印服务器IP,请查看当先显示出来的连接的所有IP,按照
顺序,往下增加测试看看。
请接通服务器电源,按着复位键,等待一分钟,直至完全启动,恢复工厂设置)。
注意,浏览器的版本需要IE6.0或者IE6.0以下的。
然后,您就可以通过这个IP地址进入设置页面。
进行固定IP等各项设置。
开始设置界面的设置
1、在浏览器输入打印服务器的IP地址,回车。
输入登录设置的用户名和密码,都是:admin
以下设置,数值仅供参考,您的实际可能不一定全完一致。
步骤是正确的。
2.选择Protocol→TCP/IP,并根据网络情况设置IP等。
3、下图:
如果要无线连接,请选择wireles s→Basic,填写无线路由的SSID 如果无线路由器设置了密码,请填写无线连接密码
4.连接好打印机,进入控制面板→传真和打印服务,选择添加打印机。
5.直接下一步。
6.选择连接到此计算机的本地打印机。
不选择自动检测。
然后下一步。
7.选择创建新端口,Standard TCI/IP Port,下一步。
8.填写打印机名或IP地址,就是打印服务器的地址。
9.选择自定义,并进入配置
10.这里主要设置协议,LPR设置
11、确定后,完成设置。
接着安装好打印机的驱动就可以了。
联系方式旺旺:阿拉激光灯QQ:35110912 地址/item.htm?id=17297444297。