使用说明书高清摄像机HC-PV100GK-Panasonic
松下HC-X920MGK-K说明书

使用说明书高清摄像机型号HC-X920GK HC-X920MGKHC-X910GKVQT4R27∫关于电池∫产品标识安全注意事项警告:为了减少火灾、触电或产品损坏的危险,≥请勿让本机遭受雨淋、受潮、滴上或溅上水。
≥请勿将花瓶等盛满液体的物品置于本机上。
≥请仅使用推荐的附件。
≥请勿卸下盖子。
≥请勿自行维修本机。
请向有资格的维修人员请求维修。
注意!为了减少火灾、触电或产品损坏的危险,≥请勿将本机安装或置于书柜、壁橱或其他密闭的空间里。
请确保本机通风良好。
≥请勿让报纸、桌布、窗帘等类似物品堵塞住本机的通风孔。
≥请勿将点燃的蜡烛等明火火源置于本机上。
电源插头是断路装置。
安装本机,使得可以立即从电源插座上拔下电源插头。
警告电池有发生火灾、爆炸和灼伤的危险。
请勿对其拆卸、加热至60o C 以上或焚烧。
注意≥如果电池更换得不正确,会有发生爆炸的危险。
请仅用制造商建议使用的类型的电池进行更换。
≥废弃电池时,请与当地机构或经销商联系,询问正确的废弃方法。
产品位置高清摄像机电池座AC适配器底部2VQT4R27-如果看到此符号的话-在欧盟以外其它国家的废物处置信息此符号仅在欧盟有效。
如果要废弃此产品,请与当地机构或经销商联系,获取正确的废弃方法。
3VQT4R27∫使用时的注意事项使本机尽可能远离电磁设备(如微波炉、电视机、视频游戏机等)。
≥如果在电视机上方或其附近使用本机,本机上的图像和/或声音可能会受到电磁波辐射的干扰。
≥请勿在移动电话附近使用本机,否则可能会影响图像和/或声音的品质。
≥扬声器或大型发动机产生的强大的磁场效应,可能会损坏录制的数据,或者可能会使图片变形。
≥由微处理器产生的电磁波辐射,可能会对本机产生负面影响,以致干扰图像和/或声音。
≥如果本机由于受电磁设备的影响而停止正常工作,请关闭本机,并取下电池或拔下AC适配器。
然后,重新安装电池或者重新连接AC适配器并开启本机。
请勿在无线电发射器或高压线附近使用本机。
Panasonic 摄像头安装指南说明书
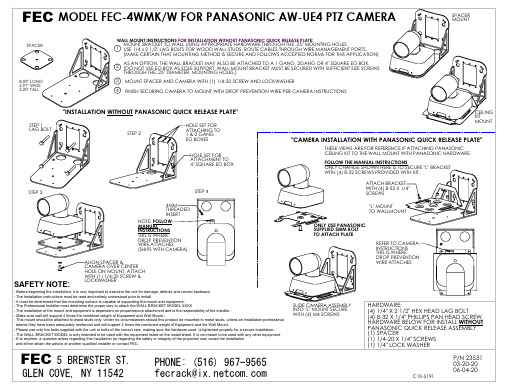
SPACER MOUNT
SPACER 8.09" LONG 4.91" WIDE 5.20" TALL
WALL MOUNT INSTRUCTIONS FOR INSTALLATION WITHOUT PANASONIC QUICK RELEASE PLATE:
CEILING KIT MOUNT
"CAMERA INSTALLATION WITH PANASONIC QUICK RELEASE PLATE"
THESE VIEWS ARE FOR REFERENCE IF ATTACHING PANASONIC CEILING KIT TO THE WALL MOUNT WITH PANASONIC HARDWARE. FOLLOW THE MANUAL INSTRUCTIONS ONLY CHANGE SHOWN HERE IS TO SECURE "L" BRACKET WITH (4) 8-32 SCREWS PROVIDED WITH KIT.
STEP 3
STEP 4
ATTACH BRACKET WITH (4) 8-32 X 1/4" SCREWS
4MM THREADED INSERT NOTE: FOLLOW MANUAL INSTRUCTIONS THIS IS WHERE DROP PREVENTION WIRE ATTACHES (SHIPS WITH CAMERA)
C10-5191
P/N 23531 03-20-20 06-04-20
- The WALL BRACKET MODEL is only intended to be used with the equipment listed on the install sheet. It is not meant to be used with any other equipment.
Panasonic 数码摄像机 NV-GS11GC GK NV-GS15GC GK 说明书
使用说明书Operating Instructions Инструкция по эксплуатации数码摄像机Digital Video CameraModel No.NV-GS11GC/GKNV-GS15GC/GK使用前,请完整阅读本说明书。
Before use, please read these instructions completely.Перед пользованием прочтите, пожалуйста, эту инструкциюполностью.LSQT0781A安全注意事项ª请仔细阅读使用说明书并正确使用摄像机。
≥由于未按照本使用说明书中说明的操作步骤进行操作,而导致的损害或材料损坏由用户负责。
使用说明书≥这些使用说明书适用于 NV-GS11型和NV-GS15型。
≥这些使用说明书中所用的图解说明的是NV-GS15型,但部分的解释涉及不同的型号。
≥依据型号,某些功能不可用。
试用摄像机。
在记录第一个重要事件前,首先要试用一下摄像机,以保证其录制性能与各种功能能够正常使用。
制造商对于录制内容的损失不负任何责任。
制造商对于因摄像机、其附件或磁带的故障或缺陷造成的任何损失概不负责。
请严格遵守版权法。
若非个人使用,复制先期录制的磁带、磁盘、其它出版物或播放材料都侵犯版权法。
即使是个人使用,也严禁复制某些特定材料。
≥摄像机使用了版权保护技术,并且被日本和美国的专利技术和知识产权所保护。
要想使用这些版权保护技术,必须得到Macrovision 公司的授权。
禁止分解或改装摄像机。
≥Windows 是美国Microsoft 公司的商标或注册商标。
≥SD 徽标是商标。
≥使用说明书中的所有其它公司和产品名称都是各个公司的商标或注册商标。
由于本设备使用时会变热,请在空气流通的地方进行操作,不要将此设备安置在狭窄的空间内,例如书柜或类似地方。
要降低起火、电击或产品损坏的危险,请勿将本设备暴露于雨中、潮湿、滴水或溅水的环境,并确保勿将盛满液体的物品(如花瓶)放在本设备上。
panasonic操作手册

i
目录
使用前注意事项............................................... v 菜单选项一览.................................................. vi
3.2 基本的按键操作........................................................36
4.7 设定检查区域和条件(检查设定).........................91 4.7.1 检查设定的种类和概述.......................................91 4.7.2 作成检查设定......................................................94
4.4.3 在“分支执行”模式中检测...............................71 4.4.4 在“指定执行”模式中检测...............................73
4.5 拍摄图像....................................................................74
4.6 图像预处理(2 值化/预处理).................................75 4.6.1 对灰度图像执行预处理(2 值化层级・灰度预处
4.6.2 4.6.3
理).....................................................................76 对图像执行 2 值化(2 值化层级)........................76 设定灰度变换......................................................77
松下摄像机说明书

松下摄像机说明书松下摄像机说明书1. 引言本文档旨在向用户提供松下摄像机的详细说明,帮助用户正确使用该摄像机,并了解其功能和特点。
请在使用前仔细阅读本说明书,并按照说明进行操作。
2. 功能特点松下摄像机具有以下主要功能特点:- 高清画质:松下摄像机采用先进的图像传感器技术,能够拍摄出高清的画面,让您的录像更加清晰逼真。
- 多种拍摄模式:摄像机支持多种拍摄模式,包括自动模式、手动模式和专业模式,满足不同用户的需求。
- 录制格式支持:摄像机支持多种录制格式,包括AVCHD和MP4,方便用户进行后期编辑和分享。
- 高速连拍功能:摄像机具备高速连拍功能,可以连续拍摄多张照片,捕捉瞬间的精彩瞬间。
- 电子防抖功能:摄像机内置电子防抖功能,可以有效抑制手持拍摄时的抖动,提供稳定的图像输出。
3. 摄像机设置和操作指南3.1 摄像机设置1. 打开摄像机电源。
2. 在菜单界面中选择“设置”选项。
3. 在设置界面中可以进行各项参数的调整,包括拍摄模式、录制格式、白平衡等。
3.2 拍摄操作1. 拍摄照片:将摄像机对准拍摄目标,按下快门按钮进行拍摄。
2. 录制视频:按下录制按钮开始录制视频,再次按下停止录制。
3.3 照片和视频回放1. 在播放模式下,可以选择查看拍摄的照片或录制的视频。
2. 使用十字键来浏览照片或视频,按下确认键进行播放。
4. 常见问题解答4.1 如何进行充电?使用附带的充电器,将充电器插入摄像机的充电接口,然后将充电器插入电源插座进行充电。
4.2 如何进行存储卡的安装和使用?在摄像机的侧面找到存储卡插槽,将存储卡插入插槽,然后推入直到卡片固定为止。
摄像机会自动识别存储卡并将拍摄的照片和视频保存在卡中。
4.3 如何进行数据传输和备份?摄像机支持通过USB接口连接电脑进行数据传输和备份。
将摄像机和电脑使用USB线连接,然后在电脑上打开文件管理器即可访问摄像机中的文件,并进行传输和备份操作。
5. 安全注意事项- 在使用摄像机时,请注意环境的安全和舒适度,避免长时间使用造成疲劳。
松下摄像机操作指南说明书

1 连接 USB 电缆和交流电适配器。 0 按 M 键约 2 秒钟,关闭摄像机。
外置蓝光驱动器上的电源键,打开电源。
A 按弹出按钮,打开光盘托架。 B 正确装入一张新的光盘。 C 按弹出按钮,关上光盘托架。
小心 : 0 连接设备时务必切断电源。
否则可能会发生电击或故障。
复制
..
4
1
兴VTC㌦⍤
ḥ㳂䒶徃惎◩ 兴ḥ㳂䒶㸑㍓⸨ 澐221!W兴351!W澑
1
⢗仯呞槲∩◩ 3
2
*图中所示的交流电适配器是 AC-V10M。 A 将外置蓝光驱动器的 USB 电缆连接至本机。 B 连接外置蓝光驱动器的交流电适配器。
C 打开外置蓝光驱动器。
D 把交流电适配器与本机连接。
0 连接交流电适配器时,本机自动接通电源。 0 本机打开,“备份”菜单出现。 0 连接 USB 电缆期间,显示“备份”菜单。 0 另请参阅外置蓝光驱动器的使用说明书。
Panasonic高清视频相机连接指南说明书
Wi-Fi Connection GuideHigh Definition Video CameraModel No. HC-W850/HC-V750HC-V550/HC-V250SQC0011It is required to install the “Image App” on your smartphone/tablet to connect this unit.1[Android ™]: Select “Google Play™ Store”.[iOS]: Select “App Store SM ”.2Enter “Panasonic Image App” into the search box.3Select “Panasonic Image App” and install it.Install the “Image App” on your smartphone/tablet Confirm the Wi-Fi ® connection method Connect to Wi-FiStep.1Install the “Image App” on your smartphone/tabletAn environment that can connect to the network is required.Step.2Confirm the Wi-Fi ® connection methodConfirm the wireless access point and smartphone used.When connecting to a wireless access point (wireless LAN router)When connecting to a smartphone1Check if the wireless access point is compatible with IEEE802.11b/g/n.≥Proceed to step 2 once the compatibility is confirmed.2Check if the wireless access point is compatible with WPS*.Compatible with WPS:Proceed to A [WPS Connection] of Step.3Not compatible with WPS:Proceed to B [Search for wireless network] of Step.3*WPS is an abbreviation for Wi-Fi Protected Setup™.Proceed to C [Direct Connection] of Step.3≥Android and Google Play are trademarks or registered trademarks of Google Inc.≥App Store is a service mark of Apple Inc.≥“Wi-Fi”, “Wi-Fi Protected Setup”, “WPA” and “WPA2” are marks or registered marks of the Wi-Fi Alliance.≥QR Code is a registered trademark of DENSO WAVE INCORPORATED.A [WPS Connection]1Press the Wi-Fi button on this unit to setup the Wi-Fi.2Touch a Blank row to register a new wireless network.3Touch [WPS Connection].4Press the WPS button on the wireless access point.≥When the connection is complete, a message is displayed on this unit.5Touch [Link to Cell] and start up the smartphone application “Image App”.≥When the connection is complete, images from this unit are displayed on the smartphone screen.B [Search for wireless network]≥Please refer to the operating instruction of the device in use for details about the setting and display of the wireless access point.1Press the Wi-Fi button on this unit to setup the Wi-Fi.2Touch a Blank row to register a new wireless network.3Touch [Search for wireless network].≥For more details about [Manual Setting], please refer to the owner’s manual (PDF format) of this unit.4Touch the wireless access point to connect.≥Touch [ENTER].≥If an Encryption key (Password) is not set on your router, the connection is complete and a message is displayed.5(When there is an Encryption key (Password))Enter the Encryption key (Password) of the wireless access point.≥For details on how to enter characters, refer to the owner’s manual (PDF format).≥When the entry is complete, touch [Enter].6Touch [Link to Cell] and start up the smartphone application “Image App”.≥When the connection is complete, images from this unit are displayed on the smartphone screen.C [Direct Connection]1Press the Wi-Fi button on this unit to setup the Wi-Fi.2Touch [Change connection type] and select [QR code].≥The QR code is displayed on this unit screen.3Start up the smartphone application “Image App”.4On the smartphone, select [QR code], and scan the QR code displayed on the screen of this unit.≥When using an iOS device, perform the following operations:1Select the option that allows you to install the app on the profilescreen of the “Image App“, and follow the on-screen instructions to complete the installation.2Press the home button to close the displayed screen.3After selecting the network name (SSID) of this unit from the Wi-Fi setup of the smartphone, start up “Image App“.≥When the connection is complete, images from this unit are displayed on the smartphone screen.This function can be used with the NFC compatible device with Android (OS version 2.3.3 or later). (Except for some models)NFC is an abbreviation for Near Field Communication.≥When this unit and the smartphone are connected to the same wireless access point, the result is a wireless access point connection. All others are direct connections.1Start up the smartphone application “Image App”.2Touch the smartphone on displayed on the smartphone screen.≥Touch [YES] on the screen of this unit, and proceed with the connection by following the smartphone screen instructions.≥When the connection is complete, images from this unit are displayed on the smartphone screen.≥The NFC function cannot be used on the smartphone when a message to touch the NFC mark of the device is not displayed. Try other connection methods.When connecting to a wireless access point (wireless LAN router)[Wi-Fi Setup] # [Wireless Settings][Wi-Fi Setup] # [Wireless Settings]A [Delete]B[ENTER]A [Delete]B[ENTER]When connecting to a smartphone[Wi-Fi Setup] # [Direct Connection]Connect with using NFC。
日本Panasonic公司的网络摄像头说明书
Network camera exceeding the human eye featured by Super Dynamic III Key FeaturesStandard Accessories• CD-ROM*.......................................1 pc.• Installation Guide...........................1 pc.* The IP setup software, the viewer softwareand the network operating instructions(PDF) are included on the CD-ROM.The following are for installation.• Mount Bracket (w/safety wire)........ 1 pc.• Fixing Screw .................... 2 pcs. (incl. a spare screw)• Decorative Cover.......................... 1 pc.• DC 12 V Power Cord Plug............ 1 pc.• Code Label*.................................. 1 pc.* It will be needed for network management.A network administrator should keep this label.• Built-in MPEG-4 and JPEG digital signal output at VGA image size with up to 30 ips.• MPEG-4/JPEG dual stream output for simultaneous live monitoring and high resolution recording.• Progressive Output with motion adaptive interlace/progressive conversion allows every frame to be clear even when the object is moving.• Super Dynamic III technology delivers 128x wider dynamic range compared to conventional cameras.• High sensitivity: Color: 0.7 lux (Sens up OFF), B/W: 0.5 lux (Sens up OFF)• Simple Day-Night function (No IR cut filter moving)• Up to 32x automatic electronic sensitivity enhancement.• Video Motion Detector with 4 programmable detection areas and 3 sensitivity levels.• 22x zoom lens with 10x digital zoom enabling 220x zoom• Auto tracking: Pan and tilt automatically controlled to keep moving objects centered in screen.• PTZ control can be taken on the user friendly GUI with 16 speeds pan/tilt and new “Drag and Zoom” operation enabling finer control. 256 speeds available for system with WV-CU950 system controller. • Up to 64 preset positions• 360 map shot: 8 thumbnail images at 45 deg. intervals make it simple to direct the camera easily by clicking on a thumbnail.• Built-in network interface (10Base-T / 100Base-TX).• Power over Ethernet (PoE) IEEE 802.3af.• Multiscreen: Image from 16 cameras can be displayed in 4 different Quad screens or 16-screen (JPEG only)• FTP client function enables periodic image data transfer or transfer upon alarm • Alarm notification via E-mail.• Max. bit rate/client for MPEG-4 (64 / 128 / 256 / 512 / 1,024 / 2,048 / 4,096 kbps) and Total bit rate control (64 / 128 / 256 / 512 / 1,024 / 2,048 / 4,096 kbps / Unlimited) allowing flexible network management.• 2-way audio feature (G.726, 32 / 16 kbps)• Alarm log, Manual REC log, FTP error log saved in the SD card is displayed on the browser GUI and can be downloaded to the client PC. Playback or Image data download through the log is also available. • Multi-language GUI and setup menu: English, French, Italian, Spanish, German, Polish, Russian (PAL), English, French (NTSC), (Installation required except for English).• SD Memory card slot for Manual recording, Alarm recording and Backup upon network failure.• Alarm sources include Terminal 1 ~ 3, VMD and Panasonic alarm command. Selectable alarm actions include SD memory recording, FTP image transfer, E-mail notification, Alarm indication, Terminal output, Camera positioning, Auto track and Panasonic protocol output.• Scheduling function for Alarm / VMD / Access permission, Preset position call and Position refresh.• Industrial grade Pan/Tilt/Zoom mechanism for high reliability• One-touch Fitting Mechanism for easy installation• Desktop/Ceiling position choice and various optional brackets for versatile installationsSuper Dynamic IIIDome Network CameraWV-NS202A WV-NS202A (12V DC or PoE) (12V DC or PoE)Optional AccessoriesCeiling Mount BracketsWV-Q152C (Clear)WV-Q152S (Smoke)Inner Dome CoverWV-Q153Wall Mount BracketsWV-Q150C (Clear)WV-Q150S (Smoke)Direct Ceiling InstallationWV-Q105(Smoke Type)(Smoke Type)(Smoke Type)Embedded Ceiling Mount BracketsWV-Q151C (Clear)WV-Q151S(Smoke)Trademarks and registered trademarks– Microsoft, and Windows are registered trademarks of Microsoft Corporation in the U.S. and other countries.– SD logo is a trademark. Important– Safety Precaution: carefully read the operating instructions and installation manual before using this product.– Panasonic can not be responsible for network performance and/or other manufacturer products that reside on the network.DISTRIBUTED BY:Panasonic is the brandname of Matsushita Electric.Printed in Japan(2A-003L)SpecificationsTV System NTSC PALCamera Image Sensor1/4-type interline transfer CCD, Effective pixeles: 768 (H) x 494 (V), Scanning Area: 3.59 (H) x 2.70 (V) mmScanning Mode 2:1 interlace scan (with motion adaptive interlace/progressive conversion)Minimum Illumination Color (30 IRE): 0.7 lux (Sen up: OFF), 0.02 lux (Sens up: 32x) at F1.6B/W (10 IRE): 0.5 lux (Sens up: OFF), 0.015 lux (Sens up: 32x) at F1.6White Balance AWC (2,000 ~ 10,000 K), ATW1 (2,700 ~ 6,000 K), ATW2 (2,000 ~ 6,000 K)Light Control Automatic integration of ALC/ELC AGC ON (LOW) / ON (MID) / ON (HIGH) / OFF Super Dynamic III ON or OFF (with BLC masking)Dynamic Range 52 dB typical (Super Dynamic III : ON, Shutter speed: OFF)Electronic Shutter OFF (1/60), AUTO, 1/100Electronic Sensitivity UP OFF / AUTO (2x, 4x, 6x, 10x, 16x, 32x)Digital Noise Reduction High / LowBlack and White Mode OFF / Auto (No IR moving)Video Motion Detector For preset position: 4 programable detection areas, Sensitivity: 6 stepsNon-preset position: Detects entire screen except clock area, Sensitivity: 6 stepsPrivacy Zone Up to 8 zones, Gray/Mosaic Up Side Down ON (desktop) / OFF (ceiling)Camera Title Up to 16 characters (alphanumeric characters, marks)Lens Type22x (3.79 mm ~ 83.4 mm) Zoom lens, 220x with 10x digital zoom. F: 1:1.6 (WIDE) ~ 3.0 (TELE)Angular Field of View H: 2.6° (TELE) ~ 51.7° (WIDE), V: 2.0° (TELE) ~ 39.9° (WIDE)Min. Object Distance 1.6 mPan and Panning Range 0° ~ 350°Tilt Panning SpeedManual: approx.1°/s ~ 100°/s, Up to 256 steps (depending on the controller) Preset: up to approx. 300°/sTilting Range –30° ~ 90° (upward-level-downward)Tilting angle limit: 0° / –5° / –10° / –15° / –20° / –25° / –30°Tilting SpeedMnual: approx. 1°/s ~ 100°/s, Up to 256 steps (depending on the controller) Preset: up to approx. 100°/sProportional Pan/Tilt Control Yes Number of Preset Positions 64Auto Mode OFF/ preset sequence / auto pan / auto track Image Hold ON / OFF PTZ Position Display ON / OFF Map Shot 360° map shot / preset map shotBrowser Camera Control Pan/Tilt (16 steps), Zoom, Focus, Click centering, Drag zoom, GUI Iris, Preset position call and program, Auto mode.Display ModeImage from 16 cameras can be displayed in 4 different Quad screens or 16-screen (JPEG only). 20 characters camera title available.SD Memory Data Download Images recorded in the SD memory card can be downloaded.Clock DisplayTime: 12H/24H, Date: 5 formats on the browser, Summer time (Manual)GU I /Setup English, French English, French, Italian, Spanish, German, Polish,Menu Language (Installation required for French)Russian (Installation required except for English.)System Log Alarm log, Manual REC log, FTP error log (SD memory required) Supported OS Microsoft Windows ® 2000 Professional SP4, Microsoft Windows ® XPProfessional/Home SP2 English, French, Italian, Spanish, GermanSupported Browser Internet Explorer 7.0 Internet Explorer 6.0 SP2 (Windows ® XP Home/Professional SP2)Internet Explorer 6.0 SP1 (Only Windows ® 2000 Professional SP4)Network Network IF 10Base-T / 100Base-TX, RJ45 connectorImage Resolution VGA (640 x 480) / QVGA (320 x 240)Image CompressionMPEG-4: Image quality: LOW/NORMAL/FINE, Transmission type: UNICAST/MULTICAST JPEG: Image quality: 10 steps, Transmission type: PULL/PUSH Image Refresh Rate0.1 / 0.2 / 0.33 / 0.5 / 1 / 2 / 3 / 5 / 6 / 10 / 15 / 30 ips (Max. rate will be 5 ips-VGA, (JPEG)10 ips-QVGA when transmitting JPEG and MPEG-4 simultaneously)Audio Compression G.726 (ADPCM) 32 kbps/16 kbps Audio Mode OFF / Mic input / Audio output / Interactive Total Bit Rate 64 / 128 / 256 / 512 / 1,024 / 2,048 / 4,096 kbps / Unlimited Max. Bit Rate/Client (MPEG-4)64 / 128 / 256 / 512 / 1,024 / 2,048 / 4,096 kbpsSupported ProtocolTCP/IP, UDP/IP, HTTP, FTP, SMTP, DHCP, DNS, DDNS, NTP, SNMP, RTP FTP Client Alarm image transfer, Periodic image transfer No. of Simultaneous Users Up to 8 usersSD Memory Card (Option)Manual REC/Alarm REC/Backup upon network failure.Compatible SD card: Panasonic 64MB, 128MB, 256MB, 512MB, 1GB, 2GB model.SDHC standard card not supported.User Registration Up to 16 users User Level 3 Levels: Administrator, Camera control, Live onlySecurity MethodUser authentication (ID and Password), Host authentication (IP address)Alarm Alarm Source 3 x Terminal inputs, VMD, Command alarmAlarm ActionsSD memory recording, E-mail notification, Indication on browser, Camera positioning, FTP image transfer, Terminal output, Panasonic protocol output, Auto trackAlarm Log With SD memory card: 5,000 logs, Without SD memory card: 1,000 logs Schedule Alarm/VMD/Access permission, Preset position call, Position refreshInput/Monitor Output 1.0 V [p-p] / 75 Ω, 1.0 V [p-p] / 75 Ω,OutputNTSC composite, ø3.5 mm mini jack PAL composite, ø3.5 mm mini jack External I/O Terminals ALARM IN 1, ALARM IN 2/ALARM OUT, ALARM IN3/AUX OUT Microphone Input MIC IN (Applicable microphone; Plug-in power type)Supply voltage: 2.5 V ±0.5 V Input impedance: 3 K Ω ±10 %Audio OutputAUDIO OUT ø3.5 mm stereo mini jack (monaural output) Line level General Safety/EMC Standard UL 6500, C-UL (E60065),CE (EN55022 ClassB EN55024),FCC Part15 ClassA, ICES003 ClassA GOST (R 51558)Power Source/Consumption DC 12 V: approx. 1,000 mA, PoE: approx.12.0 W (IEEE802.3af compliant, Class 0 device)Ambient Operating –10 °C ~ +50 °C (14 °F ~ 122 °F), 90 % or less (without condensation)Temperature/HumidityDimensionsø115 mm x 154 mm (H) (ø4-17/32" x 6-1/16" (H)) (excluding the DC 12 V power cord plug)Weight Camera: approx. 850 g (1.87 lbs.)Accessories (Camera mounting bracket, decorative cover): approx. 200 g (0.44 lbs.)Major Operating Controls & Terminals• All TV pictures/menu are simulated.• Weights and dimensions are approximate.• Specifications are subject to change without notice.• These products may be subject to export control regulations. • Product pictures shown in this catalog are all NTSC models.。
松下摄像机说明书
警告:•请勿将本产品置于雨水、潮湿的环境中,以免发生火灾或触电。
•为防止造成伤害等事故,请务必按照安装说明将本产品牢固地固定在地面、墙壁或天花板上。
•安装应当遵照本产品所适用的所有安装规则。
•本产品没有电源开关。
如需切断电源,则关闭电源装置或拔下电源线。
•连接应当符合当地的电气规定。
注意:•标示有本产品机身编号等的标签贴附于本产品的表面。
请在下面空白处填上本产品的机身编号,并将此说明书妥善保存,以便万一遭窃时查核。
型号:SER.No.(机身编号):2目录重要安全须知 (4)有限责任 (5)免责条款 (5)前言 (5)关于标记 (6)特点 (6)关于使用说明书 (7)对电脑的系统要求 (7)商标和注册商标 (8)关于著作权 (8)网络安全 (9)注意事项 (10)安装时的注意事项 (13)各部分的名称 (15)镜头安装 (17)插入和取出SD记忆卡*1 (仅WV-SP509H) (19)安装 (20)连接 (24)使用光盘 (28)配置网络设置 (31)故障排除 (33)规格 (34)附件 (38)选购件 (38)补充说明 (39)*1 SDXC/SDHC/SD记忆卡记载为SD记忆卡。
3不要损坏电源线不要损坏、加工电源线,不要使电源线靠近加热器,不要过分弯折、拧电源线,不要拉扯电源线,不要在电源线上放置很重的东西,不要绑扎电源线。
如果使用有损伤的电源线,可能会导致触电、短路或火灾。
如需修理,请委托经销商。
清洁时请切断电源否则可能导致受伤。
[使用时的注意事项]本产品仅限室内专用。
请勿在室外使用。
本产品没有电源开关切断电源时,需断开直流12 V电源或PoE设备的电源。
(同时使用直流12 V电源和PoE 设备作为电源时,两者均需断开。
)环境要求请勿长时间在高温、高湿的场所使用。
否则有可能会损坏本产品的部件从而缩短使用寿命。
请勿在靠近热源的地方(如加热器附近)使用本产品。
小心轻放本产品避免坠落、强烈冲击或振动,以免损坏产品而造成功能不良。
Panasonic高清摄像头产品说明书
• 720p HD images up to 30 fps• Super high resolution at HD / 1,280 x 720 created by 2.4 Megapixel high sensitivity MOS image sensor• Multiple H.264 (High profile) streams and JPEG streams ensure simultaneous real time monitoring and high resolution recording by “UniPhier ®”, Panasonic’s proprietary System LSI platform.• Full frame (Up to 30 fps) transmission at 1,280 x 960 image size • 45x HD extra optical zoom at 1,280 x 720 (30x optical zoom) 90x extra optical zoom at 640x360 resolution with 12x digital zoom enabling 1080x zoom.• Super Dynamic and ABS (Adaptive Black Stretch) technologies deliver 128x wider dynamic range compared to conventional cameras.• Face Super Dynamic technology ensures clear face image.• High sensitivity with Day/Night (ICR*) function: 0.3 lx (Color), 0.04 lx (B/W) at F1.6 *ICR: IR Cut filter Removal• VIQS (Variable Image Quality on Specified area) technology allows the designated 2 areas to retain higher image quality while the excluded area will have a decreased image quality, which enables to use lower image file size and bit rate.VIQS can be set on preset position (1 to 8) and except preset.• Digital Noise Reduction: 3D-DNR ensures noise reduction in various conditions.• Progressive scan ensures clear images with less motion blur and no tearing even when the subject is moving.• Electronic sensitivity enhancement: Auto (Up to 16x) / OFF • Selectable light control modes:Outdoor scene / Indoor scene (50 Hz) / Indoor scene (60 Hz) / Fix shutter Indoor scene (50 Hz / 60 Hz): Flicker causedby fluorescent lightning will be automatically compensated.• 360 degrees endless Panning• Advanced auto tracking: The camera automatically pans and tilts to follow a moving subject and keep it in the center of the image.• PTZ control can be taken very smoothly on the user friendly GUI with 16 speeds pan/tilt and “Drag and Zoom” operation enabling finer control. 256 speeds available for system with WV-CU950 system controller.• Up to 256 preset positions• 360 map shot: 8 thumbnail images at 45 deg. intervals make it simple to direct the camera easily by clicking on a thumbnail.• Industrial grade Pan / Tilt / Zoom mechanism for high reliability• VMD (Video Motion Detection) with 4 programmable detection areas, 15 steps sensitivity level and 10 steps detection size• Privacy Zone can mask up to 32 private areas, such as house windows and entrances/exits.• Camera title display: Up to 20 alphanumeric characters on the browser• Alarm sources including 3 terminal input, VMD and Panasonic alarm command can trigger actions such as SDXC/SDHC/SD memory recording, FTP image transfer, E-mail notification, Indication on browser, Alarm terminal output, and Panasonic alarm protocol output.• Full duplex bi-directional audio allows interactive communication between camera site and monitoring site.• JPEG Image compression ratio can be changed by alarm so that higher quality image can be provided.• Prioritized stream control: One of the video streams can be prioritized when multiple recorders or client PCs are accessing the camera so that the recorder or the client PC can maintain the frame rate.• SDXC/SDHC/SD Memory card slot for manual recording (H.264 / JPEG), alarm recording (H.264 / JPEG) and backup upon network failure (H.264 / JPEG) • H.264 max. bit rate / client and Total bit rate control allows flexible network traffic management. Frame rate priority mode controls bit rate and compression ratio to provide the specified frame rate.• Internet mode: H.264 images can be transmitted over HTTP protocol.• Multi-language: English / Italian / French / German / Spanish / Portuguese / Russian / Chinese / Japanese • IPv4/IPv6 protocol supported• Supports SSL, DDNS (viewnetcam, RFC2136)• Still images (JPEG) can be viewed on mobile phones via Internet.• Onvif compliant model• IP66 rated water and dust resistant. Compatible with IEC60529 measurement standard compliant.• Dehumidification device for use in various weather conditions • Rain wash coating dome cover• Ambient Operating Temperature : -50 °C to +55 °C ( -58 °F to 131 °F )• Fog compensation function equipped as standard.• AEM (Auto Eyelid Mechanism) offers images that are more natural and easy to watch reducing doubled images when direction of the lens moved above the horizontal.HD / 1,280 x 720 H.264 Weather Proof Camera featuring 45x HD extra optical zoom and Super DynamicKey FeaturesSuper Dynamic Weather Resistant HD PTZ Dome Network CameraWV-SW397A(Rain Wash Coating Model)Trademarks and registered trademarks– Microsoft, and Windows are registered trademarks of Microsoft Corporation in the U.S. and other countries.– iPad, iPhone and iPod touch are registered trademarks of Apple Inc.– Android is a trademark of Google Inc.– UniPhier is a registered trademark of Panasonic Corporation.– "MEGA Super Dynamic", "i-PRO SmartHD" logos are trademarks or registered trademarks of Panasonic Corporation.– ONVIF and the ONVIF logo are trademarks of ONVIF Inc.Important– Safety Precaution: Carefully read the Important Information, Installation Guide and operating instructions before using this product.– Panasonic cannot be responsible for the performance of the network and/or other manufacturers' products used on the network.• Masses and dimensions are approximate. • Specifications are subject to change without notice.SpecificationsSDXC/SDHC/SDMemory Card (Option)Cellular Phone Compatibility Mobile Terminal Compatibility Alarm Source Alarm ActionsAlarm LogScheduleH.264 recording (Audio recording is enable): Manual REC / Alarm REC (Pre/Post) /Schedule REC / Backup upon network failure JPEG recording: Manual REC / Alarm REC (Pre/Post) / Backup upon network failureCompatible SD (SDHC/SDXC) card: Panasonic2 GB, 4 GB*, 8 GB*, 16 GB*, 32 GB*, 64GB** model *SDHC card, ** SDXC card (except miniSD card and microSD card) JPEG image, panning/ tilting/ zoom/ focus control, AUX control (by access level)iPad, iPhone, iPod touch (iOS 4.2.1 or later) Android mobile terminals3 terminals input, VMD, Command alarm, Audio detection SDXC/SDHC/SD memory recording, E-mail notification,Indication on browser, FTP image transfer, Panasonic protocol output With SDXC / SDHC / SD memory card: 5,000 logs, without SDXC / SDHC / SD memory card: 1,000 logsAlarm / VMD / Access permission / H.264 recording / Audio detection Monitor Output (for adjustment) Microphone/Line InputAudio OutputExternal I/O Terminals Safety/EMC StandardPower Source and Power Consumption Ambient Operating TemperatureAmbient Operating Humidity Shock ResistanceWater and Dust Resistance DimensionsMass (approx.) FinishVBS : 1.0V[p-p] / 75Ω,NTSC / PAL composite, BNC JackMIC IN and Line IN are selectable. ø3.5 mm stereo mini jack (monaural input) (Applicable microphone: Plug-in power type) Supply voltage: 2.5 V ±0.5 V Input impedance: approx. 2 kΩ ø3.5 mm stereo mini jack (monaural output) Line levelALARM IN 1 (DAY/NIGHT IN), ALARM IN 2 (ALARM OUT), ALARM IN 3 (AUX OUT) AC24 V : 3.5 A, 55 WPoE+ DC54 V: 470 mA, 25 W (IEEE802.3at compliant)POE Injector (60 W) DC54 V : 1.0 A, 50 WAC24 V and Tested PoE Injector (60 W) : –50 °C to +55 °C (-58 °F to 131 °F) * with limitations POE+ : –30°C to +55°C (–22 °F to 131 °F) Less than 90 % (no condensation)Compliant with IK10 (IEC62262)Main body : IP66 (IEC60529) compliantø229 mm x 392 mm(H) {ø9-1/32 inches x 15-7/16 inches(H)} diameter of the dome 160 mm(6-5/16 inches) Approx. 5.0 kg { 11.02 lbs}Main body : Aluminum die cast, Natural silver Sunshields : ASA resin coating, Natural silverDome section : Clear polycarbonate resin (Rain wash coating)<Safety>UL (UL60950-1), C-UL (CAN/CSA C22.2 No.60950-1), CE, IEC60950-1<EMC>FCC Part15 Class A, ICES-003 Class A, EN55022 Class B, EN55024*1 Converted value*2 For further information about PC system requirements and precautions for when using Microsoft ® Windows ® 8.1,Microsoft ® Windows ® 8, Microsoft ® Windows ® 7, Microsoft ® Windows Vista ®, or Windows Internet Explorer, click“Manual” - “Open” from the supplied CD-ROM and refer to “Notes on Windows ® / Internet Explorer ® versions”.*3 AAC (Advanced Audio Coding) is only used when recording audio on an SD memory card.*4 Transmission for 2 streams can be individually set.NetworkAlarmInput/OutputGeneralImage Sensor Effective Pixels Scanning Mode Scanning AreaMinimum IlluminationWhite BalanceLight Control ModeShutter SpeedSuper DynamicFace Super Dynamic Adaptive Black Stretch Fog compensation Gain (AGC)Electronic Sensitivity UP Day & Night (ICR)Digital Noise Reduction Video Motion Detection Privacy Zone Image Stabilizer VIQSDouble Image Reduction Camera Title (OSD) Focus distance Focal Length Zoom RatioDigital (Electrical) Zoom Angular Field of ViewMaximum Aperture Ratio Focusing Range Aperture RangePanning RangePanning SpeedTilting RangeTilting SpeedProportional Pan/Tilt Control Number of Preset Positions Auto Mode Image HoldPTZ Position Display Self Return Map Shot4.3 mm - 129.0 mm {3/16 inches - 5-3/32 inches} 30x / 45x with HD extra optical zoom (at 1280 x 720)12x (Max. 1080x combined with extra optical zoom at 640 x 360) H: 2.6° (TELE) - 64.6° (WIDE), V: 1.6° (TELE) - 38.2° (WIDE) ([16:9] mode)*H: 1.4° (TELE) - 44.4° (WIDE), V: 1.1° (TELE) - 33.8° (WIDE) ([4:3]mode)1 : 1.6 (WIDE) - 4.7 (TELE) 2.0 m - ∞ F1.6 - Close 360° endlessManual: approx. 0.065°/s to 120°/s, Up to 256 steps (depending on the controller)Preset : up to approx. 300°/s–15° to 195° (upward-level-downward)Auto Eyelid Mechanism (Double image reduction)Selectable tilting angle: 0° / –5°/ –10° / –15Manual: approx. 0.065°/s to 120°/s, Preset: up to approx. 300°/s Yes 256Auto track/ Auto pan/ Preset sequence/ 360 map-shot/ Patrol On / Off On / Off10 s / 20 s / 30 s / 1 min / 2 min / 3 min / 5 min / 10 min / 20 min / 30 min / 60 min 360° map shot / Preset map shotCamera ControlDisplay ModeCamera Title Clock Display Alarm Control One Shot Capture AudioSD Memory Data Download GUI/Setup Menu LanguageSystem Log Supported OS *2Supported BrowserImage Resolution H.264 *4JPEGImage Capture Mode:16:9H.264 : 1,280 x 720 / 640 x 360 / 320 x 180, up to 30 fps JPEG (MJPEG): 1,280 x 720 / 640 x 360 / 320 x 180, up to 30 fps 10Base-T / 100Base-TX, RJ45 connectorH.264 : 1,280 x 960 / 800 x 600 / 640 x 480 / 320 x 240, up to 30 fps JPEG (MJPEG): 1,280 x 960 / 800 x 600 / 640 x 480 / 320 x 240, up to 30 fps Network IF Audio Compression Audio ModeAuthentication for Audio Total Bit RateSupported ProtocolFTP ClientMaximum concurrent access numberPan/Tilt (256 steps), Zoom, Focus, Click centering, Drag zoom, Iris,Preset position call and program, Auto modeSpot, Quad: Image from 16 cameras can be displayed in 4 different Quad screens or 16 split screen (JPEG only). 20 characters camera title available.Up to 20 alphanumeric charactersTime: 12H/24H, Date: 5 formats on the browser, Summer time (Manual)ResetA still picture will be displayed on a newly opened window.Mic (Line) Input: On / Off Volume adjustment : Low / Middle / High Audio Output : On / Off Volume adjustment : Low / Middle / High Still or motion Images recorded in the SDXC/SDHC/SD memory card can be downloaded. English / Italian / French / German / Spanish / Portuguese / Russian / Chinese / Japanese Up to 100 (Internal)Up to 4,000 (SDXC/SDHC/SD memory when the recording format is set to JPEG.) error logs Microsoft ® Windows ® 8.1,Microsoft ® Windows ® 8, Microsoft ® Windows ® 7, Microsoft ® Windows Vista ®, Microsoft ® Windows ® XP SP3Windows ® Internet Explorer ® 11 (32 bit), Windows ® Internet Explorer ® 10 (32 bit), Windows ® Internet Explorer ® 9 (32 bit), Windows ® Internet Explorer ® 8(32 bit),Windows ® Internet Explorer ® 7 (32 bi t)Approx.1/3 type MOS image sensor Approx. 2.4 mega pixels Progressive scan5.38 mm (H ) x 3.02 mm (V ) {7/32 inches(H) x 1/8 inches(V)}Color: 0.3 lx, BW: 0.04 lx (F1.6, Auto slow shutter: Off (1/30s), Gain: On(High))Color: 0.019 lx, BW: 0.003 lx (F1.6, Auto slow shutter: Max. 16/30s, Gain: On(High)) *1AWC (2,000 - 10,000 K), ATW1 (2,700 - 6,000 K), ATW2 (2,000 - 6,000 K)Outdoor scene: Automatic integration of ALC and ELCIndoor scene [50 Hz]: Automatic integration of ALC and ELC (up to 1/100 s)Indoor scene [60 Hz]: Automatic integration of ALC and ELC (up to 1/120 s)Fix shutterFix shutter: 1/30, 3/100, 3/120, 2/100, 2/120, 1/100, 1/120, 1/250,1/500, 1/1,000, 1/2,000, 1/4,000, 1/10,000 (only at Super Dynamic Off) On / OffOn / Off (Only when Super Dynamic: On) On / Off (Only when Super Dynamic: Off) On / OffOn (Low, Mid, High) / OffOFF / AUTO (Max. 2x (2/30 s), 4x (4/30 s), 6x (6/30 s), 10x (10/30 s), 16x (16/30 s)) Mode: AUTO1 / AUTO2 / AUTO3 / On / Off, Level: High / Low, with external control High / Low4 areas, Sensitivity: 15 steps, Detection size: 10 steps Up to 8 zones / Up to 32 zones, Gray / Mosaic On / OffUp to 2 zones at preset position 1-8 and except preset On / OffUp to 20 characters (alphanumeric characters, marks) Limited / UnlimitedImage Capture Mode:4:3Transmission Mode Frame Rate Bit Rate/ClientImage Quality Refresh Interval Transmission Type Image Quality Refresh Interval Transmission TypeConstant bitrate / Frame rate priority / Best effort /Advanced VBR 1 / 3 / 5 / 7.5 / 10 / 12 / 15 / 20 / 30 fps64 / 128 / 256 / 384 / 512 / 768 / 1,024 / 1,536 / 2,048 / 3,072 / 4,096 / 6,144 / 8,192 kbps Low / Normal / Fine0.2 / 0.25 / 0.33 / 0.5 / 1 / 2 / 3 / 4 / 5 s Unicast / Multicast 10 steps0.1 fps to 30 fps Pull / PushG.726 (ADPCM) 32 kbps / 16 kbps, G.711 64 kbps, AAC *3Off / Mic (Line) input / Audio output / Interactive (Half duplex) / Interactive (Full duplex) Level 1 only / Level 2 higher / All users64 / 128 / 256 / 384 / 512 / 768 / 1,024 / 2,048 / 4,096 / 8,192 kbps / Unlimited IPv6: TCP/IP, UDP/IP, HTTP, HTTPS, RTSP, RTP, RTP/RTCP, FTP, SMTP, DNS, NTP, SNMP, DHCPv6, ICMP, ARPIPv4: TCP/IP, UDP/IP, HTTP, HTTPS, RTSP, RTP, RTP/RTCP,FTP, SMTP, DHCP, DNS, DDNS, NTP, SNMP, UPnP, IGMP, ICMP, ARP Alarm image transmission, FTP periodic transmission (When the FTP transmission is failed, backup on an optional SDXC/SDHC/SD memory card is available. ) Up to 14 users (Depends on network conditions)CameraLensPan and Tilt Browser GUINetworkDISTRIBUTED BY:/PanasonicNetworkCamera(2A-146AL)。
- 1、下载文档前请自行甄别文档内容的完整性,平台不提供额外的编辑、内容补充、找答案等附加服务。
- 2、"仅部分预览"的文档,不可在线预览部分如存在完整性等问题,可反馈申请退款(可完整预览的文档不适用该条件!)。
- 3、如文档侵犯您的权益,请联系客服反馈,我们会尽快为您处理(人工客服工作时间:9:00-18:30)。
使用说明书高清摄像机型号HC-PV100GKSQT1408-1F0716DT1028请于使用前仔细阅读操作使用说明书,并将说明书妥善保管,以备将来使用。
“使用说明书(PDF 格式)”中有更详细的使用说明。
要想阅读,请从网站上下载。
https://eww.pavc.panasonic.co.jp/hdw/oi/HC-PV100/≥请单击所需的语言。
*要想浏览或打印使用说明书(PDF 格式),需要用到Adobe Reader 。
可以从下面的网站上下载您的操作系统可以使用的Adobe Reader 版本,然后进行安装。
(截至2016年7月)/products/acrobat/readstep2.html2SQT1408∫关于电池警告:为了减少火灾、触电或产品损坏的危险,≥请勿让本机遭受雨淋、受潮、滴上或溅上水。
≥请勿将花瓶等盛满液体的物品置于本机上。
≥请仅使用推荐的附件。
≥请勿卸下盖子。
≥请勿自行维修本机。
请向有资格的维修人员请求维修。
注意!为了减少火灾、触电或产品损坏的危险,≥请勿将本机安装或置于书柜、壁橱或其他密闭的空间里。
请确保本机通风良好。
≥请勿让报纸、桌布、窗帘等类似物品堵塞住本机的通风孔。
≥请勿将点燃的蜡烛等明火火源置于本机上。
电源插头是断路装置。
安装本机,使得可以立即从电源插座上拔下电源插头。
本机供在温和及热带气候地区使用。
警告电池有发生火灾、爆炸和灼伤的危险。
请勿对其拆卸、加热至60o C 以上或焚烧。
注意≥如果电池更换得不正确,会有发生爆炸的危险。
请仅用制造商建议使用的类型的电池进行更换。
≥废弃电池时,请与当地机构或经销商联系,询问正确的废弃方法。
∫产品标识产品位置高清摄像机底部AC适配器底部3SQT1408∫使用时的注意事项使本机尽可能远离电磁设备(如微波炉、电视机、视频游戏机等)。
≥如果在电视机上方或其附近使用本机,本机上的图像和/或声音可能会受到电磁波辐射的干扰。
≥请勿在移动电话附近使用本机,否则可能会影响图像和/或声音的品质。
≥扬声器或大型发动机产生的强大的磁场效应,可能会损坏录制的数据,或者可能会使图片变形。
≥由微处理器产生的电磁波辐射,可能会对本机产生负面影响,以致干扰图像和/或声音。
≥如果本机由于受电磁设备的影响而停止正常工作,请关闭本机,并取下电池或拔下AC适配器。
然后,重新安装电池或者重新连接AC适配器并开启本机。
请勿在无线电发射器或高压线附近使用本机。
≥如果在无线电发射器或高压线附近拍摄,拍摄的图像和/或声音可能会受到负面影响。
关于连接到PC≥本机不提供USB2.0电缆。
请使用市售的铁氧体磁心双屏蔽USB2.0电缆。
如果可能,建议使用长度在1.5m以下的电缆。
关于使用耳机≥来自耳机和头戴式耳机的过大声压可以导致听力损失。
≥长时间以最大音量收听可能会损伤用户的听力。
请务必使用提供的接线和电缆。
如果使用可选附件,请使用随机提供的接线和电缆。
请勿拉伸接线和电缆。
请勿向本机喷洒杀虫剂或挥发性化学药品。
≥如果用此类化学药品喷洒本机,机身可能会被损坏,表面漆可能会脱落。
≥请勿让橡胶或塑料制品与本机长时间接触。
如果在沙地或尘土较多的地方使用本机,例如在沙滩上,请勿使沙子或细小的灰尘进入到本机的机身和端口内。
另外,还要使本机远离海水。
≥沙子或尘土可能会损坏本机。
(插入及取出记忆卡时务必要小心。
)≥如果海水溅到了本机上,请用拧干的布将水擦去。
然后,用一块干布重新擦拭本机。
携带本机时要小心,请勿跌落或碰撞本机。
≥强烈的撞击可能会损坏本机的外壳,使其发生故障。
≥携带本机时,请握紧手带或肩背带,小心对待。
清洁≥清洁之前,请取下电池或从AC电源插座上拔开AC电缆,然后用软干布擦拭本机。
≥如果本机非常脏,请将布用水浸湿后用力拧干,然后用湿布来擦拭本机。
之后,再用一块干布擦干本机。
≥使用汽油、涂料稀释剂、酒精或洗碟剂可能会造成摄像机的机身发生变化或表面涂层剥落。
请勿使用这些溶剂。
≥使用化学除尘布时,请按照此布随附的说明书进行操作。
打算长时间不使用本机时。
≥存放本机时,建议同时放入一些干燥剂(硅胶)。
关于本机使用时,本机和SD卡都会变热。
这并非故障。
4SQT1408请勿在安装着三脚架的情况下用把手提起本机。
≥安装了三脚架时,其重量也会影响本机的把手,可能会导致把手折断,使用户受伤。
≥要在安装着三脚架时携带本机,请拿住三脚架。
请勿用把手挥舞、晃动或悬挂本机。
≥请勿用把手震动、挥舞或晃动本机。
如果对把手施加强烈的冲击,可能会损坏本机,或导致受伤。
请勿使线缆垂到地上或者在过道上拉着连接的线缆。
≥如果脚绊到电线,可能损坏电线,引起火灾或触电,电击也可能造成人员受伤。
在内置LED灯点亮时,请勿直视内置LED灯的发光部分。
不要将此部分靠近人眼并点亮灯光。
≥明亮的灯光可能会刺伤眼睛。
请勿直接用手触摸内置LED等的发光部分。
如果内置LED灯表面有灰尘或其他异物,请勿使用。
请勿用磁带之类的物体盖住内置LED 灯。
≥否则,可能会导致起火。
≥即使在关闭内置LED灯之后,一段时间内也不要触摸内置LED灯。
≥按住提供的滤镜左右两侧即可将其取下。
本机内使用的电池为可充电的锂离子电池。
此电池易受温度和湿度的影响,并且温度上升或下降越多,影响越大。
在寒冷的地方,可能不会出现完全充电指示,或者可能会在开始使用约5分钟后出现低电量指示。
在高温环境下,可能会启动保护功能,使本机无法使用。
请务必在使用后取出电池。
≥如果仍将电池装在本机上,即使关闭本机电源,也会有微量电流继续流动。
让本机保持此状态可能会导致电池过度放电。
这会导致电池即使在充电后也无法使用。
≥应将电池存放在乙烯塑料袋中,这样就不会让金属接触到电极。
≥应将电池存放在凉爽而干燥的地方,并应尽可能地使温度保持恒定。
(推荐的温度: 15o C至25o C,推荐的湿度: 40%RH至60%RH)≥极高或极低的温度都将缩短电池的使用寿命。
≥如果将电池置于温度高、湿度大或油污烟雾充斥的环境中,电池电极可能会锈蚀,并导致故障发生。
≥如果长时间存储电池,我们建议您每年对其充一次电,并在将充满后的电量完全消耗殆尽以后重新将其存储起来。
≥应除去附着在电池电极上的灰尘和其他杂质。
外出录制时,请准备好备用电池。
≥请准备想要录制的时间的约3至4倍的电池。
在寒冷的地方录制会缩短可以录制的时间,例如在滑雪场录制。
如果不小心跌落电池,请检查电池的电极是否损坏。
≥在端子部处于变形的状态下安装到本机上时,本机可能会被损坏。
关于电池5SQT1408请勿将废弃的旧电池掷入火中。
≥加热电池或将其掷入火中可能会引起爆炸。
如果在对电池充电后,其工作时间仍然很短,则电池有可能已经达到使用寿命。
请购买一块新的电池。
≥如果电池的温度极高或极低,充电可能要花费一些时间或者电池可能无法充电。
≥如果在收音机附近使用AC适配器,可能会对无线电接收产生干扰。
请使AC适配器与收音机保持1m以上的距离。
≥使用AC适配器时,它可能会发出嗡嗡声。
但是,这是正常现象。
≥使用后,请务必从AC电源插座上拔开AC电缆。
(如果使本机保持连接状态,AC适配器会消耗约0.3 W。
)≥请始终保持AC适配器和电池电极的清洁。
≥将设备安装在AC电源插座附近,使得电源拔开装置(AC电源插头)可以容易用手接近。
充电指示灯正在闪烁时,应该考虑以下几点。
以约4秒的周期闪烁(约2秒熄灭,约2秒点亮):≥电池过度放电或者电池的温度过高或过低时。
可以进行充电,但要正常完成充电可能会花费几个小时的时间。
≥正常充电一开始,充电指示灯就会以绿色点亮。
但是,根据使用状况,即使正在进行正常充电,充电指示灯也可能会以约4秒的间隔一直闪烁直到充电完成为止。
以约0.5秒的周期闪烁(约0.25秒熄灭,约0.25秒点亮):≥电池未被充电。
请从本机上取下电池,并试着重新充电。
≥请确认本机或电池的端子没有变脏或没有被异物覆盖,然后重新正确安装电池。
如果有异物或污垢,擦除前请先关闭本机。
≥电池温度或周围环境温度极高或极低。
请一直等待,等到恢复到适当的温度后再试着重新充电。
如果仍然无法充电,可能是本机、电池或AC适配器出了故障。
熄灭:≥充电已完成。
≥尽管充电未完成,但状态指示灯一直保持熄灭状态时,可能是本机、电池或AC适配器出了故障。
有关电池的详情,请参阅第5页。
关于AC适配器关于充电期间的充电指示灯6SQT14087SQT1408废弃或转让SD 卡时,请注意:≥本机或计算机的格式化和删除只会更改文件管理信息,而无法完全删除SD 卡中的数据。
≥在处理或转让SD 卡时,建议物理销毁主要的SD 卡元件或者使用本设备将SD 卡物理格式化。
≥要进行物理格式化,请将本机连接到AC 适配器,从菜单中选择[其它功能] # [媒体格式化] # [SD 记忆卡1]或[SD 记忆卡2],然后触摸[是]。
在下面的画面上按住录制开始/停止按钮3秒钟。
显示删除SD 卡数据的画面,因此请选择[是],然后按照画面上的指示进行操作。
≥用户负责管理SD 卡中的数据。
≥LCD 屏幕变脏或发生了水汽凝结时,请使用镜头布等软布擦拭。
≥请勿用手指甲触摸LCD 监视器,以及请勿用强力摩擦或按压。
≥贴上LCD 保护膜后,可能会变得难以看清或难以识别出触摸。
≥本机温度很低(如,存放在寒冷的地方)时,在刚刚打开电源后,LCD 监视器会比平时稍微暗一些。
本机的内部温度升高后,LCD 监视器将恢复到正常亮度。
关于SD 卡LCD 监视器/取景器LCD 监视器屏幕采用了极高的精密技术制造。
约有超过99.99%的点为有效点,仅有不到0.01%的点不亮或总是亮着。
但这并非故障,不会影响录制的图片。
取景器屏幕采用了极高的精密技术制造。
约有超过99.99%的点为有效点,仅有不到0.01%的点不亮或总是亮着。
但这并非故障,不会影响录制的图片。
∫关于录制动态影像的录制方式本机可以使用包括MOV、MP4和AVCHD*在内的3种不同的录制方式录制动态影像。
*支持AVCHD Progressive (1080/50p)。
MOV和MP4:这些录制方式适合于编辑影像。
以线性PCM录音。
≥那些方式与以AVCHD格式录制的动态影像不兼容。
AVCHD:本录制方式适合于用高清电视回放。
以Dolby® Digital录音。
∫关于录制内容的赔偿对于由于任何类型的问题所导致的录制或编辑内容的丢失而造成的直接或间接的损失,Panasonic不承担任何责任,并且如果录制或编辑不正常工作,Panasonic也不对任何内容提供保证。
同样,以上陈述也适用于对本机进行的任何类型的维修的情况。
∫关于水汽凝结(当镜头、取景器或LCD监视器雾化时)温度或湿度有变化时会发生水汽凝结,例如将本机从室外或寒冷的室内拿到温暖的室内时等。