
超级智能开关宣传手册(PDF)
超级,
单火线安装可分离式活动插接结构
无需另外布线,利用原有墙体照明线路条件,升级替换传统机械开关,
满足智能化需求,尤其适用装修后的改造。
这个设计或许将改变开关史。
面板、底盒、支架和供电线路的分离,
无需任何工具,易于对面板更换或故障维护,
更防范触电安全隐患。
母线型支架磁吸式
你不知道开关也可以跨界吗?
母线型支架,犹如航空母舰,
为智能单品提供了标准5V DC供电与快速安装的跨界连接基础,从此开关玩法将告别一成不变。
自由,就是远离条条框框。
磁吸式安装设计,
允许你,像玩乐高玩具一样,从音乐、摄像头、充电宝、3D夜灯等众多功能面板中,
轻松拆装组合,自由搭配。
平推式纯机械按键
灵动圈创新的平推按键设计,顺手,省力,
按键形状、大小,触按力度,
手感刚刚好, 符合人体工学。
不限于普通开关的LED装饰效果,在此处,呈现的则是一种设计与功能的共生关系,
柔和呼吸状的明暗节奏,开关状态一目了然,
更赋予家居空间生动表情。
“机电一体,永不瘫痪”材质颜色
机械与电子融合的首创设计,
突破常规却又严谨有条,
如人体骨骼肌理,严丝合缝,刚强有力保障,
无论是产品还是系统故障,确保开关功能万无一失。
甄选优质耐高温高强度PC原料,配合微型磨砂工艺,经久流畅耐用,手机CNC工艺的超薄金属材质,除了爽利的金属触感之外,更具硬朗、坚固、简洁之美。
流星白。
静美温润的光泽中悟得素和简的真谛。
破晓金。
甜美浪漫中透露出俏皮玩味的风范。
皓月银。
恰如圆缺不定的月亮暗示着深邃神秘。
对,就这样,
一按,即可开关,
一拧,即可调光,我们在形式上追求简洁,在使用操作上也力求简单,
一按,一拧是最简单的方式。
红酒杯,黑胶片,晶莹液体中光影交织,
“军港的夜啊,静悄悄,海浪把战舰轻轻地摇”,收音机的歌声中有父辈的回忆,家的灯光,熟悉的饭菜香味,游子的温暖港湾,
有时候喜欢的不全是产品本身,而是产品带来的场景,以及浸润的情怀,
四键极简场景控制,好记之际将带来全新生活方式和情感诉求。
摆脱线网羁绊,一劳永逸
寒冷冬夜起床,关灯,
睡眼惺忪起夜摸黑,开灯,
其中的烦恼、苦恼你一定深有体会。
告别凿墙挖孔,布管穿线,原有开关布局的不合理,
采用人体动能发电技术,随意贴,随意装,遥控+感触的双重操控,无论灯在哪里,都能轻松操作。
模块化:重新定义开关
随着超级开关的问世,一同推出的功能面板就有九种,
涵盖了蓝牙音乐、家电遥控、充电宝、摄像头、对讲等功能,
并持续为创客、极客们预留“创作”空间,发掘生活中更多可能性,墙壁开关,开始,将有突破性进步。
空白磁贴面板相框夜灯面板
内部强有力的磁贴设计可吸附任何铁质物品,搭配旅行各地带回的风景磁贴,插花生态瓶...给单调沉闷的空间增加点缀又不会喧宾夺主,既是新意,也是情怀。
下班回家时,洗去我们疲惫感的,不就是一束小小的暖光吗?
灯亮后,图案就会显现,不能把天上的星星摘给你,但可以把整座城市框成灯送给你,(*可纯手工个性定制,设计师精心绘制各种图案,3D立体。
)
USB充电宝面板
即是充电宝也是充电器,
曲面的设计握感舒适,搭配衬板还可解放双手,安心为你的爱机提供动力,智能输出合适电流,保护你的移动设备安全。
人体感应面板
每一个黑暗的角落,当你需要它时,
都会为你,自动照亮前行的路,
给你一份安心和关怀,选择它吧,
让黑夜随心而亮,做懒人之际,也满足你的节能小小心愿。
WIFI摄像头面板蓝牙音乐面板
你是不是有这样的烦恼?
不放心家中的孩子?
家中老人无子女陪伴时的情况?
宠物在家捣乱又无能为力?
它,可以实现手机远程控制,语音通话,
紧急状况信息推送通知等功能,
可灵活转动方向,无论哪个角度都能一目了然。
孩子夜里睡不好,数羊其实没什么效用,来段小故事吧,泡泡浴太沉闷,进餐太单调,让音乐“治愈”下吧。
虽只有巴掌大机身,它却能爆发出超乎想象的音效能量,特别是低音,厚润饱满,蓝牙播放、SD卡直播播放和收音机三种音源选择,
想怎么听就怎么听。
(*搭配小喇叭面板使用)
呼叫对讲面板红外遥控面板
语音对讲群呼功能,
可以快速直接进行对话,
无需布线,安装比换灯泡还要简单,给行动不便人群特殊的关爱。
有了它,再无需到处寻找各种遥控器,无论是单独使用,还是通过手机APP远程、语音控制,
都能让万千家电,听懂你的话。
超级插座网关
插座,不再是功能单一的家用配件,
也可在母线型支架上作为家居智能的延伸,
带保护门设计的国标五孔,带USB接口的两孔插座,
安全保护之际,不再为手机充电再和家人争夺插座了。
强大的产品协同工作时,离不开一个“指挥官”,自带WiFi及网口,通过TCP/IP协议连接云端平台,就可以使用微信、IOS端、Android端来“命令”设备,
本地单控、双控、多控、手机遥控、异地远程控制均可实现。
套餐解决方案
上班出差在外,担心家里小孩老人,如何应对?
腿脚行动不便,如何快速告诉家人知晓需求,有何办法?亲朋好友欢聚一堂,营造些许舒适气氛,有何妙招?快、简、易的多种套餐方案,
你选我配,让我们成为超级开关的发烧友。
看护套餐方案
紧急呼叫套餐方案 蓝牙场景套餐方案USB充电套餐方案爸爸妈妈的小天使,你在家好吗?
人老了,腿脚不灵了,能帮帮我倒杯水吗? 没音乐怎么行?灯光太单板没情调怎么行?快速营造适宜休闲氛围,让家居空间变得生动床头没插座,手机又快没电了?停电了,手机又快没电了?远程视频监控、语音对讲、手机APP控制 互联群呼、对讲求助场景控制、背景音乐快速安心充电,边充边聊
图:
图:图:图:实现功能:
实现功能:实现功能:
实现功能:
红外场景遥控套餐方案
人体感应套餐方案遥控器越来越多,随手用过就忘记丢哪儿了,怎么办?卫生间灯老忘记关,一开就是一晚,浪费;睡意朦胧,起夜摸开关,没摸着···家电控制,场景控制
(*更多套餐方案请咨询经销商)小夜灯实现夜间感应亮灯,人来灯亮,人走灯灭。
图:
图:实现功能:
实现功能:。
GoControl WS15Z-1 墙上智能开关说明书
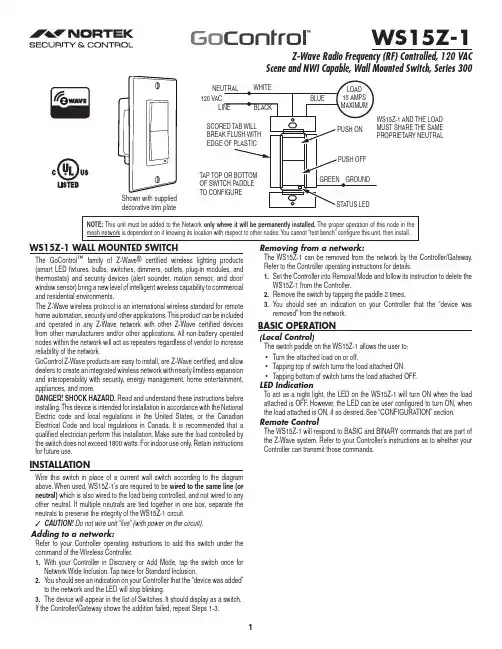
WS15Z-1 WALL MOUNTED SWITCHThe GoControl ™ family of Z-Wave ® certifi ed wireless lighting products(smart LED fi xtures, bulbs, switches, dimmers, outlets, plug-in modules, and thermostats) and security devices (alert sounder, motion sensor, and door/window sensor) bring a new level of intelligent wireless capability to commercial and residential environments.The Z-Wave wireless protocol is an international wireless standard for remote home automation, security and other applications. This product can be included and operated in any Z-Wave network with other Z-Wave certifi ed devices from other manufacturers and/or other applications. All non-battery operated nodes within the network will act as repeaters regardless of vendor to increase reliability of the network.GoControl Z-Wave products are easy to install, are Z-Wave certifi ed, and allow dealers to create an integrated wireless network with nearly limitless expansion and interoperability with security, energy management, home entertainment, appliances, and more.DANGER! SHOCK HAZARD. Read and understand these instructions before installing. This device is intended for installation in accordance with the National Electric code and local regulations in the United States, or the Canadian Electrical Code and local regulations in Canada. It is recommended that a qualifi ed electrician perform this installation. Make sure the load controlled by the switch does not exceed 1800 watts. For indoor use only. Retain instructions for future use.INSTALLATIONWire this switch in place of a current wall switch according to the diagram above. When used, WS15Z-1’s are required to be wired to the same line (or neutral) which is also wired to the load being controlled, and not wired to any other neutral. If multiple neutrals are tied together in one box, separate the neutrals to preserve the integrity of the WS15Z-1 circuit.✓CAUTION! Do not wire unit “live” (with power on the circuit).Adding to a network:Refer to your Controller operating instructions to add this switch under the command of the Wireless Controller.1. With your Controller in Discovery or Add M ode, tap the switch once for Network Wide Inclusion. Tap twice for Standard Inclusion.2. You should see an indication on your Controller that the “device was added” to the network and the LED will stop blinking.3. The device will appear in the list of Switches. It should display as a switch.If the Controller/Gateway shows the addition failed, repeat Steps 1-3.Removing from a network:The WS15Z-1 can be removed from the network by the Controller/Gateway. Refer to the Controller operating instructions for details.1. Set the Controller into Removal Mode and follow its instruction to delete the WS15Z-1 from the Controller.2. Remove the switch by tapping the paddle 2 times.3. You should see an indication on your Controller that the “device was removed” from the network.BASIC OPERATION(Local Control)The switch paddle on the WS15Z-1 allows the user to:• Turn the attached load on or off.• Tapping top of switch turns the load attached ON.• Tapping bottom of switch turns the load attached OFF .LED IndicationTo act as a night light, the LED on the WS15Z-1 will turn ON when the load attached is OFF . However, the LED can be user confi gured to turn ON, when the load attached is ON, if so desired. See “CONFIGURATION” section.Remote ControlThe WS15Z-1 will respond to BASIC and BINARY commands that are part of the Z-Wave system. Refer to your Controller’s instructions as to whether yourController can transmit those commands.WS15Z-1Z-Wave Radio Frequency (RF) Controlled, 120 VACScene and NWI Capable, Wall Mounted Switch, Series 300Shown with supplied decorative trim plateNOTE: This unit must be added to the Network only where it will be permanently installed. The proper operation of this node in the mesh network is dependent on it knowing its location with respect to other nodes. You cannot “test bench” confi gure this unit, then install.ADVANCED OPERATIONAll On/All OffThe WS15Z-1 supports the ALL ON / ALL OFF commands. The WS15Z-1 can be set to respond to ALL ON and ALL OFF commands four different ways. Refer to your Controller for information on how to set the WS15Z-1 to operate in the manner you desire. Some Controllers may be only able to set certain settings of ALL ON/ALL OFF response.The four different ways the WS15Z-1 can be setup to respond to ALL ON and ALL OFF commands are:1. Responds to ALL ON or the ALL OFF command.2. Responds to ALL OFF command but will not respond to ALL ON command.3. Responds to ALL ON command but will not respond to ALL OFF command.4. Responds to ALL ON and the ALL OFF command. CONFIGURATIONThe WS15Z-1 supports the Confi guration command. Each unit can be confi gured to operate slightly differently than how it works when you fi rst install it.Using the Confi guration command you can confi gure the following:Night LightBy default, the LED on the WS15Z-1 will turn OFF when the load attached is turned ON. To make the LED turn ON when the load attached is turned ON, set Parameter 3 to a value of 1.Parameter Length Valid Values Confi guration Option3 1 Byte 0LED OFF when the load is on, and ON when the load is off (default - night lite mode)1LED ON when the load is on, and OFF when the load is off2LED is always on3LED is always off4LED blinks during RF transmissions from or to the deviceInvert SwitchTo change the top of the switch to OFF and the bottom of the switch ON, set Parameter 4 to a value of 1.Parameter Length Valid Values Confi guration Option4 1 Byte0Top of switch is ON, bottom of switch is OFF (default)1Bottom of switch is ON, top of switch is OFF Resetting to DefaultsEach confi guration Parameter can be set back to its default setting by setting the default bit in the Configuration Set command. See your Controller’s instructions on how to do this (and if it supports it). All confi guration commands will be reset to their default state when the WS15Z-1 is excluded from the Z-Wave network by using the Controller to reset the node. SPECIFICATIONSPower:120 VAC, 60 HzSignal (Frequency): 908.42M HzMaximum Load: Resistive: 15 amps (1800 watts) maximum, 120 VACMotor: 1/2 H.P. maximum, 120 VACIncandescent: 600W maximum, 120 VACRange:Up to 130 feet line of sightZ-Wave® is a registered trademark of Sigma Designsand its subsidiaries in the United States and other countries.REGULATORY INFORMATIONThe WS15Z-1 is certifi ed to comply with applicable FCC and IC rules and regulations governing RF and EMI emissions.This device complies with part 15 of the FCC Rules. Operation is subject to the following two conditions: (1) This device may not cause harmful interference, and (2) This device must accept any interference received, including interference that may cause undesired operation.FCC NoticeThis equipment has been tested and found to comply with the limits for a Class B digital device, pursuant to Part 15 of the FCC Rules. These limits are designed to provide reasonable protection against harmful interference in a residential installation.This equipment generates, uses, and can radiate radio frequency energy and, if not installed and used in accordance with the instructions may cause harmful interference to radio communications. However, there is no guarantee that interference will not occur in a particular installation. If this equipment does cause harmful interference to radio or television reception, which can be determined by turning the equipment off and on, the user is encouraged to try to correct the interference by one or more of the following measures:• Reorient or relocate the receiving antenna.• Increase the separation between the equipment and receiver• Connect the equipment into an outlet on a circuit different from that to which the receiver is connected• Consult the dealer or an experienced radio/TV technician to help.• Changes or modifications not expressly approved by the party responsible for compliance could void the user’s authority to operate the equipmentIC NoticeThis Class B digital apparatus complies with Canadian ICES-003Cet appareil numérique de la classe B est conforme à la norme NMB-003 du Canada. Le présent appareil est conforme aux CNR d’Industrie Canada applicables aux appareils radio exempts de licence. L’exploitation est autorisée aux deux conditions suivantes : (1) l’appareil ne doit pas produire de brouillage, et (2) l’utilisateur de l’appareil doit accepter tout brouillage radioélectrique subi, même si le brouillage est susceptible d’en compromettre le fonctionnement.This device complies with the Industry Canada license exempt RSS standard(s). Operation is subject to the following two conditions: (1) this device may not cause interference, and (2) this device must accept any interference, including interference that may cause undesired operation of the device.WARRANTYWhat is Covered?Nortek Security & Control (“NS&C”) warrants to consumers who purchase this product for personal, family or household purposes new from NS&C directly or from an authorized NS&C dealer, that the product will be free from defects in materials and workmanship for a period of (1) year from the date of purchase. This warranty only applies if the product is installed at a residence in the 50 United States or District of Columbia, and only at the site of the original installation. It is not transferable. This warranty is not extended to resellers.If a defect exists, NS&C will have you ship the defective part or product to us and we will, at our option, either repair or replace it.This warranty does not cover defects or damages caused by improper handling, maintenance, storage, installation, removal or re-installation, misuse, non-factory authorized modifi cation or alteration, use of incompatible accessories, electrical power problems or surges, impact by foreign objects, accident, fire, acts of God, normal wear and tear or shipping damage other than a shipment from NS&C. Note that all NS&C products are designed to be installed, removed and serviced by trained individuals or professionals.Keep your original sales receipt as it will be required to obtain warranty service.This warranty shall not be extended or restarted upon receipt of any repaired or replacement part or product under this warranty. No person is authorized to extend or otherwise modify this warranty.How do I Obtain Warranty Service?Toobtainwarrantyservice,*********************************************.Includeyourname,address, telephone number, the model number of your product, a copy of your original sales receipt, and a description of the problem. Unless we need to discuss the situation further with you, you will be emailed a Return Authorization Number and shipping instructions. If we need to discuss the situation further with you, we will call or email you. NS&C may require troubleshooting on installed product before a Return Authorization Number is issued. Anything shipped to us without a Return Authorization Number will be automatically returned unopened. You are responsible for the charges for shipment to us, unless you are a California resident.LimitationsTHE DUR ATION OF ANY IMPLIED WAR ANTY, INCLUDING THE WAR ANTIES OF MERCHANTABILITY AND FITNESS FOR A PARTICULAR PURPOSE, SHALL NOT EXCEED THE WARRANTY PERIOD PROVIDED HEREIN.Some states do not allow limitations on how long an implied warranty lasts, so the above limitation may not apply to you.NS&C SHALL NOT BE LIABLE FOR ANY INCIDENTAL OR CONSEQUENTIAL DAMAGES RESULTING FROM THE BREACH OF ANY WRITTEN OR IMPLIED WARRANTY.Some states do not allow limitations on how long an implied warranty lasts, so the above limitation may not apply to you.This warranty gives you specifi c legal rights, and you may also have other legal rights which vary from State to State.IMPORTANTRadio controls provide a reliable communications link and fill an important need in portable wireless signaling.However, there are some limitations which must be observed.• For U.S. installations only: The radios are required to comply with FCC Rules and Regulations as Part 15 devices.As such, they have limited transmitter power and therefore limited range.• A receiver cannot respond to more than one transmitted signal at a time and may be blocked by radio signals that occur on or near their operating frequencies, regardless of code settings.• Changes or modifications to the device may void FCC compliance.• Infrequently used radio links should be tested regularly to protect against undetected interference or fault.• A general knowledge of radio and its vagaries should be gained prior to acting as a wholesale distributor or dealer, and these facts should be communicated to the ultimate users.Copyright © 2015 Nortek Security & Control LLC 10008577 X5。
Ecolink智能技术有限公司智能开关操作指南说明书
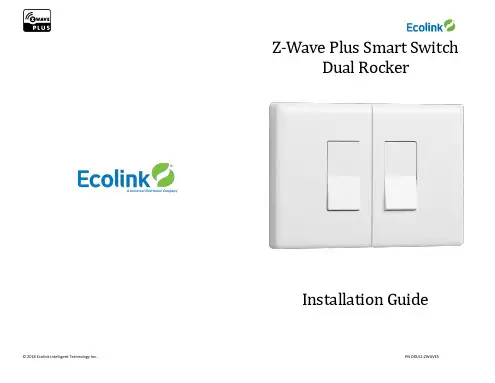
3) The LED in front of the unit will blink steadily if the network exclusion is successful.
*Please refer to the LED status section for more information on the LED behavior
© 2018 Ecolink Intelligent Technology Inc.
PN DDLS2-ZWAVE5
Notes:
Controller inclusion mode must be activated BEFORE starting sensor inclusion or exclusion mode.
The device can only be included into one controller network at a time, and must be excluded from one network before inclusion in another.
Exclusion mode on the senor iocedure as inclusion.
PN DDLS2-ZWAVE5
Network Inclusion
The Z-Wave Plus Smart Switch must be added to a Z-Wave Plus network prior to use. To include the device in a network both the device and the network controller must be in inclusion mode at the same time. Refer to the instructions provided by the manufacturer of your specific controller for details on initiating the controller’s inclusion mode. 1) Verify that the Z-Wave Plus controller you are using is compatible
EATON智能家居开关指南说明书
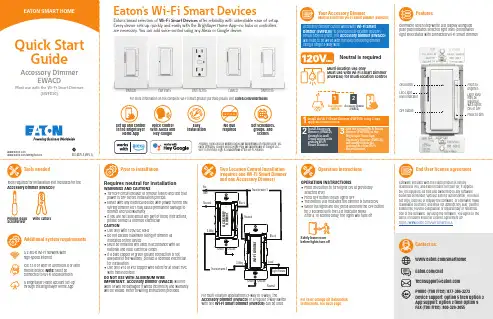
Accessory Dimmer can be wired with Wi-Fi Smart Dimmer (EWFD30) to provide multi-location ON/OFF/BRIGHT/DIM control. The Accessory Dimmer (EWACD) will need to be wired with the load controlling dimmer using a single 3-way wire.Dimmable seven step white LED display alongside push pad indicates selected light level (coordinates light level status with connected Wi-Fi Smart Dimmer)Your Accessory DimmerMust use with the Wi-Fi Smart Dimmer (EWFD30)FeaturesLight level may be adjusted with lights ON or OFF Press to brighten Press to dimTwo Location Control Installation (requires one Wi-Fi Smart Dimmer and one Accessory Dimmer)Operation instructionsMulti-location use onlyMust use with Wi-Fi Smart Dimmer (EWFD30) for multi-location controlPrior to installationOPERATION INSTRUCTIONS• Press ON button to turn lights ON at previously selected level• Press OFF button to turn lights OFF• The bottom LED indicates the dimmer is turned ON • W hen the lights are ON, press and hold the OFF button for 2 seconds until the LED indicator blinks After a 10 second delay, the lights will fade offFor color change kit installation instructions, see back pageInstall the Wi-Fi Smart Dimmer (EWFD30) using 3-way application instructions.12Install Accessory Dimmer (EWACD) through in-wall 3-way wiring with primary Wi-Fi S mart Dimmer.3Add the primary Wi-Fi Smart Dimmer (EWFD30) to the Brightlayer Home App.Accessory Dimmer (EWACD) will simply follow the commands of the Wi-Fi Smart Dimmer.3Tools neededAdditional system requirementsPhillips-head ScrewdriverWire cuttersTools required for installation (not included) for the Accessory Dimmer (EWACD):A 2.4GHz Wi-Fi network with high-speed internetIOS 12.0 or later or Android 8.0 or later mobile device. Note: Must be connected to Wi-Fi and Bluetooth A Brightlayer Home account set-up through the Brightlayer Home AppVoice controlw ith Alexa and Hey Google installation requiredSet schedules, groups, and scenesFor multi-location applications (3-way or 4-way), the Accessory Dimmer (EWACD) or a regular 3-way switch with one Wi-Fi Smart Dimmer (EWFD30) can be used.Neutral is requiredSafely leave roombefore lights turn offWi-Fi Smart Devices offer reliability with unbeatable ease o f setup. /smarthomeEWFSW15EWFTRCR15EWACDEWFFSC15Amazon, Alexa and all related logos are trademarks of , Inc. or its affiliates. Google and Google Play are trademarks of Google LLC. Wi-Fi CERTIFIED logo is a trademark of the Wi-Fi Alliance.Requires neutral for installationWARNINGS AND CAUTIONS • T urn OFF circuit breaker or remove fuse(s) and test that power is OFF before installation process • N ever wire any electrical device with power turned ON Wiring dimmer HOT may cause permanent damage to dimmer and void warranty • I f you are not sure about any part of these instructions, please contact a licensed electrician CAUTION• Use only with 120V/AC 60Hz• Do not exceed maximum rating of dimmer as indicated on the device • M ust be installed and used in accordance with all national and local electrical codes • I f a bare copper or green ground connection is not available in the wallbox, contact a licensed electrician for installation • U se only #14 or #12 copper wire rated for at least 75ºC with these devicesDO NOT USE WITH ALUMINUM WIREIMPORTANT: Accessory Dimmer (EWACD) will not work or will be damaged if wired incorrectly and warranty will be voided. Refer to wiring instructions provided.Once selected the devices would be displayed as shown below:Note: Now the user can utilize many features that are available such as creating schedules, scenes, preset light levels and minimum/maximum brightness settingsthrough the Brightlayer Home App.FCC STATEMENTThis device complies with Part 15 of the FCC Rules. Operation is subject to the following two conditions:1: This device may not cause harmful interference, and2: This device must accept any interference received, including interference that may cause undesired operation.NOTE: This equipment has been tested and found to comply with the limits for aClass B digital device, pursuant to Part 15 of the FCC Rules. These limits are designed to provide reasonable protection against harmful interference in a residentialinstallation. This equipment generates, uses and can radiate radio frequency energy and, if not installed and used in accordance with the instructions, may cause harmful interference to radio communications. However, there is no guarantee that interfer-ence will not occur in a particular installation. If this equipment does cause harmful interference to radio or television reception, which can be determined by turning the equipment off and on, the user is encouraged to try to correct the interference by one or more of the following measures:• Reorient or relocate the receiving antenna.• Increase the separation between the equipment and receiver.• Connect the equipment into an outlet on a circuit different from that to which the receiver is connected.• Consult the dealer or an experienced radio/TV technician for help.FCC CAUTION: Any changes or modifications not expressly approved by Eaton Wiring Devices could void the user’s authority to operate the equipment.This device complies with Industry Canada’s license-exempt RSSs. Operation is subject to the following two conditions:(1) This device may not cause interference; and(2) This device must accept any interference, including interference that may cause undesired operation of the device.EATON WIRING DEVICES LIMITED 2 YEAR WARRANTYEaton Wiring Devices warrants its Dimmer to be free of defects in materials and workmanship in normal use and service for a period of two years from date of original purchase. THIS TWO (2) YEAR LIMITED WARRANTY IS IN LIEU OF ALL OTHER WARRANTIES, OBLIGATIONS, OR LIABILITIES, EXPRESSED OR IMPLIED (INCLUDING ANY IMPLIED WARRANTY OF MERCHANTABILITY OR FITNESS FOR A PARTICULAR PURPOSE THAT IS IN DURATION IN EXCESS OF TWO YEARS FROM THE DATE OF ORIGINAL CONSUMER PURCHASE). NO AGENT, REPRESENTATIVE, OR EMPLOYEE OF EATON HAS AUTHORITY TO INCREASE OR ALTER THE OBLIGATIONS OF EATON UNDER THIS WARRANTY. To obtain warranty service for any properly installed Eaton Dimmer that proves defective in normal use send the defective Dimmer prepaid and insured to Quality Control Dept., Eaton Wiring Devices, 203 Cooper Circle, Peachtree City, GA 30269; in Canada: Eaton Wiring Devices, 5925 McLaughlin Road, Mississauga, Ontario L5R 1B8. Eaton will repair or replace the defective unit, at its option. Eaton will not be responsible under this warranty if examination shows that the defective condition of the unit was caused by misuse, abuse, improper installation, alteration, improper maintenance or repair of damage inTroubleshooting guideAccessory Dimmer color change kit installation instructionsSTEP 1 :Squeeze top tabs on either side of the deviceSTEP 2 :Pull faceplate offSTEP 3 :Line up all tabs and snap the faceplateWarrantyLED statusSet-up the Wi-Fi smart dimmer (EWFD30)Add the primary Wi-Fi Smart Dimmer (EWFD30) to theBrightlayer Home App, so that the Accessory Dimmer (EWACD) will simply follow the commands of the Wi-Fi Smart Dimmer.STEP 1 : Double click on the “ON” button on the Wi-Fi Smart Dimmer (EWFD30). Status LED on the Wi-Fi Smart Dimmer should be blinking cyan to indicate that the device is in set-up mode. If the status LED is not blinking, refer to the Troubleshooting guide.STEP 2 : Log in to your account on the Brightlayer Home App STEP 3 : Select “Devices” optionOnce initial device is installed, additional devices can be added using the global add (+) buttonNext click on “Add a Device” option shown in the screen belowSelect the device type to addHow to download the AppGet your Wi-Fi Smart Device running in 3 easy steps!STEP 3 (continued) :Amazon, Alexa and all related logos are trademarks of , Inc. or its affiliates. Google and Google Play are trademarks of Google LLC. Wi-Fi CERTIFIED logo is a trademark of the Wi-Fi Alliance.STEP 3 (continued) :SymptomPossible causeSolutionDevice doesn’t function. All LEDs are OFFA)B) C) Circuit breaker is OFF or trippedImproper wiring Defective dimmerA) B) C) Turn ON the circuit breakerCheck and correct wiring Replace dimmerOne of the LED indicators is blinking, but can’t control the load.Accessory dimmer (EWACD) is not connected to the Wi-Fi Smart Dimmer (EWFD30)Check wiring diagram Quick reference table for Wi-Fi Smart Dimmer (EWFD30) functionalityNOTE: Not all products include color change kits.Available in 3 different color change kitsFor more information, visit /smarthomeDownload the AppSearch and download the Brightlayer Home App via the App Store or Google Play.Select “Create an Account” to create an account by following the instructions on the screen.Fold in half vertically with page 1 on outside, then Z-fold in horizontal direction to final folded size of 3.4 in. W x 5.5 in. H with part number facing outward.。
智能开关说明书R-W2-X-S系列(18.10.8)

智能开关说明书R-W2-X-S系列(18.10.8)
屏1
●2.24调光开关群控设定与删除
SET
调光群控------同一网络中的调光触摸屏,可任意选择一路调光控制键作为群控键,控制
不同调光开关的亮度控制键。
加入群组的控制键将受群控键控制,又可独立
45ONSETOFF
屏2
同一网络
ABC
控制。
只需设置“调亮”、“调暗”控制键其中任一群控,其余两个控制键
调光群控设定
DEF
的群控由软件自动生成,无需重复设置。
L1
在触摸屏上按压对任意触摸屏按Smart
Dimmer2
Dimmer1
L2
调光控制键Remote设置遥控器
L3L4DEL
“SET”键,完成设置
屏n同一网络
6
设定保存退出
1
23
屏1
在任意触摸屏按压图示
按键,退出设置模式
6
在同一网络中选择调在该触摸屏上按压按键在同一网络中,根据用户
屏2同一网络
删除确认退出
光开关触摸屏作为发起场景设置键需求选择触摸屏上的群
屏,按SmartRemote设控键
置遥控器SET键
45
ONSETOFF
ABC
调光群控删除
DEF
待删除的调光对任意触摸屏按SmartL1
Dimmer2
屏n同一网络Dimmer1
群控被调出Remote设置遥控器L2
“DEL”键,完成设置L3L4DEL
DEL
5152
SET。
灯光触摸屏智能控制墙开关系列产品 使用说明手册
灯光触摸屏智能控制墙开关系列产品使用说明手册北京康微英特电子科技有限公司北京首创电子实验室产品优势感谢阁下选购本产品,本产品不同于其它同类产品,该产品性功能有人在追随,而无人能超越。
主要优势在于:1、适用于所有灯具;2、所有节能灯关后不会频闪光;3、对节能灯最小功率不要求;4、采用继电器开关控制;5、触摸屏+LED背光板效果显示+夜晚LED开关位置指示灯;6、单键开关+分键开关+总开+总光+防盗+延迟定时自动关灯智能程序控制功能;7、节能,20多年才消耗一度电;8、实时快速遥控无需等待;8、独家真正采用单极墙开关创造祖先米有泉的发明专利技术制造;智能触控墙开关开关控制使用说明通过点动触摸开关上某路触摸区,在手指离开触摸区瞬间可对该路灯进行开关控制,注意:在手指触到触摸区瞬间不对该路灯进行开关控制,只有当手指离开触摸区瞬间才对该路灯进行开关控制。
快速按触摸屏时间小于一秒灯亮进入开关控制状态智能触控墙开关功能程序设置使用说明通过长按触摸开关上某一路触摸区可对多个遥控器进行学习,所学功能根据灯闪的次数而不同,如学习成功灯会随着遥控器按键的按动闪亮一次。
长按触摸屏时间大于1秒以上灯亮进入学习状态一、用一个遥控键遥控灯的开关长按住墙壁开关触摸区直到灯亮一次松手,然后按遥控器上任意键,控制器收到信号后灯闪亮一次,说明学习成功,通过该按键可实现该路灯的开和关的操作。
学习完毕,轻触开关一下灯开。
再轻触一下灯关或按遥控器定义键A一下灯开。
再按遥控器键A一下灯关。
智能家居GSM彩信防盗报警主机短信学习方法:把编好的几路打开或关闭短信指令发出同时,长按住墙壁开关触摸区直到灯亮一次松手,触摸屏墙开关收到主机信号后灯闪亮一次,说明学习成功,再发反向关闭或打开短信指令即可短信远程控制电灯、电器的开或关。
二、用一个遥控键遥控灯的开、用另一个遥控键遥控灯的关长按住墙壁开关触摸区直到灯闪亮两次松手,然后按遥控器上任意键,控制器收到信号后灯闪亮一次,说明学习成功,按遥控器上的该键只能开灯。
Z-Wave In-Wall 智能开关说明书

Features• QuickFit – Improved components reduced the housing depth by up to 20 percent compared to previous Z-Wave models and eliminated the need for heat tabs. QuickFit enhancements are the ideal smart solution for older-style switch boxes, multi-gang configurations or any other application with limited space.• SimpleWire – Dual ground ports, which are o set to avoid switch box mounting screws, support daisy-chaining in multi-switch setups.• Full-home coverage – Z-Wave Plus works with all previous Z-Wave generations to allow continued expansion of your home-automation network. The dimmer is capable of controlling indoor or outdoor fixtures for whole-home automation and repeats your Z-Wave signal from your hub or other devices to extend your range by up to 150ft.• Easy installation – Requires indoor in-wall installation with hardwired connections.Neutral wire required . Full-range dimmability for use with dimmable LEDs and CFLs as well as incandescent and halogen bulbs. Supported wattage – 600W incandescent; 300W LED/CFL. Supported voltage – 120VAC. Operating temperature range 32-104 degrees Fahrenheit.Wallplate sold seperatelySIMPLE WIRE ™VERSATILITYAutomating your home not only makes your life easier, but it also saves energy, cuts costs, and boosts your home’ssecurity. Control your lights, fans and appliances, schedule a timed event, or create a custom scene from anywhere atanytime of the day. Compatible with LED, CFL, incandescent and halogen bulbs, and other hardwired devices.VOICE CONTROLControl your connected device with only your voice! Works with Amazon Alexa and Google Assistant. Alexa/Echo/Google Assistant devices sold separately. Z-Wave hub must be Alexa compatible. Not directly compatible with Echo Plus . Will work through Z-Wave hub only.1QUICKFITThe revolutionary, space-saving QuickFit design features a rounded housing and 20 percent smaller depth compared to previous models. The elimination of heat tabs also o ers a more convenient installation and user-experience without reducing the electrical ratings.SIMPLEWIREWith the SimpleWire technology, the new add-on switch features dual o set ground ports, which save time, simplify installation and reduce wire congestion in multi-switch setups. Neutral wire required.46565246565QUICK FIT ™SIMPLE WIRE ™120VAC, 60Hz 908.4/916MHz600W Incandescent, 300 Dimmable CFL/LEDUp to 150 feet from controller or closest Z-Wave device32-104° F (0-40° C)2-year limited product warrantyJasco Z -Wave In-wall T oggle Smart Dimmer· QuickFit™ – Improved componentsreduce the housing depth by up to 20 percent compared to previousZ-Wave models and eliminated the need for heat tabs· SimpleWire™ – Auto line-loadsensing terminals support fastinstallation by detecting line andswitch accordingly Dual ground ports, which are offset to avoid switch box mounting screws, support daisy-chaining in multi-switch setups · Remotely monitor with any mobile device *· Works with Google and Alexa (requires compatible hub *)· May be used in single poleinstallation or with up to four Jasco model 12728 or 46561 Add-onswitches in 3, 4, 5 or 6-way wiring· Works with most dimmable LED, CFL, halogen and all incandescent bulbs· Turn ON/OFF and control the brightness level of the connected lighting manually or via Z-Wave hub or controller · New blue LED backlit toggle (with 4 adjustable settings)· UL Listed to work with dimmable LED & CFLs· Can be Included in multiple Groups and Scenes· Utilizes the Z-Wave Firmware Update Meta Data commandupdates Over the AirDim rates, Alternate exclusion andminimum and maximum dim levelsbrightness level from 0-100% in1% increments wiring connections for Line (Hot), Load, Neutral and Ground. Traveler wire required for multi pole installation · Use a standard toggle wall plate (wall plate not included)· LED status can be inverted manually changed to invert, always OFF and always ON · Inline traveler circuit protection · Improved battery life and up to 50percent greater wireless range · QR codes with unique,industry-standard secure key exchange to add a layer of 128-bit encryption· Effortless device pairing to Z-Wave · Backward compatible with all generations of Z-Wave devices · 250% faster processor · 400% more memory· Supports wireless upgrades to future-proof your home * Requires Z-Wave hub or controller, functions may vary depending on brand.New blue LED backlit toggle· Insert wire into port and tighten screw. Do not wrap wire around screw· Indoor use only· Visit /hubs for hub compatibility· Wallplates sold separately· Trilingual Instruction manual – (English, French, Spanish)3Once the hub is ready to add your smart switch, press up or down on the smart toggle switch to add it in the network.Once the controller is ready to remove your device, press up or down on the smart toggle switch to remove it from the network. The controller’s app will indicate if it has discovered the sensor. If prompted by the controller to enter the S2 security code, refer to the QR code/security number on the back of the box, or the QRcode label on the product. Enter the 5-digit code.subject to change without noticeDistributed by Jasco Products Company LLC 10 E. Memorial Rd., Oklahoma City, OK ©Jasco 2019Quickly press up on the toggle 3 times, then press the down onthe toggle 3 times.DSK : XXXXX-125651-22671 -26939-47599 -19612-25872 -477524ORIn-Wall Plug-in In-WallPurchase additional items at, or visit your local retailer.In-Wall Plug-in In-WallEnbrighten In-Wall Hinge PinDirect Porta-In-WallPlug-inD EA B CF GHOUD EA B CF GHOD EA B CF GH。
Ecolink智能开关基础配置与安装方法说明书
Step 5 – Add Smart Switch covers and test manual and automatic operation. If Smart Switch is grinding or does not operate 110V light switch, use rocker adjustment screws to create smooth operation.
Ecolink Smart Switch HUB/Controller Compatibility
Ecolink Tested Compatibility Listing
Ecolink Device Ecolink Smart Switch
HUB/Controller Samsung SmartThings V1 Samsung SmartThings V2
Step 1 – Remove light switch plate. (Save plate screws.)
Step 2 - Mount Toggle Style Ecolink Smart Switch • Ensure switch toggle is inserted in up/ down control mechanism. • Use plate screws to secure Smart Switch.
智能道闸机产品手册说明书
智能道闸机产品手册前言本节内容的目的是确保用户通过本手册能够正确使用产品,以避免操作中的危险或财产损失。
在使用此产品之前,请认真阅读产品手册并妥善保存以备日后参考。
概述本手册适用于JX-DZ316X系列智能道闸机(以下简称“道闸”)。
符号约定对于文档中出现的符号,说明如下所示。
符号说明说明类文字,表示对正文的补充和解释。
注意类文字,表示提醒用户一些重要的操作或者防范潜在的伤害和财产损失危险。
警告类文字,表示有潜在风险,如果不加避免,有可能造成伤害事故、设备损坏或业务中断。
危险类文字,表示有高度潜在风险,如果不加避免,有可能造成人员伤亡的重大危险。
安全使用注意事项·道闸安装使用过程中,必须严格遵守国家和使用地区的各项电气安全规定。
·请不要将多个道闸连接至同一电源适配器(超过适配器负载量,可能会产生过多热量或导致火灾)。
·在接线、拆装等操作时请一定要将道闸电源断开,切勿带电操作。
·如果道闸出现冒烟现象,产生异味,或发出杂音,请立即关掉电源并且将电源线拔掉,及时与经销商或服务中心联系。
·如果道闸工作不正常,请联系购买道闸的商店或最近的服务中心,不要以任何方式拆卸或修改道闸。
(对未经认可的修改或维修导致的问题,本公司不承担任何责任)。
·请不要使物体摔落到道闸上或大力振动道闸,使道闸远离存在磁场干扰的地点。
避免将道闸安装到表面振动或容易受到冲击的地方(忽视此项可能会损坏道闸)。
·道闸接入互联网可能面临网络安全问题,请您加强个人信息及数据安全的保护。
当您发现道闸可能存在网络安全隐患时,请及时与我们联系。
·请您理解,您有责任合理配置所有的密码及其他相关产品安全设置,并妥善保管好您的用户名和密码。
·请妥善保存道闸的全部原包装材料,以便出现问题时,使用包装材料将道闸包装好,寄到代理商或返回厂家处理。
非原包装材料导致的运输途中的意外损坏,本公司不承担任何责任。
lifesmart_v20.7.pdf 产品手册说明书
产品手册杭州市滨江区滨康路352号中控信息大厦A座10-11楼 杭州行至云起科技有限公司深圳市南山区沙河西路3011号白沙新兴产业园1幢7楼C区成都市武侯区天府二街复地复城国际T1-2902热线电话商务合作********************400-886-1911官方公众账号目录控制中心超能面板Nature 视界 智慧网关红外遥控碗智慧魔镜01 03 04 04 05电气面板辰星开关恒星开关玉系开关流光开关调光开关极星开关插座系列07091113151515氛围灯光量子灯PLUS量子灯带幻彩灯带智能灯泡蓝牙灯泡门廊壁灯383838383838窗帘系统智能开合帘电机智能卷帘电机智界窗帘控制器窗帘控制面板30303031暖通系统地暖控制面板新风控制面板风机盘管控制面板暖气温控阀中央空调线控器中央空调智控网关333435363636安防门锁可视门锁智能门锁(经典版)耶鲁门锁212223安防摄像头FRAME 摄像头云眸室内摄像头云视户外摄像头282828其它奇点开关模块随心开关紧急按钮通用控制器44444444传感器系列动态感应器门禁感应器燃气感应器烟雾感应器水浸感应器环境感应器甲醛感应器CO2感应器PM2.5感应器雷达感应器一氧化碳感应器智能声光报警器171717171818181819191919影音系统SONOS音箱背景音乐智能音箱394042超能面板是一款多功能全屋智控面板,外观及界面均由获得德国红点奖和iF奖的设计团队倾力打造。
采用4英寸IPS超清多彩屏,可通过多点触控屏操控家中各类智能设备,一键启动离家模式、睡眠模式、观影模式、用餐模式等不同的智慧场景,精准控制窗帘的开合程度,调整灯光亮度与颜色,调节空调温度等。
同时这款面板可作为网关使用,添加其它智能家居设备实现全屋控制,也可作为智能开关被添加到用户的全屋智能系统中,支持多种工作模式。
墙外面板:86*86*11mm整机尺寸:86*86*36mm屏幕规格:480*480P/720*720P操作系统:Linux/Android供电方式:零火线100-240V AC 无线通讯:Wi-Fi+CoSS/Wi-Fi+CoSS+蓝牙无线传输距离:200m(开放场) 最大负载:交流负载单路阻性负载500W,感性、容性负载200W超能面板/超能面板S4英寸IPS超清多彩屏多点触控毫秒级响应86开关无缝升级智能场景控制扁平化极简界面安全用电IPSNature视界重新定义了家庭场景下的全屋智能交互体验,既是智能家居的控制中心,又将可视对讲、物业消息推送、周边O2O商业集于一身,助力地产实现业主运营和数字化转型。
智能家居(开关)
18.智能家居(开关)1.触摸智能开关(1)灯光开/关,触摸按键带背光图案,电容式触摸屏。
(2)配合无线遥控器,实现无线开关、与其他控制器任意组合场景(3)断电保护(4)专利的单双线制兼容,无需布零线(5)适应各类灯具,直接替换86式开关,安装方便(6)大功率设计,最高负载达1000W2.调光开关(1)灯光开/关及调光功能,电容屏触摸按键带背光图案(2)配合无线遥控器,实现无线开关、与其他控制器任意组合场景(3)断电保护(4)专利的单双线制兼容,无需布零线(5)适应各类灯具,直接替换86式开关,安装方便(6)大功率设计,最高调光负载达400W3.万能智能插座(1)带有多功能开关控制功能(2)无线遥控(3)工作状态指示,可查询(4)多情景功能(5)国家标准设计,直接替换86式插座(6)大功率设计,最大负载电流:10A4.五位智能电源转换器(1)多功能遥控开关控制,多情景功能(2)专利技术的三态开关控制模式,支持常开、常关和遥控功能,完全兼容传统开关(3)工作状态指示,可查询(4)五组独立开关及LED状态指示灯(5)防火阻燃材料外壳及优质锡磷铜接触端子(6)大功率设计,低功耗设计18. Smart house (switch)1. Touch smart switch(1)The light is on / off, and the touch button is provided with a backlight pattern andcapacitive touch screen(2)With the wireless remote control, the wireless switch, and any combination of theother controller scenarios(3)Blackout protection(4)The patent is compatible with the single wire system without the need for zerowire(5)Adapted to all types of lamps and lanterns, directly replace the 86 type switch,easy installation(6)High power design, the maximum load can reached 1000W2. Dimming switch(1)The light is on / off with dimming function and the capacitive screen touchbuttons with backlight pattern(2)With the wireless remote control, the wireless switch, and any combination of theother controller scenarios(3)Blackout protection(4)The patent is compatible with the single wire system without the need for zerowire(5)Adapted to all types of lamps and lanterns, directly replace the 86 type switch,easy installation(6)High-power design, the maximum dimming load of 400W3. Universal smart socket(1)A multifunctional switch control function(2)Wireless remote control(3)The status of the work may be a query(4)Amorous scene function(5)The national standard design, directly replace the 86 type outlet(6)High-power design, the maximum load current: 10A4. Five bit smart power converter(1)Multi function remote control switch, affectionate scene function(2)The three state switch control mode of the patented technology, support thenormally open, often remote and remote control(1)Fully compatible with the traditional switch(2)The status of the work may be a query(3)Five independent switches and LED status indicator(4)Fire retardant materials and high quality copper tin contact terminal shell(5)High power rate design and low power consumption design。