MotoHint_China_eng 说明书(英文 中文)
TT摩托说明书

《TT摩托》产品说明书V1.02011.11.26关于本说明书本《说明书》说明如何连接及设定本产品,主要目的是协助店家进行正确的连接及设定。
请务必遵守本手册所有安全及警告指示,以避免损坏产品。
请妥善保管本手册,以备需要时方便查阅。
此外,非技术人员请勿自行维修本产品。
未经事先书面许可,不得以任何形式擅自复制本手册的任何一部分。
安全注意事项⏹请依本手册说明操作本产品,不当操作将损害本产品。
⏹未经允许,请勿擅自拆装、更换或改造本产品。
⏹进行维修或保养前,请务必关闭电源。
⏹将本产品连接至电源时,请先确认电压符合指定规格,否则可能造成火灾或电击。
⏹当机台安装妥当后,应把机台底部的顶脚放下,使机台平稳地安放在地面。
⏹不可随意拆缷、组装、移动机台。
⏹在搬动前必须先关掉电源,并拔掉电源线,车身与主机分开移动。
⏹机台上不可放置杂物,电源线不可被重物压住。
⏹不可把机台内的电路部分长期暴露在外面。
⏹在接通电源前须先检查电源插头和电源线是否完好,检查电压是否适合本机要求。
⏹进行维护和检修时一定要将电源断开。
⏹非专业人员不得随意检修本机电控装置。
⏹当替换器件时请选用合适的配件。
⏹当拔出电源线时,应抓住插头拔出,不能抓住电线拔出。
⏹不能用湿手插拔插头,不能用力拉伸,扭曲电源线。
⏹请勿将本产品装设于下列地点:●日光直射、漏水、潮湿及高温的地方。
●易燃、高挥发性物质或危险物品周围。
●倾斜、不平稳或震动频繁的地方。
●紧急出口或灭火器等消防设备周围。
散热风扇机台的散热风扇能使机台内部空气流通,有助于维持机台的正常运作。
因此,请保持风扇口及风扇周围的净空。
风扇若有故障时,请即时修理或更换。
设置条件目录关于本说明书_______________________________________________________ a 安全注意事项_______________________________________________________ b 散热风扇___________________________________________________________ b 设置条件___________________________________________________________ b 快速使用指南_______________________________________________________ 1 1.产品介绍_______________________________________________________ 21.1产品简介____________________________________________________________ 21.2产品规格____________________________________________________________ 21.3机台外观____________________________________________________________ 21.4随机配件____________________________________________________________ 31.3接口说明____________________________________________________________ 31.3.1主机面板________________________________________________________________ 31.3.2控制板__________________________________________________________________ 31.3.4接口功能说明___________________________________________________________ 32.设置和测试_______________________________________________________ 4 2.1设置测试操作 ____________________________________________________ 42.2设置菜单____________________________________________________________ 42.3输入设置____________________________________________________________ 42.4游戏设置____________________________________________________________ 52.5投币设置____________________________________________________________ 62.6账目查询____________________________________________________________ 62.7账目清除____________________________________________________________ 63.常见故障以及解决方法___________________________________________ 64.相关故障检查方法_______________________________________________ 74.1投币故障____________________________________________________________ 74.1控制板故障__________________________________________________________ 74.3电位器故障__________________________________________________________ 74.4更换电位器__________________________________________________________ 85.连网说明_______________________________________________________ 8快速使用指南步骤1:安装1、拆除包装后把主体、踏板、1P、2P车身按照整机示意图的位置放置好,先把主体底部箱体前开口引出的接插端子与控台车身的接插端子对接牢固,再把控台车身与主体配合用螺钉缩紧即可。
摩托罗布R7系列耳机说明书

HEARDGAME-CHANGING AUDIO CAPABILITIES IN Its advanced audio processing ensures that your communications are loud and clear, while environments, and advanced connectivity optionsBE HEARD ABOVE ALL ELSE MOTOTRBO R7 series deliver unprecedented loudness, so your team can hear in any situation. Its powerful speaker delivers a booming loudness of 102 phons, over ten times louder than a shouting conversation. R7 also features a programmable extra loud profile, bringing total loudness to 107 phons on the radio and with the remote speaker microphone — roughly ten times louder than a motorcycle at close range.CUSTOMIZABLE AUDIO EXPERIENCE MOTOTRBO R7 series can be adapted withaccessories that are specially designed tomake your fleet easier to use and even morecapable, especially in loud environments.Its re-engineered accessory port adds morerobustness and longevity to the point whereyour accessories connect to the radio, whilemaking it more resistant to dust and corrosion.Remote speaker microphones and other audioaccessories let you quickly reach and use yourradio. R7’s extra loud profile can be supportedon a number of purpose-built accessories.And our IMPRES™ technology ensures that R7works seamlessly with your Motorola Solutionsaccessories, so every call is heard perfectly.LOUD AND CLEARSHARP, CLEAR AUDIOMOTOTRBO R7 series let your team hearand be heard the first time — when itmatters most. Adaptive Dual MicrophoneNoise Suppression brings game-changingnoise cancelling to your team, so you canhear them over the deafening noise of heavymachinery, a roaring stadium at full capacity,or wherever they are. Automatic AcousticFeedback Suppression intelligently cancelsout the feedback of other close-by radios,for a seamless voice experience in tightlypacked areas. Intelligent Audio monitorsbackground noise and adjusts speakervolume so users don’t have to, ensuring callsare always at the perfect volume. MOTOTRBO R7 SERIES ENABLE YOUR TEAM TO HEAR AND BE HEARD MORE CLEARLY THAN EVER BEFORE, THE FIRST TIMEBUILT TO OUTPERFORMMOTOTRBO R7 series are tested to meet militarystandards, and built to outperform whatever is thrownits way. R7 is intrinsically safe, so you can use it inhazardous environments without the risk of ignition orfire. IP68 and IP66 ratings mean that it’s completelydust-tight and protected from water immersion of upto 2 meters for 2 hours, as well as direct impact fromhighly pressurized water streams. Even the screen isruggedized for impact resilience and can withstandmultiple drops onto concrete. And R7’s housing materialwas specially designed for the medical industry to resistCONNECTED WHEN IT COUNTS As the premier radio for MOTOTRBO systems, R7 series are ready to empower your team with custom voice coverage to keep your team connected when it counts, anywhere you do business. MOTOTRBO systems combine superior signal strength with the flexibility to customize site coverage, a predictable cost structure built around your needs, the control to decide which features and which devices go on your network, capacity for as many devices as your team needs, and the capabilities to ensure that your team is only a button’s push away.Your radios serve you best when they’re easy to use, operate, and ready when you need them. Powered by a new lithiumcell, MOTOTRBO R7’s batteries enable a compact form factor while providing exceptional battery life and talk time, andself-calibration eliminates hours of downtime spent calibrating and reconditioning batteries. Built-in safeguards ensure your device is safe from unauthorized access and interception. With over-the-air programming and updating via Wi-Fi, you can keep your radios up to date without taking them out of the field. And help you resolve issues with minimal Please refer to the MOTOTRBO R7 user manual for a list of approved disinfectants andServices Offers are available and designed to minimize downtime and productivity impact.FIT FOR BUSINESSPOWERED BY A NEW LITHIUM CELL, MOTOTRBO R7’S BATTERIES ENABLE A COMPACT FORM FACTOR WHILE PROVIDING MORE TALK TIMEBIG FEATURES, COMPACT DESIGNMore features than ever before, in a sleek andergonomic form factor.READY FORTOMORROW CRITICAL INFO AT FIRST GLANCE Fewer clicks, less scrolling and navigating — more critical information at a glance. The MOTOTRBO R7 series future-proof the radio device with a 2.4 in. 320 x 240 px. QVGA display for an intuitive user experience, and efficient navigation so your team can stay informed and productive. Users can get to what they need faster, with an uncomplicated user experience that minimizes any learning curve. With detailed notifications on the home screen, there’s no need to scroll through multiple screens to access alerts or text messages. And a single button’s press allows users to get to commonly used actionswith ease.CONNECT AND COLLABORATE Connected to collaborate — not inundate. Keep your team connected and streamline critical communications, while collaborating with video security systems, sensors and more. Reimagine safety, security, and connectivity into a single business-critical communications workflow. Prioritize only the alerts that keep your workforce and customers safe, without the notification overload, and keep your team at peak productivity and efficiency. And as your operation becomes more connected, so can your MOTOTRBO radios.2.4 in. 320 x 240 px. QVGA display2.4 GHz and 5 GHz Wi-Fi andBluetooth 5.2 for simple connectivity(applicable to R7, not available in R7a)Front and backmicrophones for advancednoise cancelling Slim, long-lasting batteryPowerful forward-facing speaker,positioned behind the keypad,Large emergency button withAll these features fit into a streamlined design, easy foryour teams to carry for an entireshift — and beyond.SERVICES PACKAGESFOR OPERATIONAL CONTINUITYEssential Services provide five years of assurance through hardware repair coverage, technical support, software updates and premium features.Five-year accidental damagecoverage is available as an add-on service.PREPARED AGAINST CYBERSECURITY VULNERABILITIESMOTOTRBO R7 was built to keep your fleet and network safe from unauthorized access. Built with software designed and engineered under the NIST Cybersecurity framework, and factory-installed device certificates to authenticate devices on your network and protect against IP attacks.R7’s secure on-board processor to guard against unauthorized firmware, and the highest levels of Wi-Fi and Bluetooth security, you can be confident that critical data on your R7 device is safe from unauthorized access and interception.MOTOROLA, MOTO, MOTOROLA SOLUTIONS and the Stylized M Logo are trademarks or registered trademarks of Motorola Trademark Holdings, LLCand are used under license. All other trademarks are the property of their respective owners. © 2022 Motorola Solutions, Inc. All rights reserved. 01-2022 [EV04]For more information, please visit/R7MOTOTRBO R7 WITHIN THE MOTOROLA SOLUTIONS ECOSYSTEMSafety Reimagined。
摩托罗拉moto e5play用户手册说明书
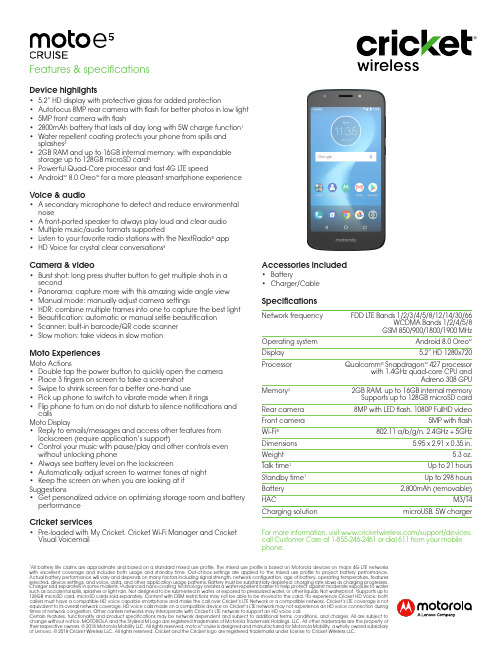
Device highlights• 5.2” HD display with protective glass for added protection• Autofocus 8MP rear camera with flash for better photos in low light • 5MP front camera with flash• 2800mAh battery that lasts all day long with 5W charge function 1•Water repellent coating protects your phone from spills and splashes 2• 2GB RAM and up to 16GB internal memory, with expandable storage up to 128GB microSD card 3• Powerful Quad-Core processor and fast 4G LTE speed• Android ™ 8.0 Oreo ™ for a more pleasant smartphone experienceVoice & audio• A secondary microphone to detect and reduce environmental noise• A front-ported speaker to always play loud and clear audio • Multiple music/audio formats supported• Listen to your favorite radio stations with the NextRadio ® app • HD Voice for crystal clear conversations 4Camera & video• Burst shot: long press shutter button to get multiple shots in a second• Panorama: capture more with this amazing wide angle view • Manual mode: manually adjust camera settings• HDR: combine multiple frames into one to capture the best light • Beautification: automatic or manual selfie beautification • Scanner: built-in barcode/QR code scanner • Slow motion: take videos in slow motionMoto ExperiencesMoto Actions• Double tap the power button to quickly open the camera • Place 3 fingers on screen to take a screenshot • Swipe to shrink screen for a better one-hand use• Pick up phone to switch to vibrate mode when it rings• Flip phone to turn on do not disturb to silence notifications and callsMoto Display• Reply to emails/messages and access other features from lockscreen (require application’s support)• Control your music with pause/play and other controls even without unlocking phone• Always see battery level on the lockscreen• Automatically adjust screen to warmer tones at night • Keep the screen on when you are looking at it Suggestions• Get personalized advice on optimizing storage room and battery performanceCricket services• Pre-loaded with My Cricket, Cricket Wi-Fi Manager and Cricket Visual VoicemailFor more information, visit /support/devices, call Customer Care at 1-855-246-2461 or dial 611 from your mobile phone.All battery life claims are approximate and based on a standard mixed use profile. The mixed use profile is based on Motorola devices on major 4G LTE networks with excellent coverage and includes both usage and standby time. Out-of-box settings are applied to the mixed use profile to project battery performance. Actual battery performance will vary and depends on many factors including signal strength, network configuration, age of battery, operating temperature, features selected, device settings, and voice, data, and other application usage patterns. Battery must be substantially depleted; charging rate slows as charging progresses. Charger sold separately in some markets. Advanced nano-coating technology creates a water repellent barrier to help protect against moderate exposure to water such as accidental spills, splashes or light rain. Not designed to be submersed in water, or exposed to pressurized water, or other liquids. Not waterproof. Supports up to 128GB microSD card, microSD cards sold separately. Content with DRM restrictions may not be able to be moved to the card. To experience Cricket HD Voice, both callers must have a compatible HD voice capable smartphone and make the call over Cricket’s LTE Network or a compatible network. Cricket’s LTE coverage is not equivalent to its overall network coverage. HD voice calls made on a compatible device on Cricket’s LTE network may not experience an HD voice connection during times of network congestion. Other carriers networks may interoperate with Cricket’s LTE network to support an HD voice call.Certain features, functionality and product specifications may be network dependent and subject to additional terms, conditions, and charges. All are subject to change without notice. MOTOROLA and the Stylized M Logo are registered trademarks of Motorola Trademark Holdings, LLC. All other trademarks are the property of their respective owners. © 2018 Motorola Mobility LLC. All rights reserved. moto e cruise is designed and manufactured for Motorola Mobility, a wholly owned subsidiary of Lenovo. © 2018 Cricket Wireless LLC. All rights reserved. Cricket and the Cricket logo are registered trademarks under license to Cricket Wireless LLC.Features & specificationsAccessories included• Battery• Charger/CableSpecificationsNetwork frequencyFDD LTE Bands 1/2/3/4/5/8/12/14/30/66WCDMA Bands 1/2/4/5/8GSM 850/900/1800/1900 MHzOperating system Android 8.0 Oreo ™Display 5.2” HD 1280x720ProcessorQualcomm ® Snapdragon ™ 427 processorwith 1.4GHz quad-core CPU andAdreno 308 GPU Memory 32GB RAM, up to 16GB internal memory Supports up to 128GB microSD card Rear camera 8MP with LED flash, 1080P FullHD videoFront camera 5MP with flashWi-Fi ®802.11 a/b/g/n, 2.4GHz + 5GHzDimensions 5.95 x 2.91 x 0.35 in.Weight 5.3 oz.Talk time 1Up to 21 hours Standby time 1Up to 298 hoursBattery 2,800mAh (removable)HACM3/T4Charging solutionmicroUSB, 5W charger。
摩托罗拉V3中文说明书(1-48)V1.0F

9
V3 中 文
自拍 .................................................................36
安全信息.......................................................... 15 录
入门知识.......................................................... 27 原装配件 .......................................................... 27 安装 SIM 卡...................................................... 28 安装电池 .......................................................... 28 为电池充电....................................................... 29 电池的使用....................................................... 30 开机 ................................................................. 31 关机 ................................................................. 32 调节音量 .......................................................... 32 拨打电话 .......................................................... 33 接听电话 .......................................................... 33 查看本机号码 ................................................... 34
MOTOMAN机器人说明书

MOTOMAN机器人应用于数控喷丸机系统调试与配置手册翻译:校对:审核:日期:2005年5月目录设定与诊断篇.............................................................................................................................. - 1 -1、设定与诊断篇的概要.................................................................................................. - 1 -2、关于安全系统.............................................................................................................. - 2 -2.1根据安全模式设定的保护............................................................................................ - 2 -2.1.1安全模式............................................................................................................. - 2 -2.1.2用户口令............................................................................................................. - 3 -3、系统设定...................................................................................................................... - 5 -3.1原点位置校准.......................................................................................................... - 5 -3.1.1原点位置校准..................................................................................................... - 6 -3.1.2操作方法............................................................................................................. - 7 -3.1.3机器人的原点位置姿态................................................................................... - 10 -3.2设定第二原点位置姿态........................................................................................ - 11 -3.2.1第二原点检查的目的....................................................................................... - 12 -3.2.2设定第二原点的位置....................................................................................... - 14 -3.2.3发生报警后的处理........................................................................................... - 15 -3.3时间的设定............................................................................................................ - 16 -3.4再现速度设定值的修改........................................................................................ - 17 -3.5解除全部极限功能................................................................................................ - 18 -3.6解除超程/解除防碰撞传感器报........................................................................... - 19 -3.7干涉区域................................................................................................................ - 20 -3.7.1干涉区域........................................................................................................... - 20 -3.7.2立方体干涉区域............................................................................................... - 21 -3.7.3轴干涉区域....................................................................................................... - 27 -3.7.4干涉区域的数据清除....................................................................................... - 29 -3.8作业原点设定........................................................................................................ - 30 -3.8.1作业原点........................................................................................................... - 30 -3.8.2作业原点的操作............................................................................................... - 30 -3.9工具尺寸的设定.................................................................................................... - 32 -3.9.1工具尺寸的设定............................................................................................... - 32 -3.9.2工具校验........................................................................................................... - 36 -3.10用户坐标的设定.................................................................................................... - 41 -3.10.1何为用户坐标................................................................................................. - 41 -3.10.2用户坐标的设定............................................................................................. - 42 -3.11输出状态的修改.................................................................................................... - 45 -3.12软校验的暂时解除................................................................................................ - 46 -3.13文件初始化............................................................................................................ - 48 -3.13.1程序初始化..................................................................................................... - 48 -3.13.2文件初始化..................................................................................................... - 48 -3.13.3参数初始化..................................................................................................... - 49 -4、系统配置的修改........................................................................................................ - 50 -4.1I/O单元的追加........................................................................................................ - 50 -4.2基座与工装轴的追加.................................................................................................. - 52 -4.2.1基座轴的设定................................................................................................... - 55 -4.2.2工装轴的设定................................................................................................... - 62 -5、系统诊断.................................................................................................................... - 70 -5.1系统版本................................................................................................................ - 70 -5.2输入输出状态........................................................................................................ - 70 -5.2.1通用输入........................................................................................................... - 70 -5.2.2通用输出........................................................................................................... - 71 -5.2.3专用输入........................................................................................................... - 75 -5.2.4专用输出........................................................................................................... - 76 -5.2.5RIN输入 ....................................................................................................... - 77 -5.3系统管理时间........................................................................................................ - 77 -5.3.1系统管理时间画面的显示............................................................................... - 77 -5.3.2系统管理时间的单独显示............................................................................... - 78 -5.3.3系统管理时间的清除....................................................................................... - 79 -5.4报警记录................................................................................................................ - 79 -5.4.1报警记录画面的显示....................................................................................... - 79 -5.4.2报警记录的清除............................................................................................... - 80 -5.5电源切断与接通的位置数据................................................................................ - 81 -5.5.1电源通断位置玉米面的显示........................................................................... - 81 - 硬件篇 ....................................................................................................................................... - 82 - 6、YASNAC XRC的规格.......................................................................................... - 82 -6.1YASNAC XRC的规格......................................................................................... - 83 -6.2YASNAC XRC的功能......................................................................................... - 84 -6.3示教编程器的规程................................................................................................... - 84 -6.4YASNAC XRC的构成......................................................................................... - 85 -6.4.1单元及基板的配置........................................................................................... - 85 -6.4.2柜内冷却........................................................................................................... - 86 -7、单元及基板的配置.................................................................................................... - 87 -7.1电源单元................................................................................................................ - 88 -7.2CPU单元 .............................................................................................................. - 89 -7.2.1CPU单元的构成....................................................................................... - 89 -7.2.2CPU单元中的基板................................................................................... - 89 -7.3I/O接通单元......................................................................................................... - 91 -7.3.1专用输入输出基板(JANCD-XI001)....................................................... - 91 -7.3.2通用输入输出基板(JARCR-XCI02)...................................................... - 98 -7.4电源单元(JZRCR-XSU02) ................................................................................ - 102 -7.4.1电源接通单元电路板..................................................................................... - 102 -7.5伺服单元.............................................................................................................. - 104 -7.5.1伺服单元的构成............................................................................................. - 105 -7.5.2各单元的说明................................................................................................. - 106 -7.6通用输入输出信号分配...................................................................................... - 108 -7.6.1弧焊用途......................................................................................................... - 108 -7.6.2搬运用途......................................................................................................... - 114 -7.6.3通用用途......................................................................................................... - 121 -7.6.4点焊用途......................................................................................................... - 128 -7.6.5JANCD-XEW01基板.............................................................................. - 136 -8、维护.......................................................................................................................... - 138 -8.1日常维护.............................................................................................................. - 138 -8.2控制柜的维护...................................................................................................... - 138 -8.2.1检查控制柜门是否关好................................................................................. - 138 -8.2.2检查密封构造部分有无缝隙和损坏............................................................. - 139 -8.3冷却风扇的维护.................................................................................................. - 139 -8.4急停键的维护...................................................................................................... - 140 -8.5安全开关的维护.................................................................................................. - 140 -8.6电池的维护.......................................................................................................... - 141 -8.7供电电源电压的确认.......................................................................................... - 141 -8.8缺相检查.............................................................................................................. - 142 -9、更换部件.................................................................................................................. - 143 -9.1更换控制柜的部件.............................................................................................. - 143 -9.1.1CPU单元部件更换 .................................................................................... - 144 -9.1.2 CPU单元部件的更换 ................................................................................... - 145 -9.1.3更换伺服单元................................................................................................. - 147 -9.1.4更换电源接通单元的部件............................................................................. - 149 -9.2控制柜使用部件一览表...................................................................................... - 151 -9.3控制柜附件一览表.............................................................................................. - 154 -10、报警.......................................................................................................................... - 155 -10.1报警代码的分类.................................................................................................. - 155 -10.2报警信息一览...................................................................................................... - 155 -11、错误.......................................................................................................................... - 190 -11.1错误信息一览...................................................................................................... - 191 -11.1.1系统和一般操作........................................................................................... - 191 -11.1.2编辑总结....................................................................................................... - 193 -11.1.3程序登录数据............................................................................................... - 193 -11.1.4外部记忆装置............................................................................................... - 195 -11.1.5并行I/O ........................................................................................................ - 198 -11.1.6维护模式....................................................................................................... - 199 -设定与诊断篇1、设定与诊断篇的概要警告●可以变更与系统基本功能有关的数据。
2015年美国霍纳达摩托车有限公司产品安装说明书

Accessory
REAR FRAME SKID PLATE P/N 08P51-HN8-100B
Application
TRX680FA/FGA
Publications No.
MII 13262-15324
Issue Date
Revised January 2015
STAY
REAR FRAME SKID PLATE
6 mm SOCKET HEAD SCREW
COLLAR (Reuse) WASHER (thin)
ENGINE GUARD
COLLAR (Reuse)
BOLT (Save)
REAR FRAME SKID PLATE
8 mm FLANGE BOLT
6 mm SOCKET HEAD SCREW THREAD LOCK
• WARNINGS are safety messages that indicate a potentially hazardous situation, which, if not avoided, could result in serious injury or death.
• CAUTIONS are safety messages that indicate a potentially hazardous situation which, if not avoided, could result in minor or moderate injury.
• NOTICES are messages to avoid vehicle or property damage.
• NOTES are additional information to help you complete a procedure.
(售后服务)摩托罗拉全质量服务中心前台培训手册
(售后服务)摩托罗拉全质量服务中心前台培训手册
单元二
让“顾客完全满意”
(TCS–TotalCustomerSatisfaction)
成为你的信念
摩托罗拉对“顾客完全满意(TCS)的定义是:超越顾客的期望,使我们顾客成为市场的赢家。
云云人海,每天接待的顾客各不相同,每天处理的问题无奇不有,你能让每壹位顾客完全满意吗?
当TCS的理念成为你的追求和信念,它就是真心为顾客送上的壹杯水,为顾客排解疑难的推心置腹的壹番话,避免信息丢失而将手机带回家,逐条抄写的壹番努力…于我们的服务行列中,有不计其数的让顾客完全满意的故事.它们均是来自于TCS的真诚信念和奉献.
于学习完本单元后,你应该做到如下:
•描述摩托罗拉TCS服务理念且举例说明其对全质量服务的意义
•举例说明如何提供TCS的服务
•通过正确回答问题和解释场景,表现出对TCS理念的基本理解
2小时
点去验证。
顾客丙不解,她说自己从未摔过手机,同时对工作人员的态度以及建议非常不满意。
Motorola军刀写频说明.
Motorola® Saber™ Radio Service Software User’s Guide业余无线电中文计划注意:·本说明书参照Motorola 68P81062C95-F文档翻译,内容有删改。
·本说明书针对的RSS(Radio Service Software)版本为R07.01.00,该版本软件已经可以支持高时钟频率的计算机,并拥有最全面的功能,推荐您采用。
·译者英语和无线电知识水平有限,难免有错误和不足,敬请各位老师指正!版权声明:The Motorola equipment described in this manual may includecopyrighted Motorola computer programs stored in semiconductor memories or other media. Laws in the United States and other countries preserve for Motorola certain exclusive rights for copyrighted computer programs, including the exclusive right to copy or reproduce in any form the copyrighted computer program. Accordingly, any copyrighted Motorola computer programs contained in the Motorola equipment described in this manual may not be copied or reproduced in any manner without the express permission of Motorola. Furthermore, the purchase of Motorola equipment shall not be deemed to grant either directly or by implication, estoppel, or otherwise, any license under the copyrights, patents or patent applications of Motorola, except for the normal nonexclusive, royalty free license to use that arises by operation of law in the sales of a product.版本:Ver. 0.1(02/12/2007)本项目参与者:暂无请您加入“业余无线电中文计划”,为中国业余无线电发展献出一份力量!第一部分 SERVICE: alignment, service aids, board replacement一、Align Radio Parameters注意:当您修改了本菜单中的任何设置后,您需要为电台重新编程(Reprogram Radio),才能使改动生效。
MotoHint_China_eng 说明书(英文 中文)
• Voice answer: Speak to answer incoming calls. Defaults to Off.
• Pass through audio: Allows ambient sound through headset.
End call
Touch headset.
Change volume
Use your phone.
Take headset out of ear to:
• Transfer a call to your phone. • Pause music.
Put headset in ear to:
• Answer an incoming call. • Transfer a call to headset. • Restart paused music.
phone and have trained it o start using voice control.
• If you need to setup Moto Voice, go to the Moto application on your phone.
2 Wearing
en
Talking
Call / Voice Touch area Touch to answer/ignore a call
or start voice commands.
Front microphone Back microphone
en
Talking 3
Incoming call
摩托罗拉A1600aGPS手机使用说明书
MOTO
天 下 行 6
地图激活
第一次启用该程序时, 用户看到的地图为 体验版本, 该地图确保用户可以在不插存 储卡的情况下试用 MOTO 天下行。 1. 进入设置-地图选择,选择需要激活的 地图,点击完成。 2. 弹出菜单,提示该地图为收费地图,是 否注册?选择是。自动进入注册界面。
地图更新
用户可以用电脑登录 /A1600,下载最新的地图,请参看网页具 体说明。 3. 刮开封底内页上的刮刮卡涂层,您可 以看到 25 位的许可证号,将其输入手 机中。点击确定。 4. 用户要等待十几秒到一分钟,确认注 册成功。 注册信息费根据当地电信运营商资 注意: 费标准收取。
系统设置 ......................................... 23
地图选择.......................................... 23 GPS 设备 ........................................ 23 计量单位.......................................... 23 背光 ................................................. 23 昼/夜模式......................................... 23
1
目录
GPS 功能 ..........................................4
关于 GPS .......................................... 4 GPS 接收器...................................... 4 关于卫星信号 .................................... 5 导航至十字光标位置 ....................... 12 快捷导航 ......................................... 12 收藏夹 ............................................. 13 历史记录 ......................................... 14 信息导航 ......................................... 15 城市-街道 ........................................ 15 公交站点查询 .................................. 15 导航到 GPS 坐标 ............................ 16
- 1、下载文档前请自行甄别文档内容的完整性,平台不提供额外的编辑、内容补充、找答案等附加服务。
- 2、"仅部分预览"的文档,不可在线预览部分如存在完整性等问题,可反馈申请退款(可完整预览的文档不适用该条件!)。
- 3、如文档侵犯您的权益,请联系客服反馈,我们会尽快为您处理(人工客服工作时间:9:00-18:30)。
Notes: • To check if charging is complete
open and shut the case.
• Lights turn off to save power. Headset will continue to charge until fully charged.
en
• Wide-band audio: Use HD Audio Plus for increased clarity and richer sound.
• Voice answer: Speak to answer incoming calls. Defaults to Off.
• Pass through audio: Allows ambient sound through headset.
Caution: This erases all pairing information stored on the headset.
en
Settings 9
Get what you need
Support: Visit /support. Bluetooth™: Motorola accessories work with leading Bluetooth enabled devices. Motorola cannot guarantee compatibility with every Bluetooth product. For Bluetooth help, visit /bluetoothanswers.
removed from the case. A fully charged case can recharge your headset twice.
Wired Charging
micro USB
Charge the case and headset by plugging in the charging cable.
phone and have trained it with your launch phrase, you’re ready to start using voice control.
• If you need to setup Moto Voice, go to the Moto application on your phone.
2 Wearing
en
Talking
Call / Voice Touch area Touch to answer/ignore a call
or start voice commands.
Front microphone Back microphone
en
Talking 3
Incoming call
2 Once paired, to connect with both devices simply turn them on. You’ll hear “device (number) connected” as each device connects with your headset.
Notes: • Two phones connected: If you are
8 Cleaning
en
Settings
Touch and hold the Call / Voice Touch area of the headset for 8 seconds, and then release. Headset will announce that it is in the "Settings Menu". Follow the voice prompts to turn features on or off: • Ear detect: Sensor for audio
en
moto hint
let’s get started
Charging
Note: Fully charge your headset before use.
Wireless Charging
Insert headset and close case to begin charging. Headset is "on" when
10 Get what you need
en
简体中文
moto hint
入门指南
充电
注意:使用之前,请为耳机充满 电。
ޗিҭऄ
ݖҵ৶ߑٷҼ৶ߑढԯՕڐҭ ऄ澞ђ৶ߑढИՈӟեͫ৶ߑהй “۸ہࣙ”ڐ澞ҭࢠऄङ৶ߑढՕО
৶ߑ؏ۨДࠩҭऄ澞
߄িҭऄ
ֺڳUSB
ݖҵҭऄিՕО৶ߑढչ৶ߑ ҭऄ澞
4 Talking
en
Moto Voice
Tell your Moto Hint headset what you want. Get directions, check voicemail, play your favorite song, or start a search using Moto Voice. • If you have Moto Voice on your
on a call and you receive a call on the other phone. Touch the headset to answer the second call. End the second call to return to first call.
• Two phones connected, not on a call: Touch the headset to activate voice recognition on the first phone. Voice recognition only works on the first phone.
简体中文
充电 1
佩戴
ૉՠ ђ৶ߑढИՈӟ৶ߑͫૹૹݹҵ৶ӄ澞
લޅ ܀Ԉ৶ߑͫफਙਞଠૉՠ澞
କٷݎପઢ ܷࣁધݕॐକݎ۴ߑ澞
2 佩戴
简体中文
通话
շՒ/ધઇݧԚ ઇݧՕݎծ/ڿऋշՒ۪կԈધոј澞
Answer
Say “answer” or touch headset.
Ignore
Say “ignore”.
Note: English only. See “Settings” on page 9 to turn on.
Call options
Voice command
Touch headset. Say a command, like “Call Francis Martin, mobile”. Note: This feature is phone dependent.
Note: This feature is set to off. When turned on it will reduce power, talk and standby times.
• Restore factory settings: Reset default settings on yur headset.en
Charging 1
Wearing
Fit Remove the headset from the case
and carefully place in your ear.
Adjust Twist your headset to make it fit comfortably.
Connect and go Follow voice prompts to connect to your phone.
en
Moto Voice 5
Lighting
Headset light indicator
In-ear
Off.
Remove from case
Turns on briefly to show power to headset.
Note: You will hear a prompt when the battery is low.
Charging.
Solid white Fully charged.
6 Lighting
en
Wireless charging of headset
Headset in Charging. case
Light
Charge status
Blinks white
Charging.
Solid white Fully charged headset.
MOTOROLA and the Stylized M Logo are trademarks or registered trademarks of Motorola Trademark Holdings, LLC. All other product or service names are the property of their respective owners. © 2014 Motorola Mobility LLC. All rights reserved. Product ID: Moto Hint QD ID: D023072 Manual Number: 68017902001-A
Second device
Do you use two phones? Or a phone and a tablet? Connect with both of them. 1 Pair each device with the headset
as normal. You don’t have to turn off the first device to pair with the second one, as long as it’s done within five minutes of turning on the headset.