SMOK电子烟——Quantum说明书策划
电子烟说明书
电子烟说明书一、产品介绍电子烟是一种电子化烟草产品,其工作原理是通过加热和雾化液体尼古丁,用户吸入这些雾化物以模拟传统烟草香烟的使用体验。
电子烟由电池、雾化器和储存液组成。
本说明书将详细介绍电子烟的使用方法、注意事项以及维护保养。
二、使用方法1. 充电将电子烟充电器插入电源插座,并将电子烟连接到充电器上。
等待充电指示灯亮起,表示正在充电。
待电子烟充满电后,拔出充电器并断开与电源的连接。
2. 组装取下电子烟的雾化器盖,将烟嘴连接到雾化器并顺时针旋转以固定。
确保烟嘴与雾化器紧密连接。
3. 加液体取下雾化器并将液体注入至雾化器内。
请注意不要超过雾化器容量的80%。
之后将雾化器安装回电子烟并紧固。
4. 启动按下电池上的启动按钮,电子烟将开始加热并产生雾气。
开始吸烟前请等待几秒钟,确保电子烟正常工作。
5. 吸烟将电子烟烟嘴放入口中,并轻吸几口即可。
请注意不要太用力吸烟,并避免在不适当的场合吸烟。
三、注意事项1. 孕妇、哺乳期妇女、未成年人以及不吸烟的人士应避免使用电子烟。
2. 请勿将电子烟置于高温或潮湿的环境中,以免损坏电池和雾化器。
3. 在使用过程中,请确保电子烟周围没有易燃物品,以免发生安全事故。
4. 请勿尝试修理电子烟,如有故障请联系售后服务中心。
5. 若长时间不使用电子烟,请将其存放在干燥通风的地方,并将电池取出以节省电力和延长电池寿命。
四、维护保养1. 定期清洁雾化器,避免残留物堵塞雾化器。
2. 请使用原装电池和充电器,避免使用不合格的电池和充电器,以免引发安全问题。
3. 若电子烟出现异常现象,如发生漏液、漏气等情况,请停止使用并联系售后服务中心进行维修。
五、温馨提示1. 电子烟仅适用于成年吸烟人群,严禁销售给未成年人。
2. 请妥善保管电子烟,避免与儿童接触。
3. 请勿吸入过量尼古丁,以免对健康造成不利影响。
4. 本产品不适用于禁烟人群或患有呼吸系统疾病的人士。
六、免责声明电子烟是一种化学产品,使用时请遵循以上说明,若因未正确使用或不当维护而产生的任何问题或危害,我们不承担任何责任。
电子烟产品说明书了解电子烟的组装和使用方法提供健康的吸烟替代品

电子烟产品说明书了解电子烟的组装和使用方法提供健康的吸烟替代品电子烟产品说明书:了解电子烟的组装和使用方法,提供健康的吸烟替代品一、电子烟简介电子烟是一种新型的吸烟替代品,它通过加热电子液体产生的雾气来模拟传统香烟的吸食感受,但与传统香烟相比,电子烟并不包含焦油、一氧化碳等有害物质,可减少吸烟对健康的危害。
二、电子烟的组成部分1. 电子烟主机电子烟主机是电子烟的核心部分,一般由电池模块、加热器和控制电路组成。
电池模块提供动力,加热器负责加热电子液体,控制电路用于控制加热器的温度和保护电池等。
2. 雾化器雾化器是电子烟的关键部件,它将电子液体转化为雾气,供用户吸入。
雾化器内部包含一个雾化芯,电子液体通过雾化芯的加热作用,变成可吸入的雾气。
3. 电子液体电子液体是电子烟中的主要成分,通常由丙二醇、甘油、香料和尼古丁等组成。
用户可以根据个人喜好选择不同口味和尼古丁含量的电子液体。
三、电子烟的使用方法1. 组装电子烟首先,将雾化器与电子烟主机进行连接。
通常,雾化器底部有一个螺纹接口,将其与电子烟主机上的相应螺纹接口对准,并旋转固定。
2. 加注电子液体在雾化器的侧边或底部,有一个小孔或开关,用于加注电子液体。
将电子烟主机倒置,将电子液体缓慢地滴入加液孔,并避免过量。
3. 激活电子烟按下电子烟主机上的开关按钮,进入工作状态。
在某些型号的电子烟上,需要按住按钮一段时间,直到指示灯亮起或屏幕显示相关信息。
4. 吸食电子烟将嘴唇紧贴电子烟的嘴咬器部分,并轻吸雾气。
电子烟会自动感应到吸力并开始加热电子液体,产生雾气供您吸入。
5. 注意事项(1)使用前请确保电子烟已经充电完毕,电池电量充足。
(2)请勿将电子烟与水或高温环境接触。
(3)如出现漏液或异常情况,请立即停止使用,并与售后服务联系解决。
四、电子烟的优势与注意事项1. 健康替代品相比传统香烟,电子烟不产生焦油、一氧化碳等有害物质,更加利于保护吸烟者的身体健康,也减少了二手烟对他人的危害。
电子烟使用说明书
电子烟使用说明书尊敬的用户:感谢您购买我们的电子烟,并选择了我们的产品。
为了您能正确、安全地使用我们的电子烟,我们特别准备了这份使用说明书,希望能对您有所帮助。
一、产品概述1.1 电子烟是一种基于电子加热技术的替代香烟的产品,其主要成分包括电池、加热装置、电子液等。
1.2 电子烟可以模拟传统香烟的味道和吸烟感受,但不会产生燃烧后的焦油、一氧化碳等有害物质。
1.3 本产品仅供成年人使用,未成年人禁止购买和使用。
二、使用前准备2.1 开箱检查:请在使用前确认电子烟包装完好,配件齐全,如有问题,请勿使用,并及时联系售后服务。
2.2 充电:请先将电子烟设备连接充电器,根据指示灯显示进行充电,待充电满后,即可断开充电器。
三、正确使用3.1 加液:请先将电子烟的嘴吸端拆开,将电子液倒入储液罐中,注意不要超过液位标记线,严禁向烟杆内加液。
3.2 吸烟:口吸用法,请将电子烟吸入口腔后,轻轻吸气,不需要用力吸气,以免产生不适感。
3.3 使用时间:每次吸烟时长不宜过长,建议每次吸烟控制在5-10分钟之间。
3.4 储存与携带:请将电子烟存放在干燥通风处,避免阳光直射。
携带时,应放入随附的防护套或盒子内,以防损坏。
四、注意事项4.1 禁止拆卸:除了充电、加液等常规操作外,请勿随意拆卸电子烟的任何部分。
4.2 温度过高:请勿将电子烟放置在高温环境下,以免电子液易泄漏,影响使用效果或导致设备损坏。
4.3 防潮防水:请保持电子烟远离水源,避免进水造成设备故障。
4.4 注意储存:长时间不使用电子烟时,请务必将电池取出,储存于干燥处。
4.5 充电安全:使用原装充电器进行充电,勿用其他充电器,避免因电压不稳定导致充电事故。
五、常见问题及解决方法5.1 异常情况:如遇电池电量不足、发热过高等异常情况,请停止使用,并及时与我们联系。
5.2 回收利用:旧的电子烟使用完毕后,请妥善处理电池、电子液等有害物质,按规定进行回收利用或丢弃。
六、售后服务6.1 如果您在使用过程中遇到任何问题或需要获取更多关于产品的信息,请随时与我们联系,我们将竭诚为您服务。
电子烟使用说明书

电子烟使用说明书一、前言感谢您选择使用我们的电子烟产品。
为了您的安全和舒适使用电子烟,我们制作了这份电子烟使用说明书,希望能够帮助您正确地使用电子烟,并提供相关的注意事项和维护建议。
二、产品特点我们的电子烟产品采用先进的电子技术,具有以下特点:1. 健康无害:相对于传统烟草制品,电子烟所产生的烟雾中不含有害物质,对身体健康影响更小;2. 方便携带:电子烟设备小巧轻便,可放入口袋或包里随时携带;3. 节约成本:相对于传统烟草制品,电子烟使用的是电子液体,可以反复充电和更换电子液体,不仅成本更低,而且使用寿命更长。
三、使用方法1. 充电: 您购买的电子烟设备需要经过充电才能正常使用。
请将充电器插入标有充电口的插头上,将插头插入电源,然后将电子烟设备连接到充电线上。
在设备上会有指示灯提示充电状态,当指示灯变为绿色时,表示充电完成。
2. 加入电子液体: 打开电子烟设备,并取下电池部分,将电子液体滴入烟弹或者直接注入烟杯中。
注意不要滴入过多的电子液体,以免溢出。
3. 启动电子烟: 关上电子烟设备,按下启动按钮,等待几秒钟,直到设备呈现出适合吸入口腔的烟雾为止。
4. 使用方法: 将电子烟放在嘴巴中,按下按钮吸气,不需要用力吸取,轻轻吸入即可。
请避免过度吸烟,以免对身体健康造成不良影响。
5. 存放方法: 当您暂时不使用电子烟时,请将电子烟设备放在干燥的环境中,并避免与水或其他液体接触,以免损坏设备。
四、注意事项1. 儿童禁用: 请将电子烟设备放在儿童接触不到的地方,以免儿童误食或玩耍造成安全隐患。
2. 避免过度吸烟: 请合理控制吸烟频率和时间,避免过度吸烟对身体健康造成不良影响。
3. 维护保养: 定期清洁电子烟设备,包括烟嘴和烟杯的清洗,并及时更换烟弹和电子液体。
4. 充电安全: 在充电时,请使用正规的充电器,并确保充电器和插头的连接安全可靠。
5. 温度控制: 请避免将电子烟设备放置在高温环境中,以免对设备的正常使用产生不利影响。
迷雾机说明书
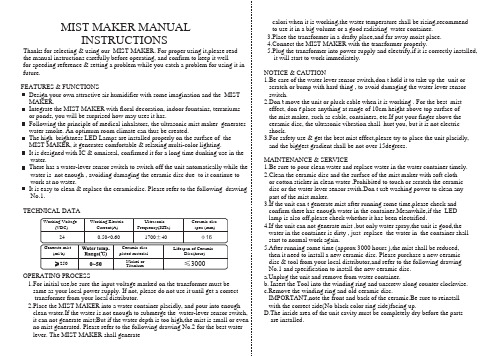
MIST MAKER MANUALINSTRUCTIONSThanks for selecting & using our MIST MAKER. For proper using it,please read the manual instructions carefully before operating, and confirm to keep it wellfor speeding reference & setting a problem while you catch a problem for using it in FEATURES & FUNCTIONSDesign your own attractive air humidifier with some imagination and the MIST Integrate the MIST MAKER with floral decoration, indoor fountains, terrariums or ponds, you will be surprised how may uses it has.Following the principle of medical inhalators, the ultrasonic mist maker generates water smoke. An optimum room climate can thus be created.The high brightness LED Lamps are installed properly on the surface of the MIST MAKER, it generates comfortable & relaxing multi-color lighting.It is designed with IC & omniseal, confirmed it for a long time dunking use in the There has a water-lever sensor switch to switch off the unit antomatically while the water is not enough , avoiding damaging the ceramic disc due to it continue to work at no water.It is easy to clean & replace the ceramicdisc. Please refer to the following drawing TECHNICAL DATAOPERATING PROCESS1.For initial use,be sure the input voltage marked on the transformer must be same as your local power supply. If not, please do not use it until get a correct transformer from your local distributor.2.Place the MIST MAKER into a water container placidly, and pour into enough clean water.If the water is not enough to submerge the water-lever sensor switch, it can not generate mist;But if the water depth is too high,the mist is small or even no mist generated. Please refer to the following drawing No.2 for the best water lever. The MIST MAKER shall generatecalori when it is working,the water temperature shall be rising,recommend to use it in a big volume or a good radiating water container. 3.Place the transformer in a drafty place,and far away moist place. 4.Connect the MIST MAKER with the transformer properly.5.Plug the transformer into power supply and electrify,if it is correctly installed, it will start to work immediately.NOTICE & CAUTION1.Be care of the water lever sensor switch,don t hold it to take up the unit or scratch or bump with hard thing , to avoid damaging the water lever sensor switch.2.Don t move the unit or pluck cable when it is working . For the best mist effect, don t place anything at range of 10cm height above top surface of the mist maker, such as cable, containers, etc.If put your finger above the ceramic disc, the ultrasonic vibration shall hurt you, but it is not electric shock.3.For safety use & get the best mist effect,please try to place the unit placidly, and the biggest gradient shall be not over 15degrees.MAINTENANCE & SERVICE1.Be sure to pour clean water and replace water in the water container timely.2.Clean the ceramic disc and the surface of the mist maker with soft cloth or cotton sticker in clean water .Prohibited to touch or scratch the ceramic disc or the water lever sensor swith.Don t use washing power to clean any part of the mist maker.3.If the unit can t generate mist after running some time,please check and confirm there has enough water in the container.Meanwhile,if the LED lamp is also off,please check whether it has been electrified.4.If the unit can not generate mist ,but only water spray,the unit is good,the water in the container is dirty , just replace the water in the container shall start to normal work again.5.After running some time (approx 3000 hours ),the mist shall be reduced, then it need to install a new ceramic disc. Please purchase a new ceramic disc & tool from your local distributor,and refer to the following drawing No.1 and specification to install the new ceramic disc.a.Unplug the unit and remove from water container.b. Insert the Tool into the winding ring and unscrew along counter clockwise.c.Remove the winding ring and old ceramic disc.IMPORTANT,note the front and back of the ceramic.Be sure to reinstall with the correct side(No black color ring side)facing up.D.The inside area of the unit cavity must be completely dry before the parts are installed.future.MAKER.water.No.1.Remote Function :A :On/Off B: Mist on/offC: light color changing/freeze the color/offPARAMETER OF MIST MAKER UNITLimited temperature:+5~40 C Water rate:90mL/HDepth of water limited :45~65mm Rate voltage :12WOutput voltage :AC 24V Output electric current:0.5AMatching transformer have CE,GS, BS,UL,CSA,PSE,SAAMist CavityWater Lever Sensor Switch Ceramic DiscBehind Of Ceramic Disc<1><2>。
电子烟使用用户手册

电子烟使用用户手册随着科技的不断发展,电子烟作为一种新型的烟草替代品,逐渐受到人们的关注和喜爱。
与传统香烟相比,电子烟无需点火,不需要明火,没有焦油、一氧化碳等有害物质的产生,因此被认为是一种更安全、更健康的吸烟方式。
本手册将为您介绍如何正确、安全地使用电子烟。
一、电子烟的基本组成1. 电子烟主机:通常由电池、控制电路和加热装置构成。
2. 雾化器:将电子烟液转化为雾气。
3. 电子烟液:包含尼古丁和香料成分的液体,供电子烟加热产生雾气。
二、使用前的准备1. 充电:首次使用前,应确保电子烟主机电量充足。
使用附带的充电器,将电子烟主机连接至电源进行充电。
注意遵循使用说明书中的充电时间要求,不过度充电。
2. 添加电子烟液:将电子烟液滴入雾化器的液孔中,注意不要过量。
3. 启动电子烟:按下电子烟主机上的启动按钮,通常是连续点击按钮3次,电子烟即可开始工作。
三、使用时的注意事项1. 呼吸方式:吸烟者应以深而缓的方式吸气,不需要用力吸。
2. 使用频率:为了避免对身体产生过度负担,建议使用电子烟的频率逐渐减少,根据个人情况合理安排使用时间和强度。
3. 储存与携带:请将电子烟存放在干燥、避光、通风的地方。
携带时请将电子烟放置在防护套内,避免与硬物、钥匙等物品摩擦。
四、常见故障排除在使用电子烟过程中,有时可能会遇到一些小故障,下面是一些常见问题的解决办法:1. 无法启动:检查电子烟主机电量是否耗尽,若耗尽请先充电。
2. 雾化不良:可能是电子烟液不足,需添加电子烟液。
同时也要注意是否需要更换雾化器。
3. 温度过高:如果感觉电子烟主机过热,请暂停使用,等待其冷却后再次使用。
五、使用注意事项1. 未成年人禁止使用:电子烟液中含有尼古丁等成分,对未成年人的身体健康会产生负面影响。
2. 孕妇和哺乳期妇女慎用:电子烟虽为无烟产品,但尼古丁对胎儿和婴儿的发育仍然会带来风险。
3. 维护保养:定期清洁电子烟主机和雾化器,确保其正常工作并延长使用寿命。
SMOK电子烟——R-Steam小飞鱼迷你套装说明书策划

R-Steam小飞鱼迷你套装简介R-Steam小飞鱼迷你套装由R-Steam Mini电池和小飞鱼迷你雾化器组成。
R-Steam Mini电池最大功率可达80瓦;搭配小飞鱼迷你雾化器,预装1.2欧双发核芯,带给你醇厚的口感和超大烟雾!产品配置1 x R-Steam Mini 80瓦温控电池盒子1 x 小飞鱼迷你雾化器1 x BM2 (预装) – 1.2欧双发核芯1 x BM2 - 0.6欧双发核芯1 x 可替换玻璃管1 x USB线1 x说明书配件包产品参数R-Steam Mini 80瓦温控电池盒子尺寸:82x38x22.3 毫米重量:120克输出功率:1-80瓦输出电压:0.8-9.0伏静态电流: <500微安充电电压/电流:5伏/1安阻值范围:0.06-2.0欧姆(温控模式)/0.1-3.0欧姆(功率模式)温度范围:100-315摄氏度(200-600华氏度)材质:锌合金小飞鱼迷你雾化器材质:不锈钢尺寸:22x48.5毫米重量:38.5克容量:2毫升接口:510产品验真1.打开电脑或者手机浏览器,访问 SMOK 官方产品验真查询网址:/support/2.刮开包装盒上产品防伪标签上的涂层,得到 16 位数字字母组合防伪码。
其中 4位为一组,在产品验真页面,顺序输入防伪码,点击验真查询按钮,稍等片刻,即可得到查询结果。
3.如果对查询结果有任何疑问,均可以通过网站、电子邮件、电话等联系方式联系我们的客户顾问,获取更多帮助。
产品保修R-Steam小飞鱼迷你套装保修周期为:自购买之日起 6 个月。
在6个月的保修期内,产品出现任何非人为造成的故障所导致的产品无法正常使用,均可以凭《R-Steam小飞鱼迷你套装用户服务卡》,联系SMOK 授权经销商和零售店进行进一步的产品售后服务。
《R-Steam小飞鱼迷你套装用户服务卡》是用户享受SMOK 产品售后服务保障的重要凭证,请务必保存好此卡片,请仔细阅读服务卡上面的信息,并正确填写相关信息。
SMOK电子烟——R-Steam mini 套装详情页策划

R-Steam mini 套装详情页策划1、简介标题:纵情蒸汽,就是它!正文:禁得起各种对比,更禁得起你的挑剔。
令人期待已久的全新R-Steam mini 套装终于强势来袭。
不锈钢、镍200及钛发热丝的温控支持,功率高达80瓦,配置18650单节电池,支持USB 直充充电,多彩喷油工艺再加符合人体工学的持握设计,多彩喷油工艺再加符合人体工学的持握设计,完美性能配比的R-Steam mini 与SMOK经典雾化器Micro TFV4和Nano TFV4分别组成R-Steam One mini edition套装和R-Steam One nano edition 套装。
给你多一种选择,R-Steam mini套装更懂你的需要。
此刻,纵情蒸汽,就是R-Steam mini 套装。
2、产品设计标题:多彩外壳,随心选正文:R-Steam mini采用锌合金电镀工艺,纤长机身,完美贴合手掌。
在追求美观的同时,更带来舒适、饱满的持握感。
机身大胆使用玩具制造中的喷油工艺,表面更耐脏耐磨,光泽和手感更柔和,更带来了多彩的外壳选择,彰显你的个性。
R-Steam mini尺寸:重量:电池容量:输出电压:静态电流:充电电压/电流:3、OLED大屏标题:0.91寸LED裸屏,更易读正文:这是我们的第一款0.91寸易读裸屏,图标更大、屏幕更亮更清晰,只为给您的双眼带来最佳的阅读舒适感,即使在强光下,它也能出色地让您完成操作。
4、产品性能标题:80W温控,智能双模式正文:全面支持不锈钢,镍200及钛发热丝的温控功能,针对性的温控系数调节,使温控效果更贴合每个用户的独特选择,一旦设置,剩下的就是简单的温度目标设定,亦高亦低。
功率最高达80瓦,支持多种阻值雾化器:0.06欧- 2欧。
5结构设计(从上到下)a、510方形螺纹接口b、进气孔预留c、功能按钮d、菜单优化升级e、磁力吸附电池后盖f、USB充电/升级接口6、功能选项a、智能双模式R-Steam mini为您提供两种输出模式温控模式使烟雾口感保持稳定香醇功率模式是大烟雾量玩家的最佳选择b、特色三丝温控R-Steam mini 支持钛丝、镍丝、不锈钢丝,三丝温控特色温控系统,直接通过调节温度达到功率匹配输出,摒弃常规意义的反复设置操作。
- 1、下载文档前请自行甄别文档内容的完整性,平台不提供额外的编辑、内容补充、找答案等附加服务。
- 2、"仅部分预览"的文档,不可在线预览部分如存在完整性等问题,可反馈申请退款(可完整预览的文档不适用该条件!)。
- 3、如文档侵犯您的权益,请联系客服反馈,我们会尽快为您处理(人工客服工作时间:9:00-18:30)。
Quantum 80WIntroductionYou would feel the real geek vaping experience from Quantum 80W. It is the first Bluetooth mod box that supports OTA upgrading; you can enjoy quick smart upgradable cloud services by Bluetooth connecting and APP operation. What’s more, it features with intelligent security chip and lateral OLED screen for vaping data. Now, you would marvel at Quantum 80W for that: dual upgrading of software & hardware, TC/VW modes, colorful shells and 80W power. How incredible it is! SpecificationsSize: 86x40x23.5mmWeight: 130gOutput Power: 1W-80WOutput Voltage: 0.8V-9VInput Current:Minimum: 1A, Typical: 10A, Maximum: 30AStandby Current: <500uAResistance Range: 0.1-3Ω(VW), 0.06Ω-2Ω (TC)Temperature Control Range: 200°F-600°F/ 100°C-315°CMaterial: Zinc AlloyThe Kit Includes1 x Quantum 80W TC Mod Box1 x USB Cable1 x User ManualSpare PartsFeatures- Powered by 1 x 18650 battery, compact size- Max output power can up to 80W- Uses magnetic battery cover and replaceable battery- Micro USB port used for charging and upgrading; It also can finish upgrading by phone APP by Bluetooth OTA technology- Bluetooth function: equipped with Bluetooth V4.0 communication function, which can connect with APP; in Bluetooth ON status, it will auto enter standby mode for battery saving without connecting with APP in 10 minutes.Verification1. Using your Smartphone or PC to visit SMOK official website:/support/2. Scratch off the coating of the security label on packing box to get the 16 anti-fake codes. Fill them into the input box on the webpage to verify. The result will come out after a few seconds.3. If you have any question, please contact SMOK consultant via e-mail, phone or our website to get more help.WarrantyQuantum 80W Warranty Period: 3 Months from the Purchase Date.Within the 3 Months, some items may not be eligible for service due to misuse, damage, or other failures caused other than by manufacturer defects or premature failure. Please contact SMOK Authorized Vendor for more information and terms of service.The “Quantum 80W Customer Card” is an important proof for customers to get warranty service, please keep it. And read the card carefully and fill it out correctly. Warranty requests must be accompanied by this card.For more warranty policy and process, please visit our official website:/support/User Guide1. Schematic Diagram抽烟键/可拆卸电池盖Fire Key/Detachable Battery Cover显示屏OLED Screen+/-按键+/- Button雾化器510接口510 ConnectorUSB接口USB Port2. Attach AtomizerPlease confirm that the atomizer head should not be blocked by any stems before attachment:1) Connect the atomizer to the device and tighten it clockwise.2) After the device is powered on, please press the Power Button to vape.3. Install BatterySMOK Quantum adopts the magnet-held battery cover design to make sure that, with a gentle touch, you will simply slide it off and replace the battery in seconds!Steps:①Please confirm to use 1x 18650 battery with enough power.②Slide to open the back cover and place the batteries into the device according to the correct directions, and then close the battery cover.4. OperationsWhen the mod unlocked: (To exit the locked mode by pressing the power button 5 times.)1)Press the power button and the Down button simultaneously to switch between “WATTMODE” and “TEMP MODE”.2)Press the power button and the Up button simultaneously to switch between “MIN”,“SOFT”, “NORM”, “HARD” and“MAX” draw effects.3)Press the Up button and the Down button simultaneously to lock both buttons, andprevent from accidental adjustment due to the buttons being pressed while in a pocket.Then press the Up button and the Down button simultaneously to unlock both.When the mod locked: (To enter the locked mode by pressing the power button 5 times.)1)Press the Up button and the Down button simultaneously to show daily vaping time andpuff numbers.2)Press the Up button to show current date.3)Press the Down button to show current time.4)Keep holding the SMOK button for about 5 seconds to turn power off.Menus1.Power on: fast press the power button 5 times with less than 2 seconds, then the screen shows“WELCOME”, which means the Mod has been turned on.2.After starting up, fast press the power button 3 times with less than 2 seconds, the screen willdisplay menu 1 to 8.·Choose menu1, the screen displays “”, wait for 2.5 seconds or press and hold down the power button to enter submenu:You can switch between “YES” (turn on Bluetooth) or “NO” (turn off Bluetooth) by pressing the Up or Down button.·Choose menu2, the screen displays “”, wait for 2.5 seconds or press and hold down the power button to enter submenu:You can switch between “W ATT MODE”and “TEMP MODE” by pressing the Up or Down button.In “WATT MODE”, press the power button to select a draw effect “STRENGTH”: MIN, SOFT, NORM, HARD or MAX. Or in “TEMP MODE”, press the power button to select a draw effect “STRENGTH”: MIN, SOFT, NORM, HARD or MAX.Then, press the power button to select your coil material: Stainless Steel, Nickel 200 or Titanium; or set coil type: Single or Dual.Once completed, press the power button to return to the main interface.·Choose menu 3, the screen displays “”, wait for 2.5 seconds or press and hold down the power button to enter puff plan interface which shows your current puff numbers and maximum ones, and by pressing the Up or Down button to set it. “NEVER” represents unlimited puffs. It also provides puff counter clearing function. Waiting for 5 more seconds, it will prompt “PUFFSRESET”, choose Y to clear.“MAX PUFFS” means setting the number of puffs range from 0 to 999.·Choose menu4, the screen displays “”, wait for 2.5 seconds or press and hold down the power button to enter submenu:You can adjust the initial resistance of your atomizer by press the Up or Down button, and its range is ±50 mΩ (±0.05 Ω).·Choose menu5, the screen displays “”, wait for 2.5 seconds or press and hold down the power button to enter submenu:You can adjust the TCR of three temperature sensing wire by press the Up or Down button.Adjustable TCR range:Nickel 200 is from 0.00400 to 0.00800. (Default setting: 0.00550)Titanium is from 0.00200 to 0.00500. (Default setting: 0.00350)Stainless Steel is from 0.00050 to 0.00300. (Default setting: 0.00105)Note: TCR= Temperature Coefficient of Resistance. It’s one of the main parameters to characterize the change in resistance. Our internal circuitry can allow users to adjust TCR values of different coil materials in different ranges, thus further improving the accuracy of temperature control and bring you the best taste.·Choose menu6, the screen displays “”, wait for 5 seconds or hold down the SMOK button to enter basic function submenus:Choose “”, you can switch to stealth mode, in this mode the display is off. Choose STEALTHOFF, and then set screen saver time (15 seconds to 240 seconds).Choose “”, you can set screen contrast.Choose “”, you can set screen rotation 180 degrees.Choose “ ”, you can set date and time.Choose “ ”, you can exit and return to the main interface.·Choose menu 7, the screen displays “”, wait for 5 seconds or press and hold down the power button to enter submenu, you can choose “OFF” to turn power off.·Choose menu 8, the screen displays “”, fast press the SMOK Button 5 times in 2s to exit.Prompts1.HIGH INPUT The input voltage is higher than 5V, the device can’t beoperated, please replace a new battery that within limits.2.LOW BATTERY The voltage is lower than3.3V, please stop vaping andreplace the battery.3.OHM TOO LOW The atomizer resistance is lower than 0.10Ω underwattage mode or lower than 0.06Ω under temperature control mode.4.OHM TOO HIGH The atomizer resistance is more than 3Ω.5.CHECK ATOMIZER Without an atomizer, please connect one.6.SHORTED Output short circuit.7.DON’T ABUSE PROTECTS! Immediately vaping after a short (please wait at least5 seconds).8.TOO HOT! The temperature inside the mod is overheating, pleasestop vaping for about 30 seconds.9.UNLOCKED CLICK 5X To enter the locked mode by pressing the powerbutton 5 times.10.LOCKED CLICK 5X To exit the locked mode by pressing the powerbutton 5 times.11.The mod is charging and its electric quantity is 60%.12.Fully charged.Warnings1. Before use please read the manual carefully.2. Before installing atomizer, please make sure the air drain cannot be blocked in case of feeling suffocated when you are vaping.3. Please do not drop, throw or mishandle this product as the outer shell or inner components may become damaged.4. Please refill the tank when the e-liquid is nearly used out to avoid dry-burning of the atomizer.5. In order to prolong the operation of your product, please keep it away from excessive temperature and humid environment.6. Please keep this product away from children and pregnant women.。