蓝沙快克--网刻+教程
PXE网刻教程和经验

PXE网刻教程和经验一:准备工作:1:GHOST服务器版(推荐8.3版)2:网卡PXE驱动(DOS驱动)3:tftpd32.exe (传送网卡DOS驱动到客户机工具)以上工具均可在百度搜索下载。
比如我要克的客户机网卡为8168B,就需要将网卡8168B的PXE驱动必须和tftpd32.exe放在同一个文件夹下:如下图:二:设置服务器1:设置GHOST服务端传输模式设置:打开GHOST服务端先设置你要网克的模式:文件-选项-直接广播-确定(自己可尝试3种模式测试速度)如下图:以上模式如果多台网克可选直接广播和多点传送。
如果你克全盘那就用GHOST默认的“磁盘”如下图如果只克系统盘(C盘)选择“分区”指定GHO文件,将你客户机做好的母盘利用GHOST全盘打包成GHO文件放到单个硬盘接到服务器。
在到GHOST服务端---映像文件---指定到硬盘目录下GHO文件。
会话名自己给一般手动连接GHOST服务端时候可以在GHOST客户端版设置里填写服务器IP及会话名最后点“接受”2:设置tftpd32如果你想用PXE网克,而不是用MAXDOS网克就会用到tftpd32。
首先进行tftpd32里的DHCP server 一项设置进行!首先设置网克服务器IP,可以只设置IP和子网掩码,如果你是跨交换机克盘,而一个网内又有人上网,建议将GHOST服务器IP设置为其他网段。
比如你现在有顾客上机的网段是192.168.0.,而你想克的只是一部分,没单独分开交换机,则建议更换网段如:192.168.1.1。
服务器IP可以随便给,如果网克的客户机超过200多台就要给个位数IP咯。
因为客户机GHOST连接服务器分配IP是按的服务器IP以后依次分配。
这将在tftpd32里设置。
如下图:比如我的网克服务器IP设置为192.168.1.1 子网255.255.255.0,则在tftpd32 工具中的DHCP server设置为上图:解释设置:IP地址池开始地址:这里就是你分配客户机IP起始段(举例)如果你同时网克200台客户机,第1个连上服务端的将被分配为192.168.2 这里不能设置为服务器IP 服务器IP 为192.168.1.1你可以任意在这里给1后起始IP。
丝网印刷操作教程

丝网印刷操作教程丝网印刷是一种常见的印刷技术,常用于印刷衣物、纸张、陶瓷等材料上。
下面是一份丝网印刷的操作教程,帮助你了解和掌握丝网印刷的基本步骤和要点。
1.准备工作-选择合适的丝网,根据印刷材料的特点和要求选择丝网的孔径和网线数量。
通常,织网比较适合印刷纸张,穿网适合印刷布料。
-准备好印刷图案,并将其转印到在透明薄膜或者透明纸中,以便后续制作丝网印刷版。
-准备印刷材料和丝网印刷机。
2.制作丝网印刷版-将印刷图案放置在制作丝网的画框上,调整图案位置并固定好。
-在丝网上涂上光敏涂料,并利用曝光机器对涂层进行曝光,使图案的部分固化。
-用清水冲洗未固化的涂层,留下固化的图案部分,并晾干丝网。
这样就制作好了丝网印刷版。
3.进行丝网印刷-将印刷材料放在印刷台上,并用胶带将其固定住,以防止其移动。
-通过调整印刷机的刮刀压力和角度,让刮刀能够顺利地将油墨刮过丝网。
-将制作好的丝网印刷版放置在印刷机的操作台上,确保图案与印刷材料对准。
-将适量的油墨放在丝网上方,然后用刮刀均匀地将油墨刮过丝网。
-抬起丝网,并将印刷材料从印刷台上取下,注意不要移动材料,以免印刷图案模糊。
4.检查和调整-检查印刷品的质量,包括图案清晰度、颜色饱和度等。
-根据检查结果,调整刮刀压力、油墨粘度、丝网网线数量等参数,以获得更理想的印刷效果。
5.印刷后处理-将印刷品晾干,确保油墨彻底干燥,以免脱落或者模糊。
-进行清洁工作,清洗丝网和刮刀,以便下一次印刷使用。
丝网印刷是一种技术密集的工艺,需要不断的实践和经验积累才能掌握。
通过不断的尝试和调整,你可以逐渐熟悉丝网印刷的各个环节,并得到更好的印刷效果。
诚龙网刻教程

诚龙网刻教程2008-06-16 06:591.首先说的是主板支持网卡启动的情况:如果主板支持网卡PXE启动,那就恭喜你,这样的网克最方便,因为不要maxdos之类的软件支持。
我这里富士康的NF4k8AB主板里面就有网卡启动!首先打开诚龙网克工具,我这里以8.3版本为例,但是11版本同样提供下载,因为maxdosv6网克要使用到。
地址在文章最下面!①服务器设置:图片02看到图片02 选择全盘网刻[网刻和网克,都是一样!],然后浏览镜像文件,现在假如我的母盘镜像文件放在D盘里面,文件名称是Yes2007.iok。
选择好之后点击开始网刻图片03[align=left] 等十秒钟左右,可以看到图片03 的画面。
这等待的十秒钟,其实就是这个软件在给你设置好服务器的IP了。
IP其实就是10.1.1.1,子网掩码为255.0.0.0。
其余的不用管,有没有都是一样的。
这些是软件自动设置好了,只是让大家知道。
上面图片的情况,最下面显示的是正在等候客户端连接...,说明服务器已经做好了准备,我们现在看看客户机的情况吧!②客户机设置:客户机设置,我这里不发布图片,因为太简单,根本就不要图片的。
你所要做的就是一个操作,进入COMS设置,选择第一启动为网卡启动[不要说你不知道?就是平时你选择光驱启动或者硬盘启动的那里!]。
当然,前面说了,这个是要有主板支持才可以的,如果主板不支持,打死你也找不到那个网卡启动。
具体的主板可能不同,但只要有那个字样的,你可以实验一下,除了硬盘,光驱之类的,排除之后最多还有一两个选项!设置之后F10保存,重启。
重启之后,如果网络是正常的,那么系统会进入GHSOT软件界面,等待服务器的进一步操作。
我首先直接使用的就是网卡启动的网克,工具是诚龙网刻8.3!但是这个要主板支持,好,如果客户机设置好了,比如你设置了20台,并且20台都是在等待的状态,那么你现在可以到服务器,看到图片03 点击那个发送就可以。
奇东网刻工具教程
软件截图2
软件截图3
B:模式选择
有对全盘进行克隆和对分区进行克隆两种模式,实话告诉你,选择哪个都行。这个不重要,因为下一步再好好设置就行了。
然后就点击“开始网络克隆了”。
接着,会打开另外一个对话框,这个就很重要了。
A:首先点击“停止”按钮。然后,你就可以自行设置所有的选项了。
此软件不需要安装,但是此软件只要一打开,就能提供DOS环境的DHCP功能。另外,它会把本机的IP地址改为:。
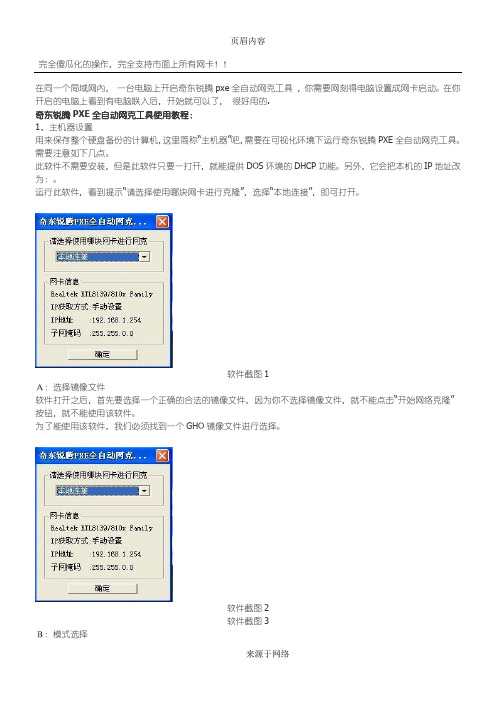
运行此软件,看到提示“请选择使用哪块网卡进行克隆”,选择“本地连接”,即可打开。
软件截图1
A:选择镜像文件
软件打开之后,首先要选择一个正确的合法的镜像文件,因为你不选择镜像文件,就不能点击“开始网络克隆”按钮,就不能使用该软件。
进入到克隆状态之后,ghost会提示您错误。这个时候,按下回车键,会看到A:>的提示,输入GHOST按回车,重新进入到GHOST状态。
然后,选择如下的菜单操作:GhostCast→MultiCast
会得到提示,然后,输入一个会话名称,就是上述保存机设置的会话名称,比如123;直接按下回车键;
接着,至于后面的选择项,都很简单,无论哪个窗口,通过TAP键,选择到OK按钮就按回车键,最后,就进入到硬盘备份状态了。
完全傻瓜化的操作,完全支持市面上所有网卡!!
在同一个局域网内,一台电脑上开启奇东锐腾pxe全自动网克工具,你需要网刻得电脑设置成网卡启动。在你开启的电脑上看到有电脑联入后,开始就可以了,很好用的.
奇东锐腾PXE全自动网克工具使用教程:
1、主机器设置
用来保存整个硬盘备份的计算机,这里简称“主机器”吧,需要在可视化环境下运行奇东锐腾PXE全自动网克工具。需要注意如下几点。
PXE网刻工具-指导使用
准备工作
1.把服务机网线接入局域网(机器网线避开话机网口,直接连接到席位的网络端口)
2.配置服务机以下IP地址和子网掩码:
10.1.0.1
255.255.0.0
3.关闭服务机的防火墙
4.关闭杀毒软件(卖咖啡等所有服务)
安装
右键,以管理员身份运行,即打开工具,如下图:
选择全盘网刻,浏览选择本地的镜像文件(非C盘路径下,路径名称全英文字符)
点击“开始网刻”后,会弹出两个窗口,如下图:
所以在任务栏,会有三个相关的图标:
接收端开始接受程序传递后,发送端的界面如下:
镜像发送完成后,提示传送完成。
可能碰到的异常报错:
接收端PC配置:
客户机准备
开启PC,多次快速按F12,进入设备开启菜单,移动光标至第二项,回车选择第二项:network1:。
等待出现接收传递的界面。
如下图:
刻录
传递完成后,接收端机器自动启动windows系统后续修改配置:
修改IP
检查网络连接
修改计算机名称(BJ-PC100格式)
映射网络驱动器(agent/SV)
编辑windows凭据
检查USB接口开关
安装并配置Google浏览器。
家庭丝网印操作方法

家庭丝网印操作方法家庭丝网印操作方法可分为以下几个步骤:1. 准备工作:首先,购买所需的丝网印材料,包括丝网印框、印刷网版、印刷墨水、印刷工具(如刮板)、印刷画板等。
另外,还需要准备一块干燥平整的工作台面,并确保周围环境干净整洁。
2. 制作印版:将印刷网版固定在丝网印框上,使用夹紧器等工具将其紧固牢固。
然后,准备印刷图案的设计稿,将其放置在网版上面。
利用印刷墨水溶液或丝网印墨在网版上进行刷涂,确保刷涂均匀。
3. 上涂胶水:将丝网印框的印版放置在工作台上,将墨水涂刷到印版上。
使用印刷刮板将印刷墨水均匀刮涂在印版上,以确保图案刷涂均匀,墨水厚度适度。
4. 开始印刷:准备一块画板,将待印刷的材料放置在画板上,确保画板平整。
然后,将已涂有墨水的印版对准画板,两者之间保持适当的间距。
轻轻地按压印版,以使墨水均匀地渗透到材料上。
可以使用手掌或刮板等工具施加适当的压力。
5. 清理和修复:印刷完毕后,将画板上的材料取下,将画板上的墨水清洗干净,以免对下一次印刷造成污染。
同时,将印版上的墨水也清洗干净,以便下次使用。
如有不完整或有缺陷的图案,可以使用修复工具进行修复,例如精细的刷子或修复刀。
6. 注意事项:在家庭丝网印操作过程中,需要注意以下几点:- 保持操作环境洁净整洁,尽量避免灰尘和杂质的污染。
- 控制印刷墨水的厚度和均匀程度,以保证印刷效果。
- 操作时要谨慎小心,避免刮破印版或画板。
- 在清洗和修复印版时,使用温水和温和的清洁剂,以免损坏印版材料。
总结:家庭丝网印操作方法包括准备工作、印版制作、上涂胶水、开始印刷、清理和修复等步骤。
在操作过程中要保持环境整洁、控制墨水的厚度和均匀性,并注意小心操作,避免损坏印版和画板。
丝网印刷网版制作流程七步法
丝网印刷网版制作流程七步法2011-03-11 15:14环球印刷设备网共0条评论字号:T|T 丝网印刷是将丝织物、合成纤维织物或金属丝网绷在网框上,采用手工刻漆膜或光化学制版的方法制作丝网印版。
丝印制版是用感光乳剂及感光液(重铬酸铵溶液),丝印网版制作是丝网印刷的起点,在制作过程中需谨慎。
丝网印刷网版制作流程:1、制版时感光乳剂与感光液按10:1的份量倒在胶浆液中。
然后慢慢扰拌,使两种液体混合为止。
同时要注意,不宜在强光下操作,否则失其效用。
2、感光乳剂调好后,稍微倾斜将感光乳剂流到网布上,向上用力刮去,直刮到网布上方为止。
使其均匀地涂布在网布上。
3、再用同样方法涂上感光乳剂于网框两面各一次,然后用吹风机热风吹干。
4、网版吹干后要立即进行感光晒版,以免全部感光,灯光可采用200W之室内照明灯炮,或用20W日光灯两支,将网版平放在灯光下面,再将阳片菲林感光胶膜向上放在网板上,再用玻璃盖上和用两个铁夹在左右两边压紧,灯光至网版的合适距离是20cm-30cm. 感光时间约八至十分钟。
5、感光后的丝网印刷网版,用水冲洗或用海棉轻擦,冲水的水压要适中,不可太强,不要把网布冲破。
冲版时应注意,网版上原来阳片黑色部份给水冲掉,而白色透明部份则形成硬膜而沾牢在网布上,直至图案清晰便可停止。
6、丝网印刷网版用水冲出图案后,再用干布盖在网版上下两方将水份吸干。
让网版自然干或用吹风机吹干。
这样便完成制版工序。
7、丝网印刷网版做好后,将要印刷的物件平放在网版下面,对好位置,把油墨倒在网版内框上,右手拿胶刮刀,用50°至70°斜度,用力向下方刮过去,注意力量要平均,图案便很清晰的印在所需要的东西上.手工丝网印刷的工艺流程2011-10-31 09:56环球印刷设备网共0条评论字号:T|T 手工丝网印刷工艺操作简单,无需昂贵的设备即可满足网印的要求,投资少、质量好、效益高,它在网印行业中还占有相当的优势。
RATOC RAL-KEB02iP USB_DAC模式使用指南(版本1.0)说明书
RAL-KEB02iP USB_DAC Mode Setup GuideRev. 1.0 01/July/2014RATOC Systems, Inc.Osaka,JapanIndex1. Introduction (3)1-1.Features (3)2. System requirements (4)2-1. PC running on Windows 8,7,Vista,XP(SP2 or newer) 32/64bits (4)2-2. MacOS X 10.7 or newer (4)2-3. Stereo Headphone (4)3. Package contents (5)4.Front Panel, Rear Panel Layout (5)5. Setting up Mac/MacOS X (11)5-1. Connecting RAL-KEB02iP to Mac USB port (11)5-2. Setting 'Sound Effects' output to Internal Speakers (12)5-3. Setting RAL-KEB02iP as an Audio Output (13)5-4. Setting up 'Audio MIDI Setup' Application (14)5-5. Launch and play iTunes or other Music Player application (15)6. Setting up Windows PC ( Windows 7 ) (16)6-1. Installation of USB Audio 2.0 Class Driver (16)7. Grade up setting for Windows (22)8. Specifications (26)iPod.iPad,iPhone, MacOS X are registered trade mark of Apple Inc.1. IntroductionThank you for purchasing RAL-KEB02iP portable USB_DAC. We are confident that you will enjoy listening Hi-Reso music at anywhere, outdoors and in hime with your PC audio system, Mac Book, iPhone, iPad, iPod and WALKMAN. RAL-KEB02iP receives High-Resolution LPCM format up to 24bit/384kHz from 16bit/44.1kHz and DoP format compatible DSD digital music stream. KEB02iP passes it to DSD Direct enabled DAC (ESS ES9018K2M) and creates clear and natural sound without any conversion, and also, RAL-KEB02iP is fully compatible with DoP(DSD over PCM) Standard 1.1 and works with popular Music Players, such as Audirvana Plus on MacOS X, foobar2000 with foo_asio_dsd, HQPlayer and JPLAY on Windows PC.*1) USB Audio Class 2 Driver for Windows must be downloaded from our site below and installed prior to use RAL-KEB02ip with Windows PC.download from /download/driver.htm*2)RAL-KEB02iP has two operation mode, iPod Compatible mode and USB_DAC Compatible mode. These two modes are switchable with slide switch at the front panel before turning on Power Switch. Refer iPod Compatible Mode User's Guide to useKEB03iP with iPod/iPhone/iPad.1-1.FeaturesUSB_DAC mode●Fully compatible with USB 2.0 (HS 480Mbps) Specifications.●Fully compatible with USB Audio Class 2.0 Driver.●Accepts DoP Standard 1.1 compliant DSD 5.6448/2.8224MHz data andL-PCM 24bit/16bit384kHz/352.8kHz/192kHz/176.4kHz/96kHz/88.2kHz/48kHz/44.1kHz (2ch).●Includes ESS SABRE32™ ES9018K2M Audio file class DAC.●Fully balanced circuit and balanced earphone output.●Earphone level switch (High <-> Low).●Digital Filter Curve selection switch ( Slow <-> Fast)●Includes reliable 3.7V/1200mAh Li-Polymer Battery(made in Japan).●Quick Charging time (2hr) and 5.5hr operating time.2. System requirements2-1. PC running on Windows 8,7,Vista,XP(SP2 or newer) 32/64bits●One USB 2.0 HS(480Mbps) enabled Host port.●Internet access to download USB Audio 2.0 Driver for Windows.●RAL-KEB02iP USB Audio Class 2.0 Driver installation required.●User's Guide, Setup Guide and Grade up Guide are able to download fromRAL_Audio site.Note) The knowledge and experience regarding 'Control Panel' for 'Sound AudioDevice', 'Device Manager', Audio Music Player application such as foobar, MediaPlayer, iTunes and CD Ripping applications are required to use RAL-KEB02iP. Refer to the User Guide, Instruction Guide or Online Helpof these Applications.2-2. MacOS X 10.7 or newer●One USB 2.0 HS(480Mbps) enabled Host port.●MacOS X 10.7 or newer already includes USB Audio Class 2 Driver.** You don't need to download and install the driver.2-3. Stereo Earphone●Stereo earphone equipped with Standard 3.5mm mini Stereo Phone Plug.●Stereo earphone equipped with balanced cable and Standard 2.5mm mini-miniphone plug.●Impedance 8-Ohm to 110-Ohm3. Package contentsRAL-KEB02iP package includes:●RAL-KEB02iP●USB 2.0 Cable ( USB-A to mini-B ) for USB_DAC mode x1.●USB-A to micro-B Cable for charging x1.●USB-A to iPod 30P Dock cable (0.1m) for iPod Compatible mode x1.●USB-A to Lightning cable (0.1m) for iPod Compatible mode x1.●Silicon Band to bundle iPod/iPhone with KEB02iP.** AC adapter (DC +5V/1A) is not included in the package.4. Front Panel, Rear Panel Layout4-1. Front Panel(1). Power & Volume LevelPower off : Turn Counter Clock wise to 7 O'clock position and check Click sound andlighting off PW/LB LED.Power on: Turn Clock wise from 7 O'clock position and check Click sound and lighting on PW/LB LED.Volume level control: adjust Headphone output level to your favorite level.(2). PW/LB LED.Light on to indicate the operating state. Green light indicates Battery level is over 3.4V and Red light indicates Low Battery state below 3.4V. In this case, charging is required.(3). HP level Slide SwitchSelect Headphone output level.Right position shown in above brings High-Level for high impedance headphones.Left position shown in above brings Low-Level for Low impedance headphones. (4). Analog Filter selection Switch.You can select Analog Filter Curve inside ES9018K2M DAC with this switch.Right position brings Sharp Roll-Off Curve and Left position brings Slow Roll-off Curve.(5). 3.5mm mini Jack.Stereo analog audio output for earphones. Supports 8 Ohm to 110 Ohm impedance. (6). 2.5mm micro jack ( L –BAL – R )Analog Audio Balanced amp output to drive 4-wire ( 2 wire for L, 2wire for R) type4-2. Rear panel(1). Digital Audio Stream Input for iPod/iPhone/iPadUSB-A Connector : Compliant with USB 2.0 Full Speed(12Mbps) Spec.*KEB02ip works as USB-Host but does not provide charging current from this connector.It can provide USB Bus_Power to USB device up to 100mA.*Don’t use this connector at USB_DAC mode. Never connect iPod/iPhone/iPad to thisconnector when Mode select Switch is set for USB_DAC mode.(2). Digital Audio Stream Input for PC/Mac.USB mini-B Connector : Compliant with USB 2.0 High-Speed(480Mbps) Spec. andKEB02iP works as the USB Audio Class 2 Audio Device.*This connector is used in USB_DAC mode. Don't connect any device when iPodLegacy Support Compatible mode is selected.(3). DC+5V power input for charging.USB micro-B Connector :Must connect DC+5V( +0.25V, -0.25V, 0.5A minimum )Power supply unit to charge internal battery with USB-A to micro USB-B cable.*AC adapter is not included inbox. Soled separately.* Use DC+5V(+0.25V -0.25V)/1 to 2A Switching type AC adaptor or USB port of PC/Mac.(4). Mode Select Slide SwitchUse this slide switch to change KEB02iP operation mode. This switch must be set in Power_OFF state, Volume Knob at the front panel must be set at 7'Oclock position. And the Volume Knob must be turned clockwise to enable operation mode being selected by current setting of this switch for iPod Legacy Support mode or USB_DAC mode.- iPod position(Left) : iPod Legacy Support mode.KEB02iP works as an USB Host and iPod/ iPhone/iPad works as an USB Device. Must be set this position before turning Power_ON KEB02iP to use this mode.- USB position(Middle or Right) : USB_DAC mode.KEB02iP works as an USB Audio Class 2 Device and High-Speed(480Mbps) Device. Must be set this position before turning Power_ON KEB02iP to connect PC or Mac to USB mini-B port. KEB02iP works with internal battery and does not require USB BUS Power at BT position. Must select BT position to connect Apple Camera Connect Kit, Lightning to USB Camera Adapter or SONY WALKMAN USB Connection canle.KEB02ip works requires USB Bus_Power at BP position. In this case you can connect to USB high-speed enabled HOST port of PC or Mac.(5). LEDs(5-1) USB(Green)/ iPod(Red)Lights on Red when succeeded to detect iPod and starts brink to indicate beingcommunicating successfully with iPod.(5-2) PCM(Green)/DSD(Red)Disabled in iPod Legacy support compatible mode. Enabled only in USB_DAC mode.(5-3) EXTP(Green)Indicates External DC+5V Power source or USB Bus_Power(BP mode) is beingsupplied and KEB02iP is working and charging internal battery with the external power source or USB Bus_power(BP mode).(5-4) Charge.Indicates internal battery is being charged with the external power or USBBus_Power(BP mode).5. Setting up Mac/MacOS X5-1. Connecting RAL-KEB02iP to Mac USB portGetting started with setting up your Mac/MacOS X 10.7 or newer.(1)Turn off Power of KEB02iP and select USB_DAC mode. And then turn on power ofKEB02iP.(2)Connect RAL-KEB02iP mini-B port to Mac USB port with USB-A to mini-B cable.The cable should be compliant with USB High-Speed(480Mbps) certification.(3)MacOS X will detect and recognize RAL-KEB02iP.(4)Click on the "System Preferences" app on Dock.(5)Click on the "Sound" icon at the Hardware row.5-2. Setting 'Sound Effects' output to Internal SpeakersClick on the "Sound Effects" tab to prevent alerts and effect sounds such as "e-mail received notification sound" from being routed to Audio System.Set Play sound effects through 'Internal Speakers'”.5-3. Setting RAL-KEB02iP as an Audio OutputClick on the "Output" tab and select "RATOC RAL_KEB02iP Audio Out".This selection will route the sound from iTunes or other Audio Applications to your Audio system.5-4. Setting up 'Audio MIDI Setup' Application(1)If "Audio Midi Setup" application is not found on Dock, open the Hard Disk icon andopen the "Applications" folder.You can find the "Audio Midi Setup" application at the "Utilities" folder.(2)Open the "Audio Midi Setup" application and select "Audio Devices".(3)Click on "Output" tab. Select "RATOC RAL_KEB02iP Audio Out" for the "DefaultOutput" to send the sounds from iTunes or other applications to Audio system.(4)Select "Built-in Output" for the "System Output" to route system alert sound such as "new mail received" sound to built-in speaker.(5)Select "RATOC RAL_KEB02iP Audio Out" and then select your desired sample ratesuch as 192000 Hz. at "Format".If sample rate which is not identical to the sample rate of original music file itself is selected, MacOS X Audio driver will execute sample rate conversion. As this conversion will affect audio quality, we recommend to select adequate sample rate which is identical to one of music file at this field.5-5. Launch and play iTunes or other Music Player applicationLaunch iTunes or other Music Player application. Start it and select Music file. You will listen and enjoy fine and clear sound from your Audio system. To learn more about Music Player application, refer to User Guide or Online Help of the application.6. Setting up Windows PC ( Windows 8, 7 )This chapter describes the driver installation and setting on Windows 7 as an example, these process is almost the same as one on Windows 8, Vista, XP.Getting started with setting up Windows 7 ( 32bit or 64bit ) PC.6-1. Installation of USB Audio 2.0 Class DriverRAL-KEB02iP requires USB Audio Class 2.0 Driver. You need to install it before using it. If you forgot it or failed to install the driver, RAL-KEB02iP would not be configured as a USB Audio Device.(1)Turn off Power of KEB02iP and select USB_DAC mode. And then turn on power ofKEB02iP.(2)Connect RAL-KEB02iP to USB 2.0 HS(480Mbps) enabled port on PC.(3)Log in as an Administrator. You must log in as an Administrator to install USB Audio Class 2.0Driver.(4)Download RAL-KEB02iP Driver from/english/download/driver/keb02ip.htmland follow the instructions at the site and install the driver.(5)Click and run KEB02iP_driver.exe. User Account Control window will appear and show RATOCSystems, Inc. as the Verified publisher name. Click 'Yes' to go to next step.(6)"RAL-KEB02iP installer" will start automatically. Click 'Next' to start installation.(7)InstallShield will start and show status.(8)Click 'Install' button at 'Windows Security' dialog box below and continue driverinstallation.(9)When this message shows up, remove USB Audio Device except RAL-KEB02iP.Only one KEB02iP should be connected at this time.Click "OK","Next","Install","Install" to finish the installation.(10)W indows Security dialog box may be shown up again, if so, click 'Install' to continue theinstallation.(11)C onnect RAL-KEB02iP to your PC when the dialog box below is shown up.Click 'OK' after the connection is completed.(12)I nstallShield Wizard will check system, prepare and start the installation.(13)InstallShield Wizard will complete. Click "Finish".(11) Open Device Manager Window and check "RATOC Systems, Inc. Check 'USB 2.0Audio Devices RAL-KEB02iP' is shown up.-2. Uninstall RAL-KEB02iP Device DriverIf you failed in RAL-KEB02iP Driver installation or desire to remove it from your Windows PC, uninstall it and re-install again.Follow the instructions below.(1) Open 'Control Panel' and select 'Programs and Features' icon.(2) Select and click 'REX-KEB02iP Driver'.(3) InstallShield will start and show dialog box below. Just in case, make sure you willstart to uninstall. And then click 'Yes.'(4) Click "Finish" at InstallShield Window below.7. Grade up setting for WindowsThis chapter describes how to improve sound quality and tune up your PC to listen high fidelity and pure sound.Before installation of Music Player application or additional drivers:- Check Compatibility and Combination of Sound Drivers and Applications. And select most suitable one for your PC/Mac Audio system. You also need some setting atDevice Manager Window to use the application or add-on drivers.- Set disable to route "System Sound" to your Audio system. Follow steps below:(1) Launch "Control Panel" and click on "Sound".(2) Select "Built-in Sound card" at the "Playback" tab. Click "Set Default" button toroute system sound such as "new mail received" to built-in speaker.(3) Select "RAL-KEB02iP" at the "Playback" tab and click "Properties" button.(4) Click "Advanced" tab. And set check mark at both "Allow applications to takeexclusive control of this device" and "Give exclusive mode applications priority".These two setting must be set to use our driver, Kernel Streaming orWASAPI mode with Music Player applications. If you would like to use MediaPlayer or iTunes, these applications use Direct Sound or QuickTime Player.7-1.Listen HD Music with Direct Sound and Kernel Mixer (1) Double click "RAL-KEB02iP Audio" at "Playback" tab. Click "Properties" button.You can change icon and device name as you like.(2) Click "Advanced" tab and select Sampling Rate/bit rate corresponding to propertyof music files you like at "Default Format" box.Note) 24bit/88.2kHz, 24bit/176.4kHz, 24bit/352.8kHz and 24bit/384kHz are not shown up at the list box.This is the known issue of Windows 7/Vista Direct Sound Driver.ing WASAPI mode, skip Kernel MixerWindows 8, 7 and Vista(SP1 or newer) includes this function. Once enabled, Windows Kernel Mixer is bypassed and Audio application can pass music data to Audio drivers directly.** iTunes does not work with WASAPI setting on 64bit Windows 8, 7, Vista.(1) Click "Start" and launch "Control Panel".(2) Double click "Sound".(3) Double click "RAL-KEB02iP Audio" at "Playback" tab. And click "Properties" button.(4) Click "Advanced" tab and mark Checkbox of both "Allow applications to takeexclusive control of this device" and "Give exclusive mode applications priority" at "Exclusive Mode" box.(5) Download components suitable for your application such as foobar2000 from theapplication web site. Install it and follow instructions described at the web page.Inputs Outputs 8. SpecificationsName DSD and High-Reso PCM ready portable USB DACModel Number RAL-KEB02iPTerminals USB mini-B for USB_DAC mode.USB-A for iPod Compatible mode.Supported PC Windows 8, 7, Vista, XP ,Mac OS X 10.7 or later.*Windows 64 bit versions are supported.Supported AudioUSB_DAC mode USB Audio Class 2.0 ( 480Mbps required )Input Format (Hi-Speed mode is required)DSD 5.6448/2.8224MHz ( DoP standard-compliant).L-PCM24bit/16bit,384kHz/354.8kHz/192kHz/176.4kHz/96kHz/88.2kHz/48kHz/44.1kHz (2ch)iPod Compatible modeUSB Full speed (12Mbps ).L-PCM 16bit, 32kHz/44.1kHz/48kHzTerminals Analog Stereo 3.5 mini Jack.Analog balanced output, 2.5mm mini-mini jacks.Compatibleearphones. Impedance 8Ω to 110ΩFrequency DC ~90 kHz (24bit/192 kHz ), Characteristics 10 Hz to 40 kHz (24bit/96 kHz),20 Hz to 20 kHz (16bit/44.1 kHz)rated output Balanced output (2.5 mini-mini):131mW/ch. @22 ohm load.Stereo output (3.5mm mini)38mW/ch. @68 ohm load.Internal Battery Li-Polymer 3.7V 1200mAh. USB charger required. Unit Dimensions/Weight 70 (W) x 103 (D) x 24 (H) mm.230g.。
GHOST网刻(克)详细图文教程
这篇文章讲的是网络克盘最初的版本,以后的PXE网克,max网克,都是基于这样一个基础。
不过是写了一些自动批处理。
或者从支持PXE启动芯片的网卡启动机子进行网克(达到空硬盘网克的目的).特别是新加入网管的兄弟,一定要了解这篇文章,正所谓知其然,并知其所以然。
制作网络克隆镜像:将做好的系统盘,直接挂接在网络克隆服务器上,这里需要注意,系统盘必须设置为从盘,网络克隆程序必须安装在网络克隆服务器的主硬盘中。
网络克隆服务器硬盘上必须有足够的硬盘空间,可用挂接第二块硬盘的方法,用于创建克隆镜像文件。
将准备好的另外一块硬盘挂在你做好的机器上.之后重新启动到DOS模式,启动GHOST,选择“Local→Disk→To Image选择需要做镜像的系统盘,按回车键选择已经准备好的拥有足够空间的分区(这里我们选择的是第二块物理硬盘)此时系统提示需要给镜像文件起一个名子,这里我们起为BAK。
按回车键,系统会提示选择的压缩方式.选NO是不压缩.FAST是快速压缩.HIGH是高压缩率.其实你里你需要随意选择。
选择HIGH虽然会节省空间,但可能会浪费时间。
选择后按YES进行备份操作。
因为FAT32格式分区最大只能识别2G的文件.所以每到达2G时候,会提示你会重新建立文件.镜像文件备份完成后,我们该建立GHOST服务器了.启动WINDOWS打开GHOSTSRV . EXE文件.其文件可以在GHOST企业版里找到.(其实BIOS维修网站论坛中已经提供下载了)给服务器起一个名字.我起的名字是shenzi选择克隆客户端,然后选择我们刚才备份到另外一个硬盘的镜像文件,点击接受客户的按扭。
系统此时将自动寻找客户端。
现在我们要做的工作是设置客户端了。
在GHOST文件所在的目录里,我们需要创建一个WATTCP . CFG的文件.此文件是指定IP以及网关的.如果没有此文件GHOST会自动扫描DHCP服务器.不推荐使用DHCP服务器.所以我们用DOS的命令,EDIT建立一个WATTCP . CFG 的文件吧.在GHOST所在的目录里输入 edit空格wattcp .cfg在EDIT中,我们建立以下内容IP=你这台机器所指定的IP.为了避免重复,尽量使用机器号.NETMASK=子网掩玛,根据IP规则设置.GATEWAY=网关.就是建立了GHOST服务器的IP地址.建立完成后,将文件保存后,退出EDIT。
蓝沙快克--网刻+教程
蓝沙快克网刻编辑:高超审阅:周经龙在我们中心,平时经常用硬刻,除了硬刻之外,网刻是我们给硬盘更新的另一个方法,下面就网刻给大家讲讲个人的认识。
网刻操作相对来说是比较方便的一个,但是要熟练操作需要一个过程。
网刻重要的是掌握住步骤,再就是细心。
在这里注意下的是在新技展主机在WIN2003下不能正常使用软件,最好进Win XP上去克。
首先,找一个号的母盘(也就是同样主板型号的硬盘),用主控端把母盘“暂停保护”,如图,选中电脑后,点击“参数设置”,,把“暂停保护”打对号,选择“是”,再点击“确定”,,这样就成功的对母盘进行了暂停保护,暂停保护的目的是为了保护母盘和子盘(子盘或者被刻盘)的数据。
暂停保护之后电脑会重新启动。
到此,母盘的工作已经做了一半了,开机之后,从ftp://192.168.18.200地址中考取网刻工具——蓝沙网络快刻软件,如图,解压缩会看到下面的几个文件,点击,即可以看到如图所示,点击之后即看到如图所示对话框,本机为192.168.0.32 那么DHCP地址也为192.168.0开始,点击确定即可看到如图所示,到目前为止,母盘准备完毕。
现在我们要对子盘进行设置,子盘的设置主要是BIOS设置。
开机后按“Delete”键,进入BIOS主界面,,选择加载最佳设置项,选择“Y”,点击确定把时间设置为2007年之前,把Drive A设置为“None”。
此项设置为“Enabled”。
设置项目前设置好了!由于主板不同,BIOS的设置有所区别,但是设置相似。
希望大家灵活掌握。
用对等线将两台电脑连接起来,对等线两端水晶头的线序如图,。
插好两端的网线,按“F10”保存,让其自行运行,这时要特别主要的是保持两台电脑的通信畅通即如图状态。
在通信过程中,母盘会读取到子盘的一些信息,如图,这时可以根据进入软件的刻盘程序,点击“下一步”,会看到如图所示,把CDEF盘全部勾选,点击“下一步”,进步刻盘的最后一个步骤,点击“克隆”即可开始硬盘数据更新。