Oracle 11g R2 升级方案
oracle升级操作流程

数据库版本升级操作手册目录备份数据库 (3)升级Oracle软件 (3)修改ORACLE_HOME (12)升级实例 (13)手工使用脚本升级实例 (14)升级遇到问题的解决办法 (15)检查升级后的版本信息和无效对象 (16)附录 (17)本文用于指导oracle数据库由版本11。
2.0.1.0升级到版本11.2.0。
3.0升级步骤如下:➢备份数据库➢升级oracle 软件➢修改ORACLE_HOME➢升级实例➢检查升级后的版本信息和无效对象备份数据库由于oracle升级存在一定风险,所以在升级前一定要对已有数据进行备份。
1、停掉所有使用数据库的相关程序,以及数据库。
2、对数据库文件进行冷备份.备份后的文件可转存到异机或在本地存放。
升级Oracle软件1、获取oracle升级软件p1*******_112030_Linux—x86—64_1of7.zip 及p1*******_112030_Linux—x86—64_2of7.zip。
2、将其上传到数据库服务器的/tmp/目录下并解压.unzip p1*******_112030_Linux-x86-64_1of7。
zipunzip p1*******_112030_Linux—x86—64_1of7.zip3、解压后,会在当前目录下生成一个database目录.4、切换到oracle用户,执行oracle升级脚本。
5、s u - oracle/tmp/database/runInstaller6、不需要进行任何更改,直接点击下一步。
7、选择跳过软件更新,点击下一步。
8、选择升级现有数据库,点击下一步。
9、语言选择简体中文和英语,点击下一步。
10、选择企业版,并点击下一步。
11、Oracle基目录无需更改,软件位置需要更改为新的位置,这样可以减少宕机时间,是oracle所推荐的方法。
如下图我们将软件安装位置选择为/home/oracle/oracle11g3,修改后,点击下一步。
oracle11g升级

# swap -a /dev/zvol/dsk/rpool/swap 将增加大小的swap设备重新加入swap
2.1.5 安装solaris 11的桌面系统
ipadm set-ifprop -m ip -p standby=on net1
ipadm delete-ip net0
ipadm create-ip net0
ipadm create-ip net1
ipadm create-ipmp -i net0,net1 ipmp0
ipadm create-addr -T static -a local=10.84.252.226/27 ipmp0/v4
ipadm set-ifprop -m ip -p standby=on net1
2.1.7 设置RAC系统使用的心跳网卡
ipadm create-ip net2
ipadm create-addr –T static –a 100.100.100.100/24 net2/v4 (db1)
三个节点共同组成应用和容灾系统,两个节点在本地,另外一个节点放于远端数据中心,通过赛门铁克的SFHA软件构成比较高的冗余来完成数据的镜像。
1.2.升级前的EXP以及NBU的rman备份,因为操作系统本身需要升级,所以,在备份ORACLE数据库的数据后,需要彻底铲除OS本身,然后在系统上进行11g rac的部署。
100.100.100.101 db2-priv
100.100.100.102 db3-priv
另外一台主机的/etc/hosts文件里面需要这些地址,都写上。
ORACLE RAC 11Gr2 升级PSU 从11.2.0.3.0到11.2.0.3.8
11.2.0.3RAC 打PSU 11.2.0.3软件包PSU包p1*******_112030_Linux-x86-64.zip此包包含GI和DATABASE的PSU安装前准备1、opatch should be 11.2.0.3.4 or later.两个节点grid和oracle的版本都要最新[grid@rac1 OPatch]$ ./opatch versionOPatch Version: 11.2.0.3.122、生成ocm.rsp两个节点都要执行login as oracle$ORACLE_HOME/OPatch/ocm/bin/emocmrsp-no_banner -output /home/oracle/ocm.rsp3、Validation of Oracle Inventory$ $ORACLE_HOME/OPatch/opatch lsinventory -detail -oh <ORACLE_HOME>4、Stop EM Agent Processes Prior to Patching and Prior to Rolling Back the Patch$ $ORACLE_HOME/bin/emctl stop dbconsole安装1、自动安装login as root安装前注意ORACLE_HOME的所属组不可以为rootopatch auto <UNZIPPED_PATCH_LOCATION> -ocmrf <ocm response file>节点1:[root@rac1 OPatch]# /u01/app/grid/OPatch/opatch auto /opt/soft/11g/gi_psu_11.2.0.3.8 -ocmrf /home/oracle/ocm.rspCan't locate Switch.pm in @INC (@INC contains: /usr/local/lib64/perl5 /usr/local/share/perl5 /usr/lib64/perl5/vendor_perl /usr/share/perl5/vendor_perl /usr/lib64/perl5 /usr/share/perl5 .) at /u01/app/grid/OPatch/crs/auto_patch.pl line 2734.BEGIN failed--compilation aborted at /u01/app/grid/OPatch/crs/auto_patch.pl line 2734.报错是因为少包,安装perl-Switch包perl-Switch-2.16-7.el7.noarch.rpm[root@rac1 ~]# /u01/app/grid/OPatch/opatch auto /opt/soft/11g/gi_psu_11.2.0.3.8 -ocmrf /home/oracle/ocm.rspExecuting /u01/app/grid/perl/bin/perl /u01/app/grid/OPatch/crs/patch11203.pl -patchdir/opt/soft/11g -patchn gi_psu_11.2.0.3.8 -ocmrf /home/oracle/ocm.rsp -paramfile /u01/app/grid/crs/install/crsconfig_paramsThis is the main log file: /u01/app/grid/cfgtoollogs/opatchauto2016-10-15_19-49-07.logThis file will show your detected configuration and all the steps that opatchauto attempted to do on your system:/u01/app/grid/cfgtoollogs/opatchauto2016-10-15_19-49-07.report.log2016-10-15 19:49:07: Starting Clusterware Patch SetupUsing configuration parameter file: /u01/app/grid/crs/install/crsconfig_paramsUnable to determine if /u01/app/oracle/product/11.2.0.3/db1 is shared oracle homeEnter 'yes' if this is not a shared home or if the prerequiste actions are performed to patch this shared home (yes/no):yesUnable to determine if /u01/app/grid is shared oracle homeEnter 'yes' if this is not a shared home or if the prerequiste actions are performed to patch this shared home (yes/no):yesStopping RAC /u01/app/oracle/product/11.2.0.3/db1 ...Stopped RAC /u01/app/oracle/product/11.2.0.3/db1 successfullypatch /opt/soft/11g/gi_psu_11.2.0.3.8/17076717/custom/server/17076717 apply successful for home /u01/app/oracle/product/11.2.0.3/db1patch /opt/soft/11g/gi_psu_11.2.0.3.8/16902043 apply successful for home /u01/app/oracle/product/11.2.0.3/db1Stopping CRS...Stopped CRS successfullypatch /opt/soft/11g/gi_psu_11.2.0.3.8/17076717 apply successful for home /u01/app/grid patch /opt/soft/11g/gi_psu_11.2.0.3.8/16902043 apply successful for home /u01/app/gridStarting CRS...CRS-4123: Oracle High Availability Services has been started.Starting RAC /u01/app/oracle/product/11.2.0.3/db1 ...Started RAC /u01/app/oracle/product/11.2.0.3/db1 successfullyopatch auto succeeded.节点2:[root@rac2 ~]# /u01/app/grid/OPatch/opatch auto /opt/soft/11g/gi_psu_11.2.0.3.8 -ocmrf /home/oracle/ocm.rspExecuting /u01/app/grid/perl/bin/perl /u01/app/grid/OPatch/crs/patch11203.pl -patchdir /opt/soft/11g -patchn gi_psu_11.2.0.3.8 -ocmrf /home/oracle/ocm.rsp -paramfile /u01/app/grid/crs/install/crsconfig_paramsThis is the main log file: /u01/app/grid/cfgtoollogs/opatchauto2016-10-15_20-54-32.logThis file will show your detected configuration and all the steps that opatchauto attempted to do on your system:/u01/app/grid/cfgtoollogs/opatchauto2016-10-15_20-54-32.report.log2016-10-15 20:54:32: Starting Clusterware Patch SetupUsing configuration parameter file: /u01/app/grid/crs/install/crsconfig_paramsUnable to determine if /u01/app/oracle/product/11.2.0.3/db1 is shared oracle homeEnter 'yes' if this is not a shared home or if the prerequiste actions are performed to patch this shared home (yes/no):yesUnable to determine if /u01/app/grid is shared oracle homeEnter 'yes' if this is not a shared home or if the prerequiste actions are performed to patch this shared home (yes/no):yesStopping RAC /u01/app/oracle/product/11.2.0.3/db1 ...Stopped RAC /u01/app/oracle/product/11.2.0.3/db1 successfullypatch /opt/soft/11g/gi_psu_11.2.0.3.8/17076717/custom/server/17076717 apply successful for home /u01/app/oracle/product/11.2.0.3/db1patch /opt/soft/11g/gi_psu_11.2.0.3.8/16902043 apply failed for home /u01/app/oracle/product/11.2.0.3/db1Stopping CRS...Stopped CRS successfullypatch /opt/soft/11g/gi_psu_11.2.0.3.8/17076717 apply successful for home /u01/app/grid patch /opt/soft/11g/gi_psu_11.2.0.3.8/16902043 apply failed for home /u01/app/gridStarting CRS...CRS-4123: Oracle High Availability Services has been started.Starting RAC /u01/app/oracle/product/11.2.0.3/db1 ...Started RAC /u01/app/oracle/product/11.2.0.3/db1 successfullyopatch auto succeeded.报错Missing command :fuserUtilSession failed:Prerequisite check "CheckSystemCommandAvailable" failed.Prerequisite check "CheckSystemCommandAvailable" failed.Prerequisite check "CheckSystemCommandAvailable" failed.Prerequisite check "CheckSystemCommandAvailable" failed.Prerequisite check "CheckSystemCommandAvailable" failed.Prerequisite check "CheckSystemCommandAvailable" failed.Prerequisite check "CheckSystemCommandAvailable" failed.Prerequisite check "CheckSystemCommandAvailable" failed.安装psmisc包[root@rac2 ~]# /u01/app/grid/OPatch/opatch auto /opt/soft/11g/gi_psu_11.2.0.3.8 -ocmrf /home/oracle/ocm.rspExecuting /u01/app/grid/perl/bin/perl /u01/app/grid/OPatch/crs/patch11203.pl -patchdir /opt/soft/11g -patchn gi_psu_11.2.0.3.8 -ocmrf /home/oracle/ocm.rsp -paramfile /u01/app/grid/crs/install/crsconfig_paramsThis is the main log file: /u01/app/grid/cfgtoollogs/opatchauto2016-10-15_21-55-47.logThis file will show your detected configuration and all the steps that opatchauto attempted to do on your system:/u01/app/grid/cfgtoollogs/opatchauto2016-10-15_21-55-47.report.log2016-10-15 21:55:47: Starting Clusterware Patch SetupUsing configuration parameter file: /u01/app/grid/crs/install/crsconfig_paramsUnable to determine if /u01/app/oracle/product/11.2.0.3/db1 is shared oracle homeEnter 'yes' if this is not a shared home or if the prerequiste actions are performed to patch this shared home (yes/no):yesUnable to determine if /u01/app/grid is shared oracle homeEnter 'yes' if this is not a shared home or if the prerequiste actions are performed to patch this shared home (yes/no):yesStopping RAC /u01/app/oracle/product/11.2.0.3/db1 ...Stopped RAC /u01/app/oracle/product/11.2.0.3/db1 successfullypatch /opt/soft/11g/gi_psu_11.2.0.3.8/17076717/custom/server/17076717 apply successful for home /u01/app/oracle/product/11.2.0.3/db1patch /opt/soft/11g/gi_psu_11.2.0.3.8/16902043 apply successful for home /u01/app/oracle/product/11.2.0.3/db1Stopping CRS...Stopped CRS successfullypatch /opt/soft/11g/gi_psu_11.2.0.3.8/17076717 apply successful for home /u01/app/grid patch /opt/soft/11g/gi_psu_11.2.0.3.8/16902043 apply successful for home /u01/app/gridStarting CRS...CRS-4123: Oracle High Availability Services has been started.Starting RAC /u01/app/oracle/product/11.2.0.3/db1 ...Started RAC /u01/app/oracle/product/11.2.0.3/db1 successfullyopatch auto succeeded.2、手动安装修改数据字典1、修改数据库字典cd $ORACLE_HOME/rdbms/adminsqlplus /nologSQL> CONNECT / AS SYSDBASQL> STARTUPSQL> @catbundle.sql psu applySQL> QUITSQL> select * from dba_registry_history;ACTION_TIMEACTION NAMESPACE VERSION ID--------------------------------------------------------------------------- ------------------------------ ------------------------------ ------------------------------ ----------BUNDLE_SERIES------------------------------COMMENTS--------------------------------------------------------------------------------------------------------------------------------------------------------------------------------------------------------17-SEP-11 10.21.11.595816 AM APPLY SERVER 11.2.0.3 0PSUPatchset 11.2.0.2.015-OCT-16 01.36.13.936629 PM APPLY SERVER 11.2.0.3 0PSUPatchset 11.2.0.2.015-OCT-16 09.26.08.161876 PM APPLY SERVER 11.2.0.3 8PSUPSU 11.2.0.3.82、Upgrade Oracle Recovery Manager CatalogIf you are using the Oracle Recovery Manager, the catalog needs to be upgraded. Enter the following command to upgrade it:$ rman catalog username/password@aliasRMAN> UPGRADE CATALOG;回滚1、自动回滚login as root# opatch auto <UNZIPPED_PATCH_LOCATION> -rollback -ocmrf <ocm response file>。
oracle11gR2(oracle11.2)新特性
oracle11gR2(oracle11.2)新特性by o8xv0123加强了升级包的安装功能1,直接从老版本升级到最新版,而不需要从老版本多次逐个执行小版本的升级比如,可以从11.0.1.0直接升级到11.0.3.0 或者从10.x直接升级到11.0.3.0而不需要先升级到11.0.2.0,再到11.0.3.02,可以将补丁包安装到新的独立的目录中,同时也支持用补丁覆盖安装到旧版oracle软件所在的目录,官方推荐前者3,新的软件安装包集成了安装程序和升级包,而不是先安装一个基础版本再打补丁包新的软件升级选项1,从oracle 11g r2开始,支持在线升级功能(动态地从oracle服务器下载,同时进行升级),也可以先将补丁包下载到本地,然后进行安装2,支持oracle客户端的覆盖安装升级3,TDE硬件设备加速功能(直译)新的oracl e网格架构安装选项Oracle Database 11g Release 2提供了新的oracle网格架构的安装,在单实例的数据库中,oracle的网格架构包括,ASM,listener和oracle restart(新特性),oracle restart将会监控oracle的运行并管理oracle的运行状况,如果一个包含了oracle数据库实例,oracle ASM管理实例和listener的oracle 环境出现故障,oracle restart将会自动对其进行重新启动。
在集群环境中,oracle网格架构包括,oracle 集群,oracle ASM和listeners。
如果想要在独立服务器中使用oracle 网格架构的话,必须要在安装oracle数据库之前安装oracle网格架构的相关软件。
新的桌面和服务器安装选项Oracle Database 11g Release 2提供了一个新的安装选项,你可以选择要安装数据库的系统的类型,如果是笔记本或者PC的话,可以选择"桌面类型“选项,否则可以选择服务器类型。
数据库11.2.0.3.12PSU升级方案
数据库11.2.0.3.12 PSU升级方案相关术语PSU (Patch Set Updates)PSU(补丁集更新)是累积型补丁--即某个特定的补丁集,它先前所有的PSU被包含于最近的PSU 中,例如:11.2.0.3.11的所有bug修复被包含于11.2.0.3.12中。
PSU包含推荐的bug修复,及最近的CPU,PSU每个季度发布一次。
具体方案1.介质下载1.1 GI PSU(INCLUDES DB PSU)介质My Oracle support网站搜索文档1922396.1可以得到数据库PSU补丁号码列表,Oracle 11g RAC 数据库它的PSU分GI部分和RDBMS部分。
通常GI的PSU介质会包含RDBMS的PSU介质--即DB 的PSU安装介质不必单独下载。
本次PSU升级是需要Linux 64平台的11.2.0.3.12 GI PSU介质,2014年第三季度发布的PSU。
补丁号:194403851.2 opatch 工具下载安装PSU,通常对opatch的最低版本有要求,如果opatch的版本不符合要求,则需要到My Oracle support去下载最新的opatch工具。
本次安装PSU 11.2.0.3.12需要opatch 11.2.0.3.5或者之后的版本。
查看opatch版本的方法:opatch version下载最新opatch工具的方法:My Oracle support 搜索补丁号:6880880得到最新的opatch工具下载链接。
2.opatch工具更新,oracle和grid用户的opatch都要更新,opatch位于$ORACLE_HOME目录下2.1 用tar命令备份现有的opatch目录2.2 删除现有的opatch目录2.3 将最新的opatch工具目录(补丁下载并解压获得)拷贝到上一步删除的目录的父目录下2.4 使用opatch version验证opatch的版本3.GI,RDBMS patching下列描述中<UNZIPPED_PATCH_LOCATION>是11.2.0.3.12 GI PSU的解压目录,<GI_HOME>是GI软件的安装目录,<ORACLE_HOME>是RDBMS的安装目录,11.2.0.3.12 GI PSU解压后形成的目录结构如下:BUG 19440385 - 11.2.0.3.12 (Oct 2014) Grid Infrastructure Patch Set Update (GI PSU) containsBUG 17592127- GRID INFRASTRUCTURE PATCH SET UPDATE 11.2.0.3.9(GI COMPONENTS) BUG 19121548- 11.2.0.3.12 (Apr 2014) Database Patch Set Update (PSU)In this example, the <GI_PSU_number> is 19440385; the <GI_Components_number> is 17592127; and the <DB_PSU_number> is 19121548.从上可知下载11.2.0.3.12介质并解压后,它包含两个子目录,一个是GI的PSU,另外一个是RDBMS的PSU建立一个目录,将zip文件移至这个目录下,然后unzip补丁文件,这个目录就是UNZIPPED_PATCH_LOCATION3.1停止EM代理进程oracle用户执行$ORACLE_HOME/bin/emctl stop dbconsole3.2root用户关闭crs,两个节点都要窒息crsctl stop crs3.3tar命令备份<ORACLE_HOME>,<GI_HOME>,两个节点都要执行3.4root用户解锁GI软件目录,两个节点都要执行# <GI_HOME>/crs/install/rootcrs.pl –unlock3.5生成ocm.rsp文件,2个节点均需执行,使用root用户执行$ORACLE_HOME/OPatch/ocm/bin/emocmrsp -no_banner -output $ORACLE_HOME/OPatch/ocm.rsp 安装psu补丁#$ ORACLE_HOME/OPatch/opatch auto <UNZIPPED_PATCH_LOCATION> -ocmrf$ORACLE_HOME/OPatch/ocm.rsp3.6Run catbundle.sql,升级数据库数据字典,只在一个节点上执行即可。
Oracle10g升级到11g
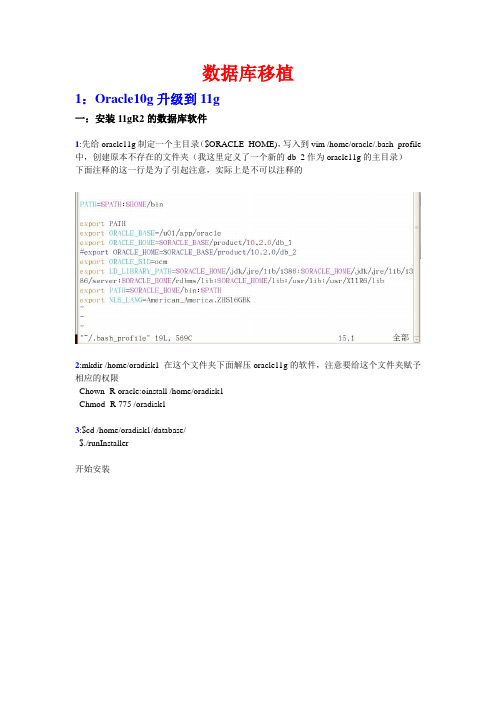
数据库移植1:Oracle10g升级到11g一:安装11gR2的数据库软件1:先给oracle11g制定一个主目录($ORACLE_HOME),写入到vim /home/oracle/.bash_profile 中,创建原本不存在的文件夹(我这里定义了一个新的db_2作为oracle11g的主目录)下面注释的这一行是为了引起注意,实际上是不可以注释的2:mkdir /home/oradisk1 在这个文件夹下面解压oracle11g的软件,注意要给这个文件夹赋予相应的权限Chown -R oracle:oinstall /home/oradisk1Chmod -R 775 /oradisk13:$cd /home/oradisk1/database/$./runInstaller开始安装这一步骤可以跳过,否则会出现错误这里仅仅需要安装数据库软件就可以了,不需要创建数据库实例注意此时的安装路径是/u01/app/oracle/product/10.2.0/db_2 (oracle11g的路径)在这里,会通过一系列的检查出先一些错误,会显示失败。
用鼠标点击错误在下面的提示框内会出现预期的值和实际出现的值,可根据提示进行修改,有些也可以忽略(点击右上角的全部忽略)修改后重新装安装完成二:进行安装前的初步检查1:此时需要启动oracle10的数据库实例,所以要先通过导入oracle10的主目录,将换将变量中的oracle11的主目录注释后重启生效,否则无法开启oracle10的数据库实例export ORACLE_HOME=/u01/app/oracle/product/10.2.0/db_12:在升级之前确保所有的组件和对象都是vaild的SQL>select substr(comp_name,1,40) comp_name, status, substr(version,1,10) version from dba_registry order by comp_name; --针对组件SQL>select substr(object_name,1,40) object_name,substr(owner,1,15) owner,object_type from dba_objects where status='INV ALID' order by owner,object_type; --针对对象如果有invalid的对象,运行utlrp.sql重新编译对象。
oracle11g数据库升级数据库升级
oracle11g数据库升级数据库升级Oracle对⾃⼰产品也⼀样,对于⾃⼰的产品在不同的时期,⽀持的强度是不⼀样的。
⼤体分来,⽀持的强度分为三个级别:Premier Support(最⾼优先级的⽀持),Extended Support(中等优先级的⽀持),Sustaining Support(最低优先级的⽀持)1.从产品发布为期5年的标准⽀持服务期-Premier support2.随后为期3年的延展⽀持服务期---------extended support3.接下来进⼊持久⽀持服务期--------------sustaining support不过根据不同的周期划分,Oracle的⽀持费⽤将会不同,在延展服务器内,第⼀年将会加收10%的费⽤提供⽀持,第⼆年加收20%的费⽤提供⽀持,第三年也是加收20%的费⽤提供⽀持。
Oracle11g的推出,oracle的升级成为必然。
升级包括软件的升级和数据库的升级两部分。
升级路线图wKiom1RwrmjSXODJAAITOSDSG4c601.jpg⼤概的升级步骤:(1)备份数据库(2)运⾏patchset,升级oracle 软件(3)准备新的ORACLE_HOME(4)运⾏dbua 或者脚本升级实例(5)检查升级后的版本信息和⽆效对象升级补丁包选择Metalink⽂档id:1922396.1会更新需要的补丁号wKioL1RwrxricNIJAAOWwmqw9J4760.jpg升级⽅法选择关于⽅法有很多,每种有各⾃的特点,根据特点选择合适的升级⽅式。
wKiom1RwrtewdeArAAQ_nAkHjZs922.jpgwKioL1Rwr5nSrTalAAJMXvvLJe0792.jpg可以选择参考⽂档id 1674333.1和1602485.1分别是9i和11g升级到最新的11gR2wKiom1Rwr2fB0BrVAASB_rjEEMs949.jpg第 1 步======下载 11.2.0.2 或更⾼版本的 RDBMS 软件。
11GRAC11.2.0.1升级11.2.0.3

11GRAC11.2.0.1升级11.2.0.311G RAC 双节点11.2.0.1升级到11.2.0.3目录一、GI 升级 (1)1. 升级前准备 (1)2. 常见问题及解决办法 (1)a. 问题1: (1)b. 问题2: (1)c. 问题3: (3)d. 问题4: (3)3. GI升级过程及详细图解 (3)4. GI升级后验证 (12)二、升级rdbms (12)1. 升级oracle software (12)2. Oracle database升级 (20)3. rdbms升级后验证 (25)4. 升级结束 (26)一、GI 升级1.升级前准备需要软件p1*******_112030_Linux-x86-64_3of7.zip解压[grid@test01 temp]$ unzip p1*******_112030_Linux-x86-64_3of7.zip[grid@test01 temp]$ cd grid/[grid@test01 grid]$ pwd/temp/grid/[grid@test01 grid]$ ./runcluvfy.shstage -pre crsinst -upgrade-n test01,test02-rolling -src_crshome $ORACLE_HOME -dest_crshome $ORACLE_HOME -dest_version 11.2.0.3.0 -fixup -fixupdir /tmp -verbose2.常见问题及解决办法a.问题1:/u01/app/11.2.0/grid test01 /u01 3.8643GB 5.5GB failed 解决方法:整理磁盘b.问题2:Checking for Oracle patch "9413827" in home "/u01/app/grid/11.2".Node Name Applied Required Comment--------------------------------------------------------------------------------------------------------------------------------- test02 missing 9413827 failedtest01 missing 9413827 failed解决方法:打补丁9413827如果集群的管理用户和数据库管理用户是在同一个用户下,那么需要改变一下环境变量,使用命令. oraenv授权(双节点)[root@test01 ~]# chown -R grid:oinstall /u01/app/grid/11.2/ 备份一下(双节点)[grid@test01 ~]$cp -rf $ORACLE_HOME/OPatch $ORACLE_HOME/OPatch_bk解压(双节点)[grid@test01 tmp]$ unzip p9413827_112010_Linux-x86-64.zip -d $ORACLE_HOME看一下版本(双节点)[grid@test01 11.2]$ $ORACLE_HOME/OPatch/opatch versionOPatch Version: 11.2.0.3.0OPatch succeeded.集群1节点操作[***************]$srvctlstophome-o$ORACLE_HOME-s /tmp/dex -n test01解锁[root@test01 ~]# /u01/app/grid/11.2/crs/install/rootcrs.pl -unlockSuccessfully unlock /u01/app/grid/11.2备份[grid@test01~]$ /u01/app/grid/11.2/9413827/custom/scripts/prepatch.sh -dbhome $ORACLE_HOME/u01/app/grid/11.2/9413827/custom/scripts/prepatch.sh completed successfully.打补丁[grid@test01 ~]$ cd /u01/app/grid/11.2/9413827/[grid@test01 9413827]$ /u01/app/grid/11.2/OPatch/opatch napply -local -oh $ORACLE_HOME -id 9413827[grid@test019413827]$ custom/server/9413827/custom/scripts/postpatch.sh -dbhome $ORACLE_HOME[root@test01 ~]# /u01/app/grid/11.2/crs/install/rootcrs.pl -patch-----------------------------------------------------------------------------------2012-05-28 14:59:52: Parsing the host name2012-05-28 14:59:52: Checking for super user privileges2012-05-28 14:59:52: User has super user privilegesUsing configuration parameter file:crs/install/crsconfig_paramsCRS-4123: Oracle High Availability Services has been started.查看下状态[grid@test01 OPatch]$ ./opatch lsinventory[grid@test01 ~]$ crsctl stat res -t------------------------------------------------------------------------------------------------------------ora.prod.db1 ONLINE ONLINE test01 Open2 ONLINE ONLINE test02 Open-------------------------------------------------------------------------------------------------------------如果出现如下这种状况,升级另外一个节点,步骤同节点1-------------------------------------------------------------------------------------------------------------ora.prod.db1 ONLINE ONLINE test01 Open2 ONLINE ONLINE test02--------------------------------------------------------------------------------------------------------------至此为止,补丁完成c.问题3:Check: Kernel parameter for "shmmni"Node Name Current Configured Required Status Comment ---------------------------------------------------------------------------------------------------------test02 4096 unknown 4096 failed Configured value too low.test01 4096 unknown 4096 failed Configured value too low.解决方法:[root@test01 ~]# /tmp/CVU_11.2.0.3.0_grid/runfixup.shResponse file being used is :/tmp/CVU_11.2.0.3.0_grid/fixup.responseEnable file being used is :/tmp/CVU_11.2.0.3.0_grid/fixup.enableLog file location: /tmp/CVU_11.2.0.3.0_grid/orarun.logSetting Kernel Parameters...The value for shmmni in response file is not greater than value of shmmni for current session. Hencenot changing it.d.问题4:Checking all nodes to make sure that search entry is " " as found on node "test02"All nodes of the cluster have same value for 'search'Checking DNS response time for an unreachable nodeNode Name Status---------------------------------------------------------------------------test02 failedtest01 failed解决方法:在dns服务器中加入缺少的域或者将/etc/resolv.conf中多余的查找域删除再次验证[grid@test01 grid]$./runcluvfy.shstage -pre crsinst -upgrade -n test01,test02-rolling -src_crshome $ORACLE_HOME -dest_crshome $ORACLE_HOME -dest_version 11.2.0.3.0 -fixup -fixupdir /tmp -verbose待所有问题解决后,开始升级安装3.GI升级过程及详细图解unset ORACLE_HOMEunset ORACLE_BASEunset ORACLE_SID ./runInstaller节点1执行脚本如下图:[root@test01 ~]# /u01/app/11.2.0/grid/rootupgrade.sh节点2执行脚本如下图:[root@test02 ~]# /u01/app/11.2.0/grid/rootupgrade.sh最后一步报错可忽略,点Skip跳过。
- 1、下载文档前请自行甄别文档内容的完整性,平台不提供额外的编辑、内容补充、找答案等附加服务。
- 2、"仅部分预览"的文档,不可在线预览部分如存在完整性等问题,可反馈申请退款(可完整预览的文档不适用该条件!)。
- 3、如文档侵犯您的权益,请联系客服反馈,我们会尽快为您处理(人工客服工作时间:9:00-18:30)。
Oracle 11g R2 升级方案一、版本升级路线Table 2-1 contains the required upgrade path for each release of Oracle Database. Use the upgrade path and the specified documentation to upgrade your database.Table 2-1 Upgrade Paths二、滚动升级Table 1-2 summarizes the various methods for performing rolling upgrades. Also, see Oracle Database High Availability Best Practices for help choosing a method to perform database upgrades.Table 1-2 Methods for Performing Rolling Upgrades三、升级方法Depending on the environment, there are several alternatives available when upgrading a database. This section discusses why a particular method would be chosen, lists considerations when using each method, and gives pointers to additional useful information.Database Upgrade Assistant (DBUA)The DBUA provides a graphical user interface (GUI) that guides a user through the in-place upgrade of a database. It is the recommended method for performing either a major release upgrade or patch release upgrade.The DBUA automates the upgrade process by performing all of the tasks that would otherwise need to be performed manually. It can be launched during installation of Oracle Database 11g Release 2 with the Oracle Universal Installer or it can be launched as a standalone tool at any time after installation is complete.The DBUA is a very useful tool, because it evaluates the current database and makes appropriate recommendations for configuration options such as tablespace sizes, cluster checks, initialization parameters, and Automatic Storage Management upgrades.DBUA is a good choice if the upgrade environment has the following characteristics: ∙Operating system remains the same (including upgrades in the same OS family, such as Windows XP to Windows Vista or Solaris 2.8 to Solaris 2.10)∙Graphical user interface is preferred over manual interface∙Real Application Clusters or Automatic Storage Management is installedo Much easier and less error prone than manual method – HIGHLY recommended!∙Existing database is at least 9.2.0.4 for Oracle Database 11g Release 1 and 9.2.0.8 for Oracle Database 11g Release 2Considerations for using DBUA:∙Databases must be on the same system (in-place upgrade where the new version of Oracle is installed on the same server as the existing version). The DBUA cannot upgrade a database remotely.For more information:∙Oracle Database Upgrade Guide 11g Release 2∙Oracle Database Upgrade Companion 11g Release 2∙Oracle Database 11g Upgrade page on OTN∙Complete Checklist to Upgrade to 11g Release 2 using DBUA (My Oracle Support Note 870814.1))Manual Upgrad eA manual upgrade consists of running SQL scripts and utilities from a command line to do an in-place upgrade of a database to the new Oracle Database 11g release. Although a manual upgrade gives finer control over the upgrade process, it is more susceptible to error if any of the upgrade steps are not followed or are performed out of order.Unlike the DBUA, the Pre-Upgrade information Tool (utlu111i.sql) that is shipped with the Oracle Database 11 software must be run manually to see what changes must be made to the target database. It performs checks on configuration options such as components, init parameters, and tablespace sizes.Manual upgrade is a good choice if the upgrade environment has the following characteristics: ∙Manual interface is preferred over graphical user interface∙Existing database is at least 9.2.0.4 for Oracle Database 11g Release 1 and 9.2.0.8 for Oracle Database 11g Release 2 (1 step upgrade). Manual upgrades can be done for databases before 9.2.0.x, but 2 steps are required versus 1. For example, if upgrading from 8.1.7.4, it is necessary to first upgrade to 10.2.0.x and then to 11.1 or 11.2. Considerations for manual upgrade:∙Cannot change operating system architectureFor more information:∙Oracle Database Upgrade Guide 11g Release 2∙Oracle Database Upgrade Companion 11g Release 2∙Oracle Database 11g Upgrade page on OTN∙Complete Checklist for Manual Upgrades to 11g Release 2 (My Oracle Support Note 837570.1))Oracl e Data Pump Export and Import / Original Export and ImportIn this method, the Export and Import utilities physically copy data from the current database to a new database. When upgrading from Oracle Database 10g or higher, Data PumpExport and Import are strongly recommended for improved performance and better manageability.Oracle Data Pump Export/Import and original Export/Import perform a full or partial export from the current database, followed by a full or partial import into a new Oracle Database 11g.In order to have two physical copies of the database, along with the dump file set, a significant amount of disk space may be required. However, the user has the flexibility (especially with Data Pump) to choose subsets of the database to export such as tablespaces, schemas, tables, and rows, leaving the original database unchanged. In addition, Data Pump Export/Import has two features that can help with this issue. First, Data Pump Import can be used in Network Mode, which allows the new Oracle database to be directly loaded across the network from the old database being upgraded. Thus, no intervening dump files are required. Second, when using Data Pump Export and Import in Oracle Database 11g, the imported data can be compressed with the Oracle Advanced Compression Option to improve performance (only when going from 11g Release 1 to Release 2 or for patch set upgrades from Oracle Database 11g onward).Data Pump Export/Import and original Export/Import do not change the existing database, which enables the database to remain available throughout the upgrade process. Data Pump Export and Import use Flashback technology to get a consistent view of the data. However, neither Data Pump Export/Import nor original Export/Import provide consistent snapshots by default.Because the current database can remain available, the existing production database can be kept available for read-only transactions while the new Oracle Database 11g database is being built at the same time by Data Pump Export/Import or original Export/Import. The current database can then be deleted once the upgraded system is determined to be fully functional.Note that Data Pump Export/Import is supported starting in Oracle Database 10g. When upgrading an Oracle database that is older than 10g, original Export and Import must be used. Data Pump Export/Import or Export/Import is a good choice if the upgrade environment has the following characteristics:∙Migration to different operating system architecture or hardware platform∙Source database is running on a version such as 8.0.3 or 8.1.6 that is not directly upgradable to the target version∙Side-by-side testing of the old and new versions of Oracle Database is needed (because an entirely new database is created)∙New database will be restructured (i.e. new tablespaces will be created and populated by imported data, or a new partitioning scheme will be implemented)Considerations for using Data Pump Export/Import or Export/Import:∙Downtime will be much longer than other methods, depending on size of the database(i.e. 10+ hours for large databases). This can be tested by running a test export into thefile system and then doubling or tripling the amount of time that would be required for the subsequent import.∙Additional disk space will be necessary to store both the export dump files and the new copy of the databaseFor more information:∙Oracle Database Upgrade Guide 11g Release 2∙Oracle Database Utilities 11g Release 2 (Part Number E10701-02)∙Oracle Database Upgrade Companion 11g Release 2∙Oracle Database 11g Upgrade web page on OTN∙Oracle Database Utilities web page on OTNOracl e Transportable TablespacesOracle Transportable Tablespaces (TTS) is an option for performing database upgrades in less than one hour for databases that have simple schemas and where the data files do not need to be transferred as part of the transport process (such as when the data files will be used in place, or when shared storage is available in a system migration).With this method, an empty 11g Release 2 database is created and data is moved from the existing database to the 11g Release 2 database. Metadata for tables and indices and the objects needed to support the tables and indices in the tablespaces is exported from the existing database and then imported into the new database using Data Pump Export/Import or original Export/Import. The majority of time taken for the upgrade is for the metadata export and import, and this is where there may be less than optimal performance.Transportable Tablespaces has been used effectively to reduce database upgrade time. However, because it was not originally designed as a database upgrade solution, it does not have the same level of automation as the DBUA. Consider whether the added testing time and complexity of using a TTS upgrade are worth the potential to reduce downtime during the upgrade.Starting with Oracle Database 10g, tablespaces can be moved across platforms. Many, but not all platforms are supported for cross platform tablespace transport. A cross-endian move involves an RMAN convert, but is a simple operation across platforms within the same endian group.Note that the time needed for the RMAN convert is essentially equivalent to the time needed for an RMAN backup of the database.Transportable Tablespaces is a good choice if the upgrade environment has the following characteristics:∙Downtime must be less than one hour∙Data files do not need to be transferred as part of the transport process∙Existing database’s object structure is not complexConsiderations when using Transportable Tablespaces:∙Metadata gets transported from the existing database to the new database and may increase upgrade time. If desired, a time estimate can be obtained by performing a metadata-only export on the source database.∙Higher level of skill is required for the database administratorFor more information:∙Oracle Database Administrator’s Guide 11g Release 2 (Part Number E10595-04)∙Database Upgrade Using Transportable Tablespaces: Oracle Database 11g Release 1 white paper∙Platform Migration Using Transportable Tablespaces: Oracle Database 11g Release 1white paper∙Platform Migration Using Transportable Database: Oracle Database 11g and 10g Release 2 white paperOracl e Data Guard SQL Apply (Logical Standby)Starting with Oracle Database 10 (10.1.0.3), Data Guard SQL Apply (logical standby) can be used to perform a database rolling upgrade with minimal downtime. The upgrade can be to a higher Oracle Database release or a later patch set. The overall downtime can be as little as the time it takes to perform a switchover.What is Oracle Data Guard? Oracle Data Guard provides the management, monitoring, and automation software infrastructure to create and maintain one or more standby databases to protect Oracle data from failures, disasters, errors, and data corruptions. There are two types of standby databases. A physical standby uses Redo Apply to maintain a block for block, exact replica of the primary database. A logical standby uses SQL Apply and contains the same logical information as the primary database, although the physical organization and structure of the data can be different. SQL Apply also enables rolling upgrades by allowing the synchronization of a standby database with a primary database that is using an earlier release of the Oracle Database.A database rolling upgrade entails first upgrading a logical standby database to a later Oracle release or patch set, and then allowing SQL Apply to re-synchronize the primary and standby databases. When the administrator is satisfied that the upgrade has been successful, the process is completed by using a Data Guard switchover operation to transition the standby to the primary role. The only downtime experienced by applications is the time needed to complete the switchover process and reconnect clients to the new primary database. The actual database upgrade is performed while applications continue to access the original production database.Beginning with Oracle Database 11g, Data Guard physical standby users can also benefit from rolling database upgrades by temporarily converting a physical standby to a transient logical standby database, enabling SQL Apply to synchronize the primary and standby databases while they operate at different Oracle releases or patch sets. The transient logical process is attractive because it can use existing physical standby databases and it only requires a single catalog upgrade to migrate both primary and standby databases to the new Oracle release. When the upgrade to process is complete, the configuration reverts to its original state of having a primary with a physical standby database.Oracle Data Guard SQL Apply is a good choice if the upgrade environment has the following characteristics:∙Oracle Data Guard SQL Apply is installed∙Minimal downtime is a requirement∙Current database is at least 10.1.0.3Considerations when using Oracle Data Guard SQL Apply:∙Operating systems must be the same∙Higher level of skill is required for the database administratorFor more information:∙Oracle Database Administrator’s Guide 11g Release 2∙Oracle Maximum Availability Architecture Best Practices web page on OTN∙Database Rolling Upgrade Using Data Guard SQL Apply – Oracle Database 11g and 10g R2 white paper∙Database Rolling Upgrade Using Physical Standby Databases and the Transient Logical Rolling Upgrade ProcessOnline Database Upgrad e with Oracle StreamsOracle Streams can be used to achieve little or no database downtime during database or patchset upgrades. A database can be migrated to different platform, for example Intel Solaris to Intel Linux, or to a different character set. A copy of the current database is upgraded using Oracle Streams to keep changes synchronized during the upgrade process. The only downtime that occurs is during the switch from the current database to the new database.Oracle Streams is a good choice if the upgrade environment has the following characteristics: ∙Operating systems are different∙Little or no downtime is a requirement∙Current database is at least 9.2Considerations when using Oracle Streams:∙Performance restrictions may occur in an OLTP environment if the copy of the database does not keep up with existing database∙Significant amount of expertise is required by the database administratorFor more information:∙Oracle Database Administrator’s Guide 11g Release 2∙Oracle Streams Concepts and Administration 11g Release 2, Appendix D (Part Number E10704-02)结论Database Upgrade Assistant is the preferred method for upgrading a database to Oracle Database 11g Release 2. However, it is not always possible to use the DBUA, and in such situations there are other options available.Choosing the appropriate upgrade method depends on the environment, amount of downtime that is acceptable, and tolerance for complexity of the database administrator doing the upgrade. It is important for the database administrator to understand the various upgrade methods and choose the one that best suits business requirements.四、方法比较五、方法建议根据实际情况,涉及到服务器操作系统更换版本,数据库版本升级,较短停机时间。