centos7和centos6常用命令区别
详解centos6和centos7防火墙的关闭

详解centos6和centos7防⽕墙的关闭CentOS6.5查看防⽕墙的状态:[zh@localhost ~]$service iptable status显⽰结果:[zh@localhost ~]$service iptable statusRedirecting to /bin/systemctl status iptable.serviceiptable.serviceLoaded: not-found (Reason: No such file or directory)Active: inactive (dead) --表⽰防⽕墙已经关闭CentOS 6.5关闭防⽕墙[root@localhost ~]#servcie iptables stop --临时关闭防⽕墙[root@localhost ~]#chkconfig iptables off --永久关闭防⽕墙CentOS 7.2关闭防⽕墙CentOS 7.0默认使⽤的是firewall作为防⽕墙,这⾥改为iptables防⽕墙步骤。
firewall-cmd --state #查看默认防⽕墙状态(关闭后显⽰notrunning,开启后显⽰running)[root@localhost ~]#firewall-cmd --statenot running检查防⽕墙的状态:从centos7开始使⽤systemctl来管理服务和程序,包括了service和chkconfig。
[root@localhost ~]#systemctl list-unit-files|grep firewalld.service --防⽕墙处于关闭状态firewalld.service disabled或者[root@localhost ~]#systemctl status firewalld.servicefirewalld.service - firewalld - dynamic firewall daemonLoaded: loaded (/usr/lib/systemd/system/firewalld.service; disabled; vendor preset: enabled)Active: inactive (dead)关闭防⽕墙:systemctl stop firewalld.service #停⽌firewallsystemctl disable firewalld.service #禁⽌firewall开机启动[root@localhost ~]#systemctl stop firewalld.service[root@localhost ~]#systemctl disable firewalld.service启动⼀个服务:systemctl start firewalld.service关闭⼀个服务:systemctl stop firewalld.service重启⼀个服务:systemctl restart firewalld.service显⽰⼀个服务的状态:systemctl status firewalld.service在开机时启⽤⼀个服务:systemctl enable firewalld.service在开机时禁⽤⼀个服务:systemctl disable firewalld.service查看服务是否开机启动:systemctl is-enabled firewalld.service;echo $?查看已启动的服务列表:systemctl list-unit-files|grep enabledCentos 7 firewall 命令:查看已经开放的端⼝:firewall-cmd --list-ports开启端⼝firewall-cmd --zone=public --add-port=80/tcp --permanent命令含义:–zone #作⽤域–add-port=80/tcp #添加端⼝,格式为:端⼝/通讯协议–permanent #永久⽣效,没有此参数重启后失效重启防⽕墙firewall-cmd --reload #重启firewallsystemctl stop firewalld.service #停⽌firewallsystemctl disable firewalld.service #禁⽌firewall开机启动firewall-cmd --state #查看默认防⽕墙状态(关闭后显⽰notrunning,开启后显⽰running)CentOS 7 以下版本 iptables 命令如要开放80,22,8080 端⼝,输⼊以下命令即可/sbin/iptables -I INPUT -p tcp --dport 80 -j ACCEPT/sbin/iptables -I INPUT -p tcp --dport 22 -j ACCEPT/sbin/iptables -I INPUT -p tcp --dport 8080 -j ACCEPT然后保存:/etc/rc.d/init.d/iptables save查看打开的端⼝:/etc/init.d/iptables status关闭防⽕墙1)永久性⽣效,重启后不会复原开启: chkconfig iptables on关闭: chkconfig iptables off2)即时⽣效,重启后复原开启: service iptables start关闭: service iptables stop查看防⽕墙状态: service iptables status下⾯说下CentOS7和6的默认防⽕墙的区别CentOS 7默认使⽤的是firewall作为防⽕墙,使⽤iptables必须重新设置⼀下1、直接关闭防⽕墙systemctl stop firewalld.service #停⽌firewallsystemctl disable firewalld.service #禁⽌firewall开机启动2、设置 iptables serviceyum -y install iptables-services如果要修改防⽕墙配置,如增加防⽕墙端⼝3306vi /etc/sysconfig/iptables增加规则-A INPUT -m state --state NEW -m tcp -p tcp --dport 3306 -j ACCEPT保存退出后systemctl restart iptables.service #重启防⽕墙使配置⽣效systemctl enable iptables.service #设置防⽕墙开机启动最后重启系统使设置⽣效即可。
centos 7句柄数

centos 7句柄数CentOS 7句柄数是指该操作系统允许的最大文件句柄数量。
句柄是操作系统为每个打开的文件分配的标识符。
在Linux系统中,一个句柄代表一个文件或设备,它允许程序对文件进行读取、写入和访问等操作。
在本文中,我们将详细讨论CentOS 7句柄数的定义、如何查看和修改句柄数以及涉及到的配置文件和常见问题。
第一步:定义CentOS 7句柄数句柄数是操作系统内核限制的一个重要参数,它指定了一个系统中可以使用的最大句柄数量。
句柄数的大小取决于操作系统版本和配置,不同的系统可能有不同的默认句柄数。
第二步:查看CentOS 7句柄数为了查看CentOS 7的句柄数,我们可以使用以下命令:ulimit -a grep "open files"该命令将显示当前用户的最大句柄数限制,即软限制和硬限制。
软限制是当前句柄数的限制,而硬限制是系统允许的最大句柄数。
第三步:修改CentOS 7句柄数为了修改CentOS 7的句柄数,我们需要编辑系统的配置文件。
1. 打开/etc/security/limits.conf文件,使用root用户权限编辑该文件:sudo vi /etc/security/limits.conf2. 在文件的末尾添加以下行,修改句柄数的限制:* soft nofile <new_limit>* hard nofile <new_limit>这里,<new_limit>是你想指定的新的句柄数限制。
在soft和hard之间的区别是,soft限制是对用户会话的限制,而hard限制是操作系统的全局限制。
3. 保存并关闭文件。
第四步:重启系统为了使新的句柄数限制生效,我们需要重启CentOS 7系统。
可以使用以下命令:sudo reboot第五步:验证句柄数更改是否成功在重启系统后,我们可以再次使用上述命令来检查句柄数是否已成功修改。
centos ipv6基本命令

centos ipv6基本命令CentOS是一种流行的Linux操作系统,它支持IPv6协议。
IPv6是互联网协议的下一代,使用128位地址以替代IPv4的32位地址。
在CentOS上,我们可以使用一些基本的命令来配置和管理IPv6网络。
本文将介绍一些常用的CentOS IPv6命令,以实现基本的IPv6网络配置。
1. ifconfig命令ifconfig命令用于配置和显示网络接口的信息。
在CentOS中,ifconfig命令也可以用于配置IPv6地址。
以下是一些常用的ifconfig命令用法:- 查看网络接口信息:`ifconfig`- 启用网络接口:`ifconfig interface up`- 禁用网络接口:`ifconfig interface down`- 添加IPv6地址:`ifconfig interface inet6 add IPv6地址`- 删除IPv6地址:`ifconfig interface inet6 del IPv6地址`- 查看指定接口的IPv6地址:`ifconfig interface inet6`2. ip命令ip命令也是一种常用的网络配置命令,在CentOS中支持IPv6的配置。
以下是ip命令的一些常用用法:- 查看网络接口信息:`ip address show`- 启用网络接口:`ip link set interface up`- 禁用网络接口:`ip link set interface down`- 添加IPv6地址:`ip address add IPv6地址/前缀长度 dev interface`- 删除IPv6地址:`ip address del IPv6地址/前缀长度 dev interface`- 查看指定接口的IPv6地址:`ip address show interface`3. ping6命令ping6命令用于测试IPv6网络连通性。
centos系统安装和配置攻略
Linux系统安装和配置攻略V1.2更新明晰:V1.1:增加了常用命令:tomcat、防火墙、apache的停启用命令。
更新了mysql集群config.ini 的内容。
V1.2:增加了防暴力破解防火墙fail2ban的安装和配置方法。
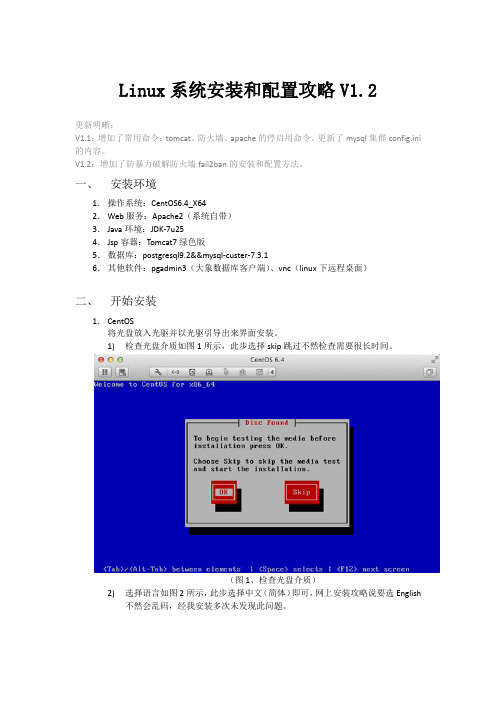
一、安装环境1.操作系统:CentOS6.4_X642.Web服务:Apache2(系统自带)3.Java环境:JDK-7u254.Jsp容器:Tomcat7绿色版5.数据库:postgresql9.2&&mysql-custer-7.3.16.其他软件:pgadmin3(大象数据库客户端)、vnc(linux下远程桌面)二、开始安装1.CentOS将光盘放入光驱并以光驱引导出来界面安装。
1)检查光盘介质如图1所示,此步选择skip跳过不然检查需要很长时间。
(图1、检查光盘介质)2)选择语言如图2所示,此步选择中文(简体)即可,网上安装攻略说要选English不然会乱码,经我安装多次未发现此问题。
(图2,选择语言)3)之后一路默认,到如图3所示部分,输入本机名称(图3,输入本机名称)4)如图4所示,输入最高权限root的密码。
如果为公网服务器密码最好要包含英文字母数字及标点的组合(图4,输入root密码)5)如图5所示,选择安装硬盘,服务器的话选择第一个全部硬盘并让其自动分根目录即可,之后会询问是否格式化硬盘,当然选择是了。
(图5,系统安装位置)6)如图6所示,选择安装模式,上面随便选,但是下面2那个框必须钩上以选择安装内容(血的教训:一台服务器安装时没选这个,结果进不去可视化界面只有命令行格式,又重装了一遍。
)(图6,选择安装模式)7)如图7所示,选择详细的安装包,其他无所谓后面可以用云安装从网络上自动下载安装主要是桌面选项里面的全要选上。
(图7,选择详细安装包)8)如图8所示自动开始安装所选的包(图8,开始安装)9)如图9所示安装成功,并要求重启电脑(图9,安装成功)10)重启后要设置一些什么一路默认,中间有个增加用户的功能不需要增加用户跳过即可,最后有个启动防系统崩溃的服务,要等很久。
centos7新特性以及与centos6的差异

Centos7 特性构架和限制构架只有 64 位硬件支持 Red Hat Enterprise Linux 7.0 安装。
Red Hat Enterprise Linux 7.0 可将 32 位操作系统作为虚拟机运行,其中包括之前的 Red Hat Enterprise Linux 版本。
Red Hat Enterprise Linux 7.0 在以下架构中作为单一套件使用。
:•64-bit AMD•64-bit Intel•IBM POWER7 和 POWER8•IBM System z (支持 IBM zEnterprise 196 硬件或者更新的版本)功能和限制下表列出了 Red Hat Enterprise Linux 7 与之前的版本 5 和版本 6 之间的功能及限制对比。
表 3.1. Red Hat Enterprise Linux 5、6 和 7 的限制软件包及支持变化淘汰的软件包淘汰的软件包删除的软件包删除的软件包淘汰的驱动程序和模块图形驱动程序xorg-x11-drv-ast、xorg-x11-drv-cirrus、xorg-x11-drv-mach64、xorg-x11-drv-mga、xorg-x11-drv-openchrome注:上述图形驱动程序将由内核模式设置(KMS)驱动程序替换。
输入驱动程序xorg-x11-drv-void存储驱动程序3w-9xxx、arcmsr、aic79xx、Emulex lpfc820不再继续使用的内核驱动程序、模块及功能Red Hat Enterprise Linux 6 已从 Red Hat Enterprise Linux 7.0 中删除的驱动程序及模块列表。
存储驱动程序megaraid_mm、cciss、aic94xx、aic7xxx、i2o、ips、megaraid_mbox、mptlan、mptfc、sym53c8xx、ecryptfs、3w-xxxx联网驱动程序3c59x、3c574_cs、3c589_c、3c589_cs、8390、acenic、amd8111e、at76c50x-usb、ath5k、axnet_cs、b43、b43legacy、can-dev、cassini、cdc-phonet、cxgb、de4x5、de2104x、dl2k、dmfe、e100、ems_pci、ems_usb、fealnx、fmvi18x_cs、fmvj18x_cs、forcedeth、ipw2100、ipw2200、ixgb、kvaser_pci、libertas、libertas_tf、libertas_tf_usb、mac80211_hwsim、natsemi、ne2k-pci、niu、nmckan_cs、nmclan_cs、ns83820、p54pci、p54usb、pcnet32、pcnet_32、pcnet_cs、pppol2tp、r6040、rt61pci、rt73usb、rt2400pci、rt2500pci、rt2500usb、rtl8180、rtl8187、s2io、sc92031、sis190、sis900、sja1000、sja1000_platform、smc91c92_cs、starfire、sundance、sungem、sungem_phy、sunhme、tehuti、tlan、tulip、typhoon、uli526x、vcan、via-rhine、via-velocity、vxge、winbond-840、xirc2ps_cs、xircom_cb、zd1211r图形驱动程序xorg-x11-drv-acecad、xorg-x11-drv-aiptek、xorg-x11-drv-elographics、xorg-x11-drv-fpit、xorg-x11-drv-hyperpen、xorg-x11-drv-mutouch、xorg-x11-drv-penmount输入驱动程序xorg-x11-drv-acecad、xorg-x11-drv-aiptek、xorg-x11-drv-elographics、xorg-x11-drv-fpit、xorg-x11-drv-hyperpen、xorg-x11-drv-mutouch、xorg-x11-drv-penmount存储与文件系统存储LIO 内核目标子系统Red Hat Enterprise Linux 7.0 使用 LIO 内核目标子系统,它是块存储的标准开源 SCSI 目标,可用于以下存储介质:FcoE、iSCSI、iSER(Mellanox InfiniBand)和 SRP(Mellanox InfiniBand)。
centos7防火墙常用命令
centos7防火墙常用命令CentOS 7防火墙常用命令CentOS 7是一款基于Red Hat Enterprise Linux 7的开源操作系统,广泛应用于服务器环境中。
作为一个服务器操作系统,安全性是非常重要的。
CentOS 7内置了名为iptables的防火墙,它可以帮助管理员保护服务器免受恶意攻击和未经授权的访问。
本文将介绍CentOS 7防火墙的常用命令,以帮助管理员学习和管理服务器的安全性。
1. 查看防火墙状态要查看防火墙的状态,可以使用以下命令:sudo systemctl status firewalld该命令将显示防火墙是否正在运行以及其当前状态。
如果防火墙正在运行,您将看到类似于以下输出:firewalld.service - firewalld - dynamic firewall daemonLoaded: loaded (/usr/lib/systemd/system/firewalld.service; enabled; vendor preset: enabled)Active: active (running) since Mon 2021-08-02 10:00:00 CDT; 1h ago2. 启动和停止防火墙启动防火墙:sudo systemctl start firewalld停止防火墙:sudo systemctl stop firewalld在某些情况下,您可能需要重新启动防火墙。
您可以使用以下命令:sudo systemctl restart firewalld3. 开放和关闭特定端口防火墙默认情况下会关闭大多数端口,以防止未经授权的访问。
如果您需要打开特定端口以允许流量通过,可以使用以下命令:sudo firewall-cmd zone=public add-port=80/tcp permanent这将在防火墙上打开TCP端口80,并将其应用到永久规则中。
centos 7 数据库操作指令
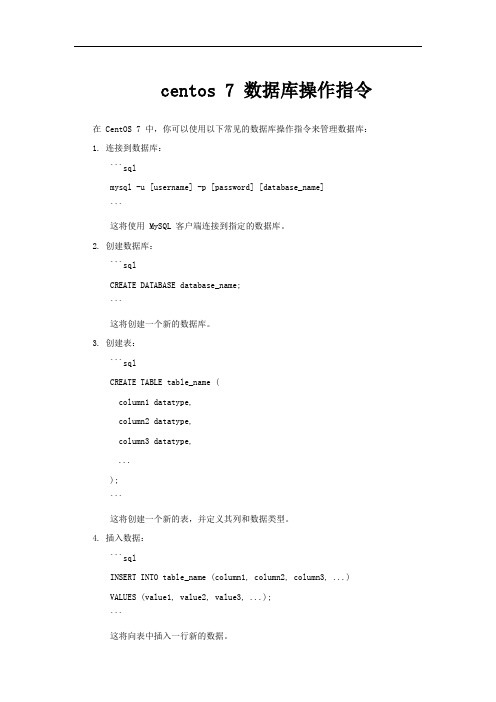
centos 7 数据库操作指令在 CentOS 7 中,你可以使用以下常见的数据库操作指令来管理数据库:1. 连接到数据库:```sqlmysql -u [username] -p [password] [database_name]```这将使用 MySQL 客户端连接到指定的数据库。
2. 创建数据库:```sqlCREATE DATABASE database_name;```这将创建一个新的数据库。
3. 创建表:```sqlCREATE TABLE table_name (column1 datatype,column2 datatype,column3 datatype,...);```这将创建一个新的表,并定义其列和数据类型。
4. 插入数据:```sqlINSERT INTO table_name (column1, column2, column3, ...)VALUES (value1, value2, value3, ...);```这将向表中插入一行新的数据。
5. 查询数据:```sqlSELECT column1, column2, column3, ...FROM table_name;```这将从表中检索数据。
6. 更新数据:```sqlUPDATE table_nameSET column1 = value1, column2 = value2, column3 = value3, ...WHERE condition;```这将更新表中的现有数据。
7. 删除数据:```sqlDELETE FROM table_name WHERE condition;```这将从表中删除数据行。
8. 删除表:```sqlDROP TABLE table_name;```这将删除已存在的表。
请注意,这些指令仅适用于关系型数据库(如 MySQL),不同的数据库系统可能具有不同的语法和命令。
centos7的常用命令

centos7的常用命令CentOS 7是一种基于Linux的操作系统,广泛应用于服务器和个人计算机中。
在CentOS 7中,有许多常用命令可以帮助用户进行系统管理和操作。
本文将介绍一些常用的CentOS 7命令,帮助读者更好地了解和使用这些命令。
一、文件和目录操作命令1. ls命令:用于列出目录中的文件和子目录。
2. cd命令:用于切换当前工作目录。
3. mkdir命令:用于创建新目录。
4. rmdir命令:用于删除空目录。
5. cp命令:用于复制文件和目录。
6. mv命令:用于移动文件和目录,也可用于重命名文件和目录。
7. rm命令:用于删除文件和目录。
8. touch命令:用于创建空文件或修改文件的访问时间。
二、文件内容查看和编辑命令1. cat命令:用于查看文件内容。
2. less命令:用于以分页形式查看文件内容。
3. head命令:用于查看文件的前几行内容。
4. tail命令:用于查看文件的后几行内容。
5. grep命令:用于在文件中搜索指定的字符串。
6. vi命令:用于文本编辑,具有强大的编辑功能和操作能力。
7. sed命令:用于对文件进行批量编辑和替换操作。
三、系统管理命令1. ps命令:用于查看当前运行的进程。
2. top命令:用于实时监控系统的运行状态和进程信息。
3. systemctl命令:用于管理系统服务,如启动、停止、重启服务。
4. service命令:用于管理系统服务,与systemctl命令类似。
5. ifconfig命令:用于查看和配置网络接口信息。
6. ping命令:用于测试网络连接是否正常。
7. netstat命令:用于查看网络连接、路由表和网络接口信息。
8. ssh命令:用于远程登录其他计算机。
9. su命令:用于切换用户身份。
10. useradd命令:用于创建新用户账号。
11. passwd命令:用于修改用户密码。
12. chmod命令:用于修改文件和目录的权限。
- 1、下载文档前请自行甄别文档内容的完整性,平台不提供额外的编辑、内容补充、找答案等附加服务。
- 2、"仅部分预览"的文档,不可在线预览部分如存在完整性等问题,可反馈申请退款(可完整预览的文档不适用该条件!)。
- 3、如文档侵犯您的权益,请联系客服反馈,我们会尽快为您处理(人工客服工作时间:9:00-18:30)。
CentOS 7 vs CentOS 6的不同
(1)桌面系统
[CentOS6] GNOME 2.x
[CentOS7] GNOME 3.x(GNOME Shell)
(2)文件系统
[CentOS6] ext4
[CentOS7] xfs
(3)内核版本
[CentOS6] 2.6.x-x
[CentOS7] 3.10.x-x
(4)启动加载器
[CentOS6] GRUB Legacy (+efibootmgr) [CentOS7] GRUB2
(5)防火墙
[CentOS6] iptables
[CentOS7] firewalld
(6)默认数据库
[CentOS6] MySQL
[CentOS7] MariaDB
(7)文件结构
[CentOS6] /bin, /sbin, /lib, and /lib64在/下[CentOS7] /bin, /sbin, /lib, and /lib64移到/usr下(8)主机名
[CentOS6] /etc/sysconfig/network
[CentOS7] /etc/hostname
(9)时间同步
[CentOS6]
$ ntp
$ ntpq -p
[CentOS7]
$ chrony
$ chronyc sources
(10)修改时间
[CentOS6]
$ vim /etc/sysconfig/clock
ZONE="Asia/Tokyo"
UTC=fales
$ sudo ln -s /usr/share/zoneinfo/Asia/Tokyo /etc/localtime [CentOS7]
$ timedatectl set-timezone Asia/Tokyo
$ timedatectl status
(11)修改地区
[CentOS6]
$ vim /etc/sysconfig/i18n
LANG="ja_JP.utf8"
$ /etc/sysconfig/i18n
$ locale
[CentOS7]
$ localectl set-locale LANG=ja_JP.utf8
$ localectl status
(12)服务相关
1)启动停止
[CentOS6]
$ service service_name start
$ service service_name stop
$ service sshd restart/status/reload
[CentOS7]
$ systemctl start service_name
$ systemctl stop service_name
$ systemctl restart/status/reload sshd
自启动
[CentOS6]
$ chkconfig service_name on/off
[CentOS7]
$ systemctl enable service_name
$ systemctl disable service_name
服务一览
[CentOS6]
$ chkconfig --list
[CentOS7]
$ systemctl list-unit-files
$ systemctl --type service
强制停止
[CentOS6]
$ kill -9 <PID>
[CentOS7]
$ systemctl kill --signal=9 sshd (13)网络
1)网络信息
[CentOS6]
$ netstat
$ netstat -I
$ netstat -n
[CentOS7]
$ ip n
$ ip -s l
$ ss
2)IP地址MAC地址
[CentOS6]
$ ifconfig -a
[CentOS7]
$ ip address show
3)路由
[CentOS6]
$ route -n
$ route -A inet6 -n
[CentOS7]
$ ip route show
$ ip -6 route show
(14)重启关闭
1)关闭
[CentOS6]
$ shutdown -h now
[CentOS7]
$ poweroff
$ systemctl poweroff
2)重启
[CentOS6]
$ reboot
$ shutdown -r now
[CentOS7]
$ reboot
$ systemctl reboot
3)单用户模式
[CentOS6]
$ init S
[CentOS7]
$ systemctl rescue
4)启动模式
[CentOS6]
[GUICUI]
$ vim /etc/inittab
id:3:initdefault:
[CUIGUI]
$ startx
[CentOS7]
[GUICUI]
$ systemctl isolate multi-user.target [CUIGUI]
$systemctl isolate graphical.target
默认
$ systemctl set-default graphical.target $ systemctl set-default multi-user.target 当前
$ systemctl get-default。