Cisco防火墙模块安装配置手册
CISCO ASA防火墙ASDM安装和配置
CISCO ASA防火墙ASDM安装和配置准备工作:准备一条串口线一边接台式机或笔记本一边接防火墙的CONSOLE 接口,通过开始——>程序——> 附件——>通讯——>超级终端输入一个连接名,比如“ASA”,单击确定。
选择连接时使用的COM口,单击确定。
点击还原为默认值。
点击确定以后就可能用串口来配置防火墙了。
在用ASDM图形管理界面之前须在串口下输入一些命令开启ASDM。
在串口下输入以下命令:ciscoasa>ciscoasa> enPassword:ciscoasa# conf t 进入全局模式ciscoasa(config)# webvpn 进入WEBVPN模式ciscoasa(config-webvpn)# username cisco password cisco 新建一个用户和密码ciscoasa(config)# int m 0/0 进入管理口ciscoasa(config-if)# ip address 192.168.1.1 255.255.255.0 添加IP地址ciscoasa(config-if)# nameif guanli 给管理口设个名字ciscoasa(config-if)# no shutdown 激活接口ciscoasa(config)#q 退出管理接口ciscoasa(config)# http server enable 开启HTTP服务ciscoasa(config)# http 192.168.1.0 255.255.255.0 guanli 在管理口设置可管理的IP地址ciscoasa(config)# show run 查看一下配置ciscoasa(config)# wr m 保存经过以上配置就可以用ASDM配置防火墙了。
首先用交叉线把电脑和防火墙的管理口相连,把电脑设成和管理口段的IP 地址,本例中设为192.168.1.0 段的IP打开浏览器在地址栏中输入管理口的IP地址:[url]https://192.168.1.1/admin[/url]弹出一下安全证书对话框,单击“是”输入用户名和密码(就是在串口的WEBVPN模式下新建的用户和密码),然后点击“确定”。
cisco防火墙配置手册
ASA防火墙配置笔记二〇〇六年十月二十七日序言:Cisco新的防火墙ASA系列已经面市了,将逐步取代PIX防火墙,网上关于ASA配置资料很少,现把我积累的ASA配置技术编写一个文档,供大家参考。
如有问题,可发邮件给我。
1. ....................................................................................... 常用技巧12. ....................................................................................... 故障倒换13. ....................................................... 配置telnet、ssh及http管理34. ........................................................................ v pn常用管理命令35. ............................................................................... 配置访问权限36. .................................................................. 配置sitetosite之VPN47. .............................................................. w ebvpn配置(ssl vpn)48. .............................................................................. 远程拨入VPN59. ........................................................................... 日志服务器配置610. .......................................................................... Snmp网管配置711. .................................................................................... ACS配置712. ................................................................................... AAA配置713. ..................................................................................... 升级IOS814. ..................................................................................... 疑难杂症81.常用技巧Sh ru ntp查看与ntp有关的Sh ru crypto 查看与vpn有关的Sh ru | inc crypto 只是关健字过滤而已2.故障倒换failoverfailover lan unit primaryfailover lan interface testint Ethernet0/3failover link testint Ethernet0/3failover mac address Ethernet0/1 0018.1900.5000 0018.1900.5001failover mac address Ethernet0/0 0018.1900.4000 0018.1900.4001failover mac address Ethernet0/2 0018.1900.6000 0018.1900.6001failover mac address Management0/0 0018.1900.7000 0018.1900.7001failover interface ip testint 10.3.3.1 255.255.255.0 standby 10.3.3.2注:最好配置虚拟MAC地址sh failover显示配置信息write standby写入到备用的防火墙中failover命令集如下:configure mode commands/options:interface Configure the IP address and mask to be used for failoverand/or stateful update informationinterface-policy Set the policy for failover due to interface failureskey Configure the failover shared secret or keylan Specify the unit as primary or secondary or configure theinterface and vlan to be used for failover communication link Configure the interface and vlan to be used as a link forstateful update informationmac Specify the virtual mac address for a physical interface polltime Configure failover poll intervalreplication Enable HTTP (port 80) connection replicationtimeout Specify the failover reconnect timeout value forasymmetrically routed sessionssh failover 命令集如下:history Show failover switching historyinterface Show failover command interface informationstate Show failover internal state informationstatistics Show failover command interface statistics information| Output modifiers<cr>3.配置telnet、ssh及http管理username jiang password Csmep3VzvPQPCbkx encrypted privilege 15aaa authentication enable console LOCALaaa authentication telnet console LOCALaaa authentication ssh console LOCALaaa authorization command LOCALhttp 192.168.40.0 255.255.255.0 managementssh 192.168.40.0 255.255.255.0 inside4.vpn常用管理命令sh vpn-sessiondb full l2l 显示site to site 之vpn通道情况sh ipsec stats 显示ipsec通道情况sh vpn-sessiondb summary 显示vpn汇总信息sh vpn-sessiondb detail l2l 显示ipsec详细信息sh vpn-sessiondb detail svc 查看ssl client信息sh vpn-sessiondb detail webvpn 查看webvpn信息sh vpn-sessiondb detail full l2l 相当于linux下的ipsec whack –status 如果没有建立连接,则表示ipsec通道还没有建立起来。
Cisco RV110W Wireless-N VPN Firewall 快速安装指南说明书

Quick Start GuideCisco RV110W Wireless-N VPN FirewallPackage Contents•Wireless-N VPN Firewall•Ethernet Cable•Power Adapter•Quick Start Guide•Documentation and software on CD-ROMWelcomeThank you for choosing the Cisco RV110W Wireless-N VPN Firewall.The RV110W provides simple, affordable, secure business-class connectivity to the Internet for small office/home office (SoHo) and remote professionals.This guide describes how to physically install your Cisco RV110W and launch the web-based Device Manager to configure and manage your firewall.Installing Cisco RV110W1T o prevent the device from overheating or being damaged:•Ambient Temperature—Do not operate it in an area that exceeds an ambient temperature of 104°F (40°C).•Air Flow—Be sure that there is adequate air flow around the device. If wall mounting the firewall, make sure the heat dissipation holes are to the side.•Mechanical Loading—Be sure that the device is level and stable to avoid any hazardous conditions and that it is secure to prevent it from sliding or shifting out of position. Do not place anything on top of the firewall, as excessive weight might damage it.Place the Cisco RV110W unit horizontally on a flat surface so that it sits on its four rubber feet.Cisco RV110W Features2Front Panel2Cisco RV110W Wireless-N VPN FirewallCisco RV110W Wireless-N VPN Firewall 3Back PanelRESET Button—The RESET button has two functions:•If the Cisco RV110W is having problems connecting to the Internet, press the RESET button for at least 3 but no more than 10 seconds with a paper clip or a pencil tip. This is similar to pressing the reset button on your PC to reboot it.Power The Power light is green to indicate the unit ispowered on. The light flashes green when thepower is coming on.WPS The Wi-Fi Protected Setup (WPS) button isused to configure wireless access for devicesin your network that are WPS-enabled. See theAdministration Guide or Device Manager helppage for more information.WAN The WAN (Internet) light is green when theCisco RV110W is connected to the Internetthrough your cable or DSL modem. The light isoff when the Cisco RV110W is not connectedto the Internet. The light flashes green when itis sending or receiving dataWireless The Wireless light is green when the wirelessmodule is enabled. The light is off when thewireless module is disabled. The light flashesgreen when the firewall is transmitting orreceiving data on the wireless module.LAN PortsThe numbered lights correspond to the LANports on the Cisco RV110W.If the lights are continuously lit green, the CiscoRV110W is connected to a device through thecorresponding port (1, 2, 3, or 4). The light for aport flashes green when the firewall is activelysending or receiving data over that port.•If you are experiencing extreme problems with the Cisco RV110W and have tried all other troubleshooting measures, press and hold in the RESET button for more than 10 seconds. This reboots the unit andrestores the factory defaults. Changes you have made to the Cisco RV110W settings are lost.LAN Ports (1-4)—These ports provide a LAN connection to network devices, such as PCs, print servers, or switches.WAN (Internet) Port—The WAN port is connected to your Internet device, such as a cable or DSL modem.POWER Button—Press this button to turn the firewall on and off.12VDC Port—The 12VDC port is where you connect the provided 12 volt DC power adapter.Connecting the Equipment3N OTE You must connect one PC with an Ethernet cable for the purpose of the initial configuration. After you complete the initial configuration, administrative tasks can be performed using a wireless connection.S TEP1Power off all equipment, including the cable or DSL modem, the PC you will use to connect to the Cisco RV110W, and the CiscoRV110W.S TEP2You should already have an Ethernet cable connecting your PC to your current cable or DSL modem. Unplug one end of the cablefrom your PC and plug it into the port marked “WAN” on the unit.4Cisco RV110W Wireless-N VPN FirewallCisco RV110W Wireless-N VPN Firewall 5S TEP 3Connect one end of a different Ethernet cable to one of the LAN(Ethernet) ports on the back of the unit. (In this example, the LAN 1 port is used.) Connect the other end to an Ethernet port on the PC that you will use to run the web-based Setup Wizard and Device Manager.S TEP 4Power on the cable or DSL modem and wait until the connection isactive.S TEP 5Connect the power adapter to the Cisco RV110W POWER port.6Cisco RV110W Wireless-N VPN FirewallC AUTION Use only the power adapter that is supplied with the unit.Using a different power adapter could damage the unit.S TEP 6Plug the other end of the adapter into an electrical outlet. You mayneed to use a specific plug (supplied) for your country.S TEP 7On the Cisco RV110W, push the POWER button in to turn on thefirewall. The power light on the front panel is green when thepower adapter is connected properly and the unit is turned on.Using the Setup Wizard N OTE The Setup Wizard and Device Manager are supported on Microsoft Internet Explorer 6.0 or later, Mozilla Firefox 3.0 or later, andApple Safari 3.0 or later. 4S TEP1Power on the PC that you connected to the LAN1 port in Step 2 of the Connecting the Equipment section. Your PC becomes a DHCPclient of the firewall and receives an IP address in the 192.168.1.xxxrange.S TEP2Start a web browser on your PC. In the Address bar, enter the default IP address of the firewall: 192.168.1.1. A message appearsabout the site’s security certificate. The Cisco RV110W uses a self-signed security certificate and this message appears because thefirewall is not known to your PC. You can safely click Continue tothis website (or the option shown on your particular web browser)to go to the web site.S TEP3When the login page appears, enter the user name and password.The default user name is cisco. The default password is cisco.Passwords are case sensitive.N OTE For security reasons, change the default user name and password as soon as possible. See the Changing the Administrator User Name and Password section.S TEP4Click Log In.Changing the Administrator User Name and PasswordS TEP1From the Getting Started page, choose Change DefaultAdministrator Password.S TEP2Select Edit Admin Settings.S TEP3In the Administrator Settings section, enter the new administrator username. We recommend that you do not use “cisco.”S TEP4Enter the old password.S TEP5Enter the new password. Passwords should not contain dictionary words from any language or the default password, and they shouldcontain a mix of letters (both upper- and lowercase), numbers, andsymbols. Passwords must be at least 8 but no more than 30characters.S TEP6Enter the new password again to confirm.S TEP7Click Save.Cisco RV110W Wireless-N VPN Firewall7Connecting to Your Wireless Network5T o connect a device (such as a PC) to your wireless network, you must configure the wireless connection on the device with the wireless security information you configured using the Device Manager.The following steps are provided as an example; you may need to configure your device differently. For instructions that are specific to your device, consult the user documentation for your device.S TEP1Open the wireless connection settings window or program for your device. Your PC may have special software installed to managewireless connections, or you may find wireless connections underthe Control Panel in the Network Connections or Network andInternet window. (The location depends on your operating system.) S TEP2Enter the network name (SSID) you chose for your network when you configured the Cisco RV110W.S TEP3Choose the type of encryption and enter the security key that you chose when setting up the Cisco RV110W. If you did not enablesecurity (not recommended), leave these fields blank.S TEP4Verify your wireless connection and save your settings.8Cisco RV110W Wireless-N VPN FirewallCisco RV110W Wireless-N VPN Firewall 9Where to Go From HereFor EU lot 26 related test result, please check this web page: /go/eu-lot26-results . Support Cisco SupportCommunity/go/smallbizsupport Cisco Support andResources/go/smallbizhelp Phone Support Contacts /en/US/support/tsd_cisco_small_business_support_center_contacts.htmlCisco Firmware Downloads /go/smallbizfirmwareSelect a link to download firmware for Ciscoproducts. No login is required.Cisco Open Source Requests /go/smallbiz_opensource_requestCisco Partner Central(Partner Login Required)/web/partners/sell/smb Product DocumentationCisco RV110WAdministration Guide /go/rv110w610Cisco RV110W Wireless-N VPN FirewallCisco RV110W Wireless-N VPN Firewall11Americas HeadquartersCisco Systems, Inc.Cisco has more than 200 offices worldwide.Addresses, phone numbers, and fax numbersare listed on the Cisco website at/go/offices.78-19329-02C0 Cisco and the Cisco logo are trademarks or registered trademarks of Cisco and/or its affiliates in the U.S. and other countries. To view a list of Cisco trademarks, go to this URL: /go/trademarks. Third-party trademarks mentioned are the property of their respective owners. The use of the word partner does not imply a partnership relationship between Cisco and any other company. (1110R)© 2014 Cisco Systems, Inc. All rights reserved.。
防火墙CISCO-PIX525配置手册
防火墙CISCO-PIX525的配置基础知识现在,我们通过一个相对简单的示例说明如何使用Cisco PIX对企业内部网络进行管理。
网络拓扑图如附图所示。
Cisco PIX安装2个网络接口,一个连接外部网段,另一个连接内部网段,在外部网段上运行的主要是DNS 服务器,在内部网段上运行的有WWW服务器和电子邮件服务器,通过Cisco PIX,我们希望达到的效果是:对内部网络的所有机器进行保护,WWW服务器对外只开放80端口,电子邮件服务器对外只开放25端口。
具体*作步骤如下。
2.获得最新PIX软件---- 从Cisco公司的WWW或FTP站点上,我们可以获得PIX的最新软件,主要包括如下内容。
pix44n.exe――PIX防火墙的软件映像文件。
pfss44n.exe――PIX Firewall Syslog Server服务器软件,能够提供一个Windows NT服务,用来记录PIX的运行日志。
pfm432b.exe――图形化的PIX管理软件。
rawrite.exe――用于生成PIX的启动软盘。
3.配置网络路由---- 在使用防火墙的内部网段上,需要将每台计算机的缺省网关指向防火墙,比如防火墙内部IP地址为10.0.0.250,则内部网段上的每台计算机的缺省网关都要设置为10.0.0.250。
具体设置在“控制面板”*“网络”*“TCP/IP协议”中进行。
4.配置PIX---- 在配置PIX之前,应该对网络进行详细的规划和设计,搜集需要的网络配置信息。
要获得的信息如下。
---- (1)每个PIX网络接口的IP地址。
(2)如果要进行NAT,则要提供一个IP地址池供NAT使用。
NAT是网络地址转换技术,它可以将使用保留地址的内部网段上的机器映射到一个合*的IP地址上以便进行Internet访问(3)外部网段的路由器地址。
---- 进入PIX配置界面的方*是:连接好超级终端,打开电源,在出现启动信息和出现提示符pixfirewall>后输入“enable”,并输入密码,进入特权模式;当提示符变为pixfirewall#>后,输入“configure terminal”,再进入配置界面。
cisco防火墙配置手册

cisco防火墙配置手册一、Cisco Pix日常维护常用命令1、Pix模式介绍“>”用户模式firewall>enable由用户模式进入到特权模式password:“#”特权模式firewall#config t由特权模式进入全局配置模式“(config)#”全局配置模式firewall(config)#防火墙的配置只要在全局模式下完成就可以了。
1、基本配置介绍1、端口命名、设备命名、IP地址配置及端口激活nameif ethernet0 outside security0端口命名nameif gb-ethernet0 inside security100定义端口的名字以及安全级别,“outside”的安全级别默认为0,“inside”安全级别默认为100,及高安全级别的可以访问低安全级别的,但低安全级别不能主动地到高安全级别。
firewall(config)#hostname firewall设备名称firewall(config)#ip address outside 1.1.1.1 255.255.255.0内外口地址设置firewall(config)#ip address inside 172.16.1.1 255.255.255.0firewall(config)# interface ethernet0 100full激活外端口firewall(config)# interface gb-ethernet0 1000auto激活内端口2、telnet、ssh、web登陆配置及密码配置防火墙默认是不允许内/外网用户通过远程登陆或WEB访问的,需要相应得开启功能。
firewall(config)#telnet 192.168.10.0 255.255.255.0 inside 允许内网此网断内的机器Telnet到防火墙配置从外网远程登陆到防火墙Firewall(config)#domain-name /doc/6b8163665.html,firewall(config)# crypto key generate rsafirewall(config)#ssh 0.0.0.0 0.0.0.0 outside允许外网所有地址可以远程登录防火墙,也可以定义一格具体的地址可以从外网登陆到防火墙上,如:firewall(config)#ssh 218.240.6.81 255.255.255.255 outside firewall(config)#enable password cisco由用户模式进入特权模式的口令firewall(config)#passrd ciscossh远程登陆时用的口令firewall(config)#username Cisco password CiscoWeb登陆时用到的用户名firewall(config)#http enable打开http允许内网10网断通过http访问防火墙firewall(config)#http 192.168.10.0 255.255.255.0 insidefirewall(config)#pdm enablefirewall(config)#pdm location 192.168.10.0 255.255.255.0 insideweb登陆方式:https://172.16.1.13、保证防火墙能上网还要有以下的配置firewall(config)#nat (inside)1 0 0对内部所有地址进行NAT转换,或如下配置,对内部固定配置的地址进行NAT转化,未指定的不予转发firewall(config)#nat(inside)1 192.168.10.0 255.255.255.0fierwall(config)#nat (inside) 1 192.168.20.0 255.255.255.0firewall (config) # global(outside) 1 interface对进行nat转换得地址转换为防火墙外接口地址firewall (config) # route 0.0.0.0 0.0.0.0 1.1.1.2 指一条默认路由器到ISP做完上面的配置内网用户就可以上网了,内部有3层交换机且划分了Vlan,若要保证每个Vlan都能够上网,还要在防火墙上指回到其他VLan的路由,如:Firewall (config) # route inside 192.168.20.0 255.255.255.0 172.16.1.24、内网服务器映射如果在局域网内有服务器要发布到互联网上,需要在PIX对内网服务器进行映射。
Cisco Catalyst 6509交换机FWSM防火墙模块设置资料
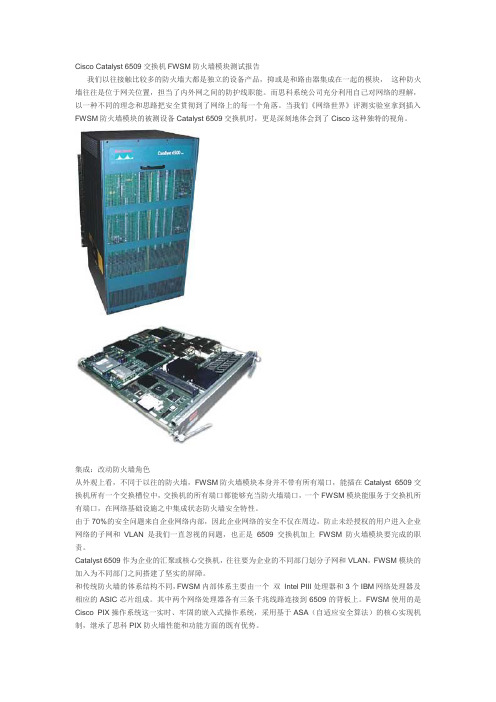
Cisco Catalyst 6509交换机FWSM防火墙模块测试报告我们以往接触比较多的防火墙大都是独立的设备产品,抑或是和路由器集成在一起的模块,这种防火墙往往是位于网关位置,担当了内外网之间的防护线职能。
而思科系统公司充分利用自己对网络的理解,以一种不同的理念和思路把安全贯彻到了网络上的每一个角落。
当我们《网络世界》评测实验室拿到插入FWSM防火墙模块的被测设备Catalyst 6509交换机时,更是深刻地体会到了Cisco这种独特的视角。
集成:改动防火墙角色从外观上看,不同于以往的防火墙,FWSM防火墙模块本身并不带有所有端口,能插在Catalyst 6509交换机所有一个交换槽位中,交换机的所有端口都能够充当防火墙端口,一个FWSM模块能服务于交换机所有端口,在网络基础设施之中集成状态防火墙安全特性。
由于70%的安全问题来自企业网络内部,因此企业网络的安全不仅在周边,防止未经授权的用户进入企业网络的子网和VLAN是我们一直忽视的问题,也正是6509交换机加上FWSM防火墙模块要完成的职责。
Catalyst 6509作为企业的汇聚或核心交换机,往往要为企业的不同部门划分子网和VLAN,FWSM模块的加入为不同部门之间搭建了坚实的屏障。
和传统防火墙的体系结构不同,FWSM内部体系主要由一个双Intel PIII处理器和3个IBM网络处理器及相应的ASIC芯片组成。
其中两个网络处理器各有三条千兆线路连接到6509的背板上。
FWSM使用的是Cisco PIX操作系统这一实时、牢固的嵌入式操作系统,采用基于ASA(自适应安全算法)的核心实现机制,继承了思科PIX防火墙性能和功能方面的既有优势。
对于已购买了Catalyst 6509交换机的用户来说,他们不必对原有产品进行更换,就能通过独立购买FWSM 模块,获得这种防火墙特性,在简化网络结构的同时,真正实现对用户的投资保护。
功能:细致到每一处从FWSM防火墙模块的管理和易用性来看,对于那些非常熟悉Cisco IOS命令行的工程师来说,通过Console或Telnet进行设置非常容易上手,而对于笔者这种对Cisco 命令仅略通一二的人来说,最佳的管理和设置方式莫过于用Web进行管理,Web管理其实是调用了用来管理PIX防火墙的PIX Device Manager(PDM)2.1(1)工具,非常直观地帮助用户进行规则设置、管理和状态监视。
Cisco防火墙的安装流程

Cisco防火墙的安装流程1. 将PIX安放至机架,经检测电源系统后接上电源,并加电主机。
2. 将CONSOLE口连接到PC的串口上,运行HyperTerminal程序从CONSOLE口进入PIX系统;此时系统提示pixfirewall>。
3. 输入命令:enable,进入特权模式,此时系统提示为pixfirewall#。
4. 输入命令: configure terminal,对系统进行初始化设置。
5. 配置以太口参数:interface ethernet0 auto (auto选项表明系统自适应网卡类型)interface ethernet1 auto6. 配置内外网卡的IP地址:ip address inside ip_address netmaskip address outside ip_address netmask7. 指定外部地址范围:global 1 ip_address-ip_address8. 指定要进行要转换的内部地址:nat 1 ip_address netmask9. 设置指向内部网和外部网的缺省路由route inside 0 0 inside_default_router_ip_addressroute outside 0 0 outside_default_router_ip_address10. 配置静态IP地址对映:static outside ip_address inside ip_address11. 设置某些控制选项:conduit global_ip port[-port] protocol foreign_ip [netmask] global_ip 指的是要控制的地址port 指的是所作用的端口,其中0代表所有端口protocol 指的是连接协议,比如:TCP、UDP等foreign_ip 表示可访问global_ip的外部ip,其中表示所有的ip。
CISCO ASA防火墙 ASDM 安装和配置
CISCO ASA防火墙ASDM安装和配置准备一条串口线一边接台式机或笔记本一边接防火墙的CONSOLE 接口,通过开始——>程序——> 附件——>通讯——>超级终端输入一个连接名,比如“ASA”,单击确定。
选择连接时使用的COM口,单击确定。
点击还原为默认值。
点击确定以后就可能用串口来配置防火墙了。
在用ASDM图形管理界面之前须在串口下输入一些命令开启ASDM。
在串口下输入以下命令:CiscoASA>CiscoASA> enPassword:CiscoASA# conf t 进入全局模式CiscoASA(config)# username cisco password cisco 新建一个用户和密码CiscoASA(config)# interface e0 进入接口CiscoASA(config-if)# ip address 192.168.1.1 255.255.255.0 添加IP地址CiscoASA(config-if)# nameif inside 给接口设个名字CiscoASA(config-if)# no shutdown 激活接口CiscoASA(config)#q 退出接口CiscoASA(config)# http server enable 开启HTTP服务CiscoASA(config)# http 192.168.1.0 255.255.255.0 inside 在接口设置可管理的IP地址CiscoASA(config)# show run 查看一下配置CiscoASA(config)# wr m 保存经过以上配置就可以用ASDM配置防火墙了。
首先用交叉线把电脑和防火墙的管理口相连,把电脑设成和管理口段的IP地址,本例中设为192.168.1.0 段的IP打开浏览器在地址栏中输入管理口的IP地址: https://192.168.1.1/admin弹出一下安全证书对话框,单击“是”输入用户名和密码,然后点击“确定”。
- 1、下载文档前请自行甄别文档内容的完整性,平台不提供额外的编辑、内容补充、找答案等附加服务。
- 2、"仅部分预览"的文档,不可在线预览部分如存在完整性等问题,可反馈申请退款(可完整预览的文档不适用该条件!)。
- 3、如文档侵犯您的权益,请联系客服反馈,我们会尽快为您处理(人工客服工作时间:9:00-18:30)。
WS-SVC-FWM-1
Serial No. SAD062302U4
例如,刚才我们查看的防火墙模块是在 Mod 4 上,我们就可以输入登陆防火 墙
Router# session slot 4 processor 1
第三步,输入登陆密码默认是 cisco
password:
第四步,输入 enable 密码,默认没有密码
防火墙模块安装配置
防火墙模块安装配置
1 内容介绍
为配合 PICC 项目防火墙模块的安装,此防火墙配置说明文档将对防火墙基 本配置和使用情况进行介绍。
本文章包括防火墙基本性能介绍、安装方法、防火墙配置命令说明等内容, 并通过实例对命令进行一一讲解。
2 防火墙模块介绍
2.1 防火墙模块介绍
Cisco Catalyst® 6500 交换机和 Cisco 7600 系列路由器的防火墙服务模块 (FWSM)是一种高速的、集成化的服务模块,可以提供业界最快的防火墙数据 传输速率:5Gb 的吞吐量,100000CPS,以及一百万个并发连接。在一个设备中 最多可以安装四个 FWSM,因而每个设备最高可以提供 20Gb 的吞吐量。作为世 界领先的 Cisco PIX 防火墙系列的一部分,FWSM 可以为大型企业和服务供应商 提供无以伦比的安全性、可靠性和性能。
4
防火墙模块安装配置
3.2 确认防火墙模块
安装完防火墙模块后,开启交换机,确认防火墙模块是否被交换机识别。 Cisco IOS software 通过命令 show module 查看防火墙模块状态是否正常
Router> show module
Mod Ports Card Type
Model
--- ----- -------------------------------------- ------------------ -----------
例如:
FWSM(config)# banner motd Welcome to the $(hostname) firewall. FWSM(config)# banner motd Contact me at admin@ for any FWSM(config)# banner motd issues.
安全网络管理
安全的、采用三重数据加密标准 (3DES)加密的网络管理接入
访问控制列表
• 最多支持 128000 条访问控制列表
URL 过滤
在服务器中设定策略,并利用 Websense 软件检查输出的 URL 请求
命令授权
对所有 CLI 设置优先级,创建与这些优先级对应的用户账号或者登录环 境。
对象群组 基本配置命令
配置防火墙模块,主要有 6 个基本命令,他们分别是 nameif、ip address、global、 nat、route、access-list,如果配置了这几个基本命令防火墙就能正常工作了。
能够组合网络对象(例如主机)和服务(例如 ftp 和 http)
防范 DoS
• DNS 保护 • Flood Defender • Flood Guard • TCP 阻截 • 单播反向路径发送 • FragGuard 和虚拟重组
路由
• 静态路由 • 动态;例如路由信息协议(RIP)和开放最短路径优先(OSPF)
FWSM(config)# enable password password
例如:
FWSM(config)#enable password cisco
默认密码无
4.2.2 设置 Hostname
FWSM(config)# hostname name
例如:
FWSM(config)# hostname farscape farscape(config)#
4.2.3 设置 Domain Name
FWSM(config)# domain-name name
例如:
FWSM(config)# domain-name
4.2.4 配置 login banner
设置 banner
FWSM(config)# banner {exec | login | motd} text
Number 这个数字是之前,show module 查看的槽位
Mod Ports Card Type
Model
--- ----- -------------------------------------- ------------------ -----------
4 6 Firewall Module
1 2 Catalyst 6000 supervisor 2 (Active) WS-X6K-SUP2-2GE
2 48 48 port 10/100 mb RJ-45 ethernet WS-X6248-RJ-45
3 2 Intrusion Detection System
WS-X6381-IDS
4 6 Firewall Module
1
防火墙模块安装配置
FWSM 特性
主要特性
优点
性能
• 5 Gbps • 一百万个并发连接 • 每秒建立和断开超过 10 万个连接
多种接口
• 最多可以支持 100 个防火墙 VLAN--任何 Cisco Catalyst 4000 VLAN 都可以充当防火墙 VLAN • 支持 802.1q 和 ISL 协议
FWSM 采用了 Cisco PIX 技术,并且运行 Cisco PIX 操作系统(OS)--一个 实时的、牢固的嵌入式系统,可以消除安全漏洞,防止各种可能导致性能降低的 损耗。这个系统的核心是一种基于自适应安全算法(ASA)的保护机制,它可以 提供面向连接的全状态防火墙功能。利用 ASA,FWSM 可以根据源地址和目的 地地址,随机的 TCP 序列号,端口号,以及其他 TCP 标志,为一个会话流创建 一个连接表条目。FWSM 可以通过对这些连接表条目实施安全策略,控制所有 输入和输出的流量。
查看防火墙 vlan-group
Router# show firewall vlan-group Group vlans ----- -----50 55-57 51 70-85 52 100
查看防火墙所关联的 VLAN
Router# show firewall module Module Vlan-groups 5 50,52 8 51,52
Router(config)# firewall vlan-group 50 5,7-10,13,45-100 firewall_group 50 vlan_range 5,7-10,13,45-100
第四步,将 firewall_group 关联到防火墙模块
Router(config)# firewall module module_number vlan-group firewall_group Router(config)# firewall module 4 vlan-group 50
AAA 支持
通过 TACACS+和 RADIUS 支持,集成常见的身份认证、授权和记帐服务
NAT/PAT 支持
提供动态/静态的网络地址解析(NAT)和端口地址解析(PAT)
Cisco PIX 设备管理器(PDM)
• 简便、直观、基于 Web 的 GUI 可以支持远程防火墙管理 • 多种基于实时数据和历史数据的报告可以提供使用趋势、基本性能和 安全事件等信息
4.2 基本维护命令
4.2.1 修改密码
4.2.1.1 修改 login password
FWSM(config)# {passwd | password} password FWSM (config)#password cisco
8
默认密码是 cisco
防火墙模块安装配置
4.2.1.2 修改 enable password
FWSM >en password: FWSM #
3.4 如何退出防火墙
FWSM# exit Logoff [Connection to 127.0.0.41 closed by foreign host] Router#
3.5 保存配置
在进行配置修改之后,需要保存,可以用命令 write memory
第三步,在 firewall_group 中添加 vlan_range
Router(config)# firewall vlan-group firewall_group vlan_range vlan_range 允许范围是(2 to 1000 and from 1025 to 4094)
7
防火墙模块安装配置
高可用性
状态故障恢复--设备内部和设备之间
日志
全面的系统日志、FTP、URL 和 ACL 日志
其他协议
• H.323 V2 • 基于 IP 的 NetBios
2
防火墙模块安装配置 • RAS 第二版本 • RTSP • SIP • XDMCP • Skinny
3 安装防火墙模块
3.1 安装防火墙模块
如果存在两个防火墙模块,分别是 module 5 和 8 可以进行如下关联
Router(config)# firewall vlan-group 50 55-57 Router(config)# firewall vlan-group 51 70-85 Router(config)# firewall vlan-group 52 100 Router(config)# firewall module 5 vlan-group 50,52 Router(config)# firewall module 8 vlan-group 51,52
WS-SVC-FWM-1
Serial No.