英国美声桌面音箱Mission Pulse II 中文用户手册
JBL ProCoustics MS-2 汽车音频优化器说明书
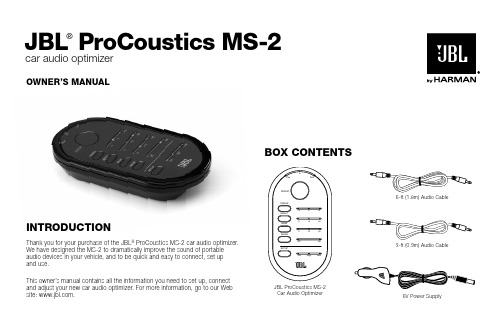
IntroductIonThank you for your purchase of the JBL ® ProCoustics MS-2 car audio optimizer. We have designed the MS-2 to dramatically improve the sound of portable audio devices in your vehicle, and to be quick and easy to connect, set up and use.This owner’s manual contains all the information you need to set up, connect and adjust your new car audio optimizer. For more information, go to our Web site: .owner’s ManualJBl ®Procoustics Ms-2car audio optimizerBoX contentsJBL ProCoustics MS-2Car Audio Optimizer6V Power SupplyVehicle Audio System2controls and IndIcatorsPower indicator: Lights green when the MS-2 is on; pulses red when the MS-2 is in Standby mode. See Standby and On Modes , on page 5, for more information.Input indicator: Lights green when audio connectors are inserted and the input signal level is OK; lights red when the output level of the connected portable media player is too high. See Setup and Use , on this page, for more information.sub indicator: Lights green when you have set up the MS-2 for use in a system with a subwoofer. See Using the MS-2 with a Powered Subwoofer , on page 5.treble control and indicators: Press the Treble control to increase or decrease the level of the treble (such as high frequency sounds from cymbals or the sound of the letter “S”). The indicators show the setting.Impact control and indicators: Press the Impact control to add midbass punch to the sound (such as the fullness of drums or the upper frequencies of a bass guitar). The impact setting may also affect the sound of male vocals. The indicators show the setting.Bass control and indicators: Press the Bass control to boost the bass (such as low-frequency sounds from bass guitar and bass drum). Two levels of bass boost are available. The indicators show the setting.Image control and indicators: For music to be accurately reproduced and seem as though it comes from musicians spread out across thedashboard instead of from only the speaker nearest you, the sound from the left and right speakers must arrive at your ears at exactly the same time. To achieve this, the MS-2 includes digital time correction (enabled in the Image control’s “On” setting). If your car’s audio system already includes “DSP” or surround sound processing, you should set the MS-2’s Image control to “Off,” but you can choose the setting that sounds best to you. The indicators show the setting.defeat button: The Defeat button turns off all of the MS-2’s EQ,processing and user settings, passing audio unchanged to the output. This lets you compare the sound with and without the MS-2’s processing. When Defeat is active, the Treble, Impact, Bass and Image indicators all turn off.setuP and useUntil you perform a setup procedure, your MS-2 will pass the audio signal unchanged from the connected device to your vehicle’s audio system. None of the MS-2’s controls or processing will be active until you perform a setup procedure.NOTE: If you have added a subwoofer to your system, please see Using the MS-2 with a Powered Subwoofer , on page 5, before performing a setup procedure.3Power IndicatorInput IndicatorSub Indicator Defeat ButtonTreble Indicators Impact Indicators Bass Indicators Image Indicators Setup IndicatorsTreble Control Impact Control Bass Control Image Control Setup Button6. Press and hold the Setup button. The Setup indicators will flash one at a time and you will hear brief test signals through your audio system’s speakers. IMPORTANT: Do not move the MS-2 while the test signals are playing.7. Keep holding the Setup button until one of the three Setup indicators remains lit, showing the setup results:• OK: Setup has been completed successfully. The MS-2’s DSP equalization and time correction processing is now active.• High: Your vehicle audio system’s volume control was set too high during the setup procedure. Lower the system’s volume and repeat steps 5 – 7.• Low: Your vehicle audio system’s volume control was set too low during the setup procedure. Raise the system’s volume and repeat steps 5 – 7.You can repeat the setup procedure at any time. For example, if you want to re-tune the system for a different listening position, simply repeat steps 5 – 7 while sitting in the new location. If you want to use the MS-2 in a different vehicle, you will need to repeat the entire setup procedure (steps 1 – 7).setup Procedure:1. Connect the MS-2 as shown in the Connections section on page2.2. Enable your vehicle audio system’s “Aux” (or MP3) input.3. Set your portable audio player’s volume level to 3/4 full or higher and play music on it. The MS-2’s input indicator should light green. If the input indicator flashes red, turn the volume of your portable player down until the red light stops flashing and remember the setting. This is the volume control setting you should use on your portable player while using the MS-2.at a comfortable volume level. Adjust the front/rear fader control so that the sound comes mostly from the front speakers but so you can still hear some sound from the back. You can readjust this after setup.5. As you sit in your vehicle’s driver’s seat, hold the MS-2 directly in front ofyour face, about 6 – 8 inches (150mm – 200mm) away.Set player6" – 8"(150mm – 200mm)4LEDs flashand-hold Setup buttonusing the Ms-2 with a Powered subwoofer:1. Press and hold the Bass button for five seconds. The Sub indicator light will turn on.2. Set your subwoofer’s crossover (low-pass filter) to 50Hz.3. Turn your subwoofer’s volume control down until you can barely hear that the subwoofer is playing while you’re seated in the driver’s position.4. Perform the MS-2’s setup procedure as directed on page 4.5. When the setup procedure is completed, readjust your subwoofer’svolume control to suit your preference. Then, use the MS-2’s adjustments to further fine tune the sound.If you want to perform a setup procedure again, follow the steps above again before doing so.If you want to use the MS-2 in another system that doesn’t include a powered subwoofer, press and hold the MS-2’s Bass button for five seconds to returnit to normal operation. The Sub indicator light will turn off.and-holdbuttonSub LED lights5Set subwoofervolume to barely audibleSet subwoofer low-pass crossoverto 50Hzstandby and on ModesThe MS-2 will automatically enter Standby mode whenever no control buttons have been pressed and an audio signal has not been present for approximately five minutes. All indicators will be off and the Power indicator will pulse red. The MS-2 will automatically turn on whenever an audio signal is present at its input or whenever you press any control button. You should disconnect the MS-2 from the power supply if you will not be driving the car for a week or more.setting the system VolumeFor the best audio performance, set your portable music player’s volume to the same level it was during the setup procedure, and use your vehicle audio system’s volume control to adjust the volume.adjusting the soundPress the Treble, Impact, Bass and Image buttons to fine-tune the sound to your personal preference. The indicators next to the buttons will show the settings.setting MemoryThe MS-2’s settings are stored in flash memory, and will remain indefinitely when the MS-2’s power connection is removed.sPecIFIcatIonsMaximum input voltage: 1.3V Power requirement:6V DC, 1ADimensions (H x W x D):9" x 5-7/8" x 2-3/8"(230mm x 150mm x 60mm)Weight:0.2 lb (96g)Features, specifications and appearance are subject to change without notice.HARMAN Consumer, Inc.8500 Balboa Boulevard, Northridge, CA 91329 USA© 2011 HARMAN International Industries, Incorporated. All rights reserved.JBL is a trademark of HARMAN International Industries, Incorporated, registered in the United States and/or other countries.This device complies with Part 15 of the FCC rules and RSS-210 of Canada.Operation is subject to the following two conditions: (1) This device may not cause harmful interference; and (2) this device must accept any interference received, including interference that may cause undesired operation.FEDERAL COMMUNICATIONS COMMISSION INTERFERENCE STATEMENTThis equipment has been tested and found to comply with the limits for a Class B digital device, pursuant to Part 15 of the FCC rules. These limits are designed to provide reasonable protection against harmful interference in a residential installation. This equipment generates, uses and can radiate radiofrequency energy and, if not installed and used in accordance with the instructions, may cause harmful interference to radio communications. However, there is no guarantee that interference will not occur in a particular installation. If this equipment does cause interference to radio or television reception, which can be determined by turning the equipment off and then on, the user is encouraged to try to correct the interference by one or more of the following measures:•• Reorient or relocate the receiving antenna.•• Increase the separation between the equipment and the receiver.•• Connect the equipment to a different outlet so that the equipment and receiver are on different branch circuits.•• Consult the dealer or an experienced radio/TV technician for help.This Class B digital apparatus complies with Canadian RSS-210.Cet appariel numérique de la classe B est conforme à la norme RSS-210 du Canada.。
SOUNDLINK REVOLVE + 2 用户指南说明书

用户指南SOUNDLINK®REVOL VE +2 - 简体中文重要安全说明请阅读并保留所有安全、安全性和使用说明。
B ose Corporation 在此声明,本产品严格遵守 2014/53/EU 指令和其他所有适用的欧盟指令要求中的基本要求和其他相关规定。
符合声明全文载于:/compliance重要安全说明1. 请阅读这些说明。
2. 请保留这些说明。
3. 请注意所有警告。
4. 请遵守所有说明。
5. 请勿安装在任何热源旁,例如暖气片、热调节装置、火炉或可产生热量的其他设备(包括扩音器)。
6. 只能使用制造商指定的附件/配件。
7. 在雷雨天或长时间不用时,请切断本设备电源。
8. 任何维修事宜均请向合格的人员咨询。
如果设备有任何损坏,应进行维修,例如电源线或插头受损、物体落入设备内、不能正常工作或跌落。
警告/小心:此符号表示产品外壳内存在未绝缘的危险电压,可能造成触电危险。
此符号表示产品指南中提供了重要的操作和维护说明。
本产品含有磁性材料。
关于是否会影响可植入医疗设备的情况,请咨询医生。
• 请将本产品放置到远离火源和热源的地方。
请勿将明火火源(如点燃的蜡烛)置于本产品上或靠近本产品。
• 未经授权切勿改装本产品。
• 请勿将本产品与逆变器配合使用。
• 产品仅使用随附的电源。
• 如果将电源插头或设备耦合器作为断路设备,那么此类断路设备应当保持可以随时恢复工作的状态。
• 请勿使含有电池的产品过热(例如请避免阳光直射并远离火源等)。
• 本产品的标签位于产品底部。
简体中文 - 3监管信息注意: 本设备已经过测试,符合 FCC 规则第 15 部分有关 B 类数字设备的各项限制。
这些限制性规定旨在防范安装在住宅中的设备产生有害干扰。
本设备产生、使用并可能辐射无线射频能量,如果不按照指示安装和使用,则可能会对无线电通讯造成有害干扰。
然而,按照指示安装也不能保证某些安装不会发生干扰。
如果本设备确实对无线电或电视接收造成有害干扰(可通过关闭和打开本设备来确定),用户可尝试采取以下一种或多种措施来纠正干扰:• 调整接收天线的方向或位置。
XA12英语2微型Hi-Fi音响系统用户手册说明书
7About MP3/WMAMP3/WMA Disc compatibility with this unit is limited as follows:• Sampling Frequency8 - 48 kHz (MP3), 32 - 48 kHz (WMA)•Bit rate8 - 320 kbps (MP3), 48 - 320 kbps (WMA)• CD-R physical format should be “ISO 9660”• If you record MP3/WMA files using the software which cannot create a FILE SYSTEM, for example “Direct-CD”etc., it is impossible to playback MP3 files.We recommend that you use “Easy-CD Creator”, which creates an ISO 9660 file system.•File names should be named using 30 letters or less and mustincorporate “.mp3”,“.wma”extension e.g.“********.MP3”or “********.WMA”•Do not use special letters such as “/ :* ? “ < >”etc.•Even if the total number of files on the disc has more than 1000, it willonly be shown up to 999.Use your player as an alarm clockPress and hold TIMER for two seconds.Each function, TUNER, CD flashes for two seconds.Press SET when the function you want to be woken by is showing.If you choose TUNER you will be shown the stations you have saved as e .or >to select the station you want, then press SET .Y ou will be shown the ON TIME display.This is where you set the time you want the alarm to go e .or > to change the hours and minutes and SET to save.Y ou will then be shown the OFF TIME display.This is where you set the time you want the function to e .or >to change the hours and minutes and press SET to save.Next you will be shown the volume (VOL) you want to be woken by.Use .or >to change the volume and SET to save.Switch the system off.The clock icon shows that the alarm is set.When the system is turned off you can check the time the alarm is set for by pressing TIMER .Y ou can also turn the alarm on and off by pressing TIMER .To set the alarm to go off at a different time, switch the system on and reprogramme following the same steps above.9Designs and specifications are subject to change without notice.。
音响操作手册

音响扩声系统操作手册一、系统组成:1、PA系统:PA系统负责场厅内观众区域的扩声,由音箱、功放及音箱控制器组成。
PA系统又可细分为主扩声系统和环绕扩声系统。
A、主观众区域扩声系统包括主席台扩声音箱TANNOY V300 4只,TANNOY TA 1400功放2台;超底音音箱TANNOY IQ 18B 2只,TANNOY TA 1000功放2台;音箱控制器TANNOY TDX22台;中置音箱TANNOY V300 2台,TANNOY TA 1400 功放1台;舞台返听音箱TANNOY V12 2台,TANNOY TA1000 1台。
B、环绕扩声包括TANNOY V8 8台,TANNOY TA 1000 2台。
C、前区补声包括TANNOY V12 2台,TANNOY TA 1000 2台。
2、MONITOR监听系统:MONITOR监听系统负责为操作人员、表演人、重要观众(贵宾等)提供清晰准确的扩声。
MONITOR监听系统可分为控制室监听系统、主席台监听系统、场地吊装监听系统及场地内流动监听系统。
控制室监听系统包括TANNOY 5A有源监听音箱2只,AKG K66监听耳机1副。
3、调音台:调音台在扩声系统中占有重要地位。
调音台英语称“MIX”为混合的意思,因此调音台在扩声系统中是将前级音源混合后再分配给不同的扩声系统,混合/分配是其主要的功能。
本套扩声系统中有扩声及流动(监听)两张调音台,扩声调音台用于扩声、控制室监听、场地吊装监听使用;流动(监听)调音台用于场地内流动监听及主席台监听使用。
A、扩声调音台包括ALLEN&HEATH GL2800-40 1台。
4、音源系统:音源系统包括系统前级中的音源播放设备及拾音设备。
A、音源播放设备包括DVD机1台;卡座/CD一体机2台;MD 1台。
B、拾音设备包括AKG WMS400/D880无线手持话筒2套;;AKGWMS400/C407无线话筒/领夹2只;TANNOY鹅颈电容会议话筒8支;TANNOY TDM27对讲话筒2只。
PULSE SPA300、SPA600、SPA900功率放大器用户操作手册说明书
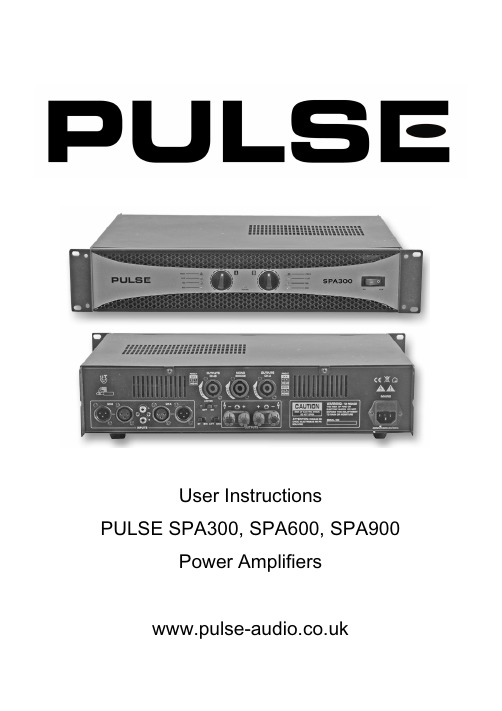
User Instructions PULSE SPA300, SPA600, SPA900
Power Amplifiers
SAVE THESE INSTRUCTIONS!!
Unpacking and Inspection
Carefully unpack the unit. If it appears damaged in any way, return it to the retailer it was purchased from in its original packaging. PULSE cannot accept any responsibility for damage arising from the use of non approved packaging.
inspire 2 用户手册说明书
美声Mission VX 中文用户手册
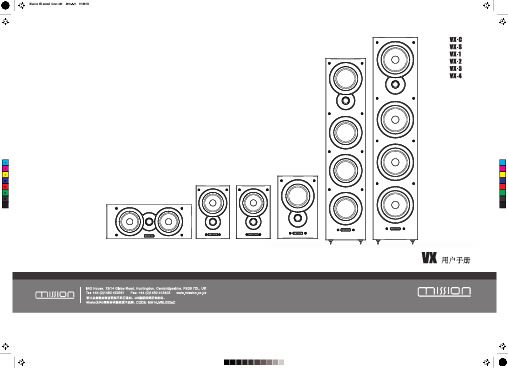
安装底座与脚钉
请将超重低音倒置放在一块诸如毛巾的柔软物体上,以保护箱体 表面。用配带的四个脚钉将底座牢牢固定在音箱上。将锁扣螺母 拧松出来到脚钉长度的2/3处,然后在脚钉上放置一个垫片,再 将每个脚钉组合重新固定在音箱上,并确保将音箱倒转过来,小心地放在地板上。 将各脚钉上的螺母都拧松一圈,如果地板不是十分平坦,那么您将会发现其中一个脚钉脱离地面。那么就将此脚钉 拧 松,重新调节,直至它能接触地面。将音箱的各个脚钉都不断地拧进拧出,直至箱体完全平衡(左右面和前后面),然后 拧紧螺母,固定脚钉。 警告:脚钉十分尖锐! 请您确认在安装音箱的地方没有任何可能被脚钉损坏的线材或其它隐藏的物体。 请不要拖曳带脚钉的音箱。通常都将音箱抬起来,如果过重,您可以寻求他人的帮助。
美声音箱:Mission M3 中文用户手册
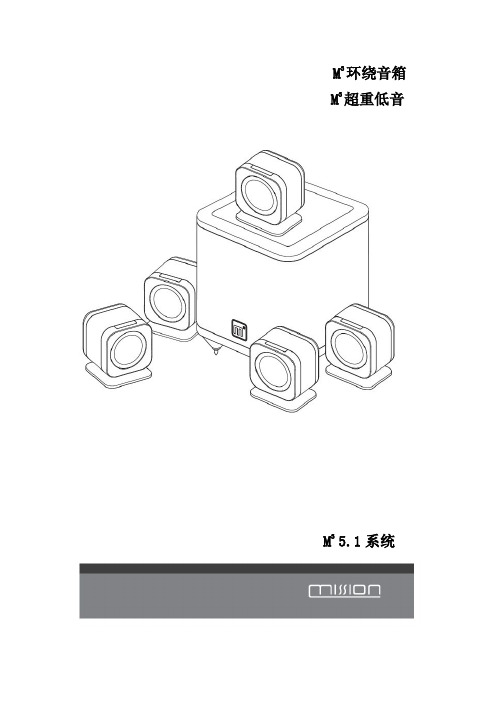
为 M3 环绕音箱设置为最高频率(150Hz),如果出现重低音或声音不清晰,则调低频率直到 达到最理想的效果。
自动开关:在普通模式下,超重低音一直处于打开状态。当系统其它设备都关闭,而只有
超重低音处于开启状态时,就可能会发出嗡嗡的噪音。将 AUTO 开关打到 ON,输入端口检 测到任何信号输入时,超重低音就会自动打开;如果一段时间没有进行操作,超重低音音箱 又会自动关闭(进入待机状态)。所以建议您在一般操作过程中,将 AUTO 开关打到 ON 的 位置上。 在自动模式下,当系统与电源连接,超重低音的指示灯会一直保持亮的状态,即便是待机状 态下。如果超重低音与电源断开或电源开关是“off”则指示灯熄灭。长时间不使用系统时, 建议您关掉超重低音,以免产生噪音。
正确的系统连接图
您的超重低音是为和数字处理器的最优搭配而设计的。如果您的 AV 处理器有低电平输出端 或 LFE 超重低音输出端,您应当采用上图的连接方式。 您需要从经销商处购买一根单独的屏蔽 RCA 音频线,按上图将音频线与超重低音的 LFE 输入 端连接起来。
超重低音的多种连接方式
您可以使用处理器上的一根 Y 形音频线来连接超重低音上的两个输入端,这种超重低音的输 入电平会偏高些。
是普通的线材。您可以咨询您的经销商。按 下图所示正确连接音箱。
连接无源音箱
请务必为每台音箱准备一条长度合适的音 频线,建议您选用专业的优质音频线,而不
确保超重低音的红色端子连接到功放的红色(+)端子上,按相同的方法将超重低音的黑色 端子连接到功放的黑色(-)端子上。
使用音频线有色彩的一端可以方便地把音箱的正极红色端子连接起来。
- 1、下载文档前请自行甄别文档内容的完整性,平台不提供额外的编辑、内容补充、找答案等附加服务。
- 2、"仅部分预览"的文档,不可在线预览部分如存在完整性等问题,可反馈申请退款(可完整预览的文档不适用该条件!)。
- 3、如文档侵犯您的权益,请联系客服反馈,我们会尽快为您处理(人工客服工作时间:9:00-18:30)。
请勿将任何明火放置于产品上方,如蜡烛。
警告:电池更换不当时可能会发生爆炸危 险,更换电池时,仅能使用相同或等同型号 和规格的电池。
警告:请勿将电池暴露于高温状态下,如日 照、火源等。 警告:安装本产品前,请参照机壳底部的标 识,获取相关的电气或安规信息。
Mission 被公认为是一个能创造出一系列成功产品的品牌。拥有几十年技术和经验于 2001 年创造的顶级 Pilastro 音箱产品是有史以来最好的音箱之一,Pilastro 以及备受赞誉的其 他优雅系列音箱是对音响工程迈入一个全新深度的一个阐述。
以工程技术为主导的产品技术的发展使得 Mission 有着音响公司所达到的一个标准水平,有 着大量的投资与客源,具有在自己工厂生产每个音箱元件的能力,作为纵向一体化的大工厂, Mission 继续重新定义音箱的再生产水平。
请阅读此操作指引。 请保留此操作指引。
请留意所有的警示性标志。
请遵循所有的操作指引。
请勿将本产品靠近水源。
请仅使用干布清洁机身。
请勿遮挡产品上的通风出口,请按照厂商的 操作说明进行安装。
请根据本指引安装新产品,安置处请勿靠近 热源,如电暖炉、热风口、火炉及其他散热 设备(包括功放)。
请勿损坏起安全保护作用的极性插头。带极 性插头一般有两个宽度不一的插片而接地 型插头除这两个插片外还配有一个接地插 片,其中稍宽的插片及接地插片是为了保障 用户安全而提供。如果产品上的插头与用户 插座不匹配,请咨询专业人士更换合适的插 座。
注意:如果此前 Pulse 已与该蓝牙音乐源连接,当再次打开 Pulse 并切换至蓝牙输入,并
且该蓝牙音乐源也已打开蓝牙功能时,Pulse 将会自动连接该蓝牙音乐源。
播放音乐 在蓝牙音乐源上,选择 Pulse 为音乐输出设备,开始音乐播放。
断开蓝牙连接 将蓝牙音乐源移开至可通信范围之外或关闭该设备的蓝牙功能。 把连接中的 NFC 智能手机靠近 Pulse 右音箱 NFC 感应区,中断连接。
待机开关 输入选择
音量增 音量减 静音开关
自动待机功能
为达到节能的目的,30 分钟无输入并且无任何操作时,Pulse 将会自动进入待机状态。
音箱的放置
Pulse 音箱设计为台式放置,您可以自由地将其放置在手提电脑或电脑显示器旁。右音箱应 放置于右手边,左音箱应放置于左手边。如您位于桌前,请勿将左右音箱放置在两旁较远的 位置。为了获得更准确的声场,左右音箱距人耳的距离应大体一致。Pulse 音箱摆放位置见 以下示意图。
注意:无法连接蓝牙设备时,请尝试“解除配对”然后重新连接。
连接
通过 3.5mm 音频线连接
您可以使用随附的音频线把 Pulse 与 iPod、 MP3 播放器等其他音乐源设备连接起来。 为此,您需要用音频线将音乐源设备与 Pulse 右音箱的 3.5mm 输入端正确连接起 来。 注意:插拔操作请在断电状态下进行。
拆开包装
请小心拆开包装,保留纸箱和包装材料以备后期维修使用。如需处理包装材料请根据当地废 品回收准则进行。
请检查产品包装盒里含有以下所有部件,如有任何部分缺失或损坏,请尽快告知您的经销商。
左音箱
右音箱
遥控器
电源适配器
电源线
USB 线
音频线
说明书
保修卡
*不同地区所含产品会有所不同。
快速入门指南
注意:请勿使用除包装内的电源适配器以外的其他适配器,且勿将此适配器用于其他设备,
目录
安全须知………………………………………………………………………… 欢迎购买 Mission………………………………………………………………1 产品简介…………………………………………………………………………1 目录………………………………………………………………………………2 产品特征…………………………………………………………………………3 拆开包装…………………………………………………………………………3 如何设置…………………………………………………………………………4 连接………………………………………………………………………………5 音箱控制…………………………………………………………………………8 自动待机功能……………………………………………………………………9 音箱的放置………………………………………………………………………9 规格参数…………………………………………………………………………10 故障检修…………………………………………………………………………11 维修服务…………………………………………………………………………12
音箱控制ห้องสมุดไป่ตู้
控制音量、输入模式、待机模式
待机状态时,按一下以唤醒 Pulse。 当已启动时,长按以使 Pulse 进入待机模式。 按一下以使 Pulse 进入静音状态。
LED 指示灯 遥控器
蓝牙、USB、3.5mm 模拟输入切换开关。 增加/减少音量。长按可持续增加音量或持 续减少音量。
橙色:静音状态 淡紫色:选择 USB 输入 绿色:选择 3.5mm 模拟信号输入 红色:待机模式 蓝色:蓝色常亮为蓝牙打开并且已连接,蓝 色闪烁为蓝牙未连接。
连接
通过蓝牙播放
通过蓝牙无线技术,您可以轻松地将 Pulse 无线连接到其他音乐源。音量可通过操作蓝 牙音乐源或 Pulse 来控制。其他功能,如播 放、暂停、上一曲、下一曲、快进和快退功 能只能通过蓝牙音乐源来操作。
建立蓝牙连接
a. 通过 NFC 连接 把兼容 NFC 的智能手机屏幕解锁。 打开手机上的 NFC 功能。 将手机上 NFC 感应区域靠近 Pulse 右音箱上的 NFC 标志处。 Pulse 的指示灯会变为蓝色常亮,手机上显示蓝牙连接状态的信息。
左音箱
注意:不同智能手机其 NFC 灵敏度不同,故手机与设备间的距离会有所不同。不同设备 NFC 天线的位置也不同,连接前请先确定其位置。如果连接失败,尝试取下手机上的保护套等物 品。
b. 手动连接 将 Pulse 和蓝牙音乐源靠近放置。 开启 Pulse 并选择蓝牙为输入源。 打开音乐源上的蓝牙功能,开始自动搜索 Pulse。 当搜索到“Mission Pulse”时,点击开始配对。 一旦连接成功,Pulse 指示灯会由蓝色闪烁变为蓝色常亮。 如果提示输入密码,请输入“0000”,有的设备可能还需要您手动接受连接。
Mission 的设计者在设计 Pulse 时潜心研究每一个美学细节,Pulse 仅使用最高端原材和最 高端技术以确保让用户得到最完美的音乐享受。Pulse 由阳极氧化铝的外箱所封装,使用了 现代化的触控技术,Pulse 所有出色的设计使其成为无与伦比的台式音箱。
Pulse 是继承了 Mission 产品具有视觉吸引听觉迷人的一个典范。我们愿您能从 Mission 音 箱中得到持久的完美音乐享受。
警告:说明书中的用户指引仅为专业维修人 员提供参考。为了避免触电的危险。任何非 专业人士请勿进行本操作指引以外的其他 任何维修服务。
请勿将本产品安装于书橱等狭小密闭的空 间内。请确保安装处空间开阔且通风良好。 请勿用报纸、桌布及窗帘等遮挡或堵塞产品 上的通风口。
警告:请仅使用厂商指定或配套销售的附件 (如专用的电源适配器、电池等)。
此标识表示设备仅适用于海拔 2000m以下地区安全使用。 此标识表示设备仅适用于非热带
气候条件下安全使用。 警告:未经厂商的许可,不可随意更改、更 换产品的任何零部件。否则,将导致产品失 效。
该标志表明该产品已符合II类设备的安全 要求,电源连接时不需要接地。
收以促进材料的可持续使用。如果要退回该 产品,应通过正规的回收渠道进行回收或联 系购买此产品的经销商,他们可对其进行无 公害的安全回收。
产品特征
蓝牙输入
支持 NFC(近场通信) USB 输入 3.5mm 信号连接线输入 数字功放 遥控器
采用 aptX 无线高保真蓝牙技术使所有支持蓝 牙的设备均能与 Pulse 无缝衔接。 通过支持 NFC 的智能手机轻轻接触便能让设备 自动开机匹配,完成蓝牙连接。 方便直接地连接您的个人电脑或 MAC。 连接外部音乐源。 内置功放使声音充满整个空间。 方便地进行音量控制与音源选择。
Bluetooth 文字商标和徽标是 Bluetooth SIG,Inc. 的注册商 标,且 IAG Group Ltd.在授权下使用任何该商标。其他商标和商 名为各自所有者的商标和商名。
aptX software is copyright CSR plc. or its group companies. All rights reserved. The aptX nark and the aptX logo are trademarks of CSR plc. or one of its group companies and may be registered in one or more jurisdictions.
安全须知
此等边三角形内加感叹号表明 随机附带的说明书中包含重要 的操作及维修指引。
警告:为了减少触电风险,请勿私自拆开面 板,机身内部无任何用户可自行更换的零部 件。如果出现异常,请咨询专业人员。
电压。
此等边三角形内加带箭头的闪 电符号的标志表明机身内存在 未绝缘的足以引起触电危险的
警告:电源插头被作为将设备断开电源的装 置,应始终处于可操作状态。
产品简介
Mission 能在此介绍 Pulse 倍感自豪,它是一台创新型的台式音箱以及第一个 Mission 该系 列无线蓝牙的音箱,Mission 音箱以其高雅而闻名,体现在严谨的听音测试和形象的风格上。
Mission 工程师致力于为 Pulse 创造出大小不限的高端音质。全新 3 英寸 BMR 平面板以全音 域 NEO 喇叭为主要特色,它通过利用蜂窝型面板创造出流畅的中音与延伸性极好的高频响 应。两个相对的 ABRs 创造出了稳定且易控制的低音性能。有着微调型的 D 级功放喇叭, Mission Pulse 将以极出色的清晰度呈现出优美的音乐。