极光远程安全评估系统用户使用手册
XRT86SH328ES评估系统用户手册说明书
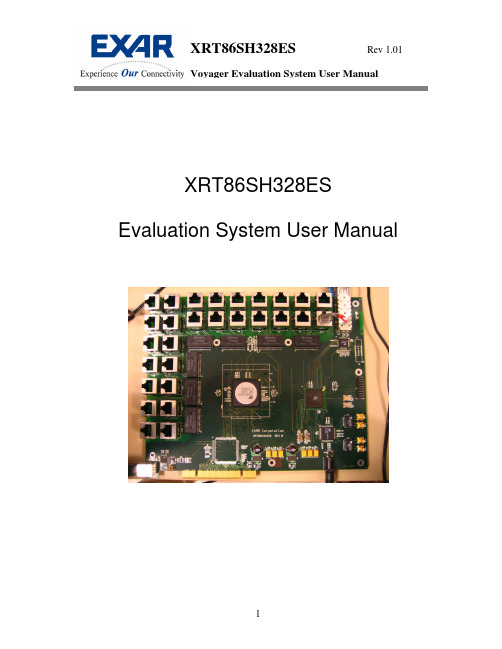
XRT86SH328ES Evaluation System User ManualSECTION 1 Introduction (3)SECTION 2 Circuit Overview (3)Figure 1. Simplified Block Diagram of the XRT86SH328ES (3)SECTION 3 Schematic Design (4)Figure 2. XRT86SH328 Schematic Page 1 (4)Figure 3. XRT86SH328 Schematic Page 2 (5)Figure 4. XRT86SH328 Schematic Page 3 (6)Figure 5. XRT86SH328 Schematic Page 4 (7)Figure 6. XRT86SH328 Schematic Page 5 (8)SECTION 4 USB Installation (9)SECTION 5 Python Script Interface (17)SECTION 6 USB Installation (25)This XRT86SH328ES is a complete evaluation kit for characterizing the 28Channel VT Mapper IC. The evaluation kit includes the following:1. Evaluation Board2. USB Cable3. AC Adaptor Power Cord4. CD Rom5. DocumentationSECTION 2 Circuit OverviewThis evaluation board is controlled by a graphical user interface (GUI)through a USB port from a typical PC. (Quick Note: The software supportsWindows XP and NT down to most versions of Windows 98) Figure 1 showsthat there are two separate data paths supported by the evaluation board. Itis important to note that only one data path can be selected at any time dueto the board architecture (not the DUT). The two data paths are the TelecomBus (Connected to the XRT91L30 OC-3 Transceiver) or the Serial Interface(Connected to the XRT75VL00 STS-1 LIU). If the part is configured in STS-1/STM-0, the Serial Interface can be used. If the part is configured in STS-3/STM-1, then only the Telecom Bus can be used. There are two separateFPGA configuration files (“TelecomBus.hex” and “SerialInterface.hex”) thatcome with this kit.Figure 2. XRT86SH328 Schematic Page 10 Figure 3. XRT86SH328 Schematic Page 2Figure 4. XRT86SH328 Schematic Page 3Figure 5. XRT86SH328 Schematic Page 40 Figure 6. XRT86SH328 Schematic Page 5Included in the Evaluation System Kit, there is an Installation file on the CD Rom called “XRT86SH328EvaluationUSB.exe”. This file should automatically load the Exar Usb drivers and the board will be up and running. However, if the following steps are performed and the board is NOT recognized by the PC, the last step in this process describes how to manually load the drivers. Step 1Double Click the “XRT86SH328EvaluationUSB.exe” file to bring up the following screen. Click on the Next> button.Step 2Exar recommends using the default directory, but the files can be installed to any directory that you choose. Note: Make sure that all files from the CD are properly copied to the unique directory if it is changed. Click on the Next> button to proceed.Click the Next> button to continue.Step 4 Click on the “Create a desktop icon if desired.Step 6Click on the Finish button to complete installation. The Exar USB drivers should be properly installed and ready to go. If so, continue to the next section that describes the Graphical User Interface. If not, see the last step below to manually load the Exar USB Drivers.Manually Loading Exar Drivers (If Installation is NOT Successful)If the Evaluation Board is NOT recognized and/or the installation process was NOT successful, most likely there is a driver contention or the driver was not installed in the proper directory from the software. This section describes how to manually load the drivers.Note: Each Windows operating system may access the System Hardware differently. Therefore, it is not practical to describe this procedure for each OS. However, the key component is usually the Control Panel of the PC. From the Control Panel, you can access the System Properties dialog box. From there, choose the Hardware menu item and go to the Device Manager…The device Manager will bring up the following dialog box. Choose the USB I/O Controlled Devices, select Exar Device, right click, select properties, select Update Driver, and then follow the directions to choose the driver from the CD or the /Driver directory in the Exar working directory (“C:\Program Files\Exar\XRT86SH328 Evaluation Software\Drivers” by default).SECTION 5 Python Script InterfaceRunning a Python Script From the GUIFrom the main GUI, select the Special Operations menu shown below andclick on the “Run Python Script” to continue.menu from the GUI, the “xrScripting Interface” will pop-up as shown below. At this point, the xrScripting Interface is independent of the GUI and any script files that are run will automatically overwrite the GUI settings if there is an overlap with the registers. Therefore, caution must be used to keep track of the register configurations if one wants to toggle back and forth from the GUI to the xrScripting Interface. The next step is to use the “Special” menu on the tool bar to run the actual test script file.Note: If you would like to view a particular test script in a plain text editor mode, use the “File” menu on the tool bar and select “Open”.Interface”, the following dialog box will appear. The first python script that should be run is the “voyager_startup.py” which will automatically run all the other script files for you. This way, you do NOT have to run each one individually. Once this file runs, you can open up any one of these files for reference. Select the “voyager_startup.py” script file and click Open.After running the “voyager_startup.py” script and a brief pause, the following dialog box will appear. This is the main Python Window that consists of two main windows. The window on top is the Display Monitor, which as can be seen starts with the message “Voyager is Detected and Ready…”. The bottom Window is the Command Console where you can perform manual Read/Write to registers and perform function calls. See the examples on the following pages.Looking at the dialog box below, you can see that the Command Console (lower window) was used to type the following command: readhex(0x0005), which is the Revision ID register. You can also see that the value of 0x1 was returned in the Display Monitor (upper window), which corresponds to Revision A silicon.Note 1: Critical: You must press Ctrl + Enter to execute a command from the Command Console!Note 2: in the lower window, the command is highlighted in Grey. The Grey highlight notifies the user that the command has been executed. If the Grey highlight does not appear, the command (or function) is still being processed. Please wait for the Grey highlight before continuing.Looking at the dialog box below, you can see that the Command Console (lower window) was used to type the following command: writereg(0x1000, 0x20), which will turn the E1 LIU Receiver On. Nothing will show up in the Display Monitor for Write functions. However, you can perform a Read function to verify that the value was written if desired.Note: Critical: You must press Ctrl + Enter to execute a command from the Command Console!Example 3: Run a Function Call for STM-0 Serial InterfaceThe following function “e1_sts1()” (which is located in the “test_scripts.py” script file) will set a general provision for running 21 channels of E1 traffic, VT Mapped up to STM-0 and output to the Serial Interface. On the Evaluation Board, a jumper cable can be used to externally route the output of the XRT75VL00 to the inputs. Once this is done, there should be no bit errors on the Test Equipment. From this point, the manual Read/Write access or a customized script can be used to fit a particular application.Note: Critical: You must press Ctrl + Enter to execute a command from the Command Console!Example 4: Run a Function Call for STM-0 Telecom Bus InterfaceThe following function “tb_stm1()” (which is located in the “test_scripts.py” script file) will set a general provision for running 21 channels of E1 traffic, VT Mapped up to STM-1 and output to the Telecom Bus. From this point, the manual Read/Write access or a customized script can be used to fit a particular application.Note: Critical: You must press Ctrl + Enter to execute a command from the Command Console!To start the GUI, double click on the xrt86sh328.exe icon, or select it through the start menu. The following dialog box will appear:When the FPGA is finished downloading, the following choices need to be made depending on the application.After the selections have been made, please wait a moment for the device to be configured.Select Test->Evaluation to begin evaluation.。
极光远程安全评估系统

极光远程安全评估系统
极光远程安全评估系统,是一种针对系统网络安全进行评估、巡检和漏洞扫描的远程服务。
该系统利用现代化技术手段,通过远程连接的方式对目标系统进行深度扫描和评估,以及提供安全咨询和建议。
极光远程安全评估系统具备以下特点:
首先,它是一种基于云计算的远程服务。
用户可以通过任何网络连接方式将目标系统连接到云平台,无需在本地部署额外软件和硬件设备,便能够利用云计算强大的计算和存储能力实现安全评估。
其次,该系统具备全面的安全性能。
系统通过对目标系统进行深度扫描,分析系统的安全配置、漏洞和风险,评估目标系统的安全状况。
同时,系统还具备强大的威胁情报和安全知识库,可以及时更新和应用最新的安全攻防技术,保证评估结果的准确性和可靠性。
此外,该系统还拥有简单易用的用户界面。
用户可以通过
Web界面完成系统的配置和管理,同时也可以查看评估结果
和报告。
系统提供直观的图形化展示,帮助用户快速了解目标系统的安全状况,并提供相应的解决方案。
最后,该系统具备高度的可定制性和灵活性。
用户可以根据自身需求和实际情况进行定制化配置,设定评估的范围和深度。
同时,用户还可以根据评估结果和报告,制定相应的安全策略
和措施,提高系统的安全性。
总的来说,极光远程安全评估系统是一款先进可靠的远程安全评估工具。
它通过云计算和现代化技术手段,为用户提供全方位的安全评估服务,并帮助用户及时发现和解决系统网络安全问题,提高系统的安全性和可靠性。
RSAS产品白皮书

R S A S产品白皮书 Document serial number【LGGKGB-LGG98YT-LGGT8CB-LGUT-绿盟远程安全评估系统产品白皮书【绿盟科技】■文档编号产品白皮书■密级完全公开■版本编号■日期2015-10-19■撰写人尹航■批准人李晨2020 绿盟科技本文中出现的任何文字叙述、文档格式、插图、照片、方法、过程等内容,除另有特别注明,版权均属绿盟科技所有,受到有关产权及版权法保护。
任何个人、机构未经绿盟科技的书面授权许可,不得以任何方式复制或引用本文的任何片断。
目录插图索引一. 攻防威胁的变化利用安全漏洞进行网络攻击的互联网安全问题,好像阳光下的阴影,始终伴随着互联网行业的应用发展。
近些年,网络安全威胁的形式也出现了不同的变化,攻击方式从单个兴趣爱好者随意下载的简单工具攻击,向有组织的专业技术人员专门编写的攻击程序转变,攻击目的从证明个人技术实力向商业或国家信息窃取转变。
新攻击方式的变化,仍然会利用各种漏洞,比如:Google极光攻击事件中被利用的IE 浏览器溢出漏洞,Shady RAT攻击事件中被利用的EXCEL程序的FEATHEADER远程代码执行漏洞。
其实攻击者攻击过程并非都会利用0day漏洞,比如FEATHEADER远程代码执行漏洞,实际上,大多数攻击都是利用的已知漏洞。
对于攻击者来说,IT系统的方方面面都存在脆弱性,这些方面包括常见的操作系统漏洞、应用系统漏洞、弱口令,也包括容易被忽略的错误安全配置问题,以及违反最小化原则开放的不必要的账号、服务、端口等。
在新攻击威胁已经转变的情况下,网络安全管理人员仍然在用传统的漏洞扫描工具,每季度或半年,仅仅进行网络系统漏洞检查,无法真正达到通过安全检查事先修补网络安全脆弱性的目的。
网络安全管理人员需要对网络安全脆弱性进行全方位的检查,对存在的安全脆弱性问题一一修补,并保证修补的正确完成。
这个过程的工作极为繁琐,传统的漏洞扫描产品从脆弱性检查覆盖程度,到分析报告对管理人员帮助的有效性方面,已经无法胜任。
绿盟极光安全评估

绿盟极光安全评估
绿盟极光安全评估(Venustech Aurora Security Assessment)是
由中国网络安全公司绿盟科技(Venustech)提供的一项安全
评估服务。
绿盟极光安全评估旨在通过全面的安全评估和测试,帮助企业发现其网络和系统中存在的潜在安全问题和风险,并提供相应的解决方案和建议。
该项安全评估服务主要包括以下内容:
1. 安全风险评估:对企业网络、系统、应用程序等进行全面的安全风险评估,识别潜在的安全漏洞和风险。
2. 安全测试:通过模拟攻击、渗透测试等手段对企业的网络和系统进行安全测试,检测其安全性能和弱点,并提供相应的修复建议。
3. 安全合规性评估:对企业的网络安全管理制度和流程进行评估,评估其是否符合相关安全合规要求,如ISO27001等。
4. 安全配置审核:对企业的网络设备、服务器等进行安全配置审核,帮助企业提升设备的安全性能,防范潜在的攻击。
5. 安全威胁感知:通过分析企业的网络流量和日志数据,识别存在的安全威胁和异常行为,及时发现和应对安全事件。
绿盟极光安全评估服务注重技术和方法的创新,采用先进的安
全评估工具和手段,帮助企业全面提升网络和系统的安全性能,有效防范各类网络攻击和威胁。
信息安全等级保护评估系统快速使用手册文档

第一章前言本手册主要介绍如何快速使用信息安全等级保护评估系统。
1.1 文档目的通过阅读本文档,使用户能够快速的了解该系统的整个业务流程,正确的使用该系统。
1.2 约定本文档遵循以下约定:图形界面操作的描述采用以下约定:“”表示按钮。
点击(选择)一个菜单项采用如下约定:点击(选择)高级管理 > 特殊对象>用户。
文档中出现的提示、警告、说明、示例等,是关于用户在使用本手册过程中需要特别注意的部分,请用户在明确可能的操作结果后,再进行相关配置。
1.3 技术服务体系天融信公司对于自身所有安全产品提供远程产品咨询服务,广大用户和合作伙伴可以通过多种方式获取在线文档、疑难解答等全方位的技术支持。
第二章系统结构信息安全等级保护自评估系统由三个子系统共同组成:等级评测、用户管理和安全对象管理子系统。
等级评测子系统是整个系统的核心。
如下图。
级保安全对象管理子系统等级备案系统录入定级第三章使用系统3.1 登陆系统系统搭建完毕后登录系统,web访问地址一般是系统搭建的应用服务器的IP地址加端口,例如:。
系统预置超级管理员admin,密码topsec123,访问用户管理子系统,登录后创建项目经理(也就是项目负责人)和项目成员,并为其分配权限。
项目经理:项目经理也就是项目的负责人,(可以根据系统需求分配相应权限)监督项目的进展、创建评测项目等。
项目成员:负责整改任务、检查任务(答题)(可以根据系统需求分配相应权限)。
管理员以哪种角色登录即拥有相应的管理权限。
3.2 添加安全对象项目经理选择安全管理子系统,登录后添加安全对象,也可以登录到等级保护子系统后二次连接到安全管理子系统添加安全对象。
如下图所示,在该系统页面添加安全对象。
3.3 等级备案等级备案模块完成等级保护评测对象的添加。
在创建评测项目之前需要添加单位信息,然后系统录入定级(添加业务系统,业务系统是进行等级保护评测的评估对象),备案库中备案。
(备案可以在评测项目任何期间进行)1)添加单位信息。
平台使用手册说明书

平台使用手册2020年7月目录1.文档概述 (1)1.1.编写目的 (1)1.2.浏览器推荐 (1)2.操作说明 (1)2.1.平台注册 (2)2.2.平台登录 (3)2.3.选课——课程中心 (4)2.4.选班——网络班级 (8)2.5.个人中心——学习 (11)2.5.1.我的课程 (11)2.5.2.我的网络班级 (13)2.5.3.课程在线学习 (15)2.5.4.我的证书 (26)2.5.5.调查问卷 (27)2.6.个人中心——动态 (28)2.7.个人中心——消息 (29)2.7.1.通知公告 (29)2.8.个人设置 (30)2.8.1.个人基本信息修改 (30)2.8.2.更换头像 (31)2.8.3.密码修改 (32)1.文档概述1.1.编写目的本手册旨在为国家卫生健康委干部培训中心远程教育培训平台学员提供关于系统的使用说明和注意事项,以使各位学员可以更高效、安全的在平台中进行操作及查询等。
1.2.浏览器推荐为了能更好的访问平台,建议您使用谷歌浏览器、360浏览器极速模式、极速浏览器极速模板等谷歌内核浏览器。
2.操作说明学员在浏览器下输入地址:/cms/,即可打开网站门户页面。
通过该门户系统可以查看管理员发布的新闻公告、培训通知等内容。
同时还可以通过门户系统查看报名管理员推荐的课程资源以及培训班级资源等。
除此之外,还可以在该门户页面中登录到学员工作室,进行在线课程学习,交流互动,如果没有相应账号可以通过点击“注册”按钮,在线立即完成账号注册,账号注册无须管理员审核。
2.1.平台注册点击门户页面的上方的注册按钮,进入到以下注册页面。
根据页面提示输入相应内容,点击注册。
注册成功后,无须管理员审核直接生效。
点击登录,输入用户名密码进行登录操作即可。
2.2.平台登录在用户登录区内输入用户名、密码、验证码,点击登录按钮,即可完成登录操作,登录后显示该学员报名的课程、班级数据,点击“进入个人中心”可跳转到个人工作室。
山石网科远程安全评估系统版本说明说明书
山石网科远程安全评估系统 V5.5-1.8.4
发布概述
发布日期:2020 年 6 月 11 日 本次发布是山石网科远程安全评估系统的全新发布。
平台和系统文件
产品型号 SG-6000-RAS3000 SG-6000-RAS5000 SG-6000-RAS3000V SG-6000-RAS5000V
数据库:Oracle、Mysql、DB2、Informix、Mssql、Sybase 等。
虚拟化平台:Vmware EXSi、XenServer 等。 网络设备:思科等。 安全设备:juniper 等 漏洞规则超过 58000 条。
覆盖缓冲区溢出漏洞、拒绝服务攻击漏洞、弱口令、信息泄露漏洞等全 部常见漏洞。 能够扫描常见的网络安全客户端软件(网络防病毒 Symantec、 TrendMicro、McAfee)的安全漏洞。 能够扫描常见的应用软件漏洞(如 IE 浏览器、MSN、Mozilla Firefox、 Yahoo Messenger、MS Office、多媒体播放器、VMware 虚拟机)的安全 漏洞。 提供专门针对 DNS 服务的安全漏洞的检测。 支持自定义扫描策略。 支持设置策略并发数。 支持 UDP 扫描。 支持扫描端口服务版本。
资产探测
支持端口与服务发现。可对监控目标进行全端口扫描,并整理出服务的 端口、应用软件类型、版本,并提供搜索接口可对目标进行搜索。
端口扫描方式:支持 TCP SYN 扫描、connect 扫描、TCP ACK 扫描、UDP 扫描、TCP FIN 扫描、TCP NULL 扫描、Xmas Tree 扫描、idle 扫描等
登录扫描
支持被动扫描,支持用户录入 url
支持自定义爬虫规则
绿盟安全评估极光
绿盟安全评估极光
极光是一家中国领先的移动互联网技术公司,其主营业务是提供移动应用开发和分发服务。
极光通过为开发者提供一整套移动应用开发工具和推广服务,帮助开发者更好地开发、运营和推广移动应用。
然而,根据绿盟安全评估,极光在过去曾存在一些安全漏洞和隐私问题。
具体来说,绿盟安全评估团队发现,极光的一些SDK(软件开发工具包)和API(应用程序接口)存在漏洞,可能导致用户隐私信息泄漏、账号被盗等安全问题。
此外,绿盟安全评估还指出,极光在用户数据的收集和使用方面存在一定风险。
极光收集的用户数据范围广泛,包括设备标识、地理位置、通讯录、消息记录等,而且这些数据可能会与其他用户数据进行关联,用于用户画像和数据分析。
这种数据收集和使用方式可能会引发用户的隐私担忧。
综上所述,绿盟安全评估认为极光存在一些安全漏洞和隐私问题。
用户在使用极光提供的服务时,应当注意保护个人隐私,谨慎处理个人信息,并在必要时采取相应的安全措施。
信息系统安全测评工具
信息系统安全测评工具一、测评工具分类一)安全测试工具1、脆弱性扫描工具脆弱性扫描工具又称安全扫描器或漏洞扫描仪,是目前应用比较广泛的安全测试工具之一,主要用于识别网络、操作系统、数据库、应用的脆弱性,给出修补建议。
1)基于网络的扫描工具:通过网络实现扫描,可以看作是一钟漏洞信息收集工具,根据不同漏洞的特征,构造网络数据包,发给网络中的一个或多个目标,以判断某个特定的漏洞是否存在,能够检测防火墙、IDS等网络层设备的错误配置或者链接到网络中的网络服务器的关键漏洞。
常用工具:天镜脆弱性扫描与管理系统、极光远程安全评估系统、榕基网络隐患扫描系统、Nessus与Nmap等。
2)基于主机的扫描工具:通常在目标系统上安装一个代理(Agent)或者是服务(Services),以便能够访问所有的主机文件与进程,这也使得基于主机的漏洞扫描器能够扫描更多系统层面的漏洞。
常用工具:微软基线安全分析器、日志分析工具与木马查杀工具等。
3)数据库安全扫描工具:通过授权或非授权模式,自动、深入地识别数据库系统中存在的多种安全隐患,包括数据库的鉴别、授权、认证、配置等一系列安全问题,也可识别数据库系统中潜在的弱点,并依据内置的知识库对违背与不遵循数据库安全性策略的做法推荐修正措施。
常用工具:安信通数据库安全扫描工具、明鉴数据库弱点扫描器等商业产品,还有oscanner、Mysqlweak等专项审核工具。
4)Web应用安全扫描工具:通过构造多种形式的Web访问请求,远程访问目标应用特定端口的服务,记录反馈信息,并与内置的漏洞库进行匹配,判断确认Web应用程序中的安全缺陷,确认Web应用程序遭受恶意攻击的危险。
常用工具:AppScan、WebRavor、WebInspect、Acunetix Web Vulnerability Scanner、N-Stealth等。
2、渗透测试工具渗透测试需要以脆弱性扫描工具扫描的结果为基础信息,结合专用的渗透测试工具开展模拟探测与入侵,判断被非法访问者利用的可能性,从而进一步判断已知的脆弱性是否真正会给系统或网络带来影响。
SuperCluster 系统安全指南说明书
SuperCluster 系统安全指南文件号码: E48455-012013 年 7 月版权所有 © 2011, 2013, Oracle 和/或其附属公司。
保留所有权利。
本软件和相关文档是根据许可证协议提供的,该许可证协议中规定了关于使用和公开本软件和相关文档的各种限制,并受知识产权法的保护。
除非在许可证协议中明确许可或适用法律明确授权,否则不得以任何形式、任何方式使用、拷贝、复制、翻译、广播、修改、授权、传播、分发、展示、执行、发布或显示本软件和相关文档的任何部分。
除非法律要求实现互操作,否则严禁对本软件进行逆向工程设计、反汇编或反编译。
此文档所含信息可能随时被修改,恕不另行通知,我们不保证该信息没有错误。
如果贵方发现任何问题,请书面通知我们。
如果将本软件或相关文档交付给美国政府,或者交付给以美国政府名义获得许可证的任何机构,必须符合以下规定:U.S. GOVERNMENT END USERS:Oracle programs, including any operating system, integrated software, any programs installed on the hardware, and/or documentation, delivered to U.S. Government end users are "commercial computer software" pursuant to the applicable Federal Acquisition Regulation and agency-specific supplemental regulations. As such, use, duplication, disclosure, modification, and adaptation of the programs, including any operating system, integrated software, any programs installed on the hardware, and/or documentation, shall be subject to license terms and license restrictions applicable to the programs. No other rights are granted to the U.S. Government.本软件或硬件是为了在各种信息管理应用领域内的一般使用而开发的。
- 1、下载文档前请自行甄别文档内容的完整性,平台不提供额外的编辑、内容补充、找答案等附加服务。
- 2、"仅部分预览"的文档,不可在线预览部分如存在完整性等问题,可反馈申请退款(可完整预览的文档不适用该条件!)。
- 3、如文档侵犯您的权益,请联系客服反馈,我们会尽快为您处理(人工客服工作时间:9:00-18:30)。
目录
前言 .................................................................................................................................................. 1
极光远程安全评估系统用户使用手册
© 2007 绿盟科技
■ 版权声明 本文中出现的任何文字叙述、文档格式、插图、照片、方法技所有,并受到有关产权及版权法保护。任何个人、机构未经绿盟科技的书面授权许可,不得以任何 方式复制或引用本文的任何片断。
■ 商标信息 绿盟科技、NSFOCUS、极光是绿盟科技的商标。
四. WEB管理 ................................................................................................................................... 26
4.1 扫描任务............................................................................................................................... 26 4.1.1 任务列表 ....................................................................................................................... 26 4.1.2 新建任务 ....................................................................................................................... 37
2.2 体系结构................................................................................................................................. 7 2.3 扫描调度................................................................................................................................. 8 2.4 PROFILE概念 ............................................................................................................................. 9 2.5 报表系统............................................................................................................................... 10
三. 登录WEB管理界面 ................................................................................................................... 20
3.1 登录 ...................................................................................................................................... 20 3.2 布局介绍............................................................................................................................... 21 3.3 在线帮助............................................................................................................................... 22 3.4 功能概述............................................................................................................................... 23
一. 概述 ............................................................................................................................................ 4