windows-server-2016无域配置故障转移群集帮助文档
win server 2016操作手册

win server 2016操作手册【Win Server 2016操作手册】前言本操作手册提供了关于Win Server 2016操作系统的详细指南和常见问题解答,旨在帮助用户快速上手并解决操作中遇到的困惑。
请按照以下顺序逐步阅读本手册,以便获得最佳操作体验。
第一章安装Win Server 20161.1 系统要求Win Server 2016对硬件和软件有一定的要求。
在开始安装之前,确保你的计算机满足以下最低配置要求。
1.2 安装步骤本节将指导您完成Win Server 2016的安装过程,并提供详细步骤和提示。
请按照以下步骤进行操作。
第二章配置基本设置2.1 系统语言和区域设置Win Server 2016支持各种语言和区域设置。
本节将介绍如何在安装后进行相关设置。
2.2 网络设置网络设置是服务器配置的重要一环。
本节将详细介绍如何配置网络参数和连接。
第三章管理用户和权限3.1 用户管理Win Server 2016允许您创建和管理多个用户账户。
本节将指导您如何添加、删除和编辑用户账户,并设置其权限。
3.2 组管理组是将用户分类和管理的一种方式。
本节将介绍如何创建和管理组,并将用户账户添加到相应的组中。
第四章文件和文件夹管理4.1 创建和编辑文件Win Server 2016提供了多种方式来创建和编辑文件。
本节将介绍几种常见的操作方式。
4.2 管理文件和文件夹文件和文件夹的管理对服务器运行和数据存储至关重要。
本节将详细介绍如何管理文件和文件夹,包括重命名、复制、粘贴、删除等操作。
第五章网络服务配置5.1 DHCP服务配置DHCP服务可自动分配IP地址和其他网络配置信息。
本节将指导您如何配置和管理DHCP服务。
5.2 DNS服务配置DNS服务负责将域名解析为对应的IP地址。
本节将介绍如何配置和管理DNS服务。
第六章安全性配置6.1 防火墙设置防火墙可以保护服务器免受未经授权的访问。
本节将指导您如何设置和配置防火墙规则。
wnowserver无域配置故障转移群集帮助完整版

w n o w s e r v e r无域配置故障转移群集帮助HEN system office room 【HEN16H-HENS2AHENS8Q8-HENH1688】准备工作软件准备(1)?SQL?Server?2016(2)?Windows?Server?2016??DataCenter???64位(3)?VMware-workstation?12 Pro操作系统:都是Windows?Server?2016??DataCenter(只有Windows?Server?2016?才能无域配置集群)计算机名node1:WIN-VF232HI2UR6node2:WIN-1MCR65603IJIP规划第二步:添加DNS后缀(所有节点均需要此操作,且后缀需一致)第三步:所有节点上以管理员方式运行Powershell,然后执行以下命令new-itemproperty -path HKLM:\SOFTWARE\Microsoft\Windows\CurrentVersion\Policies\System -Name LocalAccountTokenFilterPolicy -Value 1或者也可以手动添加此注册表项(项名:LocalAccountTokenFilterPolicy,DWEORD(32位)值,值为1)HKEY_LOCAL_MACHINE\SOFTWARE\Microsoft\Windows\CurrentVersion\Policies\System第四步:添加用户名,名称、密码均要一致,且隶属于Administrators第五步:添加节点映射(注意要把集群名以及虚拟IP加上)C:\Windows\System32\drivers\etc\host第六步:允许应用通过防火墙第七步:在其中一个节点上以管理员方式运行Powershell,然后执行以下命令创建集群命令:New-Cluster –Name <Cluster Name> -Node <Nodes to Cluster> -–StaticAddress <Cluster IP> -AdministrativeAccessPoint DNS说明:windows server 2016创建故障不支持图文界面操作,只能通过PowerSehll创建示例: -AdministrativeAccessPoint DNS--获取集群名Get-Cluster--群集详情Get-ClusterResource搞定,故障转移群集配置OK现在可以到“故障转移群集管理器”中查看群集。
windowsserver2016年无域配置故障转移群集帮助文档
准备工作软件准备(1)SQL Server2016(2)Windows Server2016DataCenter64位(3)VMware-workstation12 Pro操作系统:都是Windows Server2016DataCenter(只有Windows Server2016才能无域配置集群)计算机名node1:WIN-VF232HI2UR6node2:WIN-1MCR65603IJIP规划第一步:安装故障转移集(所有节点均需要此操作)第二步:添加DNS后缀(所有节点均需要此操作,且后缀需一致)第三步:所有节点上以管理员方式运行Powershell,然后执行以下命令new-itemproperty-path HKLM:\SOFTWARE\Microsoft\Windows\CurrentVersion\Policies\System -Name LocalAccountTokenFilterPolicy -Value 1或者也可以手动添加此注册表项(项名:LocalAccountTokenFilterPolicy,DWEORD(32位)值,值为1)HKEY_LOCAL_MACHINE\SOFTWARE\Microsoft\Windows\CurrentVersion\Policies\System第四步:添加用户名,名称、密码均要一致,且隶属于Administrators第五步:添加节点映射(注意要把集群名以及虚拟IP加上)C:\Windows\System32\drivers\etc\host第六步:允许应用通过防火墙第七步:在其中一个节点上以管理员方式运行Powershell,然后执行以下命令创建集群命令:New-Cluster –Name <Cluster Name> -Node <Nodes to Cluster> -–StaticAddress<Cluster IP> -AdministrativeAccessPoint DNS说明:windows server 2016创建故障不支持图文界面操作,只能通过PowerSehll创建示例:New-Cluster –Name SQLAlwayOn -Node WIN-VF232HI2UR6,WIN-1MCR65603IJ –StaticAddress 192.168.0.170 -AdministrativeAccessPoint DNS--获取集群名Get-Cluster--群集详情Get-ClusterResource搞定,故障转移群集配置OK现在可以到“故障转移群集管理器”中查看群集。
WINDOWS2016故障转移群集(图文教程)
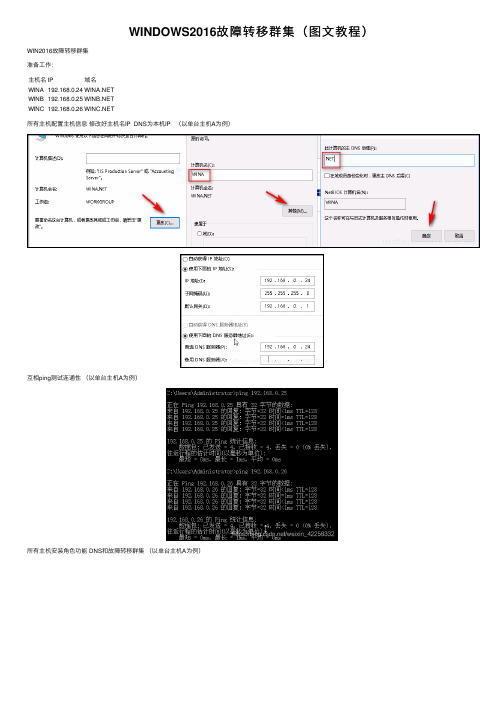
WINDOWS2016故障转移群集(图⽂教程)WIN2016故障转移群集准备⼯作:主机名IP域名所有主机配置主机信息修改好主机名IP DNS为本机IP (以单台主机A为例)互相ping测试连通性(以单台主机A为例)所有主机安装⾓⾊功能 DNS和故障转移群集(以单台主机A为例)所有主机配置DNS解析记录并测试解析新建正向查找区域NET新建反向查找区域新建正向查找区域记录默认已⽣成本机记录新建反向查找记录(我们新建正向记录勾选了PTR指针默认已经新建了B/C主机的反向记录)现在只需新建⼀条本机的PTR记录测试解析A主机配置故障转移群集 B/C主机连接到群集指定虚拟IP192.168.0.88主机A创建群集TEST主机B/C连接到群集TEST主机B(192.168.0.25)查看群集当前在⽤主机为哪台(⽹卡应有88IP)所有主机安装IIS 80端⼝为默认⽹页访问测试关闭掉在⽤主机(⽹卡有88的主机同时只会有⼀台) 查看在⽤主机被选为了哪台 192.168.0.88:80是否还可以打开(使⽤⽹络中其他主机来打开⽹页)关闭掉A主机后 B主机拥有了88IP ⽹页依然可以打开继续关闭B主机此时C主机拥有了88IP ⽹页依然可以打开参考:注:经后期测试建议不要将群集所有主机全部宕机否则会出现问题进阶:以上内容为群集搭建及群集中某主机宕机后恢复业务的情况下⾯记录⼀种主机没有宕机 IIS站点挂掉⽆法提供服务的情况新建⽂本⽂档修改为IIS.vbs 内容如下(虚线内内容)注意修改⽹站和应⽤程序池名称(默认⽆需修改) '<begin script sample>'This script provides high availability for IIS websites'By default, it monitors the "Default Web Site" and "DefaultAppPool"'To monitor another web site, change the SITE_NAME below'To monitor another application pool, change the APP_POOL_NAME below'More thorough and application-specific health monitoring logic can be added to the script if neededOption ExplicitDIM SITE_NAMEDIM APP_POOL_NAMEDim START_WEB_SITEDim START_APP_POOLDim SITES_SECTION_NAMEDim APPLICATION_POOLS_SECTION_NAMEDim CONFIG_APPHOST_ROOTDim STOP_WEB_SITE'Note:'Replace this with the site and application pool you want to configure high availability for'Make sure that the same web site and application pool in the script exist on all cluster nodes. Note that the names are case-sensitive. SITE_NAME = "Default Web Site" '⽹站名称APP_POOL_NAME = "DefaultAppPool" '应⽤程序池名START_WEB_SITE = 0START_APP_POOL = 0STOP_WEB_SITE = 1SITES_SECTION_NAME = "system.applicationHost/sites"APPLICATION_POOLS_SECTION_NAME = "system.applicationHost/applicationPools"CONFIG_APPHOST_ROOT = "MACHINE/WEBROOT/APPHOST"'Helper script functions'Find the index of the website on this nodeFunction FindSiteIndex(collection, siteName)Dim iFindSiteIndex = -1For i = 0 To (CInt(collection.Count) - 1)If collection.Item(i).GetPropertyByName("name").Value = siteName ThenFindSiteIndex = iExit ForEnd IfNextEnd Function'Find the index of the application pool on this nodeFunction FindAppPoolIndex(collection, appPoolName)Dim iFindAppPoolIndex = -1For i = 0 To (CInt(collection.Count) - 1)If collection.Item(i).GetPropertyByName("name").Value = appPoolName ThenFindAppPoolIndex = iExit ForEnd IfNextEnd Function'Get the state of the websiteFunction GetWebSiteState(adminManager, siteName)Dim sitesSection, sitesSectionCollection, siteSection, index, siteMethods, startMethod, executeMethodSet sitesSection = adminManager.GetAdminSection(SITES_SECTION_NAME, CONFIG_APPHOST_ROOT)Set sitesSectionCollection = sitesSection.Collectionindex = FindSiteIndex(sitesSectionCollection, siteName)If index = -1 ThenGetWebSiteState = -1End IfSet siteSection = sitesSectionCollection(index)GetWebSiteState = siteSection.GetPropertyByName("state").ValueEnd Function'Get the state of the ApplicationPoolFunction GetAppPoolState(adminManager, appPool)Dim configSection, index, appPoolStateset configSection = adminManager.GetAdminSection(APPLICATION_POOLS_SECTION_NAME, CONFIG_APPHOST_ROOT) index = FindAppPoolIndex(configSection.Collection, appPool)If index = -1 ThenGetAppPoolState = -1End IfGetAppPoolState = configSection.Collection.Item(index).GetPropertyByName("state").ValueEnd Function'Start the w3svc service on this nodeFunction StartW3SVC()Dim objWmiProviderDim objServiceDim strServiceStateDim response'Check to see if the service is runningset objWmiProvider = GetObject("winmgmts:/root/cimv2")set objService = objWmiProvider.get("win32_service='w3svc'")strServiceState = objService.stateIf ucase(strServiceState) = "RUNNING" ThenStartW3SVC = TrueElse'If the service is not running, try to start itresponse = objService.StartService()'response = 0 or 10 indicates that the request to start was acceptedIf ( response <> 0 ) and ( response <> 10 ) ThenStartW3SVC = FalseElseStartW3SVC = TrueEnd IfEnd IfEnd Function'Start the application pool for the websiteFunction StartAppPool()Dim ahwriter, appPoolsSection, appPoolsCollection, index, appPool, appPoolMethods, startMethod, callStartMethodSet ahwriter = CreateObject("Microsoft.ApplicationHost.WritableAdminManager")Set appPoolsSection = ahwriter.GetAdminSection(APPLICATION_POOLS_SECTION_NAME, CONFIG_APPHOST_ROOT) Set appPoolsCollection = appPoolsSection.Collectionindex = FindAppPoolIndex(appPoolsCollection, APP_POOL_NAME)Set appPool = appPoolsCollection.Item(index)'See if it is already startedIf appPool.GetPropertyByName("state").Value = 1 ThenStartAppPool = TrueExit FunctionEnd If'Try To start the application poolSet appPoolMethods = appPool.MethodsSet startMethod = appPoolMethods.Item(START_APP_POOL)Set callStartMethod = startMethod.CreateInstance()callStartMethod.Execute()'If started return true, otherwise return falseIf appPool.GetPropertyByName("state").Value = 1 ThenStartAppPool = TrueElseStartAppPool = FalseEnd IfEnd Function'Start the websiteFunction StartWebSite()Dim ahwriter, sitesSection, sitesSectionCollection, siteSection, index, siteMethods, startMethod, executeMethodSet ahwriter = CreateObject("Microsoft.ApplicationHost.WritableAdminManager")Set sitesSection = ahwriter.GetAdminSection(SITES_SECTION_NAME, CONFIG_APPHOST_ROOT)Set sitesSectionCollection = sitesSection.Collectionindex = FindSiteIndex(sitesSectionCollection, SITE_NAME)Set siteSection = sitesSectionCollection(index)if siteSection.GetPropertyByName("state").Value = 1 Then'Site is already startedStartWebSite = TrueExit FunctionEnd If'Try to start siteSet siteMethods = siteSection.MethodsSet startMethod = siteMethods.Item(START_WEB_SITE)Set executeMethod = startMethod.CreateInstance()executeMethod.Execute()'Check to see if the site started, if not return falseIf siteSection.GetPropertyByName("state").Value = 1 ThenStartWebSite = TrueElseStartWebSite = FalseEnd IfEnd Function'Stop the websiteFunction StopWebSite()Dim ahwriter, sitesSection, sitesSectionCollection, siteSection, index, siteMethods, startMethod, executeMethod, autoStartProperty Set ahwriter = CreateObject("Microsoft.ApplicationHost.WritableAdminManager")Set sitesSection = ahwriter.GetAdminSection(SITES_SECTION_NAME, CONFIG_APPHOST_ROOT)Set sitesSectionCollection = sitesSection.Collectionindex = FindSiteIndex(sitesSectionCollection, SITE_NAME)Set siteSection = sitesSectionCollection(index)'Stop the siteSet siteMethods = siteSection.MethodsSet startMethod = siteMethods.Item(STOP_WEB_SITE)Set executeMethod = startMethod.CreateInstance()executeMethod.Execute()End Function'Cluster resource entry points. More details here:'/en-us/library/aa372846(VS.85).aspx'Cluster resource Online entry point'Make sure the website and the application pool are startedFunction Online( )Dim bOnline'Make sure w3svc is startedbOnline = StartW3SVC()If bOnline <> True ThenResource.LogInformation "The resource failed to come online because w3svc could not be started."Online = FalseExit FunctionEnd If'Make sure the application pool is startedbOnline = StartAppPool()If bOnline <> True ThenResource.LogInformation "The resource failed to come online because the application pool could not be started." Online = FalseExit FunctionEnd If'Make sure the website is startedbOnline = StartWebSite()If bOnline <> True ThenResource.LogInformation "The resource failed to come online because the web site could not be started."Online = FalseExit FunctionEnd IfOnline = trueEnd Function'Cluster resource offline entry point'Stop the websiteFunction Offline( )StopWebSite()Offline = trueEnd Function'Cluster resource LooksAlive entry point'Check for the health of the website and the application poolFunction LooksAlive( )Dim adminManager, appPoolState, configSection, i, appPoolName, appPool, indexi = 0Set adminManager = CreateObject("Microsoft.ApplicationHost.AdminManager")appPoolState = -1'Get the state of the websiteif GetWebSiteState(adminManager, SITE_NAME) <> 1 ThenResource.LogInformation "The resource failed because the " & SITE_NAME & " web site is not started."LooksAlive = falseExit FunctionEnd If'Get the state of the Application Poolif GetAppPoolState(adminManager, APP_POOL_NAME) <> 1 ThenResource.LogInformation "The resource failed because Application Pool " & APP_POOL_NAME & " is not started." LooksAlive = falseExit Functionend if' Web site and Application Pool state are valid return trueLooksAlive = trueEnd Function'Cluster resource IsAlive entry point'Do the same health checks as LooksAlive'If a more thorough than what we do in LooksAlive is required, this should be performed hereFunction IsAlive()IsAlive = LooksAliveEnd Function'Cluster resource Open entry pointFunction Open()Open = trueEnd Function'Cluster resource Close entry pointFunction Close()Close = trueEnd Function'Cluster resource Terminate entry pointFunction Terminate()Terminate = trueEnd Function'<end script sample>将⽂件复制到所有群集主机的相同⽬录下如:C:\Windows\System32\inetsrv主机A打开故障转移群集管理器连接到群集TEST配置IIS故障转移此时我们在群集下⾓⾊列表⾥可以看到IIS故障转移群集⾓⾊查看⼀下WINC(192.168.0.26)主机的⽹卡情况现在我们模拟WINC主机IIS⽹页服务挂掉/端⼝⽆法访问打开WINC主机IIS管理器展开⽹页停⽌默认⽹站主机A上查看群集⾓⾊已经⾃动切换到WINB提供web服务查看WINB主机⽹卡信息 99IP已⾃动切换到WINB 我们打开的是WINB的⽹页同理我们关闭WINB的IIS⽹站 99⼜会切换到WINA 访问依然不受影响⾄此我们实现了主机在⾮宕机情况下 IIS站点挂掉后切换主机提供服务的情况注:1、本测试中99IP对应的不是整个IIS服务只是⼀个站点(默认站点)2、⽤户上传的附件需要⼀个群集共⽤的存储介质⽬前还未解决待完善参考:到此这篇关于WINDOWS2016故障转移群集(图⽂教程)的⽂章就介绍到这了,更多相关WINS2016故障转移群集内容请搜索以前的⽂章或继续浏览下⾯的相关⽂章希望⼤家以后多多⽀持!。
故障转移群集

4.这里选择需要安装角色或功能的服务器,选择完成后点”下一步”
5.选择需要添加的角色,这里我们什么都不选,点”下一步”
6.勾选”多路径I/O”及“故障转移群集”功能,点击”下一步”
7.勾选”如果需要,自动重新启动目标服务器”,并点击“安装”
安装群集故障转移群集故Fra bibliotek转移群集实施工艺
安装WindowsServer2012R2故障转移群集比较简单,只需要在群集节点分别开启故障转移群集功能,若是需要多数据路径访问群集共享,还需要开多路径I/O功能。
服务器安装故障转移群集和多路径I/O功能
1.点击”添加角色和功能”项
2.出现添加角色和功能向导页面,直接点击”下一步”
6.现在就在验证群集配置
7.查看群集报告,若没有问题就彻底大功告成。这里会有一个网络的警告,因为机器不带有双网卡,无法配置单独的心跳线,不过这样也可以工作。若有条件可以设置单独的心跳线。
7.这里直接点击”下一步”
8.下面就开始创建群集,稍等一会儿就创建成功。
验证群集
上面我们已经建立了集群,现在我们验证下集群是否成功
1.右击集群,点击”验证集群”
2.出现集群验证向导
3.这里我们选择运行全部测试
4.这里可以选择验证存储,也可以不选,但建议还是选择
5.验证群集概览,没有问题就可以点击”下一步”
1.点击Windows键,点击“故障转移群集管理器”
2.右击“故障转移群集管理器”,选择”创建群集”
3.出现创建群集向导,点击”下一步”
4.添加群集服务器。这里添加其他节点,然后点击”下一步”
5.这里询问是否验证群集,因为没有添加存储,选”否”等添加完存储后我们再验证群集
windows-server-2016无域配置故障转移群集帮助文档

准备工作软件准备(1) SQL Server 2016(2) Windows Server 2016 DataCenter 64位(3) VMware-workstation 12 Pro操作系统:都是Windows Server 2016 DataCenter(只有Windows Server 2016 才能无域配置集群)计算机名node1:WIN-VF232HI2UR6node2:WIN-1MCR65603IJIP规划第一步:安装故障转移集(所有节点均需要此操作)第二步:添加DNS后缀(所有节点均需要此操作,且后缀需一致)第三步:所有节点上以管理员方式运行Powershell,然后执行以下命令new-itemproperty -path HKLM:\SOFTWARE\Microsoft\Windows\CurrentVersion\Policies\System -Name LocalAccountTokenFilterPolicy -Value 1或者也可以手动添加此注册表项(项名:LocalAccountTokenFilterPolicy,DWEORD(32位)值,值为1)HKEY_LOCAL_MACHINE\SOFTWARE\Microsoft\Windows\CurrentVersion\Policies\System第四步:添加用户名,名称、密码均要一致,且隶属于Administrators第五步:添加节点映射(注意要把集群名以及虚拟IP加上)C:\Windows\System32\drivers\etc\host第六步:允许应用通过防火墙第七步:在其中一个节点上以管理员方式运行Powershell,然后执行以下命令创建集群命令:New-Cluster –Name <Cluster Name> -Node <Nodes to Cluster> -–StaticAddress <Cluster IP> -AdministrativeAccessPoint DNS说明:windows server 2016创建故障不支持图文界面操作,只能通过PowerSehll创建示例:New-Cluster –Name SQLAlwayOn -Node WIN-VF232HI2UR6,WIN-1MCR65603IJ –StaticAddress 192.168.0.170 -AdministrativeAccessPoint DNS--获取集群名Get-Cluster--群集详情Get-ClusterResource搞定,故障转移群集配置OK现在可以到“故障转移群集管理器”中查看群集。
Windows Server 2016 系列用户指南说明书
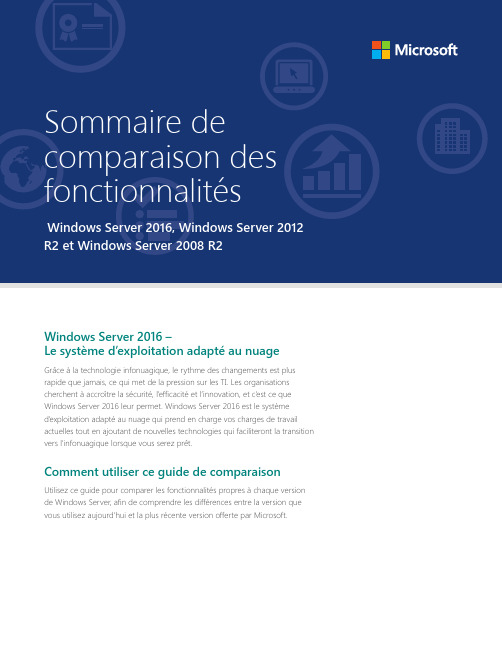
Windows Server 2016 –Le système d’exploitation adapté au nuageGrâce à la technologie infonuagique, le rythme des changements est plus rapide que jamais, ce qui met de la pression sur les TI. Les organisations cherchent à accroître la sécurité, l’e fficacité et l’innovation, et c’e st ce que Windows Server 2016 leur permet. Windows Server 2016 est le systèmed’e xploitation adapté au nuage qui prend en charge vos charges de travail actuelles tout en ajoutant de nouvelles technologies qui faciliteront la transition vers l’infonuagique lorsque vous serez prêt.Comment utiliser ce guide de comparaison Utilisez ce guide pour comparer les fonctionnalités propres à chaque version de Windows Server, afin de comprendre les différences entre la version que vous utilisez aujourd’hui et la plus récente version offerte par Microsoft.La sécurité est une priorité des équipes de TI. De nouvelles menaces rendent plus que jamais difficile la tâche de sécuriser les données et les applications. Windows Server 2016 vous donne de nouvelles capacités de prévention des attaques et de détection des activités suspectes, grâce à des fonctionnalités de contrôle des accès privilégiés, de protection des machines virtuelles et de prémunition des plateformes contre les menaces émergentes.Aujourd’hui, les opérations des centres de données semblent faire l’o bjet de plus d’e xamens que de financement. De nouvelles applications rallongent les opérations et créent des arriérés en matièred’infrastructure qui peuvent ralentir les activités. Pour répondre aux attentes, les organisations de TI doivent faire plus avec moins, mais une infrastructure vieillissante qui manque d’automatisation peut devenir un obstacle. Alors que les organisations cherchent au-delà de la virtualisation de serveurs afin de devenir plus efficaces, elles peuvent se tourner vers les capacités de Windows Server 2016 pour répondre aux défis opérationnels et de sécurité, libérant ainsi des ressources de TI qui peuvent alors se concentrer sur la planification et l’innovation en matière de solutions futures qui favorisent le succès.Utilisez Windows Server 2016 pour compter sur de nouvelles façons de déployer etd’e xécuter les applications qui vous permettront de gagner des clients et de susciter leur participation, que cesoit localement ou dans Microsoft Azure. Le nuage facilite plus que jamais l’innovation avec les applications.Vous pouvez maintenant créer de nouvelles applications au moyen de conteneurs, de Nano Server et de microservices. Windows Server 2016 demeure également une excellente option pour les organisations quiexécutent toujours des applications client sur serveur.Entièrement pris en chargePassez à l’étape suivante. Pour en savoir plus, visitez le /WindowsServer2016。
windowsserver2016下域环境的搭建(完整版)

windowsserver2016下域环境的搭建(完整版)展开全文在搭建之前简单介绍一下基础知识:1.工作组:默认模式,人人平等,不方便管理2.域:人人不平等,集中管理,统一管理•域中计算机的分类:域控制器、成员服务器、客户机、独立服务器•域的部署:1.安装域控制器-就生成了域环境安装了活动目录-就生成了域控制器2.活动目录:Active Directory =AD是指域环境中提供目录服务的组件。
目录用于存储有关网络对象的信息。
活动目录存储的是网络中所有资源的快捷方式,用户可以通过寻找快捷方式来定位资源。
•活动目录:1.AD2.特点:集中管理/统一管理本次搭建过程需要在虚拟机下进行,需要虚拟机软件(例如VMware),windows 2016 Server(作为域控制器),windows 7 ,windows server 2008 R2.这里需要注意以下所有环境都是属于链接克隆的,所以可能会遇到SID相同的错误,可参考/tech/201908163.html来进行解决。
一、环境介绍二、搭建主域1.创建主域2.创建域普通用户三、搭建子域1.创建子域2.创建子域用户四、搭建辅域五、搭建独立域1.创建财务部电脑系统2.创建财务部电脑核心资料系统六、总结一、环境介绍:1.这里用拓扑图进行展示:2.所有环境配置如下(1)主域:计算机全名:AD01域:ip:10.10.88.6 255.255.255.0默认网关:10.10.88.1首选dns服务器:10.10.88.6DNS2:10.10.88.8计算机名:AD01域:用户名:ICE\Administrator(2)辅域:计算机全名:域:ip:10.10.88.8 255.255.255.0默认网关:10.10.88.1首选dns服务器:10.10.88.8DNS2:10.10.88.6(3)域用户:计算机名:域:ip:10.10.88.104 255.255.255.0默认网关:10.10.88.1首选dns服务器:10.10.88.6用户名:USER0\ice计算机全名:(4)子域:计算机全名:域:ip:10.10.88.12 255.255.255.0默认网关:10.10.88.1首选dns服务器:10.10.88.6DNS2:10.10.88.6财务部共享:IP 10.10.99.5 255.255.255.0 默认网关:10.10.99.1首选DNS服务器:10.10.99.5用户名:ZIYU0\administrator(5)子域用户:计算机名:ip:10.10.88.22 255.255.255.0默认网关:10.10.88.1首选dns服务器:10.10.88.6外网ip:(6)财务部电脑:ip:10.10.99.22 255.255.255.0默认网关:10.10.99.1DNS:10.10.99.5ip:172.16.5.2 255.255.255.0默认网关:172.16.5.1DNS:172.16.5.2(7)财务部存放核心资料:IP:172.16.5.5子网掩码:255.255.255.0网关:172.16.5.1DNS1:172.16.5.2二、搭建主域:1.设置ip2.点击服务器管理器–>添加角色和功能–>下一步–>选择基于角色或基于功能的安装之后点击下一步–>下一步3.勾选Active Directory 域服务–>点击添加功能–>下一步4.直到确认这步点击安装等待5.成功安装之后点击将此服务器提升为域控制器6.选择添加新林–>并定义根域名–>下一步7.直接点击下一步8.检查此计算机是否满足安装AD 域服务器的条件,满足可点击安装最后重启计算机即可!创建域普通用户:1.配置IP:2.点击计算机–>右键属性更改–>加入主域–>点击确定,输入主域的账户名与密码为:administrator bing (123)三、搭建子域1.配置IP:2.点击添加角色功能和向导选择ad域服务(与上一步相似)3.开始配置选择将域添加到现有林4.点默认下一步…直到安装界面点击安装5.安装成功之后自动重启计算机创建子域用户:1.配置IP:2.点击我的电脑右键属性–>选择域3.加入成功:四、搭建辅域1.安装完子域之后,为避免出现单点故障,需要再部署一台辅域控制器为备用配置ip:2.先与主域用户配置同样的方法(加入域):3.点击服务器管理器–>添加角色和功能–>与搭建子域操作类似,添加域服务4.点击下一步直到等待安装5.点击提升为域控制器:6.这里将域控制器添加到现有的域,凭证为主域的用户名和密码7.这里都为默认,填写完密码进行下一步8.路径都为默认,直接下一步9.先决条件成功之后直接安装即可10.最后辅域控服务器重启后检查DNS服务器是否已获取到主域控制器传输过来的DNS服务器配置,检查正常后需要把辅域控制器的DNS服务器_和的起始授权机构(S○A)区域传送设置成允许。
- 1、下载文档前请自行甄别文档内容的完整性,平台不提供额外的编辑、内容补充、找答案等附加服务。
- 2、"仅部分预览"的文档,不可在线预览部分如存在完整性等问题,可反馈申请退款(可完整预览的文档不适用该条件!)。
- 3、如文档侵犯您的权益,请联系客服反馈,我们会尽快为您处理(人工客服工作时间:9:00-18:30)。
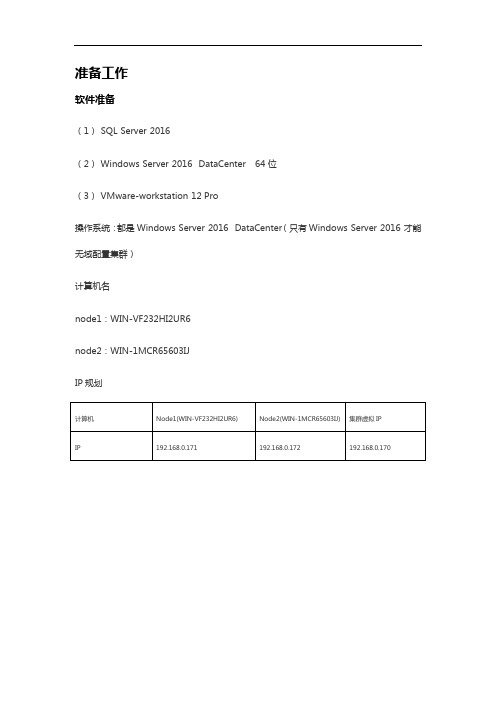
准备工作
软件准备
(1) SQL Server 2016
(2) Windows Server 2016 DataCenter 64位
(3) VMware-workstation 12 Pro
操作系统:都是Windows Server 2016 DataCenter(只有Windows Server 2016 才能无域配置集群)
计算机名
node1:WIN-VF232HI2UR6
node2:WIN-1MCR65603IJ
IP规划
第一步:安装故障转移集(所有节点均需要此操作)
第二步:添加DNS后缀(所有节点均需要此操作,且后缀需一致)
第三步:所有节点上以管理员方式运行Powershell,然后执行以下命令
new-itemproperty -path HKLM:\SOFTWARE\Microsoft\Windows\CurrentVersion\Policies\System -Name LocalAccountTokenFilterPolicy -Value 1
或者也可以手动添加此注册表项(项名:LocalAccountTokenFilterPolicy,DWEORD(32位)值,值为1)
HKEY_LOCAL_MACHINE\SOFTWARE\Microsoft\Windows\CurrentVersion\Policies\System
第四步:添加用户名,名称、密码均要一致,且隶属于Administrators
第五步:添加节点映射(注意要把集群名以及虚拟IP加上)
C:\Windows\System32\drivers\etc\host
第六步:允许应用通过防火墙
第七步:在其中一个节点上以管理员方式运行Powershell,然后执行以下命令
创建集群命令:
New-Cluster –Name <Cluster Name> -Node <Nodes to Cluster> -–StaticAddress <Cluster IP> -AdministrativeAccessPoint DNS
说明:windows server 2016创建故障不支持图文界面操作,只能通过PowerSehll创建
示例:New-Cluster –Name SQLAlwayOn -Node WIN-VF232HI2UR6,WIN-1MCR65603IJ –StaticAddress 192.168.0.170 -AdministrativeAccessPoint DNS
--获取集群名
Get-Cluster
--群集详情
Get-ClusterResource
搞定,故障转移群集配置OK
现在可以到“故障转移群集管理器”中查看群集。