打印机维修手册:WF-7620_WF-7610_WF-7110_Series
夏普复印机维修手册
夏普复印机维修手册(总12页)--本页仅作为文档封面,使用时请直接删除即可----内页可以根据需求调整合适字体及大小--进入工厂代码方式SF1118/1025/AR161/AR200进入维修代码方式C-插入-0-插入进入工厂代码方式C-Ca-0-C AR275/AR255进入维修代码方式#-插入-C-插入进入工厂代码方式#-插入-0-CM350/M450进入维修代码方式P-*-C-* 进入工厂代码方式P-*-0-CAR158进入维修代码方式C-浓度-C-浓度进入工厂代码方式C-浓度-C-倍率AR2818 M160 M205 M276进入维修代码方式#-插入-C-插入进入工厂代码方式*-插入-CA-插入数码复印机故障代码H2 00 热敏电阻断开(电阻到MCU板的连接、SIM14清)H3 00 定影部高温故障(温超240度、SIM5-2灯闪时:查接线。
常亮:查电源板、MCU板、灯控板)H4 00 定影部低温故障(温不足140度)(恒温器等)H5 01 连续5次T10D(T20D)未检测到卡纸(定影卡纸,安装等) 02 定影热敏电阴的检测异常CC 原稿检测传感器错误U2 04 EEPROM通信出错(ROM安装到位否) 11 计数器校正出错 12 调整值校正出错 20 机器速度代码数据出错(SIM26-57设的机种类型对否) 40 CRUM芯片通信出错(显影组件接触不良)U3 29 反射镜原始位置错误U7 00 RIC 板与本机连接U9 00 MCU-OPE间通信故障(接线、接地) 80 操作控制电路板故障(协议) 81 操作控制电路板故障(奇偶) 82 操作控制电路板故障(溢出) 84 操作控制电路板故障(框架) 88 操作控制电路板故障(超时) 99 操作面板语言出错U95 面板连接错误造成面板单独显示F5 02 复印灯点灯异常(灯或线路坏、反光镜上经常有水蒸汽、标准白板脏或变形、白板上面的三条黑线被抹掉,执行63-1 值不在B0左右,要调整CCD的高低或水平位置了。
佳能复印机维修手册1
(1) 打印机设置1) 基本设置基本设置根据用户需要修改或取消工厂设置的某些打印机功能。
a.警告提示页输出禁止禁止输出警告提示页时,设置此程序。
b.打印测试页输出禁止用来禁止打印测试页。
设定此项设置后,就不能再通过用户设置(测试页打印) 打印测试页。
c.A4/信纸类型自动转换需要用信纸进行打印,但没有信纸时此设置允许将打印内容切换到A4纸上进行打印。
*A4纸张缺少时,不允许将打印内容输出到信纸尺寸的纸张上。
d.保持数据删除此程序用来手动删除硬盘上所有数据。
e.内存满时的输出方法打印机数据内存满时,无法再进行更多内容打印。
所以,此时机器打印保存在内存中的数据。
此程序用来设置打印条件,工厂默认设置为“1”。
AR-C260M打印部分13 –92) 接口设置接口设置用来设置数据监视,以及控制数据到机器并行口和网络端口的输出。
a.端口选择方法用来选择机器的并行口和网络端口。
设置项目项目内容工作结束后改变打印完成后,端口选择被设置成自动。
I/O 超时后改变当达到I/O超时设置所设的时间( 以下所列项目) 时,端口选择变成自动选择。
b. 并行口允许设置此程序用来设置从并行口打印的允许/禁止。
c. USB端口允许设置此程序用来设置从USB端口打印的允许/禁止。
d. 网络端口允许设置此程序用来设置从网络端口打印的允许/禁止。
e. I/O 超时时间端口在打印数据接收等待状态时,经过一段时间端口没有收到打印数据后,此程序用来中断端口的连接,同时用来自动选择端口,并启动端口待机状态等待接收下次打印数据进行打印。
I/O 超时项表示打印数据接收等待状态到I/O端口超时之间的时间间隔。
3) 网络设置此设置用来将打印机设置成网络打印机。
网络设置可以设置以下这些项目。
改变设置项目后,终止管理者程序,关闭机器主开关,稍等片刻后重新打开机器主开关,设置被确认。
a.IP地址设置机器在TCP/IP网络协议环境下运行时,可以用此设置来设定机器的IP地址。
复印机整理维修手册全集(1)

复印机整理维修手册全集第一、复印机出现故障后的检查与维修步骤:复印机出现故障后,总有一种是主要的故障,抓住这个主要的故障进行分析,即可找到故障原因和排除的方法,我们一般可通过以下几条途径来查出故障的原因并排除之。
检修时应遵循先易后难的原则并逐步缩小范围,最后集中于某一点上。
一、了解情况维修机器前首先应认真询问操作者有关情况,如机器使用了多久,上次维修(保养)是在什么时间,维修(保养)效果如何,此次是什么情况下出现的故障。
还要认真翻阅机器有关维修记录,注意近期更换过哪些部件和消耗材料,有哪些到了使用期限而仍未更换过的零部件。
二、检查机器情况了解清楚以后,即可对机器进行全面检查,除了机内短路、打火等故障外,都可接通机器电源,复印几张,以便根据其效果进行进一步分析。
对于操作者提供的故障现象应特别注意,并在试机时细心观察。
三、准备工具在对机器进行检查的基础上,一般可对故障现象有个大致的了解,即可知道维修时需要哪些常用的专用工具,准备好将要使用的工具和材料后即可进行检查维修工作。
四、机器故障自检目前绝大多数复印机都装有彩色液晶显示面板,并设有卡纸等故障自检功能,一旦机器某一部件失灵或损坏,都能以字母数字告诉操作者。
比较常见的是故障代码,如NP系列复印机的故障代码为“E0~E8等,理光系列则以”U“加数字为代码,这些代码一出现分别表示印刷电路板,传感器、开关、接插件等工作状态异常,需要进行调整或更换。
作为机器的使用者,见到这些故障代码,应立即停机,关掉电源,请维修人员进行检修。
如果是自己修理,则必须找到与所使用机器型号相同的维修手册或维修说明书,在书中查到故障代码所表示的内容,再检查相应的零部件、电路板或电子元件。
第二、常见“共性”故障的检修由于复印机的种类和型号繁多,各制造厂生产的复印机各不相同,即使是同一个生产厂家生产的不同型号复印机也不完全一样。
因而在使用中所出现的故障现象还是有一些差别,这里仅对共性的、一般常见的故障及其成因和排除方法加以介绍。
打印机维修手册:TE15-0138A_ECC-CN WF3641_7621FW卤盲赂眉
第1页 共 1 页
版本: A
技术信息
爱普生(中国)有限公司-售后服务部
□支持 □手册 □工具
批准: 核准: 发送:
机型: WF-3641/ WF-7621
主题: Firmware 版本更新(To 26F5)
2015 年 5 月 28 日
2、 若服务机构受理类似上述现象的打印机,请首先更新固件程序。 3、 如果服务机构接到类似上述复印操作方面问题的咨询,请先了解打印机的固
件程序版本。如机器固件版本为是 24F4 或之前的版本,请指导用户联网进行 固件程序的更新操作。
发送至下列单位: ■ECC Branch Office ■ASP 科 ■Service Centers
□Dealers
< 结束 >Βιβλιοθήκη 崔岩刘 海翔
刘 爱侠
一. 涉及机型
WF-3641 WF-7621
二. 原因
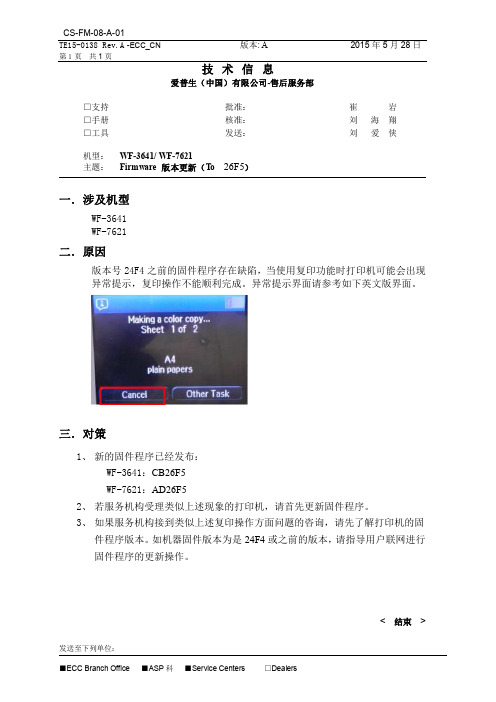
版本号 24F4 之前的固件程序存在缺陷,当使用复印功能时打印机可能会出现 异常提示,复印操作不能顺利完成。异常提示界面请参考如下英文版界面。
三. 对策
1、 新的固件程序已经发布: WF-3641:CB26F5 WF-7621:AD26F5
HP Officejet 7110宽带格式电子打印机说明书
DatasheetHP Officejet 7110Wide Format ePrinterDo more in-house with this affordable,reliable HP ePrinter.Create professional-qualitymarketing materials from postcard size to A3+.Share the performance with wireless networking 1and the ability to print from virtually anywhere.2Print speed :Up to 15ppm black ISO (A4);Up to 8ppm colour ISO (A4)Duty cycle :Up to 12,000pages (A4)RMPV :200to 800pages (print)Create professional-quality materials with affordable wide-format printing.●Do more in-house –print high-impact marketing materials from postcard to A3+with this wide format printer.●Print professional-quality colour for up to 50%lower cost per page than lasers.3●Produce borderless brochures,flyers,brochures and more for less than a print shop.4●Print affordably with four individual inks –only replace the ones you need.Maximise productivity –handle large print jobs with this compact printer.●Stay productive –load up the 250-sheet paper tray and leave long print jobs to themselves.●Minimise intervention –optional high capacity XL ink cartridges available for frequent printing.5●Keep your printer close to your desk or neatly out of the way –compact design fits where you need it.●Enjoy worry-free performance from a printer designed for volumes of up to 800pages per month.Connect,print and stay productive –at the office or on the go 2.●Add this high performance printer to your wireless network and share with other wireless-enabled PCs.1●Enjoy the flexibility of being able to print from smartphones or tablets from virtually anywhere with HP ePrint.2●Share the performance across small workgroups by adding this versatile printer to your Ethernet network.●Give your smartphone a print button –use the free HP ePrint app to print directly from your mobile device.Conserve resources without sacrificing performance.●Save energy without sacrificing performance –this device is ENERGY STAR®qualified and rated EPEAT®Bronze.●Save up to 50%on paper costs with optional automatic two-sided printing.6●Reduce your impact –easily recycle your Original HP ink cartridges for free through HP Planet Partners.7Data sheet|HP Officejet7110Wide Format ePrinter Technical specificationsPrint technology HP Thermal InkjetPrint speed Up to15ppm ISO black(A4);Up to8ppm ISO colour(A4)Either after first page or after first set of ISO test pages.For details see/go/printerclaimsStandard connectivity1USB2.0;1Ethernet;1Wireless802.11b/g/nWireless capability YesMobile printing capability HP ePrint,Apple AirPrint™Media Handling Input capacity:Up to250sheetsMaximum:Up to75sheetsDuplex printing:Automatic(optional)First page out time As fast as15sec black(A4,ready);As fast as19sec colour(A4,ready)Monthly duty cycle Up to12000pages(A4);Recommended monthly page volume:200to800pages Print languages HP PCL3GUI,HP PCL3EnhancedPrint capabilities Borderless printing:Yes(up to330x483mm)Print Area Print margins:Top:3.3mm(duplex16mm);Bottom:3.3mm(duplex16mm);Left:3.3mm;Right:3.3mmPrint resolution Up to600x1200dpi black;Up to4800x1200optimised dpi colour(when printingfrom a computer on selected HP photo papers and1200input dpi)colour Memory16MB(ROM);128MB(DDR RAM)Printer smart software features Orientation:Portrait/Landscape;Print on Both Sides:None/Flip on Long Edge/Flipon Short Edge;Page Order:Front to Back/Back to Front;Page Format:Pages perSheet:1,2,4,6,9,16(i.e.N-up printing)/Booklet/Draw Borders;Print in Greyscale:Off/High Quality Greyscale/Black Ink Only;Borderless Printing:Print withBorder/Print Borderless;Output Quality:Draft/Normal/Best/Maximum dpi;HP RealLife Technologies:Off/OnControl panel4ink cartridge lights,4buttons with lights(Resume,Wireless,ePrint&Power)and2button(Cancel&Configuration)and1network indicator lightCompatible operating systems Windows10(32-bit/64-bit),Windows8.1(32-bit/64-bit),Windows8(32-bit/64-bit),Windows7(32-bit/64-bit),Windows Vista(32-bit/64-bit);Mac OS Xv10.6,OS X Lion,OS X Mountain Lion;Linux(for more information,see/hplip-web/index.html)Minimum system requirements Windows:Windows10,8.1,8,7:1GHz32-bit(x86)or64-bit(x64)processor,2GBavailable hard disk space,Internet Explorer,CD-ROM/DVD or Internet,USB;Windows Vista:800MHz32-bit(x86)or64-bit(x64)processor,2GB available harddisk space,Internet Explorer,CD-ROM/DVD or Internet,USB;Mac OS X v10.6,OS XLion,OS X Mountain Lion:1GB available hard disk space,CD-ROM/DVD-ROM orInternet,USB;Linux(for more information,see/hplip-web/index.html)Mac:Mac OS X v10.6,OS X Lion,OS X Mountain Lion:Intel®Core™processor,1GBfree hard disk space,CD-ROM/DVD or Internet,USB.What's in the box CR768A HP Officejet7110Wide Format ePrinter;HP932Setup Black Officejet InkCartridge(~400pages);HP933Setup Ink Cartridges(Cyan,Magenta,Yellow)(~330pages);printer software and user’s guide on CD-ROM;getting started guide;setup poster;power cableAccessories C7G18A HP Inkjet Automatic Two-sided Printing AccessorySupplies CN053AE HP932XL High Yield Black Original Ink Cartridge~1,000pagesCN054AE HP933XL High Yield Cyan Original Ink Cartridge~825pagesCN055AE HP933XL High Yield Magenta Original Ink Cartridge~825pagesCN056AE HP933XL High Yield Yellow Original Ink Cartridge~825pagesCN057AE HP932Black Original Ink Cartridge~400pagesCR711AE HP933XL Officejet Value Pack-75sht/A4/210x297mm Per cartridge:~825pages cyan,~825pages magenta,~825pages yellowFor information on cartridge page and photo yields,see /go/pageyield Software included HP Printer Software,Bing Bar for HP(includes HP Smart Print),HP Officejet7110series Help,Product Improvement Study for HP Officejet7110series,HP Update,Shop for Supplies Online,HP Photo CreationsMedia weight60to250g/m²;HP Premium Plus Photo Paper(300g/m²)is also supported Media types Paper(brochure,inkjet,plain),photo,envelopes,cards(index)Media sizes A3,A3+,A4,A6,B4(JIS),B5(JIS),10x15cm,13x18cm,Envelope C5,EnvelopeC6,EnvelopeDL;Custom:76.2x127to330.2x482.6mmPrinter dimensions(W x D x H)585x419x189mm(trays closed)Package dimensions(W x D x H)687x500x270mmPrinter Weight8.5kgPackage weight12.7kgOperating environment Temperature:5to40°C,Humidity:25to75%RH non-condensingStorage Temperature:-40to60°C,Humidity:5to90%RH non-condensingAcoustics Acoustic power emissions:6.5B(A);Acoustic pressure emissions:51dB(A)Power Requirements:Input voltage:100to240VAC(+/-10%),50/60Hz(+/-3Hz)Consumption:30.3watts(maximum),25.4(active),1.92watts(standby),1.04watts(sleep),0.31watts(manual-Off)Certifications CE(European Union)Country of origin Made in ChinaWarranty Standard one-year HP limited hardware warranty.Three-year HP limited hardwarewarranty after registration within60days of purchase(see/eu/3yearwarranty).Warranty and support options vary by product,country and local legal requirements.Service and support UG194E-HP3year Care Pack w/Standard Exchange for Officejet Printers(Available in all Europe,Middle East,Africa countries)UG070E-HP3year Care Pack w/Next Day Exchange for Officejet Printers(Available in Austria,Belgium,Denmark,Finland,France,Germany,Ireland,Italy,Netherlands,Norway,Portugal,Spain,Sweden,Switzerland,UK,Czech Republic,Greece,Hungary,Poland,Slovakia).1Wireless performance is dependent upon physical environment and distance from access point.Wireless operations are compatible with2.4GHz routers only.2Requires an Internet connection to HP web-enabled printer and HP ePrint account registration(for a list of eligible printers,supported documents,and image types,and other HP ePrint details,see /go/eprintcenter).Mobile devices require Internet connection and email capability.May require wireless access point.Separately purchased data plans or usage fees may apply.Print times and connection speeds may vary.3Cost-per-page(CPP)claims are based on the majority of multi-pass colour laser printers<€200excluding VAT as of May2012.For details,see /eu/ojfacts.ISO yield with highest-capacity cartridges based on continuous printing;see /go/learnaboutsupplies.4Based on marketing materials printed on HP Color LaserJet CP2020/CM2320series and HP Officejet Pro family products compared with average retail copy shop pricing for print runs up to2,500pages.Actual results may vary.Source:InfoTrends Cost of Print Studies,June2011.Visit /go/printcosts for more details.5Not included,please purchase separately.6Automatic two-sided printing capability not included;please purchase separately.7Programme availability varies.Original HP cartridge return and recycling is currently available in47countries,territories,and regions in Asia,Europe,and North and South America through the HP Planet Partners programme.For more information,visit /recycle./ukThe product could differ from the images shown.©Copyright2015Hewlett-Packard Development Company,L.P.The information contained herein is subject to change without notice.The only warranties for HP products andservices are set forth in the express warranty statements accompanying such products and services.Nothing herein should be construed as constituting an additional warranty.HP shall not be liable for technical or editorialerrors or omissions contained herein.4AA4-4574EEE,09/15。
夏普复印机维修手册
夏普复印机维修手册(总12页)--本页仅作为文档封面,使用时请直接删除即可----内页可以根据需求调整合适字体及大小--进入工厂代码方式SF1118/1025/AR161/AR200进入维修代码方式C-插入-0-插入进入工厂代码方式C-Ca-0-C AR275/AR255进入维修代码方式#-插入-C-插入进入工厂代码方式#-插入-0-CM350/M450进入维修代码方式P-*-C-* 进入工厂代码方式P-*-0-CAR158进入维修代码方式C-浓度-C-浓度进入工厂代码方式C-浓度-C-倍率AR2818 M160 M205 M276进入维修代码方式#-插入-C-插入进入工厂代码方式*-插入-CA-插入数码复印机故障代码H2 00 热敏电阻断开(电阻到MCU板的连接、SIM14清)H3 00 定影部高温故障(温超240度、SIM5-2灯闪时:查接线。
常亮:查电源板、MCU板、灯控板)H4 00 定影部低温故障(温不足140度)(恒温器等)H5 01 连续5次T10D(T20D)未检测到卡纸(定影卡纸,安装等) 02 定影热敏电阴的检测异常CC 原稿检测传感器错误U2 04 EEPROM通信出错(ROM安装到位否) 11 计数器校正出错 12 调整值校正出错 20 机器速度代码数据出错(SIM26-57设的机种类型对否) 40 CRUM芯片通信出错(显影组件接触不良)U3 29 反射镜原始位置错误U7 00 RIC 板与本机连接U9 00 MCU-OPE间通信故障(接线、接地) 80 操作控制电路板故障(协议) 81 操作控制电路板故障(奇偶) 82 操作控制电路板故障(溢出) 84 操作控制电路板故障(框架) 88 操作控制电路板故障(超时) 99 操作面板语言出错U95 面板连接错误造成面板单独显示F5 02 复印灯点灯异常(灯或线路坏、反光镜上经常有水蒸汽、标准白板脏或变形、白板上面的三条黑线被抹掉,执行63-1 值不在B0左右,要调整CCD的高低或水平位置了。
epson打印机维修技术手册第二部

一:清EEPROM 及其它面板操作速查(打印机内存全清)1.针打系列LQ-300k+换行/换页+进纸/退纸+暂停+电源LX-300+换行/换页+进纸/退纸+暂停+电源LQ-580K :换行/换页+进退纸+暂停+电源.LQ-630K :清EEPROM:换行/换页+进退纸+暂停+电源. 设置: 进纸/退纸 + 暂停 + 电源键盘锁定: 换行/换页 + 暂停 + 5秒以上,响二声。
解锁: 进纸/退纸 + 换行/换页 + ON.LQ-670K:高速+切纸电+源LQ-680K :换行/换页+进纸/退纸+暂停+电源LQ-1600K3/K3+,2600K字体+切纸+电源LQ-1600K4/K4+字体+切纸+电源LQ-2600K字体 + 切纸 + 电源DLQ-1000KLine Feed + Form Feed + Micro Adjust ↓ + 电源DLQ-3000K清EEPROM :Selec Type + Paper Select + Pause + 电源DLQ-3500KLF/FF + Load/Eject + Pause + 电源2.喷墨系列COLOR切换 + 字体 + 进/退纸 + 暂停+电源COLOR II切换+暂停+进纸+彩清洗+电源中国专业办公技术论坛h t t p ://w w w .o a c h n .n e tCOLOR 300进纸+清洗+电源, 再按清洗10秒COLOR 400/440/460进纸灯闪几秒后,按 1、 进/退纸清EEPROM 2、 清洗10秒,清废墨计数器COLOR 500进纸 + 黑头清洗 + 彩头清洗 + on ,再按进纸键3秒COLOR 600/640/66O/670进纸+清洗+电源 缺纸灯闪5秒后,再按1、进/退纸清EEPROM及timer IC2、清洗10秒,清废墨计数器COLOR 800/850初始化:进纸+黑头清洗+彩头清洗+ON ,松手再按彩头清洗10秒COLOR 1520K切换+进/退纸+换行/换页+微调↑+ 电源COLOR 3000暂停 + 换行/换页 + 微调↓ + 电源SP870/1270进/退纸 + 清洗 + on 然后按1、 /退纸清EEPROM及timer IC2、 清洗10秒,清废墨计数器SP 950:Paper + Roll paper + on 1. Paper (EEPROM)SP 2100/2200Paper + Roll paper + on 1. Paper (EEPROM)MJ-510进/退纸 + 清洗 + on 松手后再按进/退纸10秒至进纸灯和缺墨灯闪MJ-850切换 + 暂停 + 电源, 再按进/退纸至省墨灯与暂停灯闪烁,再按切换MJ-1000切换 + 省墨/压缩 + 进/退纸 + 暂停 + 电源MJ-1500K/K+切换+微调↓+暂停+换行/换页+ONproxl(xl+) alt +font+load/eject+pause+开机stylus1000 切换+省墨/压缩+进纸/退纸+暂停+开机中国专业办公技术论坛h t t p ://w w w .o a c h n .n e tEPSON 彩喷机需清零的机型分以下几种:1。
打印机维修手册:WF-3720_Series_C

SERVICE MANUALColor Inkjet PrinterEpson WF-3720 SeriesCONFIDENTIALNotice:☐All rights reserved. No part of this manual may be reproduced, stored in a retrieval system, or transmitted in any form or by any means, electronic, mechanical, photocopying, recording, or otherwise, without the prior written permission of SEIKO EPSON CORPORATION.☐All effort have been made to ensure the accuracy of the contents of this manual. However, should any errors be detected, SEIKO EPSON would greatly appreciate being informed of them.☐The contents of this manual are subject to change without notice.☐The above not withstanding SEIKO EPSON CORPORATION can assume no responsibility for any errors in this manual or the consequences thereof.EPSON is a registered trademark of SEIKO EPSON CORPORATION.Note:Other product names used herein are for identification purpose only and may be trademarks or registered trademarks of their respective owners. EPSON disclaims any and all rights in those marks.Copyright 2017SEIKO EPSON CORPORATIONP・CS Quality Assurance DepartmentSafety PrecautionsAll safety procedures described here shall be strictly adhered to by all parties servicing and maintaining this product.DANGERStrictly observe the following cautions. Failure to comply could result in serious bodily injury or loss of life. 1.Always disconnect the product from the power source and peripheral devices when servicing the product orperforming maintenance.2.When performing works described in this manual, do not connect to a power source until instructed to do so.Connecting to a power source causes high voltage in the power supply unit and some electronic components even if the product power switch is off. If you need to perform the work with the power cable connected to a power source, use extreme caution to avoid electrical shock.WARNINGStrictly observe the following cautions. Failure to comply may lead to personal injury or loss of life.1.Always wear protective goggles for disassembly and reassembly to protect your eyes from ink in working. Ifany ink gets in your eyes, wash your eyes with clean water and consult a doctor immediately.2.When using compressed air products; such as air duster, for cleaning during repair and maintenance, the useof such products containing flammable gas is prohibited.PRECAUTIONSStrictly observe the following cautions. Failure to comply may lead to personal injury or damage of the product.1.Repairs on Epson product should be performed only by an Epson certified repair technician.2.No work should be performed on this product by persons unfamiliar with basic safety knowledge required forelectrician.3.The power rating of this product is indicated on the serial number/rating plate. Never connect this product tothe power source whose voltages is different from the rated voltage.4.Replace malfunctioning components only with those components provided or approved by Epson;introduction of second-source ICs or other non-approved components may damage the product and void any applicable Epson warranty.5.The capacitors on the Main Board may be electrically charged right after the power turns off or after drivingmotors which generates counter electromotive force such as when rotating the PF Roller or when moving the CR Unit. There is a risk to damage the Main Board if the Head FFC is short-circuited with the capacitors on the Main Board electrically charged, therefore, after the power turns off or after motors are driven, leave the printer untouched for approximately 30 seconds to discharge the capacitors before starting disassembly/ reassembly.6.To prevent the circuit boards from short-circuiting, be careful about the following when handling FFC orcables.⏹When handling FFC, take care not to let the terminal section of FFC touch metal parts.⏹When connecting cables/FFC to the connectors on circuit boards, connect them straight to the connectors to avoidslant insertion.7.In order to protect sensitive microprocessors and circuitry, use static discharge equipment, such as anti-staticwrist straps, when accessing internal components.8.Do not tilt this product immediately after initial ink charge, especially after performing the ink charge severaltimes. Doing so may cause ink to leak from the product because it may take some time for the waste ink pads to completely absorb ink wasted due to the ink charge.9.Never touch the ink or wasted ink with bare hands. If ink comes into contact with your skin, wash it off withsoap and water immediately. If you have a skin irritation, consult a doctor immediately.10.When disassembling or assembling this product, make sure to wear gloves to avoid injuries from metal partswith sharp edges.e only recommended tools for disassembling, assembling or adjusting the printer.12.Observe the specified torque when tightening screws.13.Be extremely careful not to scratch or contaminate the following parts.⏹Nozzle plate of the printhead⏹CR Scale⏹PF Scale⏹Coated surface of the PF Roller⏹Gears⏹Rollers⏹LCD⏹Scanner Sensor⏹Exterior parts14.Never use oil or grease other than those specified in this manual. Use of different types of oil or grease maydamage the component or give bad influence on the printer function.15.Apply the specified amount of grease described in this manual.16.Make the specified adjustments when you disassemble the printer.17.When cleaning this product, follow the procedure described in this manual.18.When transporting this product after filling the ink in the printhead, pack the printer without removing theink cartridges in order to prevent the printhead from drying out.19.Make sure to install antivirus software in the computers used for the service support activities.20.Keep the virus pattern file of antivirus software up-to-date.21.When disassembling/reassembling this product, if you find adhesive power of the double-sided tape whichsecure the parts or FFC is not enough, replace the tape with new one and attach it correctly to the specified points where the parts or FFC should be secured.22.Unless otherwise specified in this manual, the labels attached on the returned product should be transferred tothe corresponding attachment positions on the new one referring to the labels on the returned product.About This ManualThis manual, consists of the following chapters, is intended for repair service personnel and includes information necessary for properly performing maintenance and servicing the product.CHAPTER 1. TROUBLESHOOTINGDescribes the step-by-step procedures for the troubleshooting.CHAPTER 2. DISASSEMBLY / REASSEMBLYDescribes the disassembly/reassembly procedures for main parts/units of the product, and provides the standard operation time for servicing the product.CHAPTER 3. ADJUSTMENTDescribes the required adjustments for servicing the product.CHAPTER 4. MAINTENANCEDescribes maintenance items and procedures for servicing the product.CHAPTER 5. REFURBISHMENTDescribes refurbishing work of the product and its purpose.CHAPTER 6. APPENDIXProvides the following additional information for reference:∙Connector Diagram∙Protection for TransportationSymbols Used in this ManualVarious symbols are used throughout this manual either to provide additional information on a specific topic or to warn of possible danger present during a procedure or an action. Pay attention to all symbols when they are used, and always read explanation thoroughly and follow the instructions.Indicates an operating or maintenance procedure, practice or condition that, if not strictly observed,could result in serious injury or loss of life.Indicates an operating or maintenance procedure, practice, or condition that, if not strictly observed,could result in bodily injury, damage or malfunction of equipment.May indicate an operating or maintenance procedure, practice or condition that is necessary toaccomplish a task efficiently. It may also provide additional information that is related to a specificsubject, or comment on the results achieved through a previous action.For Chapter 2 “Disassembly/Reassembly”, symbols other than indicated above are used to show additional information for disassembly/reassembly. For the details on those symbols, see "2.3 Disassembly/Reassembly Procedures (p47)".Revision StatusRevision Date of Issue DescriptionA Mar 10, 2017First ReleaseB May 26, 2017Revised□Chapter 2 ■ Made change in "2.3 Disassembly/Reassembly Procedures (p47)" ・ Made change in "2.3.3.1 Disassembly/Reassembly Flowchart (p49)" ■ Made change in "2.4 Detailed Disassembly/Reassembly Procedure for each Part/Unit(p54)" ・ Made change in " Housing Upper (p54)"□Chapter 3 ■ Made change in "3.2 Adjustment Program (p64)" ・ Made change in "3.2.2 Adjustment and Inspection List (p64)"C December 15,2017Revised□ Chapter 1 ■ Made change in "1.3 Fatal Error Code List (p13)" ・ Made change in "1.3.2.5 Printer (Head/CSIC) (p21)" “HCS error” has been added.□ Chapter 2 ■ Made change in "2.1 Overview (p38)" ・ Made change in "2.1.4 Standard Operation Time for servicing the product (p42)" “Stacker Support Front Assy” has been added. ■ Made change in "2.3 Disassembly/Reassembly Procedures (p47)" ・ Made change in "2.3.3.1 Disassembly/Reassembly Flowchart (p49)" “Stacker Support Front Assy” has been added. ■ Made change in "2.4 Detailed Disassembly/Reassembly Procedure for each Part/Unit (p54)" ・ Made change in " SCN Hinge Assy (p54)" ・ Made change in " Printer Mechanism (p56)" ・" Stacker Support Front Assy (p57)" has been added. ■ Made change in "2.5 Routing FFCs/cables (p58)" ・ Made change in " Panel Assy (p58)" ・ Made change in " ADF/SCN Unit (p58)" ・ Made change in " Ink System (p58)" ・ Made change in " Power Supply Unit (p58)" ・ Made change in " Head FFC/CSIC FFC (p59)" ・ Made change in " Speaker Cable (p60)"□ Chapter 3 ■ Made change in "3.2 Adjustment Program (p64)" ・ Made change in "3.2.2 Adjustment and Inspection List (p64)" ・ Made change in "3.2.3 Details of the Adjustment Program (p69)"Made change in “PTS delay adjustment”. ■ Made change in "3.3 Mechanism Adjustment / Check (p76)" ・ Made change in "3.3.1 Checking the Platen Gap (p76)"□ Chapter 5 ■ Made change in "6.2 Protection for Transportation (p91)" ・"6.2.5 Preventing the shipping Liquid from leakage from Printhead (p95)" has been added.ContentsChapter 1 Troubleshooting1.1Troubleshooting (10)1.1.1Troubleshooting Workflow (10)1.2Power-On Sequence (12)1.3Fatal Error Code List (13)1.3.1Displaying the Fatal Error Code (13)1.3.2Fatal Error Code (14)1.3.2.1ADF/Scanner (14)1.3.2.2Printer (CR) (17)1.3.2.3Printer (PF) (18)1.3.2.4Printer (I/S) (20)1.3.2.5Printer (Head/CSIC) (21)1.3.2.6Printer (Others) (22)1.3.2.7System Error (23)1.4Service Support Mode (24)1.4.1Status Sheet Information (27)Chapter 2 Disassembly/Reassembly2.1Overview (38)2.1.1Tools (38)2.1.2Jigs (38)2.1.3Locations of the Parts/Units (39)2.1.4Standard Operation Time for servicing the product (42)2.2Common cautions when disassembling/reassembling the Product (45)2.3Disassembly/Reassembly Procedures (47)2.3.1Functional differences between models and component parts (47)2.3.2Disassembly Flowchart (48)2.3.2.1Disassembly/Reassembly Flowchart (49)2.4Detailed Disassembly/Reassembly Procedure for each Part/Unit (54)2.5Routing FFCs/cables (58)Chapter 3 Adjustment3.1Required Adjustments (62)3.2Adjustment Program (64)3.2.1Operating Environment (64)3.2.2Adjustment and Inspection List (64)3.2.3Details of the Adjustment Program (69)3.3Mechanism Adjustment / Check (76)3.3.1Checking the Platen Gap (76)3.3.1.1Preparation (76)3.3.1.2Confirmation procedure (78)3.3.2MAC Address Setting (79)Chapter 4 Maintenance4.1Cleaning (81)4.1.1Cleaning the CR Unit (81)4.1.2Cleaning the Exterior Parts/inside of the printer (82)4.2Lubrication (83)4.2.1Lubrication Points and Instructions (84)Chapter 5 Refurbishment5.1Overview (88)5.1.1Ink Discharge (88)Chapter 6 Appendix6.1Connector Diagram (90)6.2Protection for Transportation (91)6.2.1Securing the CR Unit (91)6.2.2Securing the SCN/ADF Unit (92)6.2.3Securing the Panel Unit (93)6.2.4Securing the ADF Paper Support (94)6.2.5Preventing the shipping Liquid from leakage from Printhead (95)CHAPTER1TROUBLESHOOTINGEPSON WF-3720 Series Revision C1.1 TroubleshootingThis section describes the troubleshooting workflow.1.1.1 Troubleshooting WorkflowThe following page describes the troubleshooting workflow. Follow the flow when troubleshooting problems.Figure 1-1.Troubleshooting Workflow (1)⏹This flowchart is compiled based on the following contents.•Our experience regarding the quality problem•ESK’s repair data•Printer Mechanism specification for WF-3720 Series⏹If the reason for the return is evident, first check the phenomenon user claims recurs,then proceed to the troubleshooting.5What is returned reason?2Standby condition 3Is printing operationfinished without error?StartTurn on the printer 14(p 11)(p 11)(p 11)(p 11)(p 11)Copy an image*:In case of “Not Trouble Found”, check fatal error code.6(p 11)ADF/Scannerunit failurePrinter failure only Yes No YesNo Yes Yes No Yes Yes NoNo No No Yes Does printer turn on thepower?Is Power-on sequencefinished without error?Print check pattern Is printing operationfinished without trouble?Is scanning operationfinished withouttrouble?Is ADF operation finished without trouble?Copy an image by ADFADF failure?Finish *EPSON WF-3720 Series Revision CFigure 1-2.Troubleshooting Workflow (2)The power-on sequence does not start (p 10)Error is indicated during power-on sequence (p 10)Error is indicated during printing nozzle check pattern (p 10)Fatal errorPlease refer to " 1.3 Fatal Error Code List (p13)" for troubleshooting.Maintenance error[Occurrence Condition]This error occurs when maintenance counter inEEPROM exceeds the specified value.[Major Occurrence Timing]•Power-on timing •Print start timing •Paper eject timing •Cleaning timing•Ink cartridge replacement timing [Major Troubleshooting]•Replace Maintenance Box •Paper Guide Lower Porous Pad replacement•Maintenance counter reset (only Paper Guide Lower Porous Pad)Ink End error[Occurrence Condition]This error occurs when ink in Ink cartridge is empty.[Major Occurrence Timing]•Power-on timing •Print start timing •Print timing •Cleaning timing•Ink cartridge replacement timing [Major Troubleshooting]Ink cartridge replacement [NOTE]If an error occurs during printing, the page where the error occurred is skipped and the printing resumes from the next page.Ink cartridge detection error[Occurrence Condition]This error occurs when Inkcartridge data is incorrect or Ink cartridge is not recognized correctly.[Major Occurrence Timing]•Power-on timing •Print start timing •Cleaning timing•Ink cartridge replacement timing [Major Troubleshooting]•Remove and reinstall Ink cartridge.•Ink cartridge replacement •CSIC Terminal replacement •CR Contact Module replacement•Head FFC replacement •Main Board replacementPaper Jam errorThis error occurs when printing the nozzle check pattern. please refer to " Paper Jam error".No Power *[Presumable Cause]•Power Supply Unit damage•Main Board damage •Panel Unit damage [Major Troubleshooting]•Power Supply Unit replacement •Main Board replacement•Panel Unit replacement2* : If the printer can turn on but turns off right away, the protection circuit may cut off the power due to an error such as a circuit failure.1No Ink cartridge error[Occurrence Condition]This error occurs when Ink cartridge is not installed.[Major Occurrence Timing]At power-on[Major Troubleshooting]Install Ink cartridgeCR fixing material error[Occurrence Condition]When the printer moves to the 80-digit side during the power-on sequence before initial ink charge, the printer detects foreign material.[Major Occurrence Timing]Power-on timing(before initial ink charge)[Major Troubleshooting]Remove the CR fixing material, and install the ink cartridge.Paper Jam error[Occurrence Condition]This error occurs when top/bottom of paper is not detected by PE Sensor in the specified steps of paper feeding operation correctly.[Major Occurrence Timing]•Power-on timing •Paper loading timing •Paper eject timing •Duplex print timing[Major Troubleshooting]1Remove the jammed paper by opening Scanner Unit or Printer Cover.2Push “Start” button.3If not resolved by 2), check the following.•Foreign material, bits of paper •Part come-off •PE Sensor Lever •PE Sensor•Float of Paper Guide Front Porous Pad •Main Board •PW Sensor [NOTE]* If an error occurs during printing, the page where the error occurred is skipped and the printing resumes from the next page.* If an error occurs during duplex printing, the following are performed.•If an error occurs during the front face of duplex printing, the page where the error occurred and the next page are skipped and the printing resumes from the page after the next.•If an error occurs during the back face of duplex printing, the page where the error occurred is skipped and the printing resumes from the next page.No Paper error[Occurrence Condition]This error occurs when top of paper is not detected by PE Sensor in the specified steps of paper loading operation correctly.[Major Occurrence Timing]Paper loading timing[Major Troubleshooting]1Put paper in cassette and push “START” button.2If a paper stops before reaching PE Sensor, remove it and check the paper condition.3A)If no damage on the paper, set edge guide correctly after putting paper in cassette and push “PRINT” button again.B)If damage on the paper, check foreign materials / parts come- off / parts transformation in paper path.4If not resolved by 3-A) & 3-B), check the following.•Pickup Roller •Duplex Unit •PE Sensor Lever •Main Board •PF Motor •Cassette AssyDouble Feed error/Stack col-lapsed error[Occurrence Condition]This error occurs on the following cases.• A paper is ejected without printing during paper loading operation.•Actual paper length is longer than theoretical one. [Major Occurrence Timing]Paper loading timing[Major Troubleshooting]•Set the paper again.•PE Sensor Lever replacement •PE Sensor replacement •PW Sensor replacement •Main Board replacement [NOTE]This error occurs only for manual duplex print.No Paper Cassette error[Occurrence Condition]This error occurs if one of the cassettes is not installed.[Major Occurrence Timing]Paper loading timing (Front loading)[Major Troubleshooting]Install the Cassette Assy.3Paper Size Unmatch error[Occurrence Condition]This error occurs when actual paper size is not matched to theoretical one.[Major Occurrence Timing]•Duplex print timing •FAX data print timing [Major Troubleshooting]1Put correct sized paper in cassette, and push “START” button.2If not resolved by step 1), check the following points.•PE Sensor Lever •PE Sensor •PW Sensor •Main BoardProblems related to print result or during printing (p 10)Scanning cannot be performedsuccessfully (p 10)ADF does not operatenormally (p 10)Poor Printing[Phenomenon]•Poor printing quality •Ink stain on paper •Dot missing•Paper eject without printing [Presumable Cause]•Driver / Panel mis-setting •Contamination of CR scale •Contamination of Printhead Cover•Printhead damage•Ink clogging of Printhead •Contamination on Cap Unit / Wiper of Ink system Assy •Ink system Assy damage •Float of Paper Guide Front Porous Pad •Narrow PG•PE Lever damage •PE Sensor damage •PW Sensor damage[Major Troubleshooting]•Driver / Panel re-setting •CR Scale replacement •Printhead cover cleaning •Printhead cleaning•Ink cartridge replacement •Printhead replacement•Rubber cleaning of Cap Unit of Ink system Assy•Ink system Assy replacement •Paper Guide Front Porous Pad re-installation •PG readjustment •Printer Mechanism replacement•PE Lever replacement •PE Sensor replacement •PW Sensor replacement •Main Board replacementPoor Paper Loading[Presumable Cause]•Use of 3rd party media •Edge guide mis-setting •Foreign material •Part come-off•Contamination of paper feed roller (Duplex Unit) •Cassette Assy damage•Pickup Roller deterioration, contamination•Contamination of PF roller [Major Troubleshooting]•Recommendation of EPSON media•Edge guide re-setting •Foreign material removal •Part re-installation •PF Roller replacement •Cassette Assy replacementAbnormal Noise[Presumable Cause]•Foreign material •Insufficient grease •Gear damage[Major Troubleshooting]•Foreign material removal •Lubrication of grease •Gear replacementADF failure[Phenomenon]•No paper feed •Double feed •Paper jam •Paper skew[Presumable Cause]•Wear of Pickup Roller •Wear of ADF Pad Assy •Gear damage•Scanner Motor damage•Contamination of Scanner Glass •ADF Paper Support Assy damage•Foreign material•ADF Cover Assy damage •Wear of EJ Roller •ADF Sensors damage [Major Troubleshooting]•ADF Cover Assy replacement •ADF Pad Assy replacement •Scanner Glass cleaning •ADF Paper Support Assy replacement•Foreign material removal •Scanner Unit replacement •ADF Unit replacement45Scanner failure[Presumable Cause]•Contamination of Scanner Glass•Contamination of Document Pad•CIS Unit bonding failure •CIS Unit damage•Scanner Motor damage [Major Troubleshooting]•Scanner Glass cleaning •Document Pad cleaning •Document Pad replacement •Scanner Unit replacement61.2 Power-On SequenceThis section describes the power-on sequences for this product. The preconditions are as follows.☐Normal power-on sequence (See Table 1-1.)⏹Turning on the printer after turning it off without an error and the power was turned off normally at the previousshut down.⏹Initial ink charge has finished and every cartridge has sufficient ink.⏹No paper on the paper path.⏹The Printhead is capped by the cap of the Ink System.⏹CR Lock is engaged normally.⏹Maintenance error recovery has never been performed.Table 1-1.Power-on SequenceRed:CR lock is setWhite:CR lock is released*2:If it cannot be initialized, the fatal error occurs.*3:Executed when the detected temperature is under 5 o C (41o F) by the thermistor on the Printhead.*4:The cleaning or empty suction operation may occur depending on situations.1.3 Fatal Error Code ListThis section describes how to check the fatal error code, description, and the possible causes.1.3.1 Displaying the Fatal Error CodeThe fatal error code is stored in the EEPROM on the Main Board and can be read out using the Adjustment Program. This product displays a printer fatal error code automatically on the panel LCD when a printer fatal error occurs.Figure 1-3.Displaying the Fatal Error CodeError CodeLCD display screen image1.3.2 Fatal Error CodeThis section describes the fatal error code and the possible cause for this product.☐" ADF/Scanner (p14)"☐" Printer (CR) (p17)"☐" Printer (PF) (p18)"☐" Printer (I/S) (p20)"☐" Printer (Head/CSIC) (p21)"☐" Printer (Others) (p22)"☐" System Error (p23)"1.3.2.1ADF/ScannerError code Error name Possible cause Confirmation procedureConnectorNo.100016HP detectionfailure⏹The scanner CR could not return to its home.1.Damage or disengaging of wheel train of thedrive mechanism2.Disengaging, fraying, jumping of the timing belt⏹Failed to read the white standard/home patterns3.Disconnection, break, skew or damage of thescanner FFC4.Failure of the CIS unit5.Failure of the scanner housing6.Failure of the main board1.With the document cover opened, turn thepower on.2.Check if the CIS moves to the left to readthe white standard/home patterns.3.Check if the CIS's emission color is white(not greenish, reddish, or bluish).If the light does not look like white, checkthe scanner FFC for damage,disconnection or skew.4.Replace the scanner unit with a new one.5.Replace the main board with a new one.Main boardCN804CN801100017Contactdetectiondistanceexceeded⏹The scanner CR cannot completely reach the home(left side)1.Damage or disengaging of wheel train of thedrive mechanism⏹Failed to read the scanner encoder2.Damage or skew of the scanner FFC3.Failure of the CIS unit4.Failure of the scanner housing5.Failure of the main board1.With the document cover opened, turn thepower on.2.Check if the CIS (CR) reaches (comes incontact with) the left side.3.Check the wheel train of the drivemechanism for damage.4.Check the scanner FFC for damage,disconnection or skew.5.Replace the scanner unit with a new one.6.Replace the main board with a new one.Main boardCN804CN801100018Opposite sidecontactdetectiondistanceexceeded error⏹The scanner CR cannot completely reach theopposite side of the home (right side)1.Damage or disengaging of wheel train of thedrive mechanism⏹Failed to read the scanner encoder2.Damage or skew of the scanner FFC3.Failure of the CIS unit4.Failure of the scanner housing5.Failure of the main board1.With the document cover opened, turn thepower on.2.Check if the CIS (CR) reaches (comes incontact with) the right side.3.Check the wheel train of the drivemechanism for damage.4.Check the scanner FFC for damage,disconnection or skew.5.Replace the scanner unit with a new one.6.Replace the main board with a new one.Main boardCN804CN801100020Measurementerror⏹Overload of the scanner drive mechanism⏹Failure of the scanner motor1.Check if the CIS (CR) moves or not.1)Check the timing belt for fraying orlooseness.2)Check the wheel train of the drivemechanism for damage.3.Replace the scanner unit with a new one.4.Replace the main board with a new one.---100032LED lightfailure⏹Failure of the CIS LED light (RGB)1.Disconnection, break, skew or damage of thescanner FFC2.Failure of the CIS unit3.Failure of the main board1.Check the color of the LED at power-on.2.Check the scanner FFC for damage,disconnection or skew.3.Replace the scanner unit with a new one.4.Replace the main board with a new one.Main boardCN801100054Paper jam error ⏹No jammed paper is remaining but the sensor doesnot turn off1.Failure of the ADF PE sensor2.Failure of the cable⏹Jammed paper is remaining⏹The paper feed rollers and paper conveying rollersslip too much☐At power-on, during paper feed, during scanning1.Open the Cover,Paper Guide,LD,ADF andcheck if paper exist or not.2.Open the Document Support ADF andcheck if paper exist or not.3.Open the ADF and check if paper exist ornot.4.Check if the paper sensor lever moves upand down.5.Replace the ADF unit with a new one.6.Replace the scanner unit with a new one.7.Replace the main board with a new one.Main boardCN802100065FB PID excessspeed error⏹Failed to read the scanner encoder1.Contamination of the scanner encoder scale2.Damage or skew of the scanner FFC3.Failure of the scanner encoder sensor⏹Failure of the scanner motor driver4.Failure of the main board1.Check the scanner FFC for damage,disconnection or skew.2.Replace the scanner unit with a new one.3.Replace the main board with a new one.Main boardCN804CN801100066FB PID reverseerror⏹Operation failure of the scanner motor1.The scanning operation was stopped by;•Disengaging of the scanner CR•Disengaging of the scanner motor pulley orcracking of the scanner motor gears⏹Failed to read the scanner encoder2.Contamination of the scanner encoder3.Damage or skew of the scanner FFC4.Failure of the scanner encoder sensor5.Failure of the main board1.Check the scanner FFC for damage,disconnection or skew.2.Replace the scanner unit with a new one.3.Replace the main board with a new one.Main boardCN804CN801100067FB PID lockerror⏹The scanner motor did not run1.The scanning operation was stopped by;•Disengaging of the scanner CR•Disengaging of the scanner motor pulley orcracking of the scanner motor gears⏹Failed to read the CR motor encoder2.Contamination of the scanner encoder3.Damage or skew of the scanner FFC4.Failure of the scanner encoder sensor5.Failure of the scanner motor6.Failure of the main board1.Check the scanner FFC for damage,disconnection or skew.2.Replace the scanner unit with a new one.3.Replace the main board with a new one.Main boardCN804CN801100068FB PIDaccelerationlock error⏹The scanner motor did not run1.The scanning operation was stopped by;•Disengaging of the scanner CR•Disengaging of the scanner motor pulley orcracking of the scanner motor gears⏹Failed to read the scanner motor encoder2.Contamination of the scanner encoder3.Damage or skew of the scanner FFC4.Failure of the scanner encoder sensor5.Failure of the scanner motor6.Failure of the main board1.Check the scanner FFC for damage,disconnection or skew.2.Replace the scanner unit with a new one.3.Replace the main board with a new one.Main boardCN804CN801100069FB PID excessload error⏹The scanner motor stopped running in the middle ofthe operation1.The scanning operation was stopped by;•Disengaging of the scanner CR•Disengaging of the scanner motor pulley orcracking of the scanner motor gears⏹Failed to read the scanner motor encoder2.Contamination of the scanner encoder3.Disconnection, break, skew or damage of thescanner FFC4.Failure of the scanner encoder sensor5.Failure of the scanner motor6.Failure of the main board1.Check the scanner FFC for damage,disconnection or skew.2.Replace the scanner unit with a new one.3.Replace the main board with a new one.Main boardCN804CN801。
- 1、下载文档前请自行甄别文档内容的完整性,平台不提供额外的编辑、内容补充、找答案等附加服务。
- 2、"仅部分预览"的文档,不可在线预览部分如存在完整性等问题,可反馈申请退款(可完整预览的文档不适用该条件!)。
- 3、如文档侵犯您的权益,请联系客服反馈,我们会尽快为您处理(人工客服工作时间:9:00-18:30)。
CONFIDENTIALColor Inkjet PrinterEpson WF-7620 Series Epson WF-7610 Series Epson WF-7110 SeriesNotice:All rights reserved. No part of this manual may be reproduced, stored in a retrieval system, or transmitted in any form or by any means, electronic, mechanical, photocopying, recording, or otherwise, without the prior written permission of SEIKO EPSON CORPORATION.All effort have been made to ensure the accuracy of the contents of this manual. However, should any errors be detected, SEIKO EPSON would greatly appreciate being informed of them.The contents of this manual are subject to change without notice.The above not withstanding SEIKO EPSON CORPORATION can assume no responsibility for any errors in this manual or the consequences thereof.EPSON is a registered trademark of SEIKO EPSON CORPORATION.Note:Other product names used herein are for identification purpose only and may be trademarks or registered trademarks of their respective owners. EPSON disclaims any and all rights in those marks.Copyright © 2014 SEIKO EPSON CORPORATIONPrinter CS Quality Assurance DepartmentSafety PrecautionsAll safety procedures described here shall be strictly adhered to by all parties servicing and maintaining this product.DANGERStrictly observe the following cautions. Failure to comply could result in serious bodily injury or loss of life. 1.Always disconnect the product from the power source and peripheral devices when servicing the product orperforming maintenance.2.When performing works described in this manual, do not connect to a power source until instructed to do so.Connecting to a power source causes high voltage in the power supply unit and some electronic components even if the product power switch is off. If you need to perform the work with the power cable connected to a power source, use extreme caution to avoid electrical shock.WARNINGStrictly observe the following cautions. Failure to comply may lead to personal injury or loss of life.1.Always wear protective goggles for disassembly and reassembly to protect your eyes from ink in working. Ifany ink gets in your eyes, wash your eyes with clean water and consult a doctor immediately.2.When using compressed air products; such as air duster, for cleaning during repair and maintenance, the useof such products containing flammable gas is prohibited.PRECAUTIONSStrictly observe the following cautions. Failure to comply may lead to personal injury or damage of the product.1.Repairs on Epson product should be performed only by an Epson certified repair technician.2.No work should be performed on this product by persons unfamiliar with basic safety knowledge required forelectrician.3.The power rating of this product is indicated on the serial number/rating plate. Never connect this product tothe power source whose voltages is different from the rated voltage.4.Replace malfunctioning components only with those components provided or approved by Epson;introduction of second-source ICs or other non-approved components may damage the product and void any applicable Epson warranty.5.The capacitors on the Main Board may be electrically charged right after the power turns off or after drivingmotors which generates counter electromotive force such as when rotating the PF Roller or when moving the CR Unit. There is a risk to damage the Main Board if the Head FFC is short-circuited with the capacitors on the Main Board electrically charged, therefore, after the power turns off or after motors are driven, leave the printer untouched for approximately 30 seconds to discharge the capacitors before starting disassembly/ reassembly.6.To prevent the circuit boards from short-circuiting, be careful about the following when handling FFC orcables.When handling FFC, take care not to let the terminal section of FFC touch metal parts.When connecting cables/FFC to the connectors on circuit boards, connect them straight to the connectors to avoid slant insertion.7.In order to protect sensitive microprocessors and circuitry, use static discharge equipment, such as anti-staticwrist straps, when accessing internal components.8.Do not tilt this product immediately after initial ink charge, especially after performing the ink charge severaltimes. Doing so may cause ink to leak from the product because it may take some time for the waste ink pads to completely absorb ink wasted due to the ink charge.9.Never touch the ink or wasted ink with bare hands. If ink comes into contact with your skin, wash it off withsoap and water immediately. If you have a skin irritation, consult a doctor immediately.10.When disassembling or assembling this product, make sure to wear gloves to avoid injuries from metal partswith sharp edges.e only recommended tools for disassembling, assembling or adjusting the printer.12.Observe the specified torque when tightening screws.13.Be extremely careful not to scratch or contaminate the following parts.Nozzle plate of the printheadCR ScalePF ScaleCoated surface of the PF RollerGearsRollersLCDScanner SensorExterior parts14.Never use oil or grease other than those specified in this manual. Use of different types of oil or grease maydamage the component or give bad influence on the printer function.15.Apply the specified amount of grease described in this manual.16.Make the specified adjustments when you disassemble the printer.17.When cleaning this product, follow the procedure described in this manual.18.When transporting this product after filling the ink in the printhead, pack the printer without removing theink cartridges in order to prevent the printhead from drying out.19.Make sure to install antivirus software in the computers used for the service support activities.20.Keep the virus pattern file of antivirus software up-to-date.21.When disassembling/reassembling this product, if you find adhesive power of the double-sided tape whichsecure the parts or FFC is not enough, replace the tape with new one and attach it correctly to the specified points where the parts or FFC should be secured.22.Unless otherwise specified in this manual, the labels attached on the returned product should be transferred tothe corresponding attachment positions on the new one referring to the labels on the returned product.About This ManualThis manual, consists of the following chapters, is intended for repair service personnel and includes information necessary for properly performing maintenance and servicing the product.CHAPTER 1. TROUBLESHOOTINGDescribes the step-by-step procedures for the troubleshooting.CHAPTER 2. DISASSEMBLY / REASSEMBLYDescribes the disassembly/reassembly procedures for main parts/units of the product, and provides the standard operation time for servicing the product.CHAPTER 3. ADJUSTMENTDescribes the required adjustments for servicing the product.CHAPTER 4. MAINTENANCEDescribes maintenance items and procedures for servicing the product.CHAPTER 5. APPENDIXProvides the following additional information for reference:•Connector Diagram•Protection for TransportationSymbols Used in this ManualVarious symbols are used throughout this manual either to provide additional information on a specific topic or to warn of possible danger present during a procedure or an action. Pay attention to all symbols when they are used, and always read explanation thoroughly and follow the instructions.Indicates an operating or maintenance procedure, practice or condition that, if not strictly observed,could result in serious injury or loss of life.Indicates an operating or maintenance procedure, practice, or condition that, if not strictly observed,could result in bodily injury, damage or malfunction of equipment.May indicate an operating or maintenance procedure, practice or condition that is necessary toaccomplish a task efficiently. It may also provide additional information that is related to a specificsubject, or comment on the results achieved through a previous action.For Chapter 2 “Disassembly/Reassembly”, symbols other than indicated above are used to show additional information for disassembly/reassembly. For the details on those symbols, see "2.2 Disassembly/Reassembly Procedures (p28)".Revision StatusA July 26, 2013First ReleaseB April 21, 2014Revise the contentsChapter 1Made change the description in "1.3 Fatal Error Code List (p15)""1.4 Status sheet (p20)" has been added.Chapter 3Made change the description in "3.2.2.2 Preparation (p65)"ContentsChapter 1 Troubleshooting1.1Troubleshooting (10)1.1.1Troubleshooting Workflow (10)1.2Power-On Sequence (13)1.3Fatal Error Code List (15)1.4Status sheet (20)1.4.1Start method of Inspection Mode (20)1.4.2Description of Status sheet (Non-disclosed information to user) (21)Chapter 2 Disassembly/Reassembly2.1Overview (24)2.1.1Tools (24)2.1.2Jigs (24)2.1.3Standard Operation Time for servicing the product (25)2.2Disassembly/Reassembly Procedures (28)2.2.1Functional differences between models and component parts (28)2.2.2Functional differences between models and component parts (30)2.2.3Disassembly Flowchart (31)2.2.3.1Housing Part (WF-7620/WF-7610 Series) (32)2.2.3.2Housing Part (WF-7110 Series) (33)2.2.3.3Printer Mechanism Part (34)2.3Detailed Disassembly/Reassembly Procedure for each Part/Unit (38)2.4Routing FFCs/cables (47)Chapter 3 Adjustment3.1Required Adjustments (53)3.2Details of Adjustments (61)3.2.1PF/CR Timing Belt Tension Measurement (61)3.2.1.1PF Timing Belt Tension Measurement (62)3.2.1.2CR Timing Belt Tension Check (63)3.2.2PG Adjustment (64)3.2.2.1PG Adjustment procedure (64)3.2.2.2Preparation (65)3.2.2.3PG adjustment procedure (68)3.2.2.4Checking the Platen Gap (70)3.2.3Touch Panel Adjustment (WF-7620/7610 Series only) (71)Chapter 4 Maintenance4.1Cleaning (76)4.1.1Cleaning the CR Unit (76)4.1.2Cleaning the Exterior Parts/inside of the printer (77)4.2Lubrication (78)4.3Lubrication Points and Instructions (79)4.4Firmware Update (82)Chapter 5 Appendix5.1Connector Diagram (85)75.2Protection for Transportation 865.2.1Securing the CR Unit 86CHAPTER1101.1 TroubleshootingThis section describes the troubleshooting workflow.1.1.1 Troubleshooting WorkflowThe following page describes the troubleshooting workflow. Follow the flow when troubleshooting problems.Figure 1-1.Troubleshooting Workflow (1) This flowchart is compiled based on the following contents.•Our experience regarding the quality problem•ESK’s repair data•Printer Mechanism specification for WF-7620/WF-7610/WF-7110 SeriesWF-7110 Series does not have the Scanner/ADF unit, so the troubleshooting for theScanner/ADF unit is not applicable to this series.If the reason for the return is evident, first check the phenomenon user claims recurs,then proceed to the troubleshooting.5What is returned reason?2Standby condition 3Is printing operationfinished without error?Turn on the printer 14(p 11)(p 11)(p 11)(p 12)(p 12)Copy an image*:In case of “Not Trouble Found”, check fatal error code.6(p 12)ADF/Scannerunit failurePrinter failure only Yes No YesNo Yes Yes No Yes Yes NoNo No No Yes Does printer turn on thepower?Is Power-on sequencefinished without error?Print check pattern Is printing operationfinished without trouble?Is scanning operationfinished withouttrouble?Is ADF operation finished without trouble?Copy an image by ADFADF failure?Please refer to " 1.3 Fatal Error Code List (p15)"for troubleshooting.[Occurrence Condition]This error occurs when maintenance counter inEEPROM exceeds the specified value.[Major Occurrence Timing]•Power-on timing •Print start timing •Paper eject timing •Cleaning timing•Ink cartridge replacement timing [Major Troubleshooting]•Replace Maintenance Box •Paper Guide Lower Porous Pad replacement•Maintenance counter reset (only Paper Guide Lower Porous Pad)[Occurrence Condition]This error occurs whenMaintenance Box is not installed.[Major Occurrence Timing]•At power-on•Maintenance Box monitoring timing [Major Troubleshooting]Turn the printer off once and install Maintenance Box again, and turn the power on.[Occurrence Condition]This error occurs whenMaintenance Box data is incorrect or it is not recognized correctly.[Major Occurrence Timing]•Power-on timing•Maintenance Box replacement timing•Maintenance Box monitoring timing [Major Troubleshooting]•Remove and reinstall Maintenance Box•Maintenance Box replacement •Relay Board CSIC Terminal replacement•Relay Board Assy replacement •Relay Board FFC replacement •Main Board replacement[Occurrence Condition]This error occurs when Inkcartridge data is incorrect or Ink cartridge is not recognized correctly.[Major Occurrence Timing]•Power-on timing •Print start timing •Cleaning timing•Ink cartridge replacement timing [Major Troubleshooting]•Remove and reinstall Ink cartridge.•Ink cartridge replacement •CSIC Terminal replacement •CR Contact Module replacement•Head FFC replacement •Main Board replacement[Presumable Cause]•Power Supply Unit damage•Main Board damage •Panel Unit damage [Major Troubleshooting]•Power Supply Unit replacement •Main Board replacement•Panel Unit replacement2* : If the printer can turn on but turns off right away, the protection circuit may cut off the power due to an error such as a circuit failure.The power-on sequence does not start (p 10)1Error is indicated during power-on sequence (p 10)[Occurrence Condition]This error occurs when ink in Ink cartridge is empty.[Major Occurrence Timing]•Power-on timing •Print start timing •Print timing •Cleaning timing•Ink cartridge replacement timing [Major Troubleshooting]Ink cartridge replacement [NOTE]If an error occurs duringprinting, the page where the error occurred is skipped and the printing resumes from the next page.[Occurrence Condition]This error occurs when Ink cartridge is not installed.[Major Occurrence Timing]At power-on[Major Troubleshooting]Install Ink cartridge[Occurrence Condition]This error occurs when Scanner Unit (Printer Cover) is open.[Major Occurrence Timing]•At power-on •During printing[Major Troubleshooting]•Close Scanner Unit (Printer Cover) replacement•Scanner Unit (Printer Cover) replacement•Cover Open Sensor replacement•Main Board replacement[Occurrence Condition]This error occurs if a paper jam occurs during the power-on sequence before initial ink charge.[Major Occurrence Timing]Power-on timing(before initial ink charge)[Major Troubleshooting]Open the scanner unit and remove the CR fixing tape.Please refer to " Paper Jam error".[Occurrence Condition]This error occurs when top/bottom of paper is not detected by PE Sensor in the specified steps of paper feeding operation correctly.[Major Occurrence Timing]•Power-on timing •Paper loading timing •Paper eject timing •Duplex print timing[Major Troubleshooting]1remove the jammed paper by opening Scanner Unit or Printer Cover.2Push “Start” button.3If not resolved by 2), check the following.•Foreign material, bits of paper •Part come-off •PE Lever •PE Sensor•Float of Paper Guide Front Porous Pad •Main Board •PW Sensor [NOTE]* If an error occurs during printing, the page where the error occurred is skipped and the printing resumes from the next page.* If an error occurs during duplex printing, the following are performed.•If an error occurs during the front face of duplex printing, the page where the error occurred and the next page are skipped and the printing resumes from the page after the next.•If an error occurs during the back face of duplex printing, the page where the error occurred is skipped and the printing resumes from the next page.[Occurrence Condition]This error occurs when top of paper is not detected by PE Sensor in the specified steps of paper loading operation correctly.[Major Occurrence Timing]Paper loading timing[Major Troubleshooting]1Put paper in cassette and push “START” button.2If a paper stops before reaching PE Sensor, remove it and check the paper condition.3A)If no damage on the paper, set edge guide correctly after putting paper in cassette and push “PRINT” button again.B)If damage on the paper, check foreign materials / parts come- off / parts transformation in paper path.4If not resolved by 3-A) & 3-B), check the following.•Pickup Roller •Duplex Unit •PE Sensor •Main Board •PF Motor •Casette Assy[Occurrence Condition]This error occurs on the following cases.• A paper is ejected without printing during paper loading operation.•Actual paper length is longer than theoretical one. [Major Occurrence Timing]Paper loading timing [Major Troubleshooting]•PE Lever replacement •PE Sensor replacement •PW Sensor replacement •Main Board replacement [NOTE]This error occurs only for manual duplex print.[Occurrence Condition]This error occurs if one of the cassettes is not installed.[Major Occurrence Timing]Paper loading timing (Front loading)[Major Troubleshooting]Install the Cassette Assy.3Error is indicated during printing nozzle check pattern (p 10)[Occurrence Condition]When printing from Manual Tray (MSF unit), this error occurs if paper is not loaded at the time of data transmission.[Major Occurrence Timing]Paper loading timing (Rear loading)[Major Troubleshooting]•Put paper in the Manual Tray (MSF unit).•PE Sensor replacement •PW Sensor replacement •Main Board replacement[Occurrence Condition]This error occurs if the printer cannot receive the manual feed request.[Major Occurrence Timing]Paper loading timing (Rear loading)[Major Troubleshooting]•Send the print data.•Main Board replacement[Occurrence Condition]This error occurs when the PE Sensor detects paper before manual feed or when paper is inserted too much.[Major Occurrence Timing]Print start timing (Rear loading)[Major Troubleshooting]•Eject paper with panel operation, and load paper again.•Main Board replacement •PE Sensor replacement •PE Lever replacement[Occurrence Condition]This error occurs during manual feed if the PE Sensor detects paper but the paper is not fed by auto loading.[Major Occurrence Timing]Print start timing (Rear loading)[Major Troubleshooting]Eject paper with panel operation, and load paper again.[Occurrence Condition]This error occurs when actual paper size is not matched to theoretical one.[Major Occurrence Timing]•Duplex print timing •FAX data print timing [Major Troubleshooting]1Put correct sized paper in cassette, and push “START” button.2If not resolved by step 1), check the following points.•PE Lever •PE Sensor •PW Sensor •Main Board[Phenomenon]•Poor printing quality•Ink stain on paper•Dot missing•Paper eject without printing [Presumable Cause]•Driver / Panel mis-setting •Contamination of CR scale •Contamination of Printhead Cover•Printhead damage•Ink clogging of Printhead •Contamination on Cap Unit / Wiper of Ink system Assy •Ink system Assy damage •Float of Paper Guide Front Porous Pad•Narrow PG•PE Lever damage•PE Sensor damage•PW Sensor damage[Major Troubleshooting]•Driver / Panel re-setting •CR Scale replacement •Printhead cover cleaning •Printhead cleaning•Ink cartridge replacement •Printhead replacement •Rubber cleaning of Cap Unit of Ink system Assy•Ink system Assy replacement •Paper Guide Front Porous Pad re-installation•PG readjustment•Printer Mechanismreplacement•PE Lever replacement•PE Sensor replacement•PW Sensor replacement [Presumable Cause]•Use of 3rd party media•Edge guide mis-setting•Foreign material•Part come-off•Contamination of paper feedroller (Duplex Unit)•Cassette Assy damage•Pickup Roller deterioration,contamination•Contamination of PF roller[Major Troubleshooting]•Recommendation of EPSONmedia•Edge guide re-setting•Foreign material removal•Part re-installation•PF Roller replacement•Cassette Assy replacement•Pickup Roller replacement[Presumable Cause]•Foreign material•Insufficient grease•Gear damage[Major Troubleshooting]•Foreign material removal•Lubrication of grease•Gear replacement[Phenomenon]•No paper feed•Double feed•Paper jam•Paper skew[Presumable Cause]•Wear of Pickup Roller•Wear of ADF Pad Assy•Gear damage•ADF Motor damage•Contamination of Scanner Glass•ADF Paper Support Assydamage•Foreign material•ADF Cover Assy damage•Wear of EJ Roller•ADF Sensors damage[Major Troubleshooting]•ADF Cover Assy replacement•ADF Pad Assy replacement•Scanner Glass cleaning•ADF Paper Support Assyreplacement•Foreign material removal•ADF Unit replacement45 Problems related to print result or during printing(p 10)Scanning cannot be performed successfully (p 10)[Presumable Cause]•Contamination of Scanner Glass•Contamination of Document Pad•CIS Unit bonding failure •CIS Unit damage •Scanner Motor damage[Major Troubleshooting]•Scanner Glass cleaning •Document Pad cleaning •Document Pad replacement •CIS Unit replacement •Scanner Motor replacement 6ADF does not operate normally (p 10)1.2 Power-On SequenceThis section describes the power-on sequences for this product. The preconditions are as follows. Normal power-on sequence (See Table 1-1.)Turning on the printer after turning it off without an error.Initial ink charge has finished and every cartridge has sufficient ink.No paper on the paper path.The Printhead is capped by the cap of the Ink System and the CR Lock is engaged normally.Table 1-1.Normal Power-on SequenceClockwise:Paper is fed normallyCounterclockwise:Paper is fed backward*2:The conditions of the CR lock are as follows.Red CR lock is setWhite CR lock is released*3:If it cannot be initialized, the fatal error occurs.*4:Confirm that the CR lock is not get stuck in the gap of the carriage or any other parts preventing the carriage from moving.*5:Eject paper if any.*6:Executed when the detected temperature is under 5 o C (41o F) by the thermistor on the Printhead.*7:The empty suction operation may occur depending on situations.The power-on sequence shown in Table 1-1 is the sequence for when the previous power-off is complete normally as indicated in the conditions. If the previous power-off ends abnormally, operations including initialization of APG and such are performed in the following steps.Table 1-1.Normal Power-on Sequence1Prior to Step 4-1Initializes the APG Lever.2Prior to Step 4-2The CR Unit evacuates to the 130-digit side once, and the PF Roller rotates clockwise once, then the cap unit of the Ink System is lowered, and then the CR Unit touches the Right Frame once again for confirmation.3Prior to Step 4-3The CR Unit moves to its CR Lock Position (130-digit side), and the PF Roller rotates counterclockwise to engage the CR Lock. Then the CR Unit touches the CR Lock for confirmation.4Prior to Step 5-5Initializes the APG unit (set to PG1 position). 5Prior to Step 7-1Measurement of the CR Motor1.3 Fatal Error Code ListThis section describes the fatal error code and the possible cause for this product.Printer fatal error listFatal errors related to the ADF/Scanner unit do not occur for WF-7110 Series because this model does not have ADF/Scanner unit.Table 1-2.Fatal Error List (Printer)ADF/Scanner0x01ADF PID excess speed error•ADF Encoder failure (contaminated/detached scale, Encoder Board failure)•Motor driver failure (Main Board failure)0x02ADF PID reverse error •ADF Encoder failure (contaminated/detached scale, Encoder Board failure)•Paper jam0x03ADF PID lock error•ADF Encoder failure (contaminated/detached scale, Encoder Board failure)•ADF Motor failure •Paper jam•Cable disconnection 0x04ADF PID acceleration lock detection error0x05ADF PID excess load error 0X 06ADF PID DRIVING TIME ERROR •Main Board failure0x09ADF BS+ excess speed error•ADF Encoder failure (contaminated/detached scale, Encoder Board failure)•Motor driver failure (Main Board failure)0x0A ADF BS+ reverse error •ADF Encoder failure (contaminated/detached scale, Encoder Board failure)•Paper jam0x0BADF BS+ lock error•ADF Encoder failure (contaminated/detached scale, Encoder Board failure)•ADF Motor failure•ADF drive overload (paper jam/foreign object)•Cable disconnection 0x0D ADF BS+ excess load error0x0E ADF BS+ driving time error •Main Board failure 0x10HP detection error•CIS Unit failure•Scanner Housing failure •Main Board failure 0x11Contact detection distance exceeded error•CIS Unit failure•Scanner Housing failure (Including wrong attachment of the origin mark)•Main Board failure•Scanner FFC failure / Scanner FFC connection failure •Scanner Motor failure / Scanner Motor connection failure0x12Opposite side contact detection distance exceeded error•CIS Unit failure•Scanner Housing failure (Including wrong attachment of the origin mark)•Main Board failure•Scanner FFC failure / Scanner FFC connection failure •Scanner Motor failure / Scanner Motor connection failure0x13Opposite side wrong contact detection distance error•CIS Unit failure•Scanner Housing failure (Including wrong attachment of the origin mark)•Main Board failure•Scanner FFC failure / Scanner FFC connection failure •Scanner Motor failure / Scanner Motor connection failure0x14Measurement failure error •Scanner drive mechanism was overloaded.ADF/Scanner 0x20LED light error•CIS Unit failure•Main Board failure0x30Option error•Main Board failure0x36Paper jam error•Paper jam•Foreign object0x41FB PID excess speed• ADF Encoder failure (contaminated/detached scale, Encoder Boardfailure)•Motor driver failure (Main Board failure)0x42FB PID reverse•ADF Encoder failure (contaminated/detached scale, Encoder Boardfailure)•Paper jam0x43FB PID lock•ADF Encoder failure (contaminated/detached scale, Encoder Boardfailure)•ADF Motor failure•ADF drive mechanism overload (assembling failure, lubrication failure)•Cable disconnection0x44FB PID acceleration lock0x45FB PID excess load0x46FB PID driving time•Main Board failure0x49FB BS+ excess speed•ADF Encoder failure (contaminated/detached scale, Encoder Boardfailure)•Motor driver failure (Main Board failure)0x4A FB BS+ reverse•ADF Encoder failure (contaminated/detached scale, Encoder Boardfailure)0x4B FB BS+ lock•ADF Encoder failure (contaminated/detached scale, Encoder Boardfailure)•ADF Motor failure•ADF drive mechanism overload (assembling failure, lubrication failure)•Cable disconnection0x4D FB BS+ excess load0x4E FB BS+ driving time•Main Board failure0x51Automatic judgment fatal error 1---*0x52Automatic judgment fatal error 20x53Automatic judgment fatal error 30x54Automatic judgment fatal error 40x55Automatic judgment fatal error 5Printer 0x60HP error•Paper jam•Foreign object•Deformation of the Main Frame0x63Contact error at ink replacement timing(Power-off)•Paper jam•Foreign object•Deformation of the Main Frame0x67APG target position acquisition error•APG Motor failure•APG Sensor failure•Main Board failure0x68Contact error at valve initialization •Ink system failure•Main Board failure0x69Contact error at I/S clutch operation0x6B PF runaway error•PF Encoder failure•Motor driver failure0x7F Inspection mode error---* 0x81PIS environmental light error•Ambient light。