Nighthawk 夜鹰 AC1900 智能无线路由器 R7000 安装指南
无线路由器安装及使用指导手册

无线路由器安装及使用指导手册一、前言随着互联网的普及,无线路由器已经成为了现代家庭必备的设备之一。
无线路由器可以将宽带信号无线传输,方便我们在家中的各个角落都能享受到高速网络的便利。
本手册将为您提供无线路由器的安装及使用指导,帮助您正确、便捷地使用这一设备。
二、无线路由器安装步骤1.准备工作在安装无线路由器之前,您需要确保已经正确接入了宽带。
同时,您还需要找到一个稳定的电源插座,以供无线路由器使用。
2.连接a)首先,将宽带调制解调器的电源线连接到电源插座,并将宽带信号线连接到调制解调器的WAN口。
b)然后,将无线路由器的电源线连接到电源插座,并将路由器的WAN口与调制解调器的LAN口连接。
请确保连接稳固。
3.开机和设置a)当完成连接后,打开无线路由器的电源开关,等待其启动。
b)使用电脑或移动设备连接到无线路由器的无线网络,打开浏览器,在地址栏输入默认网关地址,按回车键。
c)根据无线路由器背面或说明书中的默认用户名和密码,登录路由器管理界面。
d)按照引导,进行基本设置,包括无线网络名称(SSID)、密码以及其他网络配置。
4.连接其他设备在设置完成后,您可以使用该无线网络连接其他设备,如电脑、手机、平板等。
只需搜索无线网络名称(SSID),输入密码即可成功连接。
三、无线路由器使用技巧1.网络安全为了保护您的无线网络安全,建议您设置一个强密码,并定期更换密码。
另外,您还可以开启WPA2-PSK加密,限制无线网络的接入者。
2.信号覆盖若您希望无线网络信号覆盖更广的范围,可以选择适当的位置放置无线路由器。
通常情况下,将无线路由器放置在距离常用设备较近的地方,避免信号被墙壁等物体阻挡。
3.固件更新定期检查无线路由器是否有新的固件版本发布,并及时进行升级。
固件更新通常能够修复一些已知问题,并提升设备性能。
4.访客网络如有需要,您可以启用访客网络功能,提供给访客一个独立的网络接入,以保护您的主要网络安全。
5.定期重启建议您定期重启无线路由器,以保持网络的稳定性和性能。
美国网件 AC1900 WiFi 扩展器 EX7000 快速入门指南说明书

AC1900 WiFi Access PointModel EX7000Quick Start Guide¾To set up the access point:1. Use an Ethernet cable to connect your modem router or router to an Ethernet port on the access point.Note: Do not connect your access point directly to your DSL or cable modem. The access point does not function as a router. If your network includes a DHCP server, you can connect the access point to a switch or hub that is connected to the DHCP server.2. Open the WiFi network manager on your WiFi-enabled computer or mobile device and find and connect to the access point WiFinetwork called NETGEAR_EXT.When you are connected to the access point, the Device to Extender LED lights solid green.Note: If you connect your computer to the access point using an Ethernet connection, you cannot set up the access point. You can connect your computer and other devices to the access point using an Ethernet connection after the setup.3. Launch a web browser.4. Enter in the address field of the browser.A login page displays.5. Click the NEW EXTENDER SETUP button.The Extender Setup page displays.6. Complete the Extender Setup page and click the NEXT button.7. Click the ACCESS POINT button.The access point checks for an Internet connection.8. Set the network name (SSID), security option, and password for each band, and click the NEXT button.Your settings are applied.9. Use a WiFi network manager on your WiFi-enabled computer or mobile device to connect to the new access point WiFinetwork.10. Click the CONTINUE button.A message displays that you successfully created an access point.or routerSet Up the Access Pointto register your product, get help, access the latest downloads andFor the current EU Declaration of Conformity, visit /app/answers/detail/a_id/11621/.For regulatory compliance information, visit /about/regulatory/.See the regulatory compliance document before connecting the power supply.© NETGEAR, Inc., NETGEAR and the NETGEAR Logo are trademarks of NETGEAR, Inc. Any non-NETGEAR trademarks are used for reference purposes only.NETGEAR, Inc., 350 East Plumeria Drive, San Jose, CA 95134 USA March 2017NETGEAR, Inc.First Floor Building 3 University Technology Centre Curraheen Road Cork IrelandCorporate Office Phone 353 21 2333 200.This LED indicates the 2.4 GHz WiFi connection between the access point and the router.Solid green . Best connection Solid amber . Good connection Solid red . Poor connection Off . No connectionThis LED indicates the 5 GHz WiFi connection between the access point and the router.Solid green . Best connection Solid amber . Good connection Solid red . Poor connection Off . No connectionSolid green . The access point and device are connected.Solid green . The Ethernet port detected anEthernet link with the access point.Solid green . A USB device is connected to the access point.2.4 GHz Link Rate LED5 GHz Link Rate LEDDevice to Extender LED Ethernet ports 1–5 LEDsUSB LEDsAC1900 WiFi Access PointModel EX7000Quick Start GuideHardware。
安装路由器的步骤

安装路由器的步骤在现代科技日益发展的时代,路由器已经成为家庭网络的重要组成部分。
它不仅可以提供稳定的网络信号,还可以实现局域网内设备的互联互通。
但是,对于一些对网络不太了解的人来说,安装路由器可能是一项具有挑战性的任务。
本文将为大家介绍安装路由器的具体步骤,帮助大家能够顺利完成安装过程。
第一步:准备工作在正式安装路由器之前,我们需要做一些准备工作。
首先,确保你已经购买了适合自己使用的路由器,并且对其功能有一定了解。
其次,打开路由器的包装箱,检查包装箱内是否有配套的电源适配器、网线等附件。
最后,准备一个电源插座和一个合适的位置放置路由器。
第二步:连接路由器首先,找到您的宽带猫(或者光猫),将其与路由器通过网线进行连接。
将一端插入宽带猫的LAN口,另一端插入路由器的WAN口。
确保插入牢固,并且连接端口正确。
第三步:连接电源将路由器的电源适配器插入电源插座,并将另一端插入路由器的电源接口。
请务必确保电源适配器的规格与路由器匹配,并且插入稳固。
第四步:接入设备现在可以连接您的设备(如电脑、手机等)到路由器了。
在电脑上,打开网络设置,选择Wi-Fi设置,搜索并选择与您的路由器名称对应的Wi-Fi信号。
输入您的Wi-Fi密码,等待连接成功。
对于有线连接的设备,可以使用网线将其连接到路由器的LAN口。
第五步:配置路由器在上述步骤完成后,打开您的浏览器,输入路由器的默认IP地址(一般为192.168.1.1或192.168.0.1)进入路由器的管理界面。
您可以在路由器的说明书或者官方网站上找到该默认IP地址。
在管理界面中,您需要设置您的Wi-Fi名称(SSID)和密码,以及其他必要的网络配置。
根据您的需求来配置路由器,确保网络的安全性和稳定性。
第六步:测试连接最后一步是测试您的路由器连接是否成功。
您可以打开浏览器,尝试访问一些常用的网站,或者打开手机的应用商店更新应用,以验证您的网络连接是否正常。
如果出现连接问题,您可以检查一下之前的步骤是否有遗漏或者配置有误。
夜叉AC1900智能WiFi路由器操作手册说明书
cannot use WiFi to connect to the router.
WPS button with This button lets you use WPS to join the WiFi network without typing the WiFi password. The
LED
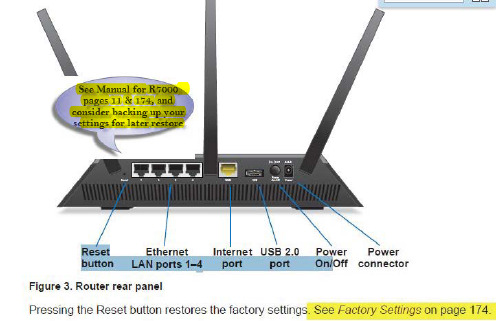
Factory Settings
You can return the router to its factory settings. Use the end of a paper clip or a similar object to press and hold the Reset button on the back of the router for at least seven seconds. The router resets, and returns to the factory configuration settings shown in the following table.
Figure 3. Router rear panel
Pressing the Reset button restores the factory settings. See Factory Settings on page 174.
Hardware Setup 11
Nighthawk AC1900 Smart WiFi Router
DHCP ending IP address
192.168.1.254
DMZ
Disabled
Time zone
GMT for WW except NA and GR, GMT+1 for GR, GMT-8 for NA
夜鹰AC1900宽带VDSL ADSL模块路由器D7000说明书
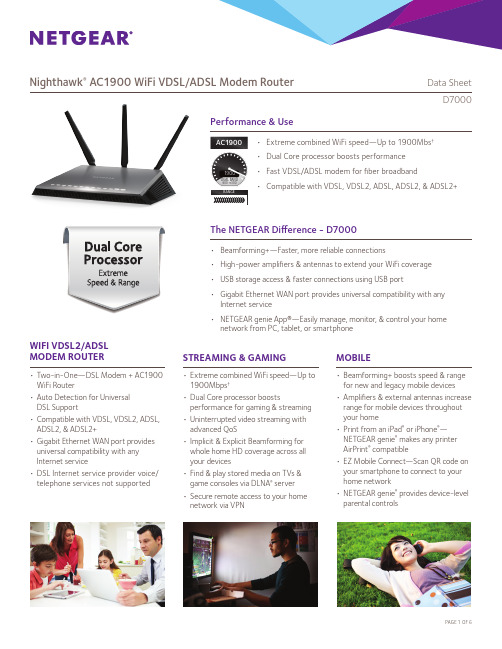
Nighthawk ® AC1900 WiFi VDSL/ADSL Modem RouterData SheetD7000WIFI VDSL2/ADSL MODEM ROUTER• Two-in-One—DSL Modem + AC1900 WiFi Router• Auto Detection for Universal DSL Support• Compatible with VDSL, VDSL2, ADSL, ADSL2, & ADSL2+• Gigabit Ethernet WAN port provides universal compatibility with any Internet service• DSL Internet service provider voice/telephone services not supportedSTREAMING & GAMING• Extreme combined WiFi speed—Up to 1900Mbps †• Dual Core processor boostsperformance for gaming & streaming • Uninterrupted video streaming with advanced QoS• Implicit & Explicit Beamforming for whole home HD coverage across all your devices• Find & play stored media on TVs & game consoles via DLNA ® server • Secure remote access to your home network via VPNMOBILE• Beamforming+ boosts speed & range for new and legacy mobile devices• Amplifiers & external antennas increase range for mobile devices throughout your home• Print from an iPad ® or iPhone ®—NETGEAR genie ® makes any printer AirPrint ® compatible• EZ Mobile Connect—Scan QR code on your smartphone to connect to your home network• NETGEAR genie ® provides device-level parental controlsThe NETGEAR Difference - D7000• Beamforming+—Faster, more reliable connections• High-power amplifiers & antennas to extend your WiFi coverage • USB storage access & faster connections using USB port• Gigabit Ethernet WAN port provides universal compatibility with any Internet service• NETGEAR genie App®—Easily manage, monitor, & control your home network from PC, tablet, or smartphoneNighthawk ® AC1900 WiFi VDSL/ADSL Modem RouterData SheetD7000Get the fastest WiFi currently available & enjoy a blazing-fast, lag-free WiFi experience for gaming, video streaming or surfing.SpeedWORLD’S FASTEST WIFI—Up to 600+1300 Mbps †GIGABIT WIFI—Next-generation WiFi now at Gigabit speeds GIGABIT WIRED—Ideal for HD gaming & videoDUAL CORE PROCESSOR—Dual Core processor boosts wireless, wired & WAN-to-LAN performanceWiFi RangeULTIMATE RANGE—WiFi coverage throughout very large homesANTENNAS—High-power amplifiers with 3 external antennasGot range? Homes come in all shapes and sizes and the Nighthawk AC1900 WiFi VDSL/ADSL Modem Router provides WiFi coverage no matter where you connect in your home.With NETGEAR, sharing across your network is fun and easy, anything from accessing stored photos & music to wireless printing. And make sure you keep it safe by using the included ReadySHARE Vault application for backing up Windows-based PCs.SharingDLNA ®—Find & play your media o n DLNA TVs & game consolesREADYSHARE PRINTER—Wirelessly access & share a USB printerREADYS H ARE ® USB ACCESS—Wirelessly access & share USB hard drive & printer via USB portVDSL MODEM—Compatible with VDSL, VDSL2, ADSL,ADSL2, & ADSL2+CABLE OR FIBRE—Also connects to cable modem via Gigabit Ethernet WAN portNighthawk ® AC1900 WiFi VDSL/ADSL Modem RouterData SheetD7000Start enjoying your new device faster than ever. NETGEAR wants to make sure installation and management is simple & easy, so you can connect quickly & make sure you stay that way!Ease Of UseEASY INSTALL—Easy setup for iPad ®, tablets, smartphones & computersPUSH ‘N’ CONNECT —Easy push button WiFi connectionsWIFI & POWER ON/OFF —Convenient power savingsMaintain high security across your network to helpensure your privacy & family is safe while online. Whether it’s preventing phishing & spyware or just limiting access for kids & guests, NETGEAR has you covered. SecurityPARENTAL CONTROLS—Web site filtering for all yourconnected devicesVPN SUPPORT —Secure access to your home network VPNGUEST NETWORK ACCESS—Separate & secure access for guests SECURE WIFI CONNECTIONS—High level wireless security with WPA/WPA2PERSONAL FTP SERVER—Customized free URL to create FTP serverThere’s nothing more frustrating than lost connections! With NETGEAR’s advanced features & best-in-class technology, you’ll reduce interference & enjoy more reliable WiFi connectivity.Reliable ConnectionsSIMULTANEOUS DUAL BAND—Reduces interference for better connections to more WiFi devicesADVANCED QoS—Downstream & upstream QoS automatically recognizes & prioritizes streaming & gaming applications BEAMFORMING+—Boosts speed, reliability, & range of WiFiconnections for 2.4 & 5GHzNETGEAR GENIE ® APP—Personal dashboard to monitor, control & repair your home network. Includes remote access to manage your network away from homeNighthawk® AC1900 WiFi VDSL/ADSL Modem Router Data SheetD7000 NETGEAR genie®—HOME NETWORKING SIMPLIFIEDNETGEAR genie makes getting the most out of your home network fun & easy. NETGEAR genie allows you to easily monitor, connect & control your home network from an iPhone®, iPad® or Android® devices. With NETGEAR genie you can share & stream music or videos, diagnose & repair network issues, set up parental controls & more.• N etwork Map—Allow or block access to your network using real-time map of connected devices• Traffic Meter—Track your Internet data usage• MyMedia®—Find & play media files in your network• EZ Mobile Connect—Scan QR code to connect to your home network• For iPhone®, iPad® or Android® devices• R emote access to manage your network away from home. View the network map, block WiFi devices, set up guest WiFi & manage Parental Controls—anytime, anywhereBEAMFORMING+—FOR MORE RELIABLE CONNECTIONSUnlike typical WiFi routers that just blast the WiFi signals in all directions, with Beamforming+ the router & device communicate with each other, so the router can directly beam the WiFi signal to the device. Boosting speed, reliability, and range for both Implicit and Explicit 2.4 & 5GHz WiFi devices, the result is a stronger, faster, more reliable connection that is locked in even when the device is moved around the home.• W iFi Signal Focus—Focuses signals from the wireless router to WiFi devices like smartphones, tablets & laptops• A utomatic Signal Management—Checks with your device to keep WiFi signal at its optimal strength• D evice Connections—Designed for home environments to support multiple WiFi device connections for highest quality• WiFi Coverage—Reduces dead spots, & boosts signal strength• I mplicit & Explicit Beamforming boosts speed, reliability & range for both 2.4 & 5GHz WiFi devices—an industry firstNighthawk ® AC1900 WiFi VDSL/ADSL Modem RouterData SheetD7000Connection DiagramGigabit WiredGigabit Ethernet Connects to Cable or Fiber ModemPush ‘N’ Connectwith WPS(front)USB WiFi On/O(front)USBConnects to Telephone Line(built-in modem)Nighthawk ® AC1900 WiFi VDSL/ADSL Modem RouterData SheetD7000This product comes with a limited warranty that is valid only if purchased from a NETGEAR authorized reseller.*90-day complimentary technical support following purchase from a NETGEAR authorized reseller.** Does not support bonded VDSL†Maximum wireless signal rate derived from IEEE 802.11 specifications. Actual data throughput and wireless coverage will vary and may be lowered by network and environmentalconditions, including network traffic volume and building construction. NETGEAR makes no representations or warranties about this product’s compatibility with future standards.‡Up to 1300 Mbps wireless speeds achieved when connecting to other 802.11ac 1300 Mbps devices. 2.4GHz performance mode requires 256QAM support on WiFi client.NETGEAR, the NETGEAR Logo, ReadySHARE, ReadySHARE Vault, and NETGEAR genie, are trademarks of NETGEAR, Inc. Mac and the Mac logo are trademarks of Apple Inc. Any other trademarks herein are for reference purposes only. ©2017 NETGEAR, Inc.NETGEAR, Inc. 350 E. Plumeria Drive, San Jose, CA 95134-1911 USA, /supportD-D7000-5Package Contents• Nighthawk AC1900 WiFi VDSL/ADSL Modem Router (D7000)• Ethernet cable • Phone cable • DSL filter • Quick start guide• Power adapter, localized to country of salePhysical Specifications• Dimensions: 11.22 x 7.26 x 1.97 in (285 x 185 x 50 mm)• Weight: 1.65 lb (750 g)Standards• Two (2) USB ports • One (1) VDSL/ADSL port • IEEE ® 802.11 b/g/n 2.4GHz + 256 QAM support• IEEE ® 802.11 a/n/ac 5.0GHz• F our (4) 10/100/1000 Mbps—(4 LAN) Gigabit Ethernet portsTechnical Specifications• H igh-speed VDSL2/ADSL2+ modem built-in • Simultaneous Dual Band WiFi—Tx/Rx 3x3 (2.4GHz) + 3x3 (5GHz)• Implicit & Explicit Beamforming • Powerful Dual Core processor• WiFi Boost with high-powered radio amplifiers • Memory: 128 MB flash and 256 MB RAM • Advanced Quality of Service (QoS)• ReadySHARE ® USB—Share your USB hard drive and printer• R eadySHARE Vault—Software for automatic PC backup to USB hard drive connected to the router • IPv6 Support (Internet Protocol Version 6)• Push ‘N’ Connect—Easy push button WiFi connectionsSupport• 90-day complimentary technical support*Broadband Internet Service• VDSL/ADSL broadband Internet service**• G igabit Ethernet WAN provides broadband connectivity options to cable, DSL or fibre modemsSystem Requirements• Microsoft ® Windows 7, 8, Vista ®, XP ®, 2000, Mac OS ®, UNIX ®, or Linux ®• Microsoft ® Internet Explorer ® 5.0, Firefox ® 2.0, Safari ® 1.4, or Google Chrome ™ 11.0 browsers or higherSecurity• Customized free URL to set up personal FTP server• VPN support—secure remote access • Guest network access—separate & secure • WiFi Protected Access ® (WPA/WPA2—PSK)• Double firewall protection (SPI and NAT)• Denial-of-service (DoS) attack preventionWarranty• /about/warranty。
网件R7000路由器如何设置

网件R7000路由器如何设置网件netgear是全球领先的企业网络解决方案,及数字家庭网络应用倡导者,那么你知道网件R7000路由器如何去设置吗?下面是店铺整理的一些关于网件R7000路由器如何设置的相关资料,供你参考。
网件R7000路由器设置的方法:网件(NETGEAR)R7000路由器第一步、设置电脑IP地址在设置网件(NETGEAR)R7000路由器上网之前,需要先把电脑本地连接(以太网)中的IP地址,设置为自动获得(动态IP),如下图所示。
把IP地址设置为自动获得第二步、连接NETGEAR R7000路由器1、电话线上网:用户需要准备2根网线,一根网线用来连接ADSL Modem (宽带猫)与NETGEAR R7000路由器的WAN接口(黄色);另一根网线用来连接计算机与R7000路由器的LAN接口(1/2/3/4中的任意一个都可以)。
电话线/光钎接入上网时,NETGEAR R7000路由器正确连接方式2、光纤上网:用户需要准备2根网线,其中一根网线用来连接光猫与NETGEAR R7000路由器的WAN接口(黄色),另一根网线用来连接计算机与R7000路由器的LAN接口(1/2/3/4中的任意一个都可以)。
连接方式,和电话线接入上网时的连接方式一样。
3、网线入户上网:用户需要准备1根网线,先把宽带运营商提供的入户网线插在NETGEAR R7000路由器的WAN接口(黄色),再把准备的这根网线,一头连接电脑,另一头连接路由器的LAN接口(1/2/3/4中的任意一个都可以)。
宽带网线接入上网时,NETGEAR R7000路由器正确连接方式注意问题:(1)、按照上诉方式连接NETGEAR R7000路由器后,电脑暂时不能上网了;当路由器完成设置后,电脑自动就可以上网了。
(2)、很多新手用户经常问道,这样连接NETGEAR R7000路由后,电脑都不能上网了,怎么能够设置路由器呢?这里说一下:设置路由器的时候,不需要电脑能够上网,只需要按照上面的方法正确连接路由器,电脑就能够进入路由器设置界面,设置路由器联网的。
无线路由器安装方法

无线路由器安装方法无线路由器是现代家庭和办公室中必不可少的网络设备,它可以让我们在家中或办公室中随时随地连接互联网,为我们提供了极大的便利。
但是,对于一些不熟悉网络设备的人来说,安装无线路由器可能会有些困难。
接下来,我将向大家介绍一下无线路由器的安装方法,希望能够帮助大家顺利完成安装。
首先,我们需要准备好安装无线路由器所需的材料和工具。
通常情况下,我们需要一台无线路由器、一根网线、一台电脑或手机以及一个可用的宽带接入设备(如光猫或ADSL调制解调器)。
接下来,我们需要按照以下步骤来安装无线路由器。
首先,将无线路由器的电源线插入电源插座,然后将网线一端插入无线路由器的WAN口,另一端插入宽带接入设备的LAN口。
接着,打开电脑或手机,在无线网络列表中找到无线路由器的名称,点击连接并输入无线路由器的默认密码(通常可以在无线路由器的说明书中找到),等待连接成功。
连接成功后,我们需要通过浏览器输入无线路由器的管理地址(通常为192.168.1.1或192.168.0.1),输入默认用户名和密码(通常为admin/admin或者admin/password),然后进入无线路由器的设置界面。
在设置界面中,我们可以进行一些基本的配置,如修改无线路由器的名称和密码、设置无线网络的加密方式和密码、开启无线网络等。
最后,我们需要将无线路由器放置在一个开阔的位置,避免与其他电子设备干扰,以获得更好的无线信号覆盖范围。
在放置无线路由器时,我们还需要注意避免放置在金属物体或电器设备附近,以免影响无线信号的传输和接收。
通过以上步骤,我们可以顺利地完成无线路由器的安装。
在安装完成后,我们可以通过无线网络连接上网,享受高速稳定的网络体验。
总之,无线路由器的安装并不复杂,只要按照以上步骤进行操作,就可以轻松完成安装。
希望以上内容对大家有所帮助,祝大家安装顺利!。
netgear r7000 夜鹰ac1900智能无线路由器安装指南说明书

电源适配器技术支持感谢您选择 NETGEAR !NETGEAR 建议您从官方渠道寻求技术支持!美国网件公司中文网址 技术支持热线 400 -830-3815NETGEAR, Inc.网件(北京)网络技术有限公司北京海淀区中关村东路 1 号院清华科技园D 座火炬大厦 11 层,1000842014 年 6 月2. 安装天线将天线安装至路由器。
合理摆放天线以获得最佳的无线性能。
NETGEAR 建议将中间的天线调整为垂直于水平面竖直向上,两侧的天线以 45 度角向外摆放,如图所示。
3. 准备好调制解调器 (Modem)拔掉 Modem 的电源适配器,如果 Modem 拥有备用电池,请将电池一并取出。
4. 连接 Modem连接 Modem 的电源适配器,如果 Modem 拥有备用电池,请将电池一并放入,开机。
使用网线将 Modem 连接至路由器的因特网端口(WAN 口、黄色标识)。
5. 开启路由器插上电源适配器,按下电源开关。
电源指示灯会先闪烁一段时间,等待直至其变为白色常亮的状态,即表示启动完毕。
6. 连接计算机您可以使用以太网线缆连接或将计算机连接至无线网络。
如需连接无线网络,请在路由器底部标签查看默认的无线网络名称 (SSID) 及密码。
7. 打开浏览器将会自动显示 NETGEAR 精灵页面。
根据 NETGEAR 精灵的步骤设置,连接至因特网。
如果没有自动显示 NETGEAR 精灵页面,则在地址栏输入访问,用户名:admin,密码:password。
8. 下载精灵应用程序于此下载免费的精灵应用程序:/china/event/genie/此应用可帮助您使用智能手机、平板电脑或笔记本电脑轻松地共享多媒体、文件和打印机。
可参考下图或按照本手册中的详细说明将路由器接入网络。
1. 移除天线保护帽从路由器的天线接口移除天线保护帽。
目录安装路由器 (2)指示灯 (6)无线网络及安全 (7)连接无线网络 (8)查看或更改路由器配置 (9)服务质量 (QoS) (11)在网络上共享 USB 存储设备 (14)ReadySHARE® ︱易共享 • Vault (16)共享 USB 打印机 (17)更多高级功能 (17)NETGEAR 精灵 (20)安装路由器在安装路由器之前,请确保您的因特网服务是可用的。
- 1、下载文档前请自行甄别文档内容的完整性,平台不提供额外的编辑、内容补充、找答案等附加服务。
- 2、"仅部分预览"的文档,不可在线预览部分如存在完整性等问题,可反馈申请退款(可完整预览的文档不适用该条件!)。
- 3、如文档侵犯您的权益,请联系客服反馈,我们会尽快为您处理(人工客服工作时间:9:00-18:30)。
NETGEAR, Inc.350 East Plumeria Drive San Jose, CA 95134 USA技术支持感谢您选择 NETGEAR !NETGEAR 建议您从官方渠道寻求技术支持!美国网件公司中文网址 技术支持热线 400-830-3815Nighthawk 夜鹰AC1900 智能无线路由器电源适配器网线您可于此获取路由器的用户手册:/可参考下图或按照本手册中的详细说明将路由器接入网络。
1.安装天线将天线安装至路由器。
合理摆放天线以获得最佳的无线性能。
NETGEAR 角向外摆放,如图所示。
2.准备好调制解调器拔掉 Modem 的电源适配器,如果 Modem3.连接 Modem连接 Modem 的电源适配器,如果 Modem 使用网线将 Modem 连接至路由器的因特网端口调制解调器路由器会先闪烁一段时间,等待直至其(SSID) 及密码。
6.打开浏览器将会自动显示 NETGEAR 精灵页面。
根据 NETGEAR 精灵的步骤设置,连接至因特网。
如果没有自动显示 NETGEAR 精灵页面,则在地址栏输入 访问,用户名:admin ,密码:password 。
7.下载精灵应用程序于此下载免费的精灵应用程序:/china/event/genie/此应用可帮助您使用智能手机、平板电脑或笔记本电脑轻松地共享多媒体、文件和打印机。
目录安装路由器. . . . . . . . . . . . . . . . . . . . . . . . . . . . . . . . . . . . . . . . . . . . 21. 安装天线 . . . . . . . . . . . . . . . . . . . . . . . . . . . . . . . . . . . . . . . . 22. 准备好调制解调器 (Modem) . . . . . . . . . . . . . . . . . . . . . . . . . 23. 连接 Modem . . . . . . . . . . . . . . . . . . . . . . . . . . . . . . . . . . . . . 34. 开启路由器 . . . . . . . . . . . . . . . . . . . . . . . . . . . . . . . . . . . . . . 35. 连接计算机 . . . . . . . . . . . . . . . . . . . . . . . . . . . . . . . . . . . . . . 46. 打开浏览器 . . . . . . . . . . . . . . . . . . . . . . . . . . . . . . . . . . . . . . 4指示灯 . . . . . . . . . . . . . . . . . . . . . . . . . . . . . . . . . . . . . . . . . . . . . . . 5无线网络及安全 . . . . . . . . . . . . . . . . . . . . . . . . . . . . . . . . . . . . . . . . .6连接无线网络. . . . . . . . . . . . . . . . . . . . . . . . . . . . . . . . . . . . . . . . . . 7查看或更改路由器配置 . . . . . . . . . . . . . . . . . . . . . . . . . . . . . . . . . . .8服务质量 (QoS) . . . . . . . . . . . . . . . . . . . . . . . . . . . . . . . . . . . . . . . 10在网络上共享 USB 存储设备. . . . . . . . . . . . . . . . . . . . . . . . . . . . . 13 NETGEAR 精灵. . . . . . . . . . . . . . . . . . . . . . . . . . . . . . . . . . . . . . . 14 ReadySHARE®︱易共享 • Vault . . . . . . . . . . . . . . . . . . . . . . . . . .15共享 USB 打印机 . . . . . . . . . . . . . . . . . . . . . . . . . . . . . . . . . . . . . .16更多高级功能. . . . . . . . . . . . . . . . . . . . . . . . . . . . . . . . . . . . . . . . . 16安装路由器在安装路由器之前,请确保您的因特网服务是可用的。
安装路由器:1.a.将天线对准路由器上的天线接口。
b.将天线旋转安装至路由器。
c.合理摆放天线以获得最佳的无线性能。
NETGEAR 建议将中间的天线调整为垂直于水平面竖直向上,两侧的天线以 45 度角向外摆放,如图所示。
2.准备好调制解调器 (Modem)a.拔掉 Modem 的电源适配器。
b.如果 Modem请将电池一并取出。
c.如果您的 Modem其他的路由器,请将其断开。
请确保 Modem 处于关闭状态,且仅连接了到因特网的线缆。
调制解调器a.插入 Modem 的电源适配器,并开启它。
如果此设备含有电池,也请一并放入。
b.使用包装内的黄色以太网线缆将 Modem 连接至路由器的因特网端口(黄色标识)。
4.调制解调器a.连接路由器的电源适配器,插上插座。
b.等待前面板的电源指示灯从闪烁变为白色常亮。
如果指示灯没亮,请找到路由器背面的电源开关按钮并按下。
您可以通过有线方式或无线方式连接至路由器。
•如需通过有线方式连接,请自备一条以太网线缆(包装内未含),连接您的计算机到路由器的 LAN 接口(黑色)。
•如需通过无线方式连接,请于路由器标签上查看默认的无线网络标识 (SSID) 及密码,使用此 SSID 和密码即可连接。
6.打开浏览器当您第一次连接至路由器时,NETGEAR 精灵向导会自动显示。
请 根据精灵向导的提示逐步完成设置以连接至因特网。
如果精灵向导没有自动显示,请尝试以下步骤:•关闭并重新打开浏览器。
•确认您的电脑通过网线连接在路由器的 4 个 LAN 口其中之一 (黑色),或已经连接至路由器默认的无线网络。
•确认路由器已经通电,电源指示灯白色常亮。
•如果您的计算机设置了静态 IP 地址(此种情况不多见),请 将其修改为自动获取 IP 地址。
•如果您依然无法看到精灵向导界面,请手动登录路由器管理页面,精灵向导将会检测您的因特网连接。
登录路由器管理页面:1.在浏览器的地址栏中输入 或 并访问。
此时将会弹出一个登录对话框。
2.使用 admin 作为用户名,password 作为密码登录,字母均为小写。
登录后将会显示路由器的管理页面。
如果您的因特网连接尚未配置,精灵向导将会自动检测因特网连接。
指示灯路由器面板上的指示灯功能如下:电源指示灯因特网指示灯2.4Ghz 无线指示灯5Ghz 无线指示灯USB 1(位于前面的 USB 3.0 端口)USB 2(位于后面的 USB 2.0 端口)局域网端口 1-4无线开关按钮及指示灯WPS 按钮及指示灯与序列号类似,您的路由器预设了唯一的无线网络标识 (SSID) 及密码 (password)。
您不必自行设置无线密码,因为路由器初始状态下就启用了无线网络安全选项。
默认的无线网络配置印刷于路由器底部标签上。
NETGEAR 建议您使用预设的无线网络配置,如果您忘记了这些信息, 您可以查看此标签。
NETGEAR 精灵界面也允许您自行设定无线网络。
如果您修改了这些 信息,请将修改后的信息记录下来并妥善保存。
您可以将标签上的信息记录在以下位置以方便查阅。
如果您修改了无线网络配置,可以将信息记录在以下位置以方便查阅,并妥善保存。
无线网络标识 (SSID):无线网络密码 (password):无线网络标识 (SSID):无线网络密码 (password):您既可以使用 WPS 一键加密功能来连接,也可以查看并选择可用的无 线网络然后输入密码。
使用 WPS 连接无线网络:1.按下路由器上的WPS按钮。
2.在 2 分钟内,按下您计算机或无线设备的WPS按钮、或点击无线设备屏幕上显示的WPS按钮。
更多信息,请参考您所使用的无线设备的用户手册。
某些较旧的设备不支持 WPS 功能。
查看并选择可用的无线网络然后输入密码:1.在您的计算机或无线设备上,打开对应的功能查看可用的无线网络。
您将会查看到在您周围区域中存在的所有无线网络。
2.找到并选择此路由器的无线网络标识。
预设的无线网络标识和密码在路由器底部的标签上。
3.输入无线网络密码,然后点击连接。
查看或更改路由器配置在初次安装后,您可以登录路由器管理页面来查看或修改路由器配置。
登录路由器管理页面登录路由器管理页面:1.将电脑或其他的无线设备连接至路由器。
您可以通过有线方式或无线方式连接到路由器:•如需通过有线方式连接,您需要自备一根以太网线缆(包装内未含),连接您的计算机到路由器的 LAN 接口(黑色)。
•如需通过无线方式连接,您可于路由器标签上查看默认的无线网络标识及密码,使用此无线网络标识 (SSID) 和密码即可连接。
2.打开浏览器。
3.在地址栏中键入并访问。
此时将会弹出一个登录对话框。
4.使用admin作为用户名,password作为密码登录。
登录后将会显示路由器的管理页面。
修改管理员密码修改管理员密码:1.登录路由器管理页面。
2.点击高级选项卡。
3.点击管理 > 设置密码。
4.输入一次当前密码和二次新的密码。
5.选中启用密码恢复选框,输入安全问题及答案。
6.点击应用按钮。
恢复管理员密码默认的管理员账号与密码分别是 admin、password。
如果您修改了密 码并启用了密码恢复功能,您可以恢复此密码。
恢复管理员密码:1.打开浏览器。
2.在地址栏中键入并访问。
此时将会出现登录框。
3.点击取消按钮。
4.出现提示时,输入您设定的安全问题的答案和序列号。
序列号位于路由器底部标签上。
忘记无线网络密码预设的无线网络密码位于路由器底部标签上。
如果您修改了无线网络密码并不幸忘记,您可以登录路由器管理页面查看此密码。
连接路由器,查看无线网络密码:1.使用以太网线连接您的电脑到路由器的 LAN 端口(黑色)。