vue 无缝滚动案例
vue实现自动滑动轮播图片
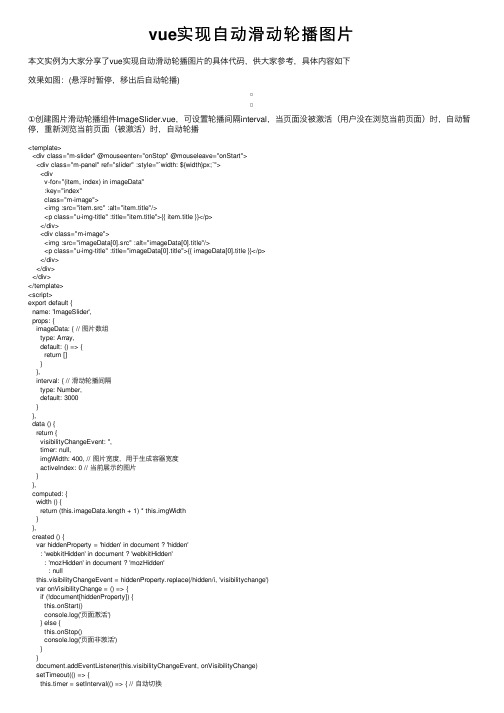
vue实现⾃动滑动轮播图⽚本⽂实例为⼤家分享了vue实现⾃动滑动轮播图⽚的具体代码,供⼤家参考,具体内容如下效果如图:(悬浮时暂停,移出后⾃动轮播)①创建图⽚滑动轮播组件ImageSlider.vue,可设置轮播间隔interval,当页⾯没被激活(⽤户没在浏览当前页⾯)时,⾃动暂停,重新浏览当前页⾯(被激活)时,⾃动轮播<template><div class="m-slider" @mouseenter="onStop" @mouseleave="onStart"><div class="m-panel" ref="slider" :style="`width: ${width}px;`"><divv-for="(item, index) in imageData":key="index"class="m-image"><img :src="item.src" :alt="item.title"/><p class="u-img-title" :title="item.title">{{ item.title }}</p></div><div class="m-image"><img :src="imageData[0].src" :alt="imageData[0].title"/><p class="u-img-title" :title="imageData[0].title">{{ imageData[0].title }}</p></div></div></div></template><script>export default {name: 'ImageSlider',props: {imageData: { // 图⽚数组type: Array,default: () => {return []}},interval: { // 滑动轮播间隔type: Number,default: 3000}},data () {return {visibilityChangeEvent: '',timer: null,imgWidth: 400, // 图⽚宽度,⽤于⽣成容器宽度activeIndex: 0 // 当前展⽰的图⽚}},computed: {width () {return (this.imageData.length + 1) * this.imgWidth}},created () {var hiddenProperty = 'hidden' in document ? 'hidden': 'webkitHidden' in document ? 'webkitHidden': 'mozHidden' in document ? 'mozHidden': nullthis.visibilityChangeEvent = hiddenProperty.replace(/hidden/i, 'visibilitychange')var onVisibilityChange = () => {if (!document[hiddenProperty]) {this.onStart()console.log('页⾯激活')} else {this.onStop()console.log('页⾯⾮激活')}}document.addEventListener(this.visibilityChangeEvent, onVisibilityChange)setTimeout(() => {this.timer = setInterval(() => { // ⾃动切换this.onMove()}, this.interval)}, this.interval)},methods: {// 滑动动画效果slideEffect (target) {const offsetLeft = this.$refs.slider.offsetLeft // 求出元素的当前偏移位置let step = (target - offsetLeft) / 10 // 由快到慢的过渡效果step = step > 0 ? Math.ceil(step) : Math.floor(step) // 对每次移动的距离取整,ceil:向上取整,floor:向下取整 setTimeout(() => {if (target !== offsetLeft) {this.$refs.slider.style.left = offsetLeft + step + 'px' // 移动this.slideEffect(target)}}, 15) // 每隔15ms执⾏⼀次},onSlider (moveX) {const offset = this.$refs.slider.offsetLeftconst target = offset + moveX // 要移动的⽬标位置this.slideEffect(target)},onMove () {if (this.activeIndex === this.imageData.length - 1) { // 最后⼀张this.activeIndex = 0 // 显⽰第⼀张this.$refs.slider.style.left = 0this.onSlider(-this.imgWidth)} else {this.activeIndex++ // 显⽰下⼀张this.onSlider(-this.imgWidth)}},onStop () {clearInterval(this.timer)this.timer = null},onStart () {clearInterval(this.timer)this.timer = setInterval(() => {this.onMove()}, this.interval)},beforeDestroy () {document.removeEventListener(this.visibilityChangeEvent)clearInterval(this.timer)this.timer = null}}}</script><style lang="less" scoped>@themeColor: #D93844;.m-slider {margin: 100px auto;width: 400px;height: 300px;overflow: hidden;position: relative;.m-panel {position: absolute;top: 0;left: 0;// width: 1600px; // (图⽚数组长度+1) * 图⽚宽度height: 300px;.m-image {float: left;width: 400px;height: 300px;img {width: 400px;height: 270px;cursor: pointer;}.u-img-title {width: 400px;font-size: 16px;color: #333;line-height: 30px;overflow: hidden;text-align: left;cursor: pointer;text-overflow: ellipsis;display: -webkit-box;-webkit-box-orient: vertical;-webkit-line-clamp: 1;&:hover {font-size: 16px;color: @themeColor;}}}}}</style>②在要使⽤滑动轮播图⽚的页⾯引⼊使⽤组件,并传⼊图⽚数组<ImageSlider :imageData="imageData" :interval="3000" />import ImageSlider from '@/components/ImageSlider'components: {ImageSlider}data () {return {imageData: [{title: 'image-1,image-1,image-1,image-1,image-1...',src: '图⽚地址'},{title: 'image-2,image-2,image-2,image-2,image-2...',src: '图⽚地址'},{title: 'image-3,image-3,image-3,image-3,image-3...',src: '图⽚地址'}]}}以上就是本⽂的全部内容,希望对⼤家的学习有所帮助,也希望⼤家多多⽀持。
vue 无缝滚动案例

vue 无缝滚动案例Vue是一种流行的JavaScript框架,用于构建Web界面。
在Vue中,实现无缝滚动效果是相对简单的,只需使用一些CSS和Vue的过渡动画功能即可。
下面是一些实现Vue无缝滚动效果的案例。
1. 基础滚动效果这个案例展示了如何使用Vue和CSS实现一个基本的无缝滚动效果。
通过使用Vue的过渡动画功能,我们可以在滚动内容到达边界时平滑地切换到起始位置。
这样用户就可以无限地滚动内容。
为了增强用户体验,我们还可以添加一些特效,如淡入淡出效果或缩放效果。
2. 横向滚动效果除了垂直滚动外,我们还可以实现横向滚动效果。
这个案例展示了如何在水平方向上滚动内容。
通过在CSS中设置容器的宽度和滚动效果,我们可以在用户滚动时平滑地移动内容。
这对于展示横向列表或图像非常有用,使用户可以无缝地浏览内容。
3. 自动滚动效果在某些情况下,我们可能希望内容自动滚动,而不是由用户手动滚动。
这个案例展示了如何使用Vue的计时器功能实现自动滚动效果。
我们可以设置一个定时器,在一定时间间隔后自动滚动到下一个内容。
这对于展示广告横幅或新闻标题非常有用。
4. 响应式滚动效果为了适应不同设备和屏幕尺寸,我们可以使用Vue的响应式功能实现滚动效果。
这个案例展示了如何根据屏幕宽度自动调整滚动速度和容器大小。
通过使用Vue的响应式属性和媒体查询,我们可以实现一个适应不同设备的无缝滚动效果。
5. 无缝滚动导航除了滚动内容,我们还可以实现无缝滚动导航。
这个案例展示了如何使用Vue和CSS实现一个带有导航条的无缝滚动效果。
通过在导航条中添加链接和事件监听器,我们可以使用户可以通过导航条快速浏览内容。
这对于长页面或分页内容非常有用。
6. 滚动动画效果为了增强用户体验,我们可以使用动画效果实现更吸引人的无缝滚动效果。
这个案例展示了如何使用Vue的过渡动画功能和CSS动画库实现滚动动画效果。
通过在滚动过渡中添加动画类和过渡效果,我们可以实现更流畅和生动的滚动效果。
vue-seamless-scroll写法
一、Vue.js简介Vue.js是一款流行的前端JavaScript框架,由尤雨溪于2014年创建。
它被设计为一款用于构建用户界面的渐进式框架,其核心库只关注视图层,并且易于上手。
Vue.js的主要特点包括响应式数据绑定、组件系统、路由管理、状态管理、虚拟DOM等。
二、无缝滚动组件介绍在Vue.js开发中,滚动组件是非常常见的UI控件,常用于列表的展示与查看。
而vue-seamless-scroll是Vue.js中一个常用的无缝滚动组件,它可以轻松地实现在页面上实现无缝滚动的效果。
在本文中,将介绍如何使用vue-seamless-scroll来实现无缝滚动功能。
三、安装vue-seamless-scroll1. 需要在项目中安装vue-seamless-scroll组件,可以通过npm安装:```bashnpm install vue-seamless-scroll --save```2. 安装完成后,在Vue组件中引入和使用vue-seamless-scroll组件:```javascript<template><seamless :list="list"><div slot="item" class="scroll-item">{{item.title}}</div></seamless></template><script>import SeamlessScroll from 'vue-seamless-scroll'export default {ponents: {SeamlessScroll},data() {return {list: [{ title: 'Item 1' },{ title: 'Item 2' },{ title: 'Item 3' },// ... 更多数据]}}}</script>```在上述代码中,首先通过import引入了vue-seamless-scroll组件,然后在Vue组件中注册并使用了该组件。
vue实现简单无缝滚动效果

vue实现简单⽆缝滚动效果本⽂实例为⼤家分享了vue实现简单⽆缝滚动的具体代码,供⼤家参考,具体内容如下效果实现思路在vue中如何复制⼀份列表出来呢且不能丢失绑定的事件,很简单使⽤slot插槽,使⽤两个插槽我们就拥有了两个列表<div class="listScroll" ref="box"><slot></slot><slot></slot></div>组件完整代码<template><div class="listScroll" ref="box"><slot></slot><slot></slot></div></template><script>export default {name: "listScroll",created() {},mounted() {//在盒⼦内容⾼度⼩于可视⾼度时不滚动if (this.boxHeight < this.ele0.clientHeight) {this.start(this.height);this.setEvet();} else {this.isScroll = false;}},props: {speed: {default: 1,type: Number,},},computed: {//第⼀个slotele0() {return this.$refs.box.children[0];},//第⼆个slotele1() {return this.$refs.box.children[1];},//盒⼦的可视⾼度boxHeight() {return this.$refs.box.clientHeight;},},data() {return {height: 0,isScroll: true,};},methods: {//⿏标移⼊停⽌滚动移出继续滚动setEvet() {this.$refs.box.onmouseenter = () => {this.isScroll = false;// this.height = 0;};this.$refs.box.onmouseleave = () => {this.isScroll = true;this.$nextTick(() => {this.start(this.height);});};},//滚动⽅法start(height) {this.ele0.style = `transform:translateY(-${height}px);`;this.ele1.style = `height:${this.boxHeight}px;transform:translateY(-${height}px);overflow: hidden;`; if (height >= this.ele0.clientHeight) {this.height = 0;} else {this.height += this.speed;}if (!this.isScroll) return;window.requestAnimationFrame(() => {this.start(this.height);});},},};</script><style lang="less" scoped>.listScroll {overflow: hidden;}.hover {overflow-y: auto;}.hide {display: none;}</style>使⽤<template><div class="scroll"><list-scroll class="box" :speed="1"><div class="list"><div class="item" v-for="item in list" :key="item.xh"><span>{{ item.xh }}</span><span>{{ bel }}</span></div></div></list-scroll></div></template><script>import ListScroll from "@/components/listScroll";export default {name: "scroll",components: { ListScroll },data() {return {list: new Array(10).fill(1).map((s, i) => ({ xh: i + 1, label: "hello wrold" })),};},};</script><style lang="less" scoped>.box {height: 300px;}.list {padding: 0 10px;width: 300px;.item {display: flex;justify-content: space-between;padding: 5px 0;cursor: pointer;&:hover {background-color: #95a5a6;}}}</style>⾄此⼀个简单的⽆缝滚动就完成了(vue2和vue3通⽤)以上就是本⽂的全部内容,希望对⼤家的学习有所帮助,也希望⼤家多多⽀持。
vue实现消息的无缝滚动效果的示例代码
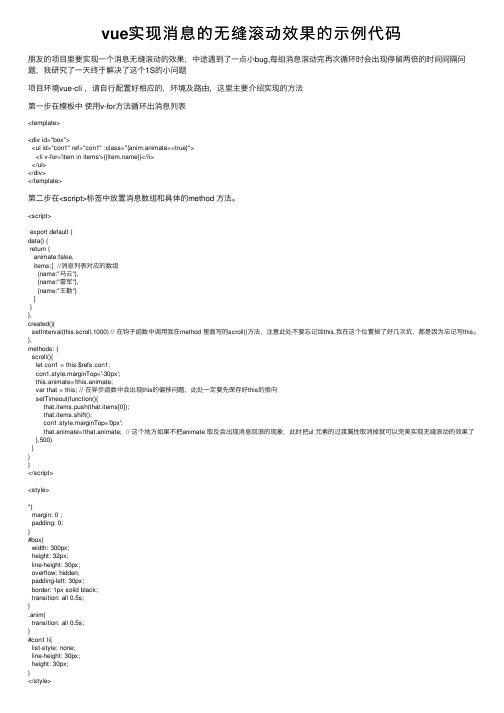
vue实现消息的⽆缝滚动效果的⽰例代码朋友的项⽬⾥要实现⼀个消息⽆缝滚动的效果,中途遇到了⼀点⼩bug,每组消息滚动完再次循环时会出现停留两倍的时间间隔问题,我研究了⼀天终于解决了这个1S的⼩问题项⽬环境vue-cli ,请⾃⾏配置好相应的,环境及路由,这⾥主要介绍实现的⽅法第⼀步在模板中使⽤v-for⽅法循环出消息列表<template><div id="box"><ul id="con1" ref="con1" :class="{anim:animate==true}"><li v-for='item in items'>{{}}</li></ul></div></template>第⼆步在<script>标签中放置消息数组和具体的method ⽅法。
<script>export default {data() {return {animate:false,items:[ //消息列表对应的数组{name:"马云"},{name:"雷军"},{name:"王勤"}]}},created(){setInterval(this.scroll,1000) // 在钩⼦函数中调⽤我在method ⾥⾯写的scroll()⽅法,注意此处不要忘记加this,我在这个位置掉了好⼏次坑,都是因为忘记写this。
},methods: {scroll(){let con1 = this.$refs.con1;con1.style.marginTop='-30px';this.animate=!this.animate;var that = this; // 在异步函数中会出现this的偏移问题,此处⼀定要先保存好this的指向setTimeout(function(){that.items.push(that.items[0]);that.items.shift();con1.style.marginTop='0px';that.animate=!that.animate; // 这个地⽅如果不把animate 取反会出现消息回滚的现象,此时把ul 元素的过渡属性取消掉就可以完美实现⽆缝滚动的效果了 },500)}}}</script><style>*{margin: 0 ;padding: 0;}#box{width: 300px;height: 32px;line-height: 30px;overflow: hidden;padding-left: 30px;border: 1px solid black;transition: all 0.5s;}.anim{transition: all 0.5s;}#con1 li{list-style: none;line-height: 30px;height: 30px;}</style>以上就是这篇⽂章的全部内容,希望对⼤家的学习有所帮助,也希望⼤家多多⽀持。
vue实现无缝轮播效果(跑马灯)
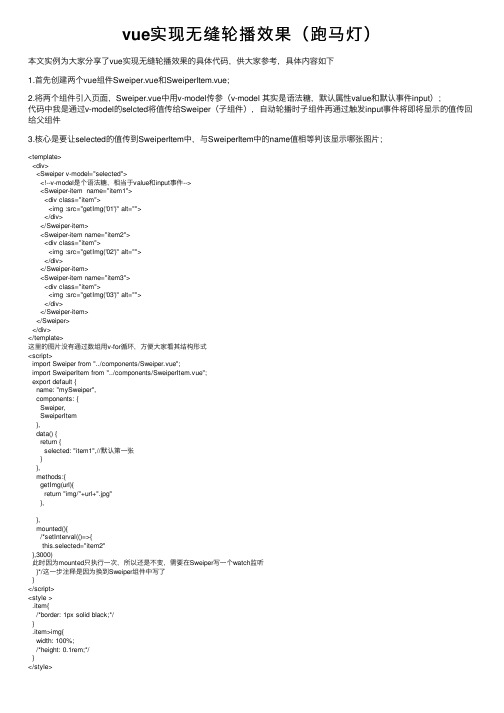
vue实现⽆缝轮播效果(跑马灯)本⽂实例为⼤家分享了vue实现⽆缝轮播效果的具体代码,供⼤家参考,具体内容如下1.⾸先创建两个vue组件Sweiper.vue和SweiperItem.vue;2.将两个组件引⼊页⾯,Sweiper.vue中⽤v-model传参(v-model 其实是语法糖,默认属性value和默认事件input);代码中我是通过v-model的selcted将值传给Sweiper(⼦组件),⾃动轮播时⼦组件再通过触发input事件将即将显⽰的值传回给⽗组件3.核⼼是要让selected的值传到SweiperItem中,与SweiperItem中的name值相等判该显⽰哪张图⽚;<template><div><Sweiper v-model="selected"><!--v-model是个语法糖,相当于value和input事件--><Sweiper-item name="item1"><div class="item"><img :src="getImg('01')" alt=""></div></Sweiper-item><Sweiper-item name="item2"><div class="item"><img :src="getImg('02')" alt=""></div></Sweiper-item><Sweiper-item name="item3"><div class="item"><img :src="getImg('03')" alt=""></div></Sweiper-item></Sweiper></div></template>这⾥的图⽚没有通过数组⽤v-for循环,⽅便⼤家看其结构形式<script>import Sweiper from "../components/Sweiper.vue";import SweiperItem from "../components/SweiperItem.vue";export default {name: "mySweiper",components: {Sweiper,SweiperItem},data() {return {selected: "item1",//默认第⼀张}},methods:{getImg(url){return "img/"+url+".jpg"},},mounted(){/*setInterval(()=>{this.selected="item2"},3000)此时因为mounted只执⾏⼀次,所以还是不变,需要在Sweiper写⼀个watch监听}*/这⼀步注释是因为换到Sweiper组件中写了}</script><style >.item{/*border: 1px solid black;*/}.item>img{width: 100%;/*height: 0.1rem;*/}</style>Sweiper.vue<template><div class="Sweiper"><slot></slot></div></template><script>export default {name: "Sweiper",data() {return{current:''}},props:{value:{type:String,default:""},},mounted(){//⾃动轮播时查找name值⽤indexOf的⽅法遍历出当前轮播的下表 s=this.$children.map(child=>{return });this. showImg();this. paly()},methods:{showImg(){this.current=this.value||this.$children[0].name;//当前实例的直接⼦组件this.$children.map(vm=>{vm.selected=this.current})},paly(){//每次轮播把图⽚做调整this.timer=setInterval(()=>{//indexOf返回某个指定字符串⾸次出现的位置const index=s.indexOf(this.current);let newIndex=index+1;//严谨⼀点if (newIndex===s.length){newIndex=0;}this.$emit("input",s[newIndex])},3000)}},watch:{//监听value值,发⽣变化就改变selectedvalue(){this. showImg()}},beforeDestroy() {//实列销毁前clearInterval(this.timer)}};</script><style>.Sweiper{/*border: 1px solid black;*/width: 100%;height: 4rem;overflow: hidden;margin: 0 auto;position: relative;}</style>SweiperItem.vue<template><transition><div class="Sweiper-item" v-show="isShow"><slot></slot></div></transition></template><script>export default {name:"SweiperItem",data(){return{selected:""}},props:{name:{type:String,required:true},},mounted(){},computed:{isShow(){return this.selected===;}}};</script><style>.v-enter-active,.v-leave-active{transition: all 1s linear;}.v-leave-to{transform:translate(-100%);}.v-enter{transform: translate(100%);}.v-enter-active{position: absolute;top:0;left: 0;}</style>以上就是本⽂的全部内容,希望对⼤家的学习有所帮助,也希望⼤家多多⽀持。
vue实现列表无缝滚动
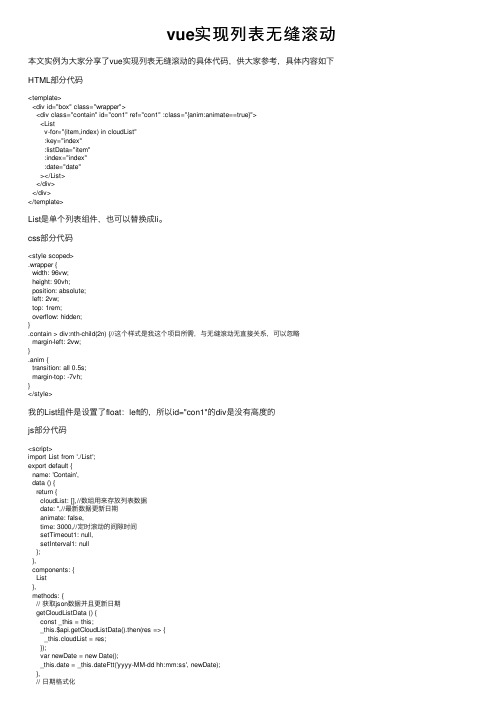
vue实现列表⽆缝滚动本⽂实例为⼤家分享了vue实现列表⽆缝滚动的具体代码,供⼤家参考,具体内容如下HTML部分代码<template><div id="box" class="wrapper"><div class="contain" id="con1" ref="con1" :class="{anim:animate==true}"><Listv-for="(item,index) in cloudList":key="index":listData="item":index="index":date="date"></List></div></div></template>List是单个列表组件,也可以替换成li。
css部分代码<style scoped>.wrapper {width: 96vw;height: 90vh;position: absolute;left: 2vw;top: 1rem;overflow: hidden;}.contain > div:nth-child(2n) {//这个样式是我这个项⽬所需,与⽆缝滚动⽆直接关系,可以忽略margin-left: 2vw;}.anim {transition: all 0.5s;margin-top: -7vh;}</style>我的List组件是设置了float:left的,所以id="con1"的div是没有⾼度的js部分代码<script>import List from './List';export default {name: 'Contain',data () {return {cloudList: [],//数组⽤来存放列表数据date: '',//最新数据更新⽇期animate: false,time: 3000,//定时滚动的间隙时间setTimeout1: null,setInterval1: null};},components: {List},methods: {// 获取json数据并且更新⽇期getCloudListData () {const _this = this;_this.$api.getCloudListData().then(res => {_this.cloudList = res;});var newDate = new Date();_this.date = _this.dateFtt('yyyy-MM-dd hh:mm:ss', newDate);},// ⽇期格式化dateFtt (fmt, date) {var o = {'M+': date.getMonth() + 1, // ⽉份'd+': date.getDate(), // ⽇'h+': date.getHours(), // ⼩时'm+': date.getMinutes(), // 分's+': date.getSeconds(), // 秒'q+': Math.floor((date.getMonth() + 3) / 3), // 季度S: date.getMilliseconds() // 毫秒};if (/(y+)/.test(fmt)) {fmt = fmt.replace(RegExp.$1,(date.getFullYear() + '').substr(4 - RegExp.$1.length));}for (var k in o) {if (new RegExp('(' + k + ')').test(fmt)) {fmt = fmt.replace(RegExp.$1,RegExp.$1.length === 1o[k]: ('00' + o[k]).substr(('' + o[k]).length));}}return fmt;},// 滚动scroll () {const _this = this;_this.animate = true;clearTimeout(_this.setTimeout1);_this.setTimeout1 = setTimeout(() => {var parent = document.getElementById('con1');var first = document.getElementById('con1').children[0];var second = document.getElementById('con1').children[1]; parent.removeChild(first);parent.removeChild(second);parent.appendChild(first);parent.appendChild(second);_this.animate = false;}, 500);}},created () {const _this = this;_this.getCloudListData();//定时器每隔24⼩时更新⼀次数据setInterval(() => {_this.getCloudListData();}, 24 * 60 * 60 * 1000);},mounted () {const _this = this;var contain = document.getElementById('box');_this.setInterval1 = setInterval(_this.scroll, _this.time);var setInterval2 = null;// ⿏标移⼊滚动区域停⽌滚动contain.onmouseenter = function () {clearInterval(_this.setInterval1);var count = 0;// 如果⿏标超过⼗秒不动就启动滚动setInterval2 = setInterval(function () {count++;if (count === 10) {_this.scroll();_this.setInterval1 = setInterval(_this.scroll, _this.time); }}, 1000);//⿏标⼀动就停⽌滚动并且计数count置为0contain.onmousemove = function () {count = 0;clearInterval(_this.setInterval1);};};// ⿏标移出滚动区域contain.onmouseleave = function () {clearInterval(setInterval2);clearInterval(_this.setInterval1);_this.scroll();_this.setInterval1 = setInterval(_this.scroll, _this.time);};}};</script>以上就是本⽂的全部内容,希望对⼤家的学习有所帮助,也希望⼤家多多⽀持。
vue实现滑动和滚动效果

vue实现滑动和滚动效果本⽂实例为⼤家分享了vue实现滑动和滚动效果的具体代码,供⼤家参考,具体内容如下⾯板滑动效果,⽗组件是resultPanel,⼦组件是resultOption,仿照了iview中,Select组件的写法。
<template><div v-if="visiable"><div class="transparent" :class="{active:resultPanelStatus==='top'}"></div><div class="mapbox-result"ref="resultPanel"style="z-index: 101;"@touchstart="onTouchStart"@touchmove="onTouchMove"@touchend="onTouchEnd":style="slideEffect"><div class="mapbox-result-content"><a class="mapbox-result-close" v-if="closable" @click="close"></a><div class="mapbox-result-header"><slot name="header"><div class="mapbox-result-header-title">共找到【{{header}}】相关{{total}}结果</div></slot></div><divclass="mapbox-result-body"ref="resultBody"><result-optionref="option"v-for="(item, index) in data":index="index+1":name="":meter="item.meter?item.meter:0":floor-name="item.floorName":key="index"v-show="visiable"@on-click-gohere="handleNavigate(index)"@on-click-item="focusResultOnMap(index)"></result-option></div></div></div></div></template><script>import resultOption from './resultOption';export default {name: 'result-panel',components: {resultOption},props: {header: {type: String},// value: {// type: Boolean,// default: true// },closable: {type: Boolean,default: true},data: {type: Array,default: []}},data() {return {// visiable: true,resultPanelStatus: 'normal', //'normal'、'top'cloneData: this.deepCopy(this.data),startY: 0, // 开始触摸屏幕的点endY: 0, // 离开屏幕的点moveY: 0, // 滑动时的距离disY: 0, // 移动距离slideEffect: '' //滑动效果}},mounted() {// this.$refs.resultBody.style.height = `${this.defaultHeight - 60}px`;// this.$refs.resultBody.style.overflowY = 'hidden';},computed: {total() {return this.data.length;},defaultHeight() {return this.data.length > 3 ? 240 : this.data.length * 60 + 60 //当结果⼤于3时,默认只显⽰三个},visiable() {this.resultPanelStatus = 'normal';this.slideEffect = `transform: translateY(-${this.defaultHeight}px); transition: all .5s`;return this.$store.state.resultPanel.show;}},methods: {/*** ⼿指接触屏幕*/onTouchStart(ev) {ev = ev || event;// ev.preventDefault();if (ev.touches.length === 1) {this.startY = ev.touches[0].clientY;}},/*** ⼿指滑动*/onTouchMove(ev) {ev = ev || event;console.log("ev.target: ", ev.target);// ev.preventDefault();if (ev.touches.length === 1) {let resultPanel = this.$refs.resultPanel.offsetHeight;this.moveY = ev.touches[0].clientY;this.disY = this.moveY - this.startY;if (this.disY < 0 && -this.defaultHeight + this.disY > -resultPanel && this.resultPanelStatus === 'normal') { //向上滑动this.slideEffect = `transform: translateY(${-this.defaultHeight + this.disY}px); transition: all 0s;`;//内容随着⾯板上滑出现的动画this.$refs.resultBody.style.transition = 'all .5s';this.$refs.resultBody.style.height = `${this.$refs.resultPanel.offsetHeight - 60}px`;} else if (this.resultPanelStatus === 'top' && this.disY < 0) {this.scroll();} else if (this.disY > 0 && this.resultPanelStatus === 'top') { //向下滑动/*当⼿指向下滑动时,如果滑动的起始点不在⾮内容区以及scrollTop不为0,则为滚动,否则⾯板随着⼿指滑动并隐藏滚动条,以防⽌下滑过程中,能够滚动数据*/ if (this.$refs.resultBody.scrollTop > 0 && ev.target !== document.getElementsByClassName("mapbox-result-header")[0]) {this.scroll();} else {this.slideEffect = `transform: translateY(${-resultPanel + this.disY}px); transition: all 0s`;this.$refs.resultBody.style.overflowY = 'hidden';} //当处于normal状态,⼿指向下滑,则下滑} else if (this.disY > 0 && this.resultPanelStatus === 'normal') {this.slideEffect = `transform: translateY(${-this.defaultHeight + this.disY}px); transition: all 0s`;}}},/*** 离开屏幕*/onTouchEnd(ev) {ev = ev || event;// ev.preventDefault();if (ev.changedTouches.length === 1) {this.endY = ev.changedTouches[0].clientY;this.disY = this.endY - this.startY;if (this.disY > 0 && this.resultPanelStatus === 'top') { //向下滑动/*当⼿指向下滑动时,如果滑动的起始点不在⾮内容区以及scrollTop不为0,则为滚动,否则⾯板滑动到默认位置*/if (this.$refs.resultBody.scrollTop > 0 && ev.target !== document.getElementsByClassName("mapbox-result-header")[0]) {this.scroll();} else {this.normal();}//⼿指离开的时候,出现滚动条,已解决第⼀次滑动内容的时候,滚动条才会出现⽽内容没有滑动的问题} else if (this.disY < 0 && this.resultPanelStatus === 'normal') { //向上滑动this.top();this.move();} else if (this.disY < 0 && this.resultPanelStatus === 'top') {this.scroll();} else if (this.disY > 0 && this.resultPanelStatus === 'normal') {this.normal(); //处于normal状态下滑,⼿指离开屏幕,回归normal状态}}},//当到默认⾼度时,设置状态为正常状态,并且隐藏滚动条,将scrollTop置0,以避免内前⾯的内容被隐藏normal() {// this.$refs.resultBody.style.overflowY = 'hidden';this.slideEffect = `transform: translateY(${-this.defaultHeight}px); transition: all .5s;`;this.resultPanelStatus = 'normal';this.$refs.resultBody.scrollTop = 0;},top() {this.slideEffect = 'transform: translateY(-100%); transition: all .5s;';this.resultPanelStatus = 'top';},move() {// this.$refs.resultBody.style.height = `${-this.disY + this.defaultHeight}px`;this.$refs.resultBody.style.overflowY = 'auto';},scroll() {this.$refs.resultBody.style.overflowY = 'auto';},close(ev) { // click事件会和touchestart事件冲突//当⾯板处于最⾼状态被关闭时,恢复到正常⾼度状态,以避免下次打开仍处于最⾼处this.normal();// this.$refs.resultBody.scrollTop = 0;// this.$refs.resultBody.style.overflowY = 'hidden';this.$store.state.resultPanel.show = false;this.$emit('on-cancel');},handleNavigate(_index) {// this.$emit("on-item-click", JSON.parse(JSON.stringify(this.cloneData[_index])), _index); //这个是获取⾏的元素,和索引 this.$emit("on-click-gohere", _index); // 这个是获取索引},focusResultOnMap(_index) {this.$emit("on-click-item", _index); // 这个是获取索引},// deepCopydeepCopy(data) {const t = this.typeOf(data);let o;if (t === 'array') {o = [];} else if (t === 'object') {o = {};} else {return data;}if (t === 'array') {for (let i = 0; i < data.length; i++) {o.push(this.deepCopy(data[i]));}} else if (t === 'object') {for (let i in data) {o[i] = this.deepCopy(data[i]);}}return o;},typeOf(obj) {const toString = Object.prototype.toString;const map = {'[object Boolean]': 'boolean','[object Number]': 'number','[object String]': 'string','[object Function]': 'function','[object Array]': 'array','[object Date]': 'date','[object RegExp]': 'regExp','[object Undefined]': 'undefined','[object Null]': 'null','[object Object]': 'object'};return map[toString.call(obj)];}}}</script><style type="text/less" scoped>//scoped是指这个样式只能⽤于当前组件.transparent {bottom: 0;left: 0;position: absolute;right: 0;top: 0;background-color: rgba(0, 0, 0, 0.3);opacity: 0;transition: opacity .3s;z-index: -1000000000;}.transparent.active {opacity: 1;z-index: 0;}.mapbox-result {height: calc(100% - 2.8vw);background: #fff;position: absolute;font-family: PingFangSC-Regular;font-size: 12px;color: #4A4A4A;bottom: 0;width: 94.4vw;margin: 0 2.8vw;outline: 0;overflow: auto;box-sizing: border-box;top: 100%;overflow: hidden;border-radius: 5px 5px 0 0;box-shadow: 0 0 12px 0px rgba(153, 153, 153, 0.25); }.mapbox-result-content {position: relative;background-color: #fff;border: 0;}.mapbox-result-header {padding: 24px 10vw;line-height: 1;text-align: center;}.mapbox-result-header-title {white-space: nowrap;}.mapbox-result-close {position: absolute;width: 16px;height: 16px;background:url('../../assets/******************'); background-size: 100% 100%;background-repeat: no-repeat;right: 5.6vw;top: 22px}.mapbox-result-body {height: auto;}</style><template><div class="mapbox-result-option"><div class="mapbox-result-option-content"><!--<button class="mapbox-btn mapbox-btn-primary mapbox-result-option-btn mapbox-btn-right" @click="handleClick"> <i class="mapbox-result-option-icon"></i></button>--><a class="mapbox-result-option-nav" @click="handleClick"></a><div class="mapbox-result-option-item" @click="resultItemClick"><div class="mapbox-result-option-item-main"><p class="mapbox-result-option-title"><span class="mapbox-result-option-order">{{index}}</span>{{name}}</p><p class="mapbox-result-option-note">{{floorName}},距离当前位置{{meter}}⽶</p></div></div></div></div></template><script>export default {name: 'result-option',props: {value: {type: Boolean,default: true},index: {type: Number},name: {type: String},meter: {type: Number},floorName: {type: String}},data() {return {}},methods: {handleClick() {this.$emit("on-click-gohere");},resultItemClick() {this.$emit("on-click-item");}}}</script><style type="text/less" scoped>.mapbox-result-option {height: 60px;width: calc(100% - 8.3vw);display: block;border-bottom: 1px solid #dbd6d6;box-sizing: border-box;margin: 0 auto;overflow: hidden;}.mapbox-result-option-content {padding: 0;margin: 0;font-family: PingFangSC-Regular;font-size: 12px;color: #4A4A4A;position: relative;display: inline-block;width: 100%;}.mapbox-btn {display: inline-block;margin-bottom: 0;font-weight: 400;text-align: center;vertical-align: middle;touch-action: manipulation;background-image: none;border: 1px solid transparent;white-space: nowrap;line-height: 1.5;}.mapbox-result-option-btn {position: relative;border-radius: 50%;height: 30px;width: 8.3vw;padding: 0;outline: none;margin: 15px 4.2vw 15px 0;z-index: 1; /*避免⽂字挡住了按钮*/}.mapbox-btn-primary {color: #fff;background-color: #2A70FE;border-color: #2A70FE;}.mapbox-btn-right {float: right;margin-right: 4.2vw;}.mapbox-result-option-icon {position: absolute;top: 50%;left: 50%;transform: translate(-50%, -50%);background-size: 100% 100%;width: 2.9vw;height: 18px;background: url("../../../static/image/icon_nav3.png") no-repeat; }.mapbox-result-option-nav {background: url("../../assets/btn_route_planning_normal.png"); width: 30px;height: 30px;background-size: 100% 100%;background-repeat: no-repeat;float: right;display: block;position: absolute;right: 0;top: 15px;z-index: 1;}.mapbox-result-option-item {display: block;position: relative;margin: 10px auto;}.mapbox-result-option-item-main {display: block;vertical-align: middle;font-size: 16px;color: #4A4A4A;}.mapbox-result-option-title {font: 15px/21px PingFangSC-Regular;position: relative;}.mapbox-result-option-order {font: 15px/21px PingFangSC-Medium;position: relative;margin-left: 1.9vw;margin-right: 4.6vw;}.mapbox-result-option-note {font: 12px/16px PingFangSC-Regular;color: #9B9B9B;white-space: normal;position: relative;margin-left: 12.5vw;margin-top: 3px;}</style>ev = ev || event,这个写法是兼容各个浏览器,在Firefox浏览器中,事件绑定的函数获取事件本⾝,是通过函数中传⼊的,⽽IE等浏览器中,则可以通过window.event或者event的⽅式来获取函数本⾝。
- 1、下载文档前请自行甄别文档内容的完整性,平台不提供额外的编辑、内容补充、找答案等附加服务。
- 2、"仅部分预览"的文档,不可在线预览部分如存在完整性等问题,可反馈申请退款(可完整预览的文档不适用该条件!)。
- 3、如文档侵犯您的权益,请联系客服反馈,我们会尽快为您处理(人工客服工作时间:9:00-18:30)。
vue 无缝滚动案例
Vue.js 是一种用于构建用户界面的渐进式JavaScript框架,它提供了无缝滚动的功能,可以在网页中实现滚动效果。
在本文中,我将为您列举10个符合标题要求的Vue无缝滚动案例。
1. 无限滚动列表:通过Vue的循环指令v-for和CSS的动画效果,可以实现一个无限滚动的列表。
可以通过监听滚动事件,当滚动到列表底部时,将列表的最后一个元素移动到列表的开头,从而实现列表的无限滚动。
2. 图片轮播:利用Vue的过渡效果和定时器,可以实现一个图片轮播的效果。
通过设置定时器,每隔一段时间切换图片,并使用过渡效果实现图片的滑动效果,从而实现无缝滚动的图片轮播。
3. 滚动导航栏:通过监听滚动事件和计算滚动距离,可以实现一个滚动导航栏。
当页面滚动到一定距离时,导航栏会固定在页面顶部,从而实现导航栏的无缝滚动效果。
4. 无缝滚动文字:通过利用Vue的过渡效果和CSS的动画效果,可以实现一个无缝滚动的文字。
可以使用定时器和过渡效果,每隔一段时间将文字移动到容器的开头,从而实现文字的无缝滚动效果。
5. 无缝滚动表格:通过Vue的数据绑定和计算属性,可以实现一个无缝滚动的表格。
可以通过监听滚动事件和计算滚动距离,当滚动到表格底部时,动态加载新的数据,从而实现表格的无缝滚动效果。
6. 滚动加载:通过Vue的数据绑定和计算属性,可以实现一个滚动加载的效果。
可以监听滚动事件和计算滚动距离,当滚动到页面底部时,动态加载新的数据,从而实现滚动加载效果。
7. 无缝滚动标签:通过Vue的过渡效果和计算属性,可以实现一个无缝滚动的标签。
可以使用定时器和过渡效果,每隔一段时间将标签移动到容器的开头,从而实现标签的无缝滚动效果。
8. 无缝滚动消息:通过Vue的数据绑定和计算属性,可以实现一个无缝滚动的消息。
可以使用定时器和过渡效果,每隔一段时间将消息移动到容器的开头,从而实现消息的无缝滚动效果。
9. 无缝滚动网格:通过Vue的数据绑定和计算属性,可以实现一个无缝滚动的网格。
可以通过监听滚动事件和计算滚动距离,当滚动到网格底部时,动态加载新的数据,从而实现网格的无缝滚动效果。
10. 无缝滚动标题:通过Vue的过渡效果和计算属性,可以实现一个无缝滚动的标题。
可以使用定时器和过渡效果,每隔一段时间将标题移动到容器的开头,从而实现标题的无缝滚动效果。
以上是我为您列举的10个符合标题要求的Vue无缝滚动案例。
通过使用Vue的特性和相关技术,我们可以实现各种各样的无缝滚动效果,为用户提供更好的界面体验。
希望这些案例对您有所帮助!。