Winform之TextBox边框底色重绘实例
WinForm控件之【TextBox】

WinForm控件之【TextBox】基本介绍⽂本控件,提供多⾏⽂本编辑和密码字符掩码功能。
常设置属性ForeColor:此组件的前景⾊,⽤于显⽰⽂本;BorderStyle:指⽰编辑控件是否应带有边框或边框类型;Lines:多⾏编辑中的⽂本⾏,作为字符串值的数组;MaxLength:指定可以在编辑控件中输⼊的最⼤字符数;PasswordChar:指⽰将为单⾏编辑控件的密码输⼊显⽰的字符;Multiline:控制编辑控件的⽂本是否能够跨越多⾏;ScrollBars:定义控件滚动条的⾏为;WordWrap:指⽰多⾏编辑控件是否⾃动换⾏;Enabled:指⽰是否启⽤该控件,true为启⽤状态⽤户可编辑,false为禁⽤状态⽤户不可编辑;Name:指⽰代码中⽤来标识该对象的名称;Text:获取或设置多格式⽂本框中的⽂本;事例举例相关代码//控件提⽰信息变量string strUser = "长度不低于四个字符", strPwd = "长度不低于六个字符,由字母和数字组成";#region⽤户密码控件设置提⽰信息相关事件private void txt_user_Enter(object sender, EventArgs e){TextBox tb = (TextBox)sender;if (tb.Text.Equals(strUser)){tb.Text = string.Empty;tb.ForeColor = System.Drawing.SystemColors.WindowText;}}private void txt_user_Leave(object sender, EventArgs e){TextBox tb = (TextBox)sender;if (string.IsNullOrWhiteSpace(tb.Text)){tb.Text = strUser;tb.ForeColor = System.Drawing.SystemColors.ScrollBar;}}private void txt_pwd_Enter(object sender, EventArgs e){TextBox tb = (TextBox)sender;if (tb.Text.Equals(strPwd)){tb.Text = string.Empty;tb.ForeColor = System.Drawing.SystemColors.WindowText;tb.PasswordChar = '*';}}private void txt_pwd_Leave(object sender, EventArgs e){TextBox tb = (TextBox)sender;if (string.IsNullOrWhiteSpace(tb.Text)){tb.Text = strPwd;tb.ForeColor = System.Drawing.SystemColors.ScrollBar;tb.PasswordChar = '\0';}}#endregion//登录private void btn_login_Click(object sender, EventArgs e){if (string.IsNullOrWhiteSpace(txt_user.Text) || txt_user.Text.Equals(strUser)){MessageBox.Show("⽤户名不能为空!", "系统提⽰", MessageBoxButtons.OK, MessageBoxIcon.Warning);return;}else{if (txt_user.Text.Length < 4){MessageBox.Show("⽤户名长度不能低于四个字符!", "系统提⽰", MessageBoxButtons.OK, MessageBoxIcon.Warning);return;}}if (string.IsNullOrWhiteSpace(txt_pwd.Text) || txt_pwd.Text.Equals(strPwd)){MessageBox.Show("密码不能为空!", "系统提⽰", MessageBoxButtons.OK, MessageBoxIcon.Warning);return;}else{if (txt_pwd.Text.Length < 6){MessageBox.Show("⽤户名长度不能低于六个字符!", "系统提⽰", MessageBoxButtons.OK, MessageBoxIcon.Warning);return;}string strRegex = "[0-9]";if (!System.Text.RegularExpressions.Regex.IsMatch(txt_pwd.Text, strRegex)){MessageBox.Show("密码必须存在数字,请确认!", "系统提⽰", MessageBoxButtons.OK, MessageBoxIcon.Warning);return;}strRegex = "[a-zA-Z]";if (!System.Text.RegularExpressions.Regex.IsMatch(txt_pwd.Text, strRegex)){MessageBox.Show("密码必须存在字母,请确认!", "系统提⽰", MessageBoxButtons.OK, MessageBoxIcon.Warning);return;}}MessageBox.Show("登录成功!", "系统提⽰", MessageBoxButtons.OK, rmation);}//退出private void btn_exit_Click(object sender, EventArgs e){this.Close();}。
winform richtextbox使用
winform richtextbox使用下面是一个关于使用WinForm RichTextBox 控件的1500-2000 字的文章。
WinForm RichTextBox 使用指南引言WinForm 是一个功能强大的桌面应用程序开发框架,它提供了许多可视化控件来帮助开发人员快速构建应用程序。
其中之一就是RichTextBox 控件,它允许我们在应用程序中创建和编辑格式化文本。
本文将详细介绍如何使用WinForm RichTextBox 控件,并提供一些实用的示例来帮助您更好地理解。
什么是WinForm RichTextBox 控件?WinForm RichTextBox 控件是一个可用于显示和编辑文本的控件。
与标准文本框控件相比,它具有更多的功能,例如可以支持不同的字体、字号和颜色,还可以插入图片和超链接等。
它是一个非常灵活和强大的工具,可以满足各种文本编辑需求。
1. 创建一个WinForm 应用程序首先,我们需要创建一个新的WinForm 应用程序来使用RichTextBox 控件。
打开Visual Studio,并选择新建项目。
在弹出的对话框中选择“Windows 应用程序”模板,然后点击“下一步”。
在下一个对话框中,输入应用程序的名称并选择一个保存位置。
最后,点击“创建”按钮,即可创建一个新的WinForm 应用程序。
2. 在窗体上添加RichTextBox 控件一旦应用程序创建完成,我们可以在窗体上添加RichTextBox 控件。
在Visual Studio 的设计器中打开窗体,然后从工具箱中拖动一个RichTextBox 控件到窗体上的合适位置。
3. 设置RichTextBox 控件的属性-在设计时,我们可以通过设置控件的各种属性来自定义RichTextBox 控件的外观和行为。
例如,我们可以设置控件的Name 属性,以便在代码中引用它。
我们还可以设置控件的大小和位置,以确保它适合窗体布局。
Visual C++调整对话框背景颜色代码
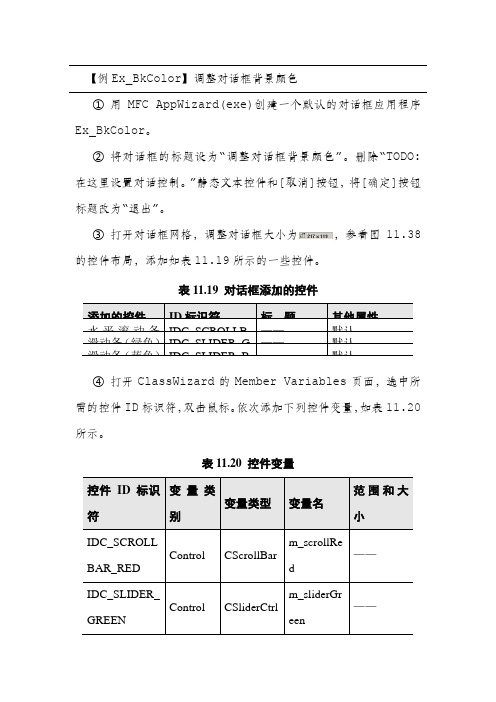
【例Ex_BkColor】调整对话框背景颜色①用MFC AppWizard(exe)创建一个默认的对话框应用程序Ex_BkColor。
②将对话框的标题设为“调整对话框背景颜色”。
删除“TODO: 在这里设置对话控制。
”静态文本控件和[取消]按钮,将[确定]按钮标题改为“退出”。
③打开对话框网格,调整对话框大小为,参看图11.38的控件布局,添加如表11.19所示的一些控件。
表11.19 对话框添加的控件④打开ClassWizard的Member Variables页面,选中所需的控件ID标识符,双击鼠标。
依次添加下列控件变量,如表11.20所示。
表11.20 控件变量⑤为CEx_BkColorDlg类添加两个成员变量,一个是int型m_nRedValue,用来指定RGB中的红色分量,另一个是画刷CBrush 类对象m_Brush,用来设置对话框背景所需要的画刷。
在OnInitDialog中添加下列初始化代码:BOOL CEx_BkColorDlg::OnInitDialog(){CDialog::OnInitDialog();…// TODO: Add extra initialization herem_scrollRed.SetScrollRange(0, 255);m_sliderBlue.SetRange(0, 255);m_sliderGreen.SetRange(0, 255);m_nBlue = m_nGreen = m_nRedValue = 192;UpdateData( FALSE );m_scrollRed.SetScrollPos(m_nRedValue);return TRUE; // return TRUE unless you set the focus to a control}⑥用MFC ClassWizard为CEx_BkColorDlg类添加WM_HSCROLL消息映射,并添加下列代码:void CEx_BkColorDlg::OnHScroll(UINT nSBCode, UINT nPos, CScrollBar* pScrollBar){int nID = pScrollBar->GetDlgCtrlID();// 获取对话框中控件ID值if (nID == IDC_SCROLLBAR_RED) { // 若是滚动条产生的水平滚动消息switch(nSBCode){case SB_LINELEFT: m_nRedValue--;// 单击滚动条左边箭头break;case SB_LINERIGHT: m_nRedValue++;// 单击滚动条右边箭头break;case SB_PAGELEFT: m_nRedValue -= 10;break;case SB_PAGERIGHT: m_nRedValue += 10;break;case SB_THUMBTRACK: m_nRedValue = nPos;break;}if (m_nRedValue<0) m_nRedValue = 0;if (m_nRedValue>255) m_nRedValue = 255;m_scrollRed.SetScrollPos(m_nRedValue);}Invalidate(); // 使对话框无效,强迫系统重绘对话框CDialog::OnHScroll(nSBCode, nPos, pScrollBar);}⑦用MFC ClassWizard为CEx_BkColorDlg类添加WM_CTLCOLOR消息映射,并添加下列代码:HBRUSH CEx_BkColorDlg::OnCtlColor(CDC* pDC,CWnd* pWnd, UINT nCtlColor){UpdateData(TRUE);COLORREF color = RGB(m_nRedValue, m_nGreen, m_nBlue);m_Brush.Detach(); // 使画刷和对象分离m_Brush.CreateSolidBrush(color); // 创建颜色画刷pDC->SetBkColor( color ); // 设置背景颜色return (HBRUSH)m_Brush; // 返回画刷句柄,以便系统使此画刷绘制对话框}代码中,COLORREF是用来表示RGB颜色的一个32位的数据类型,它是Visual C++中一种专门用来定义颜色的数据类型。
『转载』C#winform中dataGridView的重绘(进度条,虚线,单元格合并等)

『转载』C#winform中dataGridView的重绘(进度条,虚线,单元格合并等)原⽂转载⾃:最近⽐较浅的研究了⼀下dataGridView的重绘,发现⾥⾯还是有很多东西可以学习的,摘录如下(其实就是在dataGridView1_CellPainting写⼀些代码)主要代码:1int top = 0;2int left = 0;3int height = 0;4int width1 = 0;5///<summary>6///窗体的重绘事件7///</summary>8///<param name="sender"></param>9///<param name="e"></param>10private void dataGridView1_CellPainting(object sender, DataGridViewCellPaintingEventArgs e)11 {12/** 表头处理*************************************/13if (e.RowIndex == -1)14 {15if (e.ColumnIndex == 0 || e.ColumnIndex == 1 || e.ColumnIndex == 2 || e.ColumnIndex == 3 || e.ColumnIndex == 4 || e.ColumnIndex == 5)16 {17 top = e.CellBounds.Top;18 left = e.CellBounds.Left - 1;19 height = e.CellBounds.Height;20 width1 = e.CellBounds.Width;21 Rectangle rect1 = new Rectangle(left, top, width1, e.CellBounds.Height);22//表头第⼀列23if (e.ColumnIndex == 0)24 {25using (Brush backColorBrush = new SolidBrush(Color.Blue))26 {27//抹去原来的cell背景28 e.Graphics.FillRectangle(backColorBrush, rect1);29 }30 }31//表头第⼆列32else if (e.ColumnIndex == 1)33 {34using (Brush backColorBrush = new SolidBrush(Color.Orange))35 {36//抹去原来的cell背景37 e.Graphics.FillRectangle(backColorBrush, rect1);38 }39 }40//表头第三列41else if (e.ColumnIndex == 2)42 {43using (Brush backColorBrush = new SolidBrush(Color.Orange))44 {45//抹去原来的cell背景46 e.Graphics.FillRectangle(backColorBrush, rect1);47 }48 }49//表头第四列50else if (e.ColumnIndex == 3)51 {52using (Brush backColorBrush = new SolidBrush(Color.Orange))53 {54//抹去原来的cell背景55 e.Graphics.FillRectangle(backColorBrush, rect1);56 }57 }58//表头第五列59else if (e.ColumnIndex == 4)60 {61using (Brush backColorBrush = new SolidBrush(Color.Blue))62 {63//抹去原来的cell背景64 e.Graphics.FillRectangle(backColorBrush, rect1);65 }66 }67//表头第六列68else if (e.ColumnIndex == 5)69 {70using (Brush backColorBrush = new SolidBrush(Color.Blue))71 {72//抹去原来的cell背景73 e.Graphics.FillRectangle(backColorBrush, rect1);74 }75 }76using (Pen gridLinePen = new Pen(Color.Green , 1))77 {78//绘出上线79 e.Graphics.DrawLine(gridLinePen, left, top, left + width1, top);80//绘出下线81 e.Graphics.DrawLine(gridLinePen, left, top + height, left + width1, top + height); 82//绘出左线83 e.Graphics.DrawLine(gridLinePen, left, top, left, top + height);84string columnValue = "";85//计算绘制字符串的位置86if (e.ColumnIndex == 0)87 {88 columnValue = "零件号";89 }90else if (e.ColumnIndex == 1)91 {92 columnValue = "8:00--11:59";93 }94else if (e.ColumnIndex == 2)95 {96 columnValue = "12:00--16:59";97 }98else if (e.ColumnIndex == 3)99 {100 columnValue = "18:00--30:59";101 }102else if (e.ColumnIndex == 4)103 {104 columnValue = "进度";105 }106else if (e.ColumnIndex == 5)107 {108 columnValue = "进度率";109 }110 SizeF sf = e.Graphics.MeasureString(columnValue, e.CellStyle.Font);111float lstr = (width1 - sf.Width) / 2;112//float rstr = sf.Height/2;113float rstr = (height - sf.Height) / 2;114//画出⽂本框115116if (columnValue != "")117 {118 e.Graphics.DrawString(columnValue, e.CellStyle.Font,119new SolidBrush(Color.White),120 left + lstr,121 top + rstr,122 StringFormat.GenericDefault);123 }124 }125 e.Handled = true;126 }127128 }129/** 内容处理*************************************/130else131 {132if (e.ColumnIndex == 0 || e.ColumnIndex == 1 || e.ColumnIndex == 2 || e.ColumnIndex == 3 || e.ColumnIndex == 4 || e.ColumnIndex == 5) 133 {134 top = e.CellBounds.Top;135 left = e.CellBounds.Left - 1;136 height = e.CellBounds.Height;137 width1 = e.CellBounds.Width;138 Rectangle rect1 = new Rectangle(left, top, width1, e.CellBounds.Height);139//内容第⼀列140if (e.ColumnIndex == 0)141 {142using (Brush backColorBrush = new SolidBrush(Color.LightGreen))143 {144//抹去原来的cell背景145 e.Graphics.FillRectangle(backColorBrush, rect1);146 }147 }148//内容第⼆列149else if (e.ColumnIndex == 1)150 {151using (Brush backColorBrush = new SolidBrush(Color.White))152 {153//抹去原来的cell背景154 e.Graphics.FillRectangle(backColorBrush, rect1);155 }156 }157//内容第三列158else if (e.ColumnIndex == 2)159 {160using (Brush backColorBrush = new SolidBrush(Color.White))161 {162//抹去原来的cell背景163 e.Graphics.FillRectangle(backColorBrush, rect1);164 }165 }166//内容第四列167else if (e.ColumnIndex == 3)168 {169using (Brush backColorBrush = new SolidBrush(Color.White))170 {171//抹去原来的cell背景172 e.Graphics.FillRectangle(backColorBrush, rect1);173 }174 }175//内容第五列176else if (e.ColumnIndex == 4)177 {178using (Brush backColorBrush = new SolidBrush(Color.LightGreen))179 {180//抹去原来的cell背景181 e.Graphics.FillRectangle(backColorBrush, rect1);182 }183 }184//内容第六列185else if (e.ColumnIndex == 5)186 {187using (Brush backColorBrush = new SolidBrush(Color.LightGreen))188 {189//抹去原来的cell背景190 e.Graphics.FillRectangle(backColorBrush, rect1);191 }192 }193using (Pen gridLinePen = new Pen(Color.Green, 1))194 {195//绘出左线196 e.Graphics.DrawLine(gridLinePen, left, top, left, top + height);197198 }199//绘出进度率的线200if (e.ColumnIndex == 1 || e.ColumnIndex == 2 || e.ColumnIndex == 3)201 {202string str = e.Value.ToString();203int index =stIndexOf ("/");204int widths = Convert.ToInt32(Convert.ToDouble(str.Substring(0, index)) / Convert.ToDouble(str.Substring(index + 1)) * width1);205if (widths > width1)206 {207 widths = width1;208 }209using (Pen gridLinePen = new Pen(Color.Blue, Convert.ToInt32(height / 3)))210 {211212 e.Graphics.DrawLine(gridLinePen, left, top + height / 2 + Convert.ToInt32(height / 3), left + widths, top + height / 2 + Convert.ToInt32(height /3)); 213214 }215 }216//画出上下线,中线和单元格的数据217using (Pen gridLinePen = new Pen(Color.Green , 1))218 {219float[] BlueValues = { 1, 1,1, 1 };220 gridLinePen.DashPattern = BlueValues;221//绘出上线222 e.Graphics.DrawLine(gridLinePen, left, top, left + width1, top);223//绘出下线224 e.Graphics.DrawLine(gridLinePen, left, top + height, left + width1, top + height);225if (e.ColumnIndex == 1 || e.ColumnIndex == 2 || e.ColumnIndex == 3)226 {227228//绘出中线229 e.Graphics.DrawLine(gridLinePen, left, top + height / 2, left + width1, top + height / 2);230 e.Graphics.DrawLine(gridLinePen, left + width1/4, top + height / 2, left + width1/4, top + height);231 e.Graphics.DrawLine(gridLinePen, left + width1 / 2, top + height / 2, left + width1 / 2, top + height);232 e.Graphics.DrawLine(gridLinePen, left + width1*3 / 4, top + height / 2, left + width1*3 / 4, top + height);233 }234235string columnValue =e.Value.ToString () ;236 SizeF sf = e.Graphics.MeasureString(columnValue, e.CellStyle.Font);237float lstr = (width1 - sf.Width) / 2;238//float rstr = sf.Height/2;239float rstr = (height/2 - sf.Height) / 2;240//画出⽂本框数据241if (columnValue != "")242 {243 e.Graphics.DrawString(columnValue, e.CellStyle.Font,244new SolidBrush(Color.Black),245 left + lstr,246 top + rstr,247 StringFormat.GenericDefault);248 }249 }250 e.Handled = true;251 }252 }253 }例图如下:。
用滚动条调整TextBox的背景颜色

用滚动条调整TextBox的背景颜色创建如图1的程序界面:图1步骤如下:1、在VB6.0窗口界面的左边工具栏中,使用Lable()创建土1中的四个标签,并分别命名为红Red、绿Green、蓝Blue以及大小等。
2、使用TextBox(),创建一个文本框,命名为TextBackColor,值为空。
3、使用Hscrollbar()、Vscrollbar()创建图1中的水平及竖直滚动条,并分别命名为HsbRed、HsbGreen、HsbBlue及VSbsize等。
由于三原色的大小取值为0-255,故将三个滚动条的Max值设为255。
同样,竖直滚动条显示上述所创建文本框的显示大小,故设其Caption为100%。
4、上述创建的结果如图2。
图2以下对相应控件进行编程:1、双击红色滚动条,弹出程序代码窗口如图3。
图32、下拉菜单中选中HsbRed(对象)及Change(过程),输入Private Sub HsbRed_Change()TextBackColor.BackColor=RGB(HsbRed.Value,HsbGreen.Value,HsbBlue.Value) End Sub3、下拉菜单中选中HsbRed及Scroll也输入上面的代码:Private Sub HsbRed_Scroll()TextBackColor.BackColor=RGB(HsbRed.Value,HsbGreen.Value,HsbBlue.Value) End Sub4、同理,在绿色与蓝色滚动条中输入相应代码。
这样,通过滚动条控制文本框背景色的目的达到了。
5、下拉菜单中选择“通用”选项,定义全局全量,用来储存文本框的原始尺寸,输入:Dim Iwidth As IntegerDim Iheight As Integer6、下拉菜单中选中Vsbsize及Change(Scroll)用来改变文本框尺寸的竖向滚动条,输入如下代码:Change事件:Private Sub VsbSize_Change()TextBackColor.Width=Iwidth*(VsbSize.Value/100)TextBackColor.Height=Iheight*(VsbSize.Value/100)Lblsize.Caption=VsbSize.Value&"%"End SubScroll事件:Private Sub VsbSize_Scroll()TextBackColor.Width=Iwidth*(VsbSize.Value/100)TextBackColor.Height=Iheight*(VsbSize.Value/100)Lblsize.Caption=VsbSize.Value&"%"End Sub7、下拉菜单选择Form及Load,输入以下代码:Private Sub Form_Load()Iwidth=TextBackColor.WidthIheight=TextBackColor.HeightLblsize.Caption="100%"End Sub8、调试,结果如图4。
C#Winform使用扩展方法实现自定义富文本框(RichTextBox)字体颜色

C#Winform使⽤扩展⽅法实现⾃定义富⽂本框(RichTextBox)字体颜⾊在利⽤C#开发Winform应⽤程序的时候,我们有可能使⽤RichTextBox来实现实时显⽰应⽤程序⽇志的功能,⽇志⼜分为:⼀般消息,警告提⽰和错误等类别。
为了更好地区分不同类型的⽇志,我们需要使⽤不同的颜⾊来输出对应的⽇志,⽐如:⼀般消息为绿⾊,警告提⽰的⽤橙⾊,错误的⽤红⾊字体。
在原⽣Winform的RichTextBox中,是没有这种设置选项的。
如需实现以上描述的功能,我们可以使⽤.NET的静态扩展⽅法来处理。
实现扩展⽅法的类和⽅法本⾝都必须是静态的,如果你对扩展⽅法还不是太了解,建议先查阅相关⽂档资料。
我这⾥就把实现改变RichTextBox字体颜⾊的扩展⽅法贴出:using System;using System.Collections.Generic;using System.Drawing;using System.Linq;using System.Text;using System.Threading.Tasks;using System.Windows.Forms;namespace DocDetector.Core.Extensions{public static class RichTextBoxExtension{public static void AppendTextColorful(this RichTextBox rtBox, string text, Color color, bool addNewLine = true){if (addNewLine){text += Environment.NewLine;}rtBox.SelectionStart = rtBox.TextLength;rtBox.SelectionLength = 0;rtBox.SelectionColor = color;rtBox.AppendText(text);rtBox.SelectionColor = rtBox.ForeColor;}}}写好扩展⽅法后,使⽤就⾮常简单了,如下:rtxtLog.AppendTextColorful("Your message here",Color.Green);好了,⼤功告成!试⼀下,正常的看到的RichTextBox输出的⽂字是否是绿⾊的呢?PS:如果是红绿⾊盲就得另说了,哈哈~~~希望本⽂所述对⼤家的WinForm程序设计有所帮助。
C#winform动态添加控件之GroupBox和TextBox

C#winform动态添加控件之GroupBox和TextBox ⼀、添加GroupBox控件1.实例化并显⽰1//实例化GroupBox控件2 GroupBox groubox = new GroupBox();3 = "gbDemo";4 groubox.Text = "实例";5//设置上和左位置6//groubox.Top = 50;7//groubox.Left = 50;8//通过坐标设置位置9 groubox.Location = new Point(12, 12);10//将groubox添加到页⾯上11this.Controls.Add(groubox);⼆、在GroupBox控件中添加TextBox控件1.实例化并显⽰//实例化TextBox控件TextBox txt = new TextBox(); = "txtDemo";txt.Text = "txt实例";//将TextBox在GroupBox容器中显⽰//txt.Parent = groubox;//将TextBox在GroupBox容器中显⽰groubox.Controls.Add(txt);2.置于顶层和置于底层1//置于顶层2 txt.BringToFront();3//置于底层4 txt.SendToBack();3.添加事件1//添加Click单击事件2 txt.Click += new EventHandler(btn_Click);34 }56//定义Click单击事件7private void btn_Click(object sender, EventArgs e)8 {9 MessageBox.Show("事件添加成功");10 }三、添加多个1.动态添加多个1//添加控件2public void AddGroupBox()3 {4string name = "gbox";5for (int i = 0; i < 3; i++)6 {7 GroupBox gbox = new GroupBox();8 = name + i;9 gbox.Text=name+i;10 gbox.Width = 300;11 gbox.Height = 100;12 gbox.Location = new Point(32, 20 + i * 150);13this.Controls.Add(gbox);14//调⽤添加⽂本控件的⽅法15 AddTxt(gbox);16 }17 }18//添加⽂本控件19public void AddTxt(GroupBox gb)20 {21string name = "txt";22for (int i = 0; i < 3; i++)23 {24 TextBox txt = new TextBox();25 =+ name + i;26 txt.Text =+"|"+ name + i;27 txt.Location = new Point(12, 15 + i * 30);28 gb.Controls.Add(txt);29 }30 }实例:1using System;2using System.Collections.Generic;3using ponentModel;4using System.Data;5using System.Drawing;6using System.Linq;7using System.Text;8using System.Windows.Forms;910namespace Select_ListBox11 {12public partial class Form2 : Form13 {TextBox txt = new TextBox();14public Form2()15 {16 InitializeComponent();17 }1819private void Form2_Load(object sender, EventArgs e)20 {21 AddGroupBox();22////实例化GroupBox控件23//GroupBox groubox = new GroupBox();24// = "gbDemo";25//groubox.Text = "实例";26////设置上和左位置27////groubox.Top = 50;28////groubox.Left = 50;29////通过坐标设置位置30//groubox.Location = new Point(12, 12);31////将groubox添加到页⾯上32//this.Controls.Add(groubox);3334////实例化TextBox控件35//TextBox txt = new TextBox();36// = "txtDemo";37//txt.Text = "txt实例";38////将TextBox在GroupBox容器中显⽰39////txt.Parent = groubox;40////将TextBox在GroupBox容器中显⽰41//groubox.Controls.Add(txt);4243////置于顶层44//txt.BringToFront();45////置于底层46//txt.SendToBack();47////添加Click单击事件48//txt.Click += new EventHandler(btn_Click);4950 }5152////定义Click单击事件53//private void btn_Click(object sender, EventArgs e) 54//{55// MessageBox.Show("ss");56//}5758//添加控件59public void AddGroupBox()60 {61string name = "gbox";62for (int i = 0; i < 3; i++)63 {64 GroupBox gbox = new GroupBox();65 = name + i;66 gbox.Text=name+i;67 gbox.Width = 300;68 gbox.Height = 100;69 gbox.Location = new Point(32, 20 + i * 150);70this.Controls.Add(gbox);71//调⽤添加⽂本控件的⽅法72 AddTxt(gbox);73 }74 }75//添加⽂本控件76public void AddTxt(GroupBox gb)77 {78string name = "txt";79for (int i = 0; i < 3; i++)80 {81 TextBox txt = new TextBox();82 =+ name + i;83 txt.Text =+"|"+ name + i;84 txt.Location = new Point(12, 15 + i * 30);85 gb.Controls.Add(txt);86 }87 }88 }89 }效果:第⼀次在博客园⾥写学习记录,新⼿上路,请多指教。
Winform美化

Winform美化⾸先,我们先来实现主界⾯的扁平化 此处分为两个步骤,第⼀步是更改winform⾃带的MainForm窗体属性,第⼆步是添加窗体事件。
将主窗体FormBorderStyle更改为None,这样就得到了⼀个⽆边框的窗体(winform⾃带边框太丑。
)调节背景⾊,建议找到⾃⼰喜欢的颜⾊,然后使⽤取⾊器(我⽤的是按键精灵⾃带的取⾊板)取得想要的RGB参数,输⼊到BackColor 属性之中在主窗体的Mouse_Down中添加如下事件,实现窗体随意拖动:[DllImport("user32.dll")]public static extern bool ReleaseCapture();[DllImport("user32.dll")][DllImport("user32.dll")]public static extern bool SendMessage(IntPtr hwnd, int wMsg, int wParam, int lParam);public const int WM_SYSCOMMAND = 0x0112;public const int SC_MOVE = 0xF010;public const int HTCAPTION = 0x0002;/// <summary>/// 为了是主界⾯能够移动/// </summary>/// <param name="sender"></param>/// <param name="e"></param>private void MainForm_MouseDown(object sender, MouseEventArgs e){ReleaseCapture();SendMessage(this.Handle, WM_SYSCOMMAND, SC_MOVE + HTCAPTION, 0);}添加最⼩化、退出事件的按钮,背景⾊BackColor和字体⾊Forecolor设置为与界⾯颜⾊较为搭配的,将按钮的FlatStyle设置为Popup,它会⾃⼰随着界⾯风格调整哦~~最⼩化和退出的代码如下:this.WindowState = FormWindowState.Minimized;this.Close();到此为⽌主窗体的美化以及基本功能实现完毕窗体基本控件实现美化tabcontrol美化 通过tabcontrol的drawitem事件,来达到改变tabpage字体、字体颜⾊以及背景⾊的⽬的private void tabControl1_DrawItem(object sender, DrawItemEventArgs e){SolidBrush back = new SolidBrush(Color.FromArgb(45, 45, 48));SolidBrush white = new SolidBrush(Color.FromArgb(122, 193, 255));Rectangle rec = tabControl1.GetTabRect(0);e.Graphics.FillRectangle(back, rec);Rectangle rec1 = tabControl1.GetTabRect(1);e.Graphics.FillRectangle(back, rec1);StringFormat sf = new StringFormat();sf.Alignment = StringAlignment.Center;for (int i = 0; i < tabControl1.TabPages.Count; i++){Rectangle rec2 = tabControl1.GetTabRect(i);e.Graphics.DrawString(tabControl1.TabPages[i].Text, new Font("微软雅⿊", 9), white, rec2, sf);}}DataGridview美化通过设置ColumnHeadersDefaultCellStyle,来改变列标题的背景、字体和颜⾊通过设置DefaultCellStyle,来改变单元格背景、字体和颜⾊通过设置RowHeadersDefaultCellStyle,来改变⾏标题的背景、字体和颜⾊ProgressBar美化 很多⼈反映winform的进度条设置BackColor和ForeColor属性,不会产⽣效果,进度条颜⾊不会变。
- 1、下载文档前请自行甄别文档内容的完整性,平台不提供额外的编辑、内容补充、找答案等附加服务。
- 2、"仅部分预览"的文档,不可在线预览部分如存在完整性等问题,可反馈申请退款(可完整预览的文档不适用该条件!)。
- 3、如文档侵犯您的权益,请联系客服反馈,我们会尽快为您处理(人工客服工作时间:9:00-18:30)。
TextBox边框及底色重绘实例本实例通过继承TextBox类对TextBox边框及底色进行重绘,本实例实现了TextBox四个边的边框重绘,其他单边的重绘可依照此方式进行扩展。
先来看一下具体效果。
1.设计时TextBox边框线。
2.新增的属性用于对边框底色及边框宽度进行设置,FocusHotTrack=false时不对TextBox进行重绘,即此时就是MS提供的TextBox。
3.运行时效果界面具体代码如下:Windows API :[DllImport("User32.dll")]public static extern IntPtr GetWindowDC(IntPtr hWnd);[DllImport("User32.dll")]public static extern IntPtr ReleaseDC(IntPtr hWnd, IntPtr hdc);注:此处API可用可不用。
实现类:说明:重绘TextBox边框实现过程是:将TextBox加入到一个Panel中,当获取焦点时在Panel 上绘制一个矩形框,同时绘制一个1像素的TextBox边框。
添加Panel的用途是为TextBox绘制外边框,因为当TextBox边框线大于1像素的时候,会覆盖编辑区,引起绘制的边框的变形,为了能根据需要设定边框线的宽度,使用Panel来添加外边框线。
using System;using System.Collections.Generic;using ponentModel;using System.Drawing;using System.Linq;using System.Text;using System.Threading.Tasks;using System.Windows.Forms;namespace Sam.WinUI.Controls{/// <summary>/// </summary>public class RTextBox : System.Windows.Forms.TextBox{/// <summary>/// 是否启用焦点,默认不启用/// </summary>private bool _IsFocusHotTrack = true;/// <summary>/// 获取焦点时背景色/// </summary>private Color _FocusBackColor = Color.MistyRose;/// <summary>/// 获取焦点时边框色/// </summary>private Color _FocusBorderColor = Color.DarkOrange;/// <summary>/// 失去焦点背景色/// </summary>private Color _LostBackColor;/// <summary>/// 失去焦点边框色/// </summary>private Color _LostBorderColor = Color.Transparent;/// <summary>/// 边框线宽度/// </summary>private int _BorderWidth = 1;/// <summary>/// 组件的父容器/// </summary>private Panel _ParentContainer = null;/// <summary>/// 是否启用热点/// </summary>[Category("行为"),Description("获得或设置一个值,指示当鼠标经过控件时控件边框是否发生变化。
只在控件的BorderStyle为FixedSingle时有效"),DefaultValue(true)]public bool FocusHotTrack{get { return _IsFocusHotTrack; }set{this._IsFocusHotTrack = value;//在该值发生变化时重绘控件,下同//在设计模式下,更改该属性时,如果不调用该语句,//则不能立即看到设计试图中该控件相应的变化this.Invalidate();}}/// <summary>/// 获取焦点时背景色/// </summary>public Color HotBackColor{get { return this._FocusBackColor; }set{this._FocusBackColor = value;this.Invalidate();}}/// <summary>/// 获取焦点时边框色/// </summary>public Color HotBorderColor{get { return this._FocusBorderColor; }set{this._FocusBorderColor = value;this.Invalidate();}}/// <summary>/// 失去焦点时背景色/// </summary>public Color LostBackColor{get { return this._LostBackColor; }set{this._LostBackColor = value;this.Invalidate();}}/// <summary>/// 失去焦点时背景色/// </summary>public Color LostBorderColor{get { return this._LostBorderColor; }set{this._LostBorderColor = value;this.Invalidate();}}/// <summary>/// 边框线宽度/// </summary>[DefaultValue(1)]//[EditorBrowsable(EditorBrowsableState.Never),Browsable(false)] public int BorderWidth{get { return this._BorderWidth; }set{this._BorderWidth = value;this.Invalidate();}}public RTextBox():base(){this.BorderStyle = System.Windows.Forms.BorderStyle.FixedSingle;this._LostBackColor = this.BackColor;this.SetStyle(ControlStyles.OptimizedDoubleBuffer, true);this.SetParentContainer();}/// <summary>/// 设置TextBox添加父容器/// </summary>private void SetParentContainer(){this._ParentContainer = new Panel();this._ParentContainer.Controls.Add(this);}/// <summary>/// Windows消息处理函数/// </summary>/// <param name="m"></param>protected override void WndProc(ref Message m){base.WndProc(ref m);//0xf:WM_PRINT 0x133:WM_CTLCOLOREDITif (m.Msg == 0xf || m.Msg == 0x133){ResetBorderColor(m.HWnd);}}/// <summary>/// 重绘边框/// </summary>/// <param name="hWnd"></param>internal void ResetBorderColor(IntPtr hWnd){//根据颜色和边框像素取得一条线System.Drawing.Pen pen = new Pen(this._LostBackColor, this._BorderWidth);//得到当前的句柄IntPtr hdc = Win32.GetWindowDC(hWnd);if (hdc.ToInt32() == 0){return;}if (pen != null){if (_IsFocusHotTrack){if (this.Focused){pen.Color = this._FocusBorderColor;this.BackColor = this._FocusBackColor;}else{pen.Color = this._LostBorderColor;this.BackColor = this._LostBackColor;}//绘制边框System.Drawing.Graphics g = this.Parent.CreateGraphics();g.SmoothingMode = System.Drawing.Drawing2D.SmoothingMode.AntiAlias;g.DrawRectangle(pen,this.Location.X-1,this.Location.Y-1,this.Size.Width+1, this.Size.Height+1);this.CreateGraphics().DrawRectangle(new Pen(pen.Color,1), 0, 0, this.Size.Width - 1, this.Size.Height - 1);pen.Dispose();}}//释放Win32.ReleaseDC(hWnd, hdc);}/// <summary>/// 获取焦点/// </summary>/// <param name="e"></param>protected override void OnGotFocus(EventArgs e){if(this._IsFocusHotTrack){this.Parent.Invalidate();}base.OnGotFocus(e);}/// <summary>/// 失去焦点/// </summary>/// <param name="e"></param>protected override void OnLostFocus(EventArgs e){if(this._IsFocusHotTrack){this.Parent.Invalidate();}base.OnLostFocus(e);}/// <summary>/// 鼠标进入控件编辑区/// </summary>/// <param name="e"></param>protected override void OnMouseEnter(EventArgs e){if (this.Focused){this.Parent.Invalidate();this.Invalidate();}base.OnMouseEnter(e);}/// <summary>/// 鼠标离开编辑区/// </summary>/// <param name="e"></param>protected override void OnMouseLeave(EventArgs e){if (this.Focused){this.Parent.Invalidate();}base.OnMouseLeave(e);}}}。