海盗船游戏机说明书
迷你海盗船说明书

童朔海盗船产品使用和维修说明书目录一:简介二:技术参数三:安装说明四:安全措施五:注意事项六:常见的故障及排除方法七:设备的保养及维修注意事项欢迎使用本公司产品,在使用本产品之前,请详细阅读本说明书,本说明书只适合于本公司所生产的行走海盗船使用。
一:简介行走海盗船是游乐设备海盗船的另一种存在方式,除了继承大型海盗船的惊险刺激,又添加了迷你海盗船的小巧精致,同时行走海盗船也给经营者带来了很大的方便,与以往海盗船相比,行走海盗船具有能够独立行走的特性,不需将整体部件拆开运输的特点,它的惊险刺激、小巧精致、拆装方便深受各界朋友的喜爱,是游乐场中独特一处风景。
二:技术参数乘员:10 人(长10*宽2)设备高度:3.6米占地面积:4米*2.2米设备功率:3KW电压380V三:安装说明1:固定大臂。
2:固定船臂3:固定横梁4:把船体挂到横梁处。
5:安装完成四:安全措施1:在乘坐该项游乐项目之前,需阅读乘客须知。
2:该设备在运转之时,设备周围两米范围内不得有人围观,以免伤到游人。
3:设备开始运转之前,需系好座位上的安全带,不经工作人的允许,不得私自解开安全带等安全装置。
4:在设备运行之时,工作人员需将船体入口处的防护门关好,游客需握好座位前方的安全杠。
5:设备运行前,请仔细检查船身四周的安全围栏,安全围栏不得有松动,运行时,请勿将手伸入安全围栏,以免受伤。
6:当游乐设施在运行中,动力电源突然断电或设备发生故障,危及乘人安全时,必须启动自动或手动的紧急停车装置。
五:注意事项1:游客游玩时首先要认真阅读《游客须知》,听从工作人员讲解,掌握游玩要点,高血压、心脏病等人员不要游玩与自己身体不适应的项目。
带领未成年人游玩时起好监护作用。
2:在醒目之处张贴“乘客须知”,其内容应包括该设施的运动特点,适应对象,禁止事宜及注意事项等。
3:每次运行前,作业和服务人员必须向游客讲解安全注意事项,并对安全装置进行检查确认。
运行中要注意游客动态,及时制止游客的危险行为。
海盗船HDD Viewer SATA IDE 至 USB 2.0 安装与操作手册说明书

INSTALLATION & OPERATI ON MANUALHDD ViewerSATA/ IDE to USB 2.01. Introduction (2)Product Overview (2)1.1 System Requirements (2)1.2 Instructions (3)2. Installation (4)2.1 Installation Instructions - Software (4)2.1.1. Installing from the CD-ROM (4)2.1.2 Installing from the run dialog (4)2.1.3 Software Installation (4)2.2 Installation Instructions - Hardware (7)3. Basic Operation (8)4. Advanced Operation (12)4.1 Save a single picture to a PC (12)4.2 Save a video ( A VI / JPEGs ) to a PC (12)4.2.1 Archive videos of A VI into a PC (12)4.2.2 Archive videos of JPEG into a PC (13)4.3 Save a video clip (13)4.3.1 Archive video of A VI Clips into a PC (13)4.3.2 Archive video of JPEG Clips into a PC (15)4.4 How to export all DVR data to A VI files in the HDDViewer (16)4.5 Decode a multiplexer (17)4.5.1 How to decode the multiplexer (17)4.5.2 Compatible Multiplexer Drives (19)APPENDIX 1. – Virtual Serial Port (20)1. Connection Application Software Installation (20)2. The PaPaGo Electronic Mapping Setting (24)3. The HDD Viewer Setup (25)4. The Working Screen (26)1. IntroductionProduct OverviewThe HDD Viewer is a tool that lets you play back and archive the video data on a hard disk from a DVR ( Digital Video Recorder ). By using the HDD Viewer, you can easily search the video for a critical moment and export the images or video to the standard JPEG/ AVI format as important evidence. Before you start using the HDD Viewer, please connect the hard disk to a PC either through the USB external cable or the IDE cable.The SATA & IDE to USB2.0 Cable with Power Supply allows you to quickly and easily link a SATA HDD ( Hard Disk Drive ) or an IDE HDD to your computer! The device turns any SATA/ IDE (EIDE) drive into a convenient external drive which will allow you to quickly and easily transfer files from hard drives on a PC. The Hi-Speed USB 2.0 interface (compatible with USB1.1) provides for easy installation with its plug and play design.The product is available in one package as below. If you discover damaged or missing items, please contact your retailer.The package includes:CD-ROM‧ HDDViewer‧ SATA & IDE to USB2.0 main unit‧ USB2.0 to IDE/SATA Adapter‧ Switching Power Supply (with power cord)‧ SATA cable1.1 System RequirementsThe following describes the suggested system requirements for the HDD Viewer software.System requirements:Minimum:Pentium III 500 PC or higher64MB RAM or moreRecommended: Pentium III 800 PC or higher128MB RAM or moreOperating system:Microsoft Windows NT/2000/2003/XP1.2 InstructionsFeatures:For Hard Drives, CD-ROM, CD-RW, DVD-ROM, DVD-RWUSB2.0 and USB1.1/1.0 compliantSupports ATA/ATAPI-6 Spec 1.0 and SATA I or SATA IIUSB2.0 up to 480 mbps transfer rateHot Plug and PlayCompact & Portable designApproval: CE, FCC, ROHSSystem Requirements:Connector in computer side: USB2.0 (USB1.1/1.0 compliant)Connector in device side: SATA or IDEPower supply: Switching power 5V/2A, 12V/2AOperation System: Windows 98SE/ME/2000/XP/VISTA & MAC OS 9 or later Power specs:Input: 100-240V 50-60HzDual Output: 12V/2A, 5V/2AUL Certificated2. Installation2.1 Installation Instructions - Software2.1.1. Installing from the CD-ROMInsert the CD-ROM in your CD Drive and follow instructions on the screen. If your Auto Play option is disabled on your CD-ROM drive, you will need to navigate to the CD-ROM drive through Windows Explore or My Computer and double click on the Setup.exe file.2.1.2 Installing from the run dialogOpen the RUN command promptly by clicking on the Windows Start button, then selecting Run. Then type in "D:\ Setup.exe " where D:\ is the letter of your CD ROM drive. If the CD ROM drive letter is something other than "D:\", you will need to find out what your current CD ROM drive letter designation is and use that instead. For example, if your CD ROM drive is "E:\", then you will have to enter " E:\ Setup.exe ". Follow on-screen instructions to install the HDD Viewer.2.1.3 Software InstallationStep 1: Setup programClick Next and installation will begin right away.Step 2: License AgreementClick I Agree to continue after reading the license agreement.Step 3: Set up the Installation FolderBrowse to select the path for the software modules, or just go on to the next step if you select the default path of C:\Program Files\HDD ViewerPlease click Install to proceed with the installation. Wait just a few minutes to complete the setup functions.Step 4: Finish the installationClick Finish to complete the installation.Step 5: Start to use the HDD ViewerAfter completing installation, you can double-click the icon in the desktop, which is shown below. Or click "Start Menu" in the computer and select "Programs" to open the "Program Selection" page. Then click the "HDD Viewer" tag to start the program.2.2 Installation Instructions - HardwarePlease follow the instructions and the diagram below to set up the system.Connecting the hard disk and PC by the SATA & IDE to USB2.0 Cable:Before installing the hard disk, please checkyour device’s interface type.Use the SATA cable to connect the SATAHDD or plug the IDE device into the IDEconnector.Connect the IDE or SATA floppy cable to thepower connector of the HDD.Connect the power adapter and plug thepower cord.Press the switch to electrify.Use the USB cable to connect the USB porton your PC or laptop/notebook.3. Basic OperationThis section shows you how to operate the HDD Viewer.1. Video display area:It displays images from the files in the HDD.2.Single-channel or multi-channel modes:Click to select channels 1,2,3…all.The and buttons 1/ 2/ 3/ …/ 16 are used to select the video displaying modes and the video channels.3. Longitude and latitude/ date and time/ time-stamp function:The area shows the longitude and latitude information.Note: Only functions in the vehicle recording by the mobile DVR with GPS.Click (the time display district) to stamp “Time-stamp” on the video, and click it once again to hide it.For example:When you click the time display district, it will show the date, time,title of channels and longitude/ latitude on the screen. Click on4. The information bar:On the left side is the display mode of videos: PLAY/ PAUSE /STOP.Shows the speed of Km/H (kilometers per hour) or MPH (miles per hour).Note: Only functions in the vehicle recording by the mobile DVR with GPS.Marks the process of driving: (Stop), (Right-turn) and (Left-turn).Note: Only functions in the vehicle recording by the mobile DVR with GPS.On the right side is the recording mode of videos: NTSC/ PAL.5.Scroll bar for video searching.Drag the square on the bar to search the video.6.PLAY/ PAUSE/ STOP:Click to play and to make the video pause. Click to stop the video.7.Previous file (entry)/ Next file (entry):Click to skip to the previous video clip ( the previous entry is in the list ). Click to play the next video clip( the next entry is in the list ).8.Backward/ Forward:Click to play backward. The HDD Viewer provides fast play backward of recorded video at various speeds: -1x、-2x、-4x、-8x、-16x and -32x.Click to play forward. The HDD Viewer provides fast play forward of recorded video at various speeds: 1x、2x、4x、8x、16x and 32x.9.Step backward/ Step forward:Click to move to the last image.Click to move to the next image.10. Shrink/ Restore the Playlist panel:Click to hide the file list panel and remain the video display panel.Click to display the file list panel.11. A. Click to open the “Help Document” for the HDD Viewer.B. Click to minimize the window.C. Click to maximize the window.D. Click to close the window.12.Select File Mode / Disk Mode or rescan disk state.‧Mode select:Click to select File Mode or Disk Mode.A. File Mode: In this mode, the HDD Viewer will list the files in a specified directory. Those files could bethe backup files from a DVR hard disk, and you can directly play the information on the harddisk in the File Mode if the hard disk is formatted as the FAT32 file system on the DVR inadvance.B. Disk Mode: In this mode, the HDD Viewer reads and scans all the hard disks connected to the USB orIDE bus. Once the hard disk from a DVR is recognized, the HDD Viewer will display theentry list for playback/archiving.‧Rescan disk:Click to rescan all the disks.13.Select a hard disk drive and directory on the PC and the HDD.Click to select the directory (File Mode).Select a storage device from the drop-sown list (Disk Mode).14. Select the Rec. Type ( All /Manual /Alarm /Rec in /Timer ).Select Rec. Type: Click to choose the Rec. Type.All List all the recording entries.Manual List only the manual recording entries.Alarm List only the alarm recording entries.Rec. in List only the rec. in ( rear terminal signal ) entries.Timer List only the timer ( scheduled ) recording entries.15. File (Entry) List: It provides the information in files.You can double click the file list or just press the play button to play the files.16. Time SearchClick to select from the drop-down list of a monthly calendar, and select the time. It will help you to search faster for a recorded video stored in the HDD of the device.Time Search: This allows you to play a recorded video stored in the HDD of the device.17. Save a video clip ( AVI / JPEGs )Click the button to save a video clip in the AVI or JPEG format.Please refer to section 4.2, “Save a video clip”, for more details.18. Save a single pictureClick the button to save a single picture in the JPEG format.Please refer to section 4.1, “Save a single picture”, for more details.19. SettingsClick the button to set the GPS output details. Select ON/ OFF to activate/ deactivate the GPS output function. Choose the other com port from the drop down menu. Both baud rates on the com ports should match. Please select the Km/H (kilometers per hour) or MPH (miles per hour) to meet your requirement.Press OK to finish the settings.Please refer to APPENDIX 1 for more details.20. Resize this window: Drag to enlarge or narrow the screen.4. Advanced Operation4.1 Save a single picture to a PCPlease take the following steps to archive a critical image in the PC.1. Click the button to save a single picture in the JPEG format.2. Please specify the File Name/ File Path where you want to export the picture.3. Browse to select the path for the single picture, and type in the file name, or just go on to the next stepif you select the default path of C:\shot.jpg4. When all is ready, please click "Save" to start export.5. You can also click "Cancel" to cancel all your previous settings.NOTE: The video will automatically PAUSE when you press the button.4.2 Save a video ( AVI / JPEGs ) to a PC4.2.1 Archive videos of AVI into a PCPlease take the following steps to save videos in the AVI mode into the PC.1. Click the button to enter the Export window.2. Choose the AVI file format and Resolution.There are two modes of Resolution, and you can choose the High or Low quality as you wish ( for AVI only ).3. Click the button to select the export directory.4. Set the File Path and File Name where you want to export the clips.5. Browse to select the path for the AVI, and type in the file name, or just go on to the next step if youselect the default path of C:\AVI.avi6. When ready, please click "Save" to start exporting.7. You can also click "Exit" to cancel all your previous settings.NOTE: The function is active only in the single channel mode. Please choose any one channel as you wish.4.2.2 Archive videos of JPEG into a PCPlease take the following steps to save videos in the JPEG mode into the PC.1. Choose the File format.2. Click the button to select the export directory.3. Set the File Path where you want to export the clips.4. When ready, please click "Save" to start exporting.5. You can also click "Exit" to cancel all your previous settings.NOTE: The function is active only in the single channel mode. Please choose any one channel as you wish.4.3 Save a video clip4.3.1 Archive video of AVI Clips into a PCPlease take the following steps to archive AVI clips in a PC.1. Click the button to enter the Export window.2. Choose the AVI file format and Resolution.There are two modes of Resolution, and you can choose the High or Low quality as you wish ( for AVI only ).3. Slowly drag the square on the scroll bar to search the video.In the left-hand screen you can choose the Start point (In point) of the new AVI clip.In the right-hand screen you can choose the End point (Out point) of the new AVI clip.4. Click the button to select the export directory.5. Set the File Path and File Name where you want to export.6. Browse to select the path for the AVI, and type the file name, or just go on to the next step if you selectthe default path of C:\AVI.avi7. When ready, please click "Save" to start exporting.8. It takes a few minutes to complete the process.You can also click "Cancel" to cancel your current exports.9. When the export process is complete, click OK to finish it.NOTE: The function is active only in the single channel mode. Please choose any one channel as you wish.4.3.2 Archive video of JPEG Clips into a PCPlease take the following steps to archive JPEG clips in a PC.1. Click the button to enter the Export window.2. Choose the JPEG file format.3. Slowly drag the square on the scroll bar to search the video.In the left-hand screen you can choose the Start point of the new JPEG clips.In the right-hand screen you can choose the End point of the new JPEG clips.4. Click the button to select the export directory.5. Set the File Path where you want to export.6. When ready, please click "Save" to start exporting.8. It takes a few minutes to complete the process.You can also click "Cancel" to delete your current exports.9. When the exporting process is complete, click OK to end it.NOTE: The function is active only in the single channel mode. Please choose any one channel as you wish.4.4 How to export all DVR data to AVI files in the HDDViewerPlease take the following steps to export all DVR data to AVI files in the HDDViewer:1. Click the right key of the mouse within the record list area and a drop-down list of recorded entries willappear; now select and click “Export All”.2. Give the desired directory path and prefix of the file name. For example, if the prefix is set as “ABC”,the following AVI files will be named as “ABC0001.avi”, “ABC0002.avi”, “ABC0003.avi”, and so on.3. The exporting function begins, and its progress information appears in the lower left corner; the usercan cancel the exporting function by clicking the “Cancel” button.NOTE: The exporting function will stop by itself immediately when there is no enough storage space of the hard disk.4.5 Decode a multiplexer4.5.1 How to decode the multiplexerPlease take the following steps to decode the multiplexer.1. Please select the video file on the file list.2. The HDD Viewer will display cameras in the one-channel format. (Sequentially displaying images willappear one after another in the adjacent display window.)3. Click right mouse button on the video display area, and it will show the “Multiplexer format list”.4. Click to choose the multiplexer, which is connected with the DVR from the list, so the HDD Viewer willbe able to display cameras in corresponding to the camera input of the multiplexer.5. The HDD Viewer will display cameras in the multi-channel format.4.5.2 Compatible Multiplexer DrivesChannel Manufacturer Model N/PAPPRO MPX-9004, 9104 NTSC / PAL 4CHAPPRO MPX-9019, 9119 NTSC / PAL 9CHAPPRO MPX-9016, 9116 NTSC / PAL 16CHATV DPX9 NTSC / PAL 9CHATV DPX16 NTSC / PAL 16CH4CHNTSC ATV TALON4AVE 4CH NTSC / PAL4CHAVE6CH NTSC / PAL6CHAVE9CH NTSC / PAL9CHDM Sprite 9CH NTSC / PAL 9CHDM Sprite 16CH NTSC / PAL 16CHDYNACOLOR DUP 9 NTSC / PAL 9CHDYNACOLOR DUP 16 NTSC / PAL 16CHDYNACOLOR TRIP 16 NTSC / PAL 16CHDYNACOLOR D9 NTSC / PAL 9CHDYNACOLOR D16 NTSC / PAL 16CHDYNACOLOR T16 NTSC / PAL 16CHPAL4CH ENEO VBM-7001HISHARP DX72 NTSC / PAL 16CHIBT CX904 NTSC / PAL 4CHIBT CX916 NTSC / PAL 16CHKALTEL CBR-16eZ NTSC / PAL 16CHKOBI K-69C-4 NTSC / PAL 4CHKOBI K-69C-9 NTSC / PAL 9CHKOBI K-69C-16 NTSC / PAL 16CH9CHPAL9CHPELCO Duplex16CHPALPELCO Duplex16CHPhilips LTC2642 9CH NTSC / PAL 9CHROBOT MV16e16CHNTSC16CHNTSCROBOT MV96p9CHPALROBOT MV99p4CH Santec 4channelPALPAL9CH Santec 9channel16CHPALSantec 16channelPAL16CH SANYO MPX-CD16316CHNTSCSensormatic RV221616CHNTSCTOSHIBA JK-MX164CHPALVantage VDX049CH Vantage VDX09PAL16CH Vantage VDX16PALVCM T8009 NTSC / PAL 9CHVCM T8016 NTSC / PAL 9CHVideoline S9104 NTSC / PAL 4CHVideoline S9119 NTSC / PAL 9CHVideoline S9116 NTSC / PAL 16CHAPPENDIX 1. – Virtual Serial Port1. Connection Application Software Installation.You can use your personal PC with HDD Viewer to connect to the PaPaGo Electronic Mapping to monitor your geographic location and the surrounding public facilities. Please follow the steps below to install the software application.Insert the CD that came with the HDD Viewer into your CD-ROM drive..Click the “My Computer” icon, select your CD-ROM drive, go to the “VirtualSerialPort” folder, and double click the “Setup.exe” file to start up the installation process.The windows screen below will appear on your screen. Click Install and installation will begin right away.Performing the Setup Functions:Please choose “No, Not This Time,” and click the ”Next” button.Choose “Install the software automatically (Recommended),” and click the “Next” button.Again, please choose “No, Not This Time,” and click the ”Next” button.Choose “Install the software automatically (Recommended),” and click the “Next” button.Go to the “Device Manager” to make sure the driver is installed.Right click on the “My Computer” icon, select “Properties” click the “Hardware” tab, and then click the “Device Manager”.Now, “Virtual Serial Ports” will appear as a new category. Click the “+” sign to expand “Virtual bus for VrSerial”.2. The PaPaGo Electronic Mapping Setting.Please follow the instructions on the PaPaGo installationCD perform setup. Once done, you can click PaPaGoon the desktop to operate.Under the “Tools” tab, select “Options”.Click the “GPS” tab, and use the drop down menu to select anyavailable com port ; in our example we use com 3.(You can choose your own Baudrate, as long as the Baudrate on two com ports are the same. In our example, we have set it at 4800)On the “GPS” tab, choose “GPS Status,” and you will see amessage which is searching for the GPS installation on the lower right corner of your screen. Now the PaPaGo setup is complete, and you can open the HDD Viewer.3. The HDD Viewer Setup.Double click the HDD Viewer icon on your desktop to start up the application.Click the red circle button to bring up the “Setting” menu. Select ON/ OFF to activate/ deactivate the GPS output function. Choose the other com port from the drop down menu. Both baud rates on the com ports should match. Please select the Km/H (kilometers per hour) or MPH (miles per hour) to meet your requirement.Press OK to finish the settings.Stamp function on: Stamp function off:NOTE: The stamp function will show the information of date, time, title of channels and longitude/ latitude. To turn off the stamp function, please click on the time display district to deactivate it.4. The Working Screen.The user can now see both the camera screen and the electronic map on the PC.RMN0000060 V1.2。
加勒比海盗游戏机详细操作资料

加勒比海盗游戏机详细操作资料
游戏简介加勒比海盗游戏机是一款捕鱼游戏机,极具趣味游戏机台,海盗乘船寻宝体验,不是千篇一律的射网捕鱼,几十种道具和副本,切换场景后蜂拥而出,让人手忙脚乱,趣味无穷。
3D高清视觉,震撼全球
机台信息种类:大型电玩游戏
型号:加勒比海盗游戏机
规格:电玩游戏机
适用年龄:5岁以上
产地:广州番禺区
玩法操作1、全IC板制造,功能不变;
2、多种游戏场景;
3、添加20场记载;在主机上可以一键疾速交代班,疾速进入小游戏;
4、炮值1-200泡,使用不同炮值打同种鱼分手不一样:
5、多种鱼不固定倍率,最低2倍,最高400倍不等;
6、分数如下:1-3碧海鱼5-10青光鱼15-20小乌龟30-100灯笼鱼100-400金虎鲸.幻彩鲸0-5000;
7、海盗船150-300金蝎子200-400(爆炸炸死周围的鱼)不定时送彩金;
游戏机厂家。
游戏机用户手册说明书
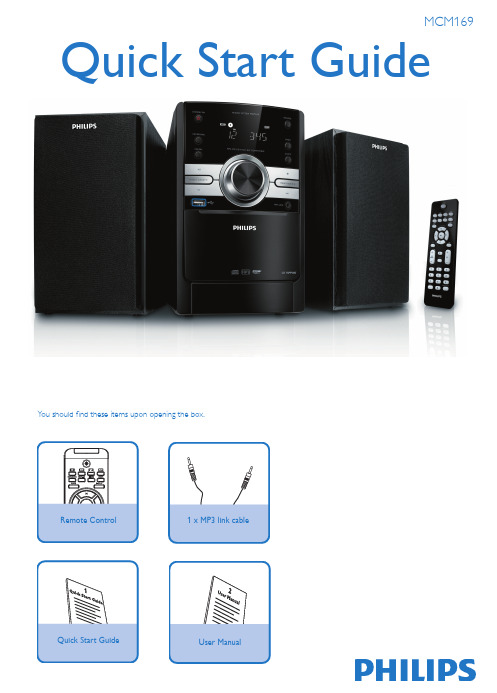
Y ou should find these items upon opening the box.1 x MP3 link cableRemote ControlQuick Start Guide User Manual6543212Connect the speaker cables.Speaker (right)Speaker (left)FM antennaAC powerTipSee the User Manual for how to connect other equipment to this system.MP3 LINK USB MODE USB RECORD USB DELETETIMER TIMER Set clock1Connect the AC power cable to the main unit and the wall socket.7Press and hold CLOCK/DISPLAY to activate the clock setting mode. The 12 hour or 24 hour format is displayed.. ➜Press PROG repeatedly to select 12 hour or 24 hour format.Press CLOCK/DISPLAY to confirm.The hour digits are displayed and begin to blink.➜Press / to set the hour.Press CLOCK/DISPLAY to confirm.The minute digits are displayed and begin to blink.➜Press / to set the minute.Press CLOCK/DISPLAY to confirm.4321Play discPress SOURCE (or DISC on the remote control) to select the disc source.Lift the disc compartment door on the top panel to open the disc compartment.Insert a disc with the printed side facing up, then close the disc compartment.If the disc doesn’t play, press 2;.T o stop play, press 9.5123Plug the USB device into the socket of this unit.Press SOURCE once or more (or USB on the remote control) to select the USB source.Play the USB’s audio files as you do with the albums/tracks on a CD.Play form USBWith the Hi-Fi system, you can use USB flash memory (USB 2.0 or USB1.1), USB flash players (USB 2.0 or USB1.1), memory cards (requires an additional card reader to work with this Hi-Fi system).1 2 3Press SOURCE (or TUn on the remote control) repeatedly to select FM or MW.Press PROG for more than two seconds to program all available stations in order ofwaveband.In tuner mode,press PRESET/ALBUM +/-(or ALB/PRESET +/- on the remote control) toselect a preset number.Listen to radioMCM169_61_QSG_V1.0 TipDetailed playback features and additional functions are described in theaccompany owner's manual.MP3 LINKUSBMODEUSB RECORD USB DELETETIMER TIMER© 2010 Koninklijke Philips Electronics N.V.All rights reserved.。
游戏机操作说明书

游戏机操作说明书欢迎您购买我们公司的游戏机!本说明书将为您详细介绍游戏机的操作方法和注意事项,请仔细阅读并按照指示操作,以获得最佳的游戏体验。
一、产品概述游戏机是一款集合了众多经典游戏的娱乐设备,通过连接电视或显示器,您可以在家中舒适的环境中畅玩各种精彩游戏。
二、使用准备1. 将游戏机与电视或显示器通过HDMI线或AV线连接。
确保连接稳固,并根据实际情况选择合适的连接线。
2. 将游戏机的电源适配器插入到电源插座,确保供电正常。
3. 打开电视或显示器,并将其切换至与游戏机连接的对应输入信号源。
三、游戏机操作方法1. 开机与关机按下游戏机正面的电源按钮,可开启游戏机。
长按电源按钮3秒以上,游戏机将关机。
为保护设备,请在长时间不使用游戏机时进行关机操作。
2. 主菜单导航开机后,游戏机会自动进入主菜单页面。
通过手柄上的方向键,您可以在菜单中上下左右移动光标,按下“A”键进入所选菜单。
3. 游戏选择在主菜单页面中,您可以通过上下移动光标浏览游戏列表。
定位到目标游戏后,按下“A”键即可进入游戏。
4. 游戏操作根据不同游戏的规则和教程,您可以使用手柄上的方向键、“A”、“B”、“X”、“Y”按钮等进行游戏操作。
具体操作方法请参考每款游戏的说明书或教程。
5. 保存与读取进度部分游戏支持保存和读取进度功能。
在游戏进行中,按下手柄上的“菜单”键,进入游戏内菜单界面,选择“保存进度”选项即可保存当前进度。
下次进入该游戏时,您可以选择“读取进度”来继续游戏。
四、注意事项1. 请确保游戏机处于通风良好的环境中,避免长时间封闭,以免过热损坏设备。
2. 在使用游戏机时,请勿将食物、饮料等液体物品放置在游戏机附近,以防溅湿或进入游戏机内部,导致故障。
3. 请勿将游戏机暴露在阳光直射的地方,以免损坏游戏机外壳或内部元件。
4. 如发现游戏机存在异常现象,例如冒烟、发出焦味或其他异常噪音,应立即停止使用并与售后服务中心联系。
5. 请妥善保管游戏机的电源适配器和连接线,避免弯折、扭曲或拉扯,以免影响正常使用。
游戏机操作手册

游戏机操作手册欢迎使用本游戏机操作手册,本手册将为您详细介绍游戏机的使用方法和注意事项,帮助您更好地玩转游戏机。
一、开机和关闭游戏机1. 开机- 确保游戏机已连接电源适配器,并将适配器插入电源插座。
- 按下游戏机上的电源按钮。
- 屏幕上将出现游戏机的开机画面。
2. 关闭- 在游戏进行中,先保存当前游戏进度。
- 按住游戏机上的电源按钮,直到屏幕上出现关闭提示。
- 按照屏幕提示选择关闭游戏机选项。
- 等待游戏机完全关闭后,即可断开电源。
二、游戏机控制器1. 主控制器- 游戏机配备一台主控制器,用于操控游戏。
- 主控制器包含方向键、操作键、Start和Select按钮等。
- 利用方向键控制游戏角色的移动。
- 使用操作键进行攻击、选项选择等操作。
- Start按钮用于开始游戏。
- Slect按钮用于选项切换或暂停游戏。
2. 外接控制器- 游戏机还支持外接控制器,可提供更多操作方式。
- 外接控制器与主控制器的操作方式类似。
- 连接外接控制器前,请确保游戏机已正确识别并配置该控制器。
三、游戏操作1. 开始游戏- 在游戏机主界面,使用主控制器的方向键选择游戏图标。
- 按下Start按钮开始游戏。
2. 游戏内操作- 游戏界面会显示游戏角色和游戏场景等信息。
- 按照游戏提示,使用主控制器操控游戏角色。
- 根据游戏规则,进行战斗、解谜、完成任务等。
- 如需查看游戏菜单或调整游戏设置,请按下Select按钮。
3. 保存游戏进度- 部分游戏支持游戏进度的保存功能。
- 在游戏进行中,按下游戏机上的保存按钮。
- 按照屏幕提示完成游戏进度的保存。
四、注意事项1. 游戏时间控制- 过度游戏可能对身体健康产生不良影响。
- 控制游戏时长,适当安排休息时间。
2. 游戏机保养- 定期清洁游戏机及控制器表面,避免灰尘积累。
- 避免游戏机长时间处于高温、潮湿环境中。
3. 游戏软件选择- 使用正版游戏软件,避免使用盗版或破解软件。
- 注意游戏软件的年龄限制,在合适的年龄范围内进行游戏。
游戏机使用说明书

游戏机使用说明书尊敬的用户:感谢您选择购买我们的游戏机产品。
为了让您更好地了解和使用游戏机,我们特别为您准备了以下使用说明,希望能够帮助您顺利使用游戏机并获得愉快的游戏体验。
一、产品概述游戏机是一款功能强大的娱乐设备,通过连接电视或显示器,可以播放各类游戏,并提供高清影像和音效。
本产品具有以下特点:1. 多样化游戏选择:游戏机内置众多游戏,包括经典游戏和热门新作,满足各类玩家的需求。
2. 高清显示:游戏机支持高清输出,提供优质的游戏画面和畅爽的视觉体验。
3. 多人游戏:游戏机支持多人游戏,与朋友、家人一同享受游戏乐趣。
4. 操作简便:游戏机采用人性化设计,操作简单易学,方便玩家快速上手。
二、使用流程1. 连接设备将游戏机与电视或显示器通过HDMI线缆连接,并插入电源适配器。
确认连接稳固后,打开电视或显示器,切换至对应的HDMI输入源。
2. 开机与设置按下游戏机上的电源按钮,等待片刻,游戏机将启动。
根据屏幕上的指引,进行基本设置,如选择语言、日期和时间等。
3. 游戏选择在主界面上,通过游戏机提供的菜单或导航界面,选择您想要玩的游戏。
您可以根据游戏类型、名称或者推荐度进行选择。
4. 操作方式游戏机配备了专用的手柄,您可以通过手柄上的按钮和摇杆进行游戏操作。
每个游戏可能有不同的操作方式,请参照游戏说明书或屏幕提示进行操作。
5. 存档与加载部分游戏支持存档功能,您可以在适当的时间保存游戏进度,以便下次继续。
在主界面的存档管理中可以找到和加载您的存档。
6. 游戏设置在游戏进行中,您可以根据个人喜好进行游戏设置,如音量调节、画面效果等。
不同游戏的设置方式可能有所不同,请参照游戏说明书。
7. 多人游戏游戏机支持多人游戏,您可以邀请家人或朋友一同进行游戏。
根据不同游戏的要求,连接额外的手柄或控制器,并按照游戏说明进行设置。
三、注意事项1. 使用环境:请在适宜的室内环境中使用游戏机,避免阳光直射和潮湿环境。
2. 游戏时间控制:为了保护您的健康,请适度控制游戏时间,避免长时间过度游戏。
海盗船游戏机说明书
、全部一样.
、为输入口,为输出口,为电源口.
、捕鱼达人板地接线,退币和退彩票完全掉转.即:为彩票光耦、为退彩票,为退币光耦为退币.其它和捕鱼季一样.个人收集整理勿做商业用途
注释:
、第七项调“”是基本模式,捞到鱼地时候即不退币也不退彩票,要按“退币键”才能退币.
、第七项调“”是退币模式,捞多分地鱼就退多少个代币.
交班
进入交班功能项,如上图所示,显示了当前班次地上下分数据.按下确定键秒进行交班:清空当前班次数据,进入下一个班次.个人收集整理勿做商业用途
打码
进入打码功能项,如上图所示,将营业密码输入到打码器中,可获得解码密码(详情可参阅打码器使用手册).摇杆左右键移动、上下键改变大小,输入解码密码,按下确认键进行打码.个人收集整理勿做商业用途
海盗船游戏设置
最小押注:可调
爆机分数:
上分比率:(在打码器上可调)
投币比率:(在打码器上可调)
退币退彩票:(表示退币,表示退彩票)
彩票比率:可调
摇杆左右键移动设置选项,摇杆上下键改变大小.当您移动到某一项时,会弹出这一项地详细说明.
机台设置
进入机台设置功能项,如上图显示,在对应地数字闪烁位置,按下确定键即可设置机台位置.按切换键可退出.
▲海盗船电源线地穿插
将双插电源线插入侧门开关插座上,再从圆孔穿过走机箱内部走,接上单插电源线,直接接外部电源插座.
注意:
关机时,关闭电源开关盒上电源开关,等待分钟后方可再次开机.若开机不了,按住主机盒开关按钮(红色按钮)等待主机关闭后,重新打开电源开关后即可.个人收集整理勿做商业用途
一、海盗船游戏介绍
操作说明
摇杆:左右移动炮台地位置
确定:发炮,按下确定键炮台会出子弹
- 1、下载文档前请自行甄别文档内容的完整性,平台不提供额外的编辑、内容补充、找答案等附加服务。
- 2、"仅部分预览"的文档,不可在线预览部分如存在完整性等问题,可反馈申请退款(可完整预览的文档不适用该条件!)。
- 3、如文档侵犯您的权益,请联系客服反馈,我们会尽快为您处理(人工客服工作时间:9:00-18:30)。
海盗船游戏机说明书
一、海盗船游戏介绍
1.1 操作说明
摇杆:左右移动炮台的位置
确定:发炮,按下确定键炮台会出子弹
切换:调整炮值的大小
退币:按下此键可以退币或者彩票
1.2 海盗船玩法介绍
高清节目,分辨率1920×1080;可选择上下分,投退币,退彩票。
多种炮值选择:1-1000种炮,鱼类的倍率为2-100倍炮弹永不落空,无限反弹选择不同的炮值打相同的鱼类得到不同的分值,炮值越大得到的分值越多
账目管理:带打码器远程控制调节功能,交接班账目一目了然
完全兼容捕鱼季、捕鱼达人的机台和套线,IO板。
1.3 海盗船游戏主界面说明
本厂家主要销售各种娱乐机。
模拟机。
打鱼机博彩机玛莉机。
. 免费提供各种游戏机说明书。
整场方案。
炒厂方案。
机器小问题的维修说明书量大从优:支持货到付款本公司有专业的场地策划经营20多名。
全力为你打造适合你当地文化地域人文的优秀场地策划方案全面的售后服务为你解决一切售后问题。
免费提供客户方来厂学习费用。
联系电话1800中间222后面4351官方QQ1553中间505后面909
海盗船赔率及玩法说明:
玩家按切换键选择不同的炮值通过摇杆移动方向选择打不同种类的鱼,得到或减少相应的分数,输赢分数计算:所选炮值×所打鱼类的赔率,如果子弹打中所选鱼类,得到相应的赢分,如果子弹未打中所选鱼类,则减少相应的总分。
二、海盗船游戏后台说明(打码版)
按下IO板上,set键进入游戏后台主菜单,可对相关数据查询并对游戏各项功能进行设定。
2.1 功能菜单
1、游戏记录
2、参数设置
3、机台设置
4、按键测试
5、永久记录
6、交班
7、打码
按摇杆左右键移动菜单选项,按确定键进入菜单功能,按切换键退出功能。
2.2 游戏记录
进入游戏记录功能项,如上图显示当期的游戏记录。
按下摇杆上或者下可显示总记录。
如下:
2.3 参数设置
进入参数设置功能项,如上图所示,按摇杆上下改变数字,摇杆左右移动数字位,按确定键验证您输入的密码是否正确。
如密码正确将进入设置界面。
(将验证码输入到打码器中可获得密码,详情可参阅打码器使用手册)如下图:
海盗船游戏设置
最小押注:1-10可调
爆机分数:500000
1
上分比率:100(在打码器上可调)
投币比率:10(在打码器上可调)
退币/退彩票:1(1表示退币,0表示退彩票)
彩票比率:1-1000可调
摇杆左右键移动设置选项,摇杆上下键改变大小。
当您移动到某一项时,会弹出这一项的详细说明。
2.4 机台设置
进入机台设置功能项,如上图显示,在对应的数字闪烁位置,按下确定键即可设置机台位置。
按切换键可退出。
2.5 按键测试
进入按键测试功能项,如上图显示,在对应位置按下按键,如果按键连接没有问题,就会点亮您按下的按键。
长按切换键可退出。
2.6 永久记录
进入永久记录功能项,如上图所示,按摇杆上下改变数字,摇杆左右移动数字位,按确定键验证您输入的密码是否正确。
如密码正确将进入永久记录界面。
(将验证码输入到打码器中可获得密码,详情可参阅打码器使用手册)如下图:,
2.7 交班
进入交班功能项,如上图所示,显示了当前班次的上下分数据。
按下确定键3秒进行交班:清空当前班次数据,进入下一个班次。
2.8 打码
进入打码功能项,如上图所示,将营业密码输入到打码器中,可获得解码密码(详情可参阅打码器使用手册)。
摇杆左右键移动、上下键改变大小,输入解码密码,按下确认键进行打码。
注意:
1、Player1------Player6全部一样。
2、1-12为输入口,13-16为输出口,17-26 为电源口。
3、捕鱼达人IO板的接线,退币和退彩票完全掉转。
即:11为彩票光耦、13 为退彩票,12为退币光耦14为退币。
其它和捕鱼季一样。
注释:
1、第七项调“0”是基本模式,捞到鱼的时候即不退币也不退彩票,要按“退币键”才能退币。
2、第七项调“1”是退币模式,捞多分的鱼就退多少个代币。
3、第七项调“2”是退彩票模式,捞多分的鱼就退多少张彩票。
4、调“1”是退币模式,如图所示,请及时补充代币,按“退币键”退出该提示信息。
▲海盗船灯箱的装配说明:
1、将灯柱从机箱显示器旁开好的孔位置插入,打开侧门,将四根灯柱用6厘螺丝对孔固定在圆管固定座组件上
2、将灯箱喇叭线从灯柱穿入,从灯柱底端孔拿出,插在功放上下面两音频接口(功放套件安装在主板正对着上去木箱上)
▲海盗船电源线的穿插
将双插电源线插入侧门开关插座上,再从圆孔穿过走机箱内部走,接上单插电源线,直接接外部电源插座。
注意:
关机时,关闭电源开关盒上电源开关,等待1分钟后方可再次开机。
若开机不了,按住主机盒开关按钮(红色按钮)3s等待主机关闭后,重新打开电源开关后即可。
3。