安全气囊故障码读取清除
雷凌轿车安全气囊故障灯常亮的处理
AUTOMOBILE MAINTENANCE技0帀手记雷凌轿车安全气囊故障灯常亮的处理沈阳一、故障现象有一辆2015年生产的丰田雷凌1.6L轿车,搭载4ZR-FE发动机和CVT 无级变速器,行驶里程约为6.5万km o 车主反映车辆的安全气囊灯常亮。
二、故障诊断接车后验证故障,点火开关置于ON位置,安全气囊系统自检后气囊指示灯不熄灭。
起动发动机怠速运转,仪表板上的安全气囊故障灯仍然不熄灭。
用故障诊断仪进入车辆安全气囊系统,读取安全气囊系统故障码为:B1826左侧安全气囊引爆电路开路。
清除故障码后再次读取,故障码依然存在。
丰田雷凌轿车的安全气囊系统主要包括:空气囊系统指示灯、左前和右前空气囊碰撞传感器、左侧和右侧空气囊碰撞传感器、左后和右后空气囊碰撞传感器、驾驶员空气囊总成、驾驶员侧空气囊总成、前排乘客空气囊总成、前排座椅侧空气囊总成、空气囊ECU总成、前排座椅外安全带总成、气囊系统线束及连接器等部件组成。
安全气囊系统的基本工作过程是:汽车行驶过程中,碰撞传感器检测车速的变化,并将车速变化信号送至空气囊ECU,空气囊ECU通过计算并判定是否向安全带收紧器或是空气囊的点火器发出点火指令。
当车速低于30km/h发生碰撞时,碰撞产生的减速度和惯性力较小,碰撞传感器将此信号送到空气囊ECU总成,空气囊ECU判定为不引爆安全气囊,只引爆安全带收紧器的点火器。
当车速高于30km/h发生碰撞时,碰撞产生的减速度和惯性力较大,碰撞传感器将此信号送到空气囊ECU,空气囊ECU判定为要同时引爆安全气囊和安全带收紧器,并向左、右安全带和空气囊点火器发出点火指令,安全带和空气囊同时引爆,保证驾乘人员的安全。
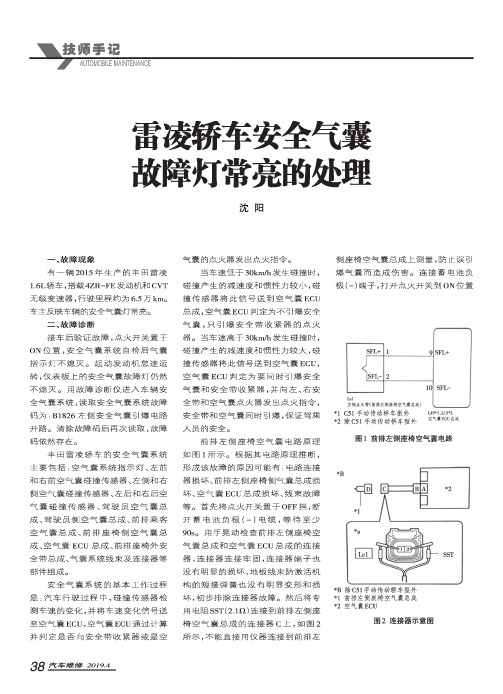
前排左侧座椅空气囊电路原理如图1所示。
根据其电路原理推断,形成该故障的原因可能有:电路连接器损坏、前排左侧座椅侧气囊总成损坏、空气囊ECU总成损坏、线束故障等。
首先将点火幵关置于OFF挡,断开蓄电池负极(-)电缆,等待至少90s o用手晃动检查前排左侧座椅空气囊总成和空气囊ECU总成的连接器,连接器连接牢固,连接器端子也没有明显的损坏,地板线束防激活机构的短接弹簧也没有明显变形和损坏,初步排除连接器故障。
长丰猎豹汽车安全气囊的结构与检修

第八章安全气囊的结构与检修第一节元件位置及电路安全气囊(SRS)元件位置见图8-1,系统电路见图8-2至图8-4。
图8-1安全气囊元件位置1-乘客侧安全气囊组件;2-左前碰撞传感器;3-右前碰撞传感器;4-SRS电脑;5-数据传输连接器;6-螺旋电缆;7-驾驶侧安全气囊组件图8-2 SRS控制原理图1-点火开关(IG1);2-多用途保险丝;3-组合仪表(SRS警示灯);4-数据传输连接器;5-连接器锁紧开关(ON:锁紧;OFF:未锁);6-模数/数模转换器;7-电源电路;8-模拟G传感器;9-警示灯驱动电路;10-连接器锁止探测电路;11-检测仪接口电路;12-备用电容器;13-微处理器;14-安全G传感器;15-驾驶侧安全气囊驱动电路;16-乘客侧安全气囊驱动电路;17-前碰撞传感器接口电路;18-螺旋电缆;19-驾驶侧气囊组件;20-乘客侧气囊组件;21-左前碰撞传感器;22-右前碰撞传感器图8-3 SRS电路(一)1-熔丝链;2-点火开关;3-接充电、点火系统;4-储备连接器;5-转向信号灯及危险警示灯;6-SRS电脑;7-备用电容器;8-模数/数模转换器;9-电源电路;10-模拟G传感器;11-微处理器;12-MuT-II接口电路;13-安全G传感器;14-数据传输连接器图8-4 SRS电路(二)1-多用途保险丝;2-接制动警示灯、灯光监控器/点火钥匙未拔提示器/安全带未系警示器/仪表/安全带警示灯;3-组合仪表;4-连接器锁紧开关(0N:锁止;0FF:未锁止);5-警示灯驱动电路;6-连接器锁紧探测电路;7-微处理器;8、9-安全气囊驱动电路;10-螺旋电缆;11-右前碰撞传感器;12-左前碰撞传感器;13-驾驶侧气囊组件;14-乘客侧气囊组件第二节故障诊断一、故障码的读取与清除1.读取故障码在连接或拆下检测仪之前,应关闭点火开关。
将检测仪连接到数据传输连接器上,然后读取故障码。
2.清除故障码将检测仪连接到数据传输连接器上,清除故障码。
安全气囊亮灯检修方案

安全气囊亮灯检修方案安全气囊是汽车中的重要安全设备之一,它在发生碰撞时能够迅速充气,保护乘车人员头部和身体,减轻碰撞带来的伤害。
然而,当安全气囊系统出现故障时,仪表盘上的安全气囊故障灯会亮起,这时就需要对安全气囊系统进行检修。
下面是一个安全气囊亮灯检修方案。
首先,需要确认安全气囊故障灯是否亮起。
如果亮起,则说明安全气囊系统存在故障,需要进行检修。
如果不亮起,则说明安全气囊系统正常工作。
接下来,需要使用汽车诊断仪对安全气囊系统进行故障码读取,并记录下故障码。
故障码会指示出安全气囊系统具体的故障位置和原因,有助于后续的检修工作。
根据故障码的指示,对安全气囊系统进行详细的检查和测试。
可以先检查气囊模块的连接是否紧固,线束是否损坏或松动。
可以采用拆卸气囊模块和线束进行清洁和连接紧固的方法进行修复。
如果线束和连接没有问题,可以检查车辆的碰撞传感器和控制模块。
可以使用万用表对碰撞传感器和控制模块的电压和电阻进行测试,以确定是否损坏。
如果有损坏,需要进行更换。
在检查和修复过程中,需要特别注意安全气囊系统的高压线路。
高压线路具有很高的电压,不正确操作可能会导致电击伤害。
检修人员应该佩戴绝缘手套,并遵守相关的安全操作规程。
经过以上的检查和修复,可以再次使用汽车诊断仪对安全气囊系统进行故障码清除和校正。
如果故障码被清除,安全气囊故障灯熄灭,则说明安全气囊系统已经修复正常。
最后,为了确保安全气囊系统的稳定和可靠性,建议定期对安全气囊系统进行检查和维护。
可以选择每隔一段时间对安全气囊系统进行全面的检修,以确保其在关键时刻能够起到有效的保护作用。
总结起来,安全气囊亮灯检修方案主要包括确认故障、读取故障码、检查和修复故障、清除故障码和校正系统、定期维护等步骤。
通过这个方案的执行,可以有效地排除安全气囊故障,确保安全气囊系统的正常工作。
一键消除气囊灯亮的方法
一键消除气囊灯亮的方法
气囊灯亮是车辆故障中比较常见的一种,它的出现不仅会影响驾驶者的心情,还会影响到车辆的安全性能。
因此,及时消除气囊灯亮是非常必要的。
下面介绍一种简单的方法,只需一键即可消除气囊灯亮。
我们需要了解气囊灯亮的原因。
气囊灯亮通常是由于车辆的气囊系统出现故障所导致的。
当气囊系统出现故障时,车辆的电脑会自动检测到,并将故障信息存储在车辆的电脑中,同时点亮气囊灯。
因此,只要消除了气囊系统的故障,气囊灯就会自动熄灭。
接下来,我们需要使用一款汽车故障检测仪。
汽车故障检测仪是一种专门用于检测车辆故障的设备,它可以通过连接车辆的OBD接口,读取车辆的故障码,并进行诊断。
在市面上,有很多种不同的汽车故障检测仪,价格也不同,我们可以根据自己的需求和经济实力选择适合自己的产品。
使用汽车故障检测仪的步骤如下:
1.将汽车故障检测仪连接到车辆的OBD接口上。
2.打开汽车故障检测仪的电源,并按照说明书的提示进行操作。
3.等待汽车故障检测仪读取车辆的故障码,并进行诊断。
4.根据汽车故障检测仪的提示,进行相应的维修和更换。
5.完成维修和更换后,再次使用汽车故障检测仪进行检测,确保故障已经消除。
6.最后,按下汽车故障检测仪上的“清除故障码”按钮,即可消除气囊灯亮。
消除气囊灯亮并不是一件难事,只要掌握了正确的方法,就可以轻松解决。
使用汽车故障检测仪是一种简单、快捷、有效的方法,可以帮助我们及时发现和解决车辆故障,保障驾驶安全。
汽车维修中常见的安全气囊系统故障及解决方案

汽车维修中常见的安全气囊系统故障及解决方案随着汽车行业的发展,安全气囊系统已经成为现代汽车中不可或缺的重要组成部分。
它的主要作用是在发生碰撞事故时,通过迅速充气来保护驾驶员和乘客,减少伤害。
然而,安全气囊系统也会出现故障,给驾驶员和乘客带来潜在的风险。
本文将探讨一些常见的安全气囊系统故障以及解决方案。
首先,最常见的安全气囊系统故障是气囊灯的亮起。
当气囊灯亮起时,意味着系统检测到了某种问题。
这可能是由于传感器故障、电气连接问题或者气囊本身的故障引起的。
解决这个问题的第一步是使用汽车诊断工具来读取故障码。
根据故障码,可以进一步确定具体的故障原因。
如果是传感器故障,可以更换传感器来修复问题。
如果是电气连接问题,可以检查连接是否松动或腐蚀,进行必要的修复。
如果是气囊本身的故障,需要更换气囊来修复问题。
其次,另一个常见的故障是安全气囊系统无法正常充气。
当发生碰撞事故时,安全气囊应该能够迅速充气以保护驾驶员和乘客。
如果安全气囊无法正常充气,可能是由于气囊充气装置的故障引起的。
解决这个问题的方法是检查气囊充气装置是否正常工作,如果发现故障,需要进行修理或更换。
此外,还需要检查气囊的连接是否松动或损坏,以确保气囊能够正常充气。
另外一个常见的故障是安全气囊误触发。
有时候,安全气囊系统会在没有发生碰撞的情况下误触发,导致气囊突然充气。
这可能是由于传感器故障、电气问题或者系统误判引起的。
解决这个问题的方法是检查传感器是否正常工作,如果发现故障,需要进行修理或更换。
此外,还需要检查电气连接是否稳固,以确保系统能够正确判断是否需要充气。
最后,还有一个常见的故障是安全气囊系统无法复位。
当安全气囊系统发生故障后,需要进行修复并复位系统,以确保在下一次碰撞事故中能够正常工作。
然而,有时候系统无法正确复位,导致气囊无法正常充气。
解决这个问题的方法是使用专用的复位工具来复位系统。
如果系统仍然无法复位,可能需要进行进一步的检查和修理。
安全气囊故障码清除(Airbagfaultcodeclearance)

安全气囊故障码清除(Airbag fault code clearance)Reading and clearing(1) SRS fault code reading and clearing method(2) SRS failure contentThe self-diagnosis of airbag system can be safely driven by the instrument panelThe warning lamp (SRS) reads the fault code for maintenance and application.(1) SRS fault code reading and clearing method1. Ignition switch ON.2. The 6 hole (warning light circuit) and 2 hole (power supply) of the cross-connect square diagnosis block.3. After taking about 2 ~ 4 seconds, remove the cross wires.4. Look at the dashboard SRS warning lights and read the flash code.The fault code read, please check the breakdown code description.6. After the maintenance, check the failure code memory again, and after the failure, cross the 6 - hole for more than 6 secondsClear the fault code.(2) SRS failure contentFault code -- -- -- -- -- -1 system normal (no problem memory)Airbag computer is not goodThe driver's safe airbag circuit is not goodThe passenger seat airbag circuit is not good5. The driving seat belt buckle is not goodThe passenger seat belt buckle is badPassenger seat safety gas protection resistance circuit The battery is too low9 SRS warning light circuit is not goodThe airbag computer is not goodDetection of airbag circuit system(1) the detection of airbag computer(2) detection of the driving seat airbag circuit(3) passenger seat airbag circuit detection(4) driving seat belt buckle switch circuit test(5) passenger seat belt buckle switch circuit test(6) passenger seat airbag protection resistance detection(7) safety airbag computer power circuit detection(8) circuit detection of SRS warning lights(9) safety belt tractor circuit testingBefore the detection of the airbag circuit, the head of the cathode must be removed. Measuring circuit tools should be usedSeveral three meters are used to avoid the inadvertent detonation of safe gas.(I) airbag computer detection1. Perform the self-diagnosis of airbag system.2. If the fault code of no.2 or 10 is read, indicating that the airbag computer is not good, the new product should be replaced.3. Replace the new airbag computer. Please pay attention to the manufacturing date and not exceed the warranty period of three years.Before replacement, the ignition switch OFF, and remove the cathode.5. Install the new airbag computer.6. When the fault code is read, a normal code should appear.(2) detection of the driving seat airbag circuitThe failure code of no.3, please click the following method to detect the circuit1. Ignition switch OFF, and remove the electric bottle to the head.2. Remove the system connector (10 feet).3. Measuring 3 and 5 feet with the digital ohmmeter, which is to measure the resistance of the airbag of airbag in the driver's seat, should be inBetween 2 ~ 5 Ω.4. Measure 3 feet and iron, and 5 feet and iron resistance respectively. When the steering wheel is rotated, its resistanceIt should be infinite. If there is a resistance reaction, it is indicated that there is a short circuit in the ring or wire in the directionTo replace.(3) passenger seat airbag circuit detectionThere is a number 4 failure code,Please check the following method1. Ignition switch ON.2. Remove the negative pole of the battery.3. Disassemble the system connector (1 pin joint).4. Use the digital ohmmeter to measure the 6 and 8 feet, as well as the 6 and 7 resistance, which is to measure twoDet collision resistance, should be between 2 ~ 5 Ω.5. Measure 6 foot and body rail, should not lead the situation, its resistance should be infinite.(4) driving seat belt buckle switch circuit testThere are no. 5 fault codes. Please check the following methods1. Don't insert the buckle latch switch.2. Ignition switch OFF, remove the wiring connector of the driving seat belt buckle switch.3, to plug the ohmmeter measuring buckle switch, its internal resistance of the magnetic, should be in the range of 390 ~ 410 Ω.4, tied to the inserted into the buckle, the resistance of the switch function, should be between 90 ~ 110 Ω.5. Finally check the resistance of the switching circuit and the body iron, and its resistance should be infinite.(5) passenger seat belt buckle switch circuit testThere are no. 6 fault codes. Please check the following methods1. Ignition switch OFF.2. Seat belt buckle, do not insert the buckle switch.Remove the seat belt and fasten the plug switch.4, ohmmeter is used to measure the internal resistance of the buckle pin switch, should be in the range of 390 ~ 410 Ω.5, anchored buckle plug and switch switch, resistor should be between 90 ~ 90 Ω at this time.6. The bolt-latch switch should not be connected with the lattes, with the ohmmeter measuring switch circuit and the body rail,The resistance should be infinite.(6) passenger seat airbag protection resistance detectionAirbag computer between 15 feet and take iron, a 100 concatenated Ω resistance, as the passenger airbag circuitUse of protection.The number 7 failure code, please click the following method to detect1. Ignition switch OFF.2. Remove the negative pole of the battery.3. Remove the air bag computer connector and measure the joint 15 foot and the iron (or 12 feet). The resistance should be inΩ between 90 ~ 90.(7) safety airbag computer power circuit detectionThe number 8 failure code, please click the following method to detect1. Ignition switch ON.2. Measure # 15R fuse with the voltmeter, and its voltage should be between 11 and 14V. If the voltage is too low, check itThe voltage value of the battery voltage and the ignition switchto identify the voltage of the battery or the contact of the wire.3. Ignition switch OFF.4. Remove the negative pole of the battery.5, remove the airbag computer connectors, measure and # 9 feet 15 r fuse, the resistance between 0 Ω should appear,Indicates that the wiring is normal.(8) circuit detection of SRS warning lightsThe number 9 failure code, please click the following method to detect1. Ignition switch ON, check whether SRS warning light will be bright and light bulb will light to indicate that the power circuit is normal.2. If the SRS light is not bright, the voltage of # 15R fuse should be tested at 11 ~ 14V.3. If the SRS light is not on or on, check the loop of the SRS bulb.4. Ignition switch OFF, remove the negative pole of the battery.5, remove the airbag computer connectors, measure and 3 feet 9 feet, check the presence of short circuit (0 Ω) or opencircuitThe resistance of a bulb is usually present.(9) safety belt tractor circuit testing1. The seat belt traction gas failure, in the self-diagnosis system, did not design the fault code representation.Ignite the magnetic OFF and remove the cathode from the cylinder.3. Remove the system connector (10 foot joints).4. The ohmmeter is used to measure the resistance of the 4 and 9 feet, which is the resistance of the seat belt tractorBetween 2 ~ 5 Ω.5, then measure and 10 feet, 4 feet is to detect passenger seat belt retractor resistance, should be in the range of 2 ~ 5 Ω.6. Measure 4 feet and body rail, the resistance should be infinite, indicating that there is no short circuit in the circuit.Airbag computer to pick up contentThe airbag computer is connected to the foot, and there are additional passenger seat airbags, which have 16 of them, and are driven by a separate deviceThe seat airbag, with 12 feet, is the same circuit.1 feet ─ ─ ─ ─ the driver and passenger seat belt traction signal (+).2 feet ─ ─ ─ ─ the driver and passenger airbags explode signal (+).3 feet ─ ─ ─ ─ the SRS warning light circuit/self diagnosis signal (square diagnosis 6 holes).4 feet ─ ─ ─ ─ no u se.5 feet ─ ─ ─ ─ the driver's seat belt retractor signal circuit (-).6 feet ─ ─ ─ ─ the driver's airbag blasting machine signal circuit (-).7 feet ─ ─ ─ ─ no use8 feet ─ ─ ─ ─ the passenger seat belt retractor signal circuit (-).9 feet ─ ─ ─ ─ t he ignition power supply/SRS warning light power shape.10 feet ─ ─ ─ ─ the driver's seat belt buckle switch switch signal.11 feet ─ ─ ─ ─ the passenger seat belt buckle switch switch signal.12 feet ─ ─ ─ ─ iron.13 feet ─ ─ ─ ─ the passenger airbag det 1 signal circuit (-).14 feet ─ ─ ─ ─ the passenger airbag blasting machine 2 signal circuit (-).15 feet ─ ─ ─ ─ the passenger airbag circuit protection resistor.16 feet ─ ─ ─ ─ no use.Airbag system circuit connectorBetween the airbag computer and the system components, a10-foot system circuit connector is configured for the circuitFor testing purposes, the circuit connection is as follows:Connect the contents of the circuit# 1 airbag computer 4 foot (not used)Air bag computer 9 foot/SRS red light (12V)# 3 airbag computer 6 foot/driver airbag detonator (-)# 4 airbag computer 1 / driver seat belt tractor (+)/passenger seatFull tape tractor (+)5. Safety bag computer 2 foot/driver airbag detonator (+)/cross-connectJoint # 66. The explosive device (+) of safety of foot/passenger seat 1 and 2.# 7 passenger seat 2 air bag detonate (-)/airbag computer 14 footPassenger seat no. 1 airbag detonator (-)/airbag computer 13 footAir bag computer 5 foot/driver seat belt tractor (-)Safety bag computer 8 foot/passenger seat belt tractor (-)。
安全气囊系统故障诊断与检查
快速数据传输
帮助
选择功能××
2、按0和1键,屏幕显示:
快速数据传输
Q
01---查询控制单元版本号
3、按Q键确认输入。5s后屏幕显示:
快速数据传输 检测仪发送地址码15
4、5s后屏幕显示前侧的安全气囊:
4B0959655G 安全气囊 前+侧 0001 → 编码00204 服务站代码WSC 06812
1、查询前乘客席安全气囊的状态 1)关闭点火开关,连接故障诊断仪 V.A.G.1552,打开点火开关,按1键选择“快 速数据传输”。屏幕显示:
快速数据传输
帮助
选择功能××
2)按0和8键,屏幕显示:
快速数据传输
Q
08---读取测量数据块
3)按Q键确认输入。屏幕显示:
自适应
输入通道号××
4)按0和1键,屏幕显示:
中央门锁 → 打开
警示灯 → 亮
车内灯 → 亮
因此在进行执行元件诊断前,应将中央门锁 设到“锁止”状态并起动发动机。将车内灯 开关设到“车门接触位置。诊断结束后应清 除中央门锁控制单元故障储存信息。
1、关闭点火开关,连接故障诊断仪 V.A.G.1552,打开点火开关,按1键选择“快 速数据传输”。屏幕显示:
1、读取故障代码 2、清除故障代码 3、查询控制单元编号 4、给控制单元编码 5、读取测量数据流 6、自适应
(一)自诊断功能
进行安全气囊系统自诊断时应满足的条件: 1、相关系统的供电及熔断丝正常; 2、连接好故障诊断仪V.A.G.1552; 3、打开点火开关。 在屏幕上出现“/SP”时表示出现偶然故障。 修理前应先清除偶然故障代码。
帮助
7)从杂物箱盖上取下前乘客席安全气囊关 闭标签。
汽车安全气囊系统的故障排除和维修技巧
汽车安全气囊系统的故障排除和维修技巧随着汽车的普及和出行安全的重视,安全气囊系统在现代汽车中扮演着至关重要的角色。
然而,由于长时间使用或错误操作,安全气囊系统有时也会出现故障,这就需要我们了解一些故障排除和维修技巧。
本文将介绍汽车安全气囊系统的常见故障问题以及相应的解决方案。
一、安全气囊系统故障的检测1. 触发器故障:当安全气囊系统触发器发生故障时,气囊可能无法正常充气。
这种故障一般会伴随着安全气囊指示灯的亮起。
在排除其他机械故障之后,可以通过连接诊断仪器,读取系统故障码来判断触发器是否故障。
2. 电气故障:电气连接问题是导致安全气囊系统故障的另一个常见原因。
例如,电缆接头松动或损坏可能会导致触发器无法接收到触发信号。
在排除机械故障后,我们可以通过仔细检查电缆连接并测量电气传感器的电压和电阻来判断是否存在电气故障。
二、具体故障排除和维修技巧1. 触发器问题的排除:首先,我们需要检查安全气囊系统的保险丝和触发器的供电情况。
确保保险丝没有烧断并且供电正常。
然后,可以使用诊断仪器读取系统故障码,定位触发器故障的具体位置。
如果发现触发器故障,应及时更换故障的触发器,并重新测试系统以确保故障已被解决。
2. 电气连接问题的排除:确定触发器无故障后,需要仔细检查电缆连接。
检查所有电缆接头是否牢固连接,并检查电缆是否受损。
如果发现松动或损坏的接头,应重新连接或更换接头。
如果发现电缆断裂或损坏,应及时更换电缆。
修复好电气连接问题后,再次测试系统以确保故障已排除。
三、安全气囊系统维护的注意事项1. 定期检查:为了确保安全气囊系统正常运行,建议定期检查系统的状态。
可以根据汽车制造商的建议,每年或每隔一定里程数进行一次检查,包括触发器、电气连接和气囊等。
2. 避免碰撞:避免不必要的碰撞对安全气囊系统造成损坏。
尽量保持安全驾驶,遵守交通规则,避免剧烈刹车或撞击。
3. 专业维修:如果无法自行解决安全气囊系统的故障,建议及时寻求专业维修服务。
- 1、下载文档前请自行甄别文档内容的完整性,平台不提供额外的编辑、内容补充、找答案等附加服务。
- 2、"仅部分预览"的文档,不可在线预览部分如存在完整性等问题,可反馈申请退款(可完整预览的文档不适用该条件!)。
- 3、如文档侵犯您的权益,请联系客服反馈,我们会尽快为您处理(人工客服工作时间:9:00-18:30)。
SRS指示灯线路
短路或断路
5.1V
~7.0
4.5V
~5.5
12V
~14
10.5V
~14.5
0
0(8.5v
~13)
10.5V
~14.5
SRS指示灯线路
短路或断路
安全气囊检测程序:
HONDA──本田雅哥(1992年以前)
1、当点火开关KEY-ON或发动引擎後,在仪表板上SRS灯会闪烁6秒钟後熄灭,表
示系统正常,若有故障,则SRS灯将一直闪烁。
2、本田 -- 雅哥车系安全气囊系统,若发生故障时,并没有提供故障码,因此,
必须由电脑左侧16PIN测试座去进行电压测试。
3、16PIN 测试座电压分析
PIN脚
故 障
1
3
4
6
7
8
9
10
11
13
14
触发感知器
断路或碰撞
感知器短路
9~14
0~2
0~2
4~9
10~14
测 试 脚
1
SADH
4
VCC
5
SV
10
BUC1
12
GND
13
IDC
14
M1
可 能
故 障
标 准 值
5.1V
~7.0
4.5V
~5.5
12V
~14
10.5V
~14.5
0
8.5V
~13
10.5V
~14.5
系统正常
触发开关断路或
碰撞感知器短路
0
4.5V
~5.5
12V
~14V
10.5V
~14.5
0
2.0V
~8.5
※DE──用於 ACCORD 车种。
元件测试:
1、碰撞感知器──3.8~4.2K。
2、方向盘游丝──0.2K以下。
安全气囊16pin测试分析:
NEC -- SRS 电脑
测 试 脚
1
SADH
4
VCC
5
SV
10
BUC1
12
GND
13
IDC
14
M1
可 能
故 障
标 准 值
3.5V
~5.2
4.5V
~5.5
12V
14
4~5.5
5.1~
6.9
10~14
0~2
5.1~
6.9
9~14
正时皮带记号
Shuttle 2.2i
拆卸
注:曲轴的正常转向为逆时针。在拆卸凸轮轴正时皮带之前必须先卸下平衡器轴皮带。
1. 拆卸:
■下防溅罩 ■辅助传动皮带 ■PAS泵(不断开软管)
■凸轮轴盖 ■正时皮带上盖[1]
2. 使曲轴转至1号缸的TDC处[2],使得凸轮轴正时标记[3]与气缸头的上表面对齐[3],且
10.5V
~14.5
碰撞感知器断路
安全气囊断线或
游丝断线
10.5V
~14.5
4.5V
~5.5
12V
~14
10.5V
~14.5
0
2.0V
~8.5
10.5v
~14.5
安全气囊断线或
游丝断线
SRS电脑#13脚没
有电源输入
4.0V
~7.0
0
0
8.5V
~14.5
0
2.0V
~8.5
8.5v
~14.5
SRS电脑#13脚没
4~5.5
0~2
10~14
0~2
0~2
9~14
触发感知器
短路或碰撞
感知器断路
9~14
0~2
0~2
4~9
10~14
4~5.5
10~
14
10~14
0~2
10~
14
9~14
碰撞感知器
断路
9~14
0~2
0~2
4~9
10~16
4~5.5
7~9
10~14
0~2
7~9
9~14
安全气囊或
游丝断路
9~14
4~
5.5
0~2
~14
10.5V
~14.5
0
8.5V
~13
7.5V
~11
系统正常
触发开关断路或碰
撞感知器短路
0
4.5V
~5.5
12V
~14V
10.5V
~14.5
0
2.0V
~8.5
7.5V
~11
触发开关断路或
碰撞感知器短路
触发开关短路或碰
撞感知器均断路
7.5V
~11
4.5V
~5.5
12V
~14
10.5V
~14.5
0
2.0V
~8.5
7.5v
~11
触发开关短路或碰
撞感知器均断路
碰撞感知器断路
5.3V
~7.2
4.5V
~5.5
12V
~14
10.5v
~14.5
0
2.0V
~8.5
7.5V
~11
碰撞感知器断路
安全气囊断线或
游丝断线
7.5V
~11
4.5V
~5.5
12V
~14
10.5V
~14.5
0
2.0V
~8.5
7.5V
~11
安全气囊断线或
1-4
驾驶座的安全气囊搭铁线短路
2-1
乘客座的安全气囊电路开路或电阻过高
2-2
乘客座的安全气囊电路开路或电阻过低
2-3
乘客座的安全囊电源线短路
2-4
乘客座的安全囊搭铁路短路
5-1
SRS电脑内部故障
9-1
SRS指示灯电路故障
9-2
SRS电源供应系统故障
10-1
SRS电脑更换号码(SRS电脑不能长期使用,
4~9
10~14
4~5.5
10~
14
10~14
0~2
0~2
9~14
保险丝断线
9~14
0~2
0~2
4~9
0~2
0~1
10~
0~2
0~2
5.1~
6.9
9~14
主搭铁线断
路
7~16
7~
16
7~
16
7~
16
7~16
7~16
7~
16
7~16
7~
16
7~
16
7~16
系统正常
9~14
0~2
0~2
10~
14
10~
(3).再次跨接EMS连接器4秒后灯会熄,此时拿开跨接线。
(4).等4秒后灯会闪2次,此时点火开关关掉,即可清除故障记忆。
SRS系统故障码一览表:
SRS指示灯
故障码
原 因
不亮
无
SRS指示灯电路故障
1-1
驾驶座的安全气囊电路开路或电阻过高
1-2
驾驶座的安全气囊电路开路或电阻过低
1-3
驾驶座的安全囊电源线短路
10.5V
~14.5
触发开关断路或
碰撞感知器短路
触发开关短路或
碰撞感知器断路
10.5V
~14.5
4.5V
~5.5
12V
~14
10.5V
~14.5
0
2.0V
~8.5
10.5V
~14.5
触发开关短路或
碰撞感知器断路
碰撞感知器断路
7.1V
~9.5
4.5V
~5.5
12V
~14
10.5V
~14.5
0
2.0V
~8.5
必需更换)
安全气囊系统自我诊断
当点火开关ON时,SRS提示灯会亮6秒後,自动熄灭,表示SRS系统是正常的;
如果SRS灯不亮,或不熄灭,表示SRS系统有故障记忆,该系统是利用在SRS主电脑
上,配置的16PIN测试来进行故障测试。
HONDA 本田车系中所采用的安全气囊系统有两种:
※NEC──用於 CIVIC 车种。
游丝断线
SRS电脑#13脚没
有电源输入
3.5V
~5.2
0
0
8.5V
~14.5
0
2.0V
~8.5
6V
~11
SRS电脑#13脚没
有电源输入
SRS指示灯线路
短路或断路
3.5V
~7.2
4.5V
~5.5
12V
~14
10.5V
~14.5
0
0(8.5V
~13)
7.5V
~11
SRS指示灯线路
短路或断路
DE -- SRS 电脑
安全气囊故障码读取清除──SRS
SRS故障码读取方法
故障码清除方法
SRS系统故障码一览表
SRS故障码读取方法:
(1).将点火开关关,连接SCS跨接线至维修检查连接器.
(2).旋转点火开关开,SRS灯闪烁故障码。
故障码清除方法:
(1).将点火开关关,跨接线至故障记忆清除信号连接器(MES).
(2).点火开关,6秒后SRS灯熄灭,此时取下跨接线,等灯再次亮起。