t-touch expert说明书
维亚维解决方案:T-BERD MTS-5800多技术测试手持设备说明书

BrochureVIAVI T-BERD/MTS-5800All-in-one handheld network and fiber testingThe T-BERD®/MTS-5800 handheld network tester is the one tool that network technicians and engineers need to install, turn-up, and maintain their networks. It supports both the legacy and emerging technologies required to handle various network applications including metro/core, mobile backhaul, and business services installations.Key Benefitsy Simplifies multitechnology testing with an all-in-one dual-10 G handheldy Optimized for field use with a multitouch screen, scripted workflows, and clear resultsy Supports efficient best practices with repeatable methods and procedures with Job Manager guided workflows y Speeds fiber characterization, Ethernet service activation, and troubleshootingKey Featuresy Fully-loaded TDM/PDH to dual 10 G Ethernet, SONET , SDH, Fiber Channel, CPRI/OBSAI, eCPRI, and OTN supporty Automated, enhanced RFC 2544 and SAMComplete testing per ITU-T Y .1564y Integrated burst testing approach per MEF 34 and RFC 6349 TrueSpeed™ TCP throughput testingy Timing/Synchronization testing with PTP , SyncE, and 1 PPS, 2 MHz and 10 MHz Wandery Compatible with VIAVI 4100-Series OTDR, FiberComplete, and COSA modules with Smart Link Mapper™, fiber microscopes, and optical power metersApplicationsy Mobile and backhaul characterization, validation, and troubleshootingy Converged Ethernet/IP network testing and troubleshooting at 10 Mbps to 10 G interfacesy Fiber link characterization and troubleshootingy Installation and maintenance of OTN and legacy SONET/SDH and TDM/PDH networksy Remote radio head (RRH) testing at the wireless basestation, including CPRI 1-9 ratesThe industry’s smallest handheld instrument can test throughout the service life cycle, including fiber characterization, service activation, troubleshooting, and maintenance. Advanced Ethernet test features such as TrueSpeed per RFC 6349, J-Profiler™, Wirespeed capture/decode, and automated J-Mentor, help field technicians test their networks faster and more accurately than ever before.y All test interfaces are readily availabley Compact form factor for easy portability:7 x 9.5 x 3 in (17.8 x 24.1 x 7.62 cm)y Large 7 in multi-touch displayy T ablet-like interface for easy navigation through test informationand advanced workflowsCompatible with VIAVI Solutions Fiber Test ToolsMobility, business services, and metro technicians can now test virtually any interface in their network as well as qualify fiber plant with one ultra-portable instrument. The T-BERD/MTS-5800 is compatible with:y The P5000i fiber microscope for connector end-face inspection and analysisy MP-Series optical power meters for optical power and loss measurementsy OTDR modules for fiber link characterization and fault findingy Smart Link Mapper optical analysis software that displays OTDR results in a simple, icon-based map view for clear diagnostics of detected issuesOptimized for Easy Field Usey Fixed test interfaces eliminate loose pluggable modules y LEDs indicate plug-ins for testsy A streamlined user interface provides simple pass/fail, green/red resultsy Extended battery life enables longer test times y Boots up rapidly from power-on to test starty Dual-port operation runs two tests simultaneously , including10 G/high-speed testsLow-speed electricalT1, PRI, E1External BITS clockinputHigh-speed electrical T3, STS1, E3, E4, STM-1eDual RJ45 ports 10/100/1000 EthernetDual SFP+ ports; 1 and 10 G Ethernet LAN/WAN; 10GE eCPRISTM-1-64, OC3-192; OTN OTU 1, 2 OTU1e, 2eFiber Channel: 1/2/4/8/10/16 G FC CPRI/OBSAI 614 Mbps – 12.2 GbpsTest every interface in your network!Compatible with VIAVI FiberScopeTrueSAM Saves Valuable Service Activation TimeT est better and quicker with automated tests combined into one ultimate installation tool: y J-QuickCheck — a fast, automated test (RFC 2544, Y .1564) for validating end-to-end and auto-negotiation configuration ykey performance indicators (KPIs)/concurrently measuring SLAssuch as throughput, frame delay committed burst size (CBS) — optionalyY .1564 SAMComplete — an automated service verification testthat speeds the installation of multiple classes of services (COS) y TrueSpeed per RFC 6349 — an automated, standards-basedtest that can save up to 25% of operating expenses (OpEx) and reveals the reason for slow file downloads, eliminating finger-pointingy Interoperable with TrueSpeed VNF and QT-600 to speed testingReduce Mean Time to Repair for Network ProblemsReduce CapEx/OpEx while immediately identifying problems with automated tests — without the need for a field expert or a separate analyzer.y Network discovery automatically identifies equipment present on the network y J-Profiler discovers live traffic streams for real-time troubleshooting with in-service top-talkers analysisy Integrated capture/decode offers 10 G line-rate packet capture and analysis in a handheld y J-Mentor provides expert troubleshooting guidance and interprets packet decodesEnhanced RFC 2544 with J-QuickCheck SAMComplete per ITU-T Y .1564TrueSpeed per RFC 6349J-Mentor provides expert troubleshooting guidanceEnables Network Evolution — Today and TomorrowThe 5800 meets leading-edge, carrier-grade Ethernet requirements:y Ensures reliability with link and service OAM (IEEE 802.3ah, 802.1ag, and ITU-T Y .1731)y Validates network scalability with VLAN, Q-in-Q, MAC-in-MAC Ethernet-over-Ethernet, MPLS, and VPLS tunnelling technologies.y Support for ODU multiplexing including ODU1, ODU0, and ODUflexy T est emerging 5G technology with eCPRI specific testing including One-Way-Delay (OWD) y Full-featured VoIP and IP video turn-up and troubleshooting testsy Supports packet transport network (PTN) evolution with MPLS-TP technology y Ethernet Service Disruption with multi-tier triggersy Run Bi-Directional Forwarding Detection (BFD) against switch and router partners while generating traffic to measure KPIsEmpower Cell-Site Technicians - Fiber testing to CPRI and eCPRIT-BERD/MTS-5800 tools let cell-site technicians efficiently install and maintain backhaul and fronthaul networks. They can ensure BBU and RRH connectivity with CPRI and OBSAI tests: y Validate C-RAN connectivity across CWDM networksy T est RRH health from the bottom of the tower or from a C-RAN location by emulating a BBUy Identity PIM and interference issues from an optical test access point including quad spectrum with enhanced markers.(RFoCPRI) y Support 2-T one PIM generation enabling PIM detection without climbing a towery Bit Error Rate T est eCPRI fronthaul circuitsy Validate RJ-45 Ethernet wiring is properly crimped down and wire mapped including end-to-end shield ground connectivity y CPRI Check automates setting Antenna Tilt, detecting PIM and reading VSWRAnd, they can verify network synchronization:y Emulate a 1588v2 master clock/slave recovery for proper point-to-point (PTP) message propagation and packet-delay variation (PDV) verificationy Verify SyncE frequency synchronization accuracy and Ethernet synchronization message channel (ESMC) message propagationTest the RRH herewith CPRIDon’t climb hereCommon Application BaseSame user interface + same results + same methods and proceduresActivate services more quickly and accuratelyReduce mean time to repair (MTTR) on network problems T est the widest range of traditional and emerging telecom interfacesPart of the Leading T-BERD/MTS Test Portfolio StrataSyncEmpower Y our AssetsStrataSync is a hosted, cloud-enabled solution for managing assets, configurations, and test data on VIAVI instruments. It ensures that all instrument software is current and the latest options are installed. StrataSync lets you manage inventory , test results, and performance data anywhere with browser-based ease while it also improves technician and instrument efficiency. StrataSync manages and tracks test instruments, collects andanalyzes results from the entire network, and it informs and trains the workforce.y Measure wander on SyncE, 1PPS, T1, E1, and 2 and 10 MHz signals y T est Floor Packet Percentile per ITU PTP Frequency recommendationsWhen equipped with an OTDR module, the T-BERD/MTS-5800 is the perfect solution for mobile network testing, providing easy fiber link characterization and troubleshooting.© 2020 VIAVI Solutions Inc.Product specifications and descriptions in this document are subject to change without notice.5800-gov-br-tfs-tm-ae 30191085 910 0120Contact Us +1 844 GO VIAVI (+1 844 468 4284)To reach the VIAVI office nearest you, visit /contact.。
ADC Adtemp TempleTouch 体温计说明书
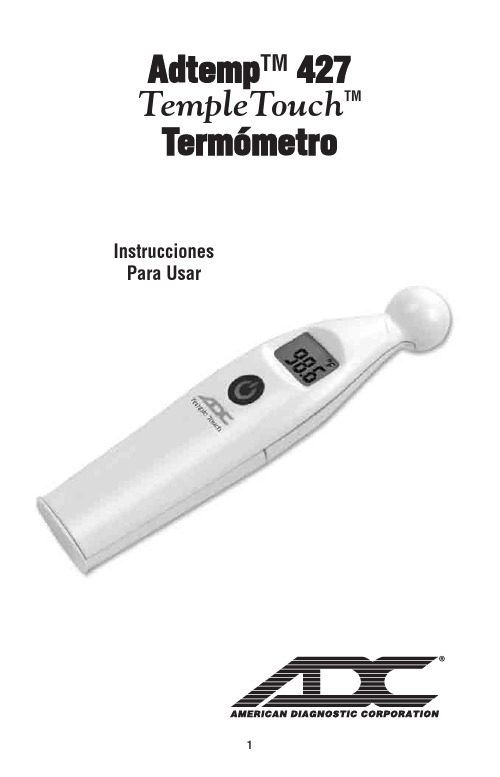
Adtemp TM 427 TempleTouch TMTermómetroInstruccionesPara UsarGracias por elegir un termómetro ADC® AdtempTMTemple Touch. Su nuevo termómetro está diseñado paraproporcionar mediciones precisas de la temperatura corporal mediante una sonda única, que mide el flujo de calor de los vasos sanguíneos a la piel y lo convierte en temperatura corporal en aproximadamente 6-8 segundos.Definiciones de símbolosLos siguientes símbolos están asociados con su termómetro.SensorMantener secoInstrucciones de operación Boton multifuncionError de detección automática La temperatura es más alta queIndicación de memoriaIndicación de batería bajaniños pequeños. Por favor, póngase en contacto con su médico.• Mantener fuera del alcance de los niños sin supervisión. Los componentes pueden ser dañinos si se ingieren.• Lea atentamente las instrucciones adjuntas para asegurar lecturas detemperatura precisas. Las lecturas de temperatura se ven afectadas por muchos factores que incluyen el ejercicio, el consumo de bebidas frías o calientes antes de tomar una lectura, así como la técnica.• ADVERTENCIA: Se recomienda retirar las baterías del termómetro cuando no se use durante un período prolongado. No arroje las baterías al fuego,recárguelas, colóquelas al revés, desmóntelas, mezcle con baterías usadas o de otro tipo, ya que pueden explotar o gotear y provocar lesiones. Las baterías de desecho deben depositarse únicamente en una basura de reciclaje de baterías.• PRECAUCIÓN: No deje caer el termómetro ni lo exponga a golpes fuertes.• PRECAUCIÓN: No sumerja el termómetro en agua ni en ningún otrolíquido.• PRECAUCIÓN: No almacene la unidad a la luz solar directa, atemperaturas elevadas, con humedad elevada o con polvo.• PRECAUCIÓN: deje de usar el termómetro si funciona de forma errática o si la pantalla no funciona correctamente.• PRECAUCIÓN: limpie la sonda del termómetro antes de guardarla.• PRECAUCIÓN: No intente desmontar la unidad, excepto para reemplazar las baterías.• PRECAUCIÓN: No autoclave. Tenga en cuenta los procedimientos delimpieza descritos en este manual.Cómo Utilizar:Use este termómetro en una frente limpia y seca. Limpie la transpiración y retire el vello del área temporal.1. Presione y suelte el botón multifunción. La pantalla parpadearáy escuchará un solo pitido audible (Figura 1). El resultadoanterior se mostrará durante 2 segundos (Figura 2) y luegodesaparecerá.2. Coloque la sonda del termómetro en el centro del área del tem-plo entre el extremo de la ceja y la línea del cabello. Sostengala unidad suavemente pero firmemente contra la sien paraasegurar un buen contacto con la piel. (Figura 3). La correctacolocación y el buen contacto aseguran lecturas fiables.3. Una vez que el termómetro esté en su lugar, la medicióncomenzará automáticamente. Aparecerá un círculo enejecución que indica que la medición está progresando conéxito (Figura 4). Asegúrese de que el termómetro y el pacienteno se muevan mientras se realiza la medición. 4. Se mostrará una lectura de temperatura dentro de 6-8 segun-dos. Escuchará un pitido largo cuando se complete la medición. La lectura permanecerá en pantalla durante aproximadamente 1 minuto. La unidad se apagará automáticamente en aproximadamente un minuto. Para prolongar la vida útil de la batería, presione el botón multifunción para apagar manualmente.NOTA: Debe esperar un minuto antes de tomar otra lectura. Si intenta comenzar otra lectura antes de que haya transcurrido este tiempo (apa-gando y encendiendo manualmente el dispositivo), la unidad mostrará una cuenta regresiva de 10 segundos mientras se reinicia. Si intenta medir durante la cuenta regresiva, el dispositivo mostrará el resultado anterior, emitirá un pitido 8 veces y se apagará automáticamente.Asegurar la Medición Precisa de la Temperatura:1. La ubicación del cuerpo de medición es la sien, cerca de la arteria temporal, entre el extremo de la ceja y la línea del cabello.2. No coloque el termómetro en un tejido cicatrizado comprometido por un trastorno de la piel, llagas abiertas o abrasiones, o pacientes en trauma.3. Las lecturas de temperatura se ven afectadas por muchos factores, incluido Figura 1Figura 2Figura 3Figura 4el ejercicio y el consumo de bebidas frías o calientes antes de tomar una lectura.4. Consulte a su médico cuando use terapias con medicamentos que puedenelevar la temperatura local de la piel en la frente; Esto puede llevar a unalectura incorrecta.5. No coloque el termómetro sobre la piel expuesta a la luz solar directa, el calor de la chimenea, el flujo del aire acondicionado o las terapias de compresa frías/calientes.6.Espere al menos un minuto entre mediciones consecutivas para que la unidad se reajuste a la temperatura ambiente.7. Si el termómetro ha sido almacenado a una temperatura fría, permita que la unidad se caliente naturalmente a temperatura ambiente antes de usarla. 8. El rendimiento puede degradarse si se opera o almacena fuera de los rangos de temperatura / humedad establecidos.Modos de Temperatura de Conmutación:La escala de temperatura predeterminada es Fahrenheit (° F).Para cambiar la escala a ° C, o volver a ° F:1. Mientras está apagado, mantenga presionado el botónmultifunción durante unos cinco segundos. Aparecerá elícono del reloj de arena, luego cambiará ° F o ° C.2. Suelte el botón.Battery Replacement:With the device off, remove the battery cover by sliding it out of its housing. Place the batteries in the chamber, making sure polarity is correct (see engraving on the bottom of battery compartment). Slide the battery cover back into place.Solución de Problemas:El termómetro ha sido diseñado para mostrar advertencias de retroalimentación para garantizar un uso adecuado y una medición precisa de la temperatura. Cuando aparece un error, el dispositivo emitirá un pitido 5 veces y luego se apagará automáticamente. En el caso de un mal funcionamiento o una medición de temperatura incorrecta, se mostrarán las siguientes advertencias:HI: Si la temperatura medida es superior a 107.6 ° F (42 ° C),el dispositivo emitirá un pitido y mostrará HI.Solución: apague la unidad, espere 1 minuto y vuelva a encenderla. Vuelva a tomar la temperatura utilizando la técnica adecuada. Si aún se lee HI, esto indica que el paciente tiene fiebre alta. Busque atención médica inmediata.NOTA: Esto no es un mal funcionamiento del dispositivo.LO: Si la temperatura medida es inferior a 95 ° F (35 ° C), eldispositivo emitirá un pitido y mostrará LO.Solución: apague la unidad, espere 1 minuto y vuelva a encen-derla. Vuelva a tomar la temperatura utilizando la técnica adecuada. Si aún se lee LO, esto indica que el paciente tiene una temperatura corporal baja. NOTA: Esto no es un mal funcionamiento del dispositivo.Er.1: Si el termómetro está demasiado frío o demasiado caliente para funcionar, el dispositivo emitirá un pitido 5 veces y mostrará Er.1.Remedio: verifique que la temperatura de la habitación se en-cuentre dentro del rango de productos de 60.8 ° F a 104 ° F (16 ° C a 40 ° C). Espere 1 minuto y luego vuelva a tomar la temperatura usando la técnica ade-cuada.Er.2: Si la temperatura no se registró debido al mal contacto, elmovimiento del paciente o la mala colocación, el dispositivo emi-tirá un pitido 5 veces y muestra Er.2.Solución: apague la unidad, espere 1 minuto y vuelva a encenderla.Vuelva a tomar la temperatura utilizando la técnica adecuada.Er.3: Si la unidad no funciona correctamente, el dispositivo emi-tirá un pitido 5 veces y mostrará Er.3.Remedio: No usar el termómetro.Llame al 1-800-232-2670 para obtener servicio.Batería baja: el icono de la batería está encendidocontinuamente.Remedio: La batería tiene suficiente vida útil paraaproximadamente 10 mediciones más. Reemplace la batería pronto.Batería agotada: el icono de batería aparece cuando se en-ciende la unidad y el dispositivo se apaga solo.Remedio: Reemplace la batería.Limpieza y Desinfección:• Limpie la punta y la sonda con un algodón humedecido con alcoholisopropílico al 70% antes y después de cada uso. Después de la limpieza,espere al menos 2 minutos antes de tomar una medida para que la unidad se vuelva a ajustar a la temperatura ambiente.• Use solo un paño suave y seco para limpiar el cuerpo del termómetro (si esnecesario). Nunca use un limpiador abrasivo ni sumerja el termómetro enagua u otros líquidos.SpecificationsCaracterística de rendimiento / datos:Tiempo de medición 6-8 segundos.Ubicación de la medida:Zona del templo de la frenteRango de medicion:95 ° F a 107.6 ° F (35 ° C a 42 ° C)Ambiente de operación: 60.8 ° F a 104 ° F (16 ° C a 40 ° C)Humedad: 15-95% (sin condensación)Entorno de almacenamiento: -4 ° F a 122 ° F (-20 ° C a 50 ° C)Humedad: 15-95% (sin condensación)Lectura de la medida:Celsius o FahrenheitExactitud: Cumple con los requisitos de la norma ASTM E 1112-00.Pantalla TN LCD 0.63" X 0.44" (16 mm X 11 mm)Batería: 2 pilas AAA 1.5VDuración de la batería:Mínimo 1000 ciclos de trabajo completos durante un período de 24 meses Peso: 1.3 oz (37 gr) incluyendo bateríasDimensiones: 4.7" x 1.17" x 1" (12 cm x 3.0 cm x 2.4 cm )Memoria: Pantalla de última lectura cuando se enciendeApagado automático:Despues de 60 segundosMaterial de la Caja:Plástico ABS de grado médicoMaterial de la sonda: Acero inoxidable de grado médico, plástico ABS de grado médico Garantía: 2 añosNormas: Cumple con EN 12470-3 y ASTM E 1112-00GARANTÍA LIMITADAADC garantiza sus productos contra defectos en materiales y mano de obra en el uso y servicio normal del hogar de la siguiente manera:1. El servicio de garantía se extiende solo al comprador minorista original y comienza con la fecha de entrega.2. Su termómetro Adtemp TempleTouch tiene una garantía de dos años a partir de la fecha de compra.Qué Está Cubierto: Reemplazo de piezas y mano de obra.Lo que no Está Cubierto: cargos de transporte a ADC. Daños causados por abuso, mal uso, accidente o negligencia.Daños incidentales, especiales o consecuentes. Algunos estados no permiten la exclusión o limitación de daños incidentales, especiales o consecuentes, por lo que es posible que esta limitación no se aplique a usted.Para Obtener el Servicio de Garantía: Envíe el (los) franqueo (s) pagado a ADC, a la atención del: Departamento de reparaciones, 55 Commerce Dr., Hauppauge, NY 11788. Incluya su nombre y dirección, número de teléfono, comprobante de compra y una breve nota. explicando el problemaGarantía Implícita: cualquier garantía implícita tendrá una duración limitada a los términos de esta garantía y en ningún caso más allá del precio de venta original (excepto donde esté prohibido por la ley). Esta garantía le otorga derechos legales específicos y es posible que tenga otros derechos que varían de un estado a otro.Para los Consumidores Australianos: Nuestros productos vienen con garantías que no pueden ser excluidas bajo la Ley de Consumidores de Australia. Usted tiene derecho a un reemplazo o reembolso por una falla importante y una com-pensación por cualquier otra pérdida o daño previsible razonable. También tiene derecho a que se reparen o reemplacen los productos si los productos no son de una calidad aceptable y el fallo no equivale a una falla importante.IB p/n 93-427-00 rev 5 SP Impreso en China Este manual está disponible en línea en unvariedad de idiomas,siga los enlaces para las opciones de idioma./carePara registrar su producto visítenos en/registerGrand Bond Electronics Ltd Room 2208 22/F CCT Telecom Bldg. 11-19 Wo Shing StreetFotan, New Territories, Shatin Hong Kong Medes Limited 5 Beaumont Gate Shenley Hill, Radlett Hertfordshire, WD7 7ARUnited KingdomDistribuido por: ADC55 Commerce Drive Hauppauge NY 11788Producto de IsraelEmbalado en ChinaPatent 7597668。
Avolites Tiger Touch Pro V7.0 操作说明书

Tiger Touch Pro V7.0操作说明书目录1. 品牌介绍 (7)1.1 Titan家族成员 (7)1.2 控台面板介绍 (9)2. 配接灯具 (12)2.1 打开配接灯具窗口 (12)2.2 配接常规灯 (12)2.3 配接电脑灯 (12)2.4 查找灯具 (13)2.5 设置命名 (14)2.6 更改灯具的地址码 (14)2.7 灯具交换 (15)2.8查看配接 (15)2.9 DMX通道查看窗口 (16)2.10更新灯库 (16)2.11 复制和移动灯具 (16)2.12 删除灯具 (17)2.13 调换灯具的Pan和Tilt (17)2.14 调换通道属性 (17)2.15 属性限制 (17)3. 控制常规灯和电脑灯 (18)3.1 选择常规灯和电脑灯 (18)3.2 通过转轮改变灯具属性 (18)3.3 触摸屏调节灯具属性 (19)3.4 设置灯具的默认状态(Locate)键 (20)3.5 条件选灯 (20)3.6 选择高亮后的灯具 (21)3.7 关闭未选择的灯具 (21)3.8 灯具跟随 (21)3.9 翻转灯具Pan / Tilt 运动轨迹 (21)3.10 Fan发散模式 (22)3.11 Menu Latch按键 (24)4. 灯组 (25)4.1 创建灯组 (25)4.2 编辑灯组 (25)4.3 删除灯组 (25)4.4 复制,移动灯组 (25)4.5 灯组内的灯具顺序 (25)5. 素材 (26)5.1 储存单一属性素材 (26)5.2 保存多属性素材 (26)5.3 设置素材的命名 (27)5.4 创建内置效果素材 (27)5.5 应用一个素材 (27)5.6 查看和编辑素材的内容 (28)5.7 编辑素材 (28)5.8 更新重放中的素材 (28)5.9 复制和移动素材 (29)5.10 删除素材 (29)5.11 手动指定素材的时间 (30)5.12 手动修改应用素材时的灯具交叠状态 (30)5.13 素材的总体时间 (30)6. 内置效果 (31)6.1 创建内置效果 (31)6.2 改变内置效果的速度和幅度 (31)6.3 改变内置效果的相位时间 (32)6.4 反向内置效果运动方向 (33)6.5 改变内置效果中的灯具顺序 (33)6.6 内置效果中移除或添加灯具 (33)6.7 删除内置效果 (33)6.8 选择一个正在运行的内置效果进行修改 (33)6.9 内置效果幅度和速度渐入时间 (34)7. 像素映射效果 (36)7.1 创建像素映射效果 (36)7.2 修改cue内的内置效果和像素映射 (37)8. Cues (38)8.2 快建模式 (39)8.3 复制或移动一个cue (39)8.4 删除cue (40)8.5 修改Cue (40)8.6 更新cue内的内容和素材 (40)8.7 Include(调入)功能 (41)8.8 查看cue (41)8.9 使用OFF键移除cue内的属性 (42)8.10 设置cue中的渐变时间和灯具交叠 (43)8.11 改变灯具顺序 (43)8.12 设置cue中的灯具属性渐变时间 (44)8.13 在编程器内编辑cue的时间 (44)8.14 暗场模式 (46)8.15 HTP和LTP (47)8.16 重放一个cue (47)8.17 重放区翻页 (47)8.18 查看正在运行的重放 (48)8.19 速度总控 (48)8.20 释放运行中的重放 (48)8.21 释放Mask (49)8.22 锁定重放在推杆上 (49)8.23 重放优先度 (49)8.24 键设置 (50)9. Chase (51)9.1 创建chase (51)9.2 复制,移动chase (51)9.3 删除chase中的一步 (52)9.4 修改chase (52)9.5 使用【Unfold】(展开)键编辑chase (52)9.6 chase默认时间 (53)9.7 chase中独立的cue时间 (53)9.8 重放一个chase (54)9.9 连接一个chase进行控制 (55)9.10 设置chase的速度和渐入渐出 (55)9.11 手动控制chase的步 (55)9.12 改变chase的运动方向 (56)9.13 跳到第X步 (56)9.14 高级选项 (56)9.15循环/停止在最后的cue (56)9.16 播放方式 (56)9.17 重排cue序号 (56)10. Cue List (57)10.1 创建cue list (57)10.2 复制,移动cue list (57)10.3 删除一个cue list (57)10.4 删除cue list中的某步cue (57)10.5 编辑cue list (58)10.6 使用Unfold键编辑一个cue list (58)10.7 修改正在运行的cue list (58)10.8 禁用一个cue (59)10.9 设置cue list的渐变时间和延时时间 (59)10.10 独立通道渐变时间 (59)10.11 cue连接和offset (59)10.12 灯具交叠 (60)10.13 使用时间码 (60)10.14 Auto load(自动读取) (61)10.15 运行一个cue list (62)10.16 关闭一个cue list (63)10.17 高级选项 (63)10.18 推杆模式 (63)10.19 Tracking跟踪模式 (63)10.20 播放第一个cue (64)11. 演出开始 (65)11.1 备份演出文件 (65)11.2 命名 (65)11.3 总控推杆 (65)11.4 分类总控推杆 (65)11.5 速度总控 (65)11.6 分组总控 (66)11.7 回放优先度 (66)11.8 预置推杆 (66)11.9 查看正在激活的重放 (67)11.10 暗场模式 (67)11.11 快捷工作区 (67)11.12 View菜单 (67)11.13 整理控台 (67)11.14 使用移动功能 (67)12. 用户设置和其它选项 (68)12.1 打开工作窗口 (68)12.2 调整窗口的位置和大小 (68)12.3 保存窗口快照 (68)12.4 配置外接显示器 (69)12.5 系统档菜单 (69)12.6 用户设置 (69)12.7 Wipe (70)12.8 触发 (70)12.9 显示设置 (70)12.10 分配总控 (70)12.11 DMX输出管理 (70)12.12 配置DMX输出 (71)13.进阶 (73)1. 品牌介绍欢迎使用Avolites Titan系列控台。
Avolites Tiger Touch ro V 操作说明书
Tiger Touch Pro V7.0操作说明书目录1. 品牌介绍 (7)1.1 Titan家族成员 (7)1.2 控台面板介绍 (9)2. 配接灯具 (12)2.1 打开配接灯具窗口 (12)2.2 配接常规灯 (12)2.3 配接电脑灯 (12)2.4 查找灯具 (13)2.5 设置命名 (14)2.6 更改灯具的地址码 (14)2.7 灯具交换 (15)2.8查看配接 (15)2.9 DMX通道查看窗口 (16)2.10更新灯库 (16)2.11 复制和移动灯具 (16)2.12 删除灯具 (17)2.13 调换灯具的Pan和Tilt (17)2.14 调换通道属性 (17)2.15 属性限制 (17)3. 控制常规灯和电脑灯 (18)3.1 选择常规灯和电脑灯 (18)3.2 通过转轮改变灯具属性 (18)3.3 触摸屏调节灯具属性 (19)3.4 设置灯具的默认状态(Locate)键 (20)3.5 条件选灯 (20)3.6 选择高亮后的灯具 (21)3.7 关闭未选择的灯具 (21)3.8 灯具跟随 (21)3.9 翻转灯具Pan / Tilt 运动轨迹 (21)3.10 Fan发散模式 (22)3.11 Menu Latch按键 (24)4. 灯组 (25)4.1 创建灯组 (25)4.2 编辑灯组 (25)4.3 删除灯组 (25)4.4 复制,移动灯组 (25)4.5 灯组内的灯具顺序 (25)5. 素材 (26)5.1 储存单一属性素材 (26)5.2 保存多属性素材 (26)5.3 设置素材的命名 (27)5.4 创建内置效果素材 (27)5.5 应用一个素材 (27)5.6 查看和编辑素材的内容 (28)5.7 编辑素材 (28)5.8 更新重放中的素材 (28)5.9 复制和移动素材 (29)5.10 删除素材 (29)5.11 手动指定素材的时间 (30)5.12 手动修改应用素材时的灯具交叠状态 (30)5.13 素材的总体时间 (30)6. 内置效果 (31)6.1 创建内置效果 (31)6.2 改变内置效果的速度和幅度 (31)6.3 改变内置效果的相位时间 (32)6.4 反向内置效果运动方向 (33)6.5 改变内置效果中的灯具顺序 (33)6.6 内置效果中移除或添加灯具 (33)6.7 删除内置效果 (33)6.8 选择一个正在运行的内置效果进行修改 (33)6.9 内置效果幅度和速度渐入时间 (34)7. 像素映射效果 (36)7.1 创建像素映射效果 (36)7.2 修改cue内的内置效果和像素映射 (37)8. Cues (38)8.2 快建模式 (39)8.3 复制或移动一个cue (39)8.4 删除cue (40)8.5 修改Cue (40)8.6 更新cue内的内容和素材 (40)8.7 Include(调入)功能 (41)8.8 查看cue (41)8.9 使用OFF键移除cue内的属性 (42)8.10 设置cue中的渐变时间和灯具交叠 (43)8.11 改变灯具顺序 (43)8.12 设置cue中的灯具属性渐变时间 (44)8.13 在编程器内编辑cue的时间 (44)8.14 暗场模式 (46)8.15 HTP和LTP (47)8.16 重放一个cue (47)8.17 重放区翻页 (47)8.18 查看正在运行的重放 (48)8.19 速度总控 (48)8.20 释放运行中的重放 (48)8.21 释放Mask (49)8.22 锁定重放在推杆上 (49)8.23 重放优先度 (49)8.24 键设置 (50)9. Chase (51)9.1 创建chase (51)9.2 复制,移动chase (51)9.3 删除chase中的一步 (52)9.4 修改chase (52)9.5 使用【Unfold】(展开)键编辑chase (52)9.6 chase默认时间 (53)9.7 chase中独立的cue时间 (53)9.8 重放一个chase (54)9.9 连接一个chase进行控制 (55)9.10 设置chase的速度和渐入渐出 (55)9.11 手动控制chase的步 (55)9.12 改变chase的运动方向 (56)9.13 跳到第X步 (56)9.14 高级选项 (56)9.15循环/停止在最后的cue (56)9.16 播放方式 (56)9.17 重排cue序号 (56)10. Cue List (57)10.1 创建cue list (57)10.2 复制,移动cue list (57)10.3 删除一个cue list (57)10.4 删除cue list中的某步cue (57)10.5 编辑cue list (58)10.6 使用Unfold键编辑一个cue list (58)10.7 修改正在运行的cue list (58)10.8 禁用一个cue (59)10.9 设置cue list的渐变时间和延时时间 (59)10.10 独立通道渐变时间 (59)10.11 cue连接和offset (59)10.12 灯具交叠 (60)10.13 使用时间码 (60)10.14 Auto load(自动读取) (61)10.15 运行一个cue list (62)10.16 关闭一个cue list (63)10.17 高级选项 (63)10.18 推杆模式 (63)10.19 Tracking跟踪模式 (63)10.20 播放第一个cue (64)11. 演出开始 (65)11.1 备份演出文件 (65)11.2 命名 (65)11.3 总控推杆 (65)11.4 分类总控推杆 (65)11.5 速度总控 (65)11.6 分组总控 (66)11.7 回放优先度 (66)11.8 预置推杆 (66)11.9 查看正在激活的重放 (67)11.10 暗场模式 (67)11.11 快捷工作区 (67)11.12 View菜单 (67)11.13 整理控台 (67)11.14 使用移动功能 (67)12. 用户设置和其它选项 (68)12.1 打开工作窗口 (68)12.2 调整窗口的位置和大小 (68)12.3 保存窗口快照 (68)12.4 配置外接显示器 (69)12.5 系统档菜单 (69)12.6 用户设置 (69)12.7 Wipe (70)12.8 触发 (70)12.9 显示设置 (70)12.10 分配总控 (70)12.11 DMX输出管理 (70)12.12 配置DMX输出 (71)13.进阶 (73)1. 品牌介绍欢迎使用Avolites Titan系列控台。
141-en T-TOUCH EXPERT

Polar
Temperate
Arid
Tropical
Mediterranean
2 sec. or
Climate zone display
Setting mode
Select hemisphere: North = North, South = South not set = not set
Set the local climate: T = temperate; M = Mediterranean; A = arid; tr = tropical; P = polar
Validate setting
w ww. ti ss o t .c h
4/13
141_EN
T-TOUCH EXPERT
*
Setting > Standby
Standby mode is a battery economy mode. All the functions are deactivated, with only the time & date counters updated. This mode economises the battery when the watch is not being worn.
*
T-TOUCH EXPERT User’s Manual
Acknowledgements
We would like to thank you for choosing a TISSOT watch, a Swiss brand among the most highly renowned in the world. Your T-TOUCH watch has the most recent technical innovations. It gives you a constant analogue time display and a variety of digital displays. In addition, the following functions can be accessed simply by touching the glass: Weather, Altimeter, Chronograph, Compass, Alarm and Thermometer.
TE 品牌的可移动刺绣工具说明书

69355Portable Crimp Tools, Premium Crimp Tooling, Not Releasable, Not Adjustable,Fixed In Tool, TE Product Specification (114-) / MIL Spec08/31/2020 10:49PM | Page 1 For support call+1 800 522 6752Application Tooling>Portable Crimp ToolsCertification:Yes – Certificate IncludedSpecification Type:MIL Spec, TE Product Specification (114-)Die Sets Type:Fixed In ToolRatchet Configuration:Not Releasable, Not AdjustableTool Grade:Premium Crimp ToolingFeaturesOtherCrimp Form-Wire Barrel Type Closed Barrel - Confined CrescentTool Grade Premium Crimp ToolingRatchet Configuration Not Releasable, Not AdjustableDie Sets Type Fixed In ToolSpecification Type MIL Spec, TE Product Specification (114-)Certification Yes – Certificate IncludedPower Type Battery, ManualTool Type Heavy Head Hand ToolProduct ComplianceFor compliance documentation, visit the product page on >EU RoHS Directive 2011/65/EU Out of ScopeEU ELV Directive 2000/53/EC Out of ScopeChina RoHS 2 Directive MIIT Order No 32, 2016Not reviewed for China RoHS complianceEU REACH Regulation (EC) No. 1907/2006Current ECHA Candidate List: JUN 2020(209)Candidate List Declared Against: JUL 2017(174)Does not contain REACH SVHCHalogen Content Not Yet Reviewed for halogen content69355 ACTIVEAMPTE Internal #:69355Portable Crimp Tools, Premium Crimp Tooling, Not Releasable,Not Adjustable, Fixed In Tool, TE Product Specification (114-) / MILSpecView on >08/31/2020 10:49PM | Page 2For support call+1 800 522 6752Halogen Content Not Yet Reviewed for halogen content Solder Process CapabilityNot applicable for solder process capabilityProduct Compliance DisclaimerThis information is provided based on reasonable inquiry of our suppliers and represents our current actual knowledge based on the information they provided. This information is subject to change. The part numbers that TE has identified as EU RoHS compliant have a maximum concentration of 0.1% by weight in homogenous materials for lead, hexavalent chromium, mercury, PBB, PBDE, DBP, BBP, DEHP, DIBP, and 0.01% for cadmium, or qualify for an exemption to these limits as defined in the Annexes of Directive 2011/65/EU (RoHS2). Finished electrical and electronic equipment products will be CE marked as required by Directive 2011/65/EU. Components may not be CE marked.Additionally, the part numbers that TE has identified as EU ELV compliant have a maximum concentration of 0.1% by weight in homogenous materials for lead, hexavalent chromium, and mercury, and 0.01% for cadmium, or qualify for an exemption to these limits as defined in the Annexes of Directive 2000/53/EC (ELV). Regarding the REACH Regulations, TE’s information on SVHC in articles for this part number is still based on the European Chemical Agency (ECHA) ‘Guidance on requirements for substances in articles’(Version: 2, April 2011), applying the 0.1% weight on weight concentration threshold at the finished product level. TE is aware of the European Court of Justice ruling of September 10th, 2015 also known as O5A (Once An Article Always An Article) stating that, in case of ‘complex object’, the threshold for a SVHC must be applied to both the product as a whole and simultaneously to each of the articles forming part of its composition. TE has evaluated this ruling based on the new ECHA “Guidance on requirements for substances in articles” (June 2017, version 4.0) and will be updating its statements accordingly.TE Model / Part #8-33462-1TERMINAL,SOLIS R 8 5/16TE Model / Part #8-35664-3TERMINAL,SOLIS R 8 1/2TE Model / Part #8-34321-3SPLICE,SOLIS BUTT 8TE Model / Part #2-33460-3TERMINAL,SOLIS R 8 10TE Model / Part #328822TERMINAL,SOLIS R HT 8 10TE Model / Part #8-33463-1TERMINAL,SOLIS R 8 3/8TE Model / Part #180599SOLIS 8 WIRE PINTE Model / Part #8-35247-2TERMINAL,SOLIS R 8 1/4TE Model / Part #2-33463-4TERMINAL, SOLIS R 8 3/8TE Model / Part #36499TERMINAL,SOLIS R 8 3/8TE Model / Part #8-33461-1TERMINAL,SOLIS R 8 1/4TE Model / Part #32996-1TERMINAL, SOLIS R 8 8Compatible Parts08/31/2020 10:49PM | Page 3For support call+1 800 522 6752TE Model / Part #2151426-2OCEAN_2.0_APPLICATOR-S-140F210OTE Model / Part #38946-22CONTACTS (=724-0003-22)TE Model / Part #34318SPLICE,SOLIS PARA 8TE Model / Part #0662-207-0882CONT SOC ASSYTE Model / Part #49935DAHT SOLIS 22-10TE Model / Part #59239-4HHHT PIDG 12-10TE Model / Part #1490414-2HYP10 SOLIS HD 6-4AWG INDENTERTE Model / Part #35664TERMINAL,SOLIS R 8 1/2TE Model / Part #55991-1TERMINAL,SOLIS R 8 5/16TE Model / Part #35666TERMINAL,SOLIS R 8 3/4TE Model / Part #35665TERMINAL,SOLIS R 8 5/8TE Model / Part #184064-1TERMINAL,SOLIS R 8 10MMTE Model / Part #2-31807-3TERMINAL, SOLIS R 8 10TE Model / Part #323168TERMINAL,SOLIS R HR 8 3/8TE Model / Part #8-34318-3SPLICE,SOLIS PARA 8Customers Also BoughtDocumentsProduct DrawingsHHHT SOLIS #8EnglishDatasheets & Catalog PagesCERTI-CRIMPII-Premium-August-1-1773864-7EnglishCrimp Term Whitepaper-Use the Right Tool 1-1773953-1EnglishCRIMPING WHERE FORM MEETS FUNCTIONCRIMPING WHERE FORM MEETS FUNCTIONEnglishBottoming DiesEnglishInstruction SheetsInstruction Sheet (U.S.)EnglishInstruction Sheet (U.S.)English08/31/2020 10:49PM | Page 4 For support call+1 800 522 6752。
Ergotron CareFit Combo System 产品说明书

© 2022 Ergotron, Inc. All rights reservedC areFit Combo System• F lexible workfl ows: Easy screensharing and one-hand stowing enhances patient interactions • C omfortable documentation: Off ers ergonomic height-adjustment, optional worksurface and intuitive access to tools • N eat workspace: Concealed cablemanagement minimizes clutter and supports infection control • S upports uptime: Convenient cord access simplifi es maintenance with timely support available from our expert team • W arm aesthetic: Modular wall mountenhances new and existing healing spaces • Q uality construction: Sturdy design supports multiple confi gurations and installation optionsSupport genuine patient connections and help reduce the risk of errors with the modular CareFit Combo System that enables an e cient and comfortable documentation experience at the point of care. Easy screensharing, one-hand stowing and intuitive access to tools allow nurses to focus on patient care. The design enhances healing spaces with concealed cable management that promotes infection control, serviceability and uptime for IT teams.Y ADAPT TO CHANGING WORKFLOWSProvides nurses with renewed control over individual workflows and health to help facilitate efficient documentation and foster patient relationships.Hidden cable management and simple cord access makes it easy for IT teams to maintain or upgrade workstations so they can efficiently get the job done.MODULAR – FULL-MOTION – CUSTOMIZABLE1 P ersonalized, ergonomic monitor positioning for each user with 180° of pan and 5″ (13 cm) of independent adjustment2 F ull unit extends up to 65″ (165 cm) for documentation at a patient’s bedside or in a private space3 W all Track covers create a clean, streamlined look with hidden cabling4 S pace-saving design easily folds when not in use to open up more work area5 S upport neat, healing spaces with concealed cable management that enhances infection control6 E nable efficient, secure access with space for an RFID employee badge reader 123456SPACE-SAVING STORAGE5 S tows quickly and easily with just one handneeded to fl ip up the worksurface 6 L ocks in place for secure stowing upright in front of the monitorThoughtful ergonomics for comfortable caregivingINTUITIVE WORKFLOWS1 Extension helps minimize the distance and steps to the patient2 Full unit moves together with a light touch to give caregivers fl exibility and choice3 Supports caregiver-patient engagement with independent monitor adjustment 4Convenient scanner access with installation on either side34216STEP 2: CHOOSE YOUR CPU PLACEMENT TO BUILD YOUR WORKSTATION Wall-mounted CPUCPU under worksurface trayCareFit Combo System 45-618-251CareFit Combo System with Worksurface 45-619-251CareFit Combo Arm 45-621-251CareFit Combo Arm with Worksurface 45-622-251 Configure your wall system for your workflowSTEP 1: SELECT YOUR BASE UNITSTEP 3: ADD ACCESSORIES TO FITYOUR UNIQUE NEEDSCPU Wall Cabinet 98-543-251Clean design keeps CPU secure andextra cables and power brick out of view CareFit Combo Extender98-547-251Provides extra reach and fl exibility forlarger care applicationsCareFit Combo CPU Tray98-548-251Saves valuable wall space by installingunder the worksurfaceCareFit Combo WirelessScanner Bracket 98-549-251Supports effi cient workfl ows withinstallation on either sideCareFit Combo Scanner Bracket98-551-251Supports effi cient workfl ows withinstallation on either sidePrinter Bracket for Wall Track98-578-251Keeps printer in reach to maximize time with patients; installs on either side 34″ Wall Track 31-018-216Enables a sturdy installation; required for CareFit Combo Arm CareFit Wall Track 34″ Covers98-609-030Hides cabling for a neat look andsupports infection controlLarge worksurfaceCPU under worksurface tray:T otal height with CPU box is 44″ (111.8 cm)Determine the additional technology you will use in your confi gurationArea for suppliesTHE DESIGN ENHANCES HEALING SPACESWITH CONCEALED CABLE MANAGEMENT THAT PROMOTES INFECTION CONTROL, SERVICEABILITY AND UPTIME FOR IT TEAMS.44″ (111.8 c m )USING A CPUUSING AN AIOArea for SuppliesLarge WorksurfaceArea for SuppliesLarge WorksurfaceCPU Wall Cabinet ORCPU TrayWired Scanner BracketORWireless Scanner BracketUpORDownPrinter BracketWired Scanner BracketOR Wireless Scanner BracketPlace RFIDPrinter Bracket Place RFIDPopular configurations for patient-centereddocumentationCareFit Combo Arm with Scanner Bracketand Printer Bracket(designed for all-in-one workflows)CareFit Combo Arm with Extender,Wireless Scanner Bracket, and Printer Bracket(designed for all-in-one workflows)CareFit Combo System with Worksurface,Wall Cabinet and Wireless Scanner BracketCareFit Combo Arm with Worksurface,Wall Cabinet, Wireless Scanner Bracketand Printer BracketCareFit Combo Arm with Worksurface,Extender, CPU Tray and Scanner BracketCareFit Combo System with Worksurface,Extender, CPU Tray, Scanner Bracketand Printer BracketCareFitComboSystemCareFitComboSystemwithWorksurfaceFolds close to the wall when notin use to maximize space11″ (28 cm)10″ (25.5 cm)13″ (33 cm)12″ (31 cm)Combo ArmCombo Armwith Worksurface Combo SystemCombo Systemwith Worksurface45-621-25145-622-25145-618-25145-619-251Extender 98-547-251≤ 27″LCD SIZE IS APPROXIMATION. DIMENSION IS DIAGONAL MEASUREMENT OF SCREEN. LCD SIZE MAY BE EXCEEDED AS LONG AS SCREEN WEIGHT DOES NOT EXCEED MAXIMUM WEIGHT CAPACITY OF THE MOUNT.LCD: 8–22 lbs (3.6–10 kg)Worksuface: 1.5 lbs (0.68 kg)20″ (51 cm)LCD: 25° 20° / ↓5°Worksurface: 90°Download additional resources at .For more information:USA&Canada:800.888.8458/+1.651.681.7600/************************ EMEA:+31.33.45.45.600/********************APAC:********************************LATAMSales:Mexico/+1.800.681.1820/*********************** Custom:*******************© Ergotron, Inc. 07.14.2022Literature made in the U.S.A.Content subject to change.Ergotron devices are not intended to cure, treat, mitigate or prevent any disease. Patent information available at /patents.WorkFit, StyleView, LearnFit, Neo-Flex, PowerShuttle, LiFeKinnex, CareFitand eKinnex are trademarks of Ergotron.System with accessory extender (98-547-251) reaches57.5″ (146 cm)System with worksurface and accessory extender (98-547-251) reaches65″ (165.7 cm)。
天梭 T-Touch Expert Solar 用户手册说明书

View and download the Manual ofTissot T-TOUCH SOLARE84 Watch (page 1 of21) (English). Also support or get the manual by email. For adventurers and outdoor fans, we have expanded our iconic Tissot T-Touch Expert Solar collection with new models User Manual, Click here to download.
The Tissot T-Touch Expert Solar II is ready for an adventure. It will help you face the challenges ofthe wild or ofa big city.
The T-Touch Expert Solar is an important new model in the Tissot range. Tissot's The Tissot user's manual give information about the use, the settings. Tissot T-Touch Expert Solar 2017 Duration: 6:23. Tissot 143,322 views. How Tห้องสมุดไป่ตู้ Set. Tissot T-Touch Watch Fitness manuals and free pdfinstructions. Find.