MiG米格KT板模型制作图纸
模型飞机图纸 3DKT板机extra330(A4切割版)

pron triangles for .8mm carbon rod landing gear support/stiffener. Groove foam and glue with order-free (foam friendly) CA or JZ Products Super RC Z 56
3
orcer. the e ng.
EXTRA 330-3 D PARK FLYER SPECS Wing Span....... 36” Length............34.5” Weight............12-13oz Power.............AXI 2212/34 Prop.............. GWS 12x4 Ch................ 4 Battery.......... 3 Cell-700 to 1350mAh-Li-Poly
r
Aileron control horns
CG
Aileron cut line
Landing Gear
Cut side plate (xBrace) from 3mm Depron
6mm Depron optional
Glue scrape Dep extra strength
Wing
Elevator Servo
Rudder Servo
Den
MATERIALS LIST
HINGE DETAIL
Best results are achieved by using 1” wide Du-Bro RC Electric Flyer Hinge Tape (3M Blenderm) for all hinges. Clean all parts with rubbing alcohol before applying.
航模微风机型制作图纸
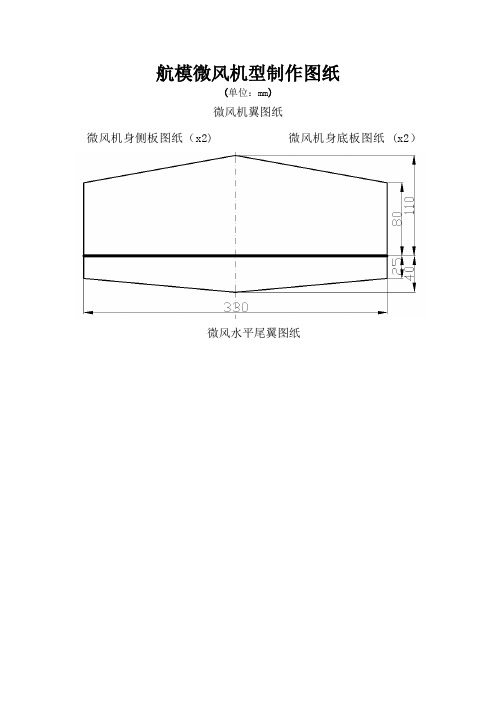
航模微风机型制作图纸
(单位:mm)
微风机翼图纸
微风机身侧板图纸(x2) 微风机身底板图纸 (x2)
微风水平尾翼图纸
微风垂直尾翼图纸
航模微风机型制作图纸从广告店做的KT板写真
用美工刀下料
用倒角刀开槽
机翼的处理方式
垂尾和加强片的制作
倒角处理过的机身精度非常好呀
假装一下
粘接机身
中间夹了一点竹条,增强机头强度,我就爱摔机头
粘接好的样子
尾翼前缘也加了竹条
塑料包装盒的直角部分
放在翼口加强正好
我的机翼是这么搞的
直角部分,机翼前缘有竹丝不用加强了。
前起落架的细节
起落架的总成
后起落架转向偏航总成
拉力线动力总成
作简单
了飞机的重心
舵机和双鱼线的链接,很大程度上减少了虚位
到现在为止,所有的地方都做好了,整体照片!。
航模图纸-KT板-上单翼-像真-F-22(All in one)

Bevel edges ofnozzles as shownBevel edges ofnozzles as shownFuselage top spine(Make 1)34 deg bevel (.15")34 deg bevel (.15")Aft fuselage bottom (Make 1)Vertical ta (Make 2Designed by SAll parts mad e from 6m foam unless othCopyright © 2007 peron control horns m 1/32" plywood)e plates for thrust oring motor mount 1 each from 1/8" ply)Epoxy to motor stick hereby Steve Sh umate m 6mm De pron or BlueCo re s otherwise specified 07 All Rig hts Reserved J i g f o r s e t t i n g t a i l d i h e d (M a k e63 de g b e v e l (.26")63 d e g b e v e l (.26")76 d e g b e v e l (.5")76 d e g b e v e l (.5")B e v e l a n d t r im a s r e q u i r e d t o f i tf l u s h w it h f u s e lag e s i d e s B e v e l a n d t r im a s r e q u i r e d t o f i t f l u sh wi t h f u s e l a g e s i d e s63 deg bevel (.26")Aft fuselage (Make 1 from 363 deg bevel (.2selage top piece from 3mm Depron)vel (.26")Trim pieces fo(Make 2ces for outboard of vertical t ail ake 2 from 3mm Depro n)Vertical tail (Make 2)Install aft fuselage sides hereVertical tail slot (cut at 28 deg angl e)t i n g v e r t i c a l i h e d r a l k e 2)S t a b i l a t o r p i v o t t u b (g r o o v e e d g e a n d a t w i t h e p o x y )Forward fuselage bottom (Make 1)Tab fits into slot in wingForward fuselage top (Make 1)Inlet d (Make 2 fThrust vector servo (HS-85MG shown)34 deg beStabilator servoTab fits into slot in wingAft fuselage side(Make 2)nlet diverter ke 2 from 3mm)Inboard inlet side (Make 2 from 3mm)Fuselage centerline s upportand motor mount (Make 2 and laminat e)34 deg bevel (.15")34 deg bevel (.15")34 deg bevel (.08")34 deg bevel (.08")eg bevel (.08")Cutout to clear rudder servoTail booms(Make 10 and laminate 5 each to make two boom s)Motor stick cutoutTemporary bulkhead to help position fusel age sides on wing during assembly (Make 4)Cut channel toclear stab pivot tubeTurtledeck top (Make 2)(this piece is slightly over size in width to allow trimmin g to shape)Optional launch grip fairings Make 2 and sand to shapeT5T4240Scale in inch2T1inches4T1T2Nose cone top template (use to help carve to shape)Cut slot for fuselagecenter spine Install aft fuselage sides hereCut slot for fucenter spiT3Wing (Make 1)Vertical tail bracesfor fuselage er spineT4T528 deg bevel (.12")S t a b i l a t o r p i v o t t u b e s (g r o o v e e d g e a n d a t t a c h w i t h e p o x y )t t u b e s d a t t a c hForward fuselageF234 d eg bev el (.15")29 d e g be v e l (.12")Canopy(Make 10 and laF3Forward fuselage sid elower half(Make 2)34 deg bevel (.15")34 de g b eve l (.15")F2F3F4 Forward fuselage sid eupper half(Make 2)29 d e g b e v e l (.12")nopynd laminate)T1T1T3T2F1F3Cut bulkhead in half along this line before assembly (will re-attachduring assembly)F2Cut bulkhead in half along this line before assembly (will re-attachduring assembly)Cut bulkhead in half along this line before assembly (will re-attachduring assembly)F4。
手把手教你制作KT板纸飞机
手把手教你制作KT板纸飞机
做得尽量精细一点,这样从外观到质量都会得到保障,不要糊弄飞机!
KT板尺寸:
1:切割KT板,画完线后就可以进行切割工作(选用较锋利的刀避免起毛刺)
各个连接处要切成v形槽,机身两块板的V型槽朝内,机翼机身连接处的v 形槽朝外,舵面连接处的v形槽朝上(与机翼机身)
注:斜坡切法,斜坡上沿靠钢尺,下沿靠桌沿,用倒靠着钢尺和桌沿切割各部分用胶带连接
2:安装电机
使用层板切割电机盒(图已画好),安装电机
在距离尾部140,195处的机身机翼连接处开孔
安装电机盒,用热熔胶固定碳梁,使得机身夹角80~90度,螺旋桨不打机身即可
3:安装舵机
在舵面连接线的中心垂线上距离连接线4cm处挖坑(将舵机放进去),不要挖通,要注意使得舵机的出线端靠近机身,用热熔胶将舵机粘在坑里,再用玻璃纤维胶带粘接舵机。
舵脚不用螺丝固定,插入KT板用热熔胶固定
4:机身前段用板固定,使用舵机延长线将线引至机身中间,安
装电调,电池。
电池尽量靠前放,使得重心符合条件(图中标注或中间稍靠前)
5:机头处可以切块kT板加强,中间可加玻纤加强。
设计制作一架KT板Mig-29像真模型飞机
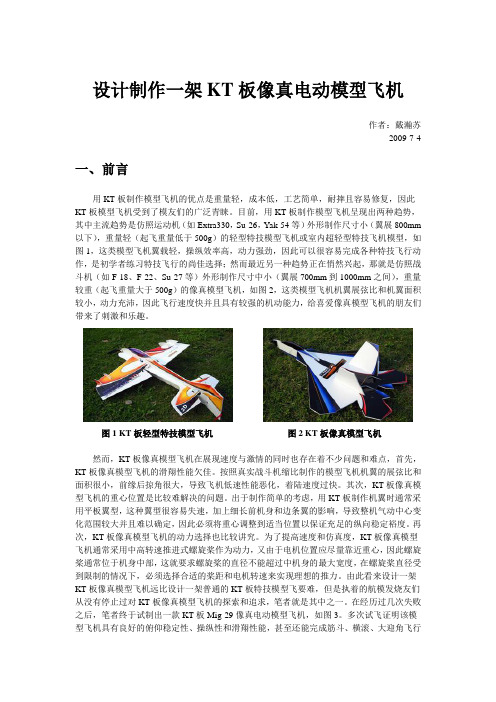
设计制作一架KT板像真电动模型飞机作者:戴瀚苏2009-7-4 一、前言用KT板制作模型飞机的优点是重量轻,成本低,工艺简单,耐摔且容易修复,因此KT板模型飞机受到了模友们的广泛青睐。
目前,用KT板制作模型飞机呈现出两种趋势,其中主流趋势是仿照运动机(如Extra330,Su-26,Yak-54等)外形制作尺寸小(翼展800mm 以下),重量轻(起飞重量低于500g)的轻型特技模型飞机或室内超轻型特技飞机模型,如图1,这类模型飞机翼载轻,操纵效率高,动力强劲,因此可以很容易完成各种特技飞行动作,是初学者练习特技飞行的尚佳选择;然而最近另一种趋势正在悄然兴起,那就是仿照战斗机(如F-18、F-22、Su-27等)外形制作尺寸中小(翼展700mm到1000mm之间),重量较重(起飞重量大于500g)的像真模型飞机,如图2,这类模型飞机机翼展弦比和机翼面积较小,动力充沛,因此飞行速度快并且具有较强的机动能力,给喜爱像真模型飞机的朋友们带来了刺激和乐趣。
图1 KT板轻型特技模型飞机图2 KT板像真模型飞机然而,KT板像真模型飞机在展现速度与激情的同时也存在着不少问题和难点,首先,KT板像真模型飞机的滑翔性能欠佳。
按照真实战斗机缩比制作的模型飞机机翼的展弦比和面积很小,前缘后掠角很大,导致飞机低速性能恶化,着陆速度过快。
其次,KT板像真模型飞机的重心位置是比较难解决的问题。
出于制作简单的考虑,用KT板制作机翼时通常采用平板翼型,这种翼型很容易失速,加上细长前机身和边条翼的影响,导致整机气动中心变化范围较大并且难以确定,因此必须将重心调整到适当位置以保证充足的纵向稳定裕度。
再次,KT板像真模型飞机的动力选择也比较讲究。
为了提高速度和仿真度,KT板像真模型飞机通常采用中高转速推进式螺旋桨作为动力,又由于电机位置应尽量靠近重心,因此螺旋桨通常位于机身中部,这就要求螺旋桨的直径不能超过中机身的最大宽度,在螺旋桨直径受到限制的情况下,必须选择合适的桨距和电机转速来实现理想的推力。
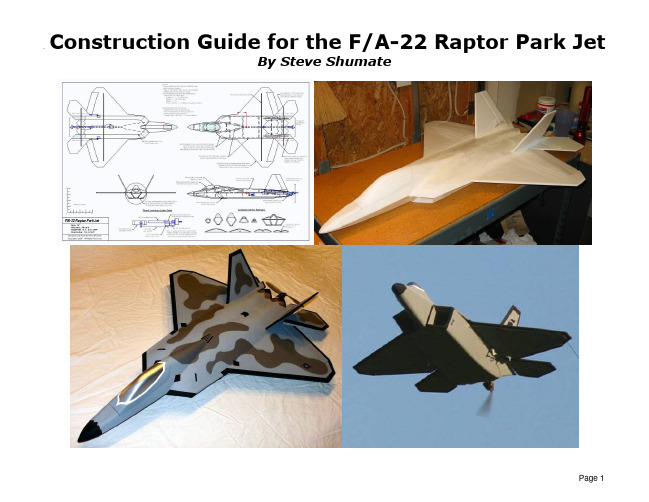
自制KT板航模遥控飞机F-22_制作教程
Page 2
1. Begin assembly with the forward fuselage. Start by carefully cutting the beveled edges on all of the forward fuselage pieces as shown on the plans. Draw a reference line on each part that’s inset from the edge the distance indicated on the plans (note you can trace the lines from an identical part onto the opposite part). Then cut the bevel with a sharp hobby knife. You can use a straightedge for the straight segments, but the curved segments will need to be cut by hand. It’s best to practice with some scrap foam first to get the hang of it before cutting the actual parts. Be sure to make mirror-image left- and right-side pieces! The beveled parts should look like the photo at lower left when done (upper forward fuselage side shown).
Page 5
5. Laminate the two fuselage centerline support pieces together (3M 77 spray adhesive recommended). Then cut bevels on the edges of the aft fuselage sides as indicated on the plans. Place the wing on a flat surface, and then glue the two aft fuselage sides and centerline piece onto the bottom of the wing as shown. Use the four temporary bulkheads provided to ensure the fuselage sides are glued on at the proper angle. Note pins can be used to hold everything together while the glues dries. I recommend using a gap-filling glue such as epoxy with microballons or ProBond for this step. Remove the temporary bulkheads once the glue dries.
设计制作一架KT板Mig29像真模型飞机资料.

设计制作一架KT板像真电动模型飞机作者:戴瀚苏2009-7-4 一、前言用KT板制作模型飞机的优点是重量轻,成本低,工艺简单,耐摔且容易修复,因此KT板模型飞机受到了模友们的广泛青睐。
目前,用KT板制作模型飞机呈现出两种趋势,其中主流趋势是仿照运动机(如Extra330,Su-26,Yak-54等)外形制作尺寸小(翼展800mm 以下),重量轻(起飞重量低于500g)的轻型特技模型飞机或室内超轻型特技飞机模型,如图1,这类模型飞机翼载轻,操纵效率高,动力强劲,因此可以很容易完成各种特技飞行动作,是初学者练习特技飞行的尚佳选择;然而最近另一种趋势正在悄然兴起,那就是仿照战斗机(如F-18、F-22、Su-27等)外形制作尺寸中小(翼展700mm到1000mm之间),重量较重(起飞重量大于500g)的像真模型飞机,如图2,这类模型飞机机翼展弦比和机翼面积较小,动力充沛,因此飞行速度快并且具有较强的机动能力,给喜爱像真模型飞机的朋友们带来了刺激和乐趣。
图1 KT板轻型特技模型飞机图2 KT板像真模型飞机然而,KT板像真模型飞机在展现速度与激情的同时也存在着不少问题和难点,首先,KT板像真模型飞机的滑翔性能欠佳。
按照真实战斗机缩比制作的模型飞机机翼的展弦比和面积很小,前缘后掠角很大,导致飞机低速性能恶化,着陆速度过快。
其次,KT板像真模型飞机的重心位置是比较难解决的问题。
出于制作简单的考虑,用KT板制作机翼时通常采用平板翼型,这种翼型很容易失速,加上细长前机身和边条翼的影响,导致整机气动中心变化范围较大并且难以确定,因此必须将重心调整到适当位置以保证充足的纵向稳定裕度。
再次,KT板像真模型飞机的动力选择也比较讲究。
为了提高速度和仿真度,KT板像真模型飞机通常采用中高转速推进式螺旋桨作为动力,又由于电机位置应尽量靠近重心,因此螺旋桨通常位于机身中部,这就要求螺旋桨的直径不能超过中机身的最大宽度,在螺旋桨直径受到限制的情况下,必须选择合适的桨距和电机转速来实现理想的推力。
Kt板飞机设计步骤
KT板飞机设计步骤1、选定想要制作的飞机型号(建议查找《世界飞机手册》图书馆一楼有,有好几种版本、《简氏飞机鉴赏指南》航模班有)说明:选机型就是选择飞机的布局,就是飞机上机翼,平垂尾的位置和型式。
考虑到手工制作建议大家选择布局传统一些,曲线少一些的机型,当然也可以选一些独特的飞机,只是简化时工作多一些,要改的地方比较多,最后可能都和原来的飞机完全不同了,只要最后图看起来可以就行。
2、将找来的飞机三视图画出来图可以用cad画或者手画。
画的内容主要是机翼,平垂尾,机身,副翼,方向舵,升降舵,起落架。
至于又进气道的建议去掉。
3、修改三视图为要制作的kt板飞机1)、由于选的飞机飞行速度很高,所以机翼面积相对小了,我们要适当的增加它们的面积,将有厚度的机翼等都简化为一个平板,不需要翼型,要动力够了平板也能飞。
平垂尾面积可能要适当的进行增减。
2)、机身最好简化为规则的几何体。
飞机尾部由于原有的飞机是装涡轮发动机,所以设计时要完全改掉,改成适合装电机和平垂尾的型式。
3)、飞机有些部位画出来后可能比较纤细,要适当的加宽,加厚或加上一垂直的板等其他措施来加强一下。
4)、进气道和起落架建议大家去掉。
进气道如不做好看来就完全是一个多余又增重而且不好制作的部分。
起落架对于kt板来说也是多余的,它本身就是很轻的,要不要起落架都无所谓。
如果要加上起落架就要在他固定的地方加强,因此而增加的重量是很大的,并且这个地方可能是降落一次就破损一次。
不过起落架有一个好处就是避免螺旋桨打到地面。
5)有的飞机是全动平尾要改成固定的平尾,还有的飞机是有鸭翼无平尾,这种的最好把鸭翼去掉加上平尾。
有是鸭翼和平尾都有,这时就把鸭翼去掉。
因为用鸭翼控制飞机低头和抬头很难设计。
总之还是那句话,设计图看起来比较协调、美观,做出来的飞机也不会差到哪。
4、确定各设备的安装位置和方式这一步要特别注意电机的安装。
(1)机的重量较大加上它又是动力作用到飞机上的点所以要进行较大的加固,且如何连接才能让飞机在飞行过程中不会因为电机的抖动而松动甚至是掉落,这是一个在设计过程中要着重考虑的问题。
- 1、下载文档前请自行甄别文档内容的完整性,平台不提供额外的编辑、内容补充、找答案等附加服务。
- 2、"仅部分预览"的文档,不可在线预览部分如存在完整性等问题,可反馈申请退款(可完整预览的文档不适用该条件!)。
- 3、如文档侵犯您的权益,请联系客服反馈,我们会尽快为您处理(人工客服工作时间:9:00-18:30)。
1/64" lite ply doubler
30mm
Tail Skid Pressure 1/32" lite ply
Make 1 10x80mm
Dorsal Fin-Practical
Bulkhead 1 Bulkhead 2
Bulkhead 3 bend line
MiG-23 "Flogger" Park Jet
1/4" balsa
Taileron Make 2
Dorsal Fin Stop Block Make 2
Make 4 1/8" lite ply
Turtledeck Side - bevel Make 2
Make 2 1/8" lite ply
1/16" dia
Make 2
1/8" lite ply
3/8" balsa
Swing Wing Control Horn Make 1 1/8" lite ply
21mm 22.5mm
Aft Lower Wing Cover Make 2
Left
Right
1/16" dia hole for control rod
Middle Strake
Make 2
Bulkhead 2 Make 1
Bulkhead 3 Make 1
Fin Make 1
Wing Make 2
Taper to 3mm at front
Nose Cone Side Make 10
Top Forward Fuse Make 1
Bottom Forward Fuse Make 1
Aft Bottom Fuse Make 1
date: 7/4/05
Scale in inches
Nose Cone - top view Make 1
Fin Fairing Make 2 - taper leading edge
Scale Sub-Fin
Cockpit Floor Make 2 Cockpit Make 8
Inlet Splitter Make 2
Turtledeck Top Make 1
Bottom Forward Right Strake Make 1
Bulkhead 1 Me Make 1
Bottom Forward Left Strake Make 1
Top Forward Wing Base Make 1
Bend along line
Designer: Ben Song Modified from/Inspired by: JetSet44 (Steve Shumate) 's F-14 Wingspan: 17in/32in Length: 38in Weight: 17.5oz HiMax 2812-850 with 8x6 prop 3s1p 1500mah lipoly 1x Hitec HS-81MG 2x 9gm servos 5chn receiver (FMA M5) Notes: Motor Mount is 10mm x 10mm hard balsa 1.65" (144mm)
Make 4 1/8" lite ply
Bottom Duct Inlet Make 2
Make 2 1/8" lite ply
Make 2
Top Forward Duct Make 1
Swing Wing Servo Mount
Make 1 1/8" lite ply
Servo Spacer Make 1
Duct Side Make 2
Cockpit Base Doubler Make 1
Forward Fuse Doubler Doublers are 10mm by 1/4in
Make 2
Front Fuse Make 2
1/64" lite ply doubler
Aft Fuse Keel Make 2
Motor Mount extends 1.6" beyond end of tail but this varies depending upon the motor and prop used.... beware of tail feather strikes from the prop If you enjoy this design, please considering contributing some $ (ie $10) to Steve Shumate (jetset44@) so that we can all continue to benefit from his wonderful ideas.