神州数码交换机基本配置
神州数码DCRS命令简单配置(可编辑修改word版)
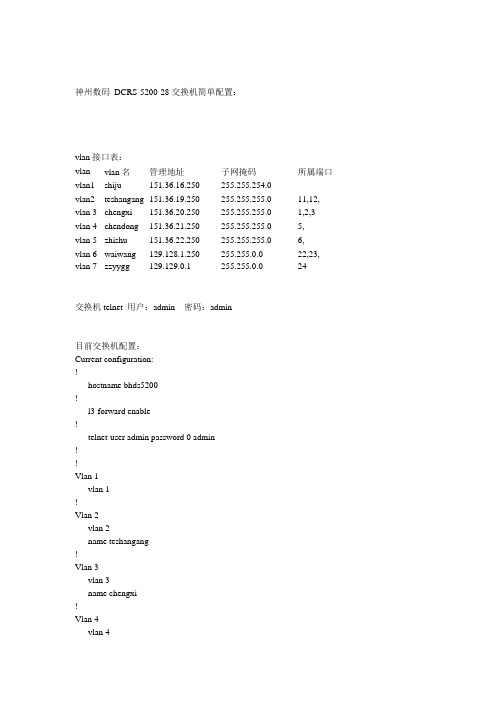
神州数码DCRS-5200-28 交换机简单配置:vlan 接口表:vlan vlan 名管理地址子网掩码所属端口vlan1 shiju 151.36.16.250 255.255.254.0vlan2 teshangang 151.36.19.250 255.255.255.0 11,12, vlan 3 chengxi 151.36.20.250 255.255.255.0 1,2,3 vlan 4 chendong 151.36.21.250 255.255.255.0 5,vlan 5 zhishu 151.36.22.250 255.255.255.0 6,vlan 6 waiwang 129.128.1.250 255.255.0.0 22,23, vlan 7 zzyygg 129.129.0.1 255.255.0.0 24交换机telnet 用户:admin 密码:admin目前交换机配置:Current configuration:!hostname bhds5200!l3-forward enable!telnet-user admin password 0 admin!!Vlan 1vlan 1!Vlan 2vlan 2name teshangang!Vlan 3vlan 3name chengxi!Vlan 4vlan 4name chengdong!Vlan 5vlan 5name zhishu!Vlan 6vlan 6name waiwang!Vlan 7vlan 7name zzyygg!!Interface Ethernet0/0/1switchport access vlan 3 !Interface Ethernet0/0/2switchport access vlan 3 !Interface Ethernet0/0/3switchport access vlan 3 !Interface Ethernet0/0/4!Interface Ethernet0/0/5switchport access vlan 4 !Interface Ethernet0/0/6switchport access vlan 5 !Interface Ethernet0/0/7!Interface Ethernet0/0/8!Interface Ethernet0/0/9!Interface Ethernet0/0/10!Interface Ethernet0/0/11switchport access vlan 2 !Interface Ethernet0/0/12switchport access vlan 2!Interface Ethernet0/0/13!Interface Ethernet0/0/14!Interface Ethernet0/0/15!Interface Ethernet0/0/16!Interface Ethernet0/0/17!Interface Ethernet0/0/18!Interface Ethernet0/0/19!Interface Ethernet0/0/20!Interface Ethernet0/0/21!Interface Ethernet0/0/22switchport access vlan 6!Interface Ethernet0/0/23switchport access vlan 6!Interface Ethernet0/0/24switchport access vlan 7!Interface Ethernet0/0/25!Interface Ethernet0/0/26!Interface Ethernet0/0/27!Interface Ethernet0/0/28!!interface Vlan1interface vlan 1imp address 151.36.16.250 255.255.254.0 !!interface Vlan2interface vlan 2ip address 151.36.19.250 255.255.255.0!!interface Vlan3interface vlan 3ip address 151.36.20.250 255.255.255.0!!interface Vlan4interface vlan 4ip address 151.36.21.250 255.255.255.0!!interface Vlan6interface vlan 6ip address 129.128.1.250 255.255.0.0!!interface Vlan7interface vlan 7ip address 129.129.0.1 255.255.0.0!ip route 151.36.47.0 255.255.255.0 151.36.16.253 ip route 151.16.16.0 255.255.248.0 151.36.16.253 ip route 23.136.98.0 255.255.255.0 151.36.16.99 ip route 0.0.0.0 0.0.0.0 129.128.1.254!!bhds5200#简单命令介绍:启动交换机进入CLI 界面后:switch#>enable *进入特权模式switch## *特权模式switch#config terminal *进入全局模式switch(config)#hostname bhds5200 *更改交换机名称bhds5200(config)#bhds5200(Config)#l3-forward enable *开启交换机三层转发功能L3 Function is alredy enabled!bhds5200(config)#vlan 1 *配置vlan1,vlan1 为默认vlan 不能更改或删除bhds5200(Config-Vlan1)#interface vlan 1 *进入vlan1 接口模式bhds5200(Config-If-Vlan1)#ip address 151.36.16.250 255.255.254.0 *设置vlan1 管理地址bhds5200(config)#vlan 2 *配置vlan2bhds5200(Config-Vlan2)# name teshangang *设置vlan2 名称bhds5200(Config-Vlan2)# switchport interface ethernet0/0/11-12 *将11 和12 口加入到vlan2 中Set the port Ethernet0/0/11 access vlan 2 successfully *提示11 口加入vlan2 成功Set the port Ethernet0/0/12 access vlan 2 successfully *提示12 口加入vlan2 成功bhds5200(config)#vlan 3 * 配置vlan3bhds5200(Config-Vlan3)# name chengxi *设置vlan3 名称bhds5200(Config-Vlan3)# switchport interface ethernet0/0/1-3 *将1,2,3 口加入到vlan3 中Set the port Ethernet0/0/1 access vlan 2 successfully *提示1 口加入vlan3 成功Set the port Ethernet0/0/2 access vlan 3successfully *提示2 口加入vlan3 成功Set the port Ethernet0/0/3 access vlan 3successfully *提示3 口加入vlan3 成功bhds5200(Config-Vlan3)#interface vlan 3bhds5200(Config-If-Vlan3)#ip address 151.36.20.250 255.255.254.0 *配置vlan3 接口地址*增加及配置vlan 照上例,删除vlan 将会删除vlan 的所有接口配置:bhds5200(config)# *vlan 更改必需在全局模式下bhds5200(config)#no vlan2 *删除vlan2配置静态路由:bhds5200(config)# ip route 0.0.0.0 0.0.0.0 129.128.1.254 *设置默认路由指向最终网关bhds5200(Config)# ip route 151.16.16.0 255.255.248.0 151.36.16.253bhds5200(Config)#ip route 23.136.98.0 255.255.255.0 151.36.16.99bhds5200(Config)#ip route 0.0.0.0 0.0.0.0 129.128.1.254删除静态路由:bhds5200(Config)#no ip route 0.0.0.0 0.0.0.0 129.128.1.254 *删除命令在启用命令前加no 即可bhds5200(config)#telnet-server enable *启用telnetTelnetd already enabled.bhds5200(Config)#telnet-user admin password 0 admin *用户名为admin,密码为admin关地址绑定问题,因进行全局端绑定需做前期大量工作,可参考神州数码DCRS5200 用户手册第16 章节节,AM 配置:am mac_ip_pool命令:am mac-ip-pool <mac_address> <ip_address>no am mac-ip-pool <mac_address> <ip_address>功能:创建一个MAC+IP 地址绑定,放到地址池中,或者删除一个在地址池中已经配置的MAC+IP 地址绑定,MAC 和IP 地址一一对应。
神州数码DCRS-5650交换机配置手册_基本管理操作
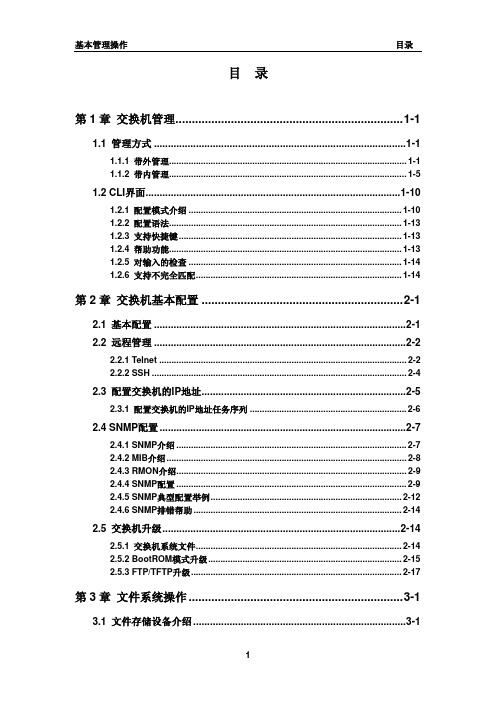
目录第1章交换机管理...................................................................... 1-11.1 管理方式 .......................................................................................... 1-11.1.1 带外管理................................................................................................. 1-11.1.2 带内管理................................................................................................. 1-51.2 CLI界面........................................................................................... 1-101.2.1 配置模式介绍 ....................................................................................... 1-101.2.2 配置语法............................................................................................... 1-131.2.3 支持快捷键........................................................................................... 1-131.2.4 帮助功能............................................................................................... 1-131.2.5 对输入的检查 ....................................................................................... 1-141.2.6 支持不完全匹配.................................................................................... 1-14第2章交换机基本配置 .............................................................. 2-12.1 基本配置 .......................................................................................... 2-12.2 远程管理 .......................................................................................... 2-22.2.1 Telnet ..................................................................................................... 2-22.2.2 SSH ........................................................................................................ 2-42.3 配置交换机的IP地址......................................................................... 2-52.3.1 配置交换机的IP地址任务序列 ................................................................ 2-62.4 SNMP配置........................................................................................ 2-72.4.1 SNMP介绍 .............................................................................................. 2-72.4.2 MIB介绍.................................................................................................. 2-82.4.3 RMON介绍.............................................................................................. 2-92.4.4 SNMP配置 .............................................................................................. 2-92.4.5 SNMP典型配置举例.............................................................................. 2-122.4.6 SNMP排错帮助..................................................................................... 2-142.5 交换机升级..................................................................................... 2-142.5.1 交换机系统文件.................................................................................... 2-142.5.2 BootROM模式升级............................................................................... 2-152.5.3 FTP/TFTP升级...................................................................................... 2-17第3章文件系统操作.................................................................. 3-13.1 文件存储设备介绍............................................................................ 3-13.2 文件系统操作任务配置序列.............................................................. 3-13.3 典型应用 .......................................................................................... 3-23.4 排错帮助 .......................................................................................... 3-3第4章集群网管配置.................................................................. 4-14.1 集群网管介绍 ................................................................................... 4-14.2 集群网管基本配置............................................................................ 4-14.3 集群网管举例 ................................................................................... 4-44.4 集群网管排错帮助............................................................................ 4-5第1章 交换机管理1.1 管理方式用户购买到交换机设备后,需要对交换机进行配置,从而实现对网络的管理。
神州数码配置命令总结
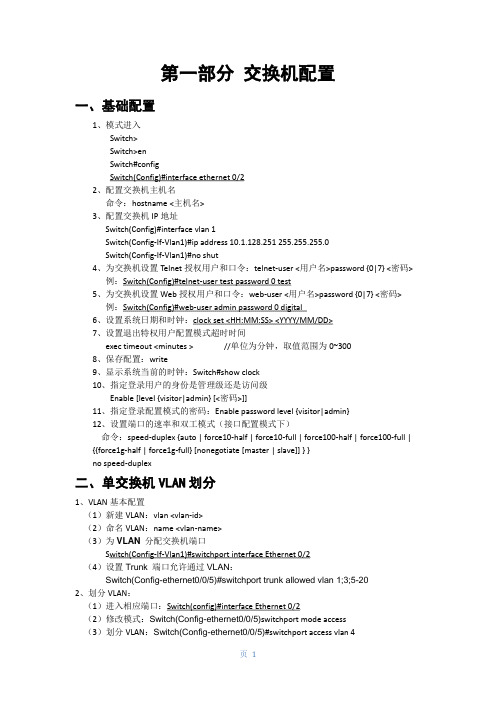
第一部分交换机配置一、基础配置1、模式进入Switch>Switch>enSwitch#configSwitch(Config)#interface ethernet 0/22、配置交换机主机名命令:hostname <主机名>3、配置交换机IP地址Switch(Config)#interface vlan 1Switch(Config-If-Vlan1)#ip address 10.1.128.251 255.255.255.0Switch(Config-If-Vlan1)#no shut4、为交换机设置Telnet授权用户和口令:telnet-user <用户名>password {0|7} <密码>例:Switch(Config)#telnet-user test password 0 test5、为交换机设置Web授权用户和口令:web-user <用户名>password {0|7} <密码>例:Switch(Config)#web-user admin password 0 digital6、设置系统日期和时钟:clock set <HH:MM:SS> <YYYY/MM/DD>7、设置退出特权用户配置模式超时时间exec timeout <minutes > //单位为分钟,取值范围为0~3008、保存配置:write9、显示系统当前的时钟:Switch#show clock10、指定登录用户的身份是管理级还是访问级Enable [level {visitor|admin} [<密码>]]11、指定登录配置模式的密码:Enable password level {visitor|admin}12、设置端口的速率和双工模式(接口配置模式下)命令:speed-duplex {auto | force10-half | force10-full | force100-half | force100-full | {{force1g-half | force1g-full} [nonegotiate [master | slave]] } }no speed-duplex二、单交换机VLAN划分1、VLAN基本配置(1)新建VLAN:vlan <vlan-id>(2)命名VLAN:name <vlan-name>(3)为VLAN 分配交换机端口Switch(Config-If-Vlan1)#switchport interface Ethernet 0/2(4)设置Trunk 端口允许通过VLAN:Switch(Config-ethernet0/0/5)#switchport trunk allowed vlan 1;3;5-202、划分VLAN:(1)进入相应端口:Switch(config)#interface Ethernet 0/2(2)修改模式:Switch(Config-ethernet0/0/5)switchport mode access(3)划分VLAN:Switch(Config-ethernet0/0/5)#switchport access vlan 4三、跨交换机VLAN划分(两台交换机作相同操作)1、新建VLAN2、划分VLAN3、修改链路模式(1)进入相应端口:Switch(config)#interface Ethernet 0/1(2)修改模式:Switch(config-if)#switchport mode trunk四、VLAN间主机的通信1、新建VLAN2、划分VLAN3、修改链路模式(1)进入相应端口:Switch(config)#interface Ethernet 0/1(2)修改模式:Switch(config-if)#switchport mode trunk注意:如果是三层交换机,在修改模式先封装802.1协议:Switch(config-if)#switchport trunk encapsulation dot1q4、建立VLAN子接口(1)、进入VLAN接口模式:Switch(config)#interface vlan 2(2)、设置VLAN子接口地址:Switch(config-if)#ip address 192.168.0.1 255.255.255.0(3)、打开端口:Switch(config-if)#no shutdown5、设置各主机IP地址、子网掩码、网关注意:(1)各主机IP地址应与其所在的VLAN在同一网段。
神州数码网络设备配置命令集合
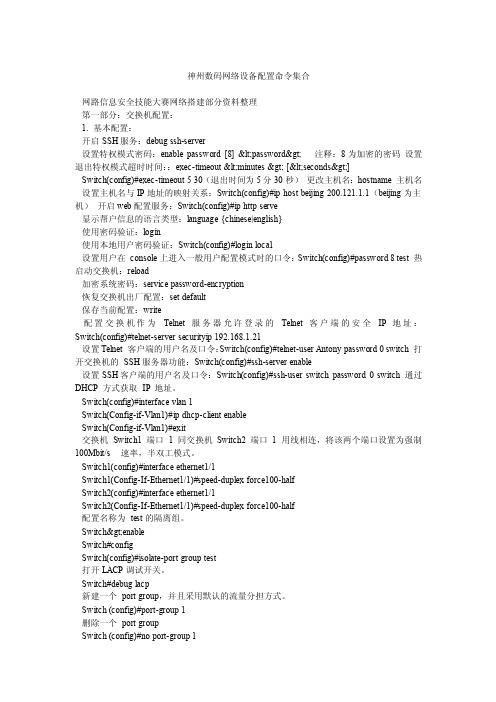
神州数码网络设备配置命令集合网路信息安全技能大赛网络搭建部分资料整理第一部分:交换机配置:1. 基本配置:开启SSH服务:debug ssh-server设置特权模式密码:enable password [8] <password> 注释:8为加密的密码设置退出特权模式超时时间::exec-timeout <minutes > [<seconds>]Switch(config)#exec-timeout 5 30(退出时间为5分30秒)更改主机名:hostname 主机名设置主机名与IP地址的映射关系:Switch(config)#ip host beijing 200.121.1.1(beijing为主机)开启web配置服务:Switch(config)#ip http serve显示帮户信息的语言类型:language {chinese|english}使用密码验证:login使用本地用户密码验证:Switch(config)#login local设置用户在console上进入一般用户配置模式时的口令:Switch(config)#password 8 test 热启动交换机:reload加密系统密码:service password-encryption恢复交换机出厂配置:set default保存当前配置:write配置交换机作为Telnet 服务器允许登录的Telnet 客户端的安全IP 地址:Switch(config)#telnet-server securityip 192.168.1.21设置Telnet 客户端的用户名及口令:Switch(config)#telnet-user Antony password 0 switch 打开交换机的SSH服务器功能:Switch(config)#ssh-server enable设置SSH客户端的用户名及口令:Switch(config)#ssh-user switch password 0 switch 通过DHCP 方式获取IP地址。
神州交换机、路由器、AC和AP基本配置

神州交换机、路由器、AC和AP基本配置交换机部分两层和三层交换机清除所有配置的命令#Set default 清除配置#Write 保存#Reload 重启交换机打开⽹站管理 http两层 (config)#ip http server(config)#Web-user xxx password 0-7 xxx三层 (config)#ip http server 打开http服务(config)#username xxx privilege 0-7 xxx 新建⽤户(config)#authentication line web login local 验证交换机打开telnet ssh两层 (config)#telnet-server enable 打开telnet服务(config)#telnet-user xxx password 0-7 xxx 设置帐号密码(config)#ssh-ser-server enable 打开ssh服务(config)#Ssh-user xxx password 0-7 xxx 设置帐号和密码三层 (config)#telnet-server enable(config)#username xxx privilege 0-7 xxx(config)#authentication line vty login local开启enable密码两层 (config)#enable password xxx 直接开启enable密码端⼝汇聚两层 (config)#port-group 1-32 创建汇聚端⼝的名字(Config-If-Port-Range)#port-group 1-32 mode acctive/on/passiv在端⼝⾥⾯选择主被动(config-if-port-channel1)#interface port-channel 1 进⼊组合端⼝1(config-if-port-channel1)#switchport mode trunk 设置为trunk负载分担两层(config)#port-group 1-32 load-balance dst-ip/mac/src-ip/ 选择⽅式三层(config)#load-balance dst-src-ip 分开配置端⼝限速两层(Config-If-Ethernet1/22)#bandwith control (xxx)K端⼝镜像两层config)#monitor session 1-4 destination/source interface ethernet x/x选择被镜像的端⼝和接受的端⼝Vlan之间的访问控制私有vlan之间的区别Primary vlan 能被⼈访问也能访问别⼈,前提是必须绑定需要访问或者被访问的vlanIsolate vlan 互相之间不能访问,能访问别⼈,也能被访问Community vlan 能访问,能互相访问但是不能被访问(config)#vlan x(config-vlanx)#private-vlan primary/isolate/connunity 绑定私有vlan(config-vlanx)#private-vlan association (VLAN) 只有primary需要团体也就是associationMstp的设置另外⼀个交换机在设置mstp时优先级相反,汇集层交换机需要⽣成树,但是不需要绑定优先级(config)#spanning-tree 打开⽣成树(config)#spanning-tree mst configurtaion 进⼊mstp⽣成树配置(config-mstp-region)#name xxxx 命名(config-mstp-region)#instance 0 vlan xx;xx 绑定vlan(config-mstp-region)#instance 1 vlan xx;xx(config-mstp-region)#exit(config)#spanning-tree mst 0 priority 4096 设置这个vlan在交换机的主根(config)#spanning-tree mst 1 priority 8192 设置这组vlan在交换机的备份根Vrrp协议的设置这就是两条路,⼀条断了⾛另外⼀条,所以⼀条要设置成⼀个vlan的优先路,当优先的断了,还有⼀条可以⾛,下⾯是优先的设置,优先级改动priority(config)#vlan 10 创建vlan(config-vlan10)#switchport interface ethernet 1/1 加⼊端⼝(config-if-vlan10)#ip address 192.168.10.2 255.255.255.0 设置ip(config-if-vlan10)#exit(config)#vlan 20(config-vlan20)#interface vlan 20Config(-if-vlan20)#ip address 192.168.20.2 255.255.255.0(config)#router vrrp 10 进⼊虚拟标识(config-router)#virtual-ip 192.168.10.254 设置虚拟ip(config-router)#interface vlan 10 进⼊vlan10(config-router)#priority 120 设置优先级(config-router)#enable 开启(config)#router vrrp 20(config-router)#virtual-ip 192.168.20.254(config-router)#interface vlan 20(config-router)#priority 120(config-router)#enableDhcp服务器switch(config)#vlan 10switch(config-Vlan10)#ip address 10.1.1.1 255.255.255.0 vlan的地址switch(config-Vlan10)#exitswitch(config)#vlan 20switch(config-Vlan20)#ip address 192.168.20.1 255.255.255.0 vlan的地址switch(config-Vlan20)#exitswitch(config)#service dhcp 开启dhcpswitch(config)#ip dhcp pool xxx 建⽴⼀个地址池switch(dhcp-xxx-config)#network 10.1.1.1 24 定义地址池内的地址switch(dhcp-xxx-config)#default-router 10.1.1.1 对应⽹关switch(dhcp-xxx-config)#exitswitch(config)#ip dhcp pool lllswitch(dhcp-lll-config)#network 192.168.20.1 24switch(dhcp-lll-config)#default-router 192.168.20.1switch(dhcp-lll-config)#exit(config)#ip dhcp excluded-address 10.1.1.1 10.1.1.10 保留ipDhcp中继服务器(config)#service dhcp 开启dhcp(config)#ip forward-protocol udp bootps 开启中继服务(config)#vlan 10 设置vlan10(config-if-vlan10)#ip address 10.1.1.2 255.255.255.0 设置vlan10 ip 和 dhcp服务器⽹段相同(config)#interface vlan 20 进⼊vlan20(config-if-vlan20)#ip address 10.1.2.1 255.255.255.0 定义ip 但是必须和dhcp定义的ip在同⼀⽹段(config-if-vlan20)#ip helper-address 10.1.1.1Dhcp侦听,防⽌⼲扰(config)#ip dhcp snooping enable 开启snooping(config)#interface ethernet 1/24(Config-Ethernet1/24)#ip dhcp snooping trust 添加与dhcp服务器相连的端⼝为信任端⼝绑定snmp服务(config)#snmp-server community ro public 只读字符串为pubilc(config)#snmp-server community rw private 读写字符串为private(config)#snmp-server securityip enable 开启安全ip模式(config)#snmp-server securityip xx.xx.xx.xx 设置安全ippim-dm⽅式开启组播(config)#ip pim multicast-routing 开启pim转发(config)#ip pim rp-candidate vlan xx 定义组播服务器所在的vlan(config)#ip pim bsr-candidate vlan xx 候选⾃举路由器(config)#interface vlan xx 进⼊vlan中(config-if-vlanxx)#ip pim sparse-mode 开启组播(config-if-vlanyy)#ip pim sparse-mode(config-if-vlanzz)#ip pim sparse-mode登录标题(config)#banner motd biaoti 直接就可以定义标题超时时间(config)#exec-timeout 10 直接定义10分钟Arp的防范(config)#interface ethernet 0/1/1(config-if-ethernet0/1/1)#arp-guard ip 192.168.10.1 绑定⽹关(config)#anti-arpscan enable 防ip扫描开启(config)#anti-arpscan recovery time 3600 设置⾃动恢复之间,防⽌pc发送⼤量报⽂(config-if-ethernet1/0/24)#anti-arpscan trust supertrust-port 设置超级信任端⼝Mac地址控制,防⽌⼀个主机访问另外⼀个主机(config)#firewall enable 开启防⽕墙(config)#mac-access-list extended xx 设置mac地址访问表(config-mac-ext-nacl-mac)#deny host-source-mac 00-FF-51-FD-AE-15 host-destination-mac E0-94-67-05-5D-84 拒绝主机到另外⼀个主机(config-mac-ext-nacl-mac)#permit any-source-mac any-destination-mac 允许所有(config)#int ethernet 0/0/4(config-if-ethernet0/0/4)#mac access-group xx in 绑定访问表xx(config)#int ethernet 0/0/10config-if-ethernet0/0/10)#switchport port-security 端⼝安全开启(config-if-ethernet0/0/10)#switchport port-security mac-address 44-37-E6-7B-69-AC 绑定安全macAcl控制列表控制端⼝(config)#firewall enable 打开防⽕墙(config)#ip access-list extended xx 创建访问控制列表xx(config-ip-ext-nacl-xx)#deny tcp 0.0.0.0 255.255.255.255 s-p range 6881 6890 host-destination 10.1.1.1 禁⽌所有⽹段的端⼝6881-6890 通过10.1.1.1(config-ip-ext-nacl-dk)#exit(config)#interface ethernet 1/0/4(config-if-ethernet1/0/4)#ip access-group xx in 绑定xx到端⼝上⽣成树SW B的配置(config)#spanning-tree 开启⽣成树(config)#spanning-tree mode stp ⽣成树(config)#spanning-tree priority 4096 优先级SW B的配置#配置STP(config)#spanning-tree(config)#spanning-tree mode stp(config)#spanning-tree priority 8192SW C的配置#配置STP(config)#spanning-tree(config)#spanning-tree mode stp设置端⼝为portfast(config-if-ethernet1/0/1)#spanning-tree portfast路由器部分端⼝描述#description xxx 端⼝描述配置回环接⼝S1_config# interface Loopback0S1_config_l0# ip address 101.0.0.1 255.255.255.255S1_config_l0# exit被动端⼝config_f0/0#ip ospf passive单臂路由交换机⽅⾯将vlan划分好,将连接路由器的端⼝设置为trunk,然后pc⽹关为路由器的虚拟⽹关。
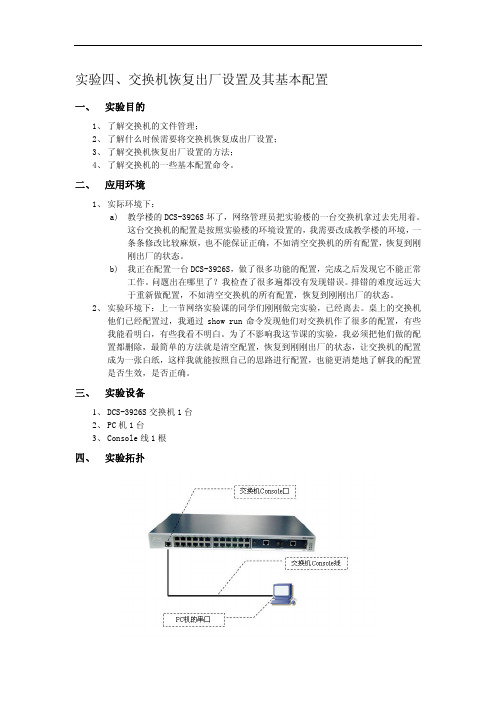
神州数码交换机恢复出厂设置及其基本配置
!再用 show 命令验证
第五步:设置交换机命令行界面的提示符(设置交换机的姓名)
switch#
switch#config
switch(Config)#hostname DCS-3926S-BD1 !配置姓名
DCS-3926S-BD1(Config)#exit
!无需验证,即配即生效
DCS-3926S-BD1#
show startup-config
命令:show startup-config 功能:显示当前运行状态下写在 Flash Memory 中的交换机参数配置,通常也是交换机下次 上电启动时所用的配置文件。 缺省情况:从 Flash 中读出的配置参数,如果与缺省工作参数相同,则不显示。 命令模式:特权用户配置模式 使用指南:show running-config 和 show startup-config 命令的区别在于,当用户完成一组配 置之后,通过 show running-config 可以看到配置增加了,而通过 show startup-config 却看 不出配置的变化。但若用户通过 write 命令,将当前生效的配置保存到 Flash Memory 中时, show running-config 的显示与 show startup-config 的显示结果一致。
!显示当前的 startup-config 文件
This is first time start up system. !系统提示此启动文件为出厂默认配置
switch#reload Process with reboot? [Y/N] y
!重新启动交换机 !
验证测试: 验证方法 1:重新进入交换机 switch> switch>enable switch#
神州数码交换机路由器配置命令(2023最新版)
神州数码交换机路由器配置命令神州数码交换机路由器配置命令章节一:引言⑴文档目的本文档旨在提供神州数码交换机路由器的详细配置命令,以指导管理员进行设备的初始化和配置。
⑵背景神州数码交换机路由器是一种用于数据传输的网络设备,拥有多种功能和特性。
本文档将介绍如何使用各种命令来配置交换机路由器的不同功能。
⑶受众本文档适用于所有需要配置神州数码交换机路由器的管理员和网络工程师。
章节二:初始化设备⑴登录设备使用如下命令登录设备:`login`⑵修改设备密码使用如下命令修改设备密码:`configure terminalenable secret [password]`章节三:基本配置⑴设置主机名使用如下命令设置设备的主机名:`configure terminalhostname [hostname]`⑵配置IP地质使用如下命令配置设备的IP地质:`configure terminalinterface [interface]ip address [ip-address] [subnet-mask]`⑶设置默认网关使用如下命令设置设备的默认网关:`configure terminalip default-gateway [gateway-address]`章节四:VLAN配置⑴创建VLAN使用如下命令创建一个新的VLAN:`configure terminalvlan [vlan-id]name [vlan-name]`⑵将接口加入VLAN使用如下命令将接口加入指定的VLAN:`configure terminalinterface [interface]switchport mode accessswitchport access vlan [vlan-id]`章节五:路由配置⑴静态路由使用如下命令配置静态路由:`configure terminalip route [destination-network] [subnet-mask] [next-hop]`⑵动态路由使用如下命令配置动态路由协议:`configure terminalrouter [routing-protocol]network [network-address] [subnet-mask]`章节六:安全配置⑴访问控制列表(ACL)使用如下命令配置ACL:`configure terminalaccess-list [acl-number] [permit----deny] [source] [destination] [protocol]`⑵端口安全使用如下命令配置端口安全:`configure terminalinterface [interface]switchport mode accessswitchport port-securityswitchport port-security maximum [max] switchport port-security violation [mode]`章节七:QoS配置⑴优先级队列使用如下命令配置优先级队列:`configure terminalinterface [interface]priority-queue out`⑵带宽限制使用如下命令配置带宽限制:`configure terminalinterface [interface]bandwidth [rate]`章节八:设备管理⑴ NTP服务使用如下命令启用NTP服务:`configure terminalntp server [server-address]`⑵ Telnet和SSH访问使用如下命令配置Telnet和SSH访问:`configure terminalline vty 0 15transport input telnet ssh`⑶登录Banner使用如下命令配置登录Banner:`configure terminalbanner login [banner-text]`附录:本文档涉及附件附件1:设备配置备份说明附录:法律名词及注释⒈ACL:访问控制列表,用于控制网络流量的访问权限。
神州数码交换机基本配置命令
神州数码交换机基本配置命令交换机基本状态:hostname> ;用户模式hostname# ;特权模式hostname(config)# ;全局配置模式hostname(config-if)# ;接口状态交换机口令设置:switch>enable ;进入特权模式switch#config terminal ;进入全局配置模式switch(config)#hostname ;设置交换机的主机名switch(config)#enab l e secret xxx ;设置特权加密口令switch(config)#enable password xxa ;设置特权非密口令switch(config)#line console 0 ;进入控制台口switch(config-line)#line vty 0 4 ;进入虚拟终端switch(config-line)#login ;允许登录switch(config-line)#password xx ;设置登录口令xxswitch#exit ;返回命令交换机VLAN设置:switch#vlan database ;进入VLAN设置switch(vlan)#vlan 2 ;建VLAN 2switch(vlan)#no vlan 2 ;删vlan 2switch(config)#int f0/1 ;进入端口1switch(config-if)#switchport access vlan 2 ;当前端口加入vlan 2switch(config-if)#switchport mode trunk ;设置为干线switch(config-if)#switchport trunk allowed vlan 1,2 ;设置允许的vlan switch(config-if)#switchport trunk encap dot1q ;设置vlan 中继switch(config)#vtp domain ;设置发vtp域名switch(config)#vtp password ;设置发vtp密码switch(config)#vtp mode server ;设置发vtp模式switch(config)#vtp mode client ;设置发vtp模式交换机设置IP地址:switch(config)#interface vlan 1 ;进入vlan 1switch(config-if)#ip address ;设置IP地址switch(config)#ip default-gateway ;设置默认网关switch#dir Flash: ;查看闪存交换机显示命令:switch#write ;保存配置信息switch#show vtp ;查看vtp配置信息switch#show run ;查看当前配置信息switch#show vlan ;查看vlan配置信息switch#show interface ;查看端口信息switch#show int f0/0 ;查看指定端口信息完了最最要的一步。
- 1、下载文档前请自行甄别文档内容的完整性,平台不提供额外的编辑、内容补充、找答案等附加服务。
- 2、"仅部分预览"的文档,不可在线预览部分如存在完整性等问题,可反馈申请退款(可完整预览的文档不适用该条件!)。
- 3、如文档侵犯您的权益,请联系客服反馈,我们会尽快为您处理(人工客服工作时间:9:00-18:30)。
神州数码交换机基本配置
恢复交换机的出厂设置
命令:set default
功能:恢复交换机的出厂设置。
命令模式:特权用户配置模式。
使用指南:恢复交换机的出厂设置,即用户对交换机做的所有配置都消失,用户重新启动交换机后,出现的提示与交换机首次上电一样。
注意:配置本命令后,必须执行write 命令,进行配置保留后重启交换机即可使交换机恢复到出厂设置。
举例:
Switch#set default
Are you sure? [Y/N] = y
Switch#write
Switch#reload
进入交换机的Setup配置模式
命令:setup
功能:进入交换机的Setup配置模式。
命令模式:特权用户配置模式。
使用指南:在Setup配置模式下用户可进行IP地址、Web 服务等的配置。
举例:
Switch#setup
Setup Configuration
---System Configuration Dialog---
At any point you may enter Ctrl+C to exit.
Default settings are in square brackets [ ].
If you don't want to change the default settings, you can input enter.
Continue with configuration dialog? [y/n]:y
Please select language
[0]:English
[1]:中文
Selection(0|1) [0]:0
Configure menu
[0]:Config hostname
[1]:Config interface-Vlan1
[2]:Config telnet-server
[3]:Config web-server
[4]:Config SNMP
[5]:Exit setup configuration without saving
[6]:Exit setup configuration after saving
配置交换机IP 地址
首先配置主机的IP地址,要与交换机的VLAN1 接口IP地址在同一个网段。
如交换机的VLAN1接口IP地址为10.1.128.251,则可以设置主机的IP地址为10.1.128.252。
在主机上执行“ping 10.1.128.251”命令,显示是否ping 通;若ping 不通,则检查原因。
下面简单介绍配置DCS-3950 的VLAN1 接口的IP地址配置命令,在进行带内管理之前,必须通过带外管理即Console 口方式配置交换机的IP地址,配置命令如下(以后如不
特殊说明,所有的交换机配置时的提示符均采用Switch):
Switch>
Switch>en
Switch#config
Switch(Config)#interface vlan 1
Switch(Config-If-Vlan1)#ip address 10.1.128.251 255.255.255.0
Switch(Config-If-Vlan1)#no shutdown
设置T elnet用户
登录到Telnet 的配置界面,需要输入正确的登录名和口令,否则交换机将拒绝该Telnet 用户的访问。
该项措施是为了保护交换机免受非授权用户的非法操作。
若交换机没有设置授权Telnet 用户,则任何用户都无法进入交换机的CLI 配置界面。
因此在允许Telnet 方式配置管理交换机时,必须在Console 口方式的全局配置模式下使用命令telnet-user <user> password {0|7} <password> 为交换机设置Telnet 授权用户和口令。
如交换机的授权用户名为test,口令为明文的test,设置方式如下:
Switch>en
Switch#config
Switch(Config)#telnet-user test password 0 test
启动交换机的HTTP Server功能
Console 方式下的全局配置模式下使用命令ip http server 启动HTTP Server 功能,使能Web 配置。
配置如下:
Switch>en
Switch#config
Switch(Config)#ip http server
设置W eb用户
登录到Web 的配置界面,需要输入正确的登录名和口令,否则交换机将拒绝该HTTP 访问。
该项措施是为了保护交换机免受非授权用户的非法操作。
若交换机没有设置授权Web 用户,则任何用户都无法进入交换机的Web 配置界面。
因此在允许Web 方式配置管理交
换机时,必须在Console方式下的全局配置模式下使用命令web-user <user> password {0|7} <password> 为交换机设置Web 授权用户和口令。
如交换机的授权用户名为admin,口令为明文的digital,设置方式如下:
Switch>en
Switch#config
Switch(Config)#web-user admin password 0 digital。