神州数码系列交换机升级指南下载
H3C_S7600-X系列以太网交换机_软件升级指南(Comware_V7版本)-6W100
目录1 版本升级操作指导 (1)1.1 设备软件简介 (1)1.1.1 BootWare程序 (1)1.1.2 启动软件包 (1)1.2 软件升级方式简介 (2)1.3 通过命令行进行软件升级 (2)1.3.1 独立运行模式下的软件升级 (3)1.3.2 IRF模式下的软件升级 (9)1.4 通过BootWare菜单升级启动软件包配置 (17)1.4.1 通过管理用以太网口利用TFTP升级启动软件包 (18)1.4.2 通过管理用以太网口利用FTP升级启动软件包 (20)1.4.3 通过Console口利用Xmodem升级启动软件包 (22)1.5 通过BootWare菜单升级BootWare配置 (27)1.5.1 通过管理用以太网口利用TFTP升级BootWare (27)1.5.2 通过管理用以太网口利用FTP升级BootWare (30)1.5.3 通过Console口利用Xmodem升级BootWare (32)2 BootWare菜单介绍 (38)2.1 BootWare菜单的快捷键 (38)2.2 进入BootWare基本段 (38)2.2.1 修改串口参数 (39)2.2.2 升级BootWare扩展段 (40)2.2.3 升级完整的BootWare (40)2.2.4 启动BootWare扩展段 (40)2.2.5 启动备份的BootWare扩展段 (41)2.2.6 进入基本段辅助子菜单 (41)2.3 进行内存测试 (41)2.4 进入BootWare扩展段 (42)2.5 BootWare扩展段主菜单 (42)2.5.1 BootWare扩展段主菜单简介 (42)2.5.2 配置密码恢复功能 (44)2.5.3 启动应用程序 (45)2.5.4 串口子菜单 (45)2.5.5 以太网配置子菜单 (46)2.5.6 文件控制子菜单 (48)2.5.7 恢复出厂配置启动 (52)2.5.8 忽略系统配置文件 (53)2.5.9 BootWare操作子菜单 (53)2.5.10 跳过console口认证 (54)2.5.11 存储器操作子菜单 (54)2.5.12 进入BootWare扩展段辅助子菜单 (55)2.5.13 格式化文件系统 (55)2.6 软件升级失败的处理 (56)1 版本升级操作指导1.1 设备软件简介设备软件包括BootWare程序和启动软件包,它是设备启动、运行的必备软件,为整个设备提供支撑、管理以及丰富的业务。
神州数码Bootrom下的升级配置

神州数码Bootrom下的升级配置实验十、交换机BootROM下的升级配置一、实验目的1、了解什么时候采用BootROM升级;2、了解怎样使用BootROM升级交换机。
二、应用环境当交换机的系统文件遭到破坏时,已经无法进入正常的CLI界面进行操作(譬如:对交换机升级不成功的时候),可以进入交换机BootROM方式对交换机重新升级或还原文件。
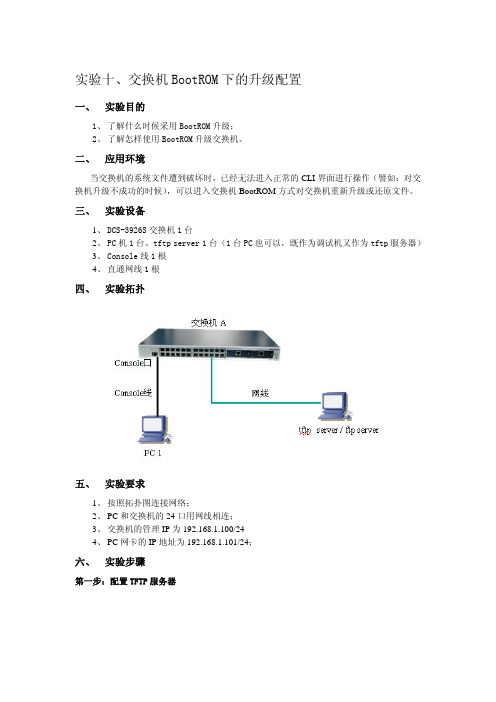
三、实验设备1、DCS-3926S交换机1台2、PC机1台、tftp server 1台(1台PC也可以,既作为调试机又作为tftp服务器)3、Console线1根4、直通网线1根四、实验拓扑五、实验要求1、按照拓扑图连接网络;2、PC和交换机的24口用网线相连;3、交换机的管理IP为192.168.1.100/244、PC网卡的IP地址为192.168.1.101/24;六、实验步骤第一步:配置TFTP服务器第二步:进入BootROM方式在交换机启动的过程中,按住“ctrl+b”键,直到交换机进入BootROM监控模式。
操作显示如下:DCS-3926S Management SwitchCopyright (c) 2001-2003 by Digital China Networks Limited.All rights reserved.Testing RAM...33,554,432 RAM OK.Loading BootROM...Starting BootRom...109.13 BogoMIPSVersion: 1.2.0Creation date: Jun 22 2004, 15:47:10Attached TCP/IP interface to sc0.[Boot]:第三步:设置交换机IP地址和升级方式。
在BootROM模式下,执行命令setconfig,设置本机在BootROM模式下的IP地址、掩码、服务器的IP地址、掩码及选择TFTP或者FTP的升级方式。
神州数码Bootrom下的升级配置
实验十、交换机BootROM下的升级配置一、 实验目的1、了解什么时候采用BootROM升级;2、了解怎样使用BootROM升级交换机。
二、 应用环境当交换机的系统文件遭到破坏时,已经无法进入正常的CLI界面进行操作(譬如:对交换机升级不成功的时候),可以进入交换机BootROM方式对交换机重新升级或还原文件。
三、 实验设备1、DCS-3926S交换机1台2、PC机1台、tftp server 1台(1台PC也可以,既作为调试机又作为tftp服务器)3、Console线1根4、直通网线1根四、 实验拓扑五、 实验要求1、按照拓扑图连接网络;2、PC和交换机的24口用网线相连;3、交换机的管理IP为192.168.1.100/244、PC网卡的IP地址为192.168.1.101/24;六、 实验步骤第一步:配置TFTP服务器第二步:进入BootROM方式在交换机启动的过程中,按住“ctrl+b”键,直到交换机进入BootROM监控模式。
操作显示如下:DCS-3926S Management SwitchCopyright (c) 2001-2003 by Digital China Networks Limited.All rights reserved.Testing RAM...33,554,432 RAM OK.Loading BootROM...Starting BootRom...109.13 BogoMIPSVersion: 1.2.0Creation date: Jun 22 2004, 15:47:10Attached TCP/IP interface to sc0.[Boot]:第三步:设置交换机IP地址和升级方式。
在BootROM模式下,执行命令setconfig,设置本机在BootROM模式下的IP地址、掩码、服务器的IP地址、掩码及选择TFTP或者FTP的升级方式。
如设置本机地址为192.168.1.100/24,PC地址为192.168.1.101/24,选择TFTP升级方式,配置如下:[Boot]: setconfigHost IP Address: [192.168.10.22] 192.168.1.100 !该地址是交换机地址Server IP Address: [192.168.10.151] 192.168.1.101 !该地址是服务器地址FTP(1) or TFTP(2): [1] 2Network interface configure OK.[Boot]:第四步:开始升级打开PC中TFTP服务器,在往交换机下传升级版本时,请先检查服务器与被升级交换机之间的连接状态,在服务器端使用ping命令,ping通后,在交换机的BootROM模式下执行load命令;若ping不通,则检查原因。
Ruckus ZoneDirector 升级指南说明书
Supporting ZoneDirector 10.0SOFTWARE UPGRADE GUIDEPart Number: 800-71771-001 Rev A Publication Date: 29 November 2017Copyright Notice and Proprietary InformationCopyright 2017 Brocade Communications Systems, Inc. All rights reserved.No part of this documentation may be used, reproduced, transmitted, or translated, in any form or by any means, electronic, mechanical, manual, optical, or otherwise, without prior written permission of or as expressly provided by under license from Brocade. Destination Control StatementTechnical data contained in this publication may be subject to the export control laws of the United States of America. Disclosure to nationals of other countries contrary to United States law is prohibited. It is the reader’s responsibility to determine the applicable regulations and to comply with them.DisclaimerTHIS DOCUMENTATION AND ALL INFORMATION CONTAINED HEREIN (“MATERIAL”) IS PROVIDED FOR GENERAL INFORMATION PURPOSES ONLY. BROCADE and RUCKUS WIRELESS, INC. AND THEIR LICENSORS MAKE NO WARRANTY OF ANY KIND, EXPRESS OR IMPLIED, WITH REGARD TO THE MATERIAL, INCLUDING, BUT NOT LIMITED TO, THE IMPLIED WARRANTIES OF MERCHANTABILITY, NON-INFRINGEMENT AND FITNESS FOR A PARTICULAR PURPOSE, OR THAT THE MATERIAL IS ERROR-FREE, ACCURATE OR RELIABLE. BROCADE and RUCKUS RESERVE THE RIGHT TO MAKE CHANGES OR UPDATES TO THE MATERIAL AT ANY TIME.Limitation of LiabilityIN NO EVENT SHALL BROCADE or RUCKUS BE LIABLE FOR ANY DIRECT, INDIRECT, INCIDENTAL, SPECIAL OR CONSEQUENTIAL DAMAGES, OR DAMAGES FOR LOSS OF PROFITS, REVENUE, DATA OR USE, INCURRED BY YOU OR ANY THIRD PARTY, WHETHER IN AN ACTION IN CONTRACT OR TORT, ARISING FROM YOUR ACCESS TO, OR USE OF, THE MATERIAL.TrademarksRuckus Wireless, Ruckus, the bark logo, BeamFlex, ChannelFly, Dynamic PSK, FlexMaster, Simply Better Wireless, SmartCell, SmartMesh, SmartZone, Unleashed, ZoneDirector and ZoneFlex are trademarks of Ruckus Wireless, Inc. in the United States and in other countries. Brocade, the B-wing symbol, MyBrocade, and ICX are trademarks of Brocade Communications Systems, Inc. in the United States and in other countries. Other trademarks may belong to third parties.Ruckus ZoneDirector Upgrade Guide 2Part Number: 800-71771-001 Rev AContentsZoneDirector Upgrade Paths (4)Upgrading ZoneDirector and ZoneFlex APs (4)Importing an AP Firmware Bundle (5)Performing an Upgrade with Smart Redundancy (6)Enabling Secured AP Image Upgrade (6)Verifying the Upgrade (6)Upgrade FAQs (9)Do I Need a Valid Support Contract to Upgrade Firmware? (9)Is My Controller Supported by the Firmware Upgrade? (10)Is My Access Point Supported by the Firmware Upgrade? (10)How Do I Get Support? (10)Ruckus ZoneDirector Upgrade GuidePart Number: 800-71771-001 Rev A3ZoneDirector Upgrade PathsTo upgrade directly to ZoneDirector build 10.0.0.0.1424, you must be running ZoneDirector 9.12 GA or a later release. If you are running an earlier release, you must first upgrade to at least the 9.12 GA build before upgrading to this release.Upgrading ZoneDirector and ZoneFlex APsConsult the Ruckus Support website on a regular basis for updates that can be applied to your Ruckus network devices.After downloading an update package to a convenient folder on your administrative PC, you can complete the network upgrade (of both ZoneDirector and the APs) by completing the following steps. The full network upgrade is successive in sequence. After ZoneDirector is upgraded, it contacts each active AP, upgrades it, and restores it to service. The APs use FTP to download firmware updates from ZoneDirector. If you have an access control list (ACL) or firewall between ZoneDirector and the AP, make sure that FTP traffic is allowed to ensure that the AP can successfully download the firmware update.NOTEUpgrading ZoneDirector and the APs temporarily disconnects them (and any associated clients) from the network. To minimize network disruption, Ruckus Wireless recommends performing the upgrade procedure at an off-peak time.1.Back up your existing configuration.2.Select Administer > Upgrade.A screen similar to the following figure displays. The graphical user interface (GUI) may differ depending on your current softwareversion.FIGURE 1 Upgrade Page3.In the Software Upgrade area, click Choose File.4.Browse to the location where you saved the upgrade package, and click Open.When the upgrade file name appears in the text field, the Choose File button becomes the Upgrade button.Ruckus ZoneDirector Upgrade Guide 4Part Number: 800-71771-001 Rev A5.Click Upgrade and ZoneDirector logs out of the Web User Interface (WebUI), runs the upgrade, and restarts. When the upgrade process is complete, the Status LED on ZoneDirector is steadily lit. You may now log in to the WebUI as Administrator.Importing an AP Firmware BundleWhen Ruckus introduces a new AP model, an AP firmware bundle (also known as a patch) is made available for download from the Ruckus Support website. Download the AP firmware bundle to a local computer, import it into ZoneDirector, and the new AP model is now supported.Beginning in ZoneDirector 10.0 and later releases, the AP firmware bundle allows administrators to import a new Access Point (AP) model patch file to ZoneDirector without requiring a full upgrade of the ZoneDirector firmware. In this way, new APs can be introduced without the need to wait for the next ZoneDirector firmware release.NOTEUpgrading ZoneDirector to a new release deletes all imported AP firmware bundles. Install the required AP firmware bundles only after upgrading ZoneDirector firmware.The steps required for importing an AP firmware bundle are similar to the steps in Upgrading ZoneDirector and ZoneFlex APson page 4.CAUTIONImporting an AP firmware bundle automatically reboots the ZoneDirector to affect the patch, temporarily disconnecting APs (and any associated clients) from the network. To minimize network disruption, Ruckus Wireless recommends performing the upgrade procedure at an off-peak time.FIGURE 2Importing an AP Firmware BundleImporting an AP Firmware BundleRuckus ZoneDirector Upgrade Guide Part Number: 800-71771-001 Rev A5Performing an Upgrade with Smart RedundancyPerforming an Upgrade with Smart RedundancyIf you have two ZoneDirectors in a Smart Redundancy configuration, the upgrade procedure is similar for the active and standy ZoneDirectors. However, the active and standby ZoneDirectors will reverse roles during an upgrade.To upgrade both ZoneDirectors in a Smart Redundancy configuration, complete the following steps.1.Log in to the active ZoneDirector. Do not attempt to manually upgrade the standby ZoneDirector before the active unit. If you doso, some configuration options may be lost during the upgrade process. Be sure to begin the upgrade process from either the Web User Interface (WebUI) of the active ZoneDirector or the shared Management Interface (if configured).2.Select Administer > Upgrade.3.In the Software Upgrade area, click Browse. The Browse dialog box appears.4.Browse to the location where you saved the upgrade package, and click Open.When the upgrade file name appears in the text field, the Browse button becomes the Upgrade button.5.Click Upgrade. The standby ZoneDirector is upgraded first.When the standby ZoneDirector upgrade is complete, the standby ZoneDirector reboots and becomes active (begins accepting AP requests), while the original active ZoneDirector becomes the standby and begins its own upgrade process.All APs are now associated to the original standby ZoneDirector (which is now the active ZoneDirector), and begin upgrading AP firmware to the new version.Each AP reboots after upgrading.Enabling Secured AP Image UpgradeBeginning with ZoneDirector release 9.13, AP firmware image upgrades can be performed using HTTPS by way of TCP port 11443 rather than FTP. In the WebUI, select the check box next to Enable secured AP image upgrade to enable HTTPS upgrade. If HTTPS upgrade is not supported, AP image upgrades fall back to FTP.Verifying the UpgradeAfter you have performed a ZoneDirector upgrade or AP firmware bundle installation, it is important to verify that the ZoneDirector and APs are running the expected software versions. Version details for both the ZoneDirector and AP installed versions can be found in the ZoneDirector Web User Interface (WebUI). If you prefer to use the command line interface (CLI), use SSH to access the ZoneDirector or AP. The following steps include both WebUI and CLI steps, but it is recommended that you verify that both the ZoneDirector and the APs are running the appropriate installed system versions.Ruckus ZoneDirector Upgrade Guide 6Part Number: 800-71771-001 Rev AThe following steps contain a WebUI and a CLI option, select just one of the options in each step.1.To verify the version number, choose one of the following bulleted options.•Open the ZoneDirector WebUI. Select Dashboard , and verify the version number under the System Info heading.FIGURE 3Verifying the Installed Software Version in ZoneDirector WebUI•To verify the installed version using the ZoneDirector CLI, use the show sysinfo command.ruckus# show sysinfo System Overview: Name= ZDScotlandIP Address= 192.168.0.2MAC Address= 24:C9:A1:3F:3E:70 Uptime= 58d 6h 35m Model= ZD1200 Licensed APs= 6Serial Number= 241426000023 Version= 10.0.0.0 build 1424Verifying the UpgradeRuckus ZoneDirector Upgrade Guide Part Number: 800-71771-001 Rev A72.To display information about all active APs, choose one of the following bulleted options.•From the ZoneDirector WebUI, select Monitor > Access Points to display information about all active APs.FIGURE 4Displaying the Active APs in ZoneDirector WebUI•To verify the installed version using the AP CLI, login, enter your password if prompted, and enter the get version command as shown in the following output.login as:Please login: admin password:Copyright (c) 2017 Ruckus Wireless, Inc. All rights Reserved.** Ruckus R710 Multimedia Hotzone Wireless AP: 261503606647Warning: AP is in ZoneDirector-Managed modeCurrent or latest ZoneDirector: 192.168.0.2 / 24:c9:a1:3f:3e:70 Any configuration changes made in CLI may conflict with the ZoneDirector's management and will cause undefined results.rkscli:rkscli: get versionRuckus R710 Multimedia Hotzone Wireless AP Version: 10.0.0.0.1424OKVerifying the UpgradeRuckus ZoneDirector Upgrade Guide 8Part Number: 800-71771-001 Rev A3.(WebUI only). Click one of the highlighted AP MAC addresses. The installed version information is displayed under the Access Points screen similar to the following figure.FIGURE 5Displaying the Installed AP Information in ZoneDirector WebUIUpgrade FAQs•Do I Need a Valid Support Contract to Upgrade Firmware?•Is My Controller Supported by the Firmware Upgrade?•Is My Access Point Supported by the Firmware Upgrade?•How Do I Get Support?Do I Need a Valid Support Contract to Upgrade Firmware?You must have a valid support contract to upgrade or downgrade the ZoneDirector software. If you do not have a valid support contract,contact your reseller to purchase an appropriate support contract. After downloading and installing the software, select Administer >Support from the WebUI for information on activating your support contract.Upgrade FAQsDo I Need a Valid Support Contract to Upgrade Firmware?Ruckus ZoneDirector Upgrade Guide Part Number: 800-71771-001 Rev A9NOTEBy downloading the ZoneDirector software and subsequently upgrading ZoneDirector to version 10.0, be advised that the ZoneDirector will periodically connect to Ruckus, and Ruckus will collect the ZoneDirector serial number, software version, and build number. Ruckus will transmit a file back to the ZoneDirector that will be used to display the current status of theZoneDirector support contract. Any information collected from the ZoneDirector may be transferred and stored outside of your country of residence where data protection standards may be different.Is My Controller Supported by the Firmware Upgrade?This guide supports the following ZoneDirector models:•ZoneDirector 1200•ZoneDirector 3000•ZoneDirector 5000For information about the specific models and modules supported in a ZoneDirector model, refer to the appropriate hardware installation guide.Is My Access Point Supported by the Firmware Upgrade?TABLE 1 Supported Access Point modelsHow Do I Get Support?For product support information and details on contacting the Ruckus Customer Services and Support Team, go directly to the Support Portal using https:// , or go to https:// and select Support .Upgrade FAQsIs My Controller Supported by the Firmware Upgrade?Ruckus ZoneDirector Upgrade Guide 10Part Number: 800-71771-001 Rev A。
神州数码(DCS)交换机
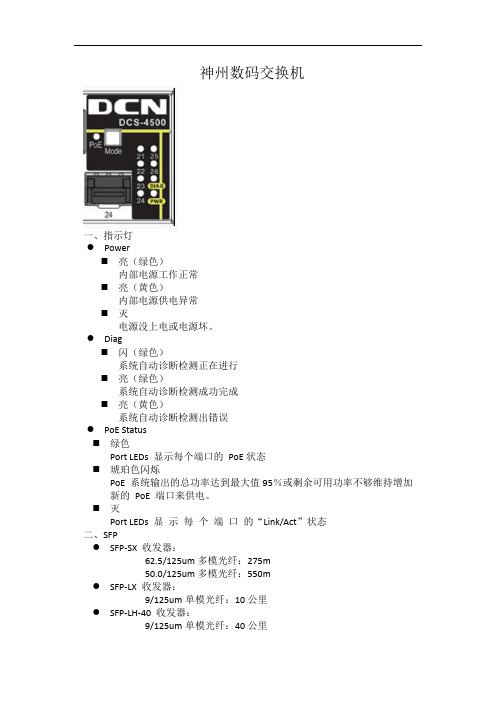
神州数码交换机一、指示灯●Power⏹亮(绿色)内部电源工作正常⏹亮(黄色)内部电源供电异常⏹灭电源没上电或电源坏。
●Diag⏹闪(绿色)系统自动诊断检测正在进行⏹亮(绿色)系统自动诊断检测成功完成⏹亮(黄色)系统自动诊断检测出错误●PoE Status⏹绿色Port LEDs 显示每个端口的PoE状态⏹琥珀色闪烁PoE 系统输出的总功率达到最大值95%或剩余可用功率不够维持增加新的PoE 端口来供电。
⏹灭Port LEDs 显示每个端口的“Link/Act”状态二、SFP●SFP-SX 收发器:62.5/125um多模光纤:275m50.0/125um多模光纤:550m●SFP-LX 收发器:9/125um单模光纤:10公里●SFP-LH-40 收发器:9/125um单模光纤:40公里●SFP-LH-70 收发器:9/125um单模光纤:70公里●SFP-LH-120 收发器:9/125um单模光纤:120公里配置命令1、删除配置文件:Switch#set defaultAre you sure?(y\n)=ySwitch#writeSwitch#reload2、进入终端配置enable进入特权用户配置模式disable退出config terminal 进入全局配置模式enable password 0|7 password //0是明文密码,7是密文no enable password删除密码login 使能密码验证(该命令是console进入一般用户配置模式时,必须键入password命令设置的密码)password 0|7 <password>设置一般用户配置模式时的口令exit返回上个模式end 退回特权用户配置模式reload 重启交换机set default 恢复交换机的出厂设置1)诊断:show tech-support [no more] 显示交换机运行信息和各任务状态,诊断交换机的运行是否正常show version显示交换机版本信息hostname 命名no hostname 删除命名ip host <hostname><ip_addr>设置主机与ip地址映射关系language chinese|english设置显示的帮助信息的语言类型2)远程管理authentication securityip <ip-addr>配置允许使用telnet和http方式登录交换机的安全ip地址telnet [vrf <vrf-name>] {<ip-addr> | <ipv6-addr> | host <hostname>} [<port>]以telnet方式登录到ip为<ip-addr>的远程主机上telnet-server enable打开交换机的telnet服务器功能telnet-server max-connection {<max-connection-number>| default}配置交换机telnet服务器支持的最大连接数,default为默认值5ssh-server authentication-retries <number>设置SSH客户端的验证重试次数,默认为3次ssh-server enable 打开交换机的SSH服务器功能{ssh(安全外壳协议)}ssh-server max-connection{<max-connection-number>| default}配置交换机SSH服务器支持的最大连接数,默认为5ssh-server timeout<timeout>1-600设置SSH客户端的验证超时时间,默认180秒3)显示设置terminal length<0-512>显示当前终端每屏显示字符的行数terminal monitor 复制调试信息到当前显示终端show ssh-server 显示SSH服务器的状态是打开还是关闭,以及已经登录SSH的用户信息show telnet login 显示当前与交换机建立telnet连接的telnet客户端的信息show flash显示保存在flash中的文件大小4)配置交换机ip地址Interface vlan <vlan-id>进入VLAN接口配置模式ip address <ip-address><mask> [secondary]设置交换机的指定VLAN 接口的IP地址及掩码,[secondary]为表示配置的IP 地址为从IP 地址5)交换机升级命令(类入侵)copy<source-url><destination-url> [ascii | binary]FTP客户机上下载文件,<source-url>为被拷贝的源文件或目录的位置;<destination-url>为文件或目录所要拷贝到的目的地址;ascii 表示文件传输使用ASCII标准;binary 表示文件传输使用二进制标准(缺省传输方式)Eg:copy <filename> ftp://或者copy ftp:// <filename>后直接回车,系统会出现如下的提示:ftp server ip/ipv6 address [x.x.x.x]/[x:x::x:x] >ftp username>ftp password>ftp filename>要求输入FTP 服务器的地址、用户名、密码及文件名。
神州数码(上海) DCRS-6512 12槽机箱式三层交换机 硬件安装维护手册

神州数码 DCRS-5526S(V3) 千兆路由交换机 说明书

神州数码网络(北京)有限公司版权所有 2006年3月前言DCRS-5526S可堆叠千兆路由交换机, 可作为大型企业网, 校园网和城域网的汇聚设备,也可以适合中等规模办公环境的网络需求。
DCRS-5526S提供24+2个端口,其中24个为固定配置的10/100Base-TX以太网接口,2个为可选模块M1、M2。
M1和M2可以插入的端口类型有1000Base-TX以太网接口、1000Base GBIC接口、100Base-FX单模/多模接口、100Base-T以太网接口和USB堆叠接口。
为了使您能更好的了解、使用及日常维护DCRS-5526S交换机产品,我们特编写了本使用手册,希望您能在使用和配置交换机前仔细阅读一下本使用手册,以免损坏交换机或影响正常使用。
在此,感谢您选择和购买了神州数码网络(北京)有限公司出品的系列网络产品,希望我们的产品和服务能让您满意,让“中国网络普遍成功”!如果上述产品有软、硬件升级和变更,导致本使用手册内容需进行相应更新,恕不能事先通知。
如需查询产品信息、更新产品软件和使用手册,请访问的相应产品目录或咨询800-810-9119客户服务热线。
本使用手册版权和著作权属于神州数码网络(北京)有限公司,未经书面许可任何个人或团体组织不得将本使用手册内容的局部或全部以任何形式转载使用或出版销售。
版权所有,侵权必究!目录第1章产品介绍_______________________________________________231.1产品简介_________________________________________________________231.1.1概述______________________________________________________________231.1.2产品特点__________________________________________________________231.1.3主要特性__________________________________________________________25 1.2技术指标_________________________________________________________26 1.3物理特性_________________________________________________________261.4产品外观_________________________________________________________271.4.1产品前面板________________________________________________________271.4.2产品后面板________________________________________________________271.4.3LED指示灯________________________________________________________27第2章硬件安装_______________________________________________292.1安装须知_________________________________________________________292.1.1安装环境要求______________________________________________________292.1.1.1安装环境清洁度________________________________________________292.1.1.2温湿度________________________________________________________302.1.1.3电源__________________________________________________________302.1.1.4防静电________________________________________________________302.1.1.5抗干扰________________________________________________________302.1.1.6机架配置______________________________________________________312.1.2安装操作提示______________________________________________________312.1.3安全警告__________________________________________________________312.2安装准备_________________________________________________________322.2.1核对装箱单________________________________________________________322.2.2安装工具及材料____________________________________________________322.3硬件安装_________________________________________________________332.3.1在机架上安装交换机________________________________________________332.3.2在交换机上安装模块________________________________________________342.3.3Console线缆连接___________________________________________________352.3.4电源线连接________________________________________________________35第3章Setup配置______________________________________________373.1Setup配置________________________________________________________373.2Setup主菜单______________________________________________________373.3Setup子菜单______________________________________________________383.3.1配置交换机的主机名________________________________________________383.3.2配置Vlan1的接口___________________________________________________383.3.3配置Telnet服务器___________________________________________________393.3.4配置Web服务器____________________________________________________413.3.5配置SNMP_________________________________________________________423.3.6退出Setup配置模式_________________________________________________44第4章交换机管理_____________________________________________454.1管理方式_________________________________________________________454.1.1带外管理__________________________________________________________454.1.2带内管理__________________________________________________________494.1.2.1通过Telnet管理交换机___________________________________________504.1.2.2通过HTTP管理交换机___________________________________________524.1.2.3通过LinkManager管理交换机____________________________________544.2管理界面_________________________________________________________544.2.1CLI界面___________________________________________________________544.2.1.1配置模式介绍__________________________________________________554.2.1.1.1一般用户配置模式___________________________________________554.2.1.1.2特权用户配置模式___________________________________________554.2.1.1.3全局配置模式_______________________________________________564.2.1.1.3.1接口配置模式______________________________________________564.2.1.1.3.2VLAN配置模式_____________________________________________574.2.1.1.3.3DHCP地址池配置模式________________________________________574.2.1.1.3.4路由配置模式______________________________________________574.2.1.1.3.5访问列表配置模式__________________________________________574.2.1.2配置语法______________________________________________________574.2.1.3支持快捷键____________________________________________________584.2.1.4帮助功能______________________________________________________584.2.1.5对输入的检查__________________________________________________594.2.1.5.1成功返回信息_______________________________________________594.2.1.5.2错误返回信息_______________________________________________594.2.1.6支持不完全匹配________________________________________________594.2.2Web界面__________________________________________________________59第5章交换机基本配置_________________________________________645.1基本配置命令_____________________________________________________645.1.1clock set___________________________________________________________645.1.2config_____________________________________________________________645.1.3exec timeout________________________________________________________655.1.4exit_______________________________________________________________655.1.5help_______________________________________________________________655.1.6ip host____________________________________________________________655.1.7ip http server_______________________________________________________665.1.8hostname__________________________________________________________665.1.9reload_____________________________________________________________665.1.10set default_________________________________________________________675.1.11setup______________________________________________________________67 5.1.12language___________________________________________________________67 5.1.13web-user__________________________________________________________67 5.1.14write______________________________________________________________685.2维护和调试命令___________________________________________________68 5.2.1ping______________________________________________________________68 5.2.2Telnet_____________________________________________________________695.2.2.1Telnet简介_____________________________________________________695.2.2.2Telnet任务序列_________________________________________________695.2.2.3Telnet命令介绍_________________________________________________705.2.2.3.1authentication login__________________________________________705.2.2.3.2monitor_____________________________________________________715.2.2.3.3telnet_______________________________________________________715.2.2.3.4telnet-server enable___________________________________________725.2.2.3.5telnet-server securityip________________________________________725.2.2.3.6telnet-user__________________________________________________72 5.2.3SSH______________________________________________________________735.2.3.1SSH简介______________________________________________________735.2.3.2SSH服务器配置任务序列________________________________________735.2.3.3SSH配置命令__________________________________________________735.2.3.3.1ssh-server enable_____________________________________________735.2.3.3.2ssh-user____________________________________________________745.2.3.3.3ssh-server timeout____________________________________________745.2.3.3.4ssh-server authentication-retries________________________________745.2.3.3.5ssh-server host-key create rsa__________________________________755.2.3.3.6monitor_____________________________________________________755.2.3.4SSH服务器配置举例____________________________________________755.2.3.5SSH监测和调试命令____________________________________________765.2.3.5.1show ssh-user________________________________________________765.2.3.5.2show ssh-server______________________________________________765.2.3.5.3debug ssh-server_____________________________________________76 5.2.4traceroute_________________________________________________________76 5.2.5show______________________________________________________________775.2.5.1show clock_____________________________________________________775.2.5.2show debugging________________________________________________775.2.5.3show flash_____________________________________________________775.2.5.4show history___________________________________________________785.2.5.5show memory__________________________________________________785.2.5.6show rom______________________________________________________795.2.5.7show running-config_____________________________________________795.2.5.8show startup-config_____________________________________________795.2.5.9show switchport interface________________________________________795.2.5.10show tcp_______________________________________________________805.2.5.11show udp______________________________________________________805.2.5.12show telnet login________________________________________________815.2.5.13show telnet user________________________________________________815.2.5.14show version___________________________________________________81 5.2.6debug_____________________________________________________________825.3配置交换机的IP地址_______________________________________________82 5.3.1配置交换机的IP地址任务序列________________________________________82 5.3.2配置交换机IP地址的命令____________________________________________835.3.2.1ip address_____________________________________________________835.3.2.2ip bootp-client enable____________________________________________835.3.2.3ip dhcp-client enable____________________________________________845.4SNMP配置_______________________________________________________84 5.4.1SNMP介绍_________________________________________________________84 5.4.2MIB介绍__________________________________________________________85 5.4.3RMON介绍________________________________________________________86 5.4.4SNMP配置_________________________________________________________865.4.4.1SNMP配置任务序列____________________________________________865.4.4.2SNMP配置命令________________________________________________885.4.4.2.1snmp-server enable___________________________________________885.4.4.2.2snmp-server community_______________________________________895.4.4.2.3snmp-server enable traps______________________________________895.4.4.2.4snmp-server engineid_________________________________________895.4.4.2.5snmp-server user_____________________________________________905.4.4.2.6snmp-server group___________________________________________905.4.4.2.7snmp-server view____________________________________________915.4.4.2.8snmp-server host_____________________________________________915.4.4.2.9snmp-server securityip________________________________________925.4.4.2.10snmp-server SecurityIP enable________________________________925.4.4.2.11rmon enable_________________________________________________92 5.4.5SNMP典型配置举例_________________________________________________93 5.4.6SNMP排错帮助_____________________________________________________945.4.6.1监测和调试命令________________________________________________945.4.6.1.1show snmp__________________________________________________945.4.6.1.2show snmp status_____________________________________________955.4.6.1.3show snmp engineid__________________________________________955.4.6.1.4show snmp user______________________________________________965.4.6.1.5show snmp group____________________________________________965.4.6.1.6show snmp view______________________________________________975.4.6.1.7show snmp mib______________________________________________975.4.6.1.8debug snmp packet___________________________________________975.4.6.2SNMP排错帮助________________________________________________975.5交换机升级_______________________________________________________98 5.5.1BootROM模式_____________________________________________________98 5.5.2FTP/TFTP升级____________________________________________________1005.5.2.1FTP/TFTP简介________________________________________________1005.5.2.2FTP/TFTP配置________________________________________________1015.5.2.2.1FTP/TFTP配置任务序列_____________________________________1025.5.2.2.2FTP/TFTP配置命令_________________________________________1035.5.2.2.2.1copy(FTP)______________________________________________1035.5.2.2.2.2dir <ftp-server-url>__________________________________________1045.5.2.2.2.3ftp-server enable____________________________________________1045.5.2.2.2.4ftp-server timeout___________________________________________1055.5.2.2.2.5ip ftp-server username________________________________________1055.5.2.2.2.6copy(TFTP)_____________________________________________1055.5.2.2.2.7tftp-server enable____________________________________________1065.5.2.2.2.8tftp-server retransmission-number_______________________________1075.5.2.2.2.9tftp-server transmission-timeout________________________________1075.5.2.3FTP/TFTP配置举例____________________________________________1075.5.2.4FTP/TFTP排错帮助_____________________________________________1105.5.2.4.1监测和调试命令_____________________________________________1115.5.2.4.1.1show ftp___________________________________________________1115.5.2.4.1.2show tftp__________________________________________________1115.5.2.4.2FTP排错帮助________________________________________________1115.5.2.4.3TFTP排错帮助______________________________________________1125.6系统日志________________________________________________________113 5.6.1系统日志介绍______________________________________________________1135.6.1.1日志输出通道__________________________________________________1135.6.1.2日志消息的严重等级(severity)_________________________________1135.6.1.3日志消息的三级开关____________________________________________114 5.6.2系统日志配置______________________________________________________1145.6.2.1系统日志配置任务序列__________________________________________1145.6.2.2系统日志配置命令______________________________________________1165.6.2.2.1clear logging_________________________________________________1165.6.2.2.2clear logflash________________________________________________1165.6.2.2.3logging buffered_____________________________________________1165.6.2.2.4logging console_______________________________________________1175.6.2.2.5logging host_________________________________________________1175.6.2.2.6logging monitor______________________________________________1175.6.2.2.7logging on___________________________________________________1185.6.2.2.8logging flash_________________________________________________1185.6.2.2.9logging source_______________________________________________119 5.6.3系统日志配置举例__________________________________________________119 5.6.4系统日志排错帮助_________________________________________________1205.6.4.1监测和调试命令_______________________________________________1205.6.4.1.1show channel_______________________________________________1205.6.4.1.2show logging buffered________________________________________1205.6.4.1.3show logging flash___________________________________________1215.6.4.1.4show logging lastFailureInfo__________________________________1225.6.4.2系统日志排错帮助_____________________________________________1225.7配置分级________________________________________________________1225.7.1配置分级介绍_____________________________________________________1225.7.2配置分级配置_____________________________________________________1235.7.2.1配置分级配置任务序列_________________________________________1235.7.2.2配置分级配置命令_____________________________________________1235.7.2.2.1Enable____________________________________________________1235.7.2.2.2Enable password level________________________________________123第6章堆叠配置______________________________________________1256.1堆叠介绍________________________________________________________1256.1.1堆叠协议介绍_____________________________________________________1256.1.2确定Master和Slave_________________________________________________1266.1.3堆叠组交换机的管理_______________________________________________1266.2堆叠配置________________________________________________________1276.2.1堆叠配置任务序列_________________________________________________1276.2.2堆叠配置命令_____________________________________________________1276.2.2.1stacking______________________________________________________1276.2.2.2stacking priority_______________________________________________128 6.3堆叠举例________________________________________________________1286.4堆叠排错帮助____________________________________________________1296.4.1堆叠调试和监测命令_______________________________________________1296.4.1.1light module__________________________________________________1296.4.1.2show stacking_________________________________________________1296.4.1.3debug stacking________________________________________________1316.4.2堆叠排错帮助_____________________________________________________131第7章集群网管______________________________________________1327.1集群网管介绍____________________________________________________1327.2集群网管基本配置________________________________________________1327.2.1集群网管配置任务序列_____________________________________________1327.2.2集群配置命令_____________________________________________________1347.2.2.1cluster run__________________________________________________1347.2.2.2cluser register timer____________________________________________1347.2.2.3cluster ip-pool_________________________________________________1357.2.2.4cluster commader______________________________________________1357.2.2.5cluster member________________________________________________1357.2.2.6cluser auto-add________________________________________________1367.2.2.7rcommand member____________________________________________1367.2.2.8rcommand commander_________________________________________1377.2.2.9cluster reset member___________________________________________1377.2.2.10cluster update member_________________________________________1377.2.2.11cluster holdtime_______________________________________________1387.2.2.12cluster heartbeat_______________________________________________1387.2.2.13clear cluster candidate table_____________________________________139第8章端口配置______________________________________________1408.1端口介绍________________________________________________________1408.2端口配置________________________________________________________1408.2.1以太网端口配置___________________________________________________1408.2.1.1以太网端口配置任务序列_______________________________________1408.2.1.2以太网端口配置命令介绍_______________________________________1428.2.1.2.1bandwidth_________________________________________________1428.2.1.2.2broadcast-suppression_______________________________________1428.2.1.2.3flow control________________________________________________1438.2.1.2.4interface ethernet___________________________________________1438.2.1.2.5loopback___________________________________________________1438.2.1.2.6mdi_______________________________________________________1438.2.1.2.7name______________________________________________________1448.2.1.2.8shutdown__________________________________________________1448.2.1.2.9speed-duplex_______________________________________________1448.2.2VLAN接口配置____________________________________________________1458.2.2.1VLAN接口配置任务序列_______________________________________1458.2.2.2VLAN接口配置命令介绍_______________________________________1468.2.2.2.1interface vlan_______________________________________________1468.2.2.2.2ip address__________________________________________________1468.2.2.2.3shutdown__________________________________________________1468.2.3端口镜像配置_____________________________________________________1478.2.3.1端口镜像介绍_________________________________________________1478.2.3.2端口镜像配置任务序列_________________________________________1478.2.3.3端口镜像配置_________________________________________________1488.2.3.3.1monitor session source interface_______________________________1488.2.3.3.2monitor session destination interface___________________________1488.2.3.4端口镜像举例_________________________________________________1498.2.3.5端口镜像排错帮助_____________________________________________1498.2.3.5.1show monitor_______________________________________________1498.2.3.5.2debug mirror_______________________________________________1498.2.3.5.3端口镜像排错帮助__________________________________________1498.3端口配置举例____________________________________________________1508.4端口排错帮助____________________________________________________1508.4.1监测和调试命令___________________________________________________1508.4.1.1clear counters ethernet__________________________________________1518.4.1.2show interface ethernet_________________________________________1518.4.2端口排错帮助_____________________________________________________151第9章MAC地址表___________________________________________1529.1MAC地址表介绍_________________________________________________1529.1.1MAC地址表的获取________________________________________________1529.1.2转发或过滤_______________________________________________________1539.2MAC地址表配置_________________________________________________1549.2.1mac-address-table aging-time________________________________________1549.2.2mac-address-table__________________________________________________1549.2.3mac-address-table blackhole_________________________________________155 9.3典型配置举例____________________________________________________1569.4排错帮助________________________________________________________1569.4.1监测和调试命令___________________________________________________1569.4.1.1show mac-address-table_________________________________________1569.4.2排错帮助_________________________________________________________1579.5MAC地址功能扩展_______________________________________________1579.5.1MAC地址绑定____________________________________________________1579.5.1.1MAC地址绑定介绍____________________________________________1579.5.1.2MAC地址绑定配置____________________________________________1579.5.1.2.1MAC地址绑定配置任务序列__________________________________1589.5.1.2.2MAC地址绑定配置命令______________________________________1599.5.1.2.2.1switchport port-security______________________________________1599.5.1.2.2.2switchport port-security convert_______________________________1599.5.1.2.2.3switchport port-security lock__________________________________1599.5.1.2.2.4switchport port-security timeout_______________________________1609.5.1.2.2.5switchport port-security mac-address___________________________1609.5.1.2.2.6clear port-security dynamic___________________________________1609.5.1.2.2.7switchport port-security maximum_____________________________1619.5.1.2.2.8switchport port-security violation______________________________1619.5.1.3MAC地址绑定排错帮助________________________________________1619.5.1.3.1MAC地址绑定调试和监测命令________________________________1619.5.1.3.1.1show port-security___________________________________________1619.5.1.3.1.2show port-security interface___________________________________1629.5.1.3.1.3show port-security address____________________________________1639.5.1.3.2MAC地址绑定排错帮助______________________________________163第10章VLAN配置____________________________________________16510.1VLAN介绍______________________________________________________16510.2VLAN配置______________________________________________________16610.2.1VLAN的配置任务序列______________________________________________16610.2.2VLAN配置命令____________________________________________________16710.2.2.1vlan_________________________________________________________16710.2.2.2name________________________________________________________16810.2.2.3switchport access vlan__________________________________________16810.2.2.4switchport interface____________________________________________16810.2.2.5switchport mode_______________________________________________16910.2.2.6switchport trunk allowed vlan___________________________________16910.2.2.7switchport trunk native vlan_____________________________________17010.2.2.9private-vlan___________________________________________________17010.2.2.10private-vlan association_________________________________________17110.2.3VLAN典型应用____________________________________________________17110.3端口隔离配置__________________________________________________17310.3.1端口隔离配置任务序列_____________________________________________17410.3.2端口隔离配置命令_________________________________________________17410.4GVRP配置______________________________________________________17510.4.1GVRP配置任务序列________________________________________________17510.4.2GVRP命令介绍____________________________________________________17610.4.2.1garp timer join________________________________________________17610.4.2.2garp timer leave_______________________________________________17610.4.2.3garp timer hold________________________________________________17610.4.2.4garp timer leaveall_____________________________________________17710.4.2.5gvrp_________________________________________________________17710.4.3GVRP典型应用____________________________________________________17710.5VLAN排错帮助__________________________________________________17910.5.1监控和调试信息___________________________________________________17910.5.1.1show vlan_____________________________________________________17910.5.1.2show garp____________________________________________________18010.5.1.3show gvrp____________________________________________________18010.5.1.4debug gvrp___________________________________________________18110.5.2VLAN排错帮助____________________________________________________181第11章MSTP配置____________________________________________18211.1MSTP介绍______________________________________________________18211.1.1MSTP域__________________________________________________________18211.1.1.1MST域内操作_________________________________________________18311.1.1.2MST域间操作_________________________________________________18311.1.2端口角色_________________________________________________________18311.1.3MSTP流量分担的实现______________________________________________18311.2MSTP配置______________________________________________________18411.2.1MSTP配置任务序列________________________________________________18411.2.2MSTP配置命令介绍________________________________________________18611.2.2.1abort________________________________________________________18611.2.2.2exit__________________________________________________________18611.2.2.3instance vlan__________________________________________________18611.2.2.4name________________________________________________________18711.2.2.5revision-level__________________________________________________18711.2.2.6spanning-tree_________________________________________________18711.2.2.7spanning-tree forward-time_____________________________________18811.2.2.8spanning-tree hello-time________________________________________18811.2.2.9spanning-tree link-type p2p______________________________________18811.2.2.11spanning-tree max-hop_________________________________________18911.2.2.12spanning-tree mcheck__________________________________________19011.2.2.13spanning-tree mode____________________________________________19011.2.2.14spanning-tree mst configuration__________________________________19011.2.2.15spanning-tree mst cost__________________________________________19111.2.2.16spanning-tree mst port-priority__________________________________19111.2.2.17spanning-tree mst priority_______________________________________19211.2.2.18spanning-tree portfast__________________________________________19211.3MSTP举例______________________________________________________19211.4MSTP排错帮助__________________________________________________19711.4.1监测和调试命令___________________________________________________19711.4.1.1show spanning-tree_____________________________________________19711.4.1.2show mst configuration_________________________________________19911.4.1.3show mst-pending______________________________________________19911.4.1.4debug spanning-tree____________________________________________20011.4.2MSTP排错帮助____________________________________________________200第12章IGMP Snooping配置____________________________________20212.1IGMP Snooping介绍______________________________________________20212.2IGMP Snooping配置______________________________________________20212.2.1IGMP Snooping配置任务___________________________________________20212.2.2IGMP Snooping配置命令___________________________________________20312.2.2.1ip igmp snooping______________________________________________20312.2.2.2ip igmp snooping vlan__________________________________________20412.2.2.3ip igmp snooping vlan mrouter___________________________________20412.2.2.4ip igmp snooping vlan static_____________________________________20412.2.2.5ip igmp snooping vlan immediate-leave____________________________20512.2.2.6ip igmp snooping vlan query_____________________________________20512.2.2.7ip igmp snooping vlan query robustness___________________________20512.2.2.8ip igmp snooping vlan query interval______________________________20612.2.2.9ip igmp snooping vlan query max-response-time____________________206 12.3IGMP Snooping举例______________________________________________20612.4IGMP Snooping排错帮助__________________________________________20912.4.1监测和调试命令___________________________________________________20912.4.1.1show ip igmp snooping__________________________________________20912.4.1.2show mac-address-table multicast_________________________________21112.4.1.3debug igmp snooping___________________________________________21212.4.2IGMP Snooping排错帮助___________________________________________212第13章802.1x配置____________________________________________21313.1802.1x介绍______________________________________________________21313.2堆叠端口介绍__________________________________________________214。
RG-S2100交换机从1.63以下版本升级到1.8(1a2)升级指南

交换机升级指导(RG-S2100交换机从1.63以下版本升级到1.8(1a2)升级指南)锐捷网络远程技术支持中心版权声明福建星网锐捷网络有限公司©2010版权所有,保留一切权利。
没有经过本公司书面许可,任何单位和个人不得擅自摘抄、复制本书内容的部分或者全部,并且不得以任何形式传播。
、、、、、、、、、都是福建星网锐捷网络有限公司的注册商标,不得仿冒。
目录重要说明:本指导文档适用于: (4)非正常模式下的升级(ctrl下升级) (6)1、设备连接 (6)2、超级终端设置 (6)3、升级前的准备 (10)4、备份配置文件(参考3250交换机备份配置文件) (10)5、boot模式下升级ctrl文件 (12)5.1、CTRL版本确认 (12)5.2、进入boot层 (12)5.3、Boot层传输ctrl.bin文件 (14)5.4、格式化flash (17)5.5、重启交换机 (17)6、ctrl模式下升级主程序文件 (18)6.1、双击打开文件包中的StarTFTP.EXE (18)6.2、进入CTRL层 (18)6.3、传入主程序文件 (18)6.4、重启交换机 (19)7、验证升级是否成功 (20)8、导入配置文件(参考3250交换机备份配置文件) (20)重要说明:本指导文档适用于:RG-S2100交换机从1.63以下版本升级到1.8(1a2)升级指南——采用ctrl模式升级。
目录重要说明:本指导文档适用于: (3)非正常模式下的升级(ctrl下升级) (6)1、设备连接 (6)2、超级终端设置 (6)3、升级前的准备 (10)4、备份配置文件(参考3250交换机备份配置文件) (10)5、boot模式下升级ctrl文件 (12)5.1、CTRL版本确认 (12)5.2、进入boot层 (12)5.3、Boot层传输ctrl.bin文件 (14)5.4、格式化flash (17)5.5、重启交换机 (17)6、ctrl模式下升级主程序文件 (18)6.1、双击打开文件包中的StarTFTP.EXE (18)6.2、进入CTRL层 (18)6.3、传入主程序文件 (18)6.4、重启交换机 (19)7、验证升级是否成功 (20)8、导入配置文件(参考3250交换机备份配置文件) (20)非正常模式下的升级(ctrl下升级)1、设备连接将交换机的1端口通过网线与主机网卡连接,Console端口通过交换机附带的配置线与同一台主机的Com端口(串口)连接。
- 1、下载文档前请自行甄别文档内容的完整性,平台不提供额外的编辑、内容补充、找答案等附加服务。
- 2、"仅部分预览"的文档,不可在线预览部分如存在完整性等问题,可反馈申请退款(可完整预览的文档不适用该条件!)。
- 3、如文档侵犯您的权益,请联系客服反馈,我们会尽快为您处理(人工客服工作时间:9:00-18:30)。
神州数码系列交换机升级指南1 适用机型本文档描述DCN 交换机软件版本升级步骤及注意事项。
当以下型号的交换机升级1.3.X.X 版本及更高版本时适用:DCS-3600-26CDCS-3600-52CDCS-3950-26CDCS-3950-28CDCS-3950-52CDCS-3950-28CTDCS-3950-52CTDCRS-5200-28DCRS-5200-522 交换机系统文件介绍交换机系统文件包括两类文件:引导文件与系统映像文件。
引导文件是指引导交换机初始化等的文件,即我们通常说的ROM文件。
在上述机型中,该文件有两份,保存在flash中,固定文件名为mini.rom和boot.rom。
对于mini.rom,其主要功能为:(1)负责引导img;(2)某些特殊情况下(比如,错误地升级了nos_release.rom和img,或者升级过程中断电,导致系统的img/bootrom无法启动)升级用户boot.rom和img;mini.rom模式下前面板的网络端口不可用,只能用xmodem升级,速度很慢,因此除非必须,否则不建议使用这个升级。
对于boot.rom,其主要功能为:(1)提供rom的前面板网口升级功能;(2)研发调试。
引导文件一般不强制要求升级,是否升级请参见对应的版本发布说明。
系统映像文件是指交换机硬件驱动和软件支持程序等的压缩文件,即我们通常说的IMG 文件。
交换机系统映像文件保存在flash中,文件名缺省为nos.img。
3 软件升级准备工作在交换机系统文件升级之前需要做一些准备工作,我们推荐以下操作步骤:(1) 查询系统当前运行的Bootrom版本和IMG软件版本;(2) 备份当前运行的引导文件、系统映像文件,便于升级失败时能够进行版本回退;(3) 备份当前系统的startup-config配置文件,便于在不同版本命令行存在差异时能够及时恢复原有的配置。
4 Shell模式下软件升级4.1 升级说明在Shell模式下升级交换机软件有两种升级方式:TFTP和FTP,可通过Console终端或TELNET/SSH远程终端上执行相应的命令来升级。
注意在Shell模式下严格按照以下升级顺序来进行:步骤1.进入升级模式在交换机正常启动后,使用enable命令进入特权用户配置模式,提示符为switch# 步骤2.配置三层接口正确配置三层接口(详见用户手册)步骤3.升级nos.imgFTP升级copy ftp://username:userpwd@serverIP/imgfilename nos.imgTFTP升级copy tftp://serverIP/imgfilename nos.img其中,username为PC端FTP服务器的用户名,userpwd为username对应的密码,serverIP为FTP服务器的IP地址,imgfilename为nos.img文件的全文件名。
下同。
步骤4.重新启动交换机使用命令reload重新启动交换机,并按步骤1重新进入升级模式步骤5.升级mini.rom(可选)FTP升级copy ftp://username:userpwd@serverIP/miniromfilename mini.romTFTP升级copy tftp://serverIP/miniromfilename mini.rom步骤6.升级nos.rom(可选)FTP升级copy ftp://username:userpwd@serverIP/romfilename nos.romTFTP升级copy tftp://serverIP/romfilename nos.rom步骤7.升级完成[注意] 若按上述方法仍无法正常升级,请检查网络状态。
4.2 升级举例1.FTP升级举例设PC端IP地址为:192.168.2.1FTP服务器的用户名为:switch密码为:switchimg文件名为:DCRS-5200-X_1.3.34.0_nos.imgminirom文件名为:DCRS-5200-X_1.3.5_nos_Release_mini.rombootrom文件名为:DCRS-5200-X_1.3.5_nos_Release.rom(1)升级nos.img在特权用户配置模式下执行:copy ftp://switch:switch@192.168.2.1/DCRS-5200-X_1.3.34.0_nos.img nos.img交换机提示“Confirm copy nos.img file[Y/N]:”,输入“Y”,开始FTP下载。
当交换机提示“write ok.”时,表示nos.img升级完成。
重新启动交换机.......。
(2)升级mini.rom(可选)在特权用户配置模式下执行:copy ftp://switch:switch@192.168.2.1/DCRS-5200-X_1.3.5_nos_Release_mini.rom mini.rom交换机提示“Confirm copy mini.rom file[Y/N]:”,输入“Y”,开始FTP下载。
当交换机提示“write ok.”时,表示mini.rom升级完成。
(3)升级nos.rom(可选)在特权用户配置模式下执行:copy ftp://switch:switch@192.168.2.1/DCRS-5200-X_1.3.5_nos_Release.rom nos.rom交换机提示“Confirm copy nos.rom file[Y/N]:”,输入“Y”,开始FTP下载。
当交换机提示“write ok.”时,表示nos.rom升级完成。
2.TFTP升级举例设PC端IP地址为:192.168.2.1img文件名为:DCRS-5200-X_1.3.34.0_nos.imgminirom文件名为:DCRS-5200-X_1.3.5_nos_Release_mini.rombootrom文件名为:DCRS-5200-X_1.3.5_nos_Release.rom(1)升级nos.img在特权用户配置模式下执行:copy tftp://192.168.2.1/DCRS-5200-X_1.3.34.0_nos.img nos.img交换机提示“Confirm [Y/N]:”,输入“Y”,开始TFTP下载。
当交换机提示“write ok.”时,表示nos.img升级完成。
DCN 交换机软件升级指南Digital重新启动交换机.......。
(2)升级mini.rom(可选)在特权用户配置模式下执行:copy tftp://192.168.2.1/DCRS-5200-X_1.3.5_nos_Release_mini.rom mini.rom交换机提示“Confirm [Y/N]:”,输入“Y”,开始TFTP下载。
当交换机提示“write ok.”时,表示mini.rom升级完成。
(3)升级nos.rom(可选)在特权用户配置模式下执行:copy tftp://192.168.2.1/DCRS-5200-X_1.3.5_nos_Release.rom nos.rom交换机提示“Confirm [Y/N]:”,输入“Y”,开始TFTP下载。
当交换机提示“write ok.”时,表示nos.rom升级完成。
5 Bootrom模式下软件升级5.1 升级说明在Bootrom模式下升级交换机软件有两种升级方式:TFTP和FTP,可通过Bootrom 模式下的命令设置选择升级方式。
注意在Bootrom模式下严格按照以下升级顺序来进行:步骤1.进入bootrom在交换机加电启动时按Ctrl+B,即可进入bootrom。
成功进入后,提示符为[Boot] 步骤2.设置网络参数使用setconfig正确设置网络接口参数步骤3.升级mini.rom(可选)(1) load miniromfilename(2) writeminirom步骤4.升级nos.rom(可选)(1) load romfilename(2) writerom步骤5.重新启动交换机使用命令reboot重新启动交换机,并按步骤1重新进入boortom步骤6.升级nos.img(1) load imgfilename(2) writeimg步骤7.升级完成DCN 交换机软件升级指南Digital China Network 55.2 升级举例1.FTP升级举例设PC端IP地址为:192.168.2.1FTP服务器的用户名为:switch密码为:switchimg文件名为:DCRS-5200-X_1.3.34.0_nos.imgminirom文件名为:DCRS-5200-X_1.3.5_nos_Release_mini.rombootrom文件名为:DCRS-5200-X_1.3.5_nos_Release.rom(1)进入bootromTesting RAM...0x00400000 RAM OKLoading BootRom...OKChecking ECC of BootRom...OKStarting BootRom......BSP version: 1.3.5Creation date: Sep 17 2007, 17:35:41Initializing... OK![Boot]:(2)设置网络参数[Boot]: setconfigBoot Device: marfecHost IP Address: [10.1.1.1]192.168.2.33 交换机的地址Server IP Address: [10.1.1.2]192.168.2.1 FTP服务器的地址FTP(1) or TFTP(2): [1] 1 选择1,即FTPFTP User Name: [test] switch 输入用户名switchFTP User Password: [test]switch 输入密码switchNetwork interface configure OK.[Boot]: saveconfig 保存设置change boot params is OK(3)升级mini.rom(可选)[Boot]: load DCRS-5200-X_1.3.5_nos_Release_mini.rom当再次显示出提示符“[Boot]:”时,输入“writeminirom”,当显示“Program OK.”并再次显示出提示符“[Boot]:”时表示mini.rom升级完成。
(4)升级nos.rom(可选)[Boot]: load DCRS-5200-X_1.3.5_nos_Release.rom当再次显示出提示符“[Boot]:”时,输入“writerom”,当显示“Program OK.”并再次显示出提示符“[Boot]:”时表示nos.rom升级完成。