Oracle安装10gr2需求
oracle10gr2forAix安装
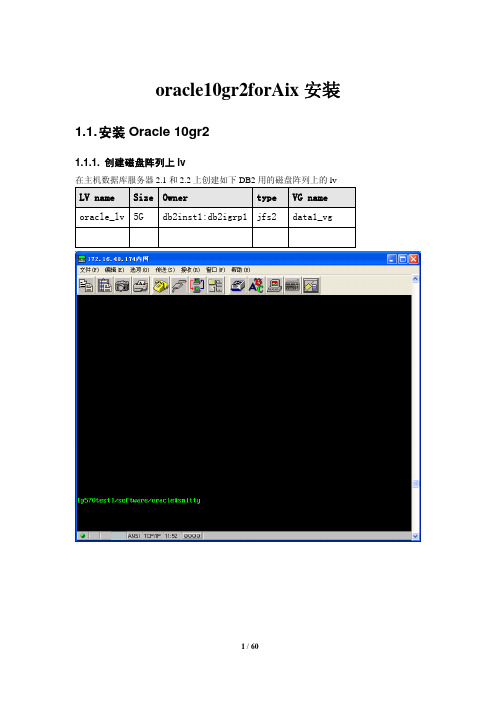
oracle10gr2forAix安装1.1. 安装Oracle 10gr21.1.1. 创建磁盘阵列上lv在主机数据库服务器2.1和2.2上创建如下DB2用的磁盘阵列上的lv LV name Size Owner type VG name oracle_lv 5G db2inst1:db2igrp1jfs2 data1_vg按F4,选择data1_vg建oracle_lv。
Add a Logical V olume 图1-1Add a Logical V olume 图1-21.1.2. 创建文件系统核心服务器上文件系统文件系统 Lv name/database oracle_lvF4选择lv名oracle_lv调整文件系统/database大小:mount /database[p570test]/software/oracle#mount /database[p570test]/software/oracle#dfFilesystem 512-blocks Free %Used Iused %Iused Mounted on/dev/hd4 4194304 1574296 63% 8073 5% //dev/hd2 8388608 2889376 66% 57584 16% /usr/dev/hd9var 2097152 1568776 26% 7314 5% /var/dev/hd3 8388608 7552104 10% 1324 1% /tmp/dev/hd1 8388608 3451520 59% 1020 1% /home/proc - - - - - /proc/dev/hd10opt 8388608 4952648 41% 21012 4% /opt/dev/software_lv 62914560 7234200 89% 8030 1% /software/dev/temp_lv 62914560 59355400 6% 4 1% /temp/dev/fslv05 8388608 5979600 29% 22452 4% /wasinst/dev/u01_lv 20971520 20967632 1% 5 1% /u01/dev/fslv08 7034252 0 100% 1758563 100% /iso/dev/fslv06 6291456 6281920 1% 154 1% /var/cics_regions /dev/fslv07 6291456 6289568 1% 26 1% /var/cics_servers /dev/fslv02 20971520 12774856 40% 50 1% /dblog/dev/fslv04 20971520 20945576 1% 54 1% /dbdir/dev/fslv00 20971520 19393960 8% 55 1% /dbdata/dev/fslv03 10485760 10084312 4% 28 1% /archlog /dev/oracle_lv 10485760 10483504 1% 4 1% /database1.1.3. 创建用户和组数据库服务器主机上分别创建如下组和用户:组Group ID users Descriptionoinstall 300oradba 301 如301已被用,改为304用户user ID Primary group Group SET Home Dirdb2inst1 301 db2igrp1 /home/db2inst1 db2inst2 302 db2igrp1 /home/db2inst2 db2fusr1 303 db2fgrp1 /home/db2fusr1 db2fusr2 304 db2fgrp1 /home/db2fusr2 workflow 401 db2igrp1 /home/workflow vhfs 402 db2igrp1 /home/vhfsdb2igrp1 /home/mcpusr mcpusr 4031.1.3.1. 创建组:启动 smitty security,进入到系统组、用户维护区:输入oinstall组名,300作为组号。
vmware workstation 7安装oracle 10gr2 rac (5) 升级clusterware到10.2.0.4

/archives/164vmware workstation 7安装oracle 10gr2 rac (5) 升级clusterware到10.2.0.4ON2011年10月17日·L E A V E A C O M M E N T本文描述vmware workstation 7安装oracle 10gr2 rac中的升级clusterware到10.2.0.4部分一.准备工作解压和改变属主unzip p6810189_10204_Linux-x86-64.zipchown -R oracle:oinstall Disk1/二.oracle用户登录执行安装[oracle@rac1 ~]$ crs_stop -allAttempting to stop `ora.rac1.gsd` on member `rac1`Attempting to stop `ora.rac2.gsd` on member `rac2`Attempting to stop `ora.rac2.ons` on member `rac2`Attempting to stop `ora.rac1.ons` on member `rac1`Stop of `ora.rac1.gsd` on member `rac1` succeeded. Stop of `ora.rac2.gsd` on member `rac2` succeeded. Stop of `ora.rac1.ons` on member `rac1` succeeded. Stop of `ora.rac2.ons` on member `rac2` succeeded. Attempting to stop `ora.rac1.vip` on member `rac1` Attempting to stop `ora.rac2.vip` on member `rac2` Stop of `ora.rac1.vip` on member `rac1` succeeded. Stop of `ora.rac2.vip` on member `rac2` succeeded.[oracle@rac1 ~]$ crs_stat -tName Type Target State Host ————————————————————ora.rac1.gsd application OFFLINE OFFLINEora.rac1.ons application OFFLINE OFFLINEora.rac1.vip application OFFLINE OFFLINEora.rac2.gsd application OFFLINE OFFLINEora.rac2.ons application OFFLINE OFFLINEora.rac2.vip application OFFLINE OFFLINE [oracle@rac1 ~]$cd /tmp/Disk1/./runInstaller1.欢迎界面2.升级CRS_HOME3.升级模式4.环境检测5.INSTALL呗6.继续跑脚本吧/oracle/crs/bin/crsctl stop crs & /oracle/crs/install/root102.sh跑完脚本clusterware就升级成功了下接vmware workstation 7安装oracle 10gr2 rac (6) 升级database到10.2.0.4。
10gR2_SL10_introduction SUSE10下安装oracle 10

Oracle Database10g R2 (10.2.0.1)onSUSE Linux 10.0IntroductionArun SinghNovell Inc./oracleIntroductionThis white paper is designed to help you get started with Oracle 10g R2 on SUSE Linux 10.0. This will help you to work with latest SUSE OS and Oracle Database 10g R2. Oracle 10g R2 is supported and certified only on SUSE LINUX Enterprise Server 9 (SLES 9) but occasionally for development and testing purposes you will prefer to have it up and running on your desktop for quick access.Hardware RequirementsThe system must meet the following minimum hardware requirements:Required SoftwareYou need SUSE Linux 10.0 and Oracle 10g R2. Also, optional orarun package will help you to make Oracle pre-Install task simple.Novell/SUSE1.Novell SUSE Linux 10.0 (SUSE OSS version: )2.orarun : Get latest version from (/partners/oracle/sles-9/)3.Novell/SUSE Documents are available here:/documentation/4.For more “Oracle on SUSE” related information visit/oracle .OracleOracle database 10g R2 Software is available for download from OTN.File name: 10201_database_linux32.zip1.URL to download SW:/technology/software/products/database/oracle10g/htdocs/10201linuxsoft.html.2.Oracle Documents are available on :/technology/documentation/database10gr2.html3.Oracle Development Tools : /tools/index.html Installation Steps1.Install SUSE Linux Operating SystemFollow the Installation instructions provided in the SUSE LINUX 10.0installation manual. We will focus on Oracle related component and make sure you meet Oracle software space requirement.SUSE Linux 10.0 with default packages along with “C/C++ Compiler and Tools” is sufficient for Oracle 10g R2 install. Here is snap-shot:Check whether C/C++ compiler is installed. “gcc --version” will show “gcc(GCC) 4.0.2 (SUSE Linux)”. If gcc is not installed, then use YaST setup tool to install “C/C++ Compiler and Tools”.2.Oracle Install prerequisitesRefer to Oracle installation document for complete list of prerequisites.Novell/SUSE provides orarun packages to automate most of the Oracle pre-install task. orarun package is not included in SUSE LINUX 10.0 as this is for SUSE LINUX Enterprise Server.orarun :1.Install orarun package. It will ask to install dependent packages first.# rpm -ivh --nodeps orarun-1.8-109.15.i586.rpm2.Install libaio and libaio-devel from SUSE LINUX 10.0 media.3.You might see xshared and pdksh not available conflict next time youuse YaST. Ignore this as this is cosmetic error. Here is snap-shot:4.Now orarun package is installed. Please enable newly created “oracle”user for Oracle 10g installation.1.The account for oracle user is disabled. Enable it, by changing theshell for the "oracle" user from "/bin/false" to "/bin/bash", either byusing YaST setup tool or by editing the "/etc/passwd" file.2.Set a new password for user “oracle” i.e. “/usr/bin/passwd oracle”. You can use SUSE setup tool YaST to accomplish above tasks./sbin/yast2 -> “security and Users” -> ”Edit and create groups”(Select users tab and set “System Users” filter to see oracle user.) Following are the screen shots of “oracle” user properties:5.Now set your Oracle environment variables.1.Change Oracle home directory by editing ORACLE_HOME variable in“/etc/profile.d/oracle.sh” file.ORACLE_HOME=$ORACLE_BASE/product/10gR22.Default ORACLE_SID set by orarun install is “mydb”. Change it toyour preferred name in “/etc/profile.d/oracle.sh” file.Note: Oracle Installer will ask this database name and it should matchto ORACLE_SID to avoid any problem.6. Run “/usr/sbin/rcoracle start “ to set kernel parameters. IgnoreORACLE_HOME not set message as this will get fixed once Oracle 10gis installed.7.Exit from current root user session and login as new “oracle” user.Following is snap-shot verifying current user.3.Oracle 10g R2 (10.2.0.1) Installation1. Make sure you are logged in as “oracle” user.Get Oracle 10g R2 (10.2.0.1) Software from oracle OTN web.1.#unzip 10201_database_linux32.zip2.modify “database/install/oraparam.ini” file to add support for SUSELinux 10.0. After modifying oraparam.ini file “[Certified Versions]”line will look like:3.You can avoid step #2 by passing “-ignoresysprereqs” torunInstaller.4.Run Oracle Universal installer : ./runInstallerIf you are installing from CD mounted as /media/cdrom then“cd /tmp && /media/cdrom/database/runInstaller” will be helpful.Note: Installer will not detect SUSE Linux 10.0. Do manual check in “Product-Specific Prerequisites Checks” for OS.5.Installation will walk you through with self explanatory instructions. Hereare screen-shots from simple Oracle 10g Installation:4.sqlplus: Startup and Shutdown of the Oracle10g Database (Manual)From diagnostic point of view it is very important to check sqlplus isfunctioning properly. If not then your installation is having problems.1.To startup the database:sl10$ sqlplus /nologSQL> connect / as sysdbaSQL> startup2.To shutdown the database:sl10$ sqlplus /nologSQL> connect / as sysdbaSQL> shutdownNote: “/” connects you to the schema owned by SYS with the privilege SYSDBA. 5.Un-Installing incomplete Installation : Clean-upOracle Installer will give you an option to remove installed product but sometimes your installation is not complete and you would like to restart the clean installation. Here are some quick and dirty steps to clean-up your system:1.Remove /usr/local/bin/{coraenv, dbhome, oraenv}2.Remove /etc/oratab, /etc/oraInst.loc, and /etc/oracle directory3.Remove all files created by Oracle installer in /opt/oracle (Install Directory)i.e. Directory /opt/oracle/{product, admin, oradata, oraInventory}6.Oracle Database Start at boot time1.Set parameter START_ORACLE_DB="yes" in “/etc/sysconfig/oracle” file.Edit “/etc/sysconfig/oracle” manually or use YaST :“/sbin/yast2->System->/etc/sysconfig Editor ->Productivity->Databases”2.Edit /etc/oratab entry corresponding to your database to “Y”.i.e. mydb:/opt/oracle/product/10gR2:Y7.Oracle Enterprise Manager1.Start Oracle listener, If it is not already started by “lsnrctl start”.2.If Enterprise manager services is not started, then start it manually byentering following command “emctl start dbconsole”.3.Enterprise Manager web interface (http://localhost:1158/em) to performroutine database administration and tuning tasks.Enjoy!。
ORACLE10.2G数据库服务器安装说明

ORACLE10.2G FOR WINDOWS 2003数据库安装步骤一、ORACLE10.2G数据库服务环境的安装1、运行SETUP安装程序2、选择安装路径以及是否创建新的数据库(推荐不创建)选择基本安装即可,ORACLE主目录位置不推荐使用操作系统分区,建议使用逻辑分区,注意空间大小预留10G以上。
你可以在安装时选择创建一个数据库,也可以在安装完毕后使用数据库安装工具来创建,注意全局数据库名称尽量要和你未来使用数据库名称一致。
输入正确的信息后,按下一步3、安装系统自动做先决条件的检测只有所有先决条件都检测成功才可以按下一步进行安装,否则可能在以后的安装过程中出现错误。
4、安装系统列出需要安装的组件列表5、开始安装进入安装界面,请等待,保持计算机始终工作,防止以外断电。
请注意安装日志的路径,如果安装出现错误,可以通过日志来查看具体的信息。
6、安装完毕系统提示安装成功,并弹出iSQL*Plus工具使用的网址,请复制该段信息,以方便日后使用该工具来调试数据库。
点击退出即可。
注意:以上安装过程,并没有安装数据库,只是安装了数据库服务环境,如果需要数据库服务器正常工作,还需要安装数据库以及监听服务。
安装完成后,可以发现在开始菜单里就应该存在一个Oracle - OraDb10g_home1。
二、建立数据库1、运行数据库管理工具DBCA(DA TABASE CONFIGURA TION ASSISTANT)数据库管理助手。
在开始菜单中找到Oracle - OraDb10g_home1-配置和移植工具下可以找到该工具。
按下一步进行安装2、选择创建数据库在这个界面可以选择安装数据库,配置数据库选项,删除数据库等操作。
按下一步继续安装3、选择数据库用途一般选择定制数据库,因为只有定制数据库中没有安装自带的数据文件,数据库会比较干净,同时也可以进行一些设置项的选择。
按下一步进行配置。
4、数据库标识灏瀚系统主数据的名称和SID名称为ICARE,PACS数据库名称为DICOM。
linux SUSE10下安装oracle 10.2g 详细解析

二、安装ORACLE 10.2g并启动
1)安装orarun软件包--这个是安装oracle必须的安装包
linux-peter:~ # yast2 -i orarun
或:linux-peter:~ #rpm –ivh orarun-1.8-109.15.i586.rpm
local_enable=YES /开启本地用户登录服务否则只允许匿名用户登录/
write_enable=YES /开启任何用户的写权限/
listen_port=21 增加监听21端口
如果“/etc/vsftpd.conf”中的有选项为“listen=YES”,注销它
开通并安装ftp和telnet,协议都为tcp。
--ftp为(/usr/sbin/vsftpd),telnet为(/usr/sbin/in.telnetd),选中并改变其状态为ON,则会提示安装。
已经安装以上工具,则可以下命令开通
chkconfig vsftpd on
oracle:x:103:106:ORACLE用户:/opt/oracle:/bin/bash
b.修改/ect/profile.d/oracle.sh文件
suse-linux:/etc/profile.d # vi oracle.sh
# Set your ORACLE environment variable here
chmod -R 777 /opt/oracle
6) 执行xhost +
7) 安装Oracle
#. /runInstaller –ignoresysprereqs
注意:安装时不能使用root用户su到oracle用户,这可能将造成不能启动图形界面
Oracle数据库10.2.0.4安装指南
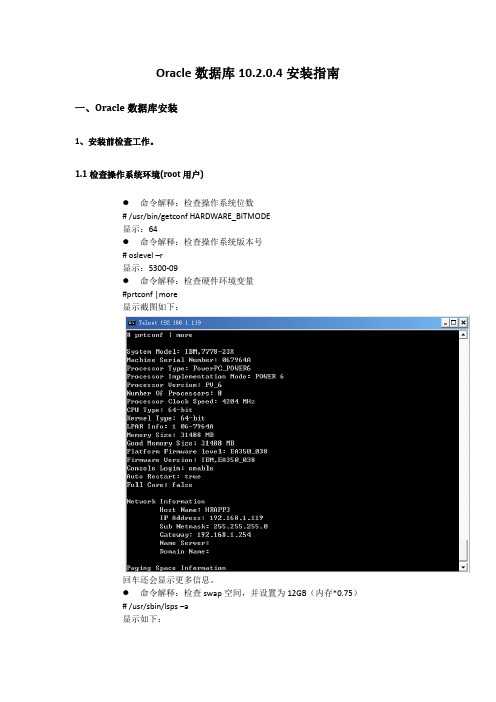
Oracle数据库10.2.0.4安装指南一、Oracle数据库安装1、安装前检查工作。
1.1检查操作系统环境(root用户)●命令解释:检查操作系统位数# /usr/bin/getconf HARDWARE_BITMODE显示:64●命令解释:检查操作系统版本号# oslevel –r显示:5300-09●命令解释:检查硬件环境变量#prtconf |more显示截图如下:回车还会显示更多信息。
●命令解释:检查swap空间,并设置为12GB(内存*0.75)# /usr/sbin/lsps –a显示如下:如果上面的Size不符合要求,可以通过如下命令:#smitty chps来进行调整。
提示框弹出后选择hd6,回车,增加逻辑分区数量为8个(每个分区大小为512Mb,可调),确认,ok。
●新建卷oradb 和peoplesoft,分别对应文件系统/PRD(100GB)和/psreports(25gb)命令如下:#smitty lv (增加逻辑卷)#smitty jfs2 (调整逻辑卷的文件格式)进入菜单式选择窗口后,按照要求填写相关项并增加/tmp文件系统大小至10Gb●查看各个卷的大小命令:#df –g显示:●新建组DBA命令:smitty group显示:●创建用户oracle和psoft命令:smitty user显示:注意修改下面参数为-1:并且要将用户划归到相应的用户组。
给用户授权#chown -R oracle:DBA /PRD/oracle#chown -R psoft:DBA /PRD/app#chmod –R 777 /PRD/oracle#chmod –R 777 /PRD/app1.2通过FTP上传文件AIX下使用ftp命令只能支持单一文件传输,不支持对文件夹的传输,需要先将文件压缩后再上传,然后在服务器解压缩。
假设我要将10gr2_aix5l64_database.cpio.gz文件上传至/tmp目录下:先在客户端机器上进入到存放文件的目录(不要使用中文),然后使用命令:ftp 192.168.1.119出现提示后使用oracle用户登录然后进入到/tmp目录下,使用如下命令:ftp>binftp>putLocal File 10gr2_aix5l64_database.cpio.gzRemote File等待文件上传完毕。
Oracle 10g Release 2 (10.2) for RHEL 5.2安装教程 (good)
Oracle 10g Release 2 (10.2) for RHEL 5.2安装教程(转载说明:RHEL 5.2 是最新的版本,在部署Oracle 10g 数据库测试环境的过程中,发现了几个问题值得关注,虽然顺利解决了,也想分享一下,顺便搜索了一下,发现这篇文章已经写得很详细了。
问题1、linux版本问题导致Oracle 10g 做系统版本检查时未通过。
Oracle 10g 所支持的操作系统和版本号在Oracle压缩包中的文件/database/install/oraparam.ini 可以查看到。
问题2、RHEL 5.2 安装过程中,软件包的选择不再有像 RHEL 4.5 版本里的everything 这个选项,如果有几个包未选择会导致在检查 Oracle 10g 所依赖的软件包时,提示未通过。
笔者在安装Oracle 10g 提示,libXp.so 链接错误,64位机器上报 compat-db、libXp、openmotif 链接错误,这些错误都是由于未安装相应的rpm 造成的。
解决方法:(当然不用重装操作系统了)将光盘或者iso镜像中对应的rpm包及其关联包拷贝到某个目录下,如/mnt/rpm_pkg下,rpm_pkg为新建立的文件夹。
以root执行命令:rpm -ivh 包名.rpm (如:rpm -ivh libXp*.rpm)libXp 在32位的RHEL 5.2 下有两个文件libXp和libXp-devel,在64位的RHEL 5.2有3个相应的文件。
如果有相关的rpm包未安装,都可以通过此种方法解决。
直到依赖的软件包检查通过。
3、静态IP的问题,修改/etc/hosts文件,修改后重新启动一下network服务。
安装RHEL 5.2 过程中如果选了支持IPv6,可以登录系统后,将IPv6取消。
IPv4配置静态地址,并且在系统启动时进行激活。
4、安装过程的配置在Oracle官方网站和这篇转载的文章中都有说明。
ORACLE 10gR2 RAC 安装-1.RAC系统配置
RX bytes:303221 (296.1 KiB) TX bytes:61090 (59.6 KiB)
Base address:0x2400 Memory:d8920000-d8940000
TX packets:539 errors:0 dropped:0 overruns:0 carrier:0
collisions:0 txqueuelen:1000
RX bytes:283095 (276.4 KiB) TX bytes:65760 (64.2 KiB)
[root@racnode2 init.d]# more /etc/hosts
# Do not remove the following line, or various programs
# that require network functionality will fail.
127.0.0.1 racnode2 localhost
172.18.84.246 racnode2-vip
2.内核参数据配置
配置内核文件,编辑/etc/sysctl.conf,增加如下内容:
#vi /etc/sysctl.conf
net.ipv4.ip_local_port_range = 1024 65000
lo Link encap:Local Loopback
inet addr:127.0.0.1 Mask:255.0.0.0
inet6 addr: ::1/128 Scope:Host
UP LOOPBACK RUNNING MTU:16436 Metric:1
ORACLE 10g R2-LINUX 64bit下安装-图文版
LINUX 64位环境下安装ORACLE 10g – Writer:Derry-戴樑(注释:#表示使用root 用户操作,$表示使用oracle 用户进行操作.提示符后面的蓝色部分表示需要输入的命令)1.检查LINUX系统配置:配置RedHat AS操作系统版本:Red Hat Enterprise Linux AS4 –X86 64位(1)安装LINUX操作系统时,记得要安装开发工具(gcc 等必要工具).(2)安装X Window或VNC2.检查必要的硬件信息:(1) 检查操作系统内核版本# uname -r(2) 检查最小值物理内存5M(要求512M物理内存)。
检查命令:# grep MemTotal /proc/meminfo(3) 交换空间1.0 GB (或者2倍物理内存大小)。
检查命令:#grep SwapTotal /proc/meminfo(4) /tmp 空间至少400 MB。
Oracle 软件所需空间0.5 GB ~ 3GB (空间越大越好,如果是正式系统,应该进行详尽的规划) 。
数据库文件1.2 GB (空间越大越好,如果是正式系统,应该进行详尽的规划) 。
检查命令:# df –h(5) 检查网卡ip地址是否已设置成固定ip3.检查必要的LINUX软件安装信息:(1)系统基本软件包,必须需要。
检查命令:# rpm -q gcc make binutils openmotif glibc(2)相关文档记载需要检查这些软件包,但有些是没有的,事实证明也确实是不需要的。
检查命令:# rpm -q gcc-3. gcc-c++- glibc- make- openmotif setarch- compat-db compat-gcc- compat-gcc-c++- compat-libstdc++- compat-libstdc++-devel compat-gcc或# rpm -q gcc make binutils openmotif setarch compat-db compat-gcc openmotif compat-gcc-c++ compat-libstdc++ compat-libstdc++-devel compat-glibc/******************************************//RHEL AS 4的发行注记中提到这些软件包已经被删除://compat-gcc//compat-gcc-c++//compat-glibc//compat-libstdc++//compat-libstdc++-devel//所以他们再也不需要被安装上了。
201211 Solaris10 + Oracle 10gR2 Client安装教程
技术文档模板(v 121110)作者王卫锋审核分类Oracle 子类DateBase 10gR2 Client 更新时间2012-11-10关键字Solaris 10,Oracle DataBase 10gR2 Client摘要Solaris 10平台安装Oracle DataBase 10gR2 Client详细教程主要适Solaris 10,Oracle DataBase 10gR2 Client用环境版本说明拟制/修改责任人拟制/修改日期修改内容/理由版本号V121110 王卫锋2012-11-10 新建目录版本说明 (2)1 系统和软硬件环境说明 (4)2准备工作 (4)2.1确定安装哪个版本的Solaris (4)2.2 必须安装以下软件包(或更高版本) (4)2.3确定是否安装所需的软件包 (5)2.4创建所需的操作系统组和用户 (5)3安装步骤 (6)4环境变量配置 (13)5验证效果 (14)1 系统和软硬件环境说明硬件环境:Sun SPARC或x86服务器软件环境:Solaris 10,Oracle DataBase 10gR2 Client2准备工作对于要安装的Oracle产品,系统必须满足以下产品的具体要求:•PL / SQL本地编译,PRO * C / C + + Oracle调用接口,甲骨文公司的C + +调用接口,以及Oracle XML 开发工具包(XDK)•Sun ONE Studio 10(C和C + + 5.5)•GCC 3.4.2•Pro* FORTRAN Sun ONE Studio 8(FORTRAN 95)•Oracle的JDBC / OCI驱动程序与Oracle JDBC / OCI驱动程序,您可以使用以下版本的JDK:•Sun Java 2 SDK标准版1.3.1_11和JNDI扩展•Sun Java 2 SDK标准版1.2.2_17和JNDI扩展注意:安装此版本的JDK 1.4.2_08为了确保该系统满足这些要求:2.1确定安装哪个版本的Solaris# uname -r5.10在这个例子中,所示版本的Solaris 10(5.10)。
- 1、下载文档前请自行甄别文档内容的完整性,平台不提供额外的编辑、内容补充、找答案等附加服务。
- 2、"仅部分预览"的文档,不可在线预览部分如存在完整性等问题,可反馈申请退款(可完整预览的文档不适用该条件!)。
- 3、如文档侵犯您的权益,请联系客服反馈,我们会尽快为您处理(人工客服工作时间:9:00-18:30)。
1、要单独分配两块磁盘,独立共享,每一块为1g。
以便于放ocr和voting disk。
并且多路径软件一定要安装好
2、Operating System Filesets for AIX 6L(操作系统6.1 AIX操作系统的文件集6L)
The following filesets are supported on Oracle Database 10g release 2(下列文件集支持Oracle数据库10g Release 2):
■ bos.adt.base
■ bos.adt.lib
■ bos.adt.libm
■ bos.perf.libperfstat
■ bos.perf.perfstat
■ bos.perf.proctools
■ xlC.aix61.rte:9.0.0.1
■ xlC.rte:9.0.0.1
■ rsct.basic.rte (For RAC configurations only)
■ pat.clients.rte (For RAC configurations only)
3、需要给出ASM磁盘组密码值
4、/tmp大于10GB大小
5、操作系统内核为AIX64位6以上版本
6、确认AIX上的AIO文件集安装,并启用AIO服务。
注:AIO即为异步IO
7、操作系统文件系统大小必须5GB以上。
8、
确保对外服务网络与内部心跳网络在不同网段,并且能ping即可。
确保RAC的两个节点同时可看到同一块共享磁盘
chdev –l hdisk(n) –a pv=yes,将所有磁盘设置完后,查询两边的PV,之后查看PV ID两边是否一致。
9、确保安装X11相关所有系统包,并启动服务。
注:177端口必须与终端间保持无限制。
只保证能使用图形化界面就OK了。