tt摩托说明书
TT摩托说明书

TT摩托说明书首先按测试键进入方画面TEST MENU 按服务键到INPUT TEST调试方向油门,刹车和各种MEMORY TEST 开关INPUT TESTSOUND TESTC.R.T TESTGAME ASSIGNMENTSCOIN ASSIGNMENTSBOOKKEEPINCBACKUP DATA CLEAROUTPUT TESTEXITINPUT TEST 1.按服务键把光标移到THROTTLE---油门,按住SHIFT DOWN键出现SETTING时,拉动油门,>THROTTLE:22H<24H><24H> SETT 数据显示改变,松手。
BANK: 22H<20H> < e OH > 2.按服务键盘把光标移动到BRAKE---刹车,按住BANK: 23H<20H> <e OH ><80H> SHIFT DOWN出现SETTING时,刹车手柄,数据显SHIFTUP:OFF 示改变,松手。
3.按服务键把光标移到BANK---方向,SHIFTDOWN: ON 按住SHIFT DOWN键出现SETTNG时,左右转动方START /VR: OFF 向后,数据显示忙乱变,放松。
COIN CHUTE #1: OFFCOIN CHUTE #2: OFFSERVICE OFFTEST OFFTEST MENU 把光标移到GAME ASSIGNMENTS—进入MEMORY TESTINPUT TESTSOUND TESTC.R.T TEST>GAME ASSIGNMENTSCOIN ASSIGNMENTSBOOKKEEPINCBACKUP DATA CLEAROUTPUT TESTEXITGAME ASSIGNMENTSADVERTISE SOUND : <ON>COUNTRY :<TWIN> COUNTRY—英.日GABINET TYPE :<TWIN>>LINKTYPB:<SLAVE> CADINET TYPE—动感BIKE CLOLOR<ON>:<BLA VE<NO.2>RACEMODE:<RACE> LINK TYPE—连线LAXEY NUMBER OF LAP:<2>GAMEDIFFICULTY:<NORMAL> 不连线标识为:NO LINKREVISE MODE:<2/3> BIKE COLOR<ON.>--选择车的颜色START SWITCHOP :<OFF>EXITTEST MENU 把光标移到COIN ASSIGNMENTS—进入调试投币MEMORY TESTINPUT TESTSOUND TESTC.R.T TESTGAME ASSIGNMENTS>COIN ASSIGNMENTSBOOKKEEPINCBACKUP DATA CLEAROUTPUT TESTEXITCOIN ASSIGNMENTS 投币>COIN /CREDIT SETTING#1 COIN CREDIT SETTING#1投币量COINCHOTE#1 COINCHOTE #1(投币口)1COIN1CREDIT 1 CIOMS 1 CREDITCOINCHOTE#2 币数局数1COIN1CREDIT COINCHOTE#1(投币口2)MANWRC SETTINGEXITTEST MENU 把服务光标移到:MEMORY TESTINPUT TESTSOUND TESTC.R.T TESTGAME ASSIGNMENTSCOIN ASSIGNMENTS>BOOKKEEPINC 查记录BACKUP DATA CLEAR 清记录OUTPUT TESTEXITBACKUP DATA CLEARYES<CLEAR> YES 清除记录>NO<CANCEL> NO 不清除记录。
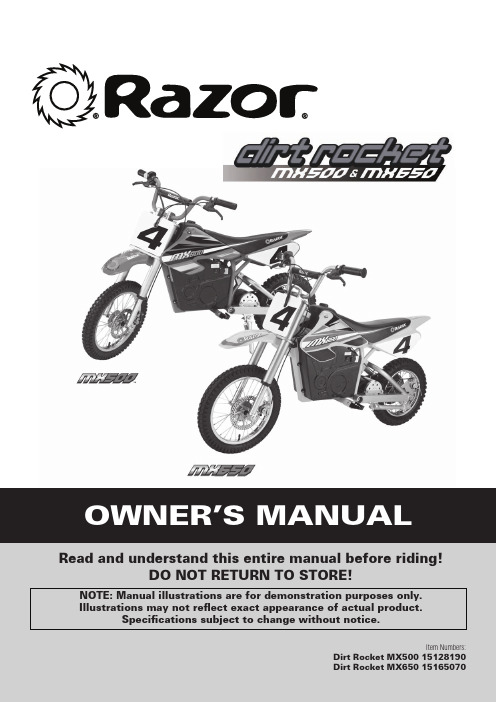
恒基汽车Dirt Rocket MX500和MX650电动摩托车用户手册说明书
WARNING: Riding an electric motorbike can be a hazardous activity. Certain conditions may cause the equipment to fail without fault of the manufacturer. Like other electric products, the Dirt Rocket can and is intended to move, and it is therefore possible to lose control, fall off and/or get into dangerous situations that no amount of care, instruction or expertise can eliminate. If such things occur you can be seriously injured or die, even when using safety equipment and other precautions. RIDE AT YOUR OWN RISK AND USE COMMON SENSE.This manual contains many warnings and cautions concerning the consequences of failing to maintain, inspect or properly use your electric motorbike. Because any incident can result in serious injury or even death, we do not repeat the warning of possible serious injury or death each time such a possibility is mentioned.APPROPRIATE RIDER USE AND PARENTAL SUPERVISIONThis manual contains important safety information. It is your responsibility to review this information and make sure that all riders understand all warnings, cautions, instructions and safety topics and assure that young riders are able to safely and responsibly use this product. Razor USA recommends that you periodically review and reinforce the information in this manual with younger riders, and that you inspect and maintain your child’s product to insure their safety.The recommended rider age (14 for the MX500 and 16 for the MX650) is only an estimate, and can be affected by the rider’s size, weight or skills. Any rider unable to fit comfortably on the Dirt Rocket should not attempt to ride it.A parent’s decision to allow his or her child to ride this product should be based on the child’s maturity, skill and ability to follow rules.Keep this product away from small children and remember that this product is intended for use only by persons who are, at a minimum, completely comfortable and competent while operating the product.DO NOT EXCEED THE WEIGHT LIMIT OF 175 pounds for the MX500 and 220 pounds for the MX650. Rider weight does not necessarily mean a person’s size is appropriate to fit or maintain control of the Dirt Rocket.Do not touch the brakes or electric motor on your electric motorbike when in use as they can become very hot.Refer to the section on safety for additional warnings.ACCEPTABLE RIDING PRACTICES AND CONDITIONSAlways check and obey any local laws or regulations which may affect the locations where the Dirt Rocket may be used.Ride defensively. Watch out for potential obstacles that could catch your wheel or force you to swerve suddenly or lose control. Be careful to avoid pedestrians, skaters, skateboards, scooters, bikes, children or animals who may enter your path, and respect the rights and property of others.The Dirt Rocket is meant to be used only in controlled environments free of potential traffic hazards and not on public streets or sidewalks. Do not ride your electric motorbike in any areas where pedestrian or product traffic is present.Do not activate the speed control on the hand grip unless you are on the electric motorbike and in a safe, outdoor environment suitable for riding. These bikes were manufactured for performance and durability but are not impervious to damage. Jumping or other aggressive riding can over-stress and damage any product, including the electric motorbike, and the rider assumes all risks associated with high-stress activity.Be careful and know your limitations. Risk of injury increases as the degree of riding difficulty increases. The rider assumes all risk associated with aggressive riding activities.Maintain a hold on the handlebars at all times.Never carry passengers or allow more than one person at a time to ride the electric motor bike.Never use near steps or swimming pools.Keep your fingers and other body parts away from the drive chain, steering system, wheels and all other moving components.Never use headphones or a mobile phone when riding.Never hitch a ride with another product.Do not ride the Dirt Rocket in wet or icy weather and never immerse the electric motorbike in water, as the electrical and drive components could be damaged by water or create other possibly unsafe conditions.The Dirt Rocket is intended for use on flat, level ground without loose debris such as rocks or gravel. Wet, slick, bumpy, uneven or rough surfaces may impair traction and contribute to possible accidents. Do not ride the electric motorbike in mud, ice, puddles or water. Avoid excessive speeds that can be associated with downhill rides. Never risk damaging surfaces such as carpet or flooring by use of an electric motorbike indoors.Do not ride at night or when visibility is limited.PROPER RIDING ATTIREAlways wear proper protective equipment such as an approved safety helmet (with chin strap securely buckled), elbow pads and kneepads. A helmet may be legally required by local law or regulation in your area. A long-sleeved shirt, long pants and gloves are recommended. Always wear athletic shoes (lace-up shoes with rubber soles), never ride barefooted or in sandals, and keep shoelaces tied and out of the way of the wheels, motor and drive system.USING THE CHARGERThe charger supplied with the electric motorbike should be regularly examined for damage to the cord, plug, enclosure and other parts, and in the event of such damage, the bike must not be charged until the charger has been repaired or replaced.Use only with the recommended charger.Use caution when charging.The charger is not a toy. Charger should be operated by an adult.Do not operate near flammable materials.Unplug charger and disconnect from bike when not in use.Always disconnect from the charger prior to wiping down and cleaning your electric motorbike with liquid.FAILURE TO USE COMMON SENSE AND HEED THE ABOVE WARNINGS INCREASES RISK OF SERIOUS INJURY. USE WITH APPROPRIATE CAUTION AND SERIOUS ATTENTION TO SAFE OPERATION.warnIng: DO NOT USE NON-RAZOR PRODUCTS WITH YOUR RAZOR DIRT ROCKET. The Dirt Rocket has been built to certain Razor design specifications. The original equipment supplied at the time of sale was selected on the basis of its compatibility with the frame, fork and all other parts. Certain aftermarket products may or may not be compatible and will void your warranty.required Tools5mm and 6mm Allen wrenches (Included)2.5mm Allen wrench (Not Included)Spoke tightener(Included)Charger Phillips screwdriver (Included)Bicycle tire pump for Schrader valve tires, with pressure gauge (Not Included)Remove contents from box. Remove the foam separators that protect the components from damage during shipping. Inspect the contents of the box for scratches in the paint, dents or kinked cables that may have occurred during shipping. Because the Dirt Rocket is 95 percent assembled and packed at the factory, there should not be any problems, even if the box has a few scars or dents.MAKE SURE POWER SWITCH IS TURNED “OFF” BEFORE CONDUCTING ANY MAINTENANCE PROCEDURES.estimated assembly and set-up TimeRazor recommends assembly by an adult. Allow up to 30 minutes for assembly.Allow up to 12 hours for initial charge (see page 5 for charging information).10mm, 14mm and 17mmopen wrenches (Included)19mm open wrench (Not Included)1Place the handlebars in the handlebar clamps. Note: Handlebar clamps are located in the plastic bag.2Align parallel to the fork andtighten the bolts using a 6mmAllen wrench. When properlytightened, the handlebars shouldnot move forward or back.Adjust the brake leveradjuster to the proper placeand tighten it with the 5mmAllen wrench.attaching the Handlebars1 Align fender with the holein the fork and insert thebolt. Tighten securely using a10mm open wrench and 5mmq attaching the front fenderInflating the TiresTires are inflated when shipped, but they invariably lose some pressure between the point of manufacturing and your purchase.Note: The pressurized airsupplies found at gasoline stations are designed to inflate high-volume automobile tires. If you decide to use such an air supply to inflate your tires, first make sure the pressure gauge is working, then use very short bursts to inflate to the correct PSI. If you inadvertently over-inflate the tire, release the excess pressure immediately.Using a bicycle tire pump equipped for Schrader valves, inflate the tires to the PSI indicated on the sidewall of the tire.warnIng:Failing to properly adjust and tighten the nuts and bolts that affix the fork can cause you to lose control and fall.through the other side of the wheel hub, add the other spacer and slide though the fork. Secure with washer and nut.Note: Front axle is installed with the spacer between the fork and wheel for all Dirt Rockets.Note: If your model has one short spacer, it goes on the side of the hub with the disc brake.Note:where front axle is located in box.1 Position wheel in front fork and slide disk brake into caliper.3 With a 14mm and 17mmopen wrench tighten the front wheel screws.The brake is capable ofcausing the electric motorbike repaIr anD MaInTenancewarnIng:Always disconnect your electric motorbike from the charger beforewarnIng:To prevent shock, please follow the instructions accordingly and do not skip any steps.Note: the arrangement of the hardware sequence:Right Side (Throttle)16-1 Nut 16-2 Washer 16-3 Spacer Left Side (Brake)16-1 Nut 16-2 Washer 16-3 Spacer16-116-316-216-216-316-1qwarnIng:To avoid a pinch or injury, keep fingers away from moving q warnIng: Regularly check the spoke tension and retighten the 1q Battery care and DisposalDisposal: Your Razor product uses sealed lead-acid batteries which must be recycled or disposed of in an environmentally sound manner. Do not dispose of a lead-acid battery in a fire. The battery may explode or leak. Do not dispose of a lead-acid battery in your regular household trash. The incineration, land filling or mixing of sealed lead-acid batteries with household trash is prohibited by law in most areas. Return exhausted batteries to a federal or state approved lead-acid battery recycler or a local seller of automotive batteries. If you live in Florida or Minnesota, it is prohibited by law to throw away lead-acid batteries in the municipal waste stream.q chargerThe charger supplied with the bike should be regularly examined for damage to the cord, plug,enclosure and other parts and in the event of such damage, the Dirt Rocket must not be charged until it has been repaired or replaced.Use ONLY with the recommended charger.warnIng:If a battery leak develops, avoid contact with the leaking acid and place the damaged battery in a plastic bag. Refer to the disposal instructions at left. If acid comes into contact with skin or eyes, flush with cool water for at least 15 minutes and contact a physician.warnIng: Batteryposts, terminals and related accessories contain lead and lead compounds. Wash your hands after handling.Motor bike does not runMotor bike was running but suddenly stoppedShort run time (less than 15 minutes per charge)Motor bike runs sluggishlySometimes the motor doesn’t run, but other times it doesMotor bike does not stop when applying the brake Motor bike makes loud noises or grinding soundsproblem possible cause solutionUndercharged batteryLoose wires or connectorsBurned-out fuseMotor or electrical switch damageUndercharged batteryBattery is old and will not accept full chargeBrakes are not adjusted properlyRiding conditions are too stressful Tires are not properly inflatedMotor bike is overloadedLoose wires or connectors Motor or electrical switch damageBrakes are not adjusted properly Chain is too dryCharge the battery. A new battery should have been charged for at least 12 hours before using the motor bike for the first time and up to 12 hours after each subsequent use.Check all connectors. Make sure the charger connector is tightly plugged into the charging port, and that the charger is plugged into the wall.Make sure power flow to the wall outlet is on.Check all wires and connectors to make sure they are tight.The fuse will burn out and automatically shut off the power if the motor is overloaded.An excessive overload, such as too heavy a rider or too steep a hill, could cause the motor to overheat. Replace the fuse(s) with a new one of equal amperage. Correct the conditions that caused the fuse to burn out and avoid repeatedly burning out fuse.Contact your local Razor authorized service center for diagnosis and repair.Charge the battery. A new battery should have been charged for at least 12 hours before using the motor bike for the first time and up to 12 hours after each subsequent use.Check all wires and connectors. Make sure the battery connector is tightly plugged into the charger connector, and that the charger is plugged into the wall.Even with proper care, a rechargeable battery does not last forever. Average battery life is 1 to 2 years depending on use of product and conditions. Replace only with a Razor replacement battery.Refer to brake adjustment instructions on page 5 of this e only on solid, flat clean and dry surfaces such as pavement or level ground.The tires are inflated when shipped, but they invariably will lose some pressure between the point of manufacturing and your purchase. Refer to instructions on page 4 of this manual to properly inflate tires.Make sure you do not overload the motor bike by allowing more than one rider at one time, exceeding the maximum weight limit, going up too steep a hill or towing objects behind the vehicle.Check all wires around the motors and all connectors to make sure they are tight.Contact your local Razor authorized service center for diagnosis and repair.Refer to instructions on page 5 of this manual to properly adjust brakes.Apply a lubricant such as 3 in 1TMor Tri-Flow TMto the chain.01 Handlebar grip (right/left)02Twist grip throttle02-1 Sleeve 03 Front brake lever assembly (right)04 Handlebar05 Rear brake lever assembly (left)06 Front fork 07Front fender08 Handlebar clamp (upper/lower)09 Front wheel complete 10 Caliper brake 11 Shock 12 Control module13 Battery (3- 12V/ 12Ah) with Fuse 14 MX500 motor (36V/500W)MX650 motor (36V/650W)15 Kickstand16 Rear wheel complete 17 Chain 18 Chain guard19 Battery cover (left/right)20 On/ Off switch 21 Charger port 22Seat fairingSB 1918 (CALIFORNIA) DECLARATIONYOUR INSURANCE POLICIES MAY NOT PROVIDE COVERAGE FOR ACCIDENTS INVOLVING THE USE OF THIS SCOOTER/ELECTRIC RIDE-ON PRODUCT. TO DETERMINE IF COVERAGE IS PROVIDED, YOU SHOULD CONTACT YOUR INSURANCE COMPANY OR AGENT.Tire InflationPeriodically inspect the tires for excess wear and replace as required, and regularly check the tire pressure and re-inflate as necessary. If you get a flat tire, the inner tube can be patched or a new tube can be purchased from Razor or an authorized repair center.safety gearAlways wear proper protective equipment, such as an approved safety helmet, elbow pads and kneepads. Always wear shoes, never ride barefooted or in sandals, and keep shoelaces tied and out of the way of the wheels, motor anddrive system.razor limited warrantyThe manufacturer warranties this product to be free of manufacturing defects for a period of 90 days from date of purchase. This Limited Warranty does not cover normal wear and tear, tires, tubes orcables, or any damage, failure or loss caused by improper assembly, maintenance, or storage or use of the Razor Dirt Rocket.This Limited Warranty will be void if the product is ever: •used in a manner other than for recreation;•modified in any way;•rented.The manufacturer is not liable for incidental or consequential loss or damage due directly or indirectly to the use of this product.Razor does not offer an extended warranty. If you have purchased an extended warranty, it must be honored by the store at which it was purchased.For your records, save your original sales receipt with this manual and write the serial number below.__________________________________________Item Numbers:MX500 15128190MX650 15165070loose partsThere should not be any unusual rattles or sounds from loose parts or broken components. If you are not sure, ask an experienced mechanic to check.BrakesCheck the brakes for proper function. When you squeeze the lever, the brake should provide positive braking action.frame, fork and HandlebarsCheck for cracks or broken connections. Although broken frames are rare, it is possible for an aggressive rider to run into a curb or wall and wreck and bend or break a frame. Get in the habit of inspecting yours regularly.q pre-rIDe cHecKlIsTq qq qDo not use this product for the first time until you have inflated the tires to the correct psI and charged the battery for at least 12 hours.failure to follow these instructions may damageyour product and void your warranty.Discover skating and wheel toys in our online store.。
林海雅马哈100t—3说明书
林海雅马哈100t—3说明书
林海雅马哈100t—3功能键主要包括转向灯开关、大灯开关、远近灯光开关、喇叭开关、变速开关、以及电启动开关。
以上按键是电动车在日常驾驶当中使用得比较多的,并且也是大部分电动车型所具备的。
林海雅马哈100t—3驻车档按键
电动车的p档和小汽车的驻车档有些类似,都是在长时间停车的时候使用。
电动车挂入p挡后,即便是打开电源,转动油门转把,车子也是不会向前行驶的,需要取消驻车挡后才能继续行驶。
以往电动车是没有p档的,这主要是为了防止无意之间转动转把而导致电动车窜行,或未断电的状态下,被小孩子转动转把而引发危险,所以后续的车型才有配备该功能。
这也使得很多人挂入P档后,转动转把电动车都不走也不知道发生了什么事。
林海雅马哈100t—3定速巡航按键
定速巡航按键的功能就是不需要驾驶员手动去拧转把,按照驾驶员要求的速度启动该功能后,车子就会自动以固定的速度行驶。
这个设计的作用就是为了行驶在开阔、平坦的路段上,避免让骑手因为长时间以同一扭矩行驶而手酸。
tt摩托说明书

T.T摩托简要说明书TEST MENU 测试主菜单INPUT TEST 存诸器测试INPUT TEST 输入测试SOUND TEST 声音测试C.R.T TEST 画面测试GANE ASSIGNMENTS 游戏调整COIN ASSIGNMENTS 投币调整BOOKKEEPING 游戏记录BOOKUP DATA CLEAR 清除记录OUTPUT TEST 输出测试EXIT 退出一、MEMORY 主要为ROM〈存储器〉的好坏测试二、INPUT TEST 输入项目的测试MIN MAX MID 最小值最大值中间值〉THROTTLE:20H〈20H〉〈eoH〉加油:20H 〈20H〉〈eoH〉BRAKE :20H〈20H〉〈eoH〉刹车:20H 〈20H〉〈eoH〉BANK :80H 〈20H〉〈eoH〉〈80H〉方向:80H 〈20H〉〈eoH〉〈80H〉SHIFT UP:OFF/ON 加档:关/开SHIFT DOWN:OFF/ON 去档:关/开START/VR:OFF/ON 开始/视点:关/开COTN CHUTE.#1:OFF/ON 投币器1:关/开COIN CHUTE#2:OFF/ON 投币器2:关/开SERVICE :OFF/ON 辅助测试:关/开TEST :OFF/ON 主测试:关/开三、SOUND TEST 声音测试VOICE 语音EFFECT 音效BRAEE-P 打滑ENGINE-P 加油ENGINE-E 加油B.G.M 背景音乐EXIT 退出四、C.R.T.TEST 主要用于对显示器的红、绿、蓝〈R.G.B〉彩色三基色的校正,以及对网格线的垂直度调整和扫描四个边的到位情况、校正。
五、GAME AWWIGNENTS 游戏方面的各项调整AD.VERTISE SOUND:OFF/ON 演示时,音效的开关:关/开COUNTRY :JARAN 出口国家:日本CABINET TYPE :TWIN 游戏立场:DELUXELINK TYPE :NOTLINK 关于连线:不用连线:MASTER :设为主机:SIA VE :设为分机:RELA V :只为演示BIKE COLIR〈NO〉:RED〈NO.1〉连线团队中的编号:红色一号:BLUE〈NO.2〉:蓝色二号RACE MODE :T.T 游戏类型:用于连线时或赛时:RACE :与电脑比赛LAXEY NUMDEROFLAP.1-10 摩托车可跑的圈数:1至10可调GAME.DIFFICULTY :EASY 游戏的难度:容易:NORMAL :普通:HARD :困难:HARDEST :极困难REVISE.MODE.1-3/3 自动校正项START.SWITCH.OP:ON/OFF 是否用自动开始:是/否EXIT 退出六:COIN/CREDIT.SETTING.1 投币方式的调整,共有27种方式COIN CREDIT 投币器 11 COIN 1 CREDIT 1币1局COIN CHUTE 2 投币器 21 COIN 1 CREDIT 1币1局MANUAL.SETTING 币数与游戏的次数COIN.TO.CREDIT1-9 COIN 1 CREDIT 1至9可调一局BONUS.ADDER:NO BONUS ADDER 额外奖励:无奖:2 COINS.GEVELEXTRA :2个币奖一将次〈2-9可调查〉COIN CHUTE 1.MUL.TIPLIER 投一个币代表几个币〈1至9可调〉EXIT 退出七、BOOKKEEPING 此项是查看游戏中,投了多少币,以及过关人数时间等诸多参数。
雅马哈t max 16年使用手册

雅马哈t max 16年使用手册1、安全守则1、1人离开车子的时候,把档位置于前进档的位置上,把锁匙转到“OFF”(停止)的位置上把锁匙拔出,并且踩下刹车。
1.、2驾驶雅马tmax的时候,请注意周围情况,安全驾驶,驾驶时请注意道路上的来往车辆。
1、3上下坡时请尽量沿直线行走。
1、4停车时,一定要踩下驻车刹车。
1、5在行驶时,请不要把身体伸出车外。
1、6在高低不平的路上行驶时要格外小心。
1、7在改变行走方向时,一定要确认前后左右的情况。
1、8在转弯时一定要放慢速度。
1、9在下坡时,可利用刹车,边放慢速度边驾驶车辆。
1、10需要改变(前进-后退)的换挡位置时,必须在车子完全停下后才能进行操作。
1、11突然的起动,原地打方向盘,急刹车等操作行为十分危险,请尽量不要发生。
1、12在下坡时不要加快速度,如急刹车或突然改变行车方向,车子会失去控制。
1、13在车子后退时一定要注意车辆后方情况。
1、14车辆起动或行驶时请抓紧扶手。
2、电池充电及保养2、1充电操作步骤:先把直流电源插头插进位于驾驶员座位下面的插座里,再插进交流电源插座。
充电器在使用过程中需防潮、防湿,并放置在通风良好的地方,充电器工作时有一定的温度升、请注意散热。
充电时间一般在7-8小时,视电池使用状态而不同。
充电时,充电器的电源指示灯显示红色,充电指示灯也显示为红色,充满后,充电指示灯为绿色,在指示灯由红色转绿色后1-2小时停止充电,停止充电后,先拔出交流电源插头后再拔直流电源插头。
违反此操作程序,会导致充电器烧坏无法充电。
2、2充电期间中途停电应按上述步骤把插座拔掉,来电后按上述步骤重新充电,否则自动保护功能将无法起动重新充电。
2、3必须使用原车配给的充电器,进行充电。
充电器坏了需更换充电器时,必须咨询专业人士,及时更换正确的充电器。
使用不正确的充电器充电,会导致电池充坏。
充电器属于较精密的电子设备,因此,在使用中要注意防震动。
尽量不要随车携带,如却要携带,应将充电器用减振材料包装好后放置与于车上工具箱内,并注意防雨防潮。
TT摩托说明书改
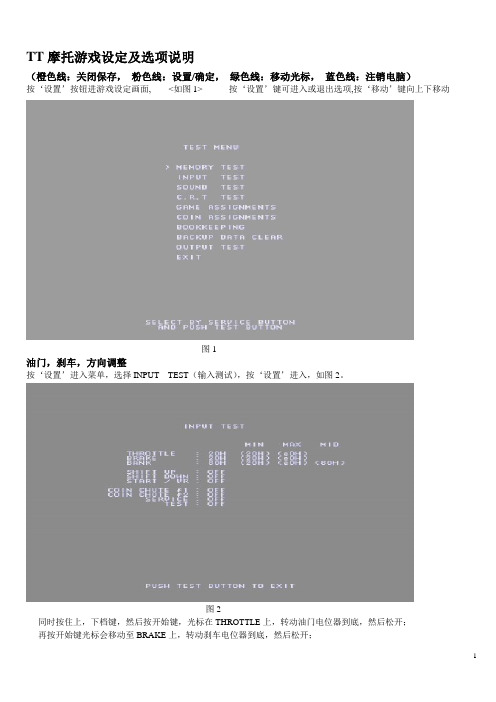
TT摩托游戏设定及选项说明(橙色线:关闭保存,粉色线:设置/确定,绿色线:移动光标,蓝色线:注销电脑)按‘设置’按钮进游戏设定画面, <如图1> 按‘设置’键可进入或退出选项,按‘移动’键向上下移动图1油门,刹车,方向调整按‘设置’进入菜单,选择INPUT TEST(输入测试),按‘设置’进入,如图2。
图2同时按住上,下档键,然后按开始键,光标在THROTTLE上,转动油门电位器到底,然后松开;再按开始键光标会移动至BRAKE上,转动刹车电位器到底,然后松开;再按开始键,光标会移至BANK上,将摩托车向左摆动到底,再向右摆动到底,然后回到中点按下开始键,光标消失,松开上下档键,完成设置。
投币设置按TEST进入菜单,选择COIN ASSIGNMENTS(投币设置),按开始进入,如图3。
用上下档键将光标移至COIN/CRDIT SETTING #按开始键更改,如需二币一玩将CION/CREDIT SETTING # 1 改为2 COIN 1 CREDIT;选择EXIT 按开始键,即完成设置。
如需开免费模式,将其改为FREE PALY即可;清零游戏币按TEST进入菜单,选择BACKUP DA TA CLEAR(备份数据清除),按开始进入,如图4。
图4用上下档键将光标移至YES<CLEAR>选项,按开始键即完成清币。
GAME ASSIGNMENTS 游戏难度模式调整如图5图5各选项说明(以下选项除演示音乐可修改外,其他选项不需修改)ADVERTISS SOUND ON/OFF 演示时音乐开/关一般选择ON,游戏演示时有音乐声COUNTRY USA/JAPEN/EXPORT 国家美国/日本/其它一般选japan游戏版本为日本版,游戏提示字符为日文CABINET TYPE TWIN/DELUXE 游戏类型双人/豪华此项只能选TWIN,否则不能正常游戏LINK TYPE MASTER/SLA VE/RELAY/NOT LINK 网络模式主机/副机/中继/单机(两台联机时,一台主机设为MASTE,另外一台应设为SLA VE)BIKE COLOR RED/BLUE/YELLOW /GREEN 车手衣服颜色红/兰/黄/绿此选项可以对游戏人物的衣服进行选择RACE MODE RACE/TT 赛道模式竞赛模式/TT模式LAXEY NUMBER OF LAP 1/2/3/4/5/6/7/8/9/10 赛道圈数1/2/3/4/5/6/7/8/9/10 GAME DIFFICULTY EASY/NORMAL/HARD/HARDEST 游戏难度简单/标准/难/最难REVISE MODE 1/3 2/3 3/3 NOT REVISE 修正模式1/3 2/3 3/3 无修正TT NUMBER OF LAP 1/2/3/4/5/6/7/8/9/10 赛道圈数1/2/3/4/5/6/7/8/9/10 GAME DIFFICULTY EASY/NORMAL/HARD/HARDEST 游戏难度简单/标准/难/最难REVISE MODE 1/3 2/3 3/3 NOT REVISE 修正模式1/3 2/3 3/3 无修正START SWITCH OP OFF/ON 开始键开关关/开(此选项只能设为ON,否则不能正常游戏EXIT 退出选项(选择到此项,按TEST键退出此项设定)注意:完成设置后,一定要退出主菜单再按保存键,更改的设置才能有效,主机会自动重启。
踏板摩托车用户手册说明书

Nº DE CUADRO:_______________________________________ MARQUE SEGUN CORRESPONDA:
CHASIS
DISTANCIA ENTRE EJES LARGO ANCHO ALTO MEDIDAS DE LA CAJA 200 - 150
200 - 150
NEUMÁTICOS
DELANTERO TRASERO
SUSPENSIÓN
DELANTERA TRASERA
6
FRENOS
DELANTERO
! ADVERTENCIA
8
DEPÓSITO DE COMBUSTIBLE
9
CONTROLES DEL MANILLAR DERECHO
4 Acelerador
10
CONTROLES DEL MANILLAR IZQUIERDO
4 11Βιβλιοθήκη TABLERO Y COMANDOS
4
4
8
9
12
MOTOMEL CERTIFICADO DE GARANTIA
Motocargo 200/150
Las unidades se entregan alistadas para la marcha en condiciones de uso.
AGENTE AUTORIZADO:
IDENTIFICACIÓN DE LA UNIDAD ADQUIRIDA:
2004款TT敞篷车技术规格说明书
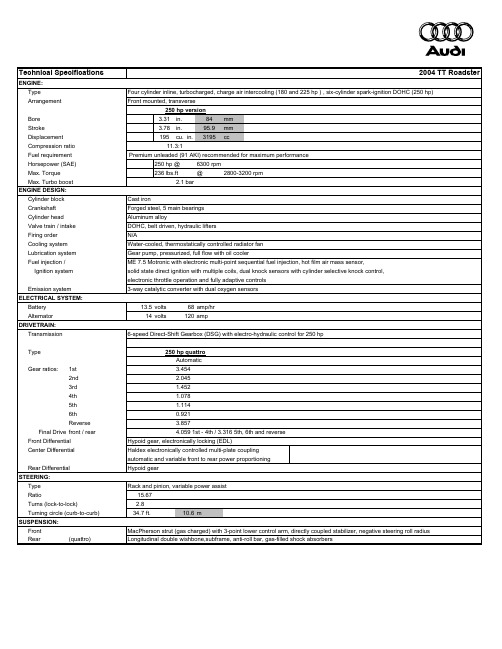
Technical Specifications2004 TT Roadster ENGINE:Type Four cylinder inline, turbocharged, charge air intercooling (180 and 225 hp ) , six-cylinder spark-ignition DOHC (250 hp)Arrangement Front mounted, transverse250 hp versionBore 3.31in.84mmStroke 3.78in.95.9mmDisplacement195cu. in.3195ccCompression ratio11.3:1Fuel requirement Premium unleaded (91 AKI) recommended for maximum performanceHorsepower (SAE) 250 hp @6300 rpmMax. Torque236 lbs.ft@2800-3200 rpmMax. Turbo boost 2.1 barENGINE DESIGN:Cylinder block Cast ironCrankshaft Forged steel, 5 main bearingsCylinder head Aluminum alloyValve train / intake DOHC, belt driven, hydraulic liftersFiring order N/ACooling system Water-cooled, thermostatically controlled radiator fanLubrication system Gear pump, pressurized, full flow with oil coolerFuel injection /ME 7.5 Motronic with electronic multi-point sequential fuel injection, hot film air mass sensor,Ignition system solid state direct ignition with multiple coils, dual knock sensors with cylinder selective knock control,electronic throttle operation and fully adaptive controlsEmission system3-way catalytic converter with dual oxygen sensorsELECTRICAL SYSTEM:Battery 13.5volts68amp/hrAlternator14volts120ampDRIVETRAIN:Transmission6-speed Direct-Shift Gearbox (DSG) with electro-hydraulic control for 250 hpType250 hp quattroAutomaticGear ratios:1st 3.4542nd 2.0453rd 1.4524th 1.0785th 1.1146th0.921Reverse 3.857Final Drive front / rear 4.059 1st - 4th / 3.316 5th, 6th and reverseFront Differential Hypoid gear, electronically locking (EDL)Center Differential Haldex electronically controlled multi-plate couplingautomatic and variable front to rear power proportioningRear Differential Hypoid gearSTEERING:Type Rack and pinion, variable power assistRatio15.67Turns (lock-to-lock) 2.8Turning circle (curb-to-curb) 34.7 ft.10.6mSUSPENSION:Front MacPherson strut (gas charged) with 3-point lower control arm, directly coupled stabilizer, negative steering roll radiusRear(quattro)Longitudinal double wishbone,subframe, anti-roll bar, gas-filled shock absorbersTechnical Specifications (continued)2004 TT RoadsterBRAKES:Service brakeAnti-lock brake system, vacuum power assist, with asbestos free linings, dual diagonal circuits,and electronic rear brake pressure proportioningFront, size and type 17.0in.432mm - Vent. disc Rear, size and type 17.0in.432mm- Vent. discParking brakeMechanically actuated at the rear wheelsWHEELS (standard only):Size7.5J x 17 cast aluminum, six spoke designTIRES (standard only):Size 225 / 45 R 17 Y summer performance radial BODY:MaterialFully galvanized (both sides) steel, aluminum hood Corrosion protection Multi-step anti-corrosion protectionCw = 0.36 frontal area = 1.99 m²CAPACITIES:Engine oil 5.2 qt. 5.5 liter Fuel tank 16.3 gal.62 liter Cooling system 7.4 qt.7 literEXTERIOR DIMENSIONS:Wheelbase 95.6in.2429mm Track:front / rear60 / 59.3in.1528/1505mmOverall length 159.1in 4041mm Overall width 73.1in 1856mm (includes mirrors)1764mmHeight53in.1348mm Ground clearance 4.4in.113mm Curb weight3472lbs.1590kgDistribution % front / rear INTERIOR DIMENSIONS:Seating Capacity 2EPA class Two seaterHead room 38.3in.972mm Shoulder room 55.6in.1412mm Leg room 41.2in.1047mmInt. vol. (EPA)Luggage capacity (EPA) 6.4cu. ft.180Liter(quattro version)PERFORMANCE:250 hp quattro automatic0-60 mph 6.6sec.1/4 mileTBD sec.Top speed - 250 hp version Electronically limited to 130 mph (209 km/h) for North America FUEL ECONOMY:EPA estimate250 hp quattroCity TBD mpg Highway TBD mpg CombinedTBD mpg FUEL ECONOMY: Canadian estimate250 hp quattroCity TBD liters/100km HighwayTBD liters/100km 250 hp quattro version58 / 42N/Aquattro (250 hp)quattro (250 hp)X = Standard o = Optional - = Not available fwd quattro® quattro®1.8 liter turbocharged DOHC 180 hp 4-cylinder engine with direct ignition, intercooler,x--electronic turbo boost regulation, 5-valves per cylinder1.8 liter turbocharged DOHC 225 hp 4-cylinder engine with direct ignition, two in-line-x-intercoolers, electronic turbo boost regulation, 5-valves per cylinder3.2 liter 250 hp 6-cylinder engine--x6-speed automatic transmission with Tiptronic®, steering wheel controls and interlockx--between D & S6-speed manual transmission with synchronized reverse gear, dual mass flywheel-x-Direct shift gearbox automatic transmission with steering wheel control paddles xFront wheel drive x--quattro - permanent all-wheel drive system, includes Haldex® coupling-x xAnti-lock brake system (ABS) with Electronic Differential Lock (EDL) and Electronic Brake-x x x force Distribution (EBD)ASR (Anti-Slip Regulation) full time traction control x - -2-sided fully galvanized body assembly with aluminum hood x x xESP (Electronic Stabilization Program) x x x7.5Jx17 6-spoke cast alloy wheels with 225 / 45 R17 summer performance radial tires x x xMacPherson struts (gas charged) front suspension with 3-point forged lower control arm,x x x negative roll radius, directly coupled stabilizer barTorsion-beam rear axle with trailing arms, stabilizer bar, separate coil spring and shockx--absorbers (gas charged), and toe correcting axle bushingsParallelogram multi-link independent rear suspension -x xRack and pinion power steering with quick ratio x x xTilt and telescopic (manual) adjustable steering column x x x2.5 MPH (US Federal standard) integrated bumpers in body color (for Canada 5 MPHx x x Canadian standard)Retractable high pressure headlight washers integrated in front bumper x x xBody color outside mirrors x x xHeated windshield washer nozzles x x xAluminum door sill trim with TT logo x x xPower glass rear windscreen x x xTwo fixed roll bars with polished aluminum finish x x xAluminum fuel filler door x x xNomenclature :- TT badge on left rear bumper x x x- quattro badge on:right rear bumper-x xdash trim above glove box-x xright front of grille -x xManually retractable cloth top with heated glass rear window x--Power folding top with heated glass rear window o x xFixed rear spoiler x x xX = Standard o = Optional - = Not available fwd quattro® quattro®Xenon high intensity discharge headlights with automatic self-leveling and automatic lightx x x adjustmentDaytime running lights for Canada using front fog lights x x xBack-up lights integrated in both taillights x x xWhite side turn indicator lights in front fenders with amber shine-through bulbs x x xInterior light console in headliner with fade-in & fade-out feature, time delay and automaticx x x switch-on when key removed from ignition switchFront reading lights x x xVanity mirrors in sunvisors x x xRear cargo area light built-into the trunk lid x x xAutomatic climate control with sun sensor, dust and pollen filter x x xPower windows with:x x x- Power retention when ignition shut-off (until door opened)- One-touch up and one-touch down feature for both windows- Pinch protection (reverses window at force > 100 Nm)- Comfort close and open with key in driver door- Windows automatically open and close slightly when door opened andclosed to assist door operation and window sealPower rear deck lid release button in center console x x xFuel filler door release button in center console x x xElectronic cruise control with coast, resume and shut-off feature x x xElectric rear window defogger with automatic shut-off feature x x xElectrically adjustable outside mirrors with defog feature x x xPower central locking system (doors, deck lid and fuel door), with selective unlockingx x x (enables unlocking of a single door or all doors), plus:- convenient open & close feature for windows- master switch located in center consoleCenter storage compartment above middle speaker x x xStorage compartment behind driver's seat including first-aid kit and CD Changer whenx x x orderedStorage compartment behind passenger seat including navigation system CD ROM whenx x x orderedPower remote keyless entry with trunk release, door / ignition key and valet key x x xTwo sport seats with individual manual height adjustment x x xX = Standard o = Optional - = Not available fwd quattro® quattro® Fine Nappa leather seat upholstery, including door panel inserts x x xLeather shift knob and aluminum surrounding x x xAluminum trim on center dashboard vents, shift lever knob and base, knee bolsters onx x x center console, door release handles, radio cover, glove box coverFour tie-down eyelets in rear cargo area x x xTwo floor mats x x x3-spoke leather sport steering wheel with aluminum center trim ring x x xTwo aluminum cup holders in center console x x xStorage shelf under glove box x x xBacklit instrument cluster with automatic brightness control, including : x x x- tachometer, electric speedometer, digital clock with date, fuel gauge,coolant temperature gauge, oil temperature gauge, ambient temperature gaugeDigital odometer with trip odometer and service interval indicator x x xAnti-theft vehicle alarm system with blinking theft deterrent lights on front doors x x xWindshield wipers with 4-position intermittent control x x xConcert AM / FM radio with in-dash CD player and following features: x x x- RBDS (Radio Broadcast Display System displays radio station call letters and otherinformation)- GALA (Graduated Audio Level Adjustment, varies volume based on vehicle speed)- CD changer operation capability120-watt system with four speakers in doors, two 2-way rear speakers, middle speakerx x x between seats and CD changer pre-wiringDriver information display with outside temperature display plus 5-function trip computer,x x x vehicle auto check system, radio display, and pictogram for open door and deck lidPre-wiring for Motorola® hands-free cellular telephone (includes microphone, rear fenderx x x mounted antenna and transceiver bracket)Battery located in trunk with protective covering xRadio antenna on left rear fender (also used for telephone)x x xDriver and passenger next generation front airbag supplemental restraints x x xThorax (chest) side and head airbag supplemental restraints located in front seats x x xTwo 3-point safety belts with automatic pre-tensioners, height-adjustment and belt forcex x x limitersCentral locking with safety unlock (automatically unlocks doors and switches off fuel pumpx x xif airbag deploys)Reflectors in rear of doors x x xFixed headrests for front seats x x xFirst-aid kit located in storage compartment behind driver's seat x x xEmergency warning triangle located in rear cargo area x x x2004 Audi TT RoadsterOption P rogram 12Legend 180 hp225 hp250 hp X = Included in Package o = Optional - = Not available fwd quattro®quattro®Audio Package o o oBose® premium sound system with four speakers in door, two 2-way rear speakers,x x x center speaker in dashboard, subwoofer between the seats, 225W amplifier andAudio Pilot technology6-disc CD changer¹ (located in storage compartment next to left rear seat) x x xPremium Package o o o17-inch 6-spoke cast alloy wheels with 225 / 45 R 17 summer performance tires x Standard Standard HomeLink® universal garage door opener x x x Heated front seats with individual temperature control (standard in Canada)x x xSeparate optionsMotorola® hands-free digital portable telephone o o o Audi Navigation System o o o Baseball optic leather (only w / Ebony and Amber Red) o o o Power folding top o Standard Standard Alcantara steering wheel - for 180 hp and 250 hp with Tiptronic® controls o o o17-inch 6-spoke cast alloy wheels with 225 / 45 R 17 all season tires o o o17-inch 5-spoke forged alloy wheels with 225 / 45 R 17 summer performance tires -o-18-inch 7-spoke cast alloy wheels with 225 / 40 R 18 summer performance tires -o o18-inch 9-spoke cast alloy wheels with 225 / 40 ZR 18 summer performance tires --o Audi Satellite Radio o o oUnited States / Canada4-year/50,000 mile new vehicle limited warranty / 4-year / 80,000 km new vehiclelimited warranty4-year/50,000 mile no-charge scheduled maintenance / 4-year / 80,000 km no-charge scheduled maintenance12-year limited warranty against corrosion perforation24-hour Roadside Assistance for 4 years"quattro" is a registered trademark of Audi AG."Tiptronic" is a registered trademark of Dr. Ing. h. c. F. Porsche AG."Motorola" is a registered trademark of Motorola, Inc."HomeLink" is a registered trademark of Johnson Controls, Inc."Bose" is a registered trademark of the Bose Corporation."Haldex" is a registered trademark of Haldex Corporation.Retail PricesAudi of America, Inc.Effective: 1-January-04Revised: 1-January-042004 TTOrder Model Body Transmission Drivetrain SuggestedCode Style Retail8N355U TT180 Coupe 6-Spd Automatic Tip.FrontTrak$ 33,2508N3569TT225 Coupe6-Speed Manual quattro $ 36,7008N35BL TT250 Coupe Auto Direct Shift Gearbox quattro $ 39,9008N955U TT180 Roadster6-Spd Automatic Tip.FrontTrak$ 35,2508N9569TT225 Roadster6-Speed Manual quattro $ 39,5008N95BL TT250 Roadster Auto Direct Shift Gearbox quattro $ 42,900180 Coupe180 Roadster225 Coupe225 Roadster250 Coupe250RoadsterLeather Upholstery S S S S S S NCPapaya Orange Exterior Paint O O O O O O 1,000 PLG Baseball Optic Leather N/A O N/A O N/A O 1,000PPX Premium Package O O O O O O 700HomeLink® Remote TransmitterHeated Front SeatsPAS Audio Package O O O O O O 1,200Bose® Premium Sound SystemSix Disc CD Changer3FN Power Folding Top N/A O N/A S N/A S 800PRX17-Inch 6-Spoke Cast Alloy Wheels &O O O O O O NC All-Season TiresPRT17-Inch 5-Spoke Forged Alloy Wheels &N/A N/A O O N/A N/A 600 Performance TiresPRY18-Inch 7-Spoke Cast Alloy Wheels &N/A N/A O O O O 775 Performance TiresWQR18-Inch 9-Spoke Cast Alloy Wheels &N/A N/A N/A N/A O O 1,700 Performance TiresPNK Audi Navigation System (Map CD's Included)O O O O O O 1,3509ZG Cell Phone Prep O O O O O O 350California / Northeast Emissions O O O O O O 150(States included: Cal, NY, Maine, VT, Mass, RI, CT, and NH)PORT INSTALLED OPTIONSAWL Security Wheel Locks O O O O O O 78ACK Phone Cradle O O O O O O 180ATN Cargo Net O N/A O N/A O N/A 96Destination Charge720Key:O= Optional NA= Not AvailableS= Standard NC= No ChargeSpecifications, equipment, options and prices are subject to change without notice. Some items may be unavailable when the vehicle is built.Prices exclude destination charges, registration and dealer delivery charges.Intro 2004 MY Prices C:\Documents and Settings\perking\Desktop\[01062004_CY_2002_MY_2003.xls]Sheet1。
- 1、下载文档前请自行甄别文档内容的完整性,平台不提供额外的编辑、内容补充、找答案等附加服务。
- 2、"仅部分预览"的文档,不可在线预览部分如存在完整性等问题,可反馈申请退款(可完整预览的文档不适用该条件!)。
- 3、如文档侵犯您的权益,请联系客服反馈,我们会尽快为您处理(人工客服工作时间:9:00-18:30)。
T.T摩托简要说明书
TEST MENU 测试主菜单INPUT TEST 存诸器测试INPUT TEST 输入测试SOUND TEST 声音测试
C.R.T TEST 画面测试GANE ASSIGNMENTS 游戏调整COIN ASSIGNMENTS 投币调整BOOKKEEPING 游戏记录BOOKUP DATA CLEAR 清除记录OUTPUT TEST 输出测试EXIT 退出
一、MEMORY 主要为ROM〈存储器〉的好坏测试
二、INPUT TEST 输入项目的测试
MIN MAX MID 最小值最大值中间值
〉THROTTLE:20H〈20H〉〈eoH〉加油:20H 〈20H〉〈eoH〉
BRAKE :20H〈20H〉〈eoH〉刹车:20H 〈20H〉〈eoH〉
BANK :80H 〈20H〉〈eoH〉〈80H〉方向:80H 〈20H〉〈eoH〉〈80H〉SHIFT UP:OFF/ON 加档:关/开
SHIFT DOWN:OFF/ON 去档:关/开
START/VR:OFF/ON 开始/视点:关/开
COTN CHUTE.#1:OFF/ON 投币器1:关/开
COIN CHUTE#2:OFF/ON 投币器2:关/开
SERVICE :OFF/ON 辅助测试:关/开
TEST :OFF/ON 主测试:关/开
三、SOUND TEST 声音测试
VOICE 语音
EFFECT 音效
BRAEE-P 打滑
ENGINE-P 加油
ENGINE-E 加油
B.G.M 背景音乐
EXIT 退出
四、C.R.T.TEST 主要用于对显示器的红、绿、蓝〈R.G.B〉
彩色三基色的校正,以及对网格线的垂直
度调整和扫描四个边的到位情况、校正。
五、GAME AWWIGNENTS 游戏方面的各项调整
AD.VERTISE SOUND:OFF/ON 演示时,音效的开关:关/开
COUNTRY :JARAN 出口国家:日本
CABINET TYPE :TWIN 游戏立场
:DELUXE
LINK TYPE :NOTLINK 关于连线:不用连线
:MASTER :设为主机
:SIA VE :设为分机
:RELA V :只为演示
BIKE COLIR〈NO〉:RED〈NO.1〉连线团队中的编号:红色一号
:BLUE〈NO.2〉:蓝色二号
RACE MODE :T.T 游戏类型:用于连线时或赛时
:RACE :与电脑比赛
LAXEY NUMDEROFLAP.1-10 摩托车可跑的圈数:1至10可调GAME.DIFFICULTY :EASY 游戏的难度:容易
:NORMAL :普通
:HARD :困难
:HARDEST :极困难REVISE.MODE.1-3/3 自动校正项
START.SWITCH.OP:ON/OFF 是否用自动开始:是/否
EXIT 退出
六:COIN/CREDIT.SETTING.1 投币方式的调整,共有27种方式COIN CREDIT 投币器 1
1 COIN 1 CREDIT 1币1局
COIN CHUTE 2 投币器 2
1 COIN 1 CREDIT 1币1局
MANUAL.SETTING 币数与游戏的次数
COIN.TO.CREDIT
1-9 COIN 1 CREDIT 1至9可调一局
BONUS.ADDER:NO BONUS ADDER 额外奖励:无奖
:2 COINS.GEVELEXTRA :2个币奖一将次〈2-9可调查〉COIN CHUTE 1.MUL.TIPLIER 投一个币代表几个币〈1至
9可调〉
EXIT 退出
七、BOOKKEEPING 此项是查看游戏中,投了
多少币,以及过关人数时
间等诸多参数。
八、BACKUP DA TA.C.L.EAR 清楚所有的记录
YES〈CLEAR〉是清除
ON 〈CAERA〉不清除
九、OUTPUT TEST MENU 输出项目的测试
LAMP TEST 灯光的测试
START/VR 开始与视点的灯
LEADER 领先灯
BRAKE 刹车灯
十、进入测试项
打开投币门,可以看到四个按键和两个电位器,上面的一个电位器与两个按键是左
〈L〉边的音量调整和测试〈下面的是右(R)〉。
左边的按键是主测试按键TEST。
右边是辅测试按键
WERVICE。
按TEST 进入主菜单,按SERVICE可以移动光标进选子菜单项。
十一、加油、刹车、转弯的调整
1〉一般情况下机器在到场地后组装起来要按照1号车在左边,2号车在右边。
因为每一
台摩托车上的机械感应器在出厂时是跟相对的电脑板参数是调整好的,若不匹配,会出现:
①油门加到底而摩托车跑不了或跑不快
②摩托车在跑的时候只往一边斜
2〉在有些情况下,机器在长时间长途运输中,也有造机参数变动的情况,若是在开机后发现某台摩托在跑时是向一边斜很厉害,可以自行调节:
①打开投币门,按下相对那台机的主测试按键;
②选中INPUT TEST
③在其子菜单中,按辅测试键,使ROTTLE:20H〈20H〉前面出现一个闪动的光标“〉”
④此时,按住落档键SHIFT DOWN,同时扭动加油至终点,后松开落档按键
⑤使得MIN-MAX间的数值在OOH-ffH〈中间数值差约大约好〉。
此时加油的机械感应
器就较好了。
刹车和转弯的感应器也是和上面的方法一样,只要把光标移动到所要校正的地方就可以了。
十二、连线的调整
当你所买的TT摩托是带连线的,先把光纤线以串连的方式接好后,进入游戏调整下面的连线项,设正确。
①在GANE ASSIGNMENTS 游戏子菜单下找到LINK.TYPE。
②把光标移动的LINK.TYPE项后,按主测试键,使左边的参数变成MASTER主机,
右边的参数调为siave。
③再把BIKE.COLOR〈NO.〉的颜色和带号分别调成RED.〈NO.1〉红色1号机和
BLUE〈NO.2〉蓝色2号机,退出调整项,等待几秒钟即可。