LED(RGB)蓝牙遥控智能灯说明书
LED室内灯-遥控器操作功能说明
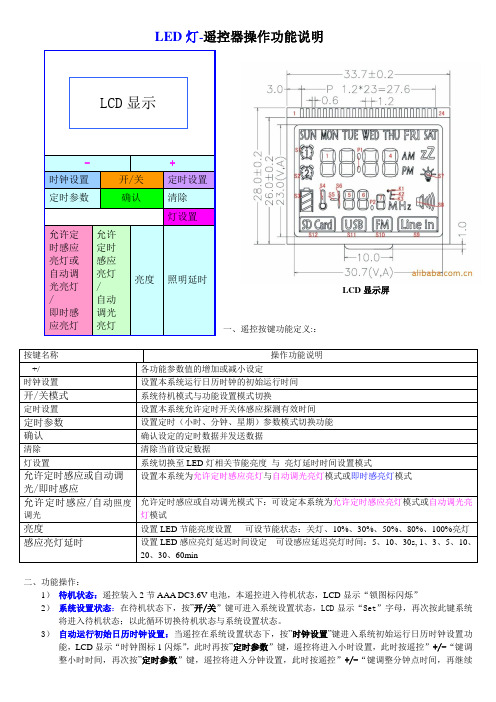
LED 灯-遥控器操作功能说明LCD 显示屏 一、遥控按键功能定义::二、功能操作:1) 待机状态:遥控装入2节AAA DC3.6V 电池,本遥控进入待机状态,LCD 显示“锁图标闪烁”2) 系统设置状态:在待机状态下,按”开/关”键可进入系统设置状态,LCD 显示“Set ”字母,再次按此键系统将进入待机状态;以此循环切换待机状态与系统设置状态。
3) 自动运行初始日历时钟设置:当遥控在系统设置状态下,按”时钟设置”键进入系统初始运行日历时钟设置功能,LCD 显示“时钟图标1闪烁”,此时再按”定时参数”键,遥控将进入小时设置,此时按遥控”+/-“键调整小时时间,再次按”定时参数”键,遥控将进入分钟设置,此时按遥控”+/-“键调整分钟点时间,再继续按”定时参数”模式键,遥控将进入星期设置,前面小时、分钟、星期都设置好后,此刻如果按”清除”键时,系统将清除当前设置的小时、分钟、星期等数据,所有数据都设置好后,再一次按”时钟设置”键时系统发送初始运行日历时钟数据,系统并退出系统运行初始日历时钟设置进入系统设置状态。
4)系统定时感应亮灯设置:当遥控在系统设置状态下,按”定时设置”键进入系统第1组定时感应开,LCD显示(“1”、“AM”、“时钟图标2闪烁”),此时再按”定时参数”键,遥控将进入小时设置,此时按遥控”+/-“键调整小时时间,再次按”定时参数”键,遥控将进入分钟设置,此时按遥控”+/-“键调整分钟点时间,再继续按”定时参数”键,遥控将进入星期设置,前面小时、分钟、星期都设置好后,此刻如果按”清除”键时,系统将清除当前设置的小时、分钟、星期等数据,所有数据都设置好后,如果按”确认”键,系统将发送定时数据并自动进入第1组定时感应亮灯关设定,LCD显示(“1”、“PM”、“时钟图标2闪烁”),再次按前术操作方式设置,本系统最多可设7组允许定时感应亮灯时间。
当7组允许定时感应亮灯时间设置完成后,此时按”定时设置”键或按”确认”键,系统将退出允许定时感应亮灯设置功能,并自动进入系统设置状态。
5合1智能LED控制器 用户手册说明书
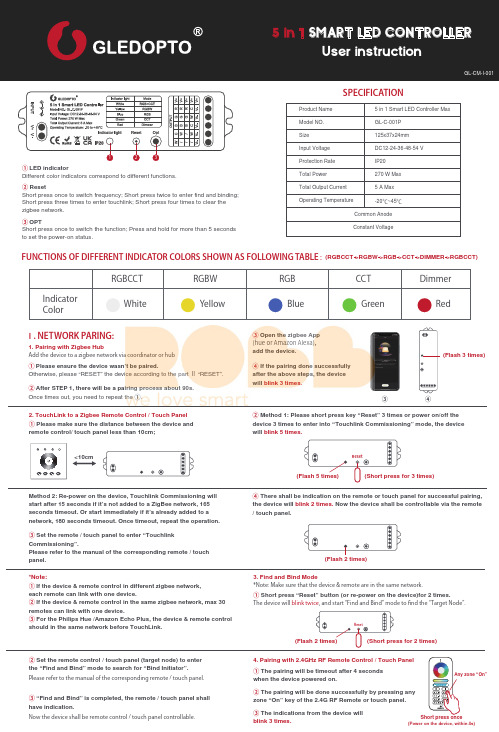
. NETWORK PARING:1. Pairing with Zigbee HubFUNCTIONS OF DIFFERENT INDICATOR COLORS SHOWN AS FOLLOWING TABLE :(RGBCCT >RGBW >RGB >CCT >DIMMER >RGBCCT)Add the device to a zigbee network via coordinator or hub① Please ensure the device wasn’t be paired.Otherwise, please “RESET” the device according to the part Ⅱ “RESET”.③ Open the zigbee App (hue or Amazon Alexa), add the device.② After STEP 1, there will be a pairing process about 90s.Once times out, you need to repeat the ①.Different color indicators correspond to different functions.② ResetShort press once to switch frequency; Short press twice to enter find and binding;Short press three times to enter touchlink; Short press four times to clear the zigbee network.③ OPTShort press once to switch the function; Press and hold for more than 5 seconds to set the power-on status.④ If the pairing done successfully after the above steps, the device will blink 3 times.③④2. TouchLink to a Zigbee Remote Control / Touch Panel ① Please make sure the distance between the device and remote control/ touch panel less than 10cm;Method 2: Re-power on the device, Touchlink Commissioning will start after 15 seconds if it’s not added to a ZigBee network, 165 seconds timeout. Or start immediately if it’s already added to a network, 180 seconds timeout. Once timeout, repeat the operation.② Method 1: Please short press key “Reset” 3 times or power on/off the device 3 times to enter into “Touchlink Commissioning” mode, the device will blink 5 times.(Flash 3 times)<10cm③ Set the remote / touch panel to enter “Touchlink Commissioning”.Please refer to the manual of the corresponding remote / touch panel.④ There shall be indication on the remote or touch panel for successful pairing, the device will blink 2 times. Now the device shall be controllable via the remote / touch panel.*Note:① If the device & remote control in different zigbee network, each remote can link with one device.② If the device & remote control in the same zigbee network, max 30 remotes can link with one device.③ For the Philips Hue /Amazon Echo Plus, the device & remote control should in the same network before TouchLink.3. Find and Bind Mode4. Pairing with 2.4GHz RF Remote Control / Touch Panel*Note: Make sure that the device & remote are in the same network.Please refer to the manual of the corresponding remote / touch panel.The device will blink twice , and start “Find and Bind” mode to nd the “Target Node”.① Short press “Reset” button (or re-power on the device)for 2 times.① The pairing will be timeout after 4 seconds when the device powered on.③ The indications from the device will blink 3 times.② The pairing will be done successfully by pressing any zone “On” key of the 2.4G RF Remote or touch panel.② Set the remote control / touch panel (target node) to enter the “Find and Bind” mode to search for “Bind Initiator”.Now the device shall be remote control / touch panel controllable.③ “Find and Bind” is completed, the remote / touch panel shall have indication.Any zone “On”Short press once(Power on the device, within 4s)SPECIFICATIONInput VoltageDC12-24-36-48-54 V Size 125x37x24mm Model NO.Product Name GL-C-001P 5 in 1 Smart LED Controller Max Protection Rate IP20Total Power 270 W Max Total Output Current 5 A Max Operating TemperatureCommon Anode Constant Voltage-20℃~45℃600Hz800Hz 1000Hz 2000Hz 4000Hz 8000Hz Flashing times123456. RESET:1. RESET the Zigbee Network2. Frequency Settings1. RGBCCT: . FACTORY RESET:(Short press for 4 times)(Long press for 5 seconds)① Method 1: Delete the device on theAPP, the device will blink 3 times.② Method 2: Short press key “Reset” 4 times (Or re-power on the device 4 times) to unpair the network, the device will blink 3 times.Method 1:Method 2:Method 1:Method 2:2. RESET the 2.4GHz RF Network① Method 1: Short press the Master “On” key 5 times within 4 seconds after the device powered on, the device will blink 3 times.Under RGBCCT function, the RGBCCT strip can be connected to the device.2. RGBW:Under RGBW function, the RGBW strip can be connected, without any connection to “N” terminal.4. CCT:Under CCT function, two pieces of CCT strips can be connected, without any connection to “N” terminal.In order to be applicable to different power supplies, the frequency of device is selectable as 600Hz 、800Hz 、1000Hz 、2000Hz 、4000Hz 、8000Hz with default frequency 1000HZ. Once short pressing “Reset” key , the frequency will switch into the next one. The indicator will flash in Pink color and resume to previous color after “off” for 2 seconds. The rule of indicator flashing times for different frequency please refer to table.1. Power-on Status Settings3. RGB:Under RGB function, the RGB strip can be connected, without any connection to “N” terminal.② Method 2: Short press continuously 5 times the Zone “On” key the device being paired within 4 seconds after the device powered on, the device will blink 3 times.Short press for 5 times(Power on the device, within 4s)Short press for 5 times(Power on the device, within 4s)“On” button of Zone 1-6 which is pairingThe Factory Reset will be done successfully by long pressing “Reset” key more than 5 seconds (or re-power on the device 5 times or more). All configuration parameters will be reset after the device is reset or removed from the network, including ZigBee and 2.4G RF Network. The indicator will flash firstly 3 times in the color of corresponding function selected, and turn into default White color (Default RGBCCT function) after flashing 4 times again .. WIRING DIAGRAM:POWER ON STATUS & FREQUENCY SETTINGS. SATURATION CONTROL FUNCTION VIA 2.4G RF REMOTE CONTROL. V+R G B C W5. DIMMER:1000Hz > 2000Hz > 4000Hz > 8000Hz > 600Hz >800Hz > 1000HzUnder dimmer function, five pieces of single color strips can be connected.Long press “opt” key for more than 5 seconds , the indicator will flash in light blue color and resume to previous color after “off” for 4 seconds to complete power-on status setting. The default power-on status is light on. The indicator flashing 3 times in light blue means light on under power-on status, flashing 4 times in light blue means light off under power-on status.。
华丽型CRGBW无线LED遥控器使用指南说明书

Wireless CRGBW LED Remote Control Instructions Important Safety Informationproduct performance.See the Important Safety and Product Information guide in the stereo box for product warnings and other important information.This device must be installed according to these instructions.Disconnect the vessel's power supply before beginning to install this product.NOTICEWhen drilling or cutting, always check what is on the opposite side of the surface to avoid damaging the vessel. You must read all installation instructions before beginning the installation. If you experience difficulty during the installation, contact Fusion® Product Support.Supplies and Tools Needed•2-conductor 22 AWG (0.33 mm2) wire to connect the remote control receiver to the power source•6-conductor 22 AWG (0.33 mm2) wire (or equivalent combination of 2- to 4-conductor wire) to connect the receiver to the LED speakers•Cable ties or adhesive for mounting the receiver• 4 gauge (3 mm) countersunk stainless-steel screws for mounting the remote cradle (optional)• 3 mm flat screwdriver•Wire cutters•Drill and drill bits for mounting the remote cradle (optional)Mounting and Connection ConsiderationsWhen selecting a location for the remote control receiver and making the wiring connections, observe these considerations.•The receiver housing is not weather proof, and you must install the receiver in a location that is not exposed to the elements.•You can connect a single receiver to up to 10 LED speakers with RGB, cool white, and warm white functionality (5 pair). You must use an additional receiver and remote control (sold separately) to connect to additional LED speakers.•You cannot use a single remote control with more than one receiver.Connecting the Remote Control ReceiverYou can connect up to 10 (5 pair) of CRGBW LED speakers to one remote control receiver.1Route a power wire (not included) from a 12 Vdc power source to the location of the receiver .2Install the included 7.5 A fuse on the power wire.3Route 6-conductor wire or equivalent (not included) from the receiver to the speakers you want to control, joining the wire where needed to connect up to 4 speakers.NOTE: To avoid interference, you must not route the LED wires near and parallel to any RCA, power, or speaker audio cables. You should also avoid routing this cable near any other electronic cabling on the vessel.4Connect the 6-conductor wire or equivalent to the CRGBW connectors on the speakers according to the installation instructions provided with the speakers.5Loosen the wire terminal screws on the bottom of the receiver using a 3 mm flat screwdriver.6Connect the power and RGB speaker wires to the wire terminals on the sides of the receiver.78Secure the receiver to the mounting location using cable ties or adhesive (not included).Installing the Remote Control CradleYou can install the included remote cradle to store the remote when not in use. Mounting hardware for the cradle is not included.Because the remote control is not weatherproof, you must install the cradle in a location that is not exposed to the elements.1Using the cradle as a template, mark the two pilot holes.2Remove the cradle from the mounting surface and drill the pilot holes.Do not drill through the cradle when drilling the pilot holes. This may damage the cradle.3Secure the cradle to the mounting surface using two 4 gauge (3 mm) countersunk stainless-steel screws. Installing the BatteriesYou must install AAA alkaline batteries (not included) in the remote control.1Slide the battery door to the back of the remote, and pull up to open it.2Insert two AAA batteries, observing polarity.3Slide the battery door back onto the remote to close it.Remote Control OperationTurning the LEDs On and OffAfter you connect the remote control receiver to the speaker LEDs, you must use the remote control to turn the LEDs on and off.1Press .The LEDs connected to the receiver turn on with the same color and mode settings applied before the last time you turned them off.2Press to turn off the LEDs connected to the receiver.Changing the Color of the LEDs1If necessary, turn on the LEDs for the speakers you want to change.2Select an option:•Touch the color wheel to select a new color, and slide your finger to fine-tune it.•Hold to change the LED color to white.NOTE: This turns off all color LEDs and turns on the cool white and warm white LEDs.Changing the Brightness of the RGB LEDs1If necessary, turn on the LEDs for the speakers you want to change, and select a color.2Select an option:•To increase the LED brightness, press above .•To decrease the LED brightness, press below .Using Cool or Warm White LEDsYou can use the remote control to add cool or warm white to any color, or on their own.•To add or remove warm white LEDs to or from a color, press .•To add or remove cool white LEDs to or from a color, press .•To turn off all color LEDs and turn on the warm and cool white LEDs, holdChanging the Brightness of the Warm or Cool White LEDs1If necessary, turn on the warm or cool white LEDs for the speakers you want to change.2Select an option:•To increase the LED brightness, press above or .•To decrease the LED brightness, press below or .Changing the Display Mode of the LEDsYou can cycle through a pre-defined set of LED flashing, breathing, or color-changing effects (Display Mode Options, page 6).1If necessary, turn on the LEDs for the speakers you want to change.2Press .3Press to change to the next mode in the sequence.4Touch a color on the color wheel to stop the display mode and return to a solid color.Display Mode OptionsYou can select among 25 different color and transition patterns. When you reach the end of the cycle of display modes by continually pressing , the patterns stop, and the LEDs are a static full white. When you press again, the cycle starts at the beginning.Changing the Speed of a Display Mode PatternYou can adjust the speed of the effects when using a display-mode pattern.1If necessary, turn on the LEDs for the speakers.2If necessary, select a the display mode (Changing the Display Mode of the LEDs, page 5).3Select an option:•To increase the speed of the display-mode-pattern effect, press above .•To decrease the speed of the display-mode-pattern effect, press below .Unpairing a Remote Control from the Wireless ReceiverYou can unpair a remote control from the wireless receiver if you are planning to replace it.1If necessary, install the wireless receiver, and connect it to the speaker LEDs (Connecting the Remote Control Receiver, page 2).2If necessary, install batteries in the replacement remote control (Installing the Batteries, page 3).3Disconnect the power from the wireless receiver.4Hold on the remote control, and connect the wireless receiver to power.The LEDs flash nine times to indicate that the remote control is unpaired from the wireless receiver.NOTE: After the remote control is unpaired from the wireless receiver, the connected LEDs fade in and out through a red, green, and blue cycle until you pair a new remote control with the wireless receiver (Pairing a Remote Control with the Wireless Receiver, page 7).Pairing a Remote Control with the Wireless ReceiverIf you replace a lost or damaged remote control with a new remote control, you can use the replacement remote control with an existing wireless receiver.1If necessary, install the wireless receiver and connect it to the speaker LEDs (Connecting the Remote Control Receiver, page 2).2If necessary, install batteries in the replacement remote control (Installing the Batteries, page 3).3Disconnect the power from the wireless receiver.4Hold on the remote control, and connect the wireless receiver to power.The LEDs flash three times to indicate that the remote control is paired to the wireless receiver. SpecificationsRegistering Your Wireless CRGBW LED Remote ControlHelp us better support you by registering the product online.•Go to .•Keep the sales receipt, or a copy, in a safe place.© 2020–2022 Garmin Ltd. or its subsidiariesGarmin, the Garmin logo, Fusion, and the Fusion logo, are trademarks of Garmin Ltd. or its subsidiaries, registered in the USA and other countries. These trademarks may not be used without the express permission of Garmin.。
iColor MR g2 智能RGB MR16 LED灯说明书
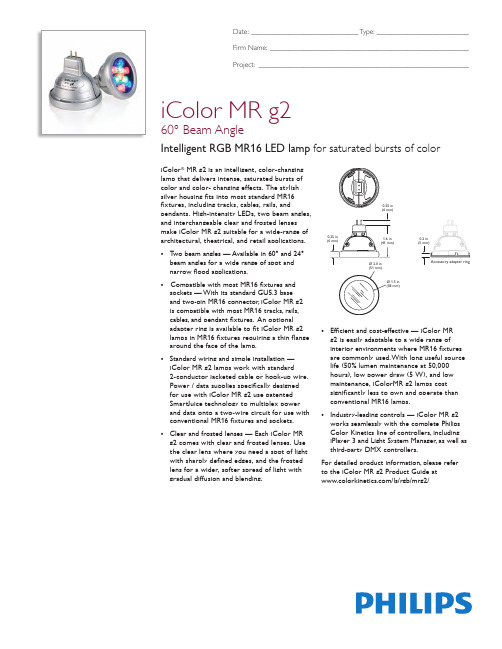
• Compatible with most MR16 fixtures and sockets — With its standard GU5.3 base and two-pin MR16 connector, iColor MR g2 is compatible with most MR16 tracks, rails, cables, and pendant fixtures. An optional adapter ring is available to fit iColor MR g2 lamps in MR16 fixtures requiring a thin flange around the face of the lamp.
2 x 2 x 1.9 in (51 x 51 x 47 mm)
3.4 oz (97 g) Die-cast zinc, silver Clear or frosted tempered glass Standard 2-pin MR16 connector 4° – 104° F (-20° – 40° C) 167° F (75° C) Surface 0 – 95%, non-condensing 14 maximum per PDS-70mr Maximum cable length 50 ft (15 m) UL / cUL, CE Class 2 LED product Dry Location, IP20
• Standard wiring and simple installation — iColor MR g2 lamps work with standard 2-conductor jacketed cable or hook-up wire. Power / data supplies specifically designed for use with iColor MR g2 use patented SmartJuice technology to multiplex power and data onto a two-wire circuit for use with conventional MR16 fixtures and sockets.
2.4G遥控灯功能说明(标准)
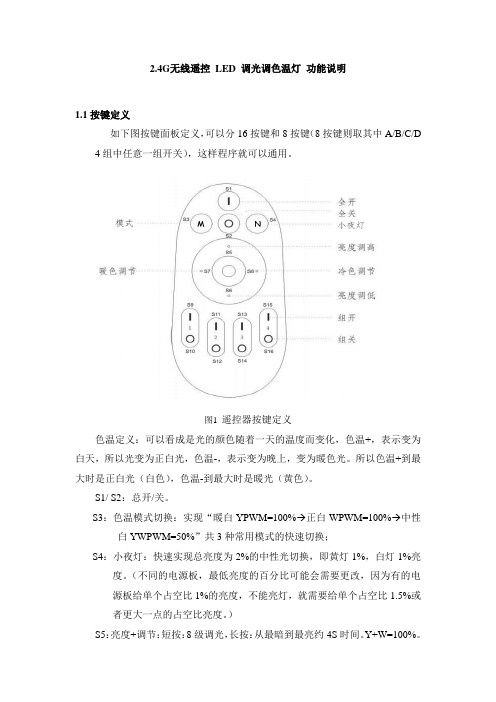
2.4G无线遥控LED 调光调色温灯功能说明1.1按键定义如下图按键面板定义,可以分16按键和8按键(8按键则取其中A/B/C/D 4组中任意一组开关),这样程序就可以通用。
图1遥控器按键定义色温定义:可以看成是光的颜色随着一天的温度而变化,色温+,表示变为白天,所以光变为正白光,色温-,表示变为晚上,变为暖色光。
所以色温+到最大时是正白光(白色),色温-到最大时是暖光(黄色)。
S1/ S2:总开/关。
S3:色温模式切换:实现“暖白YPWM=100%→正白WPWM=100%→中性白YWPWM=50%”共3种常用模式的快速切换;S4:小夜灯:快速实现总亮度为2%的中性光切换,即黄灯1%,白灯1%亮度。
(不同的电源板,最低亮度的百分比可能会需要更改,因为有的电源板给单个占空比1%的亮度,不能亮灯,就需要给单个占空比1.5%或者更大一点的占空比亮度。
)S5:亮度+调节:短按:8级调光,长按:从最暗到最亮约4S时间。
Y+W=100%。
S6:亮度-调节:短按:8级调光,长按:从最亮到最暗约4S时间。
Y+W=2%。
S7:色温-调节:从白光向暖光渐变:短按:8级调光,长按:从白灯到黄灯约4S时间。
S8:色温+调节:从暖光向白光渐变:短按:8级调光,长按:从黄灯到白灯约4S时间。
S9/S10:组A分组开/关。
S11/S12:组B分组开/关。
S13/S14:组C分组开/关。
S15/S16:组D分组开/关。
1.2功能定义a)分组对码功能:断开交流点电源10 秒钟以上,插上电源 3 秒钟内,按分组开灯键(S9/S11/S13/S15),LED中性光形式慢闪3次,对码成功,这组开关可以控制对码的LED 灯的调节,其他分组类推;b) 清码功能:断开交流电源10 秒钟以上,插入电源 3 秒钟内,连按“分组开/总开”键(S10/S12/S14/S16/S2) 3 次,LED 中性光形式快闪 6 次,实现“分组清码/全部清码”,重复上面可重新分组对码;注意:清码只能用已经学过的遥控器进行清码。
Mi·light遥控LED灯系统 快速使用指南

Mi·light遥控LED灯系统快速使用指南感谢您购买Mi.light 遥控LED灯系统。
在使用本产品前,请仔细阅读本使用指南,并遵循其中的使用指导,可以帮助您快速获得产品性能的完美验。
为了及时获得正确的使用指导,建议您在产品的存续期内保存此使用指南。
内容目录一.产品介绍二.首次使用遥控LED灯和遥控器的对码匹配同时进行分组与分组控制三.替换和新增四.常见问题五.故障和排除六.丢弃七.技术参数一.产品介绍只需将白炽灯或普通节能灯,LED灯泡替换成Mi·light遥控LED灯,就可以使用配套遥控器实现无线遥控,控制灯的开关和调节光亮,色温。
无需额外的布线安装,简单方便。
注意:Mi·light遥控LED灯不适用于有调光功能的灯具;注意:Mi·light遥控LED灯和遥控器是独立的系统,只能与本公司的产品配套,不兼容其它品牌和公司的普通节能灯,白炽灯,LED灯和遥控系统。
本套装提供基本使用组合,(2个遥控LED灯,1个遥控器)此外,我还提供单支Mi·light遥控LED灯的售卖包装,方便你购买更多的遥控LED灯装点家居。
遥控器功能键说明;二.首次使用如果首次使用本产品,请按以下步骤完成遥控器和灯的安装准备;2.1安装遥控器电池:·取出包装内的遥控器按图示,轻轻按住电池仓盖,向下(遥控器宽的那一端)滑开,然后取下电池仓盖。
·按图示装入两节AAA电池,注意按照电池仓内指示的正负极按装·再盖上电池仓盖,向上(遥控器窄的那一端)推紧。
注:由于电池的不可控制因素,我司不随产品附送。
请见谅!2.2安装遥控LED灯:(注意,操作中请握住灯体的金属部分!)·将遥控LED灯从包装中小心取出。
·切断欲安装遥控LED灯灯具的电源。
·取下原有的灯,并拧上遥控LED灯。
·然后打开电源,正常情况下,LED灯亮。
2.4G遥控说明书

LED智能遥控器2.4G调光调色温本产品适用于水晶灯/筒灯/平板灯/球泡/吸顶灯等调光、调色温灯具。
调光调色温系统说明书本产品为智能LED灯具控制系统,控制灯具的开关、亮度及色温的无级调节。
采用2.4G无线遥控技术,具有功耗低,传输距离远,干扰极小,抗干扰能力强,传输速度快等特点。
遥控器外形时尚美观,功能简单实用。
且具有小夜灯(0.6W-0.8W)、色温切换(白光-黄光-中性光)功能、亮度记忆功能(即遥控关闭后重新开启,灯具会自动保留关闭前的亮度状态)及无极调光调色温功能。
亮度可从1%-100%遥控调节;色温可从3000K-6500K(具体参见所用LED色温)遥控调节;在有效遥控范围内,一个遥控器可以控制多个LED灯具,且同步性、一致性好。
将不同的灯具分到不同的组,最多分4组(每个灯具只能分在同一遥控器某一分组),实现同时控制或分组控制;每个灯具也可以学习多个遥控器(最多4个),方便使用。
系统自带恒流限压电源,驱动和保护LED灯珠,电流稳定,启动快,灯光不闪烁(对保护眼睛有好处),有利于延长LED寿命。
支持一控多,或者多控一,可以自由搭配灯具和遥控器的数量。
产品提供2年质保(外形受损的除外),终身维修。
规格参数开关调色控制(无遥控情况下)当遥控电力不足、丢失或损坏等暂时无法使用遥控控制的情况下,可以通过墙壁开关或其他电源通断控制器来手动“开/关”灯具,随着“开”与“关”的操作,灯具同时可切换“白光”、“暖光”、“中性光”三种亮灯模式。
基本功能操作1.对码和分组遥控器需要与LED灯具进行对码操作后才能使用,方法如下:将LED灯安装固定好,确认电源连接正常后,选定需要分组控制的灯具,切断电源3秒钟后重新接通电源,在接通电源的瞬间(3秒钟内)长按相应分组“开”键, LED灯将"冷暖各慢闪三下"确认匹配分组成功。
重复以上步骤将所有分组的灯具实现分组。
注:每个LED灯具只能对同一遥控器上的某一组匹配,一个遥控器的一个分组可以匹配多个LED灯具;一个LED灯具最多只能同时接受4个遥控器同时匹配控制。
LED智能灯具说明书20XX
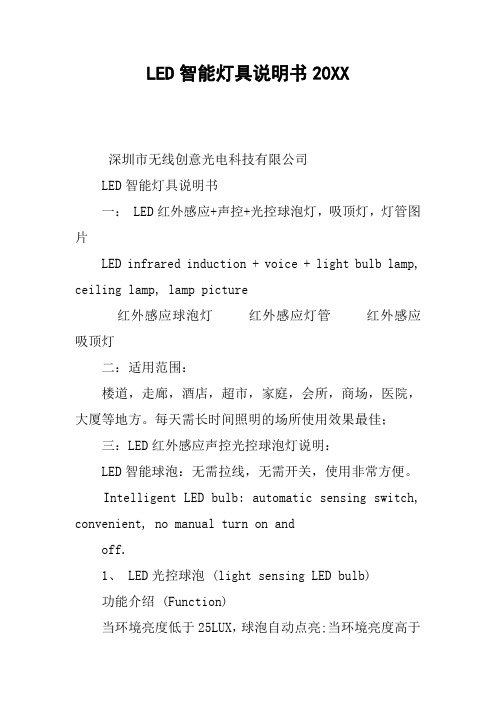
LED智能灯具说明书20XX深圳市无线创意光电科技有限公司LED智能灯具说明书一: LED红外感应+声控+光控球泡灯,吸顶灯,灯管图片LED infrared induction + voice + light bulb lamp, ceiling lamp, lamp picture红外感应球泡灯红外感应灯管红外感应吸顶灯二:适用范围:楼道,走廊,酒店,超市,家庭,会所,商场,医院,大厦等地方。
每天需长时间照明的场所使用效果最佳;三:LED红外感应声控光控球泡灯说明:LED智能球泡:无需拉线,无需开关,使用非常方便。
Intelligent LED bulb: automatic sensing switch, convenient, no manual turn on andoff.1、 LED光控球泡 (light sensing LED bulb)功能介绍 (Function)当环境亮度低于25LUX,球泡自动点亮;当环境亮度高于25LUX,球泡自动退出灭掉。
Light turns on automatically when ambient brightness is below 25 Lux and it turns off when ambient brightness is above 25 Lux.2、 LED红外感应球泡 (infrared sensing LED bulb)功能介绍 (Function)①通电时感应球泡温机30秒,然后灭掉进入感应状态。
Light turns up for 30 seconds after power on, then enters the sensing status (light off).②当环境亮度低于10LUX时,人进入感应球泡的感应范围内灯会自动亮,亮一次的时间为2分钟(可以设置时间)。
At ambient brightness below 10 Lux (twilight status), the LED light turns on automatically for 2 minutes whenever there is a person within sensing area. Different light-up time can be set. ③感应球泡感应范围为半径5M。
- 1、下载文档前请自行甄别文档内容的完整性,平台不提供额外的编辑、内容补充、找答案等附加服务。
- 2、"仅部分预览"的文档,不可在线预览部分如存在完整性等问题,可反馈申请退款(可完整预览的文档不适用该条件!)。
- 3、如文档侵犯您的权益,请联系客服反馈,我们会尽快为您处理(人工客服工作时间:9:00-18:30)。
LED(RGB)蓝牙遥控智能灯说明书
一、前言
在大多数人眼里,开灯与关灯需要用手去触控墙壁上的开关,对于无线灯光控制理念不是很了解,一时间也无法改变自身早已习惯的控制方法,不过生活中需要多去尝试新的创意和事物,只要你用有一台智能手持设备,便能直接控制LED灯的开关,为生活中很多事情的进行提供方便,比如你无需在半夜抹黑去找寻找开关,无需离开温暖的被窝去关闭灯光,而且有定时开关的功能,设定一个灯光开启和关闭的时间,你就可舒心地伴着舒适的灯光入睡,随着清晨的一丝微亮为苏醒,非常贴心的享受。
二、功能概述
灯光控制:定时功能:
不仅可以控制灯具的开关,还可强大的定时功能,定时开关以对颜色、亮度、进行调节,还定义选择颜色,定义选择模配有设定好灯光模式式
语音功能:智能手机控制设备:
可以语音控制开灯、关灯一部智能手机就是一个遥颜色,还可以设置识别的控器,界面更人性,功能
语言(中文、英语、粤语)强大,操作更智能无需另
外配置遥控器,而且传统
遥控器容易丢失,控制达
不到要求
蓝牙连线控制:
支持蓝牙4.0连接通信
注意:不支持蓝牙4.0以下
三、软件下载地址及功能使用介绍
(一)APP软件下载地址:
iOS平台(iPhone4以下不能用):
/apple
安卓平台(4.3以上的版本才能使用):
/android
注意:手机蓝牙4.0以上才能使用
(二)软件功能界面介绍
1.安卓版主界面功能介绍
1.单色模块:该模式可以触摸圆环圈随意调节
颜色。
2.亮度调节:滑动滑条设置LED灯亮度,从左
往右亮度由亮变暗。
3.语音控制:可以通过语音来控制开关灯和灯
颜色。
4.蓝牙连接:可以通过智能灯与手机蓝牙配对。
5.LED灯开关:可以控制开启和关闭灯功能。
6.设置功能:可以编辑定时设置、语音设置。
1)蓝牙连接配对
(图1)
图1-点击连接蓝牙。
(图2)
图2-进入蓝牙搜索界面点击配对SmartComm名称蓝牙。
(图3)
图3-蓝牙配对已连接。
2)语音控制
(图4)
图4-语音控制:可以通过语音来控制开关灯和灯颜色等。
3)定时设置和语音设置
(图5)
图5-点击右上角设置菜单可以进入定时和语音设置。
(图6)
图6-定时闹钟设定;可以对时间、星期、开关灯、颜色、闹钟铃声等设置。
(图7)
图7-语音设置:可以对识别语言选择、喜爱的颜色起名和选择喜爱颜色等。
2.iOS版主界面功能介绍
1)蓝牙连接配对
(图8)
图8-开启APP会提示连接界面。
(图9)
图9-进入蓝牙搜索界面点击配对SmartComm
名称蓝牙。
(图10)
图10-选择SmartComm名称蓝牙进行配对。
2)主界面功能介绍
1.单色模块:该模式可以触摸圆圈颜色随意调节选择颜色。
2.亮度调节:滑动滑条设置LED灯亮度,从左往右亮度由暗变亮。
3.语音控制:可以通过语音来控制开关灯和灯颜色。
4.LED灯开关:可以控制开启和关闭灯功能。
5.蓝牙连接:可以通过智能灯与手机蓝牙配对。
6.设置功能:可以编辑闹钟设置、声控设置。
3)语音控制
(图11)
图11-语音控制;可以通过语音来控制开关灯和灯颜色等。
4)闹钟设置和声控设置
(图12)
图12-点击右上角设置菜单可以进入闹钟和声控设置。
(图13)
图13-闹钟设置:可以对时间、星期、开关灯、
颜色、闹钟铃声等设置。
(图13)
图13-声控设置:可以对识别语言选择、喜爱
的颜色起名和选择喜爱颜色等。
四、安全指引
注意!为了保证产品的完好状态和使用安全,请遵守此说明书
上的指示和提醒。
谨慎操作!请详细阅读安全注意事项:
●安装时尽量避免在雷区、强磁场和高压区域。
●请确保接线正确牢固,以免短路损坏部件和触发火灾事故。
●请将控制器安装在通风良好的地方,以保证环境温度适宜。
●请检查控制器输入电压、开关电源(电源要配套恒压开关
电源)是否符合产品要求,电源正负极定义是否和产品一
致。
●禁止带电接线,检查确认接线正确后,检查无短路,再通
电!
●如果发生问题,请勿私自维修。
如果有疑问,请联系供应
商。