BEA+TUXEDO安装手册
ABB Ability ODM zenon 8.20快速安装指南说明书

—APPLICATION NOTEABB Ability ODM zenon 8.20Quick Installation GuideBefore installing ABB zenon 8.20:1.All current operating system updates must be installedNote: If you always use the latest version (Service Pack) of your operating system, you not only avoid compatibility issues but also security problems.2.There must not be a restart pending.3.The system requirements are checked before installation. If the requirements are not met, you areshown these on a separate page with notices on how to rectify this.4.Automatic Windows updates influence the installation. If an update of the Windows operatingsystem is carried out while the zenon setup is running, it can cause problems during the zenon installation.To prevent this: Deactivate the automatic Windows update during the time of installation and carry out the Windows update before starting the zenon installation5.With Windows 7 Embedded Standard, zenon is installed using the normal installation routine. Youcan find the hardware requirements in the Runtime under Windows Embedded Standard chapter.6.During the installation of zenon, the ABB Multiple Network Protocol Driver (cdprotdrv.sys) isinstalled. To start the driver, the operating system must be restarted after installation.7.Activate Windows feature - .NET framework 3.5 before installation.Frequent sources of error during installation:1.The virus scanner is active and blocks the installtion because the scanner thinks it´s a virus.Solution: Seperate the system from the network, disable the virus scanner, execute the installation again.2.The firewall was not configured correctly. Solution: Seperate the system from the network, disablethe firewall, execute the installation again.3.Erroneous SQL-installation on the system. Solution: Create project backups; if possible, deinstallSQL server, rename the SQL folder, and restart installation.Get started with download:1.Download ABB zenon 8.20 setup from ABB website (use direct link as mentioned below):ABB zenon 8.20 download link2.Run installer as administrator.3.Select the language for the installation.4.Read and agree to the license terms. Print button will print the EULA and previous button go back tothe language selection page.5.Select options for download:a.Main Release – ABB zenon editor and runtime standard packageb.Zenon PDF Help Files - Besides the Online Help which is installed with zenon software bydefault, the same help content in PDF format can be downloaded and installed.c.ZEE600 - ABB zenon Electrification Edition for seamless integrator of diverse devices such asABB and 3rd party make protection relays, meters, substation equipment condition monitoring units, Programmable Logic Controllers (PLC) and Remote Terminal Units (RTUs),6.Download in progress.7.Downloaded package will be saved in selected target folder.Get started with installation:1.You can start installation on the same machine or download setup can be copied to anothermachine for installation.2.Right click on Start.exe and run as administrator.3.Select language again for installation:4.Also accept license terms again.5.Select options for installation (We suggest youto select all options during download and later youcan choose desired options for installation).a.Zenon 8.20 – You can select Editor (complete development package withruntime), or standalone runtime option. Additionally zenon web sevrer and clientcan be selected for installation.b.Zenon PDF Help Files – in English and German.c.ZEE600 package.6.You will get installation successful message once all selected components are installed properly.7.In case of failed installation please click Show logs link to collect logs and contact us via*********************.。
TUXEDO安装部署使用排错文档
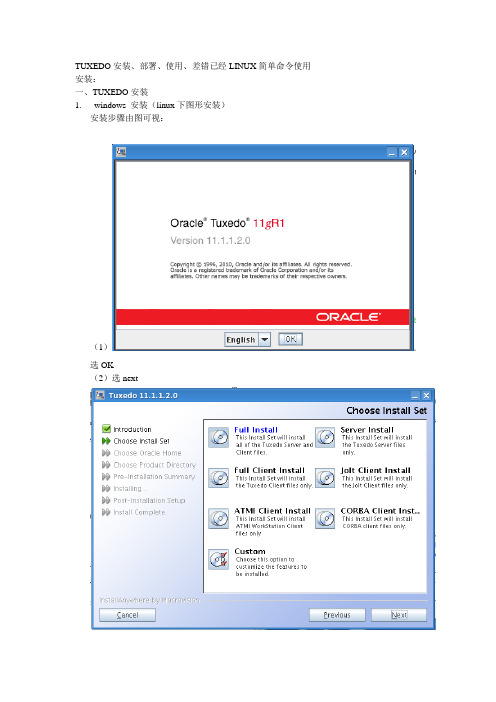
TUXEDO安装、部署、使用、差错已经LINUX简单命令使用安装:一、TUXEDO安装1.windows 安装(linux下图形安装)安装步骤由图可视:(1)选OK(2)选next(3)这是tuxedo的安装路径,放哪个目录随你自己选(4)这里最好勾选上install simples(5)选install(6)这里需先选下cancle弹出界面再选resume 然后再输入密码(7)选NO (8)选doneOK texudo就装好了2.linux下非图形界面安装(脚本安装)Tuxedo 部署流程1.将tuxedo.tar拷贝到某个目录下2.修改/opt目录权限为rwx-rwx-rwx3.解压tuxedo,tar到当前目录: tar -vxf tuxedo.tar -C ./4.运行安装脚本./install.sh5.选择16.直接回车键7.选择18.选择19.输入:/opt10.选择211.选择Y或者N12.回车13.回车14.输入两次oracle15.选择216.回车17.回车安装完成程序所在目录为当前目录下的tuxedo目录二、tuxedo部署查看虚拟机IP查看机器名称修改环境变量文件:tux.env主要设置:TUXDIR,PATH,LD_LIBRARY_PA TH,LANG,APPDIR修改UBB配置文件(c) 2003 BEA Systems, Inc. All Rights Reserved.#ident "@(#) samples/atmi/simpapp/ubbsimple $Revision: 1.7 $"#Skeleton UBBCONFIG file for the TUXEDO Simple Application.#Replace the <bracketed> items with the appropriate values.*RESOURCESIPCKEY 123456 (1)DOMAINID simpappMASTER serverMAXACCESSERS 100MAXSERVERS 50MAXSERVICES 50MODEL SHMLDBAL NNOTIFY SIGNAL*MACHINESDEFAULT: (2)APPDIR="/home/oracle/simpapp"TUXCONFIG="/home/oracle/simpapp/tuxconfig"TUXDIR="/home/oracle/tuxedo11gR1"MAXWSCLIENTS=5#Example:# APPDIR="/home/me/simpapp"# TUXCONFIG="/home/me/simpapp/tuxconfig"# TUXDIR="/usr/tuxedo""bogon130" LMID=server#Example:#beatux LMID=iogon*GROUPSGROUP1 (3)LMID=server GRPNO=1 OPENINFO=NONE*SERVERSDEFAULT:CLOPT="-A"forward SRVGRP=GROUP1 SRVID=10 (4)toupper SRVGRP=GROUP1 SRVID=1WSL SRVGRP=GROUP1 SRVID=20 (5)CLOPT="-A -- -n //192.168.192.130:9977 -m 2 -M 5 -x 10 -p 10000 -P 11000"*SERVICES (6)TOUPPERTOUPPERTEST(1)IPC资源识别号设置(2)服务器程序环境设置(3)服务器组设置(4)服务设置(5)通讯设置(6)服务名设置设置环境变量. ./tux.env编译程序配置文件tmloadcf –y ubb启动程序tmboot建议:1.关闭服务器防火墙,或者设置通讯端口开发,WSH端口段开开放2.Selinux设置为不启动3.启动程序以后在客户端使用telnet命令测试连接是否成功。
TUXEDO安装部署使用排错文档
TUXEDO安装、部署、使用、差错已经LINUX简单命令使用安装:一、TUXEDO安装1.windows 安装(linux下图形安装)安装步骤由图可视:(1)选OK(2)选next(3)这是tuxedo的安装路径,放哪个目录随你自己选(4)这里最好勾选上install simples(5)选install(6)这里需先选下cancle弹出界面再选resume 然后再输入密码(7)选NO (8)选doneOK texudo就装好了2.linux下非图形界面安装(脚本安装)Tuxedo 部署流程1.将tuxedo.tar拷贝到某个目录下2.修改/opt目录权限为rwx-rwx-rwx3.解压tuxedo,tar到当前目录: tar -vxf tuxedo.tar -C ./4.运行安装脚本./install.sh5.选择16.直接回车键7.选择18.选择19.输入:/opt10.选择211.选择Y或者N12.回车13.回车14.输入两次oracle15.选择216.回车17.回车安装完成程序所在目录为当前目录下的tuxedo目录二、tuxedo部署查看虚拟机IP查看机器名称修改环境变量文件:tux.env主要设置:TUXDIR,PATH,LD_LIBRARY_PA TH,LANG,APPDIR修改UBB配置文件(c) 2003 BEA Systems, Inc. All Rights Reserved.#ident "@(#) samples/atmi/simpapp/ubbsimple $Revision: 1.7 $"#Skeleton UBBCONFIG file for the TUXEDO Simple Application.#Replace the <bracketed> items with the appropriate values.*RESOURCESIPCKEY 123456 (1)DOMAINID simpappMASTER serverMAXACCESSERS 100MAXSERVERS 50MAXSERVICES 50MODEL SHMLDBAL NNOTIFY SIGNAL*MACHINESDEFAULT: (2)APPDIR="/home/oracle/simpapp"TUXCONFIG="/home/oracle/simpapp/tuxconfig"TUXDIR="/home/oracle/tuxedo11gR1"MAXWSCLIENTS=5#Example:# APPDIR="/home/me/simpapp"# TUXCONFIG="/home/me/simpapp/tuxconfig"# TUXDIR="/usr/tuxedo""bogon130" LMID=server#Example:#beatux LMID=iogon*GROUPSGROUP1 (3)LMID=server GRPNO=1 OPENINFO=NONE*SERVERSDEFAULT:CLOPT="-A"forward SRVGRP=GROUP1 SRVID=10 (4)toupper SRVGRP=GROUP1 SRVID=1WSL SRVGRP=GROUP1 SRVID=20 (5)CLOPT="-A -- -n //192.168.192.130:9977 -m 2 -M 5 -x 10 -p 10000 -P 11000"*SERVICES (6)TOUPPERTOUPPERTEST(1)IPC资源识别号设置(2)服务器程序环境设置(3)服务器组设置(4)服务设置(5)通讯设置(6)服务名设置设置环境变量. ./tux.env编译程序配置文件tmloadcf –y ubb启动程序tmboot建议:1.关闭服务器防火墙,或者设置通讯端口开发,WSH端口段开开放2.Selinux设置为不启动3.启动程序以后在客户端使用telnet命令测试连接是否成功。
第一次安装tuxedo for linux 全过程

/tmp/install.dir.22860/Linux/resource/jre/bin/i386/native_threads/java: error while loading shared libraries: libstdc++-libc6.1-1.so.2: cannot open shared object file: No such file or directory
The included VM could not be uncompressed. Please try to download
the installer agng 'binary'
mode. Please do not attempt to install this currently downloaded copy.
解决办法:
ubb文件中主机名大小写弄错,即ubb文件中主机名要与实际相一致,包括大小写,改正即可
出错9------------------------------------------------------------------
[tuxedo@TUXSVR4 tuxedo]$ tmboot -y
参考:
https:///archives/fedora-list/2004-July/msg00315.html
出错4-----------------------------------------------------------------
Xlib: connection to ":0.0" refused by server
TUXEDO教程

2003.8
1.中间件 1.中间件
定义:中间件是一种独立的系统软件或服务程序,分布式应用软件借助这种软件在不 同的技术之间共享资源,中间件位于客户机服务器的操作系统之上,管理计算资源和 网络通讯 。 工作机制:客户端上的应用程序需要从网络中的某个地方获取一定的数据或服务,这 些数据或服务可能处于一个运行着不同操作系统和特定查询语言数据库的服务器中。 而C/S应用程序中负责寻找数据的部分只需访问一个中间件系统,由中间件完成到网络 C/S应用程序中负责寻找数据的部分只需访问一个中间件系统,由中间件完成到网络 中找到数据源或服务,进而传输客户请求、重组答复信息,最后将结果送回应用程序对象请求代理的标准,分别是CORBA和DCOM
事务处理中间件(TPM, Monitor) 事务处理中间件(TPM,Transaction Processing Monitor) IBM cics Bea Tuxedo
2.Tuxedo简介 2.Tuxedo简介
1.中间件(续) 1.中间件( 中间件
中间件的分类 :
数据库中间件(DM,Database Middleware) Middleware) 数据库中间件(DM,
ODBC是一种基于数据库的中间件标准 ODBC是一种基于数据库的中间件标准
远程过程调用中间件( Call) 远程过程调用中间件(RPC, Remote Procedure Call) 面向消息中间件(MOM, Middleware) 面向消息中间件(MOM,Message Oriented Middleware) IBM MQ 基于对象请求代理(ORB, Broker) 基于对象请求代理(ORB,Object Request Broker)的中间件
中间件操作指引-Tuxedo

中间件操作指引Bea Tuxedo广东亿迅科技有限公司2008年7月项目名称/代码:集成部版本: 1.0状态:所有人:系统组作者/创建时间:唐彪批准人/批准时间:文档更改历史记录目录第1章BEA TUXEDO产品 (5)1.1T UXEDO是什么 (5)1.2T UXEDO系统特点 (5)第2章TUXEDO安装 (6)2.1在UNIX系统安装 (6)2.2在WINDOWS系统安装 (7)2.3安装LICENSE (7)2.4T UXEDO环境变量 (7)2.5T UXEDO目录结构 (8)2.6T UXEDO应用步署过程 (8)第3章配臵管理 (8)3.1配臵文件 (8)3.2资源定义 (9)3.3机器的信息 (10)3.4组定义 (11)3.5服务定义 (11)3.6交易定义 (12)3.7生成TUXCONFIG文件 (13)第4章管理命令 (13)4.1TMBOOT命令 (13)4.2TMSHUTDOWN命令 (14)4.3TMADMIN命令 (14)4.3.1查看services状态 (15)4.3.2查看server状态 (16)4.3.3查看队列状态 (16)4.3.4查看客户端状态 (17)4.4查看日志 (18)第5章常见故障 (18)5.1UBB编译类 (18)5.2服务启动类 (19)5.3服务关闭类 (20)5.4域间通信类 (20)第1章Bea Tuxedo产品1.1 Tuxedo是什么BEA TUXEDO是在企业、Internet 这样的分布式运算环境中开发和管理三层结构的客户/服务器型关键任务应用系统的强有力工具。
它具备分布式事务处理和应用通信功能,并提供完善的各种服务来建立、运行和管理关键任务应用系统。
开发人员能够用它建立跨多个硬件平台、数据库和操作系统的可互操作的应用系统。
BEA TUXEDO是企业、Internet 分布式应用中的基础主干平台。
它提供了一个开放的环境,支持各种各样的客户、数据库、网络、遗留系统和通讯方式。
TUXEDO中间件安装手册

全国邮政综合计算机网应用软件系统版本号:V1.00 文档编号:邮区中心局生产系统TUXEDO中间件安装手册方正奥德计算机系统有限公司二○○三年五月文档管理信息表文档修改记录目录1TUXEDO安装环境 (4)1.1 服务端 (4)1.2 客户端 (4)2安装步骤 (4)2.1 安装T UXEDO8.0 FOR L INUX: (4)2.1.1用Tuxedo8.0 for Linux光盘进行安装: (4)2.1.2用Tuxedo8.0 for Linux 的tar 包进行安装 (4)2.2配置UBB文件(有关各参数的详细说明请参阅有关文档) (5)3相关设置 (6)3.1 SERVER端环境变量(在用户环境变量中加入以下设置) (7)3.2CLIENT端环境变量(在用户环境变量中加入以下设置) (8)1Tuxedo安装环境1.1 服务端操作系统:RedFlag Linux网络协议:TCP/IPTuxedo版本: BEA Tuxedo8.0 for Linux1.2 客户端操作系统:RedFlag Linux网络协议:TCP/IPTuxedo版本: BEA Tuxedo8.0 for Linux2 安装步骤2.1 安装Tuxedo8.0 for Linux2.1.1 用Tuxedo8.0 for Linux光盘进行安装2.1.1.1 CLIENT的安装a.先建一tuxedo用户;b.插入tuxedo's sdk盘,mount上之后;c.执行./LinuxTuxedo80.bin。
按界面提示操作即可完成安装。
2.1.1.2 SERVER的安装a.先建一tuxedo用户;b.插入tuxedo's sdk盘,mount上之后;c.执行./LinuxTuxedo80.bin。
按界面提示操作即可完成安装。
2.1.2 用Tuxedo8.0 for Linux的tar 包进行安装a.先建一tuxedo用户;b.将tuxedo8.0 for linux 的tar 包(假定名称为tuxedo8.0.tar.gz) ftp 至tuxedo用户的$HOME下;c.以tuxedo 的用户执行tar zxvf tuxedo8.0.tar.gz ,解开压缩包。
BEA WebLogic Server Tuxedo Connector快速入门指南说明书
BEA WebLogicServer™WebLogic TuxedoConnector Quick StartGuideVersion 8.1Revised: March 28, 2003CopyrightCopyright © 2003 BEA Systems, Inc. All Rights Reserved.Restricted Rights LegendThis software and documentation is subject to and made available only pursuant to the terms of the BEA Systems License Agreement and may be used or copied only in accordance with the terms of that agreement. It is against the law to copy the software except as specifically allowed in the agreement. This document may not, in whole or in part, be copied, photocopied, reproduced, translated, or reduced to any electronic medium or machine readable form without priorconsent, in writing, from BEA Systems, Inc.Use, duplication or disclosure by the U.S. Government is subject to restrictions set forth in the BEA Systems License Agreement and in subparagraph (c)(1) of the Commercial Computer Software-Restricted Rights Clause at FAR52.227-19; subparagraph (c)(1)(ii) of the Rights in Technical Data and Computer Software clause at DFARS252.227-7013, subparagraph (d) of the Commercial Computer Software--Licensing clause at NASA FAR supplement 16-52.227-86; or their equivalent.Information in this document is subject to change without notice and does not represent a commitment on the part of BEA Systems. THE SOFTWARE AND DOCUMENTATION ARE PROVIDED “AS IS” WITHOUT WARRANTY OF ANY KIND INCLUDING WITHOUT LIMITATION, ANY WARRANTY OF MERCHANTABILITY OR FITNESS FOR A PARTICULAR PURPOSE. FURTHER, BEA Systems DOES NOT WARRANT, GUARANTEE, OR MAKE ANY REPRESENTATIONS REGARDING THE USE, OR THE RESULTS OF THE USE, OF THE SOFTWARE OR WRITTEN MATERIAL IN TERMS OF CORRECTNESS, ACCURACY, RELIABILITY, OR OTHERWISE. Trademarks or Service MarksBEA, Jolt, Tuxedo, and WebLogic are registered trademarks of BEA Systems, Inc. BEA Builder, BEA CampaignManager for WebLogic, BEA eLink, BEA Liquid Data for WebLogic, BEA Manager, BEA WebLogic Commerce Server, BEA WebLogic Enterprise, BEA WebLogic Enterprise Platform, BEA WebLogic Express, BEA WebLogic Integration, BEA WebLogic Personalization Server, BEA WebLogic Platform, BEA WebLogic Portal, BEA WebLogic Server, BEA WebLogic Workshop and How Business Becomes E-Business are trademarks of BEA Systems, Inc.All other trademarks are the property of their respective companies.ContentsConfiguring the WebLogic Tuxedo Connector. . . . . . . . . . . . . . . . . . . . . . . . . . . . . . . . .1-1 Build the Simpapp Example. . . . . . . . . . . . . . . . . . . . . . . . . . . . . . . . . . . . . . . . . . . .1-2Create a WTC Service . . . . . . . . . . . . . . . . . . . . . . . . . . . . . . . . . . . . . . . . . . . . . . . .1-3Create a Local Tuxedo Access Point . . . . . . . . . . . . . . . . . . . . . . . . . . . . . . . . . . . . .1-3Create a Remote Tuxedo Access Point. . . . . . . . . . . . . . . . . . . . . . . . . . . . . . . . . . . .1-4Create Exported Services . . . . . . . . . . . . . . . . . . . . . . . . . . . . . . . . . . . . . . . . . . . . . .1-4Create Imported Services . . . . . . . . . . . . . . . . . . . . . . . . . . . . . . . . . . . . . . . . . . . . . .1-5Target mySimpapp to the examplesServer . . . . . . . . . . . . . . . . . . . . . . . . . . . . . . . . .1-5Register TDOM1 as a WebLogic Server User . . . . . . . . . . . . . . . . . . . . . . . . . . . . . .1-5 Configuring Tuxedo. . . . . . . . . . . . . . . . . . . . . . . . . . . . . . . . . . . . . . . . . . . . . . . . . . . . . .1-6Run the Example . . . . . . . . . . . . . . . . . . . . . . . . . . . . . . . . . . . . . . . . . . . . . . . . . . . . . . . .1-7 WebLogic Server to Tuxedo Interoperability. . . . . . . . . . . . . . . . . . . . . . . . . . . . . . .1-7Tuxedo to WebLogic Server Interoperability. . . . . . . . . . . . . . . . . . . . . . . . . . . . . . .1-8WebLogic Tuxedo Connector Quick Start Guide iiiiv WebLogic Tuxedo Connector Quick Start GuideC H A P T E R1 WebLogic Tuxedo Connector Quick Start GuideNote:For more detailed information on how to configure the WebLogic Tuxedo Connector for this WebLogic Server Release, see the WebLogic Tuxedo Connector Programmer’sGuide at /wls/docs81/wtc_admin/index.html.The following sections describe how to use the WebLogic Server console to configure WebLogic Tuxedo Connector to allow WebLogic Server to interoperate with Tuxedo Releases 6.5 and higher:z Configuring the WebLogic Tuxedo Connectorz Configuring Tuxedoz Run the ExampleConfiguring the WebLogic Tuxedo ConnectorNote:This section summarizes how to configure the WebLogic Tuxedo Connector on a Windows platform. UNIX users can adapt the instructions by making appropriatesubstitutions such as replacing the “\” with “/” and “.cmd” with “.sh”.This example extends the Tuxedo simpapp application to run over Tuxedo Domains(TDomains). This allows clients of the TOUPPER service to run on either the Tuxedo server or the WebLogic Server examplesServer. The example provides the following services:z TOUPPER: A Tuxedo service that converts a string to upper case. A WebLogic Server clientinvokes the TOUPPER EJB and connects to the Tuxedo TOUPPER service.WebLogic Tuxedo Connector Quick Start Guide1-1z Tolower: A service implemented by an EJB in WebLogic Server. The client for theTolower service runs on Tuxedo.The following sections describe how to configure WebLogic Tuxedo Connector using theAdministration Console:z Build the Simpapp Examplez Create a WTC Servicez Create a Local Tuxedo Access Pointz Create a Remote Tuxedo Access Pointz Create Exported Servicesz Create Imported Servicesz Target mySimpapp to the examplesServerz Register TDOM1 as a WebLogic Server UserBuild the Simpapp ExampleNote:You may want to enable tracing to monitor WebLogic Tuxedo Connector. See Monitoring the WebLogic Tuxedo Connector located at/wls/docs81/wtc_admin/troubleshooting.html.Use the following steps to build the simpapp example:1.Boot your WebLogic examplesServer.2.Open a new shell window and set environment variables using theSAMPLES_HOME\domains\examples\setExamplesEnv.cmd file.3.Change directories to yourSAMPLES_HOME\server\examples\src\examples\wtc\atmi\simpapp directory.4.Build the wtc_toupper.jar file using ant. This will deploy the EJB on WebLogic Server.Enter the following command: ant5.Change directories to theSAMPLES_HOME\server\examples\src\examples\wtc\atmi\simpserv directory.6.Build the wtc_tolower.jar file. This will deploy the EJB on WebLogic Server. Enter thefollowing command: ant1-2WebLogic Tuxedo Connector Quick Start GuideConfiguring the WebLogic Tuxedo Connector unch the Administration Console in your browser. Use the following URL:http://your_machine:7001/console. Replace your_machine with the IP address for your machine or your machine name.8.In the navigation tree, Click Deployments→ EJB Modules and confirm that thewtc_tolower.jar and wtc_toupper.jar are deployed.Create a WTC ServiceUse the following steps to create and configure a WTC service using the WebLogic Server Console:1.Click Services in the navigation tree.2.Right-click WTC.3.Click Configure a New WTC Service.4.Enter the Name of your WTC service in the Name field. Example: mySimpapp5.Click Create.6.Your new WTC Service appears in the navigation tree.Create a Local Tuxedo Access PointNote:When configuring the Network Address for a local access point, the port number used should be different from any port numbers assigned to other processes. Example: Setting the Network Address to //mymachine:7001 is not valid if the WebLogic Serverlistening port is assigned to //mymachine:7001.Use the following steps to configure a local Tuxedo access point:1.Click mySimpapp in the navigation tree.2.Click the Contents tab.3.Select Local APs and click Configure a new Local Tuxedo Access Point.4.Enter the following values for the following fields on the General tab:Access Point: myLocalApAccessPoint ID: TDOM2Network Address: the network address and port of your local access pointWebLogic Tuxedo Connector Quick Start Guide1-3Example: //123.123.123.123:56785.Click Create.6.If you are connecting to a Tuxedo 6.5 domain, do the following:a.Click the Connections tab.b.Set the Interoperate field to Yes.c.Click Apply.Create a Remote Tuxedo Access PointUse the following steps to configure a remote Tuxedo access point:1.Click mySimpapp in the navigation tree.2.Click the Contents tab.3.Select Remote APs and click Configure a new Remote Tuxedo Access Point.4.Enter the following values for the following fields on the General tab:Access Point: myRemoteAPAccessPoint ID: TDOM1Local Access Point: myLocalApListen Address: the network address and port of your remote access pointExample: //123.123.123.123:12345.Click Create.Create Exported ServicesUse the following steps to configure an exported service:1.Click mySimpapp in the navigation tree.2.Click the Contents tab.3.Select Exported and click Configure a new Exported Service4.Enter the following values for the following fields on the General tab:1-4WebLogic Tuxedo Connector Quick Start GuideConfiguring the WebLogic Tuxedo ConnectorResource Name: TOLOWERLocal Access Point: myLocalApEJB Name: tuxedo.services.TOLOWERHomeRemote Name: TOLOWER5.Click Create.Create Imported ServicesUse the following steps to configure an imported service:1.Click mySimpapp in the navigation tree.2.Click the Contents tab.3.Select Imported and click Configure a new Imported Service4.Enter the following values for the following fields on the General tab:Resource Name: TOUPPERLocal Access Point: myLocalApRemote Access Point List: myRemoteAPRemote Name: TOUPPER5.Click Create.Target mySimpapp to the examplesServer1.Click mySimpapp in the navigation tree.2.Click the Target and Deploy tab.3.Click the checkbox for the examplesServer.4.Click ApplyRegister TDOM1 as a WebLogic Server UserUse the following steps to register TDOM1 as a WebLogic Server user:1.Click Security in the navigation tree.WebLogic Tuxedo Connector Quick Start Guide1-52.Click Realms.3.Click myRealm.4.Click on Users.5.Click the Configure a new User.6.In the General tab, do the following:a.Add TDOM1 in the Name field.b.Enter and validate a password.c.Click apply.Configuring TuxedoUse the following steps to configure your Tuxedo domain:1.Your PATH environment variable needs to include the path of your C compiler. Use set PATHto check the status and add the path if necessary.2.Copy the simpapp example from your Tuxedo installation and create a working Tuxedosimpapp directory.3.Change directories to your working Tuxedo simpapp directory.4.Set environment variables using the setEnv.cmd located at TUXDIR. Update the followingparameters:TUXDIR - base directory of the TUXEDO SoftwareAPPDIR - base directory of the sample program5.Build the clients:buildclient -o simpcl -f simpcl.cbuildserver -o simpserv -f simpserv.c -s TOUPPER6.Copy the ubbdomain and dom1config files from theSAMPLES_HOME\server\examples\src\examples\wtc\atmi\simpapp directory toyour Tuxedo simpapp directory.7.Copy the tolower.c file from theSAMPLES_HOME\server\examples\src\examples\wtc\atmi\simpserv directory toyour Tuxedo simpapp directory.1-6WebLogic Tuxedo Connector Quick Start GuideRun the Example8.Modify the ubbdomain for your Tuxedo environment. This includes setting the pathnamesfor APPDIR, TUXCONFIG, and TUXDIR and setting the machine name. Replace all <braced>items with information for your environment.Example:APPDIR="\home\me\simpapp"TUXCONFIG="\home\me\simpapp\tuxconfig""TUXDIR="\usr\tuxedo"9.Load the ubbdomain file: tmloadcf -y ubbdomain10.Modify the dom1config for your Tuxedo environment. This includes creating log devicesand updating the network addresses.Example:DMTLOGDEV="d:\my_apps\tlog"AUDITLOG="d:\my_apps\aud"TDOM1 NWADDR="//TuxedoMachine:1234"TDOM2 NWADDR="//WTCMachine:5678"11.Load the dom1config file.set BDMCONFIG=d:\mydomain\simpapp\bdmconfigdmloadcf -y dom1config12.Build the tolower clientbuildclient -f tolower.c -o tolower13.Boot the Tuxedo domaintmboot -yRun the ExampleRun each client to demonstrate interoperability between Tuxedo and WebLogic Server.WebLogic Server to Tuxedo InteroperabilityStart a WebLogic Server client from theSAMPLES_HOME\server\examples\src\examples\wtc\atmi\simpapp directory to invoke the TOUPPER EJB and connect to the Tuxedo TOUPPER service. Use the following command: ant runWebLogic Tuxedo Connector Quick Start Guide1-7The Tuxedo service replies to your WebLogic Server application with:Buildfile: build.xmlrun:[java][java] Beginning statefulSession.Client...[java][java] Creating Toupper[java][java] converting allcaps[java] converted to: ALLCAPS[java][java] End statefulSession.Client...[java]BUILD SUCCESSFULTuxedo to WebLogic Server InteroperabilityRun the tolower client from the Tuxedo simpapp directory to invoke the Tolower EJB and return the results to the client. Use the following command:tolower ALLSMALLThe WebLogic Server service replies to your Tuxedo client with:Returned string is: allsmall1-8WebLogic Tuxedo Connector Quick Start Guide。
- 1、下载文档前请自行甄别文档内容的完整性,平台不提供额外的编辑、内容补充、找答案等附加服务。
- 2、"仅部分预览"的文档,不可在线预览部分如存在完整性等问题,可反馈申请退款(可完整预览的文档不适用该条件!)。
- 3、如文档侵犯您的权益,请联系客服反馈,我们会尽快为您处理(人工客服工作时间:9:00-18:30)。
该目录必须是空的. BEA TUXEDO 系统管理员必须具有对该目录的读、 写和执行应用程序等 权限。 注意:在整个 BEA TUXEDO 系统文档中,应该把这个目录称作: � � 在 UNIX 平台上 $TUXDIR 在 WINDOWS 平台上 %TUXDIR%.
第 4 页 共 19 页
BEA TUXEDO 安装手册
BEA TUXEDO 安装手册
BEA 系统有限公司 产品手册
BEA TUXEDO 安装手册
目录
关于..................................................................................................................................................... 3 使用者................................................................................................................................................. 3 手册构成............................................................................................................................................. 3 安装前的准备工作............................................................................................................................. 3 检查你的软件包......................................................................................................................... 3 必备的硬件和软件..................................................................................................................... 4 管理文档和数据库..................................................................................................................... 4 选择 TUXEDO 的安装目录...................................................................................................... 4 配置好 UNIX 系统..................................................................................................................... 5 在 UNIX 系统上安装 TUXEDO SYSTEM ...................................................................................... 5 在 WINDOWS 系统上安装 TUXEDO ............................................................................................. 9 调试运行 simpapp 程序................................................................................................................... 11 准备 simpapp 的文件和资 源................................................................................................ 11 复制 simpapp 例子的相关文件.............................................................................................. 12 检查并编译客户程序............................................................................................................... 13 检查并编译服务程序............................................................................................................... 13 编辑并加载配置文件............................................................................................................... 13 编辑配置文件................................................................................................................... 13 加载配置文件................................................................................................................... 14 启动应用程序........................................................................................................................... 15 执行 tmboot 启动应用程序............................................................................................ 15 如何执行运行时应用程序...............................................................................................15 如何监视运行时应用程序...............................................................................................15 如何关闭应用程序........................................................................................................... 16 建立 TUXEDO 与数据库的连接.................................................................................................... 17 ORACLE XA ............................................................................................................................ 17 SYBASE XA............................................................................................................................. 18 INFORMIX XA........................................................................................................................ 18
安装前的准备工作
检查你的软件包
两张 CD:
� � The BEA Tuxedo System and BEA Jolt product software CD The BEA Tuxedo System Online Documentation CD
第 3 页 共 19 页
BEA TUXEDO 安装手册
• • •
使用超级用户登陆系统并 MOUNT 上 CDROM. 确定系统是否有足够的空间用于安装和使用 BEA TUXEDO SYSTEM 安装 CC 编译器
在将 BEA TUXEDO SYSTEM 安装在 WINDOWS 系统之前,你需要下列的资源:
• • • •
一符合硬件和软件在站台数据表中描绘要求的系统. 确定系统是否有足够的空间用于安装和使用 BEA TUXEDO SYSTEM WINDOWS NT 或 WINDOWS2000 的 Administrator 权限 安装 C++ 编译器 注意:WINDOWS 95/98 系统只支持 TUXEDO workstation,不支持 TUXEDO core(服务器)。
管理文档和数据库
如果你把 BEA TUXEDO SYSTEM 安装在一 UNIX 站台, 我们强烈建议你为 BEA TUXEDO 管理人员建立一个独立帐户并将 BEA TUXEDO SYSTEM 的所有权赋 予该帐户