诺基亚Lumia1020拆解手册
全面评测诺基亚1020拍摄性能
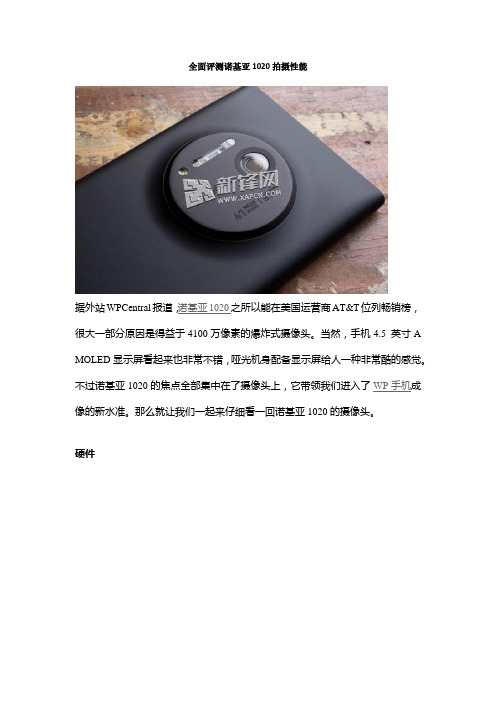
全面评测诺基亚1020拍摄性能据外站WPCentral报道,诺基亚1020之所以能在美国运营商AT&T位列畅销榜,很大一部分原因是得益于4100万像素的爆炸式摄像头。
当然,手机4.5 英寸A MOLED显示屏看起来也非常不错,哑光机身配备显示屏给人一种非常酷的感觉。
不过诺基亚1020的焦点全部集中在了摄像头上,它带领我们进入了WP手机成像的新水准。
那么就让我们一起来仔细看一回诺基亚1020的摄像头。
硬件诺基亚1020配备了一枚4100万像素摄像头,它采用背照式传感器((BSI))和光学防抖技术(OIS)、f/2.2 光圈、镜头孔径为26毫米。
同时,摄像头配备一个机械快门,有助于图像清晰度以及光学稳定,减少运动模糊。
诺基亚1020的卡尔蔡司摄像头由6块镜片组成,并结合了一个镜头盖以及外层保护元件。
起初,工作人员对外层保护元件表示担忧,它比任何WP手机的都要大,会不会容易划伤?也许,诺基亚已经提前看出了这种担忧,于是采用耐刮抗摔的第三代康宁大猩猩玻璃取代传统的玻璃或是塑料。
手机采用氙气闪光灯和双LED视频照明灯取代闪光LED灯以及自动对焦辅助灯。
不过WPCentral编辑表示,个人对LED闪光灯并没什么好感,虽然氙气闪光灯的效果由于尺寸的限制受到了一些阻碍,但是它仍旧比LED闪光灯效果更好。
仅考虑硬件和机械(摄像头),诺基亚1020或是目前市场上最好的相机手机。
此外,这款手机近距离聚焦的能力的改进也没有令我们失望,许多WP摄像头的物距一般要保持在6英尺以外,不过诺基亚1020的物距还可以再扩大两倍以上。
手机“先拍照后变焦”的功能有助于弥补更远距离对焦最小值。
Camera Grip 有无必要?实际上,WPCentral编辑对诺基亚1020配件Nokia Camera Grip持怀疑态度,很大程度上它的创新元素盖过了实用性。
不过,这位编辑最后还是也从AT&T 购买了一Camera Grip,毕竟当在动物园、旅行或是社交活动拍摄更多的图片时,配件还是很必须的。
诺基亚520拆机教程图文解说
诺基亚520拆机教程图文解说
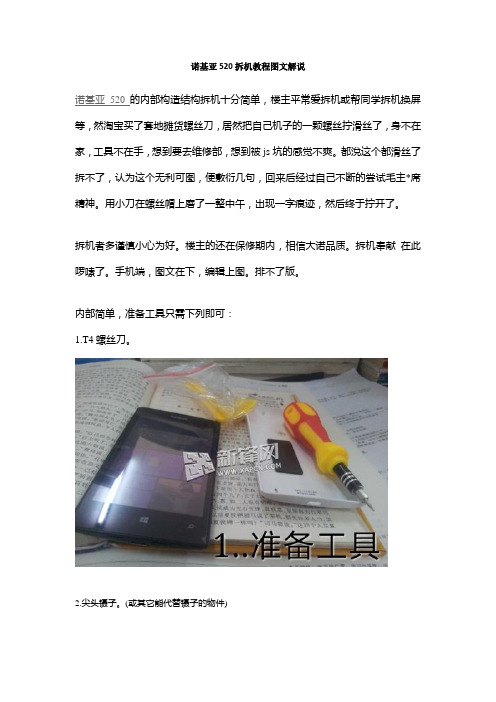
诺基亚520的内部构造结构拆机十分简单,楼主平常爱拆机或帮同学拆机换屏等,然淘宝买了套地摊货螺丝刀,居然把自己机子的一颗螺丝拧滑丝了,身不在家,工具不在手,想到要去维修部,想到被js坑的感觉不爽。
都涗这个都滑丝了拆不了,认为这个无利可图,便敷衍几句,回来后经过自己不断的尝试毛主*席精神。
用小刀在螺丝帽上磨了一整中午,出现一字痕迹,然后终于拧开了。
拆机者多谨慎小心为好。
楼主的还在保修期内,相信大诺品质。
拆机奉献在此啰嗦了。
手机端,图文在下,编辑上图。
排不了版。
内部简单,准备工具只需下列即可:
1.T4螺丝刀。
2.尖头镊子。
(或其它能代替镊子的物件)
开始拆机,把后盖上的8颗螺钉卸下,然后从屏幕上方沿左右两方用指甲(或代替指甲的物什器件)慢慢撬开,然后框壳往下推一点,不然usb接口会挡着,后盖即可打开。
然后见到主板,把主板的两端上的排线接口用镊子轻轻翘起即可。
可以卸下主板了。
接着是卸下带框的屏幕显示屏,框的旁边有凹槽,把尖嘴镊子伸下去轻轻与同一边上方的凹槽平衡翘起,便可分离带框的显示屏,和触摸屏了,
从框子内取下最主要的显示屏,亦是将镊子尖端伸进凹槽内,轻轻翘起即可,如果不是换屏的,请勿操作这项,操作不当内连接着屏幕排线粘贴在框内,需要些许技术方能取出,不然易造成屏幕损坏。
至此拆机已经结束.
/tutorial/112714.html。
诺基亚LUMIA 1020说明书
Philips 7000 seriesSmart lever door lockThe elaborate free handleSliding cover designLift up the lever to lockSafehandle functionDDL172LKCC0Stable and lasting performanceGood life is always safeguardedAdopted with an OLED display, Philips 7200 allows an easier and more intuitiveoperation. A sliding cover to protect the fingerprint sensor area and the keypad area.Upgraded smart chip enhances home security•One button to prevent safety risks while away•Verification portfolio provides double security•Protect real password from being peepingCraftsmanship ensures high quality•More protection for home security•Prevent mortise from violently opening•Easy installation with high adaptability•Prevent damage from dust and the sunEasy life doesn't stop here•Say goobye to key-only era•Slightly touch to unlockHighlightsMechanical key opening alertPhilips 7200 smart lever door lock is equipped with a smart alert function. When someone opens the lock through the mechanicalkeyhole, the lock will give an alert, which can effectively prevent violent damage and technical lock picking.The elaborate free handleThe handle is left in a free state after locking, through lift and lower the handle, the mortise would no longer being touched, which can prevent the mortise from violently opening.Support concealed rodsPhilips 7200 smart lever door locks can be installed on a variety of materials and types of doors, such as wooden doors, copper doors, iron doors, security doors, etc., and it is also suitable for doors equipped with concealed multi-point lock rods. You can directly removethe old lock and install the smart lock to open up a smart life.Sliding cover designThe sliding cover design of the Philips 7200 can protect the fingerprint recognition area and the keypad area from damage caused by wind, rain, direct sunlight, or artificial scratches, and it is also dust-proof. Thanks to the sliding cover, the fingerprint recognition area, and the keypad area could be more rugged and durable.Safehandle switchOnce the safehandle function is enabled, the indoor handle would be locked up, which allows nobody to open the door by pressing down the inside handle. This can effectively prevent the suspicious unlocking from the inside through the door viewer, children, or pets from unlocking the door accidentally by pressing down the indoor handle, thus reducing security risks for the family.Dual verficationIn the dual verification mode, you could open the door with any two verification methods via fingerprint, PIN code, and key tag, whichprovides double protection for home security.32-digit hidden PIN codeFeatured with the 32-digit hidden PIN code technology, Philips 7200 allows you to enter any random number combination forverification and unlock the door as long as there is a consecutive input of the validpassword. This feature can effectively prevent peeping and safeguard the real password.Various ways of unlockingThere are four methods like fingerprint, PIN code, key tag, and mechanical key to unlock the door lock. Multiple choices to meet different user needs in the family.Issue date 2023-11-29 Version: 1.0.1EAN: 69 71318 50086 2© 2023 Koninklijke Philips N.V.All Rights reserved.Specifications are subject to change without notice. Trademarks are the property of Koninklijke Philips N.V. or their respective owners.SpecificationsDesign & Appearance •Color:Red copper •Handle:Lever handle •Fingerprint Sensor: Semiconductor •Display: OLED displayAccess Solution •Fingerprint•Password/PIN Code•Card/Key TagLock Capacity•Card/Key Tag: Up to 100•Master PIN Code: 1Power Specification •Power Supply: 4 AA batteries •Battery Type: Alkaline Batteries•Time of Use: 8 months*•Maximum Batteries Capacity: 8 batteries•Emergency Power Supply: 5V power bank•Working Voltage: 4.5-6VEasy Operation•Voice Guide: Human voice guideInstallation•Door Thickness: 38-60 mm, 60-90 mm, 90-120mm, Other range*•Door Opening Direction: Left inward opening, Leftoutward opening, Right inward opening, Rightoutward oepning•Door Type: Antitheft door, Copper door,Wooden door*Data source: Lock cylinder test report.*8 months: The battery life may be less than 8 months, which issubject to the user's actual unlocking frequency.*The effect of the digital keypad showed in the photos of this productmay be inconsistent with the actual display effect. Please be subjectto the digital keypad displaying status under the actual usagescenarios.*Other door thickness range: If the thickness of the door is out of thementioned range, please contact our local dealers or consumer carecenter.。
不同时期Lumia 1020 版本拍摄比较及参数

四、Lumia 1020使用技巧
1、Lumia 1020硬格式化:(硬格式化会重置手机,把手机回到原厂设定!资料会消失)
关机! 接着 按下电源键,感觉到震动后 马上按着 <音量(一)> => 此时会出现惊叹号!
接着请依顺序按 <音量(十)>、 <音量(一)> 、<电源键> 、<音量(一)>
3051.50009.1451.1003,d版本
二、不同版本拍照比较:
1、“诺基亚专业拍摄”v4.5.1.7(此版新增功能,为1020提供raw输出,整合“智能拍摄”,更改笑脸,面部识别)。
后面的版本基本趋向于新机器的优化,包括动态,快速对焦,需要新处理器。个人觉得4.5.1.7是专属,同样于1.6的拍摄界面,快门声音,启动保存速度。最新版4.8.1.1版的不好用,应该还是原来的好。
三、Lumia 1020国行版网络参数:
GSM 网络: 850 MHz, 900 MHz, 1800 MHz, 1900 MHz
GSM 最GSM 最高数据上传速度: EGPRS 236.8 kbps
WCDMA 网络: 频段 1 (2100 MHz), 频段 2 (1900 MHz), 频段 4 (1700/2100 MHz), 频段 5 (850 MHz), 频段 8 (900 MHz)
WCDMA 最高数据下载速度: 21.1 Mbps (Cat 14)
WCDMA 最高数据上传速度: 5.76 Mbps (Cat 6)
对比分析,Lumia1020国行支持4G,但是此4G为中国移动4G频段,而非联通4G频段,SO,Lumia1020国行版经历此次更新应当为支持移动4G、联通3G手机,但不支持移动3G。
诺基亚 Nokia Lumia 1020手机说明书

PHO5BEI Sensors SASEspace Européen de l’Entreprise 9, rue de Copenhague B.P. 70044 Schiltigheim F 67013 Strasbourg CedexTél : +33 (0)3 88 20 80 80 Fax : +33 (0)3 88 20 87 87 Mail : *******************Web : PROGRAMMABLE MULTITURN ABSOLUTE ENCODER, PHO5 SERIE∙ Extra flat encoder, through shaft Ø 14 mm, reduction hubs available: 6, 8, 10, 12mm ∙ Robustness and excellent resistance to shocks / vibrations ∙ High performances in temperature –20°C to +85°C ∙ Isolated SSI interface, clock from 100 to 500 kHz∙ Universal electronic circuits from 5 to 30Vdc∙ Protection against short-circuits and inversion of polarity ∙ High resolutions available: 8192 (13 bits) per turn ∙Turn counting up to 65 536 (16 bits) ∙ 2 inputs : DIRECTION and RAZ∙Type choice of the wished limit value : position, rotation speed, temperature ∙ Diagnostic functions: temperature, rotation speed, position, input/output level∙ Programming of the encoder with a serial transmission RS232 directly with the serial PC connection: resolution, number of turn, output code, parity, SSI frame bit number, reset value, functions of the 2 outputs : (OUT 1 and OUT 2): limit switch, incremental channelsPHO5_14 connection P6R (M23 radial), DAC 9445/015* mounted on the bodyRS232* accessories to be ordered separatelyCover : treated steelShock (EN60068-2-27) ≤ 500m.s -2 (during 6 ms) Body: aluminium Vibration (EN60068-2-6) ≤ 100m.s -2 (10 … 2 000 Hz)Material Shaft : stainless steel EMC EN 61000-6-4, EN 61000-6-2 Bearings 6 803 serie Isolation 100V (1 min) Axial : 20 N Weight0,480 kgMaximum loads Radial : 50 N Operating temperature - 20 ... + 85 °C (encoder T°) Shaft inertia ≤ 2,2.10-6 kg.m 2 Storage temperature - 20 ... + 85 °C Torque≤ 6.10-3 N.m Protection(EN 60529) IP 65Permissible max. speed 6 000 min -1 Torque (ring pressure screw) nominal: 1.5N.m, break: 2.0N.mContinuous max. speed 6 000 min -1Theoretical mechanical lifetime 109 turns (F axial / F radial )Shaft sealViton 10 N / 25 N : 18520 N / 50 N : 24Changes possible without further notice - Version 2.0PHO5BEI Sensors SASEspace Européen de l’Entreprise 9, rue de Copenhague B.P. 70044 Schiltigheim F 67013 Strasbourg CedexTél : +33 (0)3 88 20 80 80 Fax : +33 (0)3 88 20 87 87 Mail : *******************Web : PROGRAMMABLE MULTITURN ABSOLUTE ENCODER, PHO5 SERIEIn order to optimize the installation times of SSI encoders, BEI IDEACOD has developed a friendly software, easy to use, with which it’s possibleto program your encoder under WINDOWS in only 2 minutes. With a simple connection to the serial connector of your PC, you can : - configure : the number of points per revolution, the number of turns, the code type, SSI frame bit number, the parity, reset value- read : type of selected encoder, the serial number of the encoder, the position of the encoder, the temperature, the speed of rotation, the level of the input/output- save the chosen configuration, load saved configurations- function of the outputs and limit value: position, speed of rotation, temperature, incremental channels 2048 pprELECTRICAL CHARACTERISTICInput signal clock CLK per opto-coupler Power supply 5 – 30Vdc Output signal DATA line - driver RS422 Introduction< 1 sClock frequency CLK 100kHz – 500kHz Cons. without load < 100mA (typically 60-70mA at 24Vdc) Precision± ½ LSB (13 bits)Position refresh< 200µsSSI TRANSMISSIONSSI CONNECTIONType Vcc Gnd Clk+ Data+ RAZ Data- Clk- DIR. OUT1 OUT2 TXD Encoder RXD RS232RXD Encoder TXD RS232P6123456791011812The pinouts TXD and RXD are used for the encoder programmingConnect the entry DIRECTION and RAZ to a potential (RAZ to the 0V if not used)Output : - Max current: 20m A - Level ‘’0’’ max : 0.5V, Level ‘’1’’ min : Vsupply-2,5V - Limit switch time answer : < 400µs - Incremental channels : 100kHz maxProgrammation cable : PC RS232- Supply : 230Vac / 12Vdc- Cable SubD9 (serial PC) / M23 12 pins (encoder) Reference: PRO-020S001ORDERING REFERENCE (Contact the factory for special versions, ex: special flanges, connections, electronics…)ShaftSupply Output stage Code ResolutionConnectionOrientation13 B12 D5ResolutionNb of turnNb data PHO5_ 14:14mmP : 5 to 30VdcPX : SSIprogrammableNota : without parity by defaultG : Graydefault 13: 13 bits defaultB12: 12 bits defaultD5: 25 bits defaultP6: M23 12pins CW for SSI transmissionR : radial PHO5 _14 // P PXG //13B12D5 //P6 RSOFTWARE / CONFIGURATION MANUAL: consult usEncoder available in stock, manufacture setting: 8192pts/turn, 4096 turns (25bits) - GrayMade in FRANCEChanges possible without further notice - Version 2.0Copyright © 2023 Sensata Technologies, Inc.Datasheets provided by Sensata Technologies, Inc., its subsidiaries and/or affiliates (“Sensata”) are solely intended to assist third parties (“Buyers”) who are developing systems that incorporate Sensata products (also referred to herein as “components”). Buyer understands and agrees that Buyer remains responsible for using its independent analysis, valuation, and judgment in designing Buyer’s systems and products. Sensata datasheets have been created using standard laboratory conditions and engineering practices. Sensata has not conducted any testing other than that specifically described in the published documentation for a particular datasheet. Sensata may make corrections, enhancements, improvements, and other changes to its datasheets or components without notice.Buyers are authorized to use Sensata datasheets with the Sensata component(s) identified in each particular datasheet. HOWEVER, NO OTHER LICENSE, EXPRESS OR IMPLIED, BY ESTOPPEL OR OTHERWISE TO ANY OTHER SENSATA INTELLECTUAL PROPERTY RIGHT, AND NO LICENSE TO ANY THIRD PARTY TECHNOLOGY OR INTELLECTUAL PROPERTY RIGHT, IS GRANTED HEREIN. SENSATA DATASHEETS ARE PROVIDED “AS IS”. SENSATA MAKES NO WARRANTIES OR REPRESENTATIONS WITH REGARD TO THE DATASHEETS OR USE OF THE DATASHEETS, EXPRESS, IMPLIED, OR STATUTORY , INCLUDING ACCURACY OR COMPLETENESS. SENSATA DISCLAIMS ANY WARRANTY OF TITLE AND ANY IMPLIED WARRANTIES OF MERCHANTABILITY , FITNESS FOR A PARTICULAR PURPOSE, QUIET ENJOYMENT, QUIET POSSESSION, AND NON-INFRINGEMENT OF ANY THIRD PARTY INTELLECTUAL PROPERTY RIGHTS WITH REGARD TO SENSATA DATASHEETS OR USE THEREOF.All products are sold subject to Sensata’s terms and conditions of sale supplied at .SENSATA ASSUMES NO LIABILITY FOR APPLICATIONS ASSISTANCE OR THE DESIGN OF BUYERS’ PRODUCTS. BUYER ACKNOWLEDGES AND AGREES THAT IT IS SOLELY RESPONSIBLE FOR COMPLIANCE WITH ALL LEGAL, REGULATORY , AND SAFETY-RELATED REQUIREMENTS CONCERNING ITS PRODUCTS, AND ANY USE OF SENSATA COMPONENTS IN ITS APPLICATIONS, NOTWITHSTANDING ANY APPLICATIONS-RELATED INFORMATION OR SUPPORT THAT MAY BE PROVIDED BY SENSATA.Mailing Address: Sensata Technologies, Inc., 529 Pleasant Street, Attleboro, MA 02703, USARegional head offices:United States of America Sensata Technologies Attleboro, MAPhone: 508-236-3800E-mail:*******************NetherlandsSensata Technologies Holland B.V.HengeloPhone: +31 74 357 8000E-mail:*******************ChinaSensata Technologies China Co., Ltd.ShanghaiPhone: +8621 2306 1500E-mail: *******************CONTACT US。
诺基亚C6-01 产品一、二级维修手册

诺基亚C6-01 产品一、二级维修手册诺基亚C6-01 产品一、二级维修手册目录:一、维修前准备1、工具和设备准备2、构建维修环境二、产品拆解1、拆解工具准备2、拆解步骤三、零部件更换1、主板更换2、屏幕更换3、电池更换4、按键更换5、摄像头更换6、信号天线更换四、硬件故障排除1、无法开机或关机2、屏幕显示异常3、无信号或信号弱4、按键失灵5、电池无法充电6、其他硬件故障五、软件故障排除1、系统卡顿或崩溃2、无法连接Wi-Fi3、无法接听或拨打方式4、无法发送或接收短信5、其他软件故障六、维修后组装1、零部件安装2、组装步骤七、维修质量检验1、屏幕显示检验2、信号接收检验3、按键功能检验4、电池充放电检验5、摄像头功能检验八、安全注意事项1、高压电是危险的2、维修过程要注意静电防护附件:1、零部件图纸2、维修工具清单法律名词及注释:1、产品维修:对产品进行故障排除和修复的过程。
2、一、二级维修:一级维修指简单的故障排除,二级维修指更复杂的故障排除,可能涉及更换零部件。
3、维修质量检验:对维修后的产品进行功能和性能的测试,确保维修质量达标。
本文档涉及附件:1、零部件图纸2、维修工具清单本文所涉及的法律名词及注释:1、产品维修:对产品进行故障排除和修复的过程。
2、一、二级维修:一级维修指简单的故障排除,二级维修指更复杂的故障排除,可能涉及更换零部件。
3、维修质量检验:对维修后的产品进行功能和性能的测试,确保维修质量达标。
手机拆机专题 - 副本

手机拆装专题
第五组
系别:电子信息工程系
专业:通信技术
班级:通信11101
主要负责人:
次要负责人:
二〇一三年四月十一日
目录
一、手机拆装步骤及注意事项
二、附手机型号及图片
一、拆机步骤:
1、卸下手机的电池、SIM卡、存储卡等。
2、拆卸螺丝。
选择合适的螺丝刀将螺钉拧下。
注意隐藏在标签、橡胶垫等下面的螺钉。
有些标签需要加热后撕下。
3、分离前后机壳。
拆完螺钉后,分离前后机壳之间的卡扣。
用塑料起子,用力适当,方向正确,即可拆开。
4、取出手机主板,分离按键板、显示屏等。
5、滑盖手机,按上述步骤继续拆卸。
6、翻盖手机转轴的拆卸。
用弯头镊子顶住转轴,把前翻盖取下即可。
二、注意事项:
1、注意静电的防护。
2、拆装时要小心,不要损坏机壳及电路上的元器件。
3、拆下的部件要顺序放好,安装时不要漏装。
4、显示屏为易损器件,拆装时注意不要用力按压。
装机前注意清洁显示屏,禁
5、止使用清洗剂擦显示屏表面。
6、翻盖滑盖手机在安装时,不要漏装磁铁等。
直板手机拆机图片:诺基亚3120
滑盖拆机图片:诺基亚E66
翻盖手机:BBK K9。
Lumia 928、1020大容量存储模式刷机实战

Lumia 928,1020大容量存储模式刷机实战2017年10月30日CDWOOD关键词:Lumia;928;1020; 刷机;ROOT; 大容量存储模式1 Lumia 928 刷机1.1 进入刷机状态刷机前,手机已是Windows 10 Mobile 15063的版本,并无对应的FFU镜像文件。
由于已有的FFU镜像文件为WP8.1的Denim版本,为了后面用Windows Phone Internal解锁BootLoader并开启MASS STORAGE存储模式,需要重新刷机。
手机关机,不连接电脑。
同时按下手机电源键和音量+,手机振动后,放开电源键和音量+,立即按下音量-,屏幕出现闪电和齿轮。
手机连接电脑。
也可同时按下电源键和音量-键退出刷机状态,系统正常启动。
1.2 刷WP8.1的Denim版本此处可用多种工具刷机,如NCS、FFUTool等。
这里采用Windows Phone Image Designer刷机。
启动Windows Phone Image Designer, 点击第3项(将Windows Phone图像刷写到您的手机上)刷机。
点击下一步进入刷机页面。
选择对应机型(Lumia 928)的FFU刷机包文件和先择闪存设备。
只有手机进入第1步刷机状态才能选择刷机设备。
选择完成后,点击闪光灯(软件的翻译问题,英语Flash应为刷机),进入刷机过程。
等待10分钟左右,刷机成功。
关闭Windows Phone Image Designer。
手机自启动,进入Welcome欢迎页面。
这时就可以按通常的方法进行设置了。
设置过程中,可连接WIFI,开启微软账号,选用推荐设置,很快进入熟悉的WP界面。
采用WP Internals的刷机要求,要求WP8 的OS版本需与WP Internals支持列表的中版本一致。
因此刷机后应检查版本。
如果不一致,可能会在刷机完后升级系统,或用Windows预览体验升级,或更换原始的FFU,找到一致的OS版本。
- 1、下载文档前请自行甄别文档内容的完整性,平台不提供额外的编辑、内容补充、找答案等附加服务。
- 2、"仅部分预览"的文档,不可在线预览部分如存在完整性等问题,可反馈申请退款(可完整预览的文档不适用该条件!)。
- 3、如文档侵犯您的权益,请联系客服反馈,我们会尽快为您处理(人工客服工作时间:9:00-18:30)。
关机,取出sim卡槽
拧开顶部两个螺丝
使用三角撬片撬开屏幕边缘
注意:此时不能直接拆开屏幕,屏幕下方与主板之间有三条排线,分别是电池排线,前摄像头排线,显示器排
线
前摄像头排线位置
显示屏排线位置
取出显示屏
拆除前置摄像头
前置摄像头组件取下
每次拆机都会对一些垫片造成不可逆的破坏,所以必须更换
撬开主板上的所有排线
摄像头周围的保护垫片
撬开摄像头排线
、用贴纸贴住镜头,防止进尘
取出同轴线旁边的填充条
取出
侧边音量键等的排线,撬开
拧开如图所示四颗螺丝
拧开图中螺丝
用撬棒轻轻撬动主板,使其松动
待主板完全松动后将其取出
分离主板上的听筒组件
取出听筒组件
听筒可以单独取下,维修的时候奸商可能会坑你更换整个组件
拆完主板拆电池,双面胶固定,轻松取下
如图四颗螺丝,拆下镜头外罩
正确卸下螺丝后,外罩自动脱落、
外罩上面有氙气闪光灯,用撬机棒拆下
拆机完成
主板正面芯片位置
主板背面芯片位置
. .。