LMSTest.Lab中文操作指南全.pdf
(完整版)LMS模态测试使用说明
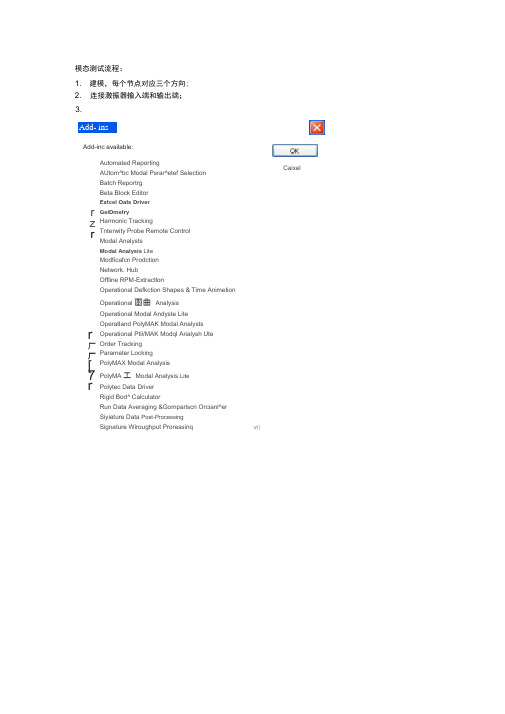
v||模态测试流程: 1. 建模,每个节点对应三个方向;2. 连接激振器输入端和输出端;3. Add- ins Add-inc available: Caixelr z r r 厂 厂 [7 r Automated Reporting AUtom^bc Modal Psrar^etef Selection Batch Reportrg Beta Block EditorEstcel Oats DriverGeiDmetryHarmonic TrackingTnterwity Probe Remote ControlModal AnalystsModal Analysis LiteModficafcn Prodction Network. HubOffline RPM-ExtractlonOperational Defkction Shapes & Time Animetion Operational 函曲 Analysis Operational Modal Andyste Lite Operatland PolyMAK Modal AnalystsOperational Ptil/MAK Modql Arialysh UteOrder Tracking Parameter LockingPolyMAX Modal AnalysisPolyMA 工 Modal Analysis Lite Polytec Data DriverRigid Bod^ CalculatorRun Data Averaging &Gomparlscn Orcianl^er Siyiature Data Post-Processing Signature Wiroughput ProressinqAdd-insAdd-ins available:厂Operational PolyMAX Modal Analysts 厂AOperational PolyMAX Modal Analysis Lite 厂OrderTracking 厂Parameter Locking 疋PolyMAX Modal Analysis 厂Poly MAX Modal Analysis Lite 厂Poly tec Data Driver 厂Rigid Body Calculator 厂Run Data Averaging & Comparison Organizer 厂Si gnatur e D ata Po st-Proce ssing [7 Signature Throughput Processing 厂Sound Diagnosis 厂Sound Intensity Analysis 匝Source Control 厂Structural Remote Control 厂Tec.Manager Hub 厂Time Data ExtractionTime Recording During Spectral Testing 厂Time Signal Calculator 厂Time-Variant Frequency Analysis 厂TPA Component Editing 厂TPA Single Reference 厂User 1 r User 2 厂User 3 I- User 4 厂User 5V建模界面,注意运用局部坐标系。
LMSTest.Lab中文操纵指南全
LMS b中文操作指南比利时LMS国际公司北京代表处2009年 6月内容¾ Desktop桌面操作¾ Geometry几何建模¾ Signature信号特征测试分析¾ Impact锤击法模态测试¾ Spectral Testing谱分析¾ Modal Analysis模态分析¾ Modification Prediction模态修改预测¾ ODS工作变形分析¾ OMA运行模态分析LMS b中文操作指南— Desktop桌面操作比利时LMS国际公司北京代表处2009年2月LMS b中文操作指南— Desktop桌面操作目录1.开始 (2)2.浏览数据 (3)3.显示数据 (4)3.1.测试的数据 (4)3.2.图形拷贝 (8)3.3.几何图形显示 (8)4.数据调理 (10)5.搜索功能 (11)6.Documentation 界面 (13)6.1.添加附件 (13)6.2.添加模板 (14)6.3.添加用户属性 (15)7.导入外部数据 (17)1. 开始¾ 启动 LMS b Desktop 从 开始菜单 Æ 所有程序 Æ LMS b 9AÆ Desktop 或者通过 桌面的快捷图标软件打开后,通过底部的导航条,可以看到两个界面:Documentation 和 Navigator 。
默认会打开一个空白的Project ,软件激活“Navigator”页面中的“Data Viewing”子页面。
可以浏览数据,图形显示数据。
页面在LMS b 资源管理器中可以看到Project ,另外还有:My Computer: 资源管理器最后一个项目。
可以浏览您电脑中的数据。
My Links: 此处可以链接常用Project 的快捷方式,首先从“My Computer”找到Project ,右键单击Copy ,然后到 “My Links”右键单击Paste as link 。
LMSTest.Lab中文操作指南全.pdf

LMS b中文操作指南比利时LMS国际公司北京代表处2009年 6月内容¾ Desktop桌面操作¾ Geometry几何建模¾ Signature信号特征测试分析¾ Impact锤击法模态测试¾ Spectral Testing谱分析¾ Modal Analysis模态分析¾ Modification Prediction模态修改预测¾ ODS工作变形分析¾ OMA运行模态分析LMS b中文操作指南— Desktop桌面操作比利时LMS国际公司北京代表处2009年2月LMS b中文操作指南— Desktop桌面操作目录1.开始 (2)2.浏览数据 (3)3.显示数据 (4)3.1.测试的数据 (4)3.2.图形拷贝 (8)3.3.几何图形显示 (8)4.数据调理 (10)5.搜索功能 (11)6.Documentation 界面 (13)6.1.添加附件 (13)6.2.添加模板 (14)6.3.添加用户属性 (15)7.导入外部数据 (17)1. 开始¾ 启动 LMS b Desktop 从 开始菜单 Æ 所有程序 Æ LMS b 9AÆ Desktop 或者通过 桌面的快捷图标软件打开后,通过底部的导航条,可以看到两个界面:Documentation 和 Navigator 。
默认会打开一个空白的Project ,软件激活“Navigator”页面中的“Data Viewing”子页面。
可以浏览数据,图形显示数据。
页面在LMS b 资源管理器中可以看到Project ,另外还有:My Computer: 资源管理器最后一个项目。
可以浏览您电脑中的数据。
My Links: 此处可以链接常用Project 的快捷方式,首先从“My Computer”找到Project ,右键单击Copy ,然后到 “My Links”右键单击Paste as link 。
LMS-TestLab安装说明教程文件

注意:这个说明没有多少说明文字,请仔细看清安装过程中的选择LMS TesLLabVVWW」E contactus b rowse cd .exit LMS Test Lab 13A License ServerSoftware License Terms and Conditions Read the release notesRead the installation manualInstall LMS b now...Read the end users guide in stall RLM License server now.-.LMS Viewer and Smart ControlInstall LMS Data Plugin for Active Pictures now. Install LMS Scadas Smart C ontrol now..-■:5 LMS InlernaLiOiial Adobe Aerob臼t Reader Install reader RD叽A Siemens &usin«s选择In stall LMS b now ••安装软件LMS b ISA SetuiWelcome to the Prerequisites WizardThe setup has determined that some of the prerequisites needed torun this program are missing. This wizard will assist you in gettingand installing those prerequisites. Click Next to continue to the list ofprerequisitesClick Finish at any time to completely skip the installation ofprerequisites and jump to the installation of the main program. ClickCancel to cancel the installation and sxit the Setup Wizard.A Siemens Business[<上一^6”帀一步00 >]「题][翊P LMS b 12A SetupPrerequisitesThese programs are needed for the applies b on to run. Click on the check box next to aprerequisite to select it for install or to skip it.□K上一步⑻II下一步闪)R ~矽 LMS Unit System 2.0 Setup< Back 11 Next > ] [~Cancel劃 LMS Unit System 2.0 SetupEnd-User License AgreementPlease read the following license agreement carefullyThe use of this software program requires that you accept on behalf of the company that ordered this ■ software program (the "LICENSEE r ) the terms and conditions of following Software License Terms and Conditio ns. By cicking the *1 agree r ・button below. they will be fuly applicable unless and to the extent otherwise agreed in writing with LMS International NV ・If you doni agree with these terms and conditions, dont push the x l agreed-button. In such case, neither installation nor use of the software program will be allowed and you wil have to contact the response line of one of the LMSofficesSOFTWARE LICENSE TERMSAND CONDITIONS< BackCancel肝 i_nm□ I—MS*A Siewons BusinessWelcome to the LMS Unit System 2.0 Setup WizardThe Setup Wizard will install LMS Unit System 2.0 on your computer. Click "Next' to continue or "Cancel" to exit the Setup Wizard.o I accept the terms in the License AgreementI do not accept the terms in the License Agreement<_Back | Next > Cancel<_Back | Next > CancelInstallation TypeChoose the installation type.Install LMS Unit System 2.0 for:Only for me (Joy) o Everybody (all users)|― Bock || Next a ] | CancelSelect Installation FolderThis is the folder where LMS Unit System 2.0 will be installed.To install in this folder, click ,,Next ,f . To install to a different folder, enter it below or click ,,Browse ,1.Folder:|cAProgram Files (x86)\LMS\觀 LMS Unit System 2.0 SetupBrowse...AOtnlrxmLMS Unit System 2.0 Setup < Back |Install CancelUser Configuration Folder;|C:\LMS\The Group Con figuration Folder is a folder used to provide specific configuration settings to several users. For instance, company templates placed in that folder will be accessible to several Test.Lob users ・ If you don't need such o folder, please leave the field as is. Group Configuration Folder:|C:\LMS\[—< Back 11 Next a ~| CancelLM& Unit System 2.0 SetupClick M Install M to begin the installation. If you v/ant to review or change any of your installation settings, click "Back". Click "Cancel" to exit the wizard ・出J LMS Unit System 2.0 Setup< BackFinish1CancelASiome^s BusinessCompleting the LMS UnitSystem 2.0 Setup WizardClick the "Finish" button to exit the Setup Wizard£3 LMS Tes-tLab 13A SetupIA Siemens BusinessThe Setup Wizard will install LM5 b 13A on your computer. Click ^Next" to continue or "Cancer* to exit the Setup Wizard ・Welcome to the LMS b 13ASetup WizardCancel< Back日 LMS TestLab 13A SetupNew license mechanism introduced based on RLMLMS b Rev. 12A SL1 and higher use a new licensing mechanism that is incompatible with earlier versions ・ You therefore need a new license file. If your installation uses a license server^ you must also instaII a new one. This new license server does not support older versions of LMS TestLab.Please contact your local LMS office and request a new RLM ficense file before installing this version.Please read the installation guide for more details on how to install the new license serverS3 LMS TestLab 13A SetupPlease read the following document carefully. It contains important information about your rights and obligations, as well as limitations and exclusions concerning the use of this software program.A Wnwn> (hAlnoaThe us-e of this software program requires that you accept on behal 1 of the company that ordered this software program (the 'LICENSEE ) the terms and conditions of following Saftv/are License Terms and Conditions. By clicki ng the M l agree*-button below, they will be fully applicable unless and to the extent otherwise agreed in wrting with LMS International NV.If you don't agree with these terms and con<jrtions f dont push the -lagfefr r -button. In such case ・ n either installation nor use of the software program will be allowed and you will have io contact the response Ime of one of the LMS-offices.SOFTWARE LICENSE TERMS AND CONOITIONSThese Software License Terns and Conditions (hereinafter: the Terms and Conditions) s&t forth the terms and conditions according to which LMS Inter national NV (herei natter LMS) agrees to grant to I ICPMQ 匚匚 a e A I IC"O H-e e aro rwrr^/inr*4-e I I-IQ «ort/t I ICPM Q 匚匚 ar-oa e ■♦hoO I agree with the Software Licerse Terms and ConditionsIdo not agree wth the Software LicenseTernrs and ConditionsCancel ]< BackNext >Cancel ]A SWTwrnOl LMS Test Lab 13A Setup貝 i_zimThe system wll set the instanation features based on all .be files in the provried directory. The automatic selection of features based on a license file is optional and can be skipped. If skipped, all products will be selected for installation. In either case you can still change the selected products ually. Automatic license selectionYes t us-e automatic product selection 0 No, do not use automatic product selection Licensn directory path; CABrowse...Please note that if any token features are present in any license file. 9l products wfl be selected.Cancel£3 LMS TestLab 13A SetupProduct SelectionPlease select the products to install▲ { )▼ LMS b Appbcationsi 十产 Desktop Standard & AdvancedAcoustic匸^▼ Environmental ( General Processing and Recording(Rotating Mach in ary 二^▼ Structures Acquisition▼ Structures Analysisi Turbine Testing i_ ▼ Data ServerX p TL-DTP.60.2 LMS [>ata Server th at is part of LMS b Data Management Se 厶b DocumentationHelp(Theory丫 v b Demo DatainCancelLicense Based Automatic Feature Selection (aptron^l) Please enter the path to the license fife.t>t > tSome LMS Te$b workbooks require specific hardware and drivers to be installed・ Please follow installation instructions before connecting thehardware to your computer.LMS HD acoustic camera (HDcam—drivers—installabon.pdf)LMS 3D Solid Sphere array (3Dcam_drivers_installation.fxif)LMS 3D Photo Geometry Scanner (3Dcam_drivers_instalation pdf)These documents are available on the b installation DVD in the Documents folder.Next> Cancel泛 LMS b 13A SetupABwJhnn*Desktcp - Standard (Product cirfe; TL-DTR20.1 rd Desktop - Ad .■ a need (Pro duct cade : TL-DTP.21.1)盘 LMS La b J3A 舁tupSUMS'A 弘”rHbRvilMMl Do you wiah LUS TeatiLafr 1 SAto add exceptions to the Win lows Firewfill?4 H DYes., EPI a bletrs exceptions to tne 'jVindaws. Firewall during the mslalljtion. (Reccnunendedj< Back || Nexti | Cancel 这里选择NO□ LMS Testlab 13A SetupI - j MOMSelect Installation FolderThis is the folder where LMS b 13A will be instaled.To install n this folder, click HexT. To install to a different folder, enter t below or click •Browse**.Install LMS b in the folder:C:\Program Files (x86)\LMSBrowse...£3 LMS Test. Lab 13A SetupSelect User Configuration FolderThis folder will be used for configuration files (project templates, layout, configurate)n,.・・) saved by the user.To use this folder, click m NexT. To use a different folder, enter t below or click "Browse"Important: make sure that you choose a folder on which the user will have read and write permissionsb user configuration folder (*): C:\LM®C)This folder wi be the base folder, used for al user configurations. b will appe nd \UserConfiguration\SLOGN\b 13A\to the folder specified.Browse...Cancel< Back CancelA Stctncrn、Q LMS Test Lab 13A SetupSelect Group Configuration FolderPlease specify whether you want b to use a group folderA Siemens BuUnr%>A group folder is a folder where an administrator can place files which are in common for a group of busers・ These files include project templates, documentation :emplates. print formats, layout files andconfiguration files.9 No, de not use a group configuration folderYes, use a group con figurati on fold erb group configuration tolder (f):C:\LMSX BrowseFile access priority:When accessing files, prioritize the Local folderC)This folder wil be the base foldef. u&ed for all group configuratiom. b wil append\GroupConfiguraton\LMS b 13A\ tothe folder specified.«Bacc I Next > Cancel£3 LMS Test Lab 13A SetupA S'emens RuMnws.Please specify in what way you would like to use the ASAM/ODS data driver on ths machine. You can access ASAM/ODS data using a Corba Names server. In that case, please provide the server name and port numtoer Corba Names Servera Mo. do not use a Corba Names ServerYes. use a Corba Names Server[vBadc ||ASAM/ODS ConfigurationPlease specify the ASAM/ODS configuraOon to useCancel完成后选择安装“ In stall RLM Lice nse server now …”JLMS Tesl.L^b UA ^etupj■A Siemens Busi nessCompleting the LMS b 13A SetupWizardLMS b 13A is installed successftjly. Please dick thf ^Finish" button to exit ttie 虫tup Wizard.Back | FinistiC.anc el岀 LMS RLM 10.0.1 License server SetupSelect License RleSetup v\il use the license file specified below ・ If left empty, you have to copy the license file hter to the daU folder that you specify below.|G: gLM _License_Server V-MS.lic© Configure the license server to look for license files in Cr^rogramData^LMSpcensing and copy the license file to thslocation ・ RecommendedConfigure the license server to look for license files in a specific directory and copy the license file to this location:Browse...<Back Next >CancelLMS RLM 10.0.1 License server SetupDefine the options2l Do not allow to shut down the license server from a remote computerPleaseO specfy the path f&r the server logfile CRLMLOG.txt): |C!^LNJ-icense_ServerV-MSDIog .txt\ Please specify the path for the daemon logfile (LMSLOG.DLOG): |C^LM_License_Server\|ms .dlog.dlog<BackNext >CancelA 5icfncm (knl nenBrowse...劃LMS RLM 10.0.1 Lkens-e server SetupFirewall settings必i_zim Adapt the firewall exclusions...Ifsdected f the installation will modify the firewall settings on your computer, such that the communication between your computer rnd the license server will not x prohibited.[/ Adapt the fireball settings to allow the licensing daemon to pass< Bad [ Next > ] 「Cancel ]上¥ _M& RLM LO.O.l Licence server SetupReady to IiistBllTlhe Setup V/izard is ready to begin the LMS RLM UO.O.lUoenBe server instil日lionL'c /?i5ta ' LKec'il'ie irst-zlatic. It /c_. -ai\ :a e -匚,c卜己】匚亡■亍江LJ「installation settings, dick 'B日ck*. Click r Cancd r bo exit the wizard.< Sack Install匚 ancel 安装结束后将crack\RLM_License_Server目录下的所有文件复制到C:\Program Files (x86)\LMS\LMS RLM 10.0.1 Lice nseserver\Licensing\Bin目录内覆盖掉安装文件,重启电脑即可。
LMS Test Lab中文操作指南 Signature信 特征测试分析
LMS b中文操作指南— Signature信号特征测试分析比利时LMS国际公司北京代表处2009年2月LMS b中文操作指南— Signature信号特征测试分析目录---开启软件--- (2)第一步,通道设置(Channel Setup) (4)第二步,校准灵敏度(Calibration)—选做项 (8)第三步,跟踪设定(Tracking Setup) (9)第四步,示波/采集设定(Acquisition Setup) (14)第五步,在线分析设定(Online Processing) (17)第六步,开始测量(Measure) (20)第七步,频域后处理(Post Processing) (23)第八步,时域信号选择(Time Data Selection ) (24)第九步,时域信号后处理(Time Data Processing ) (24)---开启软件---1- 在 Windows 桌面上点击 Test Lab的快捷方式,然后点击进入b Signature文件夹,在快捷方式里选择打开 Signature Acquisition (只是采集,无后处理功能)或Signature testing (根据购买协议,有高级版和标准版之分,主体内容2者一致,都有Post processing频域后处理功能,高级版则多了时域信号后处理功能(time data processing)). 图标见下图:2- 下面以Signature Testing – Advanced 为例说明 Signature testing的操作说明,点击打开后出现软件界面如下:3- 开始软件操作,打开项目a) 点击 File键正下方的空白项目图标,新建一个软件默认空白设置的项目(Newproject);b) 也可以点击 File键,在下拉菜单里选择 New,弹出选择项目模板的界面如下在模板列表中选择点击一个以前存好的或者软件默认提供的模板(后缀为.tpl),然后点击Open打开一个新的项目,打开的新项目将套用模板里所有的设置(包括通道设置,采样频率,加什么窗函数等各种设置);c) 当然也可以点击图标来打开以前已经存在硬盘里的项目文件(后缀为.lms,路径在安装 Test Lab软件时已设定,存数据的文件夹叫LMSLocal9A(9A是版本号,如果8A 的话就是LMSLocal8A)路径假设设定成 E:\LMSLocal9A\,那么格式为*.lms的项目文件和与*同名的文件夹(存有全程时域信号Time date的TDF格式文件)存在路径E:\LMSLocal9A\电脑用户名\Data下)。
LMS Test.Lab中文操作指南_Geometry几何建模

LMS b中文操作指南— Geometry几何建模比利时LMS国际公司北京代表处2009年2月LMS b中文操作指南— Geometry 几何建模目录第一步,软件启动 (3)第二步,界面及工作表流程 (4)1. Geometry界面 (4)2. Geometry工作表 (4)第三步,创建几何 (5)1. 创建组件 (6)2. 创建节点 (7)3. 创建线 (9)4. 创建面 (10)5. 创建从节点 (10)第四步,几何操作 (11)1. 平移、缩放及旋转 (11)2. 右键菜单操作 (11)3. 其他操作 (13)第五步,如何在柱坐标或球坐标下建立模态分析几何模型 (14)1. 坐标系的选择: (14)2. 关于整体坐标系和局部坐标系的说明 (16)3. 关于欧拉角的使用说明 (17)第六步,外部几何模型文件的导入 (18)第一步,软件启动¾通过Windows开始菜单¾通过桌面图标当安装LMS Test. Lab后,系统会在桌面上创建一个LMS Test. Lab文件夹,通过此文件夹也可启动软件。
通过打开Test lab 9A文件夹,双击Geometry按钮,作为一项独立的任务开始¾在任意Test lab的模块中,通过add ins…进行添加第二步,界面及工作表流程1. Geometry 界面2. Geometry 工作表节点工作表 ¾ 从节点 – 创建主/从自由度Geometry 工作表组成: ¾ 组件工作表 – 创建组件 ¾ – 创建节点¾ 线工作表 – 创建线 ¾ 面工作表 – 创建面第三步,创建几何几何坐标的输入有三种方式¾直角坐标¾柱坐标¾球坐标在部件工作表中可以选取不同的坐标输入方式下面以直角坐标输入方式为例创建几何¾ 1--定义组件名称; ¾ 2--定义对应组件颜色; ¾ 3--定义组件间的相对位置 ¾ 4--接受输入状态;¾ 5--在单击Accept Table 后文件列表中会显示相应的组件名如下图中1也可选取显示组件的位置position 应x,y,z); 选取显示组向(orientatio 另外,单击Table Options 后,弹出组件表设置对话框,在其中可进行组件表显示的设置,所示。
LMSTestLab中文操作指南全

LMS b中文操作指南比利时LMS国际公司北京代表处2009年 6月内容¾ Desktop桌面操作¾ Geometry几何建模¾ Signature信号特征测试分析¾ Impact锤击法模态测试¾ Spectral Testing谱分析¾ Modal Analysis模态分析¾ Modification Prediction模态修改预测¾ ODS工作变形分析¾ OMA运行模态分析LMS b中文操作指南— Desktop桌面操作比利时LMS国际公司北京代表处2009年2月LMS b中文操作指南— Desktop桌面操作目录1.开始 (2)2.浏览数据 (3)3.显示数据 (4)3.1.测试的数据 (4)3.2.图形拷贝 (8)3.3.几何图形显示 (8)4.数据调理 (10)5.搜索功能 (11)6.Documentation 界面 (13)6.1.添加附件 (13)6.2.添加模板 (14)6.3.添加用户属性 (15)7.导入外部数据 (17)1. 开始¾ 启动 LMS b Desktop 从 开始菜单 Æ 所有程序 Æ LMS b 9AÆ Desktop 或者通过 桌面的快捷图标软件打开后,通过底部的导航条,可以看到两个界面:Documentation 和 Navigator 。
默认会打开一个空白的Project ,软件激活“Navigator”页面中的“Data Viewing”子页面。
可以浏览数据,图形显示数据。
页面在LMS b 资源管理器中可以看到Project ,另外还有:My Computer: 资源管理器最后一个项目。
可以浏览您电脑中的数据。
My Links: 此处可以链接常用Project 的快捷方式,首先从“My Computer”找到Project ,右键单击Copy ,然后到 “My Links”右键单击Paste as link 。
LMS_Test._lab_锤击法模态分析步骤

LMS b锤击法模态测试流程比利时LMS国际公司北京代表处技术支持:邓江华LMS Test. Lab锤击法模态测试及分析的流程在软件窗口底部以工作表形式表示,按照每一个工作表依次进行即可,如下图示。
1Documentation――可以进行备忘录,测试图片等需要记录的文字或图片的输入,作为测试工作的辅助记录,如下图示。
2Geometry――创建几何(参见创建几何步骤说明)3Channel setup――通道设置,在该选项卡中可进行数采前端对应通道的设置,如定义传感器名称,传感器灵敏度等操作。
4Calibration――对传感器进行标定5Impact scope――锤击示波,用来确定各通道量程6Impact setup――锤击设置,设置触发级、带宽、窗以及激励点选择7Measure――设置完成后进行测试以下为进行模态测试的流程。
步骤一:通道设置(Channel setup)假设已创建好了模型,传感器已布置完成,数采前端已连接完成。
通道设置窗口如下图示,在锤击法试验中,首先将力锤输入的通道定义为参考通道,其他为传感器对应的通道1——选取测试通道2——定义参考通道,通常为力锤输入的通道3——依次在ChannelGroupld中定义传感器测量类型(对加速度计和力锤则选vibration),在point中定义测点名称(也可对应为几何模型上的节点名,见后),在Direction中设置测点所测振动的方向,InputMode中设置传感器类型(通常为ICP,若为应变则选Bridge,若为位移则选Vlltage DC),在Measured Quantity中定义测量量(加速度、力、位移等),在Electrical Unit中定义输入量的单位,通常均为mv.另外若已经确定传感器的灵敏度则可在Actual Sensitivity中直接输入灵敏度值,否则可在Calibration工作表中进行标定。
注:通道设置中测点名称使用几何模型名称的方法步骤二:锤击示波(Impact scope)在该工作表中可设置测试的量程范围,以保证得到更精确的测试结果。
- 1、下载文档前请自行甄别文档内容的完整性,平台不提供额外的编辑、内容补充、找答案等附加服务。
- 2、"仅部分预览"的文档,不可在线预览部分如存在完整性等问题,可反馈申请退款(可完整预览的文档不适用该条件!)。
- 3、如文档侵犯您的权益,请联系客服反馈,我们会尽快为您处理(人工客服工作时间:9:00-18:30)。
LMS b中文操作指南
比利时LMS国际公司北京代表处
2009年 6月
内容
¾ Desktop桌面操作
¾ Geometry几何建模
¾ Signature信号特征测试分析
¾ Impact锤击法模态测试
¾ Spectral Testing谱分析
¾ Modal Analysis模态分析
¾ Modification Prediction模态修改预测¾ ODS工作变形分析
¾ OMA运行模态分析
LMS b中文操作指南— Desktop桌面操作
比利时LMS国际公司北京代表处
2009年2月
LMS b中文操作指南
— Desktop桌面操作
目录
1.开始 (2)
2.浏览数据 (3)
3.显示数据 (4)
3.1.测试的数据 (4)
3.2.图形拷贝 (8)
3.3.几何图形显示 (8)
4.数据调理 (10)
5.搜索功能 (11)
6.Documentation 界面 (13)
6.1.添加附件 (13)
6.2.添加模板 (14)
6.3.添加用户属性 (15)
7.导入外部数据 (17)
1. 开始
¾ 启动 LMS b Desktop 从 开始菜单 Æ 所有程序 Æ LMS b 9A
Æ Desktop 或者通过 桌面的快捷图标
软件打开后,通过底部的导航条,可以看到两个界面:Documentation 和 Navigator 。
默认会打开一个空白的Project ,软件激活“Navigator”页面中的“Data Viewing”子页面。
可以浏览数据,图形显示数据。
页面
在LMS b 资源管理器中可以看到Project ,另外还有:
My Computer: 资源管理器最后一个项目。
可以浏览您电脑中的数据。
My Links: 此处可以链接常用Project 的快捷方式,首先从“My Computer”找到
Project ,右键单击Copy ,然后到 “My Links”右键单击Paste as link 。
Search Results: LMS b 软件可以进行搜索,搜索的结果放在此处。
Input Basket: 暂时存放准备作处理的数据。
Online Data: 此目录可浏览采集时定义的在线数据。
Workspace: 和Windows 中的Workspace 一样,暂时存放数据。
2. 浏览数据
打开某个测试的数据,以下“ProblemDescription.lms”为例。
¾ 通过 File Æ Open 打开 “ProblemDescription.lms”
下图显示“ProblemDescription”包括两个sections ,称为Section1和Section2,可以增加删除或重命名section 。
Section 中分不同的runs 。
每一次测试生成一个新的run ,同样,每一次后处理也生成一个新的run 。
每一个run 包括设定的所有测试函数。
在Section1 中有一次测试名称是“Run 1”,如下图所示。
一个project 最多只有一个Geometry
,包括测试对象的三维模型,测点、连线和面 。