基于MFC对话框的报表打印和预览功能(推荐文档)
报表的预览和打印

3.在“打印机”下拉列表框中,选择打印报表时所使用的打印机型 号;
4.在“打印范围”下,指定打印“所有页”或者确定打印页的范围;
5.在“份数”下,指定复制的份数和是否需要对其进行归类。只有 在打印多份的情况下才有归类的选择,即是打印完整的一份后 再打印下一份还是按照页码来进行多份打印。
6.单击“设置”按钮可以进入“页面设置”对话框;
视图中快速核对报表的页面布局。 操作方法如下:
在报表设计视图中,单击工具栏中“视图”按钮旁边的箭头按钮,打开视 图列表,选择“版面预览”选项。此时就会打开“版面预览”窗口,可以 预览报表的版面布局,如图所示;
“销售数据记录”报表的“版面预览”窗口
2.打印预览 打印预览主要用来预览报表中的数据,根据当前所处窗口的不同可页面设置 1.2 预览报表 1.3 报表的打印
1.1 报表的页面设置
操作方法如下: 1.单击“文件”菜单中的“页面设置”命令,弹出“页面
设置”对话框。 2.在“页面设置”对话框中“边距”选项卡中设置上、下、
左、右的页边距并确认是否只打印数据。 3.在“页”选项卡中设置打印方向、打印纸张的设置和选
用的打印机。
4.在“列”选项卡中设置报表列数、行间距、列 的宽度和高度等,可以使用默认值。
设定完成后,单击“确定”按钮,即完成了为报 表设置页面的操作。
1.2 预览报表
预览报表可以快速查看报表打印结果的页面布局,以方便我们对报表进行外观 的修饰。预览报表有两种类型的预览窗口:版面预览和打印预览。
1.版面预览 “版面预览”窗口只能在报表设计视图中使用。通过“版面预览”可以在设计
1.3 报表的打印
首次打印报表时,Access要检查页边距、页方向和其 他页面设置的选项,以便使报表的信息正确的打印在 纸张上。
mfc打印功能的实现

mfc打印功能的实现怎样用MFC实现打印功能?最佳答案int count=this->m_logList.GetItemCount(),page,row=0;int i,j;page=count/40+1;CPrintDialog print(false);if(print.DoModal()==IDOK){CDC printed;printed.Attach(print.GetPrinterDC());DOCINFO pdoc;pdoc.cbSize=sizeof(pdoc);pdoc.lpszDocName=L"pdoc";pdoc.lpszDatatype=NULL;pdoc.fwType=NULL;pdoc.lpszOutput=NULL;if(printed.StartDoc(&pdoc)>=0){LOGFONT logfont;memset(&logfont,0,sizeof(LOGFONT));logfont.lfHeight=75;CFont font;CFont *oldfont=NULL;if(font.CreateFontIndirect(&logfont))oldfont=(CFont*)printed.SelectObject(&font);for(j=1;j<=page;j++){printed.StartPage();int x=500,y=400;//A4纸,页面中的位置,横向为x轴,纵向是y轴,A4 maxX=4000 maxY=7000 建议按字符大小为75,每页安排40条纪录,初试纪录开始位置为x=500 y=200CString pageHead,pageBottom;pageHead.Format(_T("日志信息纪录统计表"));printed.TextOut(1500,100,pageHead); //打印页眉CString title;//设置标题栏title.Format(_T("序号时间操作"));printed.TextOut(500,200,title); //打印页眉CString stt;stt.Format(_T("________________________________________________ __ ____________________________________"));printed.TextOut(500,200+80,stt); //打印页眉for(i=1;(i<40)&&(row<count);i++)< bdsfid="100" p=""></count);i++)<>{CString record(_T(""));record+=this->m_logList.GetItemText(row,0)+L" ";record+=this->m_logList.GetItemText(row,1)+L" ";record+=this->m_logList.GetItemText(row,2);printed.TextOut(x,y,record);y+=80;printed.TextOut(x,y,stt);y+=80;row++;}pageBottom.Format(_T("共%d页第%d页"),page,j);printed.TextOut(1500,y,pageBottom);printed.EndPage();//此页结束}font.DeleteObject();if(oldfont!=NULL)printed.SelectObject(oldfont);printed.EndDoc();}printed.DeleteDC();}MFC简单打印方法2001-04-06· ·vc.faq··yesky通过MFC来完成打印作业有很多的方法,应用场合也有所不同。
vc++使用MFC操作EXCEL文件
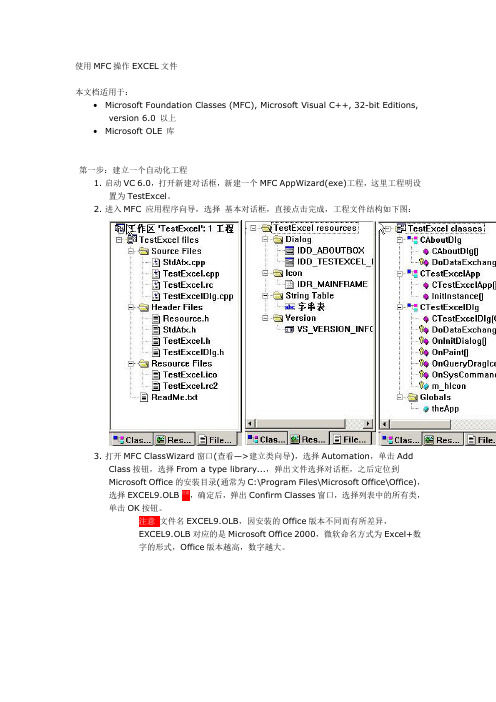
使用MFC操作EXCEL文件本文档适用于:•Microsoft Foundation Classes (MFC), Microsoft Visual C++, 32-bit Editions, version 6.0 以上•Microsoft OLE 库第一步:建立一个自动化工程1.启动VC 6.0,打开新建对话框,新建一个MFC AppWizard(exe)工程,这里工程明设置为TestExcel。
2.进入MFC 应用程序向导,选择基本对话框,直接点击完成,工程文件结构如下图:3.打开MFC ClassWizard窗口(查看—>建立类向导),选择Automation,单击AddClass按钮,选择From a type library...,弹出文件选择对话框,之后定位到Microsoft Office的安装目录(通常为C:\Program Files\Microsoft Office\Office),选择EXCEL9.OLB注意,确定后,弹出Confirm Classes窗口,选择列表中的所有类,单击OK按钮。
注意文件名EXCEL9.OLB,因安装的Office版本不同而有所差异,EXCEL9.OLB对应的是Microsoft Office 2000,微软命名方式为Excel+数字的形式,Office版本越高,数字越大。
4.返回编辑器,查看工程文件,可发现多了EXCEL9.H及EXCEL9.CPP两个文件。
5.打开stdafx.h头文件确保包含如下头文件:#include <afxdisp.h>#include "excel9.h"6.打开TestExcel.cpp文件,修改CTestExcelApp::InitInstance(),加入如下代码:BOOL CTestExcelApp::InitInstance(){if( !AfxOleInit() ){AfxMessageBox("初始化Ole出错!");return FALSE;}AfxEnableControlContainer();............return FALSE;}为保证编译时不产生重复定义错误,打开excel9.h文件,在文件开始位置加入如下代码:#if !defined _HEAD_FILE_EXCEL9_#define _HEAD_FILE_EXCEL9_相应的,在文件末尾加入:#endif到此,OLE自动化工程建立完成。
实验八 MFC中的对话框及控件(二)
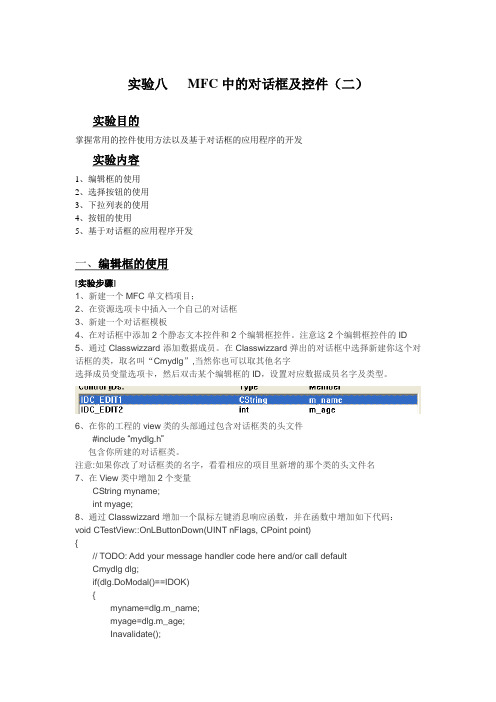
实验八MFC中的对话框及控件(二)实验目的掌握常用的控件使用方法以及基于对话框的应用程序的开发实验内容1、编辑框的使用2、选择按钮的使用3、下拉列表的使用4、按钮的使用5、基于对话框的应用程序开发一、编辑框的使用[实验步骤]1、新建一个MFC单文档项目;2、在资源选项卡中插入一个自己的对话框3、新建一个对话框模板4、在对话框中添加2个静态文本控件和2个编辑框控件。
注意这2个编辑框控件的ID5、通过Classwizzard添加数据成员。
在Classwizzard弹出的对话框中选择新建你这个对话框的类,取名叫“Cmydlg”,当然你也可以取其他名字选择成员变量选项卡,然后双击某个编辑框的ID,设置对应数据成员名字及类型。
6、在你的工程的view类的头部通过包含对话框类的头文件#include “mydlg.h”包含你所建的对话框类。
注意:如果你改了对话框类的名字,看看相应的项目里新增的那个类的头文件名7、在View类中增加2个变量CString myname;int myage;8、通过Classwizzard增加一个鼠标左键消息响应函数,并在函数中增加如下代码:void CT estView::OnLButtonDown(UINT nFlags, CPoint point){// TODO: Add your message handler code here and/or call defaultCmydlg dlg;if(dlg.DoModal()==IDOK){myname=dlg.m_name;myage=dlg.m_age;Inavalidate();}CView::OnLButtonDown(nFlags, point);}9、在OnDraw函数里增加如下显示内容的代码CString str;str.Format("我的姓名是%s",myname);pDC->TextOut(10,10,str);str.Format("我的年龄是%d",myage);pDC->TextOut(10,30,str);10、编译运行程序,在工作视图区点鼠标左键二、选择按钮的使用[实验步骤]1、新建一个MFC单文档项目;2、在资源选项卡中插入一个自己的对话框3、新建一个对话框模板4、在对话框中添加3个单选框控件。
MFC打印与打印预览(1)

MFC打印与打印预览(1)Programming Windows 95 with MFC, Part VIII: Printing and Print PreviewingJeff ProsiseJeff Prosise writes extensively about programming in Windows and is a contributing editor of several computer magazines. He is currently working on a book, Programming Windows 95 with MFC, tobe published this spring by Microsoft Press.Click to open or copy the EZPRNT project files.Click to open or copy the HEXDUMP project files.I demonstrated previously ("Programming Windows® 95 with MFC, Part VII: The Document/View Architecture," MSJ, February 1996) how the document/view architecture simplifies the development of SDI and MDI applications by letting the framework take over key aspects of a program's operation. Now I'll show you how the same document/view architecture simplifies printing and print previewing. Even MFC-style printing isn't something to be taken lightly, but thanks to the support lent by the framework, the tedium of writing and testing code that renders documents on printers and other hardcopy devices is sharply reduced. And once you've implemented Print, Print Preview comes almost for free.Documents and ViewsThe MFC print architecture is built around core API print functions and protocols built into the Windows GDI. To understand what's on the outside, it helps to first understand what's on the inside. Inthis article I will:∙Discuss the Windows printing model and examine the steps an SDK-style application goes through toprint a document.∙Describe the relationship between the MFC print architecture and the Windows print architecture, and the mechanics of printing from MFC applications, including key virtual functions you can override in yourview class.∙Develop a bare-bones printing program that demonstrates how the same code can be used to sendoutput to the screen or printer.∙Develop a more ambitious program with print and preview capabilities on par with those ofcommercial applications. (Sounds pretty good, huh?)The Windows Print ArchitecturePrinting a document from a Windows-based application without the benefit of the framework involves a number of grueling steps. The application normally begins by obtaining a device context for the printer. Just as you need a screen DC to send output to the screen, you need a printer DC to send output to a printer. If you know the device name of the printer you want, you can create a device context with the ::CreateDC function in Windows or CDC::CreateDC in MFC.CDC dc;dc.CreateDC (NULL, "HP LaserJet IIP", NULL, NULL);The device name specified in the second parameter is the same one that appears in the control panel and Print Setup dialog. By the way, this syntax is simpler than Windows 3.1, which requires the driver name and other information. If you don't know the device name but would like to print to the default printer (the one whose context menu has a check mark by the "Set As Default" menu item), you can use the handy MFC CPrintDialog::GetDefaults and CPrintDialog::GetPrinterDC functions.CDC dc;CPrintDialog dlg (FALSE);dlg.GetDefaults ();dc.Attach (dlg.GetPrinterDC ());If you'd like to let the user select a printer, you can display a Print dialog (one of the commondialogs supplied for you by the operating system) with CPrintDialog::DoModal, then callCPrintDialog::GetPrinterDC after the dialog is dismissed.CDC dc;CPrintDialog dlg (FALSE);if (dlg.DoModal () == IDOK)dc.Attach (dlg.GetPrinterDC ());A printer device context obtained by any of these methods should be deleted when it's no longerneeded. If you create a CDC object on the stack, deletion is automatic.Once you have a printer DC in hand, you're ready to print. The next step is to call ::StartDoc or its MFC equivalent, CDC::StartDoc, to mark the beginning of the print job. CDC::StartDoc accepts just one parameter: a pointer to a DOCINFO structure containing a string with a descriptive name for the document that's about to be printed, the name of the file that output will go to (if you're printing to a file), and other information about the print job. The statementsDOCINFO di;::ZeroMemory (&di, sizeof (DOCINFO));di.cbSize = sizeof (DOCINFO);di.lpszDocName = "Budget Figures for the Current FiscalYear";dc.StartDoc (&di);start a print job on the printer associated with the CDC object dc. If the user examines the print queue while the document is printing, the string "Budget Figures for the Current Fiscal Year" will appear in the Document Name column. If StartDoc fails, it returns a zero or less-than-zero value. If it succeeds, it returns a positive integer that identifies the print job. The print job ID can be used in conjunction with Win32® print-control functions such as ::GetJob and ::SetJob.Next comes output to the printed page. Text and graphics are rendered on a printer with GDI functions. If dc refers to a screen device context, the statementdc.Ellipse (0, 0, 100, 100);draws an ellipse 100 logical units wide and 100 logical units high on the screen (that is, a circle). If dc refers to a printer device context, the circle is drawn on the printer instead. Pages of output are framed between calls to CDC::StartPage and CDC::EndPage that mark the beginning and end of each page. A document that contains nPageCount pages of output could be printed as follows:dc.StartDoc (&di);for (int i=1; i<=nPageCount; i++) {dc.StartPage ();// Print page idc.EndPage ();}In a very simplified sense, calling EndPage is like sending a form-feed character to the printer. In between StartPage and EndPage, you print the page by calling CDC member functions. Even if the document contains only one page, you must call StartPage and EndPage.One mistake programmers often make the first time they write printing code is that they fail to initialize the printer DC for each page. In Windows 95, the device context's default attributes are restored each time you call StartPage. You can't select a font or set the mapping mode right after the DC is created and expect those attributes to remain in effect indefinitely the way you can for a screen DC. Instead, you must reinitialize the printer DC for each page. (In Windows NTÔ 3.5 and later, a printer DC retains its settings across calls to StartPage and EndPage—but even in a Windows NT-based application, you should reinitialize the device context at the beginning of each page if you want your code to work under Windows 95 too.) If you print using the MM_LOENGLISH mapping mode, for example, you must call CDC::SetMapMode at the beginning of each new page.for (int i=1; i<=nPageCount; i++) {dc.StartPage ();dc.SetMapMode (MM_LOENGLISH);// Print page idc.EndPage ();}If you do it this way instead,// Don't do this!dc.SetMapMode (MM_LOENGLISH);for (int i=1; i<=nPageCount; i++) {dc.StartPage ();// Print page idc.EndPage ();}printing will be performed in the default MM_TEXT mapping mode.After the final page is printed, you terminate the print job by calling CDC::EndDoc—unless a previous call to EndPage returned a code indicating that the print job was already terminated by GDI. EndPage returns a signed integer value that is greater than zero if the page was successfully printed. A zero or negative return value indicates that either an error occurred or the user canceled the print job while the page was being printed. In either event, the return value is one of the codes shown in Figure 1.Figure 1 Printing Return CodesReturn Code DescriptionSP_ERROR The print job was aborted for an unspecified reasonSP_APPABORT The print job was aborted because the user clicked the Cancel button in the dialog box that displays the status of the print jobSP_USERABORT The print job was aborted because the user canceled it through the operatingsystem shellSP_OUTOFDISK The system is out of disk space, so no further printer data can be spooledSP_OUTOFMEMORY The system is out of memory, so no further printer data can be spooledThe following loop demonstrates the correct use of EndDoc.if (dc.StartDoc (&di) > 0) {BOOL bContinue = TRUE;for (int i=1; i<=nPageCount && bContinue; i++) {dc.StartPage ();// Initialize the device context// Print page iif (dc.EndPage () <= 0)bContinue = FALSE;}if (bContinue)dc.EndDoc ();elsedc.AbortDoc ();}CDC::AbortDoc aborts an uncompleted print job just as EndDoc ends a successful print job. You can also call AbortDoc at any time to terminate a print job before the job is done.The Abort Procedure and Abort DialogIf that's all there were to printing, it wouldn't be such a big deal. But there's more; because a large print job can take minutes or even hours to complete, the user should be able to terminate a print job before it is finished. Windows-based applications traditionally let the user cancel a print job by clicking a Cancel button in a dialog box. The Cancel button cancels printing by forcing EndPage to returnSP_APPABORT.The mechanism that links the Cancel button to the printing code in your application is a function that Windows calls an "abort procedure." An abort procedure is an exported callback function that Windows calls repeatedly as it processes printed output. It's declared like this:BOOL CALLBACK AbortProc (HDC hDC, int nCode)hDC holds the handle of the printer device context. nCode is zero if printing is proceeding smoothly or SP_OUTOFDISK if the print spooler is temporarily out of disk space. nCode is usually ignored because the print spooler responds to an SP_OUTOFDISK condition by waiting for more disk space tofree up. The abort procedure's job is twofold:∙To check the message queue with ::PeekMessage and retrieve and dispatch any messages waitingfor the application.∙To tell Windows whether printing should continue by returning TRUE (to continue printing) or FALSE(to abort).A very simple abort procedure looks like this:BOOL CALLBACK AbortProc (HDC hDC, int nCode)MSG msg;while (::PeekMessage (&msg, NULL, 0, 0,PM_NOREMOVE))AfxGetThread ()->PumpMessage ();return TRUE;}The message loop inside AbortProc allows the WM_COMMAND message (generated when the print-status dialog's Cancel button is clicked) to make it to your window procedure even though the application is busy printing. In 16-bit Windows, the message loop plays an important role in multitasking by yielding so the print spooler and other processes running in the system can get CPU time. In Windows 95, yielding in the abort procedure enhances multitasking performance when 32-bit applications print to 16-bit printer drivers by reducing contention for the Win16Mutex—the flag inside Windows that locks 32-bit applications out of the 16-bit kernel while a 16-bit application executes code in the kernel.Before calling StartDoc, the application calls SetAbortProc to set the abort procedure, then disables its own window by calling CWnd::EnableWindow (FALSE), and displays the print-status or "abort" dialog—a modeless dialog containing a Cancel button and usually one or more static controls to show the document name and number of pages printed. Disabling the main window ensures that no other input will interrupt the printing process. The window is reenabled when printing is finished and the dialog box is destroyed. The dialog, meanwhile, sets a flag—call it bUserAbort—from FALSE to TRUE if the Cancel button is clicked, and the abort procedure returns FALSE to abort printing if bUserAbort isTRUE.BOOL CALLBACK AbortProc (HDC hDC, int nCode){MSG msg;while (!bUserAbort &&::PeekMessage (&msg, NULL, 0, 0, PM_NOREMOVE))AfxGetThread ()->PumpMessage ();return !bUserAbort;Printing proceeds unimpeded until/unless the user cancels, whereupon bUserAbort changes from FALSE to TRUE, the next call to AbortProc returns zero, and Windows terminates the print job. EndPage returns SP_APPABORT and the call to EndDoc is subsequently bypassed.Print SpoolingEverything I've described up to this point constitutes the "front end" of the printing process—the portion that the application is responsible for. Windows handles the back end, which is a joint effort on the part of GDI, the print spooler, the printer driver, and other components of the 32-bit print subsystem. If enhanced metafile (EMF) print spooling is enabled, GDI calls executed through the printer DC are written to an enhanced metafile on the hard disk and stored there until the print spooler, which runs in a separate thread, unspools the commands and "plays" them into the printer driver. If "raw" print spooling (the only option on PostScript printers) is enabled instead, output is processed through the printer driver and spooled to disk in raw form. If spooling is disabled, GDI commands are transmitted directly to the printer driver each time EndPage is called. Print spooling speeds the return-to-application time by letting a program do all its printing to a metafile so the user doesn't have to wait for the printer to physically print each page. Metafiles further speed things up by decoupling the performance of the application from the performance of the printer driver. That's one reason why Windows 95 seems to print so much faster than Windows 3.1. In Windows 3.1, GDI commands are processed by the printer driver before they're spooled to disk. In Windows 95, output is spooled first and played through the printer driver later, so the translation of GDI commands into device-dependent printer data is performed entirely in the background.Fortunately, you can safely ignore what happens on the back end of the printing process and concentrate on printing your document. Still, there's a host of details to fret before you can get down to the real business of printing—paginating the output and executing GDI calls between StartPage and EndPage to render each page on the printer. With this background in mind, let's see how MFC makesprinting easier.The MFC Print ArchitectureThe simplified print architecture in MFC is just one more reason that programmers are migrating away from the SDK and toward object-oriented development environments such as Visual C++®. When you print from a document/view application, you can forget about most of the code samples in the previous section. The framework creates a printer DC for you and deletes the DC when printing is finished. The framework also calls StartDoc and EndDoc to begin and end the print job, and StartPage and EndPage to bracket GDI calls for each page. It even supplies a Cancel dialog and abort procedure.In some cases, the very same OnDraw function you use to render your document on screen can doprinting and Print Preview too.The key to printing in document/view is a set of virtual CView functions that the framework calls at various stages during the printing process. These functions are summarized in Figure 2. Which CView functions you override and what you do in the overrides is highly dependent upon the content of yourprinted output. At the very least, you must override OnPreparePrinting to call DoPreparePrinting so the framework will display a Print dialog and create a printer DC.BOOL CMyView::OnPreparePrinting (CPrintInfo* pInfo){return DoPreparePrinting (pInfo);}Figure 2 CView Print OverridablesFunction DescriptionCView::OnPreparePrinting Called at the very onset of a print job. Override to callCView::DoPreparePrinting and provide the framework with the page count (ifknown) and other information about the print job.CView::OnBeginPrinting Called just before printing begins. Override to allocate fonts and otherresources required for printing.CView::OnPrepareDC Called before each page is printed. Override to set the viewport origin orclipping region to print the current page if OnDraw will be used to produce theprinted output.CView::OnPrint Called to print one page of the document. A page number and printer DC aresupplied to you by the framework. Override to print headers, footers, andother page elements that aren't drawn by the view's OnDraw function or toprint each page without relying on OnDraw.CView::OnEndPrinting Called when printing is finished. Override to deallocate resources allocated inOnBeginPrinting.A nonzero return from OnPreparePrinting begins the printing process, while a zero return cancelsthe pending print job. DoPreparePrinting returns zero if the user cancels the print job by clicking the Cancel button in the Print dialog, if there are no printers installed, or if the framework is unable to create aprinter DC.More on OnPreparePrintingThe CPrintInfo object passed to OnPreparePrinting contains information describing the parameters of the print job, including the minimum and maximum page numbers. The minimum and maximum page numbers default to 1 and 0xFFFF, with the latter value signaling to the framework that the maximum page number is unknown. If you know how many pages your document has, you should callCPrintInfo::SetMaxPage before calling DoPreparePrinting.BOOL CMyView::OnPreparePrinting (CPrintInfo* pInfo){pInfo->SetMaxPage (nMaxPage);return DoPreparePrinting (pInfo);}The framework, in turn, will display the maximum page number in the "to" box of the Print dialog.SetMaxPage is one of several CPrintInfo member functions you can call to set printing parameters or query the framework about print options entered by the user. SetMinPage lets you specify the minimum page number. GetMinPage and GetMaxPage return the minimum and maximum page numbers, while GetFromPage and GetToPage return the starting and ending page numbers entered in the Print dialog's "from" and "to" boxes. CPrintInfo also includes several public data members, including m_pPD, which points to the initialized CPrintDialog object. You can use this pointer to customize the Print dialog before it's displayed, or get information from it. I'll show you an example of this later in the article.OnBeginPrinting and OnEndPrintingOften the maximum page number depends on the size of the printable area of each page. Unfortunately, you don't know what that is until after the user has selected a printer and the framework has created a printer DC. If you don't set the maximum page number in OnPreparePrinting, you should set it in OnBeginPrinting if at all possible. OnBeginPrinting receives a pointer to an initialized CPrintInfo structure and a pointer to a CDC object representing the printer DC. You can determine the dimensions of the printable page area by calling CDC::GetDeviceCaps twice—once with a HORZRES parameter,and once with a VERTRES parameter.void CMyView::OnBeginPrinting (CDC* pDC,CPrintInfo* pInfo){int m_nPageHeight = pDC->GetDeviceCaps (VERTRES);int nDocLength = GetDocument ()->GetDocLength ();int nMaxPage = max (1, (nDocLength +(m_nPageHeight - 1)) /m_nPageHeight);pInfo->SetMaxPage (nMaxPage);}In this example, GetDocLength is a document function that returns the length of the document in pixels. CPrintInfo contains a data member, m_rectDraw, that describes the printable page area in logical coordinates—but don't try to use it in OnBeginPrinting because it isn't initialized until shortly beforeOnPrint is called.Calling SetMaxPage in either OnPreparePrinting or OnBeginPrinting lets the framework know how many times it should call OnPrint to print a page. If it's impossible (or simply not convenient) to determine the document length before printing begins, you can perform "print-time pagination" by overriding OnPrepareDC and setting CPrintInfo::m_bContinuePrinting to TRUE or FALSE each time OnPrepareDC is called. FALSE terminates the print job. If you don't call SetMaxPage, the framework assumes the document is only one page long. Therefore, you must override OnPrepareDC and setm_bContinuePrinting to print additional pages.OnBeginPrinting is also the best place to create fonts and other GDI resources that you need to print. Suppose your view's OnCreate function creates a font that OnDraw uses to draw text on the screen, and the font height is based on screen metrics returned by GetDeviceCaps. To print a WYSIWYG version of that font on the printer, you must create a separate font that's scaled to printer metrics rather than screen metrics. One solution is to let OnDraw create the font each time it's used so the font is scaled for whatever device the CDC corresponds to—printer or screen. An alternative solution is to create the printer font in OnBeginPrinting and delete it in OnEndPrinting. Then you avoid the extra overhead ofcreating and deleting a font each time OnDraw is called.OnEndPrinting is the counterpart to OnBeginPrinting. It's a great place to free fonts and other resources allocated in OnBeginPrinting. If there are no resources to free, or if you didn't override OnBeginPrinting to begin with, then you probably don't need to override OnEndPrinting either.OnPrepareDCMFC calls OnPrepareDC once for each page of your document. One reason for overriding OnPrepareDC is to perform print-time pagination as described in the previous section. Another reason is to calculate a new viewport origin from the current page number so OnDraw will render the appropriate page in your document. Like OnBeginPrinting, OnPrepareDC receives a pointer to a device context and a pointer to a CPrintInfo object. Unlike OnBeginPrinting, OnPrepareDC is called prior to screen repaints as well as in preparation for outputting a page to the printer. In the case of screen rendering, the CDC pointer refers to a screen DC and the CPrintInfo pointer is NULL. For printing, the CDC pointer is a printer DC and the CPrintInfo pointer is non-NULL. In the latter case, the number of the page that's about to beprinted can be obtained from CPrintInfo::m_nCurPage. You can determine whether OnPrepareDC was called for the screen or printer by calling CDC::IsPrinting.The following implementation of OnPrepareDC moves the viewport origin in the y direction so the device point (0, 0)—the pixel in the upper-left corner of the printed page—corresponds to the upper-left corner of the current page. m_nPageHeight is a CMyView data member that holds the printable pageheight.void CMyView::OnPrepareDC (CDC* pDC, CPrintInfo* pInfo){CView::OnPrepareDC (pDC, pInfo);if (pDC->IsPrinting ()) { // If printing...int y = (pInfo->m_nCurPage- 1) * m_nPageHeight;pDC->SetViewportOrg (0, -y);}}Setting the viewport origin this way ensures that an OnDraw function attempting to draw the entire document will actually only draw the portion that corresponds to the current page. This is a simple example of OnPrepareDC that assumes you want to use the entire printable area of the page. Sometimes it's also necessary to set a clipping region to restrict the printed portion of the document to something less than the page's full printable area. Rectangular regions are created with CRgn::CreateRectRgn and selected into DCs to serve as clipping regions with CDC::SelectClipRgn.As a rule, you only need to override OnPrepareDC to print multipage documents for which OnDraw does the printing. If you do all of your printing from OnPrint, as one of my sample programs does, then there's no need to override OnPrepareDC. When you do override OnPrepareDC, you should call the base class before doing anything else so the default implementation will get a chance to do its thing. This is especially important when your view class is derived from CScrollView, because CScrollView::OnPrepareDC sets the viewport origin for screen DCs to match the current scroll position. When CScrollView::OnPrepareDC returns, the DC's mapping mode is set to the mapping mode specified when you called SetScrollSizes. If your view class is not derived from CScrollView, OnPrepareDC is agood place to call SetMapMode.OnPrintAfter calling OnPrepareDC, but prior to physically printing each page, the framework calls CView::OnPrint. The default implementation in Viewcore.cpp verifies the validity of pDC and passes thebuck to OnDraw.void CView::OnPrint(CDC* pDC, CPrintInfo*){ASSERT_VALID(pDC);// Override and set printing variables based on// page numberOnDraw(pDC); // Call Draw}If you prepared the printer DC for printing in OnPrepareDC, or if the document contains only one page, you don't have to override OnPrint; you can let the default implementation call OnDraw to do theprinting.In practice, OnPrint is frequently overridden to perform page-specific printing tasks. Probably the most common reason to override OnPrint is to print headers, footers, page numbers and other visual elements that appear on the printed page but not on the screen (with the exception of print previews). The following OnPrint function calls local member functions PrintHeader and PrintPageNumber to print a header and page number before calling OnDraw to print the page:void CMyView::OnPrint (CDC* pDC, CPrintInfo* pInfo){PrintHeader (pDC);PrintPageNumber (pDC, pInfo->m_nCurPage);// Set the viewport origin and/or clipping// region before calling OnDraw...OnDraw (pDC);}Note that any adjustments made to the printer DC with SetViewportOrg or SelectClipRgn should now be made in OnPrint rather than OnPrepareDC so headers and page numbers won't be affected. An alternative approach is to forego the call to OnDraw and do all your printing in OnPrint. If your drawing and printing code are substantially different, doing the printing in OnPrint draws a clearer boundary between how you print a document and how you render it on screen.CView::OnFilePrint and Other Command HandlersPrinting usually begins when the user selects the Print command from the File menu. MFC provides a CView::OnFilePrint that you can connect to the ID_FILE_PRINT menu item through the view's message map. Figure 3 summarizes what happens when the user prints. It also shows how the MFC print architecture meshes with the Windows print architecture because, if you take away the round rectangles representing the virtual CView functions that the framework calls, you're left with a pretty good schematic of the Windows printing model. Note that OnPrepareDC is called twice per page when your code executes under Windows 95. The first call to OnPrepareDC is made to preserve compatibility with 16-bit versions of MFC, which called OnPrepareDC before StartPage (and got away with it because in 16-bit Windows, it's EndPage, not StartPage, that resets the device context). The second call is made because, in Windows 95, changes made to the device context in the first call to OnPrepareDC arenullified when StartDoc is called.Figure 3 Overwiew of the MFC Print ArchitectureMFC also provides predefined command IDs and default command handlers for the File menu's Print Preview and Print Setup commands. The Print Preview command (ID=ID_FILE_PRINT_PREVIEW) is handled by CView::OnFilePrintPreview, and Print Setup (ID=ID_FILE_PRINT_SETUP) is handled by CWinApp::OnFilePrintSetup. Like OnFilePrint, these command handlers are not prewired into the message maps of the classes to which they belong. To enable them, you must do the message mapping yourself. Of course, if you use AppWizard to generate the skeleton of an application that prints, the message mapping is done for you. AppWizard also maps ID_FILE_PRINT_DIRECT to CView::OnFilePrint to enable "direct" printing—printing performed not by selecting Print from the Filemenu, but by dropping a document icon onto a printer.Print PreviewOnce a document/view application can print, adding print preview is as simple as adding a Print Preview command and hooking it up to CView::OnFilePrintPreview. There's a lot of code in the class library to support OnFilePrintPreview (see Viewprev.cpp for details), but what happens is pretty simple.OnFilePrintPreview takes over the frame window and fills it with a view created from a special CScrollView-derived class named CPreviewView. It adds a toolbar with buttons for going to the next or previous page, switching between one-page and two-page views, zooming in and out, and so on.CPreviewView::OnDraw draws a white rectangle representing a printed page (or two rectangles if。
MFC打印和打印预览

MFC打印和打印预览MFC提供了一个框架性的打印和打印预览功能代码,它的基本思想是将实际显示和打印文档的代码合二为一,即都由此文档关联的CView中的OnDraw(CDC *pDC)来处理,由MFC框架根据用户的操作来决定传进来的pDC是指向屏幕还是打印机,当pDC指向屏幕设备,就在屏幕上显示文档,当指向打印机设备时就打印文档。
这些都很好理解,但是,当我们要打印预览时,传进来的pDC就有些特别了。
因为打印预览是在屏幕上进行的,所以通常我们会认为这时传进来的pDC一定也是属于屏幕DC一类的。
但是其实不然,这个pDC是根据当前默认的打印机的属性来构造的。
举个例子,我的计算机上安装了一个打印机,它的默认打印纸是A4大小(210mm X 297mm),而它的默认分辨率是1200dpi。
当打印预览时Cview::OnDraw函数中的pDC指向的就是那个用来预览输出的DC,现在我们调用pDC->GetDeviceCaps(HORZSIZE),pDC->GetDeviceCaps(VERTSIZE),这两个函数用来取得DC显示区域的大小,以毫米为单位,得到的返回值为210和297,这恰好就是A4纸的大小。
接着再调用pDC->GetDeviceCaps(HORZRES),pDC->GetDeviceCaps(VERTRES),这两个调用返回的也是DC显示区域的大小,不过单位是象素(或者说是点dot),得到的值是9917和14031。
让我们看看这两个值与上面的210和297有什么关系。
1英寸等于25.4毫米,那么210毫米的长度按照1200dpi的分辨率能容纳多少点?当然是210/25.4×1200,算算看等于多少?没错,就是9917左右(实际是9921.259……),同样可以将297换算成14031。
现在来看看另外一个问题。
当我们用MemDC.CreateCompatibleDC(pDC)来创建一个与pDC兼容的内存DC时,调用GetDeviceCaps(HORZSIZE)等函数得到的值是否与pDC的一样呢?答案是不一样。
基于MFC对话框的报表打印和预览功能(推荐文档)

基于MFC对话框的报表打印和预览功能第一步:在工程中加入实现打印功能的四个文件PrintFrame.h,PringtView.h,PrintFrame.cpp, PrintView.cppCPrintFrame和CPrintView类是两个个可重用的类,开发者只需要把这两个类对应的四个文件拷贝到工程文件所在目录中(PrintFrame.h,PringtView.h,PrintFrame.cpp, PrintView.cpp),并将这四个文件加入工程,并在需要执行打印功能的代码处加入#include "PrintFrame.h"#include "PrintView.h"第二步:添加三个消息响应函数来执行该功能ON_MESSAGE(WM_BEGIN_PRINTING,OnBeginPrinting)ON_MESSAGE(WM_END_PRINTING,OnEndPrinting)ON_MESSAGE(WM_MY_PRINT,OnMyPrint)这三个消息响应函数放在.cpp文件的BEGIN_MESSAGE_MAP(CReportDlg, CDialog)与END_MESSAGE_MAP()之间,如下:BEGIN_MESSAGE_MAP(CReportDlg, CDialog) //{{AFX_MSG_MAP(CReportDlg)ON_WM_SYSCOMMAND()ON_WM_PAINT()ON_WM_QUERYDRAGICON()ON_BN_CLICKED(IDC_BUTTON1, OnButton1)ON_MESSAGE(WM_BEGIN_PRINTING,OnBeginPrinting)ON_MESSAGE(WM_END_PRINTING,OnEndPrinting)ON_MESSAGE(WM_MY_PRINT,OnMyPrint)ON_BN_CLICKED(IDC_BUTTON2, OnButton2)//}}AFX_MSG_MAPEND_MESSAGE_MAP()其中OnMyPrint是跟具体要打印什么内容有关的开发人员要重点完成的代码,可以打印表格,图片,数据,只要GDI绘图可以进行的操作在这里都可以完成。
winform打印和预览
winform打印和预览 在windows应⽤程序中⽂档的打印是⼀项⾮常重要的功能,在以前⼀直是⼀个⾮常复杂的⼯作,Microsoft .Net Framework的打印功能都以组件的⽅式提供,为程序员提供了很⼤的⽅便。
由于⼯作中常⽤到印功功能,个⼈写了⼀个专门打印DataGridView对象⼀个类,可以实现预览和打印功能,⽽且⾃动缩放字段、添加颜⾊;在预览时可以根据不同的⽐例查看效果,可以查看第⼏页数据和直接打印第⼏页的数据。
请看效果图。
⼆、附上调⽤代码三、提供源码:1using System;2using System.Collections.Generic;3using System.Linq;4using System.Text;5using System.Drawing.Printing;6using System.Windows.Forms;7using System.Drawing;8using ponent;9namespace Bll10 {11///<summary>12///打印13///开⼼懒⼈14/// 2014-10-1015///</summary>16public class PrintDataGridView17 {1819static DataGridView dgv;20static string titleName = ""; //标题名称21static string titleName2 = ""; //第⼆标题名称22static int rowIndex = 0; //当前⾏23static int page = 1; //当前页24static int rowsPerPage = 0; //每页显⽰多少⾏25///<summary>26///打印DataGridView27///</summary>28///<param name="dataGridView">要打印的DataGridView</param>29///<param name="title">标题</param>30///<param name="title2">第⼆标题,可以为null</param>31public static void Print(DataGridView dataGridView, string title, string title2)32 {33try34 {35if (dataGridView == null) { return; }36 titleName = title;37 titleName2 = title2;38 dgv = dataGridView;39 PrintPreviewDialog ppvw = new PrintPreviewDialog();40 ppvw.PrintPreviewControl.Zoom = 1.0; //显⽰⽐例为100%41 PrintDocument printDoc = new PrintDocument();42 PrintDialog MyDlg = new PrintDialog();43 MyDlg.Document = printDoc;44 printDoc.DefaultPageSettings.PaperSize = new PaperSize("A4", 850, 1000);45 printDoc.DefaultPageSettings.Margins = new Margins(60, 60, 60, 60); //设置边距46 ppvw.Document = printDoc; //设置要打印的⽂档47 ((Form)ppvw).WindowState = FormWindowState.Maximized; //最⼤化48 rowIndex = 0; //当前⾏49 page = 1; //当前页50 printDoc.PrintPage += new PrintPageEventHandler(printDoc_PrintPage); //打印事件51 printDoc.EndPrint += new PrintEventHandler(printDoc_EndPrint);52 ndscape = true; // 设置打印为横向53 ppvw.ShowDialog(); //打开预览5455 }56catch (Exception ex)57 {58 MessageBox.Show(ex.Message, "错误", MessageBoxButtons.OK, MessageBoxIcon.Error);59 }6061 }6263static void printDoc_EndPrint(object sender, PrintEventArgs e)64 {65 rowIndex = 0; //当前⾏66 page = 1; //当前页67 rowsPerPage = 0;//每页显⽰多少⾏68 }69private static void printDoc_PrintPage(object sender, PrintPageEventArgs e)70 {7172//标题字体73 Font titleFont = new Font("微软雅⿊", 16, FontStyle.Bold);74//标题尺⼨75 SizeF titleSize = e.Graphics.MeasureString(titleName, titleFont, e.MarginBounds.Width);76//x坐标77int x = e.MarginBounds.Left;78//y坐标79int y = Convert.ToInt32(e.MarginBounds.Top - titleSize.Height);80//边距以内纸张宽度81int pagerWidth = e.MarginBounds.Width;82//画标题83 e.Graphics.DrawString(titleName, titleFont, Brushes.Black, x + (pagerWidth - titleSize.Width) / 2, y);84 y += (int)titleSize.Height;85if (titleName2 != null && titleName2 != "")86 {8788//画第⼆标题89 e.Graphics.DrawString(titleName2, dgv.Font, Brushes.Black, x + (pagerWidth - titleSize.Width) / 2 + 200, y);90//第⼆标题尺⼨91 SizeF titleSize2 = e.Graphics.MeasureString(titleName2, dgv.Font, e.MarginBounds.Width);92 y += (int)titleSize2.Height;9394 }9596//表头⾼度97int headerHeight = 0;98//纵轴上内容与线的距离99int padding = 6;100//所有显⽰列的宽度101int columnsWidth = 0;102//计算所有显⽰列的宽度103foreach (DataGridViewColumn column in dgv.Columns)104 {105106//隐藏列返回107if (!column.Visible) continue;108//所有显⽰列的宽度109 columnsWidth += column.Width;110 }111112//计算表头⾼度113foreach (DataGridViewColumn column in dgv.Columns)114 {115116//列宽117int columnWidth = (int)(Math.Floor((double)column.Width / (double)columnsWidth * (double)pagerWidth));118//表头⾼度119int temp = (int)e.Graphics.MeasureString(column.HeaderText, column.InheritedStyle.Font, columnWidth).Height + 2 * padding;120if (temp > headerHeight) headerHeight = temp;121 }122123//画表头124125foreach (DataGridViewColumn column in dgv.Columns)126 {127128//隐藏列返回129if (!column.Visible) continue;130//列宽131int columnWidth = (int)(Math.Floor((double)column.Width / (double)columnsWidth * (double)pagerWidth));132//内容居中要加的宽度133float cenderWidth = (columnWidth - e.Graphics.MeasureString(column.HeaderText, column.InheritedStyle.Font, columnWidth).Width) / 2;134if (cenderWidth < 0) cenderWidth = 0;135//内容居中要加的⾼度136float cenderHeight = (headerHeight + padding - e.Graphics.MeasureString(column.HeaderText, column.InheritedStyle.Font, columnWidth).Height) / 2; 137if (cenderHeight < 0) cenderHeight = 0;138//画背景139 e.Graphics.FillRectangle(new SolidBrush(Color.LightGray), new Rectangle(x, y, columnWidth, headerHeight));140//画边框141 e.Graphics.DrawRectangle(Pens.Black, new Rectangle(x, y, columnWidth, headerHeight));142////画上边线143144//e.Graphics.DrawLine(Pens.Black, x, y, x + columnWidth, y);145146////画下边线147148//e.Graphics.DrawLine(Pens.Black, x, y + headerHeight, x + columnWidth, y + headerHeight);149150////画右边线151152//e.Graphics.DrawLine(Pens.Black, x + columnWidth, y, x + columnWidth, y + headerHeight);153154//if (x == e.MarginBounds.Left)155156//{157158////画左边线159160// e.Graphics.DrawLine(Pens.Black, x, y, x, y + headerHeight);161162//}163164//画内容165 e.Graphics.DrawString(column.HeaderText, column.InheritedStyle.Font, new SolidBrush(column.InheritedStyle.ForeColor), new RectangleF(x + cenderWidth, y + cenderHeight, columnWidth, headerHeight)); 166 x += columnWidth;167168 }169170 x = e.MarginBounds.Left;171 y += headerHeight;172while (rowIndex < dgv.Rows.Count)173 {174175 DataGridViewRow row = dgv.Rows[rowIndex];176if (row.Visible)177 {178179int rowHeight = 0;180foreach (DataGridViewCell cell in row.Cells)181 {182183 DataGridViewColumn column = dgv.Columns[cell.ColumnIndex];184if (!column.Visible || cell.Value == null) continue;185int tmpWidth = (int)(Math.Floor((double)column.Width / (double)columnsWidth * (double)pagerWidth));186int temp = (int)e.Graphics.MeasureString(cell.Value.ToString(), column.InheritedStyle.Font, tmpWidth).Height + 2 * padding;187if (temp > rowHeight) rowHeight = temp;188 }189190foreach (DataGridViewCell cell in row.Cells)191 {192193 DataGridViewColumn column = dgv.Columns[cell.ColumnIndex];194if (!column.Visible) continue;195int columnWidth = (int)(Math.Floor((double)column.Width / (double)columnsWidth * (double)pagerWidth));196 e.Graphics.DrawRectangle(Pens.Black, new Rectangle(x, y, columnWidth, rowHeight));197198if (cell.Value != null)199 {200201//内容居中要加的宽度202203float cenderWidth = (columnWidth - e.Graphics.MeasureString(cell.Value.ToString(), cell.InheritedStyle.Font, columnWidth).Width) / 2;204205if (cenderWidth < 0) cenderWidth = 0;206207//内容居中要加的⾼度208209float cenderHeight = (rowHeight + padding - e.Graphics.MeasureString(cell.Value.ToString(), cell.InheritedStyle.Font, columnWidth).Height) / 2;210211if (cenderHeight < 0) cenderHeight = 0;212213////画下边线214215//e.Graphics.DrawLine(Pens.Black, x, y + rowHeight, x + columnWidth, y + rowHeight);216217////画右边线218219//e.Graphics.DrawLine(Pens.Black, x + columnWidth, y, x + columnWidth, y + rowHeight);220221//if (x == e.MarginBounds.Left)222223//{224225////画左边线226227// e.Graphics.DrawLine(Pens.Black, x, y, x, y + rowHeight);228229//}230231//画内容232233 e.Graphics.DrawString(cell.Value.ToString(), column.InheritedStyle.Font, new SolidBrush(cell.InheritedStyle.ForeColor), new RectangleF(x + cenderWidth, y + cenderHeight, columnWidth, rowHeight)); 234235 }236237 x += columnWidth;238239 }240241 x = e.MarginBounds.Left;242243 y += rowHeight;244245if (page == 1) rowsPerPage++;246247//打印下⼀页248249if (y + rowHeight > e.MarginBounds.Bottom)250 {251252 e.HasMorePages = true;253254break;255256 }257258 }259260 rowIndex++;261262 }263264//页脚265string footer = " 第 " + page + " 页,共 " + Math.Ceiling(((double)dgv.Rows.Count / rowsPerPage)).ToString() + " 页";266//画页脚267 e.Graphics.DrawString(footer, dgv.Font, Brushes.Black, x + (pagerWidth - e.Graphics.MeasureString(footer, dgv.Font).Width) / 2, e.MarginBounds.Bottom); 268 page++;269270 }271272273 }274275 }View Code。
- 1、下载文档前请自行甄别文档内容的完整性,平台不提供额外的编辑、内容补充、找答案等附加服务。
- 2、"仅部分预览"的文档,不可在线预览部分如存在完整性等问题,可反馈申请退款(可完整预览的文档不适用该条件!)。
- 3、如文档侵犯您的权益,请联系客服反馈,我们会尽快为您处理(人工客服工作时间:9:00-18:30)。
基于MFC对话框的报表打印和预览功能第一步:在工程中加入实现打印功能的四个文件PrintFrame.h,PringtView.h,PrintFrame.cpp, PrintView.cppCPrintFrame和CPrintView类是两个个可重用的类,开发者只需要把这两个类对应的四个文件拷贝到工程文件所在目录中(PrintFrame.h,PringtView.h,PrintFrame.cpp, PrintView.cpp),并将这四个文件加入工程,并在需要执行打印功能的代码处加入#include "PrintFrame.h"#include "PrintView.h"第二步:添加三个消息响应函数来执行该功能ON_MESSAGE(WM_BEGIN_PRINTING,OnBeginPrinting)ON_MESSAGE(WM_END_PRINTING,OnEndPrinting)ON_MESSAGE(WM_MY_PRINT,OnMyPrint)这三个消息响应函数放在.cpp文件的BEGIN_MESSAGE_MAP(CReportDlg, CDialog)与END_MESSAGE_MAP()之间,如下:BEGIN_MESSAGE_MAP(CReportDlg, CDialog) //{{AFX_MSG_MAP(CReportDlg)ON_WM_SYSCOMMAND()ON_WM_PAINT()ON_WM_QUERYDRAGICON()ON_BN_CLICKED(IDC_BUTTON1, OnButton1)ON_MESSAGE(WM_BEGIN_PRINTING,OnBeginPrinting)ON_MESSAGE(WM_END_PRINTING,OnEndPrinting)ON_MESSAGE(WM_MY_PRINT,OnMyPrint)ON_BN_CLICKED(IDC_BUTTON2, OnButton2)//}}AFX_MSG_MAPEND_MESSAGE_MAP()其中OnMyPrint是跟具体要打印什么内容有关的开发人员要重点完成的代码,可以打印表格,图片,数据,只要GDI绘图可以进行的操作在这里都可以完成。
由于打印预览的一部分工作在CView类里完成,因此在用户程序中只需要相应WM_MY_PRINT消息就可以执行打印预览的功能,而不需要另外编写打印预览代码。
第三步:建立一个CPrintFrame的对象,设该对象的指针为pFrame,并将对话框的指针传给该对象的m_pCallerDlg,即pFrame->m_pCallerDlg = this;调用对象的Create函数创建框架窗口;例如pFrame->Create(NULL,"频谱打印",WS_OVERLAPPEDWINDOW,CRect(0,0,0,0));如果要执行打印,则调用pFrame->m_pView->OnMyPrint();如果要执行打印预览,则调用:pFrame->m_pView->OnMyPrintPreview();例如:ON_COMMAND(ID_FILE_PRINT_PREVIEW, CView::OnFilePrintPreview);ON_BN_CLICKED(IDC_PNT, OnPnt);pFrame->m_pCallerDlg->SendMessage(WM_MY_PRINT,(WPARAM) pDC, (LPARAM) pInfo);pFrame->m_pView->OnMyPrintPreview();void CDlgPrintDlg::OnPrint() //执行打印功能{CPrintFrame *pFrame = new CPrintFrame;pFrame->m_pCallerDlg = this;pFrame->Create(NULL,"CurvePrint",WS_OVERLAPPEDWINDOW,CRect(0,0,0,0));pFrame->m_pView->OnMyPrint();}void CDlgPrintDlg::OnPrintPreview() //执行打印预览功能{CPrintFrame *pFrame = new CPrintFrame;pFrame->m_pCallerDlg = this;pFrame->Create(NULL,"Curve PrintPreview",WS_OVERLAPPEDWINDOW,CRect(0,0,0,0));pFrame->m_pView->OnMyPrintPreview();}OnBeginPrinting事例LRESULT 类名::OnBeginPrinting(WPARAM wParam, LPARAM lParam){CDC* pDC = (CDC*)wParam;CPrintInfo* pInfo = (CPrintInfo *)lParam;pInfo->m_pPD ->GetDevMode ()->dmOrientation=1 ;pInfo->SetMaxPage (pagecount);//打印的总页数return TRUE;}OnEndPrinting事例LRESULT 类名::OnEndPrinting(WPARAM wParam, LPARAM lParam){CPrintInfo* pInfo = (CPrintInfo *)lParam;pInfo->m_pPD ->GetDevMode ()->dmOrientation=1 ;return TRUE;}OnMyPrint事例//具体要打印的内容CDC* pDC = (CDC*)wParam;CPrintInfo* pInfo = (CPrintInfo *)lParam;PrintPageHeader(pDC,pInfo->m_nCurPage, pInfo);int nPageNumber = pInfo->m_nCurPage;CFont *pOldFont;CFont font;CSize size;TEXTMETRIC tm;font.CreatePointFont (110,"宋体",pDC);pOldFont=pDC->SelectObject (&font);//选择设备pDC->GetTextMetrics (&tm);int m_width=(pDC->GetDeviceCaps (HORZRES)-3*tm.tmHeight );nPosY+=(int)(0.2*tm.tmHeight );pDC->TextOut ((int)(1.5*tm.tmHeight) ,nPosY," EPC号 "); pDC->TextOut ((int)(1.5*tm.tmHeight+m_width/9*1.6) ,nPosY,"充值前余额 ");pDC->TextOut ((int)(1.5*tm.tmHeight) +m_width/9*3,nPosY,"本次充值金额");pDC->TextOut ((int)(1.5*tm.tmHeight) +m_width/9*4,nPosY,"充值时间 ");nPosY+=(int)(1.2*tm.tmHeight) ;int m_height=(pDC->GetDeviceCaps (VERTRES)-1*tm.tmHeight-nPosY )/48; for(int i=0;i<48;i++){int nPosYtemp=nPosY+m_height*i;CString str=m_List.GetItemText ((nPageNumber-1)*48+i,0);str=str.Right (str.GetLength ()-2);pDC->TextOut ((int)(1.5*tm.tmHeight) ,nPosYtemp,str);pDC->TextOut((int)(1.5*tm.tmHeight+m_width/9*1.6),nPosYtemp,m_List.GetItemText ((nPageNumber-1)*48+i,1));pDC->TextOut ((int)(1.5*tm.tmHeight)+m_width/9*3,nPosYtemp,m_List.GetItemText ((nPageNumber-1)*48+i,2));pDC->TextOut ((int)(1.5*tm.tmHeight)+m_width/9*4,nPosYtemp,m_List.GetItemText ((nPageNumber-1)*48+i,3));}pDC->MoveTo ((int)(1*tm.tmHeight) ,nPosY+m_height*48);pDC->LineTo (pDC->GetDeviceCaps(HORZRES)-(int)(1*tm.tmHeight) ,nPosY+m_height*48);CString strpage="";strpage+="第(";CString str;str.Format ("%d",nPageNumber);strpage+=str;strpage+=")页";font.DeleteObject ();font.CreatePointFont (110,"宋体",pDC);pDC->SelectObject (&font);//选择设备pDC->TextOut (pDC->GetDeviceCaps(HORZRES)-6*tm.tmHeight,(int)(nPosY+m_height*48.2),strpage);pDC->SelectObject (pOldFont);pDC->SelectObject(pOldFont);return TRUE;}PrintPageHeader函数void 类名::PrintPageHeader(CDC *pDC, UINT nPageNumber, CPrintInfo*pInfo){AfxMessageBox("222222");CFont *pOldFont;CFont fontHeader;CPen pen;CPen *pOldPen;pen.CreatePen (PS_SOLID,(int)(5*printxs),RGB(0,0,0));pOldPen=pDC->SelectObject (&pen);fontHeader.CreatePointFont (140,"宋体",pDC);pOldFont=(CFont *)(pDC->SelectObject(&fontHeader));TEXTMETRIC tm;pDC->GetTextMetrics (&tm);nPosY=(int)(0.5*tm.tmHeight) ;CSize sz=pDC->GetTextExtent(strworkname);nPosX=(pDC->GetDeviceCaps (HORZRES)-sz.cx )/2;pDC->TextOut (nPosX,nPosY,strworkname);nPosY+=tm.tmHeight ;fontHeader.DeleteObject ();fontHeader.CreatePointFont (110,"宋体",pDC);pDC->SelectObject(&fontHeader);//绘制用户类型nPosX=tm.tmHeight ;nPosY=nPosY+(int)(0.5*tm.tmHeight );pDC->TextOut(nPosX,nPosY,"用户类型:"+usertype);//绘制姓名nPosX=(pDC->GetDeviceCaps (HORZRES)-2*tm.tmHeight )/3; pDC->TextOut(nPosX,nPosY,"姓名:"+Printname);//绘制打印日期nPosX=(pDC->GetDeviceCaps (HORZRES)-2*tm.tmHeight )/3*2; pDC->TextOut(nPosX,nPosY,"打印日期:"+Printdate);nPosY+=(int)(1.2*tm.tmHeight) ;pDC->GetTextMetrics (&tm);pDC->MoveTo ((int)(1*tm.tmHeight) ,nPosY);pDC->LineTo (pDC->GetDeviceCaps(HORZRES)-(int)(1*tm.tmHeight) ,nPosY);//资源释放pDC->SelectObject(pOldFont);pDC->SelectObject (pOldPen);fontHeader.DeleteObject();pen.DeleteObject ();}。