Dimension 3D打印机说明书
3d 打印机快速使用指南说明书

3D打印机快速使用指南请仔细阅读此说明书目录A:让我们开始3D打印之旅-打印机安装与使用时注意事项-打印机的工作原理-您需要了解的专业知识B:准备好您的3D打印机-3D打印机功能图示-拆开3D打印机的包装-了解载物平台--热床-组装您的耗材支架-连接电源并尝试开机C:开始打印前的准备工作-了解喷头与热床的自动调平功能-自动调平指南-将耗材正确穿入挤出机并使喷头正常出丝-运行SD卡内的测试程序D:学习使用切片软件-认识CURA软件E:故障排除、屏幕操作、以及设备维护-常见故障及排除方法-LCD屏幕菜单及功能简介-设备日常维护及维修-如何更换耗材-调整与更换调平传感器-2/32让我们开始3D打印之旅吧!本用户指南的目的是开始您的3D打印之旅,跟随指南的指引您将以最快的速度了解如何使用SMARTMKAER系列3D打印机。
即使您已经在使用本公司的其它3D打印机产品或者其它类型的3D打印机,但仔细阅读本说明书仍是非常有必要的,当您阅读完毕后,您会发现本台3D打印机的与众不同之处。
警告:SMARTMKAER系列桌面3D打印机在工作时会产生高温,包括移动部分均可能对您造成伤害。
3D打印机在工作时或者没有完全冷却时,请不要操作机器内部部件。
注意:如果要对SMARTMKAER系列3D打印机进行维护维修工作,请务必关闭电源开关并断开电源连接。
——3D打印机放置与使用注意事项在安装和使用本机之前,请务必阅读以下内容。
请勿尝试任何用户手册中没有描述的方法来使用本机,避免可能造成的意外人身伤害和财产损失。
使用环境的要求:1本机适合放置在通风、阴凉、干燥和少尘的环境内。
2使用时注意打印机周围环境的散热,避免放置在地毯上或者紧靠墙壁放置。
3请勿将本机放置在易燃易爆物品或高热源附近。
4请勿将本机放置在振动较大或者其他不稳定的环境内。
5请勿在本机上堆积重物。
3/32安装前:1设备内有高压电源,切勿拆开外罩,进行修理和改造;2放置到儿童无法接触到的地方,以免儿童触碰设备造成烫伤或其它伤害;3请使用本机附带的电源线。
三维打印机设备说明书
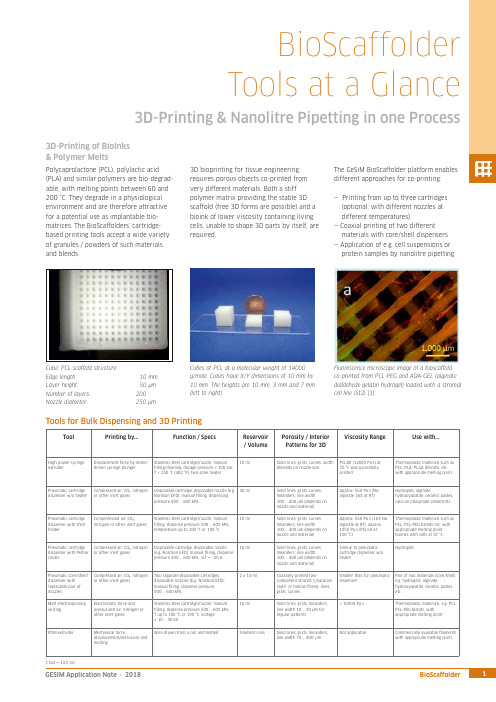
ToolPrinting by...Function / SpecsReservoir / VolumePorosity / InteriorPatterns for 3DViscosity Range Use with...High-power syringe extruder Displacement force by motor-driven syringe plungerStainless steel cartridge/nozzle; manual lling/cleaning, dosage pressure > 100 bar, T < 250 °C (482 °F), two-zone heater 10 mlSolid lines, grids, curves; width depends on nozzle sizePCL80 (12600 Pa·s) at 70 °C was succesfully printed Thermoplastic materials such asPCL, PLA, PLGA (blends), etc. with appropriate melting pointPneumatic cartridgedispenser w/o heater Compressed air, CO₂, nitrogen or other inert gasesDisposable cartridge, disposable nozzle (e.g Nordson EFD); manual lling, dispensing pressure 500 … 600 kPa30 ml Solid lines, grids, curves, meanders; line width100 … 400 µm (depends on nozzle and material)Approx. 550 Pa·s (Na-alginate 16% at RT)Hydrogels, alginate,hydroxyapatite, ceramic pastes,calcium phosphate cement etc.Pneumatic cartridge dispenser with shell heaterCompmressed air, CO₂,nitrogen or other inert gasesStainless steel cartridge/nozzle; manual lling, dispense pressure 500 … 600 kPa, temperature up to 100 °C or 190 °C10 mlSolid lines, grids, curves, meanders; line width100 … 400 µm (depends on nozzle and material)Approx. 550 Pa·s (16% Na-alginate at RT), approx. 1350 Pa·s (PCL50 at 100 °C)Thermoplastic materials such as PCL, PCL-PEG blends etc. with appropriate melting point, bioinks with cells at 37 °C Pneumatic cartridge dispenser with Peltier cooler Compressed air, CO₂, nitrogen or other inert gases Disposable cartridge, disposable nozzle (e.g. Nordson EFD); manual lling, dispense pressure 500 … 600 kPa, ΔT ≈ –20 K10 mlSolid lines, grids, curves, meanders; line width100 … 400 µm (depends on nozzle and material)Similar to pneumatic cartridge dispenser w/o heaterHydrogelsPneumatic core/shelll dispenser with replacable pair of nozzlesCompressed air, CO₂, nitrogen or other inert gasesTwo separate disposable cartridges, disposable nozzles (E.g. Nordson EFD); manual lling, dispense pressure 500 … 600 kPa2 x 10 mlCoaxially printed two-component strands (…macaroni style“ or hollow bres), lines, grids, curvesSmaller than for pneumatic dispenserPair of two materials (core/shell), e.g. hydrogels, alginate,hydroxyapatite, ceramic pastes etc.Melt electrospinning writingElectrostatic force andpressurized air, nitrogen or other inert gasesStainless steel cartridge/nozzle; manual lling, dispense pressure 500 … 600 kPa T up to 100 °C or 190 °C, voltage ± 10 … 30 kV10 ml Solid lines, grids, meanders; line width 10 … 20 µm for regular patterns> 10000 Pa·sThermoplastic materials, e.g. PCL, PCL-PEG blends, with appropriate melting pointFDM extruderMechanical force(displacement/extrusion) and meltingWire drawn from a coil and meltedFilament coilsSolid lines, grids, meanders; line width 70 (400)µmNot applicableCommercially available laments with appropriate melting pointBioScaffolder Tools at a Glance3D-Printing & Nanolitre Pipetting in one ProcessPolycaprolactone (PCL), polylactic acid (PLA) and similar polymers are bio-degrad-able, with melting points between 60 and 200 °C. They degrade in a physiological environment and are therefore attractive for a potential use as implantable bio-matrices. The BioScaffolders‘ cartridge-based printing tools accept a wide variety of granules / powders of such materials and blends.3D-Printing of BioInks & Polymer MeltsCubic PCL scaffold structure:Edge length: 10 mmLayer height: 50 µm Number of layers: 200Nozzle diameter:250 µmCubes of PCL at a molecular weight of 14000 g/mole. Cubes have X/Y dimensions of 10 mm by 10 mm. The heights are 10 mm, 3 mm and 7 mm (left to right).The GeSiM BioScaffolder platform enables different approaches for co-printing:— Printing from up to three cartridges (optional: with different nozzles at different temperatures)— Coaxial printing of two different materials with core/shell dispensers — Application of e.g. cell suspensions or protein samples by nanolitre pipetting3D bioprinting for tissue engineering requires porous objects co-printed from very different materials. Both a stiff polymer matrix providing the stable 3D scaffold (free 3D forms are possible) and a bioink of lower viscosity containing living cells, unable to shape 3D parts by itself, are required.Fluorescence microscope image of a bioscaffold co-printed from PCL-PEG and ADA-GEL (alginate dialdehyde gelatin hydrogel) loaded with a stromal cell line (St2) [1]Tools for Bulk Dispensing and 3D PrintingBioScaffolderTools at a GlanceTool Printing by...Function / Specs Reservoir/ VolumeInterior Patterns for3D ObjectsViscosity Range Use with...Piezoelectric pipette(optionally heatable)or Twin-TipUltrasonic wave; Twin-Tippipette allows kinetic mixingPipettor(s) with wash system, drop-on-demand dispensing, single drop volume100 … 400 picolitres, automatic ll-up,T < 100 °C96 well microtitreplate, max.120 µl/wellSingle spots of at least 80 µm,arrays, linesUp to 10 mPa·s All líquid samples, e.g. proteinsolutions, cell suspensions,solved polymers (two-componentsystems)Solenoid valvepipetteSolenoid valve andpressurized airPipettor with wash system, drop-on-demand dispensing, single pulse60 nanolitres, range up to microlitres,automatic ll-up96 well microtitreplate, max.120 µl/wellSingle spots, arrays, lines Up to 40 mPa·s All líquid samples, e.g. proteinsolutions, cell suspensions,dissolved polymersPassive pipette tips(Metal/Te on-coated)Diluter syringe displacement Pipettor with wash system, µl range,automatic ll-up96 well microtitreplate, max.120 µl/wellBulk dispensing of ml volumeson printed patternsLiquids (depends on tipsize)All liquid samples, e.g. proteinsolutions, cell suspensions,dissolved polymersPiezoelectricdispense valves (OEMcomponents)Piezoelectric valve andpressurized airCartridge dispenser, drop-on-demanddispensing, drop volume in the nanolitrerange (also heatable)3 ml Single spots, arrays, lines Approx. 50 … 200.000mPa·sHighly viscous liquids, e.g. glue,dissolved polymersPowder pipette Vacuum, compressed air Aspiration / dispensing of powder aliquotsin the µg rangemin. 1 ml Spots Solid materials Granular materials and powderReferences:[1] Tobias Zehnder, Tim Freund, Merve Demir, Rainer Detsch, Aldo R. Boccaccini: Fabrication of cell-loaded two-phase 3D constructs for tissue engineering, Materials 2016, 9, 887(Institute of Biomaterials, Department of Materials Science and Engineering, University of Erlangen-Nürnberg, Germany)[2] Stefan Giron, Anja Lode, Michael Gelinsky: In situ functionalization of scaffolds during extrusion-based 3D plotting using a piezoelectric nanoliter pipette, J. 3D Print. Med., 2017, 1,25 (Centre for Translational Bone, Joint & Soft Tissue Research, University Hospital Carl Gustav Carus & Faculty of Medicine, TU Dresden, Germany)Melt Electrospinning WritingThe Melt Electrospinning Writing Module(MES) uses electrical charge to draw verythin bres, typically in the micrometrerange, from a liquid or polymer melt.Depending on the experimental set-up,arbitrary and regular patterns can begenerated.The MES module for the BS3.x contains ahigh-voltage generator and a specialsubstrate support. Special dispense nozzlesand metal cartridges are required.The spun scaffold consists of stacked layers, eachrotated at 30 degrees. Printing was done withPCL 14,000 at 100 °C and 10 kV.SEM image, PCL 14,000, 15 kV, 100 °C, strutwidth is between 20 and 40 µmNanolitre PipettingThe pipetting module enables the partialfunctionalization of 3D-printed structuresby applying nanolitre amounts of cellsuspensions or protein solutions.Alternatively, micro-scaffolds from curableliquid samples are feasible.On the right: Fluorescein-labelled dots (green)printed at de ned XY positions on a scaffold thatwas printed from oil-based CPC (calcium-phoshatecement) paste [2]Tools for Liquid and Powder PipettingBottom layer with 20 µm strands, top layer with100 µm strandsOmniCure S1500: 200 W mercury UV lamp with selectable lters covering wavelengthsfrom 250 nm to 500 nm. Typical irradiation is in the range of 6 ... 28 W/cm².Camera with a wide range of lenses at different magni cationsOptical (OEM) Components。
创意力3D打印机用户手册说明书
K13D Printer User ManualV1.0Thank you for choosing our products. For the best experience, please read this User Manual carefully and strictly follow the instructions to operate the printer. Ourteams will always be ready to provide you with the best services. Please contact us via the phone number or e-mail address provided at the end of this User Manual when you encounter any problem with the printer. For a better experience in using our products, you can also learn how to use the printer in the following ways:Accompanied instructions: you can find the relevant instructions and videos in the USB flash disk.You can also visit our official website (https://) to find information regarding software, hardware, contact information, device instructions, device warranty information, and more.1. About the Device 1.1 About the Printer 1.2 Device Specifications 1.3 Packing List2. Unboxing 2.1 Unpacking Steps 2.2 Install the Product 2.3 Power-on guide3. About the User Interface 3.1 Main、Prepare 3.2 Files 3.3 Tune、Support4. First Printing 4.1 USB flash disk Printing 4.2 LAN Printing5. Functional Specification 5.1 Extrude、Filament Retreat6. Tips and Routine Maintenance 6.1 Maintenance Items 6.2 Error Code Instructions 6.3 Precautions for printing ...................................................................................................................................................................................................................................................................................................................................................................................................................................................................................................................................................................................................................................................................................................................................................................................................................................................................................................................................................................................................................................................................................................................................................................................................................................................................................................................................................................................................................................................................................................................................................................................................................................................................................................................................................................................................................................................................................................................................................................................................................................................................................................................................................................................................................................................................................................................................................................................................................................................................................................................................................................................................................................................................................................................................................................................................................................................................................................................................................................................................................................................................................................................................................................................................................................................................................................................................................................................................................................................................................................................................................................................................................................................................................................................................................................................................................................................................................................................................................................................................................................................................................................................................................................................................................................................................................................................................................................................................................................................................................................................................................................................................................................................................................................................................................................................................................................................................................................................................................................................................................................................................................................................................................................................................................................................................................................................................................................................................................................................................................................................................................................................................................................................................................................................01-0301-0102-0203-0309-0911-1112-1216-1617-1718-1819-2017-2013-1509-1110-1012-1516-1604-0804-0506-0708-081.1 About the Printer1.3 Packing ListWrench and Screwdriver ×14Touch screen 2Filament3Blade ×15M6 socketspanner ×112After-sales ServicesCard ×115Power Cable ×111Material barrel ×161.2mm nozzle cleaner ×1813Tool Box ListCutting plier ×17USB flash disk ×19LubricatingGrease ×1Quick Guide ×1* Tips: the above accessories are for reference only. Please refer to the physical accessories!2.1 Unpacking StepsKeep the blue cube in the figure clean of debris and then click "OK".① Network Settings② Time Zone Settings③ Creality Cloud binding④ Self-inspection⑤Self-testing2.3 Power-on guide⑥ Self-test completedNote: The current interface is for reference only. Due to the continuous upgrading of functions, it shall be subject to the latest firmware UI published on the official website.Prepare3.1 Tune、Prepare① Local model② Press and hold on the model to multi-selectand copy it to a USB flash drive③ USB flash drive model ④ HistoryTips: Choosing print calibration can improve print quality 3.2 FilesNote: The current interface is for reference only. Due to the continuous upgrading of functions, it shall be subject to the latest firmware UI published on the official website.SupportSystemSystem HelpNetworkError historyUpload LogNote: The current interface is for reference only. Due to the continuous upgrading of functions, it shall be subject to the latest firmware UI published on the official website.4.1 USB flash disk Printing④ Printing③ Select to print② USB flash drive modelNote: The current interface is for reference only. Due to the continuous② Choose a language and region;③ Choose a Printer;⑤ Select to download the model;④ Click on "Model Library" and select the model file;4.2 LAN Printing Creality Print①Download at()or find the software on a USB flash driveand install it.Note: The current interface is for reference only. Due to the continuous upgrading of functions,it shall be subject to the latest firmware UI published on the official website.4.2 LAN Printing⑥ Log into a Creality Cloud account;⑦Start slicing;⑧Selection of LAN printing;⑩ Device List;Add a device: a. Add by scanning;→Select a device;⑪ Device Details 。
3D打印机使用说明书

3D 打印机使用手册
ZAYH-FDM-1311
run wizard 运行 配置向导。这里需要对其进行简单的配置:点击下一步 (“Next”)跳过语言选择;
选择 其他机型(“Other”),并点击下一步(“Next”);
选择自定义机型信息(“Custom”),并点击下一步(“Next”);
6
贵州省北斗卫星技术有限公司
3D 打印机使用手册
填入如图所示的配置参数,并点击 结束(“Finish”)完成配置。 基本配置完成后,你还需要通过菜单 File>Machine settings„ 进入机型配置 页面(“Machine settings”),在 Communication settings 中将 Serial Port 中 串口设置为本产品使用的串口(查看串口号见本手册 驱动安装 部分),并将波 特 率 设 置 为 115200 ; 通 过 菜 单 File>Preferences „ 进 入 偏 向 设 置 页 (“Preferences”),在 Printing window type 下拉菜单中选择 Pronterface UI。
5.1 Cura 转码配置详解.............................................................................................................................. 19 5.2 3D 打印机建模要领........................................................................................................................... 22 6 FAQ ............................................................................................................................................................... 23
Dell Dimension 1100 B110 用户手册说明书

w w w.d e l l.c o m | s u p p o r t.d e l l.c o mDell™ Dimension™ 1100/B110用户手册型号:DMC**并非所有计算机上都有。
键盘连接器USB 2.0 *输出连接器串行连接器PCI 卡插槽电源连接器 (4)***具有集成音频功能的计算机上才有。
或 DVD 驱动器活或 DVD 弹出按钮连接器注、注意和警告注:注表示可以帮助您更好地使用计算机的重要信息。
注意:注意表示可能会损坏硬件或导致数据丢失,并告诉您如何避免此类问题。
警告:警告表示可能会导致财产损失、人身伤害甚至死亡。
如果您购买的是 Dell™ n Series 计算机,则本说明文件中有关 Microsoft® Windows®操作系统的所有参考信息均不适用。
____________________本说明文件中的信息如有更改,恕不另行通知。
©2006Dell Inc.。
版权所有,翻印必究。
未经 Dell Inc. 书面许可,严禁以任何形式进行复制。
本文中使用的商标:Dell、DELL徽标、Inspiron、Dell Precision、Dimension、OptiPlex、Latitude、PowerEdge、PowerVault、PowerApp、PowerConnect和Dell OpenManage是 Dell Inc. 的商标;Intel、Pentium和Celeron是 Intel Corporation 的注册商标;Microsoft、Windows和Outlook是 Microsoft Corporation 的注册商标。
本说明文件中述及的其它商标和产品名称是指拥有相应商标和产品名称的公司或其制造的产品。
Dell Inc. 对其它公司的商标和产品名称不拥有任何所有权。
型号:DMC2006 年 9 月P/N UD577修订版 A04目录查找信息 (7)1设置和使用计算机设置打印机 (9)打印机电缆 (9)连接 USB 打印机 (9)连接并行打印机 (10)设置家庭和办公网络 (11)连接网络适配器 (11)网络安装向导 (12)连接至 Internet (12)设置 Internet 连接 (13)播放 CD 和 DVD (14)调节音量 (15)调整图片 (16)复制 CD 和 DVD (16)如何复制 CD 或 DVD (16)使用空白 CD 和 DVD (17)注意事项 (18)超线程 (18)2解决问题故障排除提示 (19)电池问题 (19)驱动器问题 (19)CD 和 DVD 驱动器问题 (20)硬盘驱动器问题 (21)电子邮件、调制解调器和 Internet 问题 (21)目录3错误信息 (22)IEEE 1394 设备问题 (23)键盘问题 (24)锁定和软件问题 (24)计算机无法启动 (24)计算机停止响应 (24)程序停止响应 (25)程序多次崩溃 (25)程序设计为用于早期版本的 Windows 操作系统 (25)出现蓝屏 (25)其它软件问题 (25)内存问题 (26)鼠标问题 (26)网络问题 (27)电源问题 (28)打印机问题 (28)扫描仪问题 (29)声音和扬声器问题 (30)扬声器没有声音 (30)耳机没有声音 (31)视频和显示器问题 (31)如果屏幕为黑屏 (31)如果屏幕显示不清楚 (32)3高级故障排除诊断指示灯 (33)Dell 诊断程序 (36)Dell 诊断程序主菜单 (36)驱动程序 (37)什么是驱动程序? (37)识别驱动程序 (37)重新安装驱动程序 (38)4目录还原操作系统 (39)使用 Microsoft Windows XP 系统还原 (39)使用 Symantec 提供的 Dell PC Restore (40)使用操作系统 CD (42)解决软件与硬件不兼容的问题 (43)4卸下和安装部件开始之前 (45)建议工具 (45)关闭计算机电源 (45)拆装计算机内部组件之前 (46)计算机的正面视图和背面视图 (47)正面视图 (47)背面视图 (48)卸下主机盖 (50)计算机内部视图 (51)系统板组件 (52)内存 (53)DDR 内存概览 (53)内存安装原则 (53)安装内存 (54)插卡 (56)PCI 卡 (56)前面板 (59)卸下前面板 (59)卸下前面板插件 (60)重新连接前面板 (60)驱动器 (61)一般安装原则 (62)连接驱动器电缆 (62)硬盘驱动器 (63)卸下硬盘驱动器 (63)安装硬盘驱动器 (65)目录5软盘驱动器 (67)卸下软盘驱动器 (67)安装软盘驱动器 (68)CD/DVD 驱动器 (70)卸下 CD/DVD 驱动器 (70)安装 CD/DVD 驱动器 (71)添加第二个 CD 或 DVD 驱动器 (72)电池 (73)装回主机盖 (74)5附录规格 (77)系统设置程序 (80)概览 (80)进入系统设置程序 (80)系统设置程序选项 (82)引导顺序 (86)清除已忘记的密码 (88)清洁计算机 (89)计算机、键盘和显示器 (89)鼠标 (89)软盘驱动器 (89)CD 和 DVD (89)与 Dell 联络 (90)索引 (109)6目录查找信息7查找信息注: 并非所有功能或介质都是必需的,您的计算机可能未附带某些功能或介质。
3D打印机操作指南

3D打印机操作指南3D打印技术作为一种快速、高效的生产方法,正逐渐应用于各个领域。
了解如何正确操作3D打印机是非常重要的,本文将为您提供一份详细的3D打印机操作指南。
一、机器准备1. 温度调整:首先,确保3D打印机的温度已经调整到适当的位置。
不同的打印材料需要不同的温度,所以务必仔细研究您要使用的材料的温度要求,并根据需要进行相应的调整。
2. 底板调整:确认打印机的底板调整合适,以确保打印物体能够牢固附着在底板上。
适当的调整可以避免材料在打印过程中脱落或变形的情况。
3. 打印材料加载:根据您打印的对象和所选择的材料,将正确的打印材料加载到打印机的材料槽中。
确保材料加载正确,以避免材料卡住或导致其他问题。
二、文件准备1. 设计和准备文件:在开始打印之前,确保您已经设计好所需的3D模型,并将其保存为适当的文件格式,例如STL或OBJ。
确保文件的准备工作已经完成,模型没有缺陷或错误。
2. 切片软件调整:使用切片软件将3D模型转换为适合打印的文件,在这个过程中,您需要调整一些参数,如打印层厚度、打印速度和填充密度等。
确保这些参数根据您的需求正确调整。
三、打印过程1. 启动打印机:打开3D打印机的电源开关,等到打印机完全启动后,您可以开始下一步操作。
2. 文件传输:将您准备好的打印文件通过USB、无线网等方式传输到打印机上。
确保传输的文件与您之前准备的文件相匹配。
3. 打印设置:通过打印机的界面,设置打印模式、温度、速度等参数。
确保这些参数与您之前在切片软件中设定的参数相匹配。
4. 打印开始:在一切准备就绪后,您可以点击打印按钮开始打印过程。
确保您的打印机在打印过程中不会受到外界干扰,以免影响打印质量。
5. 监控打印过程:在打印过程中,您可以通过打印机的屏幕或者相关软件来监控打印进度。
及时发现问题并采取相应的措施,以确保打印顺利进行。
6. 完成和取下物体:当打印完成后,等待打印物体冷却一段时间,然后轻轻取下。
2023年3D打印机操作与维护使用说明书

2023年3D打印机操作与维护使用说明书首部感谢您选择购买2023年款3D打印机。
为了帮助您正确操作和维护设备,提供了以下使用说明。
请在开始使用之前仔细阅读此手册,并按照指导进行操作。
第一章操作指南1. 准备工作在使用3D打印机之前,请确保您已准备好以下物品:- 3D打印机及其电源线- 适用的3D打印材料- 笔记本电脑或电脑与打印机连接的USB线- 相关的打印文件确保3D打印机周围空间足够,并避免接触可能引起电磁干扰的设备。
2. 连接与调试将3D打印机与电源线连接,并确保电源开关处于关闭状态。
使用USB线将3D打印机与笔记本电脑或电脑连接。
打开电源开关,并按照屏幕上的指示进行操作,完成设备的初始化和调试。
3. 打印文件准备将您要打印的文件保存为STL格式,并使用专业的3D建模软件进行操作。
确保文件没有错误并符合打印要求,如正确的尺寸、支撑结构等。
4. 打印操作在进行打印操作之前,请确保以下事项:- 检查打印机内部是否有残留物,如有,请清理干净。
- 检查3D打印材料是否充足。
- 确认打印床平整,并在需要的情况下进行调整。
开启打印机,选择合适的打印文件并加载到打印机软件中,按照软件提示完成参数设定。
如果需要,可以选择打印速度、温度等参数进行调整。
确认设置无误后,开始打印。
5. 打印结果处理在打印完成后,不要立即取出打印品。
让其自然冷却,以防烫伤。
然后使用合适的工具将打印品从打印床上取下,并进行后续的处理,如去除支撑结构、砂光、喷漆等。
第二章维护与保养1. 定期清洁定期清洁您的3D打印机可以确保其正常运行和打印质量。
关闭电源并拔掉电源线,使用干净的布或棉签轻轻擦拭打印机表面和打印床,移除灰尘和杂质。
2. 润滑与保养根据制造商的指导,定期对打印机的润滑部件进行保养。
使用适当的润滑剂,确保打印头、导轨等部件的正常运行。
3. 定期检查定期检查打印机内部和外部的连接部件,确保其紧固度和稳定性。
检查打印床的平整度,并进行调整。
3D打印机使用说明打印须知

By 武尚卿
3D打印机硬件介绍
打印机喷头
开关
托盘,3D模型 成型位置
Байду номын сангаас
打印材料盒
废料盒 网线接口, 连接电脑
3D打印机使用说明
支撑材料盒
计算机设置
3D打印机使用说明
计算机设置
网 络 连 接 IP
工 作 组 名 称
3D打印机使用说明
客户端软件设置
导 入 建 模 文 件
①
最 佳 打 印 位 置 检 查
3D打印机使用说明
3D打印机使用说明
②
封 闭 性 检 查
③
用 料 估 计
④
估 计 量 及 打 印 时 间
3D打印机使用说明
客户端软件设置
当Slices大于4/总Slices(切记,一定要大于4)以后,点击Serve端显示 器界面中下面的红色按钮
3D打印机使用说明
打印须知
打印前需用沾酒精的丝巾擦拭打印机喷头 用打印机中perform pattern test测试喷头状态 打印完毕后,清理机内残余物,按先关闭软件 后关闭电源的步骤关闭打印机
- 1、下载文档前请自行甄别文档内容的完整性,平台不提供额外的编辑、内容补充、找答案等附加服务。
- 2、"仅部分预览"的文档,不可在线预览部分如存在完整性等问题,可反馈申请退款(可完整预览的文档不适用该条件!)。
- 3、如文档侵犯您的权益,请联系客服反馈,我们会尽快为您处理(人工客服工作时间:9:00-18:30)。
Dimension 3D Printers Stratasys Inc.7665 Commerce Way Eden Prairie, MN 55344-2020 U.S.A.+1 866 721 9244 (US Toll Free)+1 952 937 3000+1 952 937 0070 (Fax) info@ISO 9001:2008 Certified Dimension 3D Printers Stratasys GmbH Weismüllerstrasse 2760314 Frankfurt am Main Germany +49 69 420 9943 0 (Tel)+49 69 420 9943 33 (Fax) europe@ ©2012 Stratasys Inc. All rights reserved. Stratasys, Dimension, Catalyst and FDM are registered trademarks and Fused Deposition Modeling, FDM Technology and ABS plus are trademarks of Stratasys Inc., registered in the United States and other countries. Product specifications subject to change without notice. Printed in the USA. DFB0412Print 3D models that hold up under pressure.All Dimension 3D Printers useABS plus , a production-gradethermoplastic that gives yourmodels the ability to perform justlike production parts.The core of every model: FDM ® Technology.Our proven technology has made Dimension the number one selling 3D Printer family for more than ten years. Stratasys FDM (Fused Deposition Modeling) Technology is the foundation for all Dimension 3D Printers. Two materials — one for models, one for support — are heated in an extrusion head and deposited in thin layers on a modeling base. The model is precisely built layer upon layer. When the model iscomplete, the support materialis removed leaving an accurate, durable functional 3D model.Whatever you imagine, there’s a Dimension 3D Printer to build it.For more information about Dimension 3D Printers,contact a reseller at+1 866 721 9244 or visit Dimension 1200es 3D Print PackDimension Elite 3D Print Pack Dimension 1200es BST BuildEnvelope254 x 254 x 305 mm (10 x 10 x 12 in)203 x 203 x 305 mm (8 x 8 x 12 in)254 x 254 x 305 mm (10 x 10 x 12 in)Size andWeight 838 x 737 x 1143 mm (33 x 29 x 45 in)148 kg (326 lbs)686 x 914 x 1041 mm (27 x 36 x 41 in) 136 kg (300 lbs)838 x 737 x 1143 mm (33 x 29 x 45 in) 148 kg (326 lbs)Layer Thickness .254 mm (.010 in) or.330 mm (.013 in).178 mm (.007 in) or .254 mm (.010 in) .254 mm (.010 in) or .330 mm (.013 in)Modeling MaterialABS plus in ivory, blue,fluorescent yellow,black, red, nectarine,olive green, gray orwhite.ABS plus in ivory, blue, fluorescent yellow, black, red, nectarine, olive green, gray or white.ABS plus in ivory, blue, fluorescent yellow, black, red, nectarine, olive green, gray or white.SupportMaterialSoluble or breakaway.Soluble only.Breakaway only.Price 1200es SST:$32,900 (€24.370)*1200es SST Print Pack$34,900 (€25.900)*Elite: $29,900 (€22.150)*Elite Print Pack:$31,900 (€23.700)*1200es BST: $24,900 (€18.500)**Manufacturer’s worldwide list price. Additional options, shipping and applicable taxes/VAT/duties not included.Create a more productive design process with Dimension 3D Printers.Dimension 1200es SST 3D Print PackWith the largest build size in the Dimension family, the Dimension 1200es SST 3D Printer has thecapacity to create a wide variety of 3D models fast. See and test your concepts earlier in the design process. Reach final designs sooner. It’s easy to use, and now easier to acquire thanks to the newDimension 1200es SST 3D Print Pack. With the print pack you get everything you need to startprinting right away – the Dimension 1200es SST 3D Printer, an SCA-1200 support removal system, and startup supply of materials.Dimension Elite 3D Print PackThe Dimension Elite 3D Printer prints intricate, durable models for projects such as medical devices or handheld electronics. It precisely deposits ABS plus thermoplastic in layers thin enough to printtiny functional parts with clearly visible details. Bundle your printer purchase into a Dimension Elite 3D Print Pack and you’ll be ready to show off your designs by morning. The Dimension Elite 3D Print Pack comes with the Elite 3D Printer, SCA-1200 support removal system, and startup supplies.Dimension 1200es BSTThe Dimension 1200es BST 3D Printer is idealfor users who prefer printing their models withbreakaway support material. Built with thesame functionality of its SST (soluble supporttechnology) sibling, the Dimension 1200es BST 3DPrinter is on par with its capacity and speed.Automotive componentsHands-on classroom experiences Rapid tooling masters Architectural models Medical devices and modelsConsumer products。