精工v198_c使用说明
Cuckoo cmc-q5 series 使用说明书

CMC-Q5 SeriesICOOK Q5 PREMIUMOperating InstructionsKOREA NO.1CUCKOOElectric Multi Pressure CookerThank you very much for purchasing “CUCKOO ”Electric Multi Pressure CookerRead the following instruction manual carefully before use or when facing problems. 在使用产品之前或是使用过程中出现任何问题, 请仔细阅读该产品的说明书.Lea atentamente a las siguientes instrucciones antes de su uso o en caso de cualquier mal funcion.※The actual color of this product may be different.※因本产品是系列产品,图片与实际颜色可能有所不同。
※El color real de este producto puede ser diferente.CONTENTS2CONTENTSBEFORE USINGImportant safeguards (3)How to use extension cord (5)Specifications (5)Safety precautions …………………………………………6~7Name of each part (10)How to clean ………………………………………………11~15Function operating part (16)WHEN USINGHOW TO SET FUNCTION (17)HOW TO PRESET COOKING (18)COOKER SETTINGS OVERVIEW (19)PREPARATION BEFORE COOKING (20)HOW TO COOK …………………………………………21~23KEEP WARM, REHEAT, VOLTAGE SAG PROTECTION (24)PROBLEM CHECKLISTPLEASE CHECK BEFORE CALLING FOR SUPPORT……25~27TABLA DE CONTENIDOSANTES DE USARIImportant safeguards (3)ESPECIFICACIONES (5)NOMBRE DE LAS PIEZAS (50)CÓMO LIMPIAR ………………………………………51~55Panel de Control y Pantalla (56)CUANDO USASCómo configurar (57)Cómo preconfigurar la cocción (58)Tabla de resumen (59)Preparación antes de cocinar (60)Cómo Cocinar ……………………………………………61~63Mantener Caliente, Recalentar, Protección de caída de voltaje (64)LISTA DE COMPROBACIÓN DE PROBLEMASPor favor verifique antes de pedir soporte…………65~67TABLE DES MATIÈRESAVANT L'UTILISATIONMesures de protection importantes (4)Comment utilizer une rallonge (5)Spécifications (5)Mesures de sécurité …………………………………………8~9 (3) (5) (30)………………………………………………31~35 (36) (37) (38) (39) (40)……………………………………………………41~43 (44)………………………………………45~47ӈ ҍ ӲГ控制&显示板使用时设定功能预约煮饭方法压力锅设置概览煮饭方法煮饭方法保温, 再加热, 防止电压低下问题检查表常见故障及处理方法31. Read all instructions before using this appliance.2. Do not touch hot surfaces. Use handles or knobs.3. To protect against fire, electric shock and / or injury to persons do not immerse cord, plugs, or Pressure Cooker Body in water or any other liquid.4. Close supervision is necessary when this appliance is used by or near children. This appliance is not intended for use by young children without supervision.5. Unplug cord from outlet when not in use and before cleaning. Allow appliance to cool before putting on or taking off parts, and before cleaning the appliance.6. Do not operate any appliance with a damaged cord or plug, after the appliance malfunctions, or has been damaged in any manner. Return the appliance to the nearest authorized service facility for examination, repair or adjustment.7. The use of accessory attachments not recommended by the appliance manufacturer may result in fire,electric shock, and / or injury to persons.8. If the supply cord is damaged, it must be replaced by a special cord or assembly available from the manufacturer or your service agent.9. Do not use outdoors.10. Do not let the cord hang over the edge of a table or counter, or touch hot surfaces.11. Do not place on or near a hot gas, electric burner, or in a heated oven.12. Always attach the plug to the appliance first, then plug the cord into the wall outlet. To disconnect, orset all control to “off”, then remove the plug from the wall outlet.13. Do not use this appliance for other than its intended use.14. Extreme caution must be used when moving an appliance containing hot oil or any hot liquids.15. Oversized foods, metal foil packages, or utensils must not be inserted into the appliance as they are arisk of fire or electric shock.16. Fire may occur if the appliance is covered or touching flammable material, including curtains, draperies,walls, etc while in operation.17. To reduce the risk of electric shock, cook only in the provided removable container.18. This appliance cooks under pressure. Improper use may result in scalding injury. Before operating theunit, properly secure and close the unit. See “Operating Instructions.”19. Before use always check the pressure releasing device for clogging.20. Do not use this pressure cooker to fry in oil.21. This appliance is not intended for use by persons (including children) with reduced physical, sensory ormental capabilities, or lack of experience and knowledge, unless they have been given supervision or instruction concerning use of the appliance by a person responsible for their safety. 22. Never immerse the appliance in water while cleaning.SAVE THESE INSTRUCTIONSTHIS APPLIANCE IS FOR HOUSEHOLD USE ONL YWARNING :This appliance generates heat and releases steam during use. Use proper precaution toprevent risk of burns, fires, other injuries, or damage to property.1. Keep hands and face away from the Pressure Release Valve when releasing pressure.2. Take extreme caution when opening the Lid after cooking. Severe burns can result from steam inside.3. Never open the Lid while the unit is in operation.4. Do not use without the inner Pot in place.5. Do not cover the Pressure Valve with anything as an explosion may occur.6. Do not touch the inner pot nor any heating parts, immediately after use. Allow the unit to cool down completely first.This appliance is intended to be used in household and similar applications such as :- staff kitchen areas in shops, offices and other working environments;- farm houses;- by clients in hotels, motels and other residential type environments;- bed and breakfast type environments.ADDITIONAL IMPORTANT SAFEGUARDSIMPORTANT SAFEGUARDS1. Lisez toutes les instructions avant d'utiliser cet appareil.2. Ne touchez pas les surfaces chaudes. Utilisez les poignées ou les boutons.3. Pour prévenir les risques d'incendie, les chocs électriques et/ou les blessures, ne plongez pas le cordon, les prises ou le corps autocuiseur dans l'eau ou tout autre liquide.4. Une surveillance étroite est nécessaire quand cet appareil est utilisé par des enfants ou qu'il se situe à leur portée.Cet appareil n'est pas prévu pour être utilisé par de jeunes enfants sans surveillance.5. Débranchez le cordon de la prise lorsque vous ne vous servez pas de l'appareil et avant de le nettoyer. Laissez l'appareil refroidir avant de remettre en place ou de retirer des pièces, et avant de le nettoyer.6. N'utilisez aucun appareil si le cordon ou la fiche est endommagé, s'il ne fonctionne pas correctement ou s'il est endommagé de quelque façon que ce soit. Renvoyez l'appareil à un centre technique agréé le plus proche pour le faire examiner, réparer ou régler.7. L'utilisation d'accessoires non recommandés par le fabricant peut causer un incendie, un choc électrique et/ou des blessures.8. Si le cordon d'alimentation est endommagé, il doit être remplacé par un cordon ou ensemble prévu à cet effet,disponible auprès du fabricant ou de réparateurs agréés.9. N'utilisez pas l'appareil à l'extérieur.10. Ne laissez pas le cordon pendre d'une table ou d'un comptoir. Ne le laissez pas non plus en contact avec une surface chaude.11. Ne placez pas l'appareil au-dessus ou près d'un brûleur à gaz, sur une plaque électrique ou dans un four chaud.12. Branchez toujours la fiche sur l'appareil en premier, puis branchez le cordon dans la prise murale. Pour débrancher,ou désactiver toutes les commandes, retirez la fiche de la prise murale.13. N'utilisez pas cet appareil à des fins autres que celles pour lesquelles il a été conçu.14. Une prudence extrême est requise lorsque vous déplacez l'appareil contenant de l'huile chaude ou tout autre liquide chaud.15. Des denrées alimentaires de taille excessive, les emballages sous feuille métallique, ou les ustensiles ne doivent pas être insérés dans l'appareil car ils constituent un risque d'incendie ou de choc électrique.16. Un incendie peut se déclarer si l'appareil est couvert ou en contact avec des matériaux inflammables, y compris des rideaux ou des draperies, des murs, etc durant son fonctionnement.17. Afin de réduire le risque de choc électrique, faites cuire uniquement dans le récipient amovible fourni.18. Cet appareil cuit sous pression. Un mauvais usage peut entraîner des brûlures. Avant d'utiliser l'appareil, mettez l'appareil bien en place et fermez-le. Reportez-vous à la section « Instructions d'utilisation ».19. Avant toute utilisation, vérifiez toujours si le dispositif de relâchement de la pression est obstrué.20. N'utilisez pas cet autocuiseur pour faire frire dans de l'huile.21. Cet appareil n'est pas conçu pour être manipulé par des personnes (y compris des enfants) dont les capacités physiques sensorielles ou mentales sont réduites ou qui manquent d'expérience et de connaissance, à moinsqu'elles n'aient reçu une une formation ou des instructions sur l'utilisation de l'appareil par une personne responsable de leur sécurité22. Ne jamais immerger l'appareil dans l'eau pendant le nettoyage.CONSERVEZ CES INSTRUCTIONSCET APPAREIL EST DESTINÉ À UN USAGE DOMESTIQUE UNIQUEMENTAVERTISSEMENT :Cet appareil génère de la chaleur et libère de la vapeur durant son fonctionnement. Utilisez lesprotections appropriées pour prévenir le risque de brûlures, d'incendies, de blessures ou de dégâts matériels.1. Gardez vos mains et votre visage à l'écart de la soupape de décharge lors du relâchement de la pression.2. Faites extrêmement attention lors de l'ouverture du couvercle après la cuisson. La vapeur à l'intérieur peut provoquer des brûlures graves.3. N'ouvrez jamais le couvercle lorsque l'appareil est en fonctionnement.4. N'utilisez pas l'appareil sans la cuve de cuisson à sa place.5. Ne recouvrez pas la soupape de pression par un objet quelconque, une explosion pourrait survenir.6. Ne touchez pas la cuve de cuisson ni les éléments chauffants immédiatement après utilisation. Laissez tout d'abord l'appareil refroidir complètement. Cet appareil est prévu pour être utilisé à la maison à des fins telles que :- la cuisine pour le personnel dans des magasins, des bureaux et d'autres environnements de travail;- les fermes;- par des clients dans des hôtels, des motels et autres environnements de type résidentiel;- des environnements de type chambres d'hôtes.MESURES DE PROTECTION SUPPLÉMENTAIRESMESURES DE PROTECTION IMPORTANTES4Note:A.A short power-supply cord (or cord set) is provided to reduce the hazards from entanglement by a longer cord.B. Extension cord should be used properly.C. Extension cord usage for the rice cooker:(1) The correct rated voltage should be used for the rice cooker.(2) If the appliance is set on the ground, the extension cord should also be set on the ground.(3) The cord wires and extension cord should always be arranged to prevent hazards to children."This appliance has a polarized plug (one blade is wider than the other).To reduce the risk of electric shock, this plug is intended to fit into a polarized outletonly one way. If the plug does not fit fully into the outlet, reverse the plug. If it still does not fit,contact a qualified electrician. do not attempt to modify the plug in any way."Remarque :A.Un cordon d'alimentation court (ou câble) est fourni pour réduire les dangers d'emmêlement causés par un cordon plus long.B. La rallonge doit être utilisée correctement.C. L'utilisation de la rallonge pour le cuiseur à riz :(1) La tension nominale correcte doit être utilisée pour le cuiseur à riz.(2) Si l'appareil est installé sur le sol, la rallonge doit aussi être installée sur le sol.(3) Les câbles et la rallonge doivent toujours être disposés dans le but d'éviter les dangers pour les enfants."Cet appareil possède une fiche polarisée (une lame plus large que l'autre).Afin de réduire le risque d'électrocution, cette fiche est conçue pour s'adapter à une prise polarisée dans un seul sens. Si la fiche ne s'emboîte pas complètement dans la prise, inversez la fiche. S'il ne convient toujours pas,veuillez communiquer avec un électricien qualifié. N'essayez pas de modifier la fiche de quelque façon que ce soit."CMC-Q5 SeriesAC120V~, 60Hz1150W 1.3m78.4KPa(0.8kgf/cm 2)7.5kg 30.4cm 39.5cm 28.2cmSPECIFICATIONS / 规格 / ESPECIFICACIONESModel name/型号名称/Modelo Power supply/电源/Alimentación eléctrica Power consumption/功耗/Consumo de energíaPower cord length/电源线长度/Longitud del cable eléctricoPressure/压力/Presión Weight/重量/PesoWidth/宽度/AnchuraLength/长度/LongitudHeight/高度/AlturaMenu/菜单/MenúSoup Meat Vegetables Rice Porridge Steam Cook Multi Cook Slow Cook Browning Fry Auto Clean Dimension/尺寸/Dimensiones 5HOW TO USE EXTENSION CORD / COMMENT UTILISER UNE RALLONGERead the following product safety guide carefully to prevent any accidents and/or serious danger.‘Warning’ and ‘Caution’ are different as follows.● ●SAFETY PRECAUTIONS67SAFETY PRECAUTIONSS A F E T Y P R E C A U T I O N SLisez attentivement le guide de sécurité du produit qui suit afin d'éviter les accidents et/ou les dangers graves.MESURES DE SÉCURITÉ89MESURES DE SÉCURITÉM E S U R E S D E S ÉC U R I T ÉPot HandleTemperature10it down. a neutral detergent.direction of the arrow.How to Clean The Pressure Weight Nozzle11HOW TO CLEANH O W T O C L E A NUnless detachable cover is mounted, preset coo king cannot be done. (Alarm may sound while k eeping warm.) -Clean the detachable cover to prevent odors. Array12• proper maintenance of the pressure packing helps keep high airtightness, adds durability to packing and ensures the taste of the food.• Read the directions below carefully to install your packing properly.How to remove and clean the pressure packingHow to install the Double Motion Packing (Pressure Packing)The all-stainless cover is not only delamination-free and easy to clean, but it also lasts long, In addition, CUCKOO’s special stainless CSV-a CUCKOO’s patented technology, improves the product’s durability and makes it easier to clean.①Unplug the power cord and wait until the pot cools down before opening the Top Cover.③ After hand washing it with a neutralcleaning liquid and a sponge, wipe it clean with a well wrung dish cloth.② To remove the pressure packing, hold it asshown in the picture above and pull it out.Figure.1Standard pointsStandard notches245136How to reassemble the pressure packing② ①to insert it into the groove. Repeat with points #2 to # 6.13HOW TO CLEANH O W T O C L E A N①Visual inspection• check the entire circumference carefully for any crack or damage between the Inner Pot lid and the pressure packing.③ Water boiling test• Pour water in the Inner Pot up to water level 2 (for “Rice”) and press the Menu/Selection button to select the self-cleaning mode.Then push the Pressure Cook/Turbo button.• Within 10 minutes, the pressure regulator weight will start rattling and hissing while emitting stream. If there is no steam coming out from the pot other than through the pressure regulator weight the packing has been properly installed.• If steam comes out from other parts, stop the test and pull out the power cord. Wait until the pot cools down before removing the pressure packing from the lid. Once reinstalled repeat the boiling test.• For a more precise water boiling test, you can wrap plastic around the circumference of the closed Top Cover. By doing so, you can easily check where the steam leakage is.• If you still have a problem with reassembling the packing, please contact our Customer Service.②Physical inspection• Check if the pressure packing is thoroughly put into the groove by rubbing the inside rimeof the packing with a finger around the entire circumference as shown in the picture above.• Check if the pressure packing is properly putinto the groove of the Inner Pot lid by pushing the outer rim with a finger around the entire circumference as shown in the picture.• Check if the pressure packing is thoroughlyput into the groove by pushing the inside of the rim packing with a finger around the entire circumference as shown in the picture.How to double check whether the packing is well assembledNormal assemblyAbnormal assemblyNormal assembly Abnormal assemblyHOW TO CLEAN14How to use the handlehandle to unlock shown in the picture on the right.main body.When top cover does not close perfectlyDo not try to close the top cover by force. It can damage your cooker and cause problems.grasping thedented part withyour fingers andpulling to the side while lifting gently.way.locked.pressing it in thedirection as shown above.1. After cooking, turn the handle from “Lock” to “Unlock” to open2. After cooking, turn the handle from “Lock” to “Unlock” turn the handle to open.If there is unreleased steam in the Inner pot it might be hard to turn the handle. In this case twist the pressure weight and let the excess steam out. Do not open by force.3. Handle must be turned to “Unlock” when opening and closing.15HOW TO CLEANH O W T O C L E A NKEEP WARM /REHEAT buttonUsed to keep warm or heat up food right before your mealCOOK buttonUsed to start cooking (Refer to page 21)CANCEL buttonUsed to cancel a selected function or to automatically discharge steam(Press the button for two seconds to cancel during cooking.)Menu buttonUsed to select among SOUP,MEAT, VEGETABLES, RICE,PORRIDGE, BROWNING FRY,MULTI COOK, STEAM COOK,SLOW COOK, and AUTO CLEANPRESET button(Refer to page 18)HEAT / TIME buttonUsed to set the heating level or the Used to set the heating level and the cooking time (Refer to page 22, 23).Used to change the preset time (Refer to page 18)This appears when the Inner Pot is not mounted.This indicates that the Temperature Sensor fails to work.Contact our customer service center.This appears when you press the COOK or PRESET button without completely turning the Cover pletely turn the Cover Handle to “ ” (Lock).For any incorrect use or when it does not work properly, the Display Panel will display the below signs to alert.If a sign keeps showing even in a normal condition for use or after proper action has taken, please contact our customer service center.Error Inspection Function of Display PanelThis appears when the Cover Handle is not turned to “ ” (Open) in the Keep Warm mode after cooking is done and you press the COOK or the PRESET button again after entering in the Standby mode. This function is to check the operation of the Cover Fastening Sensor. Turn the Cover Handle to “ ” (Open) and then turn it to “ ” (Lock).If the problem persists, contact our customer service center.This indicates that there is an error with the externalmemory of MICOM. Contact our customer service center.This appears when you boil only water continuously or there is a malfunction with the product.Contact our customer service center.This indicates that the Environmental Sensor fails to work. Contact our customer service center.This indicates that there is an error with the internalmemory of MICOM. Contact our customer service center.NAMES AND FUNCTIONS ON CONTROL PANEL / MALFUNCTION INSPECTION OF DISPLAY PANEL16HOW TO SET FUNCTION(LANGUAGE, VOLUME, KEEP WARM TEMPERATURE)HOW TO PRESET COOKING18Press the HEAT / TIME button to enter the heating level Setting mode,and then press the SELECTION -, + buttons to set the heating level.▶It is applied to the menus of BROWNING FRY, MULTI COOK, STEAM COOK, and SLOW COOK.Press the PRESET button.▶▶the set time and the PRESET sign blinking.▶▶time.▶In the Standby mode, the PRESET button won't work.▶preset time.▶Press the PRESET button or the COOK button, and the product presets cooking.▶Here, the preset starts with the voice saying “SOUP(the set menu) has been reserved.”.▶After pressing the PRESET button, if you don't press any button in 7 seconds, the Preset mode will start automatically.▶When the Preset mode begins, the Preset lamp will stop blinking and the preset time will decrease by a minute until it starts thepreset cooking.(While the preset cooking continues, the “ ”sign between the hour and the minute blinks.)▶The preset time is the time remaining until the preset cooking will be completed.(The time of completion may differ according to the quantity of food and conditions for use.)▶If you want to change the preset time, press the CANCEL button to cancel the preset cooking, and then start all over again.19COOKER SETTINGS OVERVIEWP R E S E T C O O K I N G / O V E R V I E W T A B L EPREPARATION BEFORE COOKING20B E FO 21Press the HEAT / TIME button to enter the heating level Setting mode, and press the SELECTION -, +buttons to set the heating level.•It is applied to the menus of BROWNING FRY, MULTI COOK, STEAM COOK, and SLOW COOK.Press the COOK button.▶Press the COOK button, and the RICE cooking begins.H O W T O C O O K23HOW TO COOKMULTI COOK, STEAM COOK, SLOW COOKTurn the Cover Handle to “ ”(Lock), and press the MENU button to select the desired menu.▶The selected Menu's lamp blinks.Turn the Cover Handle to “ ”(Lock), and press the MENU button to select BROWNING FRY.▶The BROWNING FRY menu lamp blinks.Press the COOK button.▶Press the COOK button, and the product starts cooking. When the product starts cooking,the remaining time is displayed.▶The Adjust lamp is turned off. If you press the HEAT / TIME button during cooking, the product displays the heating level and the cooking time.▶In case of Multi Cook, if you press down the Preset button for two seconds within 10seconds after cooking begins (while the Pressure lamp blinks), the product can cook with no pressure.Press the SELECTION -, + buttons to set the time.▶Each time you press the button, the cooking time is adjusted by one minute.▶In the Cooking Time Setting mode, the Adjust lamp blinks.Press the HEAT / TIME button to enter the heating level Setting mode.▶Press the HEAT / TIME button again, and the product returns to the Time Setting mode.▶In the heating level Setting mode, the Adjust lamp blinks.Press the SELECTION -, + buttons to set the heating level.▶Each time you press the button, the heating level is adjusted by one step.Press the COOK button.▶Press the COOK button, and the BROWNING FRY cooking begins.When the BROWNING FRY cooking begins, the remaining time is displayed.▶For the BROWYING FRY menu, the Adjust lamp is turned on during cooking, and while the Adjust lamp is turned on, you can adjust the heating level and the cooking time.Press the SELECTION -, + buttons to set the time.▶Each time you press the button, the BROWNING FRY time is adjusted by one minute.▶In the Cooking Time Setting mode, the Adjust lamp blinks.Press the SELECTION -, + buttons to set the heating level.▶Each time you press the button, the heating level is adjusted by one step.Press the HEAT / TIME button to enter the heating level Setting mode.▶Press the HEAT / TIME button again, and the product returns to the Time Setting mode.▶In the heating level Setting mode, the Adjust lamp blinks.12435e.g.) When MULTI COOK is selectede.g.) When MULTI COOK is selectede.g.) When MULTI COOK is selectedBROWNING FRY23546Type BROWNING FRYMULTI COOKSTEAM COOKSLOW COOKCooking TimeSetting15~90min (Def: 10 min)15~90min (Def: 20 min)15~90min (Def: 20 min)15 min~12 hr (Def: 2 hr)Heating LevelSettingLE1~LE6(Def: Level 4)LE1~LE9(Def: Level 7)LE1~LE6(Def: Level 3)LE1~LE6(Def: Level 3)The BROWNING FRY menu is used for stir-frying or roasting food.※Please be careful when using the Browning Fry function with the cover open, the food may splatter.1Open the Cover and prevent pressure from being applied into the Inner Pot.Cautions for Keeping Warm▶When you open the cover right after cooking or during the Keep Warm function, the cover may not open properly due to pressure. Always bend back the pressure weight to completely remove the pressure before opening the cover.▶Always lock the cover handle when keeping warm or reheating food. (If not, there may be damage caused to the Cover Open button and the Keep Warm function.)▶If there is no food in the inner pot during the Keep Warm function or if you are not using the product, press the Cancel button to cancel the Keep Warm function or remove the power cord from the power outlet.▶Do not use the Keep Warm function with a rice spatula left in the inner pot. In particular, a wooden spatula may generate germs and odors.When you serve your meal▶If you want to serve your meal during the Keep Warm mode and want the food hot, press the KEEP WARM /REHEAT button, and then the Keep Warm / Reheat function begins with the voice saying “REHEATing is starting”. Then, in 9 minutes, you can eat the heated food.Warm function is 3 hours.minutes while the Keep Warm lamp is blinking with the “”sign on the Display going round and round."REHEAT has been completed" and the product starts the Keep Warm function again, displaying the time elapsed.KEEP WARM / REHEAT FUNCTION AND VOLTAGE SAG PROTECTION FUNCTION24▶Clean the product often. In particular, if the Cover is not cleaned completely, germs may grow, which can cause smell during the Keep Warm mode.▶Even if the product looks clean outside, germs may grow anywhere, which can cause smell during the Keep Warm mode. Thus, if the product smells, clean the product by using the Auto Clean menu.After the Auto Clean function is completed, the Inner Pot must be washed completely.▶If you don't wash the Inner Pot after cooking and then use the Keep Warm function, the food may smell or stink.When it smells during The Keep Warm mode▶This product remembers its status even when a blackout occurs, so if electricity gets back again within around 2 minutes, this product will normally work again. (There may be differences according to the product.)▶If cooking is canceled because of a blackout, you need to press the COOK button again to resume cooking.▶If a blackout occurs during cooking, the cooking time is delayed for the duration of the blackout, and the status of cooking may differ to some extent according to the time of the blackout.▶If a blackout occurs The Keep Warm function and when the food becomes cold, the Keep Warm function is canceled.Voltage Sag Protection Function?。
CHT3560说明书

自发货之日起,和普承诺其产品的主机保修两年,其它附件保修一年。凡在保修期内因产品本身的质 量引起的硬件或软件的故障,请用户出示产品保修卡及维修登记卡,由和普维修部或其授权的维修点对产 品进行免费的维修。对于超过保修期的产品,和普将为客户进行有偿维修。
CHT3560 电池内阻测试仪 使用说明书
安全 2
安全
安全须知 警告 危险:当你发现有以下不正常情形发生,请立即终止操作并断开电源线。立刻与和普电
子科技销售部联系维修。否则将会引起火灾或对操作者有潜在的触电危险。 仪器操作异常。 操作中仪器产生反常噪音、异味、烟或闪光。 操作过程中,仪器产生高温或电击。 电源线、电源开关或电源插座损坏。 杂质或液体流入仪器。
1.1 装箱清单 ............................................................................................................................................ 9 1.2 电源要求 ............................................................................................................................................ 9 1.3 保险丝的更换 ..........................................................................................
电主轴参数
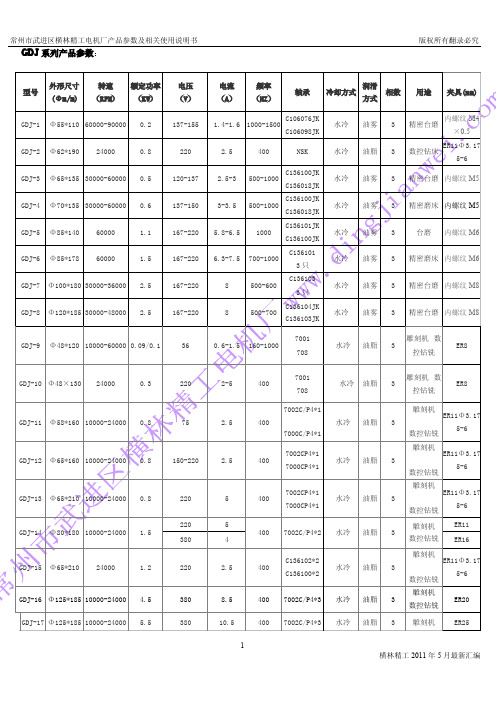
GDJ系列产品参数:2、安装前首先用手转动电主轴轴头,应手感灵活,无阻滞现象。
3、用500V的摇表检查定子绝缘电阻不低于100MΩ。
4、将以上检验符合要求的电主轴装入机座内,电主轴外壳以机座安装孔的配合为滑动配合。
电主轴严禁装夹在前、后轴承部位,以防轴承室变形,卡住轴承造成轴承提早损坏。
夹紧力不宜过大,电主轴装入机座内不得松动。
二、正确使用1、按要求连接电主轴进出水管接头,检查连接处是否漏水和通畅。
水冷电主轴的冷却系统系统应于机床的总开关连接;开机后至停机的中间,冷却系统系统应连续工作;冷却液水量按2.5升/千瓦·分钟计算,冷却液流量按3~6升/分钟,小的电主轴取小值,大的电主轴取大值;冷却液要求使用单独水箱,冷却液要求每月定期更换;冷却液的温度应低于环境温度3~5℃为宜,最好控制在25℃左右。
2、选择变频器应与电主轴的电压、功率、频率相匹配来配套使用。
设置变频器首先设置变频器的基准频率,变频器的基准频率按电主轴的最高频率设置。
变频器的最高频率、转折频率和对应的电压按电主轴的频压曲线对应设置;变频器的电流按电主轴的额定电流设置;载波频率按电主轴的功率大小设置,小于10kw电主轴按8kHz设置,大于10kw电主轴按5kHz设置;增、减速时间按10s左右设置,如遇到起动电流超过额定电流而保护时应延长增、减速时间。
增、减速时间过短易造成前螺母松动。
3、将变频器与电主轴三相电源连接,其中变频器的三相电源线应焊接在插头1(U1)、2(V1)、3(W1)脚上,4脚为地线。
然后变频器与外接电源连接。
接通电源后变频器点动,观察电主轴的旋转方向是否与电主轴指示方向一致,如旋转方向不一致应立即关机改正,电主轴严禁在错误的旋转方向上运转。
电主轴与变频器连线不宜超过25m。
4、电主轴在安装刀具时,应清除干净轴头锥孔及弹簧夹头表面的污垢,以免降低精度。
装夹、拆卸刀具时应使用专用工具。
注意装夹、拆卸时禁止用力过猛。
精工光波表中文使用说明书
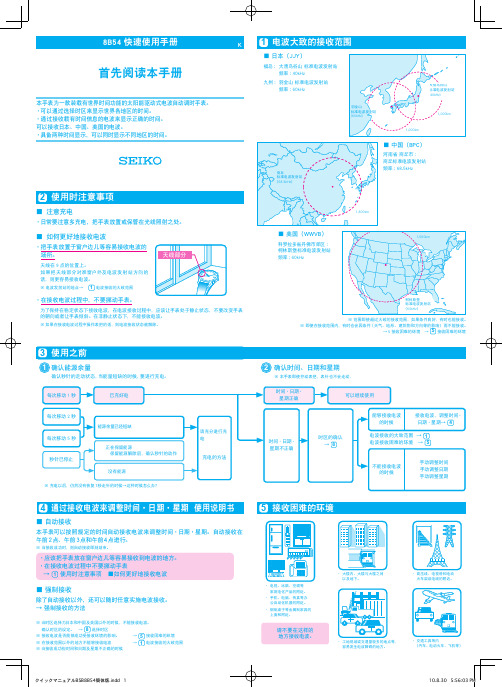
首先阅读本手册8B54快速使用手册K使用之前3确认能源余量确认时间、日期和星期确认秒针的走动状态,当能量短缺的时候,要进行充电。
※ 本手表即使拧动表把,表针也不会走动.每次移动1秒每次移动2秒每次移动5秒秒针已停止已充好电※ 充电以后,仍然没有恢复1秒走针的时候→这种时候怎么办?时间·日期·星期正确可以继续使用时间·日期·星期不正确时区的确认→ 8电波接收的大致范围 → 1电波接收困难的环境 → 5不能接收电波的时候手动调整时间手动调整日期手动调整星期能够接收电波的时候電接收电波,调整时间·日期·星期→ 412能源余量已经短缺正在保留能源 保留能源解除后,确认秒针的动作没有能源充电的方法请充分进行充电使用时注意事项2・日常要注意多充电,把手表放置或保管在光线照射之处。
■ 注意充电■ 如何更好地接收电波・ 把手表放置于窗户边儿等容易接收电波的场所。
天线在9点的位置上。
如果把天线部分对准窗户外及电波发射站方向的话,则更容易接收电波。
天线部分※ 电波发射站的地点→ 1电波接收的大致范围・在接收电波过程中,不要挪动手表。
为了保持在稳定状态下接收电波,在电波接收过程中,应该让手表处于静止状态,不要改变手表的朝向或者让手表倾斜。
在非静止状态下,不能接收电波。
※如果在接收电波过程中操作表把的话,则电波接收状态被解除。
通过接收电波来调整时间·日期·星期 使用说明书4・应该把手表放在窗户边儿等容易接收到电波的地方。
・在接收电波过程中不要挪动手表 → 1 使用时注意事项 ■如何更好地接收电波除了自动接收以外,还可以随时任意实施电波接收。
→ 强制接收的方法※ 当接收成功时,则自动接收即刻结束。
■ 自动接收■ 强制接收※ 当时区选择为日本和中国及美国以外的时候,不能接收电波。
确认时区的设定。
→ 8 选择时区※ 接收电波是否能够成功受接收环境的影响。
Fluke 19xC-2x5C ScopeMeter 用户操作指南说明书

Fluke 19xC-2x5CScopeMeterSoftware version 8.00 onwardsGetting StartedGBJun 2008, Rev. 1, 09/2009© 2008, 2009 Fluke Corporation, All rights reserved. Printed in the NetherlandsAll product names are trademarks of their respective companies.Table of ContentsPage TitleUnpacking the Test Tool Kit (ii)Introduction (1)Contacting Fluke (1)Safety Information: Read First (1)Preparing for Use (4)Powering/Resetting the Test Tool (4)How to Navigate a Menu (example) (4)Changing the Information Language (5)Adjusting Contrast and Brightness (5)Using the Scope (5)Multimeter (7)Recorder Functions (8)Fieldbus Measurements (Bushealth) (8)Replay (10)Zoom (10)Making Cursor Measurements (11)Triggering (11)Saving/Printing Screens and Setups (13)User Options (20)iFluke 19xC-2x5CGetting StartediiUnpacking the Test Tool KitThe following items are included in your test tool kit: 1. ScopeMeter Test Tool 2. Battery Charger3. 10:1 Voltage Probe Set (Red)4. 10:1 Voltage Probe Set (Gray)5. Test Lead Set (Red and Black)6. Bus Health Test adapter (2x5Conly)7. Safety Information + CD ROMwith complete Users Manual 8. Shipment box (basic versiononly) The -S versions also include: 9. Optically Isolated USBAdapter/Cable10. CD ROM with FlukeView ®Software 11. Hard CaseGetting StartedIntroductionThis Getting Started Manual provides basic information on Models 192C, 196C, 199C, 215C and 225C, software versions V08.00 and newer. Refer to the Users Manual on the accompanying CD-ROM for complete operating instructions.Contacting FlukeTo locate an authorized service center, visit us on the World Wide Web at: or call Fluke using any of the phone numbers listed below:+1-888-993-5853 in the U.S.A and Canada+31-40-2675200 in Europe+1-425-446-5500 from other countries. Safety Information: Read FirstThe Fluke Models 192C, 196C, 199C, 215C and 225C ScopeMeter test tools (hereafter referred to as “test tool”) comply with:• ANSI/ISAS82.01-1994•EN/IEC61010-1 : 2001• CAN/CSA-C22.2No.61010-1-04•1000 V Measurement Category II, 600 VMeasurement Category III, Pollution Degree 2• UL61010B-1Use the test tool only as specified in the Users Manual. Otherwise, the protection provided by the test tool might be impaired.A Warning identifies conditions and actions that pose hazard(s) to the user. A Caution identifies conditions and actions that may damage the test tool.1Fluke 19xC-2x5C Getting Started2 To avoid electrical shock or fire:•Use only the Fluke power supply, ModelBC190 (Battery Charger / Power Adapter).•Before use check that the selected/indicatedvoltage range on the BC190 matches the localline power voltage and frequency.•For the BC190/808 universal BatteryCharger/Power Adapter use only line cordsthat comply with the local safety regulations.NoteTo accommodate connection to various linepower sockets, the BC190/808 universal BatteryCharger / Power Adapter is equipped with a maleplug that must be connected to a line cordappropriate for local use. Since the adapter isisolated, the line cord does not need to beequipped with a terminal for connection toprotective ground. Since line cords with aprotective grounding terminal are morecommonly available you might consider usingthese anyhow.To avoid electrical shock or fire if a test toolinput is connected to more than 42 V peak (30Vrms) or on circuits of more than 4800 VA:•Use only insulated voltage probes, test leadsand adapters supplied with the test tool, orindicated by Fluke as suitable for the Fluke19xC-2x5C ScopeMeter series.•Before use, inspect voltage probes, test leadsand accessories for mechanical damage andreplace when damaged.•Remove all probes, test leads andaccessories that are not in use.•Always connect the battery charger first tothe ac outlet before connecting it to the testtool.•Do not connect the ground spring (Figure 1,item f) to voltages higher than 42 V peak (30Vrms) from earth ground.•Do not apply input voltages above the ratingof the instrument. Use caution when using 1:1test leads because the probe tip voltage willbe directly transmitted to the test tool.•Do not use exposed metal BNC or bananaplug connectors.Getting StartedSafety Information: Read First3• Do not insert metal objects into connectors. • Always use the test tool only in the manner specified.Max. Input VoltagesInput A and B directly...............................300 V CAT III Input A and B via 10:1 probe...................1000 V CAT II 600 V CAT III METER/EXT TRIG inputs........................1000 V CAT II 600 V CAT IIIMax. Floating Voltage From any terminal to earth ground..........1000 V CAT II 600 V CAT III Between any terminal..............................1000 V CAT II600 V CAT IIIVoltage ratings are given as “working voltage”. They should be read as Vac-rms (50-60 Hz) for AC sinewave applications and as Vdc for DC applications. Measurement Category III refers to distribution level and fixed installation circuits inside a building.Measurement Category II refers to local level, which is applicable for appliances and portable equipment. The terms ‘Isolated’ or ‘Electrically floating’ are used in this manual to indicate a measurement in which the test tool input BNC or banana jack is connected to a voltage different from earth ground.The isolated input connectors have no exposed metal and are fully insulated to protect against electrical shock. The red and gray BNC jacks, and the red and black4-mm banana jacks can independently be connected to a voltage above earth ground for isolated (electrically floating) measurements and are rated up to 1000 Vrms CAT II and 600 Vrms CAT III above earth ground.If Safety Features are ImpairedUse of the test tool in a manner not specified may impair the protection provided by the equipment.Before use, inspect the test leads for mechanical damage and replace damaged test leads!Whenever it is likely that safety has been impaired, the test tool must be turned off and disconnected from the line power. The matter should then be referred to qualified personnel. Safety is likely to be impaired if, for example, the test tool fails to perform the intended measurements or shows visible damage.Fluke 19xC-2x5C Getting Started4Preparing for UseAt delivery, the installed NiMH batteries may be empty and must be charged for 4 hours (with the test tool turned off) to reach full charge:• use only the Fluke Battery Charger/Power Adaptermodel BC190• before use check that the BC190 voltage andfrequency range match the local line power range • connect the battery charger to the ac outlet• connect the battery charger to the appropriate input onthe test tool near Input B. CautionTo prevent decrease of the battery capacity, you must charge the batteries at least once a year.Powering/Resetting the Test ToolTurning power on/off:The test tool powers up in its last setup configuration.Resetting the test tool to the factory settings:+Turn power off, then press and hold the USER key and turn on. You should hear a double beep.How to Navigate a Menu (example)Display the input A function key labels.Show the Input A (input A) menu.The menu example shows that the input A signal isdisplayed non-inverted (Normal ) with full bandwidth (Full ). To let input A invert the input signal, and to limit the bandwidth to 20 MHz do the following:Hiding a menu or key label:Press the CLEAR MENU key.Getting StartedChanging the Information Language5Changing the Information LanguageDuring operation of the test tool messages may appear on the screen (for instance if you select a recorder function). You can select the language in which messages will be displayed.Display the USER key labels.Open the LANGUAGE menu to select a language.Adjusting Contrast and BrightnessUsing the ScopeConnect the probe(s) as shown in figure 2.Figure 2. Scope ConnectionsAUTO- MANUAL rangingAfter an Auto Set the trace position, range, time base and triggering will be automatically adjusted to assure a stable display of virtually any waveform.Perform an Auto Set or select Manualranging (toggle). AUTO or MANUAL appears at the top right of the screen.Use the light-gray RANGE , TIME and MOVE keys to change the view of the waveform manually.Fluke 19xC-2x5C Getting Started6Scope Readings and WaveformsAutomatic scope measurement results are shown asReading 1 (READING 1) and Reading 2 (READING 2) at the upper left and right display edge.Scope readings on (ON ) or off (OFF ).on A : Reading 1 (2) is input A result. on B : Reading 1 (2) is input B result. V ac ...dB : measurement function.Glitch Detect: glitch capture on or off. Average: waveform averaging on or off. Waveform:Normal : normal waveform display. Persistence... : waveform persistence.□ Digital Persistence: persistence off,short, medium, long, infinite. □ Envelope: envelope on, off. □ Dot-join : dot join on or offMathematics... : A+B, A-B, AxB, A vs B (XY mode), Spectrum (frequency spectrum FFT).Reference... : compare waveforms, pass/fail testing.MultimeterInput A and Input B SettingsInput A (B) on or off. Input coupling AC or DC.Probe Type: voltage, current or temperatureprobe.Attenuation: probe attenuation. Probe Cal...: calibration of 10:1 /100:1probe.Polarity: input polarity normal or inverted;variable input sensitivity.Bandwidth: bandwidth full, 10 kHz, 20 MHz.MultimeterConnect the test leads (Figure 1, item 5) to the 4-mmsafety banana jack METER input.Relative measurements on or off.Getting StartedRecorder FunctionsFirst, choose a measurement in Scope or Meter mode.RECORDER ANALYZEShow the recorder functions. Select arecorder function (Scope Trendplot, Scope Record, or Meter Trendplot), then pressto display the recorder key labels:Start (RUN ) or stop (STOP ) recording.Show the recorder options.Reference: time reference is time of day (Time of Day ) or time from start (From Start ).In Scope Record:Display Glitches: glitch detection on, or 10 kHz filter on.Mode: Single Sweep : stores samples until memory is full, then stops.Mode: Continuous : stores samples continuously; deletes first samples if memory is full.Mode: on Ext. ... : start (Start ), stop (Stop ) or continue (Run ) recording if triggered via the meter input (Ext.). Run requires one trigger per division in VIEW ALL mode.In Trend Plot:Reading 1 (2)... (Scope) or Measurement... (Meter) show the measurement functionmenu.VIEW ALL : see all stored samples.NORMAL: see the most recent 9 divisions.EXIT : exit the recorder mode.Fieldbus Measurements (Bushealth)The Bushealth function is standard available in the Fluke 215C-225C.Selecting the Bus TypeFieldbus Measurements (Bushealth) Toggle between scope screen (OFF) andbushealth screen (ON).Bushealth ScreenThe following icons are used to indicate the bus measurement status:bus activity indicators:Q (filled) : voltage measured{ (open) : no voltage measuredÑÑ(blinking) : activity{{ (both open) : no activityBusy, the tester is measuring/processing data.No reading available.Result OK .Warning. Result on edge of limitsResult not OK.Setting up the LimitsTo set up the test limits of the current bus type, do thefollowing:Note: Changed limits are marked by a * (asterisk).Getting StartedReplayIn scope mode, the test tool automatically stores the 100most recent screens. Use REPLAY to review these screens.From Scope mode show the REPLAY keylabels.Step through the previous screen. Step through the next screens. Continuously play the stored screens.Exit the REPLAY mode.ZoomUse the zoom function to obtain a more detailed view of a waveform.Making Cursor MeasurementsMaking Cursor MeasurementsCursors allow you to make precise digital measurements on live, on recorded, and on saved waveforms.Display the CURSOR key labels.Select cursor measurement type:measure signal height at one point of time. measure signal height difference of two points of time, and measure the time or the trace RMS value between the cursors. measure signal height at the cursor positions and between cursor positions.measure rise time and fall time.Select the cursor to be moved. Use the blue arrow keys to move.Depending on cursor measurement type: Automatic or manual risetime measurement on a single channel.Reading 2 is time (T ), frequency (1/T ) , or RMS value.Cursor measurements on trace A , B or M if A and B are on; M if Mathematics ... is on, see ScopeReadings and Waveforms on page 6. OFF : Switch cursor measurements off.TriggeringTriggering tells the test tool when to begin displaying the waveform.Automatic triggering assures a stable display of virtually any signal:Perform an auto set. AUTO appears at the top right of the screen. Input A is the default trigger source.Now you can take over basic trigger controls such as source, level, slope and delay:Display the trigger key labelsA B : trigger on input A or B waveform Ext : trigger on the meter-input signal.Select the trigger slope.Getting Started□Single Shot : the test tool waits for atrigger. After receiving a trigger, thewaveform is displayed and theinstrument is set to HOLD.Press to arm for a new trigger.Noise reject Filter: the noise reject filterreduces jitter on the screen whentriggering on noisy waveforms.NCycle: Each N th trigger results in a traceupdate.Video on A... : enables triggering on videosignals (input A only).Pulse Width on A... : enables triggering onqualified pulses (input A only).Trigger Point, Trigger DelayThe trigger icon shows the trigger point. Initially youhave two divisions of pre-trigger view (negative delay).To change the trigger delay, do the following:Hold down to adjust the trigger delay.If you move the trigger icon to the left of the screen, itchanges to . The status at the bottom of the screenshows for example:The 500ms indicates the (positive) delay between thetrigger point and the waveform display.Saving/Printing Screens and SetupsSaving/Printing Screens and SetupsYou can save screens, recordings and setups to memory, and recall them again from memory. You can print actual or recalled screens.Display the SAVE PRINT key labels.SAVE: save a screen + setup (Screen +Setup), or a record/replay/trendplot + setup(Record + Setup, Replay+Setup,TrendPlot+Setup) in a memory location.The Edit Name menu allows you to changethe name for the saved item:- press to select the characterto be changed.- press the arrow keys to select a character.- press to set default name.- press to save.RECALL : open the Recall (recall) menu.RECALL FOR REFERENCE: recall a screenas a reference waveform.RECALL SETUP: recall a setup. Test tool isin run mode.RECALL: recall a screen + setup, or arecord + setup. Test tool is in hold mode.CANCEL: Close menuPRINT: Print the displayed screen. Refer tothe User Options below for printer setupinformation.VIEW DELETE : open the View/Delete menu.DELETE: clear the selected memory.RENAME… : rename a saved item.VIEW : view and/or print a saved item.CANCEL: Close menu.NoteWhen saving a screen the most recently acquired waveform will be stored. Persistence waveforms will not be stored.Getting StartedUser OptionsDisplay the USER key labels.Open the options menu.Auto Set Adjust...Select how auto set (AUTO key) behaves:auto set on signals >15 Hz (fast response) or >1 Hz (slower response).set input coupling to DC (Set to DC ) or don’t change the input coupling setting.set glitch detection on (Set to On ) or don’t change the glitch detection setting.Battery Save Options...When powered on the battery only, the test tool initially shuts itself down 30 minutes after you pressed a key (not in Trend Plot or Scope Record).You can set the automatic power shutdown time to 5 minutes and to 30 minutes, or you can disable the automatic power shutdown (Disabled ).Battery refreshStart a battery refresh about four times a year to keep the batteries in optimal condition. The batteries will be fully discharged and charged again.Date adjust...Set the date (Year: Month: Day: ) and the date format (DD/MM/YY is day- month-year, MM/DD/YY is month-day-year).Time Adjust...Set the time clock (Hours - Minutes - Seconds).Printer Setup...Select a printer type and select the baud rate.Factory defaultClears all memories and sets the test tool to factory defaults.Display Options...Set the display to color (Color ) or black and white (Black and White ).。
VICTOR 81c 81D数字多用表 说明书
VICTOR 81C/81D数字多用表使用说明书目 录一.概述 (1)二.开箱检查 (2)三.安全注意事项 (3)四.仪表面板及按键功能说明 (5)五.其它功能 (6)六.特性 (7)七.仪表保养 (16)八.故障排除………………………………17 Generated by Foxit PDF Cr V I C T O R81C/D是一款性能稳定、高可靠性33/4位数字多用表。
仪表采用18.9m m字高L C D显示器,读数清晰。
可用来测量直流电压、交流电压、直流电流、交流电流、电阻、温度、电容、频率/占空比、二极管及通断测试。
同时还设计有单位符号显示、自动/手动量程转换、自动断电及报警功能。
整机采用了一个能直接驱动L C D的8位微处理器和双积分A/D转换集成电路,一个提供高分辨力、高精度的数字显示驱动,该表功能齐全,测量准确度高,使用方便,是实验室、工厂、无线电爱好者及家庭的理想工具。
打开包装箱取出仪表,仔细检查以下附件是否缺少或损坏,如有缺少或损坏请立即与经销商联系。
w数字多用表 一台w使用说明书 一本w表笔 一付w温度探头(K型热电偶) 一只(仅VICTOR81D有此配件)w AAA(1.5V)7号电池两节w合格证一张w防震套一个w产品博览一张该仪表在设计上符合I E C1010条款(国际电工委员会颁布的安全标准),在使用之前,请先阅读安全注意事项。
1.在测量直流36V、交流25V以上电压,测量10mA以上电流,测量带电感负载的交流电力线;测量电力波动期间的交流电力线时,谨防电击。
2.测量前,检查测量功能开关是否置于正确的档位,要检查表笔是否可靠接触,是否正确连接、是否绝缘良好等,以避免电击。
3.仪表只有和所配备的表笔一起使用才符合安全标准要求。
如表笔线破损时,必须更换上同样型号或者相同电气规格的表笔线。
4.不要使用其它未经确认或未认可的保险管来更换仪表内部的保险管。
只能换上同样型号或相同规格的保险管。
UC98xx系列AC DC IR多功能耐压测试仪用户使用手册说明书

常州市优策电子有限公司UC98xx 系列AC/DC/IR多功能耐压测试仪用户使用手册(V1.0)公司:常州市优策电子科技有限公司地址:江苏省常州市天宁区采华路3号电话:*************传真:*************网址: 版本历史:本说明书将不断完善以利于使用。
由于说明书可能存在的错误或遗漏,仪器功能的改进和完善,技术的更新及软件的升级,说明书将做相应的调整和修改。
第1章准备使用 (1)1.1开箱检查 (1)1.2使用注意事项 (1)1.3移动时的注意要点 (3)1.4检查电源和保险丝 (3)1.4.1 切换电源电压 (3)1.4.2 检查并替换保险丝 (3)1.5连接交流电源线 (4)1.6接地 (4)1.7操作检查 (4)1.8仪器的其它特性 (5)第2章操作规范和措施 (6)2.1禁止的操作行为 (6)2.2紧急情况的处理 (6)2.3测试中的预防措施 (7)2.4高压测试警告 (7)2.5有故障仪器的危险状态 (8)2.6保证长时间无故障使用的条件 (8)2.7日常检查 (9)第3章仪器面板概述 (10)3.1前面板说明 (10)3.2后面板说明 (11)3.3仪器性能概述 (14)第4章基本操作 (18)4.1仪器界面结构概述 (18)4.2显示页面和参数说明 (18)4.2.1 测量显示页面 (19)4.2.2 列表显示页面 (19)4.3测量设置页面 (20)4.3.1 测量配置页面 (20)4.4测试项目页面和参数说明 (22)4.4.1 AC交流耐压参数设置 (22)4.4.2 DC直流耐压参数设置 (22)4.4.3 IR绝缘电阻参数设置 (23)4.4.4 OS开短路检测参数设置 (24)4.4.5 CK双端接触检测参数设置(UC98xxS) (24)4.5测试功能原理与使用说明 (26)4.5.1 启动测试 (26)4.5.2 测试电压上升 (26)4.5.3 DC充电电流检测 (27)4.5.4 高压测试 (27)4.5.5 测试电压下降 (27)4.5.6 防电墙功能 (27)4.5.7 电流超限与电弧侦测(ARC)功能 (27)4.5.8 不合格判断 (28)4.5.9 测试结果处理 (29)4.5.10 STOP (29)第5章系统设置 (30)5.1系统设置(SYSTEM SETUP) (30)显示风格(SKIN) (30)按键音(KEY SOUND) (30)语言(LANGUAGE) (30)密码(PASSWORD) (30)日期和时间 (31)5.2接口设置(INTERFACE SETUP) (31)接口模式 (31)RS232C设置 (31)5.3系统信息(INTERFACE SETUP) (32)5.4固件升级(FIRMWARE UPDATE) (32)第6章存储与调用 (33)6.1存储系统概述 (33)6.2文件列表(FILE LIST) (33)第7章附录接口 (35)第1章准备使用本章讲述当您收到仪器后必须进行的一些检查,在安装使用仪器之前必须了解和具备的条件。
胜利仪器 VICTOR 9100D无线高低压CT变比测试仪用户手册

钳口尺寸:φ200mm;外形尺寸:200mm×245mm×13mm
钳口尺寸:φ8mm;外形尺寸:137mm×40mm×19.5mm
无线传输距离 100M
2米 5kg(含工具包和绝缘杆) 避免特强电磁场;避免 433MHz、315MHz 同频干扰 -25℃~45℃;80%Rh 以下 -10℃~60℃;70%Rh 以下 φ32mm,1m/节,5 节 110KV 主机与检测仪:AC1000V/rms(外壳与螺钉之间)
注意
感谢您购买了本公司的 VICTOR 9100D 无线高低压变比测试仪,为了更好地使用 本产品,请一定:
——详细阅读本用户手册,操作者必须完全理解手册说明并能熟练操作本仪表 后才能进行现场测试。
——严格遵守本手册所列出的安全规则及注意事项。
任何情况下,使用本仪表应特别注意安全,特别测量超过 AC100V 及以上电压 线路的时候。
外电场、磁场
应避免
被测导线位置
被测导线处于钳口的中心位置
2. 技术参数
功能
电源 测试方式 一次高压电流钳 测试精度 一次柔性电流钳 测试精度 二次电流测试精度
高低压电流互感器、变压器一二次回路的电流、变比、角差 测试,极性、相别判断。 DC6V 碱性干电池 LR03(1.5V AAA×4) 钳形 CT 量程:0.0A~800A;分辨率:0.1A;精度:±0.5%FS
(23℃±3℃,70%RH 以下,导线处于钳口中心位置)
量程:0.0A~3000A;分辨率:0.1A;精度:±1.0%FS
量程:0.00mA~5A;分辨率:0.01mA;精度:±0.5%FS
变比测量范围 1~500
- 1、下载文档前请自行甄别文档内容的完整性,平台不提供额外的编辑、内容补充、找答案等附加服务。
- 2、"仅部分预览"的文档,不可在线预览部分如存在完整性等问题,可反馈申请退款(可完整预览的文档不适用该条件!)。
- 3、如文档侵犯您的权益,请联系客服反馈,我们会尽快为您处理(人工客服工作时间:9:00-18:30)。
〔重要事項〕
指針位置的調整結束後,務必使主盤和鬧鈴側盤兩時間同時回位至零。 349
● 主盤及鬧鈴側盤的時間設定
t 在小秒針處於 12 點鐘位置時拉出到第二格。 小秒針立刻停住。 • 若 在秒 錶 正 在 計 時 時 拉出 錶 冠, 則秒錶將自動回位至零。 • 若在鬧鈴被設定的狀態下拉出錶 冠,鬧鈴的設定將被自動解除。 • 上述操作可在日曆 / 鬧鈴方式和 秒錶方式下實施。
第二格 小秒針
旋轉以設定主盤時間。
B
第二格
考慮到完成鬧鈴側盤時間設定所需 要花費的時間,以及推回錶冠等各項 操作,最好先把指針調到越過現在時 間幾分鐘的時間上,然後再調回到正 確的時間上。
鬧鈴側盤
主盤和鬧鈴側盤的時間設 定 結束後, 推回到正常位置上。 在鬧 鈴側盤時 間指向半夜 12 點 鐘 的那一刻,日期開始轉換。
特徵
■時間 ‧ 時針、分針及小秒針。 ■秒錶 ‧ 以 1/5 秒鐘遞進的 24 小時秒錶。 ‧ 按需要設定的分段點計時。 ‧ 當計時達到 24 小時後,秒錶自動停止並回位至零。 ■一次性鬧鈴 ‧ 可設定鬧鈴在 24 小時內按照指定的時間發響一次。 ‧ 可利用聲音測試功能 ■永恆日曆 ‧ 日期由日曆 / 鬧鈴方式下的中央指針表示。 ‧ 星期由 12 點鐘位置的星期指針表示。 ‧ 到 2100 年 2 月 28 日為止無需在月底調整日期。 ‧ 可按照需要確認月份和年份。 ■ 由光能提供電源
鬧鈴側盤 ( 鬧鈴時針和分針 )
星期指針
若有任何一 個指針 需 要調整位置,則必須先 完成指針位置的調整, 然 後再 移動到時間設 定的步驟上。
345
● 如何確認指針位置
◆ 在錶冠處於正常位置時確認秒針是否以 1 秒鐘間隔移動。若手錶已經停住或以 2 秒 鐘間隔移動,則需要把手錶放在光源下充電。請參閱 “如何充電並啟動手錶” t 按照下表確認每個指針是否處於它的預備位置。 指針名稱 秒錶時針和分針 ( 鬧鈴時針和分針 ) 秒錶秒針 ( 日曆指針 ) 電能存儲指針 ( 星期指針 / 方式指針 ) 預備位置 0:00 0 秒鐘位置
338
339
顯示及按鈕
■ 無需更換電池 ( 請參閱第 371 頁上的“電源的注意事項”部分。) ■ 充滿電能後可持續操作 6 個月 ■ 電能存儲指針 ■ 電能耗盡預告功能 ■ 過度充電預防功能
時針
電能存儲指針 / 星期指針 / 方式指針(月 / 年 / 鬧鈴)
日曆指針 ( 秒錶秒針 )
A
小秒針 分針
a
b
c
B
鬧鈴側盤 ( 秒錶時針和分針 )
a: 正常位置 : b: 第一格 : 鬧鈴設定 c: 第二格 : 時間設定、日曆設定、 指針位置調整
340
341
u 中央指針具有雙項功能 : - 在日曆 / 鬧鈴方式下 ,該指針表示日、月、年。 - 在秒錶方式下 ,該指針表示秒鐘。
第二格 秒錶時針和分針
346
▲
A
低值
347
● 如何調整指針位置
電能存儲指針
A A
t
按壓一下。電能存儲指針旋轉一整圈。 壓以使電能存儲指針指向低值位置。 若一直按住按鈕 B 不放, 則指針快速移動。
A
B
按壓以將秒錶時針和分針設定到 0:00 位置。 若一直按住按鈕 B 不放,則指針快速移動。 • 調整指針位置時,指針只能按順時針方向 向前移動。
日曆 / 鬧鈴方式
秒錶方式
星期指針
日曆指針 分針
電能存儲指針
秒錶秒針
主盤
日曆指針 第二格
B
▲ ▲
小秒針
B
鬧鈴側盤
B
B
秒錶時針及分針
• 當顯示方式被轉換後,各指針的功能也發生相應的變化。 • 在將秒錶方式轉換到日曆 / 鬧鈴方式之前,需要確認秒錶是否被回位至零。 “SPLIT( 分 段 點 )” 、 “SPLIT • 當 秒 錶 正 在 計 時 時, 按 鈕 B 可 用 於 操 作 RELEASE( 分段點解除 )”或 “RESET( 回位 )”功能。 344
350
351
永恆日曆
l 如何使用螺絲鎖定型錶冠
在不需要操作的時候一定要將其擰緊。
[ 如何擰開螺絲鎖定型錶冠 ]
逆時針旋轉錶冠。 錶冠被打開,可實施操作。
[ 如何擰緊螺絲鎖定型錶冠 ]
一旦結束對錶冠的操作,一邊按順時針方向旋轉錶冠,一邊朝 手錶錶體方向輕輕按壓直至它停住。 • 鎖定錶冠時,注意要慢慢地轉動,以保證螺絲齒能 完全吻合。 ,以免損傷錶殼內的螺絲孔。 • 不可過度用力推入
拉出到第二格。 t
電能存儲指針
壓 2 秒鐘以上。 秒錶時針和分針、秒錶秒針、 電能存儲指針回到預備位置。 本錶此時處於指針位置調整狀態。
秒錶秒針
◆ 若有任何指針位置不正確,請按照下一頁上的實施步驟進行調整。 ◆ 若所有指針位置正確,請操作“主盤和鬧鈴側盤上的時間設定”內的步驟。 • 若在秒錶正在計時時拉出錶冠,則秒錶自動回位至零。 • 若在鬧鈴被設定的狀態下拉出錶冠,則鬧鈴的設定自動被解除。 • 上述操作可在日曆 / 鬧鈴方式和秒錶方式下實施。
使用前須知
有些初期設定, 比如指針位置的調整和時間 / 日曆的設定需要在使用本錶之前操作。 請在使用之前, 參閱第 345 頁上的“時間設定 / 指針位置調整”的步驟設定本錶。
337
ENGLISH
目錄
頁 特徵...........................................................................................................339 顯示及按鈕. ..................................................................................................341 螺絲鎖定型錶冠.............................................................................................343 如何轉換顯示方式..........................................................................................344 時間設定及指針位置調整. .................................................................................345 永恆日曆.....................................................................................................352 如何使用秒錶. ...............................................................................................358 如何使用鬧鈴. ...............................................................................................361 如何充電和起動本錶.......................................................................................365 過度充電預防功能..........................................................................................366 電能存儲指針. ...............................................................................................367 關於充電時間 / 精確度. ....................................................................................369 電力耗儘預警功能..........................................................................................370 電源的注意事項.............................................................................................371 非正常性能. ..................................................................................................372 旋轉環........................................................................................................373 視距儀........................................................................................................374 測距儀 .......................................................................................................376 故障排除.....................................................................................................378 規格...........................................................................................................382